spring-framework-core-iocContainer
-
xml方式实例化bean
-
注解方式实例化bean
-
java方式实例化bean
-
ClassPathXmlApplication和AnnotationConfigApplicationContext
-
Bean存放到了哪里?
-
选取哪一种方式合适?
-
bean的名称
-
延迟加载
-
bean加载顺序
-
bean范围
-
bean的回调函数
-
组件扫描
-
内部类实例化
-
静态工厂方法
-
实例工厂方法
-
BeanPostProcessor
-
BeanFactoryPostProcessor
-
FactoryBean
阅读须知
1 本文核心内容来自 https://docs.spring.io/spring/docs/5.2.1.RELEASE/spring-framework-reference/core.html
2 在我自己阅读文档并写出test后,为了提高本文的可读性和连续性,我决定本文不按照spring文档目录顺序排版。将IOC部分拆分为 实例化bean,为bean注入属性,spring的其他特性三个方面。
3 文章中所包含的test都经过测试。git地址为 https://gitee.com/zumengjie/springcode-core-ioc
4 文章中对于spring的使用方式和使用技巧,仅代表我个人。如有错误,或不足,请留言。
5 文章环境为jdk8,springboot2.2.2.RELEASE
6 文章适用于使用过spring系列框架的朋友,或者准备学习spring的朋友。
7 最后,这篇博客从第一遍看spring文档到手稿,到整理,三周,一个个test敲出来。对我自身是有很大提升的,spring对于ioc部分的处理十分细腻,本文也只是根据我所看到的整理出来了。在原文中,还有很多东西没有被我挖掘出来。我觉得对于每一个学spring用spring的人来讲都应该去看一遍官方文档。在我看文档前,我担心自己英语不好,看不懂。在一篇博客上,有个前辈说,你看不懂的不是英文文档,而是文档。确实,一篇文档,如果没有一点根基,就算他是中文的,我们也不一定看一遍就懂,看一遍就记住。spring官方文档,值得我们耐着性子看,然后自己写test。只看文档和边看边写还是有很大差距的。下一章资源,会在后续更新。
实例化bean
1 xml方式实例化bean


<?xml version="1.0" encoding="UTF-8"?>
<beans xmlns="http://www.springframework.org/schema/beans"
       xmlns:xsi="http://www.w3.org/2001/XMLSchema-instance"
       xsi:schemaLocation="http://www.springframework.org/schema/beans http://www.springframework.org/schema/beans/spring-beans.xsd">
    <!-- class:哪个bean需要被实例化,就用哪个bean的路径
         id:告诉spring被实例化这个bean叫什么名字-->
    <bean class="com.datang.springcode.xmlRegisterBean.Computer" id="computer"></bean>
</beans>
2 注解方式实例化bean
package com.datang.springcode.annoRegisterBean;
import org.springframework.stereotype.Component;

//@Component标识这个类,需要被实例化
@Component
public class Pear {
}
3 java方式实例化bean
package com.datang.springcode.javaRegisterBean;

//需要被实例化的bean
public class Banana {
}
package com.datang.springcode.javaRegisterBean;


import org.springframework.context.annotation.Bean;
//注意:此处RegisterBeanConfig类上我并未使用@Configuration注解,是因为我使用的AnnotationConfigApplicationContext对象时,
// 传递的是RegisterBeanConfig.class。否则,RegisterBeanConfig类必须也要使用xml方式或@Component配置成bean。
public class RegisterBeanConfig {

    //这个注解才是真正的java实例化bean的关键,可以指定多个value值,第一个往后,为别名
    @Bean(value = {"banana", "banana2", "banana3"})
    public Banana getBanana() {
        return new Banana();
    }
}
4 ClassPathXmlApplication和AnnotationConfigApplicationContext
@Test
public void t1() {
ApplicationContext context = new ClassPathXmlApplicationContext("classpath:xmlRegisterBean.xml");
Computer computer = context.getBean("computer", Computer.class);
}
@Test
public void t2() {
ApplicationContext context = new AnnotationConfigApplicationContext(Pear.class);
Pear bean = context.getBean(Pear.class);
}
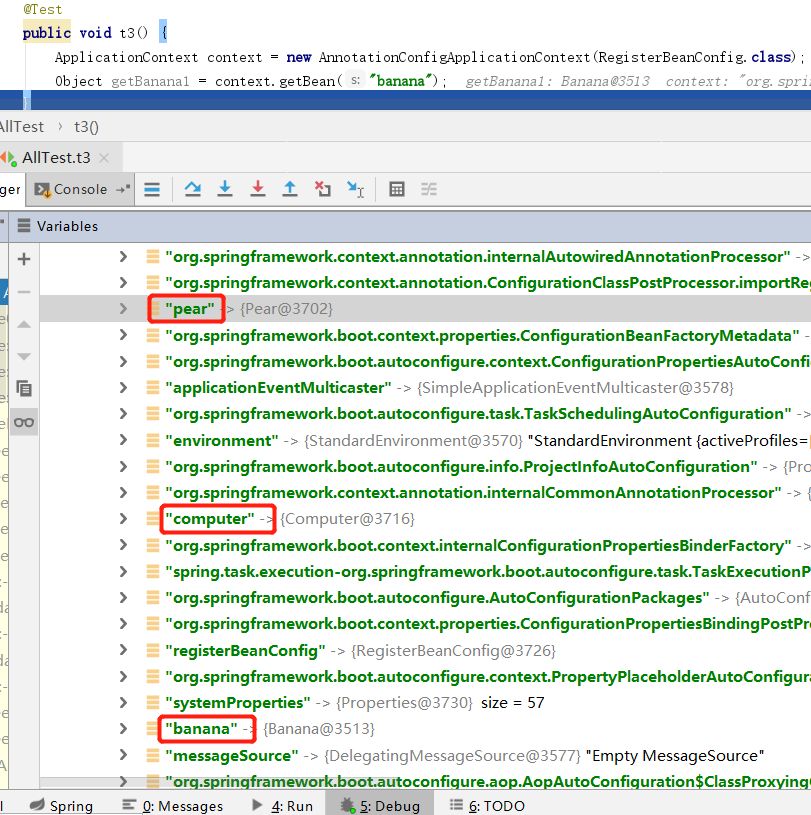
@Test
public void t3() {
ApplicationContext context = new AnnotationConfigApplicationContext(RegisterBeanConfig.class);
Object getBanana1 = context.getBean("getBanana");
}
ClassPathXmlApplicationContext对象用来加载xml配置文件,AnnotationConfigApplicationContext用来加载一个类。spring通过抽象抽取了一个用户使用的对象ApplicationContext,此次ioc部分我们最常用的方法就是getBean()
ClassPathXmlApplicationContext有多个构造函数重载,这里提一种常见的 ClassPathXmlApplicationContext(String... configLocations)参数接收可变长度的字符串,也就是说,ClassPathXmlApplicationContext可以同时加载多个xml配置文件。
AnnotationConfigApplicationContext也有多个构造函数重载,最常用的是AnnotationConfigApplicationContext(Class<?>... componentClasses)参数接收可变长度的Class类对象,可以同时加载多个配置对象类。
getBean()方法的可重载方式很多,接收一个字符串根据bean的id查询,接收Class根据类型查询,还可以同时接收id和class。
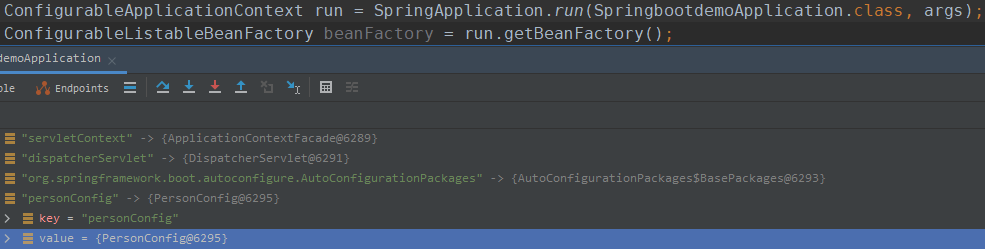
5 Bean存放到了哪里?
上边介绍的三种方式无论哪一种最终都会将pojo实例化到spring容器中。那么我们经常说的spring容器到底是什么?通过debug查看ApplicationContext对象。在spring上下文中有一个beanFactory对象,该对象实现类DefaultListableBeanFactory。依次再找父类AbstractAutowireCapableBeanFactory-->AbstractBeanFactory-->FactoryBeanRegistrySupport-->DefaultSingletonBeanRegistry中有一个Map,registeredSingletons这个Map就是用来
存放所有单例模式的bean。关于bean的模式后边内容会说到。


6 选取哪一种方式合适?
以上三种实例化bean的方式,无论使用哪一种,最终的bean都会存到到registeredSingletons这个Map中。我们可以三种方式混着用,也可以只用一种方式。使用过springmvc框架的朋友一般都有过这样的配置。
 <listener>
    <listener-class>org.springframework.web.context.ContextLoaderListener</listener-class>
  </listener>
 <context-param>
    <param-name>contextConfigLocation</param-name>
    <param-value>classpath:applicationContext.xml</param-value>
  </context-param>
ContextLoaderListener实现了ServletContextListener接口,所以能够监听Tomcat启动和停止。而在ContextLoaderListener中则读取了。classpath:applicationContext.xml。在这个xml中我们是不是了实例化bean,例如dataSource。
而使用springboot的朋友一般极少使用xml实例化的方式,就算有需要配置的也会在application.properties中配置。如果是我们用户自己的pojo,那使用注解方式实例化bean最方便,如果有一些系统pojo需要统一规范的配置,那就选取xml方式实例化bean,便于管理和修改,而且不容易配破坏,大家都不会随便修改xml的内容嘛。最后如果你使用的是第三方的jar,那此时使用java的实例化方式是最合适的了,毕竟你也无法在源码上加@Component注解。
7 bean的名称
7.1 默认名称
无论哪种方式实例化bean,被实例化到map中的bean都有一个唯一的名称。我们通过这个名称来找到bean,如getBean(),包括在注入属性时,我们也需要使用到bean的名称来找到bean。以上test中使用xml实例化bean时,我们使用id属性来指定bean的名称,不设置id也有默认的名称。而使用java方式和注解方式时,我们则没有指定bean的名称。为了演示方便我们将xml中实例化bean的id属性去掉。
package com.datang.springcode.javaRegisterBean;


import org.springframework.context.annotation.Bean;
import org.springframework.context.annotation.ComponentScan;
import org.springframework.context.annotation.ImportResource;
//扫描包下的注解
@ComponentScan(value = "com.datang.springcode")
//加载xml
@ImportResource(value = "classpath:xmlRegisterBean.xml")
public class RegisterBeanConfig {

    //这个注解才是真正的java实例化bean的关键。
    @Bean
    public Banana getBanana(){
        return new Banana();
    }
}
在上边代码中,使用@ComponentScan和@ImportResource注解分别扫描包中的注解和加载xml,为的就是我们能在一个Map中看到三个bean。xml方式实例化bean默认的id是类的全路径拼接#和编号。而@Component注解方式则是使用类名,首字母换成了小写。使用@Bean方式实例化bean时,bean的名称是@Bean所注释的方法名。

7.2 设置名称
package com.datang.springcode.javaRegisterBean;
import org.springframework.context.annotation.Bean;
public class RegisterBeanConfig {

    //这个注解才是真正的java实例化bean的关键。value指定bean的名称
    @Bean(value = "banana")
    public Banana getBanana(){
        return new Banana();
    }
}
package com.datang.springcode.annoRegisterBean;
import org.springframework.stereotype.Component;

//@Component标识这个类,需要被实例化.value指定bean的名称
@Component(value = "pear")
public class Pear {
}
<?xml version="1.0" encoding="UTF-8"?>
<beans xmlns="http://www.springframework.org/schema/beans"
       xmlns:xsi="http://www.w3.org/2001/XMLSchema-instance"
       xsi:schemaLocation="http://www.springframework.org/schema/beans http://www.springframework.org/schema/beans/spring-beans.xsd">
    <!-- class:哪个bean需要被实例化,就用哪个bean的路径
         id:告诉spring被实例化这个bean叫什么名字-->
    <bean class="com.datang.springcode.xmlRegisterBean.Computer" id="computer"></bean>
</beans>
通过以上代码我们给每一个bean设置了名称。
7.3 设置别名
package com.datang.springcode.javaRegisterBean;


import org.springframework.context.annotation.Bean;
import org.springframework.context.annotation.ComponentScan;
import org.springframework.context.annotation.ImportResource;

//扫描包下的注解
@ComponentScan(value = "com.datang.springcode")
//加载xml
@ImportResource(value = "classpath:xmlRegisterBean.xml")
public class RegisterBeanConfig {

    //这个注解才是真正的java实例化bean的关键,可以指定多个value值,第一个往后,为别名
    @Bean(value = {"banana", "banana2", "banana3"})
    public Banana getBanana() {
        return new Banana();
    }
}
<?xml version="1.0" encoding="UTF-8"?>
<beans xmlns="http://www.springframework.org/schema/beans"
xmlns:xsi="http://www.w3.org/2001/XMLSchema-instance"
xsi:schemaLocation="http://www.springframework.org/schema/beans http://www.springframework.org/schema/beans/spring-beans.xsd">
<!-- class:哪个bean需要被实例化,就用哪个bean的路径
id:告诉spring被实例化这个bean叫什么名字
通过name设置别名,可以用 , 号分割-->
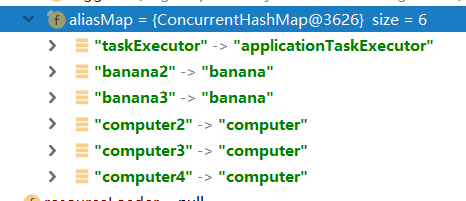
<bean class="com.datang.springcode.xmlRegisterBean.Computer" id="computer" name="computer2,computer3"></bean>
<!-- alias也可以给bean起别名,但是一个alias标签仅能指定一个别名 -->
<alias name="computer" alias="computer4"/>
</beans>
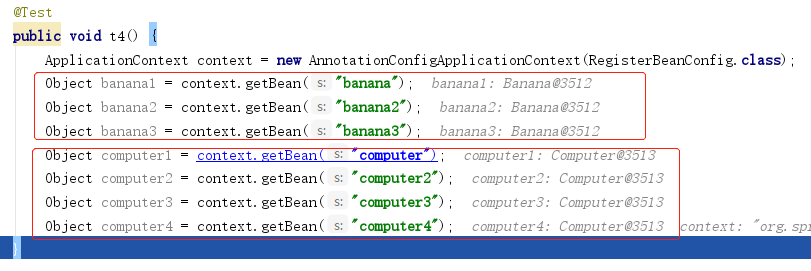
通过别名也可以获取到bean。另外别名不可以重复,否则会被替换。在beanFactory下有aliasMap,记录的就是当前所有bean的别名。@Component注解实例化bean无法设置别名。
8 延迟加载
bean的延迟加载也就是说,在spring上下文启动时,不会立刻将bean实例化到registeredSingletonsMap中,而是在第一次使用getBean()时才会实例化。
@Component
@Lazy
public class Bookrack {
}
package com.datang.springcode.lazyBean;
public class Schoolbag {
}
package com.datang.springcode.lazyBean;
public class Stool {

}
<?xml version="1.0" encoding="UTF-8"?>
<beans xmlns="http://www.springframework.org/schema/beans"
       xmlns:xsi="http://www.w3.org/2001/XMLSchema-instance"
       xsi:schemaLocation="http://www.springframework.org/schema/beans http://www.springframework.org/schema/beans/spring-beans.xsd">

    <bean class="com.datang.springcode.lazyBean.Stool" id="stool" lazy-init="true"></bean>
</beans>
package com.datang.springcode.lazyBean;

import org.springframework.context.annotation.Bean;
import org.springframework.context.annotation.ComponentScan;
import org.springframework.context.annotation.Lazy;

@ComponentScan(value = "com.datang.springcode.lazyBean")

public class LazyConfig {
    @Bean(value = "schoolbag")
    @Lazy
    public Schoolbag getSchoolbag(){
        return new Schoolbag();
    }
}
以上代码通过三种方式实例化bean,并且通过三种方式实行懒加载。结果如下。在spring启动成功后,并singletonObects中并没有出现。Bookrack,Schoolbag,Stool三个类的实例对象。
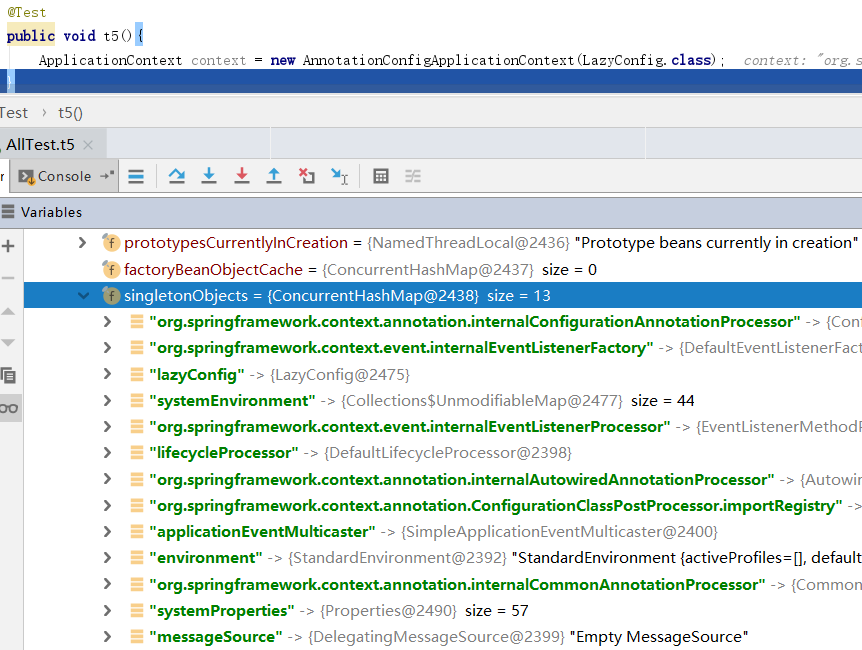
但实际开发中我们又不会直接使用getBean()方法,多数会使用属性注入。比如@Autowried。如果Abean不是lazy,Bbean是lazy。Abean需要注入Bbean,那么在实例化Abean时也会把Bbean实例化了。
9 bean加载顺序
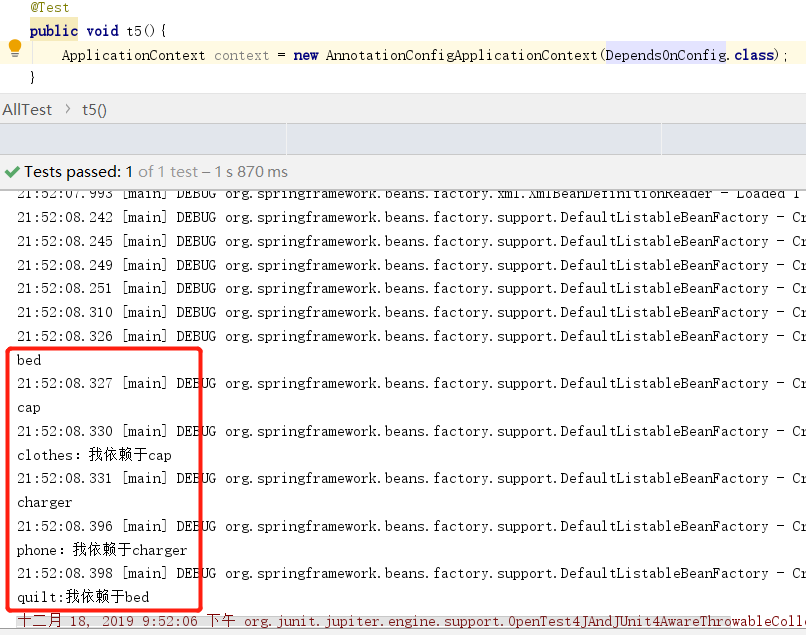
假设一个场景,我们有一个全局配置类sitting,里边有默认的几个静态全局变量。同时我们在程序的各个地方调用通过static.的方式调用。但是,这里的参数有些在项目启动后需要从数据库重新取值,对此我们创建了一个专门重新赋值的刷新类,该类初始化过程中,从数据库取值,然后在重新赋值到sitting类中。在此场景中,散布在程序各处的类和从数据库取值的刷新类没有明显依赖注入关系,但是有弱依赖关系。也就是说,spring必须先把刷新类实例化到Map中,然后才能实例化其他各个业务类。
package com.datang.springcode.depends_on;

import org.springframework.stereotype.Component;

@Component(value = "cap")
public class Cap {
    public Cap(){
        System.out.println("cap");
    }
}
package com.datang.springcode.depends_on;

import org.springframework.context.annotation.DependsOn;
import org.springframework.stereotype.Component;

@Component
@DependsOn(value = {"cap"})
public class Clothes {
    public Clothes(){
        System.out.println("clothes:我依赖于cap");
    }
}
package com.datang.springcode.depends_on;

import org.springframework.stereotype.Component;

@Component(value = "bed")
public class Bed {
    public Bed(){
        System.out.println("bed");
    }
}
package com.datang.springcode.depends_on;
public class Quilt {
    public Quilt(){
        System.out.println("quilt:我依赖于bed");
    }
}
<?xml version="1.0" encoding="UTF-8"?>
<beans xmlns="http://www.springframework.org/schema/beans"
       xmlns:xsi="http://www.w3.org/2001/XMLSchema-instance"
       xsi:schemaLocation="http://www.springframework.org/schema/beans http://www.springframework.org/schema/beans/spring-beans.xsd">
    <bean class="com.datang.springcode.depends_on.Quilt" id="quilt" depends-on="bed"></bean>
</beans>
package com.datang.springcode.depends_on;

public class Phone {
    public Phone() {
        System.out.println("phone:我依赖于charger");
    }
}
package com.datang.springcode.depends_on;

public class Charger {
    public Charger() {
        System.out.println("charger");
    }
}
package com.datang.springcode.depends_on;

import org.springframework.context.annotation.*;

@Configuration
@ImportResource(value = {"classpath:depends_on.properties.xml"})
@ComponentScan(value = {"com.datang.springcode.depends_on"})
public class DependsOnConfig {

    @Bean(value = {"phone"})
    @DependsOn(value = {"charger"})
    public Phone getPhone() {
        return new Phone();
    }

    @Bean(value = {"charger"})
    public Charger getCharger() {
        return new Charger();
    }

}
以上代码,演示了三种实例化bean的方式分别使用不同的方式指定bean的加载顺序。xml实例化方式使用depends-on属性,java实例化方式和注解实例化方式使用@DependsOn注解。两种方式都可以指定多个值。
10 bean范围
在实例化bean时,我们可以选择bean的活动范围。spring默认实例化单例bean,我们可以自定义选择注入prototype原型bean(有会讲多实例bean)。在web环境还有request,session,application和websocket。
package com.datang.springcode.scope;
import org.springframework.context.annotation.Scope;
import org.springframework.stereotype.Component;

@Component
@Scope(value = "prototype")
public class Refrigerator {
}
package com.datang.springcode.scope;
public class Television {
}
<?xml version="1.0" encoding="UTF-8"?>
<beans xmlns="http://www.springframework.org/schema/beans"
       xmlns:xsi="http://www.w3.org/2001/XMLSchema-instance"
       xsi:schemaLocation="http://www.springframework.org/schema/beans http://www.springframework.org/schema/beans/spring-beans.xsd">

    <bean class="com.datang.springcode.scope.Television" id="television" scope="prototype"/>
</beans>
package com.datang.springcode.scope;
public class Spoon {
}
package com.datang.springcode.scope;

import org.springframework.context.annotation.Bean;
import org.springframework.context.annotation.ComponentScan;
import org.springframework.context.annotation.ImportResource;
import org.springframework.context.annotation.Scope;

@ComponentScan(value = {"com.datang.springcode.scope"})
@ImportResource(value = {"classpath:scope.xml"})
public class ScopeConfig {

    @Bean(value = "spoon")
    @Scope(value = "prototype")
    public Spoon getSpoon(){
        return new Spoon();
    }
}
    @Test
    public void t6(){
        ApplicationContext context = new AnnotationConfigApplicationContext(ScopeConfig.class);

        Refrigerator refrigerator = context.getBean(Refrigerator.class);
        Refrigerator refrigerator1 = context.getBean(Refrigerator.class);
        Assert.assertFalse(refrigerator==refrigerator1);

        Television television = context.getBean(Television.class);
        Television television1 = context.getBean(Television.class);
        Assert.assertFalse(television==television1);

        Spoon spoon = context.getBean(Spoon.class);
        Spoon spoon1 = context.getBean(Spoon.class);
        Assert.assertFalse(spoon==spoon1);

    }
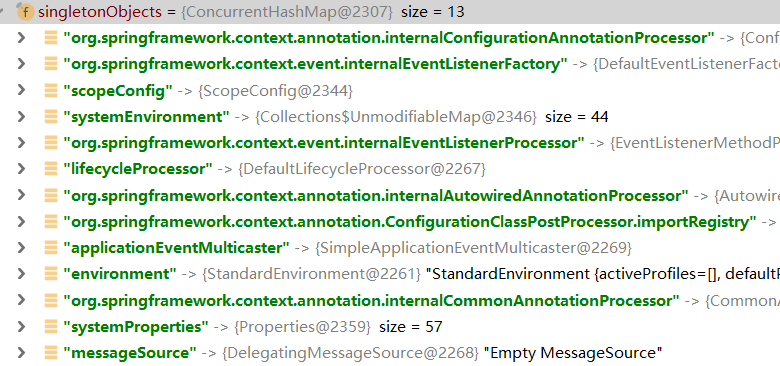
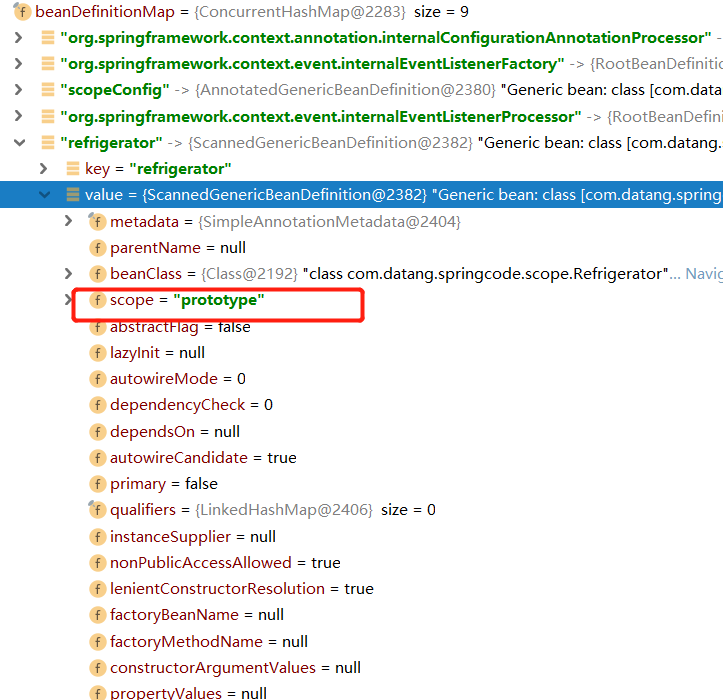
上边测试使用三种实例化bean的方式,实例化了三个原型bean。在singletonObjectsMap中并没有上边所实例化的三个单例bean。
另外我们也可以在。beanFactory下的beanDefinitionMap中查看所有bean的描述信息。在spring实例化bean的过程中,有一个步骤会将收集到的每个pojo信息存到到beanDefinitionMap中,等到以后使用。例如在实例化时,会先查看这个pojo是否是singleton,如果不是则不会实例化。
11 bean的回调函数
在spring实例化bean后,和销毁bean之前有两个钩子函数。spring有三种方式实现这两个钩子函数。分别时xml配置,注解,和实现接口。
package com.datang.springcode.beanCallBack;

import org.springframework.beans.factory.DisposableBean;
import org.springframework.beans.factory.InitializingBean;
import org.springframework.stereotype.Component;

import javax.annotation.PostConstruct;
import javax.annotation.PreDestroy;
//此处标记类需要被扫描
@Component
public class House implements InitializingBean, DisposableBean {

    @Override
    public void afterPropertiesSet() throws Exception {
        System.out.println("接口形式的回调after");
    }

    @Override
    public void destroy() throws Exception {
        System.out.println("接口形式的回调destroy");
    }

    public House() {
        System.out.println("house的构造函数");
    }

    public void xmlInit() {
        System.out.println("xml形式初始化回调");
    }

    public void xmlDes() {
        System.out.println("xml形式销毁回调");
    }

    @PostConstruct
    public void annInit() {
        System.out.println("注解形式的初始化回调");
    }

    @PreDestroy
    public void annDes() {
        System.out.println("注解形式的销毁回调");
    }


}
<?xml version="1.0" encoding="UTF-8"?>
<beans xmlns="http://www.springframework.org/schema/beans"
       xmlns:context="http://www.springframework.org/schema/context"
       xmlns:xsi="http://www.w3.org/2001/XMLSchema-instance"
       xsi:schemaLocation="http://www.springframework.org/schema/beans
       http://www.springframework.org/schema/beans/spring-beans.xsd
       http://www.springframework.org/schema/context
       https://www.springframework.org/schema/context/spring-context.xsd">
    <!-- 扫描包,注意导入命名空间 -->
    <context:component-scan base-package="com.datang.springcode.beanCallBack"/>
    <bean class="com.datang.springcode.beanCallBack.House" id="house" init-method="xmlInit" destroy-method="xmlDes"/>
</beans>
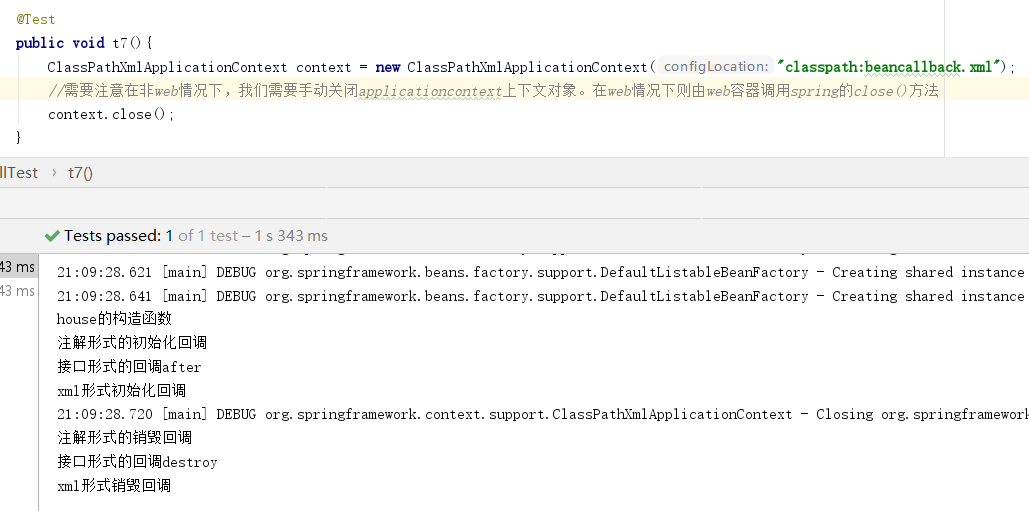
注意这三种方式同时使用时的顺序。注解优先,实现接口其次,xml配置最后。
12 组件扫描
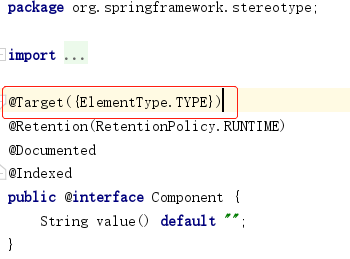
12.1 @Component @Controller @Service @Repository @Configuration
@Component只能被标记在类上,被@Component标记表示这个类需要被spring实例化。
package com.datang.springcode.scanPack;

import org.springframework.stereotype.Component;

@Component
public class Milk {

}
package com.datang.springcode.scanPack;
public class Fruit {
}
@ComponentScan(value = {"com.datang.springcode.scanPack"})
public class ScanPackConfig {

}
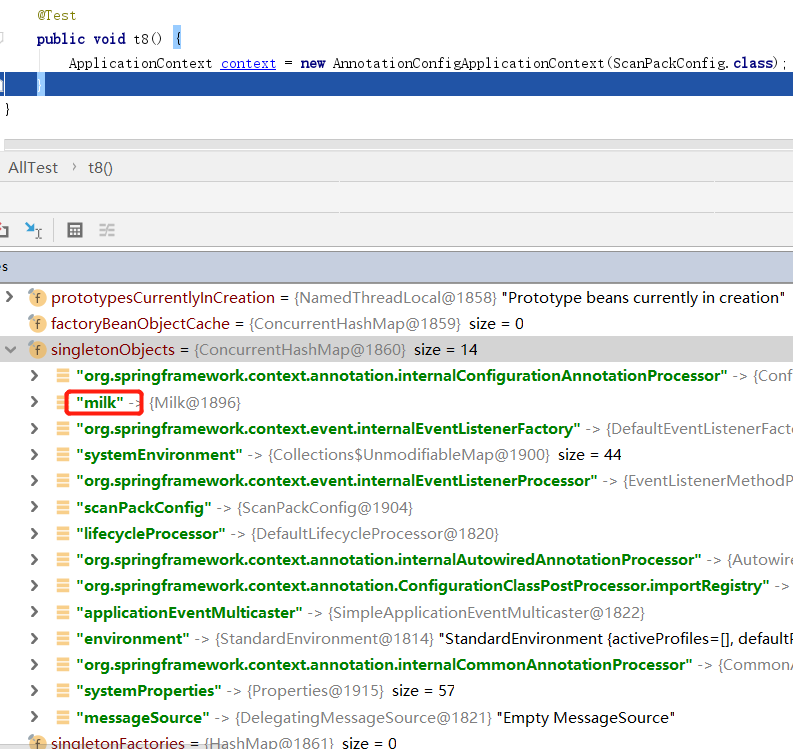
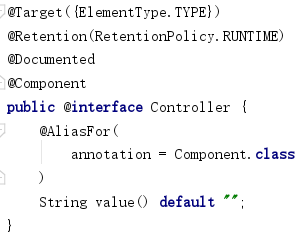
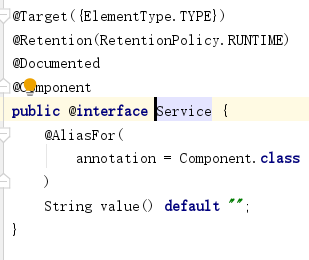
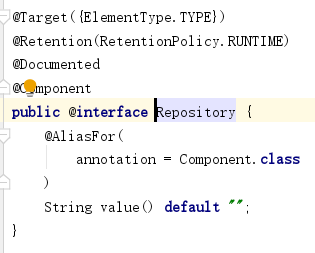
上边代码片段,Fruit类没有被@Component标记,所以没有被实例化到singletonObjects这个Map中。@Controller @Service @Repository @Configuration 注解都是和@Component组合的注解。也就是说,这4个注解和@Component有同等的效果。其中 @Controller @Service @Repository 在语义化上代表服务层,业务层,持久层。而 @Configuration则一般和@Bean使用。也只有@Configuration是有特殊的功能。

12.2 @Bean@Configuration的精简模式和完全模式
略微修改Milk类。
package com.datang.springcode.scanPack;

public class Milk {

    public Fruit fruit;
    //使其构造函数需要持有一个Fruit实例
    public Milk(Fruit fruit) {
        this.fruit = fruit;
    }
}
package com.datang.springcode.scanPack;

import org.springframework.context.annotation.Bean;
import org.springframework.context.annotation.ComponentScan;
import org.springframework.context.annotation.Configuration;

@ComponentScan(value = {"com.datang.springcode.scanPack"})
@Configuration
public class ScanPackConfig {

    @Bean(value = "milk")
    public Milk getMilk() {
        //这种写法完全没有问题。构造函数需要一个Fruit而getFruit()方法返回的就是一个fruit
        return new Milk(getFruit());
    }

    @Bean(value = "fruit")
    public Fruit getFruit() {
        return new Fruit();
    }
}
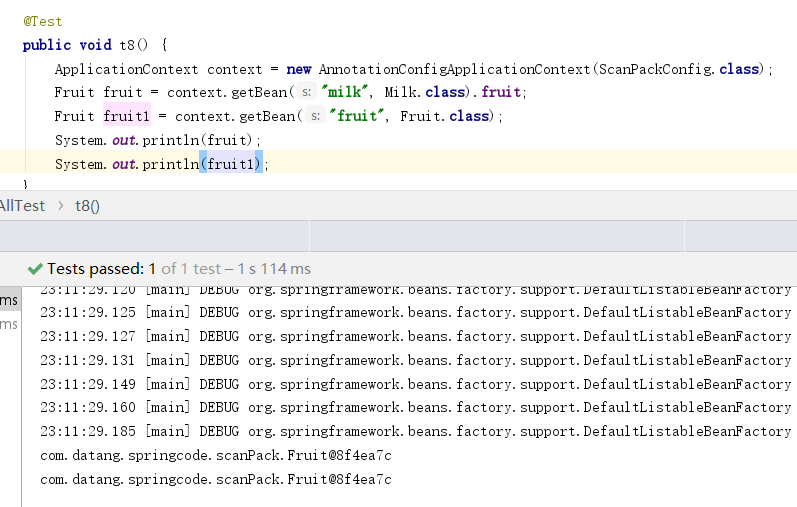
看结果,两个fruit是同一个对象。这种结果就是完全模式。再看@Configuration

默认是true。我们修改成false试试。
package com.datang.springcode.scanPack;

import org.springframework.context.annotation.Bean;
import org.springframework.context.annotation.ComponentScan;
import org.springframework.context.annotation.Configuration;

@ComponentScan(value = {"com.datang.springcode.scanPack"})
@Configuration(proxyBeanMethods = false)
public class ScanPackConfig {

    @Bean(value = "milk")
    public Milk getMilk() {
        //这种写法完全没有问题。构造函数需要一个Fruit而getFruit()方法返回的就是一个fruit
        return new Milk(getFruit());
    }

    @Bean(value = "fruit")
    public Fruit getFruit() {
        return new Fruit();
    }
}

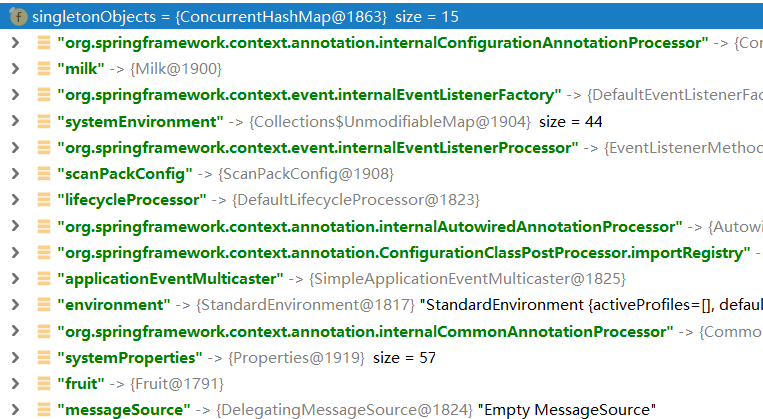
现在发现两个fruit就不是同一个对象了。但是在singletonObjects中只有一个fruit
这就是@Bean的精简模式。也是@Configuration和@Component的区别。
12.3 开启组件扫描
spring提供两种方式的组件扫描,注意组件扫描只会扫描类上标记有@Component注解或和@Component的组合注解如@Service
package com.datang.springcode.scanPack2;

import org.springframework.stereotype.Component;

@Component
public class Reality {
}
package com.datang.springcode.scanPack2;

import org.springframework.stereotype.Component;

@Component
public class Exist {
}
package com.datang.springcode.scanPack2;

public class Dream {
}
package com.datang.springcode.scanPack2;

import org.springframework.context.annotation.ComponentScan;

@ComponentScan(value = "com.datang.springcode.scanPack2")
public class ScanPack2Config {
}
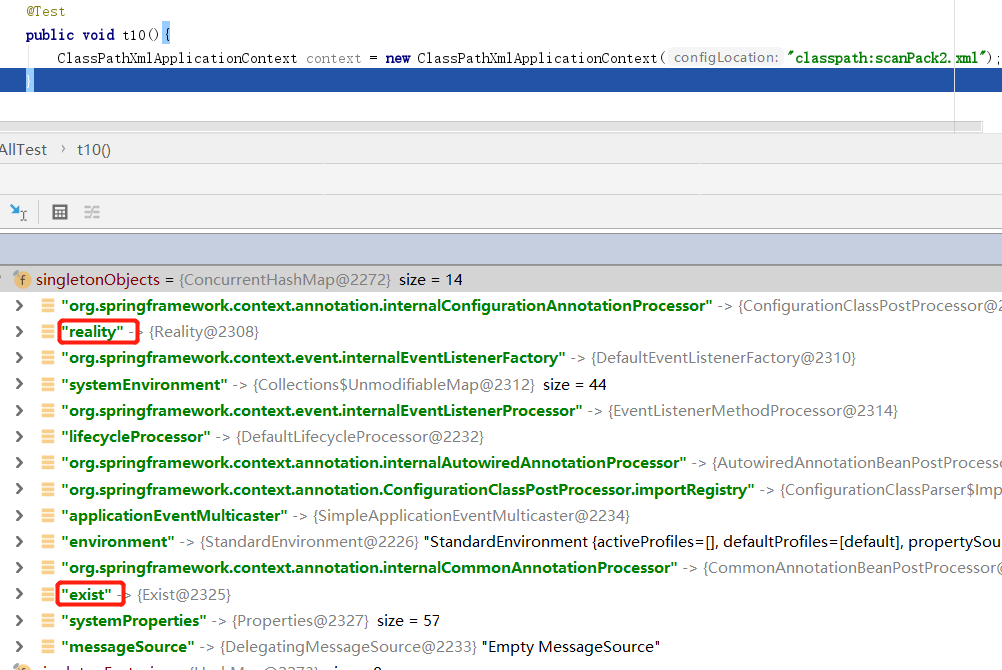
使用@ComponentScan注解扫描Dream类没有标记@Component所以没有被实例化出来。

<?xml version="1.0" encoding="UTF-8"?>
<beans xmlns="http://www.springframework.org/schema/beans"
       xmlns:context="http://www.springframework.org/schema/context"
       xmlns:xsi="http://www.w3.org/2001/XMLSchema-instance"
       xsi:schemaLocation="http://www.springframework.org/schema/beans
       http://www.springframework.org/schema/beans/spring-beans.xsd
       http://www.springframework.org/schema/context
       https://www.springframework.org/schema/context/spring-context.xsd">
    <!-- 扫描包,注意导入命名空间 -->
    <context:component-scan base-package="com.datang.springcode.scanPack2"/>
</beans>
使用xml方式配置扫描器,结果也是一样的。
12.4默认的扫描路径
即使我们使用@ComponentScan注解时,不指定value或者basePackages属性,spring会默认扫描,该配置类的平级以及自包中所有@Component。
package com.datang.springcode.filterScan1;
public class Clerk extends Employee {
}
package com.datang.springcode.filterScan1;
public class Employee {
}
package com.datang.springcode.filterScan1;
public class Manager extends Employee {
}
package com.datang.springcode.filterScan1;

import org.springframework.stereotype.Component;

@Component
public class Smoke {
}
package com.datang.springcode.filterScan1.child;

import org.springframework.stereotype.Component;

@Component
public class Mask {
}
package com.datang.springcode.filterScan1;

import org.springframework.context.annotation.ComponentScan;
@ComponentScan
public class FilterScan1Config {
}
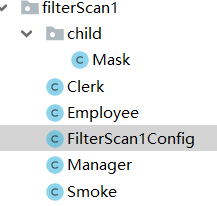

同级中的@Component被扫描到,子包中的@Component也可以被扫描到。这也就是springboot启动类以下的包可以被扫描到的原因。
12.5 扫描过滤
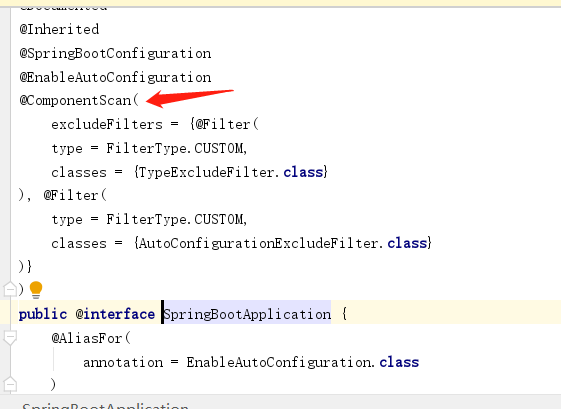
在组件扫描过程中,除了扫描@Component标记的类,我们也可以额外的设置扫描规则。
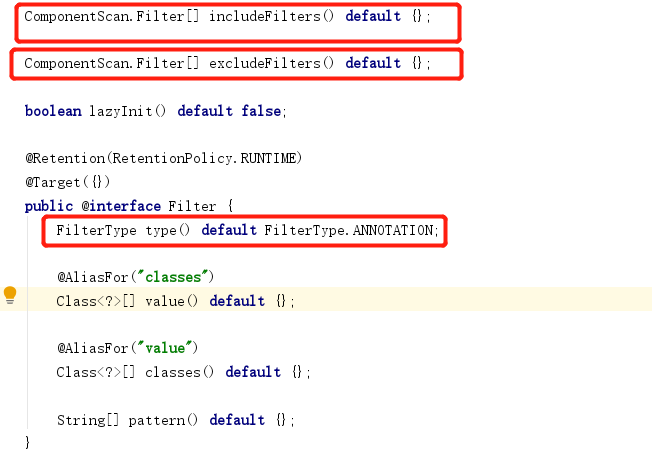
在@ComponentScan注解的属性中,有includeFilters()和excludeFilters()两个属性,分别是包含和排除,而这两个属性可接收多个Filter。我们来看看Filter中的type()属性,有哪些可选值。
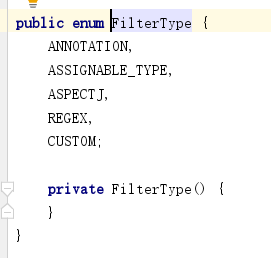
FilterType下有五种匹配模式,顺序依次是。注解匹配,类型匹配,AspectJ表达式匹配,正则表达式匹配,自定义匹配器。
package com.datang.springcode.filterScan1;
public class Employee {
}
package com.datang.springcode.filterScan1;
public class Manager extends Employee {
}
package com.datang.springcode.filterScan1;
public class Clerk extends Employee {
}
package com.datang.springcode.filterScan1;

import org.springframework.stereotype.Component;

@Component
public class Smoke {
}
package com.datang.springcode.filterScan1.child;

import org.springframework.stereotype.Component;

@Component
public class Mask {
}
package com.datang.springcode.filterScan1;
import org.springframework.context.annotation.ComponentScan;
import org.springframework.context.annotation.FilterType;
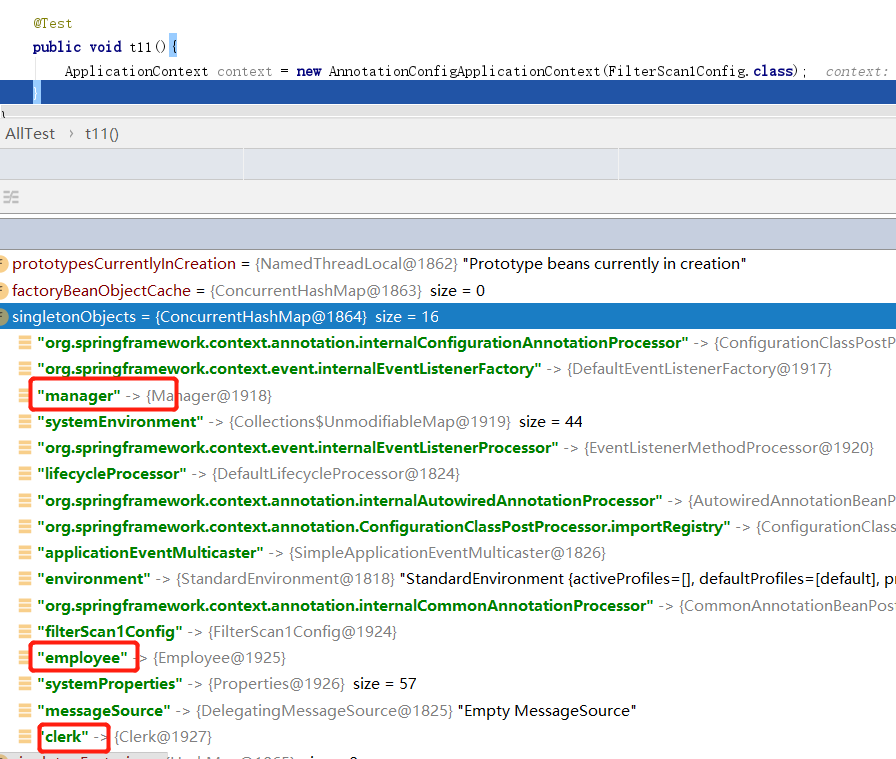
@ComponentScan(includeFilters = {@ComponentScan.Filter(type = FilterType.ASSIGNABLE_TYPE, classes = {Employee.class})})
public class FilterScan1Config {
}
以上代码片段,Employee Clerk Manager 三个类没有被@Component注解。但我们在扫描组件时使用 includeFilters 并且按照 FilterType.ASSIGNABLE_TYPE Class类型 值是 Employee.class 如此Employee类及其子类可以被spring实例化。

下边我们在试试excludeFilters,此时@Component标记的类没有被注入。
package com.datang.springcode.filterScan1;

import org.springframework.context.annotation.ComponentScan;
import org.springframework.context.annotation.FilterType;
import org.springframework.stereotype.Component;

@ComponentScan(includeFilters = {@ComponentScan.Filter(type = FilterType.ASSIGNABLE_TYPE, classes = {Employee.class})},
        excludeFilters = {@ComponentScan.Filter(type = FilterType.ANNOTATION, classes = Component.class)})
public class FilterScan1Config {
}
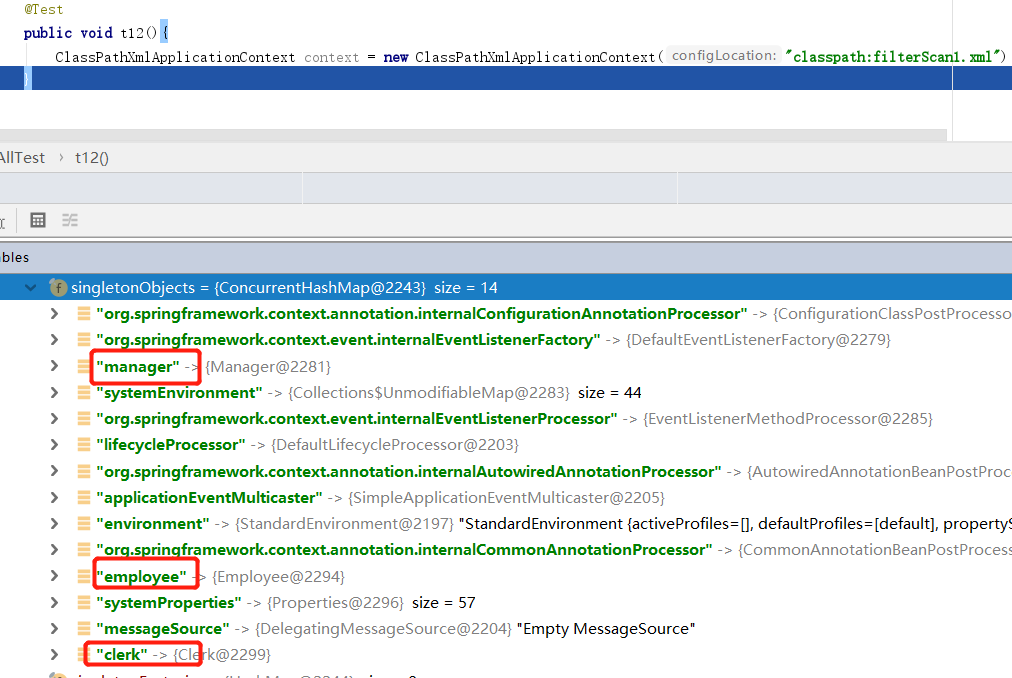
使用xml配置方式也可以做到过滤扫描,需要注意的是,在xml中assignable代表class类型,和Filter中的ASSIGNABLE_TYPE作用一样。<context:include-filter/>必须在<context:exclude-filter/>之前
<?xml version="1.0" encoding="UTF-8"?>
<beans xmlns="http://www.springframework.org/schema/beans"
       xmlns:context="http://www.springframework.org/schema/context"
       xmlns:xsi="http://www.w3.org/2001/XMLSchema-instance"
       xsi:schemaLocation="http://www.springframework.org/schema/beans
       http://www.springframework.org/schema/beans/spring-beans.xsd
       http://www.springframework.org/schema/context
       https://www.springframework.org/schema/context/spring-context.xsd">
    <!-- 扫描包,注意导入命名空间 -->
    <context:component-scan base-package="com.datang.springcode.filterScan1">
        <!-- 加载Employee类 -->
        <context:include-filter type="assignable" expression="com.datang.springcode.filterScan1.Employee"/>
        <!-- 排除配置类 -->
        <context:exclude-filter type="assignable" expression="com.datang.springcode.filterScan1.FilterScan1Config"/>
        <!-- 排除@Component注解-->
        <context:exclude-filter type="annotation" expression="org.springframework.stereotype.Component"/>
    </context:component-scan>
</beans>
13 内部类实例化
在使用xml实例化bean时,内部类必须是static的,否则报错
package com.datang.springcode.innerBean;
public class Teacher {
     static class  Student {

    }
}
<?xml version="1.0" encoding="UTF-8"?>
<beans xmlns="http://www.springframework.org/schema/beans"
       xmlns:xsi="http://www.w3.org/2001/XMLSchema-instance"
       xsi:schemaLocation="http://www.springframework.org/schema/beans http://www.springframework.org/schema/beans/spring-beans.xsd">
    <bean class="com.datang.springcode.innerBean.Teacher$Student" id="student"/>
</beans>

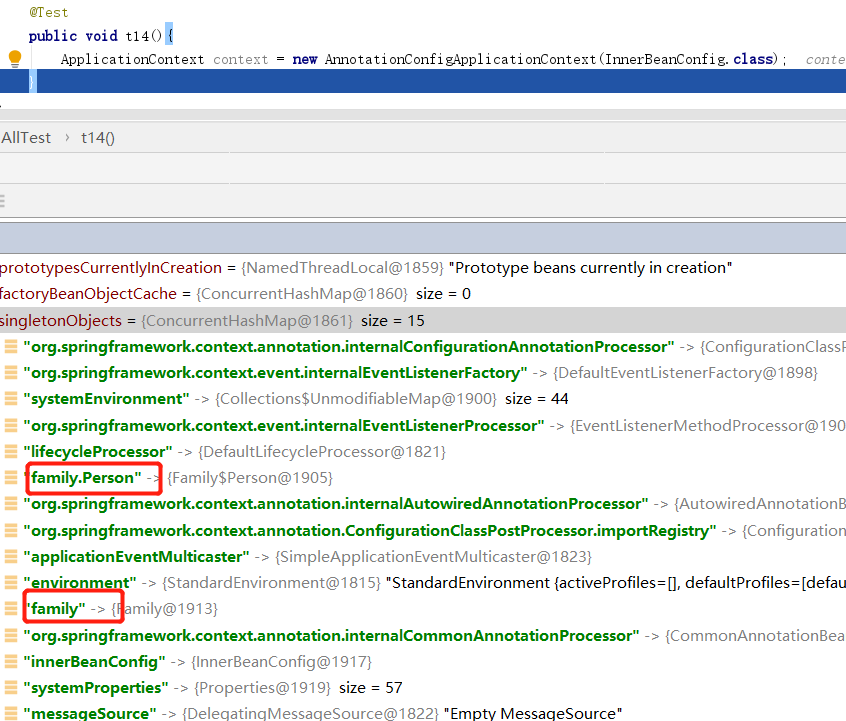
@Component方式,外部类必须要是一个springbean,内部类必须是静态的。
package com.datang.springcode.innerBean;

import org.springframework.stereotype.Component;
@Component
public class Family {
    @Component
    static class Person{

    }
}
package com.datang.springcode.innerBean;

import org.springframework.context.annotation.ComponentScan;

@ComponentScan(basePackages = {"com.datang.springcode.innerBean"})
public class InnerBeanConfig {

}
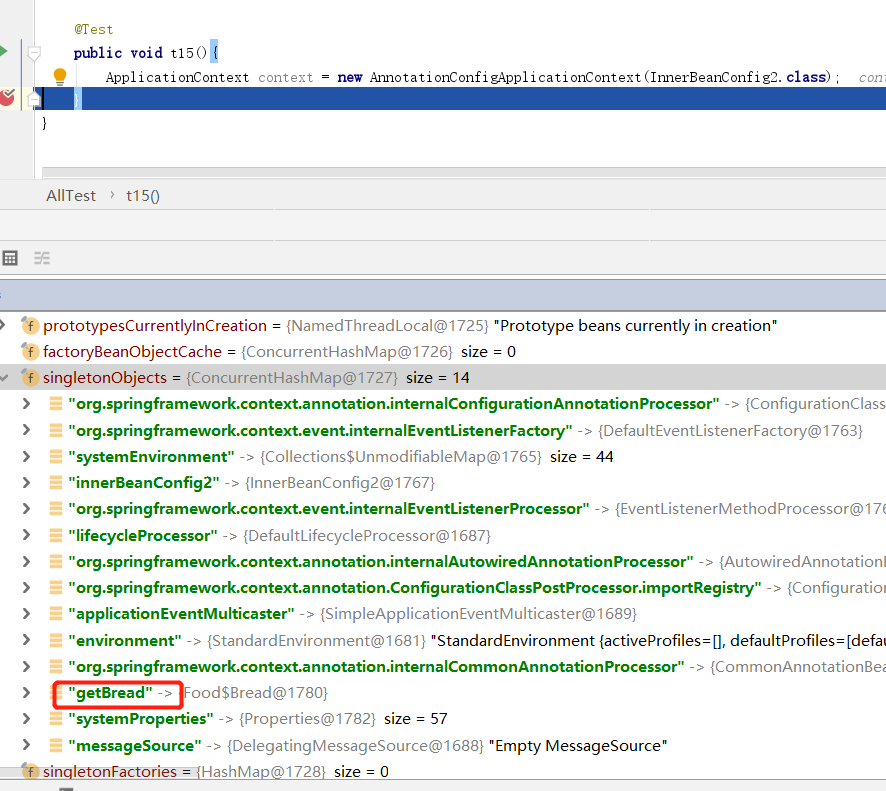
java方式实例化bean则比较灵活
package com.datang.springcode.innerBean;

public class Food {
    class Bread {

    }
}
package com.datang.springcode.innerBean;

import org.springframework.context.annotation.Bean;

public class InnerBeanConfig2 {
    @Bean
    public Food.Bread getBread() {
        return new Food().new Bread();
    }
}
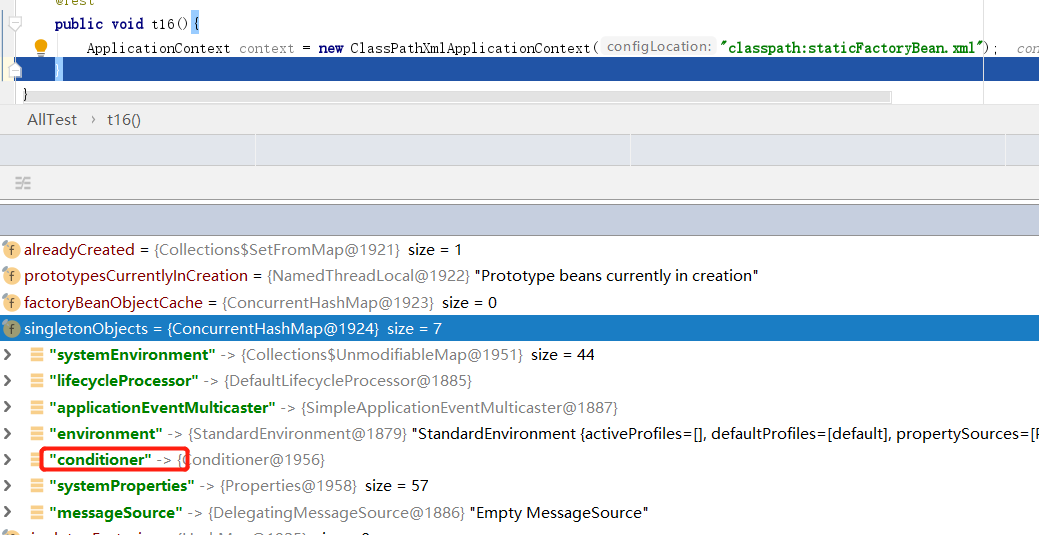
14 静态工厂方法
package com.datang.springcode.staticFactoryBean;

public class Conditioner {

    private Conditioner() {
    }

    private static Conditioner conditioner = new Conditioner();

    public static Conditioner getConditioner() {
        return conditioner;
    }
}
<?xml version="1.0" encoding="UTF-8"?>
<beans xmlns="http://www.springframework.org/schema/beans"
       xmlns:xsi="http://www.w3.org/2001/XMLSchema-instance"
       xsi:schemaLocation="http://www.springframework.org/schema/beans http://www.springframework.org/schema/beans/spring-beans.xsd">

    <bean class="com.datang.springcode.staticFactoryBean.Conditioner" id="conditioner" destroy-method="getConditioner"/>
</beans>
注意,静态工厂,本身无法实例化,需要提供一个静态的方法,用来返回bean。其实静态工厂方法,如果您需要的是单例对象。不使用springbean完全可以。
延用刚才的pojo。我们用@Bean注入,其实这种做法就有点脱裤子放屁的感觉了,感受下。
package com.datang.springcode.staticFactoryBean;

import org.springframework.context.annotation.Bean;

public class StaticFactoryBeanConfig {

    @Bean
    public Conditioner getConditioner() {
        return Conditioner.getConditioner();
    }
}
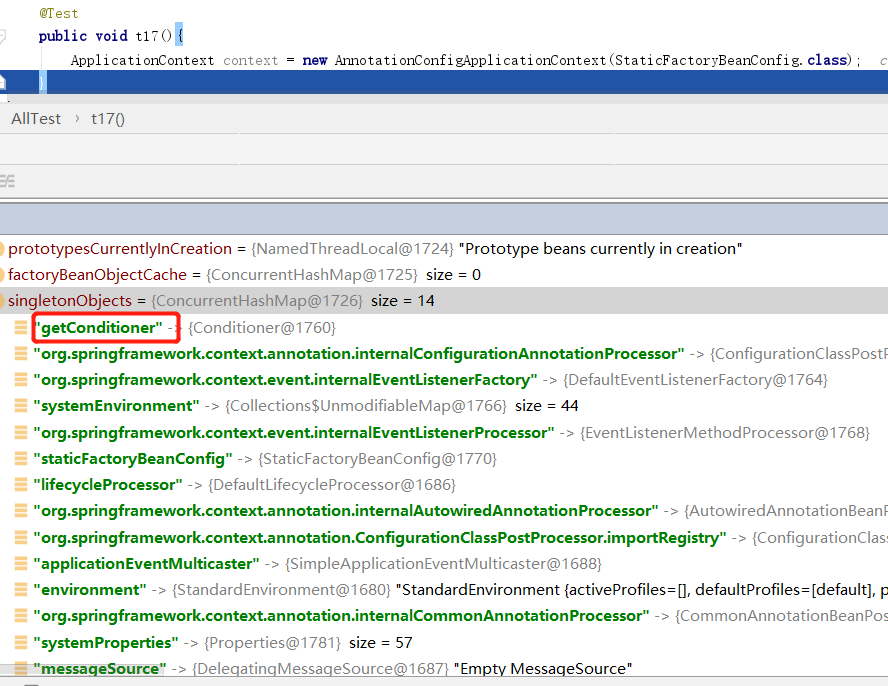
@Component注解方式无法创建静态工厂bean。因为构造方法私有化。
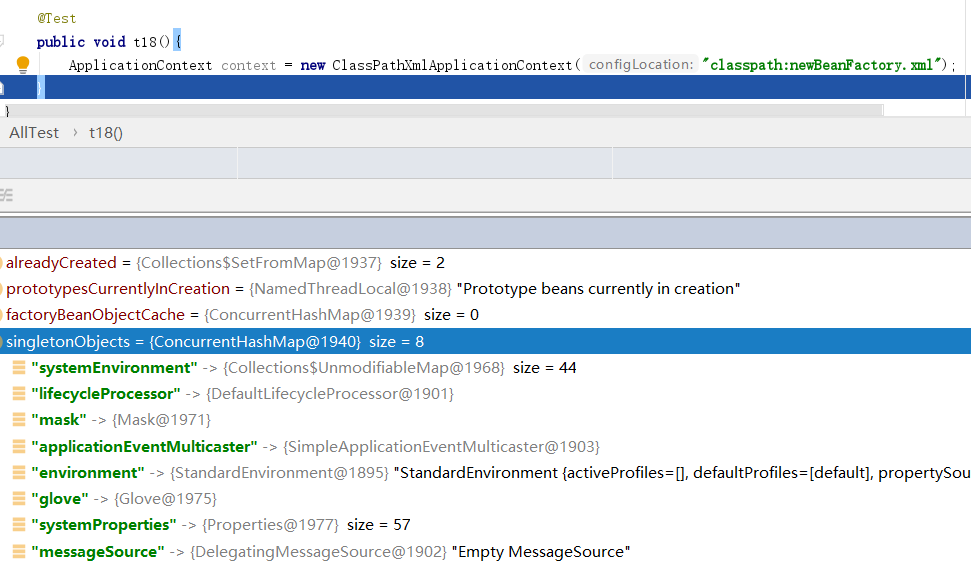
15 实例工厂方法
只有xml配置支持实例工厂方法,要配置由实例工厂返回的pojo,需要先配置工厂类。
<?xml version="1.0" encoding="UTF-8"?>
<beans xmlns="http://www.springframework.org/schema/beans"
       xmlns:xsi="http://www.w3.org/2001/XMLSchema-instance"
       xsi:schemaLocation="http://www.springframework.org/schema/beans http://www.springframework.org/schema/beans/spring-beans.xsd">

    <bean class="com.datang.springcode.newBeanFacotry.Mask" id="mask"/>

    <bean id="glove" factory-bean="mask" factory-method="getGlove"/>
</beans>
package com.datang.springcode.newBeanFacotry;
public class Glove {
}
package com.datang.springcode.newBeanFacotry;

public class Mask {

    private static Glove glove = new Glove();

    public Glove getGlove() {
        return glove;
    }
}
16 BeanPostProcessor
beanPostProcessor接口是spring提供给用户的一个扩展接口,其作用是在每一个bean创建后,都可以对bean进行个性化设置。
package com.datang.springcode.beanPostProcessorTest;

import org.springframework.stereotype.Component;

@Component
public class Bright {
    public String name = "张三";

    public Bright() {
        System.out.println("构造函数 Bright");
    }
}
package com.datang.springcode.beanPostProcessorTest;

import org.springframework.beans.BeansException;
import org.springframework.beans.factory.config.BeanPostProcessor;
import org.springframework.core.Ordered;
import org.springframework.stereotype.Component;

@Component
public class CustomBeanPostProcessor implements BeanPostProcessor, Ordered {
    @Override
    public Object postProcessBeforeInitialization(Object bean, String beanName) throws BeansException {
        System.out.println("BeanPostProcessor1,before");
        if (beanName.equals("bright")) {
            Bright bright = (Bright) bean;
            bright.name = "李四";
        }
        return bean;
    }

    @Override
    public Object postProcessAfterInitialization(Object bean, String beanName) throws BeansException {
        System.out.println("BeanPostProcessor1,after");
        if (beanName.equals("bright")) {
            Bright bright = (Bright) bean;
            bright.name = "王五";
        }
        return bean;
    }

    @Override
    public int getOrder() {
        return 1;
    }
}
package com.datang.springcode.beanPostProcessorTest;
import org.springframework.beans.BeansException;
import org.springframework.beans.factory.config.BeanPostProcessor;
import org.springframework.core.Ordered;
import org.springframework.stereotype.Component;

@Component
public class CustomBeanPostProcessor2 implements BeanPostProcessor, Ordered {
    @Override
    public Object postProcessBeforeInitialization(Object bean, String beanName) throws BeansException {
        System.out.println("BeanPostProcessor2,before");
        if (beanName.equals("bright")) {
            Bright bright = (Bright) bean;
            bright.name = "赵六";
        }
        return bean;
    }

    @Override
    public Object postProcessAfterInitialization(Object bean, String beanName) throws BeansException {
        System.out.println("BeanPostProcessor2,after");
        if (beanName.equals("bright")) {
            Bright bright = (Bright) bean;
            bright.name = "冯七";
        }
        return bean;
    }

    @Override
    public int getOrder() {
        return 2;
    }
}
package com.datang.springcode.beanPostProcessorTest;

import org.springframework.context.annotation.ComponentScan;

@ComponentScan(value = "com.datang.springcode.beanPostProcessorTest")
public class BeanPostProcessorTestConfig {
}

在以上代码片段,我们创建了两个BeanPostProcessor的实现类,并对Bright进行改造。这里需要注意,实现BeanPostProcessor接口的实现类,必须也是一个springbean,多个实现类之间可以实现Ordered接口,指定顺序。
17 BeanFactoryPostProcessor
BeanFactoryPostProcessor扩展接口,用于在bean实例化之前改造bean,确切说是改造BeanDefinition,上边提到过,spring首先收集所有pojo,给每个pojo创建一个BeanDefinition。BeanFactoryPostProcessor实现类,只执行一次,并不是每一个bean都执行。多个BeanFactoryPostProcessor还是使用Ordered接口指定顺序。
package com.datang.springcode.beanFactoryPostProcessorTest;

import org.springframework.stereotype.Component;

@Component
public class Money {
}
package com.datang.springcode.beanFactoryPostProcessorTest;
public class Pen {
}
package com.datang.springcode.beanFactoryPostProcessorTest;

import org.springframework.beans.BeansException;
import org.springframework.beans.factory.config.BeanFactoryPostProcessor;
import org.springframework.beans.factory.config.ConfigurableListableBeanFactory;
import org.springframework.beans.factory.support.GenericBeanDefinition;
import org.springframework.core.Ordered;
import org.springframework.stereotype.Component;

@Component
public class BeanFactoryPostProcessor1 implements BeanFactoryPostProcessor, Ordered {
    @Override
    public void postProcessBeanFactory(ConfigurableListableBeanFactory configurableListableBeanFactory) throws BeansException {
        GenericBeanDefinition genericBeanDefinition = (GenericBeanDefinition) configurableListableBeanFactory.getBeanDefinition("money");
        genericBeanDefinition.setBeanClass(Pen.class);
        System.out.println("BeanFactoryPostProcessor1");
    }

    @Override
    public int getOrder() {
        return 1;
    }
}
package com.datang.springcode.beanFactoryPostProcessorTest;

import org.springframework.beans.BeansException;
import org.springframework.beans.factory.config.BeanDefinition;
import org.springframework.beans.factory.config.BeanFactoryPostProcessor;
import org.springframework.beans.factory.config.ConfigurableListableBeanFactory;
import org.springframework.core.Ordered;
import org.springframework.stereotype.Component;

@Component
public class BeanFactoryPostProcessor2 implements BeanFactoryPostProcessor, Ordered {
    @Override
    public void postProcessBeanFactory(ConfigurableListableBeanFactory configurableListableBeanFactory) throws BeansException {
        BeanDefinition pen = configurableListableBeanFactory.getBeanDefinition("money");
        pen.setScope("prototype");
        System.out.println("BeanFactoryPostProcessor2");
    }

    @Override
    public int getOrder() {
        return 2;
    }
}
package com.datang.springcode.beanFactoryPostProcessorTest;

import org.springframework.context.annotation.ComponentScan;

@ComponentScan
public class BeanFactoryPostProcessorTestConfig {
}

这个测试有点复杂,首先注解@Component在Money类上,第一个BeanPostProcessor找到Money的BeanDefinition,然后向下转型成GenericBeanDefinition使用setBeanClass重新设置BeanDefinition中的class,此时money就不是money了,而是Pen,在第二个BeanPostProcessor中我们设置bean的范围是原型bean。
18 FactoryBean
除了使用xml配置,注解方式在IOC容器内创建bean实例另外实现FactoryBean接口也可以。这里顺便说下BeanFactory是spring存放bean实例的地方。
@Component
public class PersonConfig implements FactoryBean {
    @Override
    public Object getObject() throws Exception {
        return new User();
    }

    @Override
    public Class<?> getObjectType() {
        return User.class;
    }

    @Override
    public boolean isSingleton() {
        return true;
    }
}
注入依赖属性
1 xml方式注入
1.1 基于构造器注入依赖属性
package com.datang.springcode.xmlConstructorInject1;

public class Basketball {
    private String hobby;
    private String nikeName;
    private Football football;

    public Basketball(String nikeName, String hobby, Football football) {
        this.nikeName = nikeName;
        this.hobby = hobby;
        this.football = football;
    }
}
<?xml version="1.0" encoding="UTF-8"?>
<beans xmlns="http://www.springframework.org/schema/beans"
       xmlns:xsi="http://www.w3.org/2001/XMLSchema-instance"
       xmlns:c="http://www.springframework.org/schema/c"
       xsi:schemaLocation="http://www.springframework.org/schema/beans http://www.springframework.org/schema/beans/spring-beans.xsd">

    <bean class="com.datang.springcode.xmlConstructorInject1.Football" id="football"/>

    <bean class="com.datang.springcode.xmlConstructorInject1.Basketball" id="basketball">
        <constructor-arg name="nikeName" value="张三"/>
        <constructor-arg name="hobby" value="我喜欢打篮球"/>
        <constructor-arg name="football" ref="football"/>
    </bean>

    <bean class="com.datang.springcode.xmlConstructorInject1.Basketball" id="basketball2"
          c:_0="李四"
          c:_1="我喜欢乒乓球"
          c:_2-ref="football"/>

    <bean class="com.datang.springcode.xmlConstructorInject1.Basketball" id="basketball3"
          c:nikeName="王五"
          c:hobby="我喜欢打游戏"
          c:football-ref="football"/>
</beans>
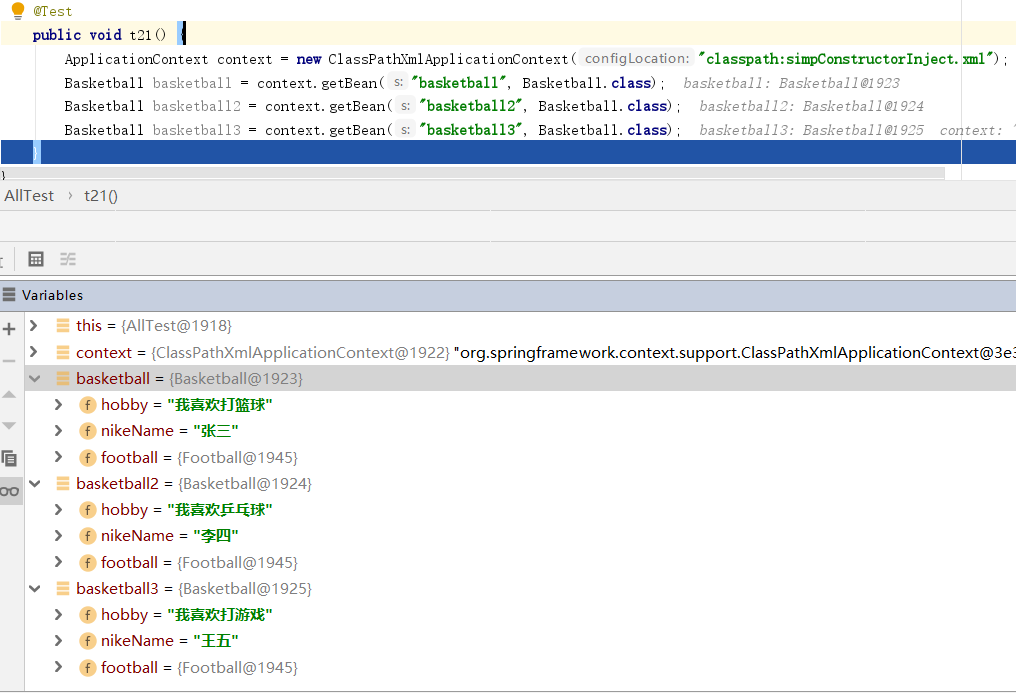
构造器注入注入,value属性用于普通类型注入,ref属性用于pojo属性注入。另外引入c标签我们也可以使用c:写法注入属性。
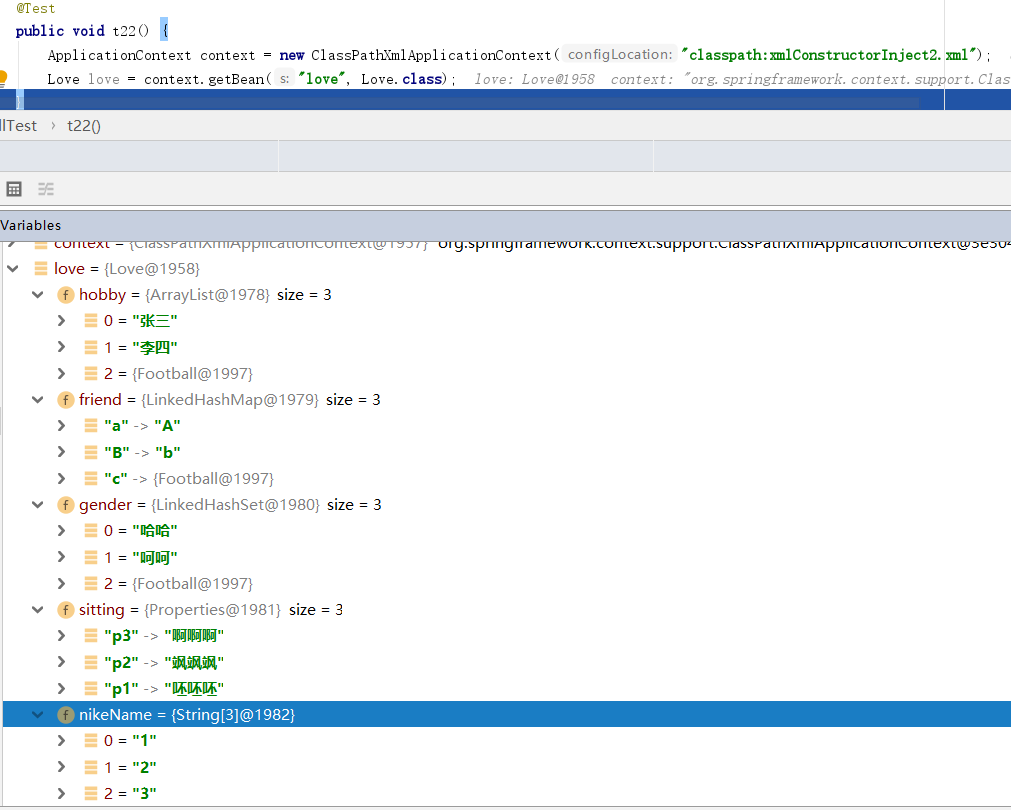
1.2 注入复杂元素数组,集合
构造器注入这次我们使用下标顺序来注入属性<constructor-arg index="0">,在内部使用spring提供的集合标签,分别复制基本数据类型,和引用数据类型。
package com.datang.springcode.xmlConstructorInject1;

import java.util.List;
import java.util.Map;
import java.util.Properties;
import java.util.Set;

public class Love {
    private List hobby;
    private Map friend;
    private Set gender;
    private Properties sitting;
    private String[] nikeName;

    public Love(List hobby, Map friend, Set gender, Properties sitting, String[] nikeName) {
        this.hobby = hobby;
        this.friend = friend;
        this.nikeName = nikeName;
        this.gender = gender;
        this.sitting = sitting;
    }
}
<?xml version="1.0" encoding="UTF-8"?>
<beans xmlns="http://www.springframework.org/schema/beans"
       xmlns:xsi="http://www.w3.org/2001/XMLSchema-instance"
       xsi:schemaLocation="http://www.springframework.org/schema/beans http://www.springframework.org/schema/beans/spring-beans.xsd
">

    <bean class="com.datang.springcode.xmlConstructorInject1.Football" id="football"/>


    <bean class="com.datang.springcode.xmlConstructorInject1.Love" id="love">
        <constructor-arg index="0">
            <list>
                <value>张三</value>
                <value>李四</value>
                <ref bean="football"/>
            </list>
        </constructor-arg>
        <constructor-arg index="1">
            <map>
                <entry key="a" value="A"/>
                <entry key="B" value="b"/>
                <entry key="c" value-ref="football"/>
            </map>
        </constructor-arg>
        <constructor-arg index="2">
            <set>
                <value>哈哈</value>
                <value>呵呵</value>
                <ref bean="football"/>
            </set>
        </constructor-arg>
        <constructor-arg index="3">
            <props>
                <prop key="p1">呸呸呸</prop>
                <prop key="p2">飒飒飒</prop>
                <prop key="p3">啊啊啊</prop>
            </props>
        </constructor-arg>
        <constructor-arg index="4">
            <array>
                <value>1</value>
                <value>2</value>
                <value>3</value>
            </array>
        </constructor-arg>
    </bean>

</beans>
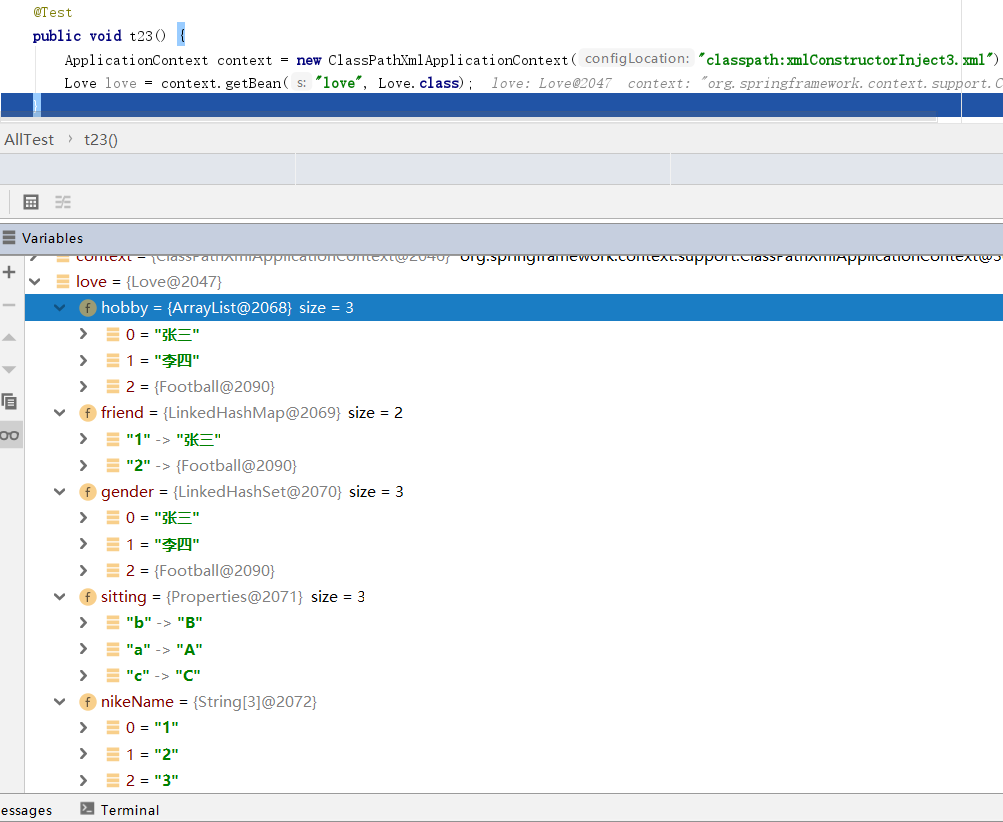
1.3 <util>创建集合类型的bean
在1.2的代码片段中我们在<constructor-arg index="0">内部定义集合,但是这种方式定义的集合只能使用一次,下面我们来创建集合bean,达到复用的效果。util标签需要引入命名空间。
<?xml version="1.0" encoding="UTF-8"?>
<beans xmlns="http://www.springframework.org/schema/beans"
       xmlns:xsi="http://www.w3.org/2001/XMLSchema-instance"
       xmlns:util="http://www.springframework.org/schema/util"
       xsi:schemaLocation="http://www.springframework.org/schema/beans http://www.springframework.org/schema/beans/spring-beans.xsd
       http://www.springframework.org/schema/util
       http://www.springframework.org/schema/util/spring-util.xsd">

    <bean class="com.datang.springcode.xmlConstructorInject1.Football" id="football"/>

    <util:list id="list">
        <value>张三</value>
        <value>李四</value>
        <ref bean="football"></ref>
    </util:list>

    <util:map id="map">
        <entry key="1" value="张三"/>
        <entry key="2" value-ref="football"/>
    </util:map>

    <util:set id="set">
        <value>张三</value>
        <value>李四</value>
        <ref bean="football"></ref>
    </util:set>

    <util:properties id="properties">
        <prop key="a">A</prop>
        <prop key="b">B</prop>
        <prop key="c">C</prop>
    </util:properties>

    <bean class="com.datang.springcode.xmlConstructorInject1.Love" id="love">
        <constructor-arg index="0" ref="list"/>
        <constructor-arg index="1" ref="map"/>
        <constructor-arg index="2" ref="set"/>
        <constructor-arg index="3" ref="properties"/>
        <constructor-arg index="4">
            <array>
                <value>1</value>
                <value>2</value>
                <value>3</value>
            </array>
        </constructor-arg>
    </bean>

</beans>
1.4 类型选取
如果pojo的多个构造器参数个数相同,类型不同。此时我们就需要在使用构造器注入时,定义参数的类型,让spring知道我们要使用哪一个构造器。
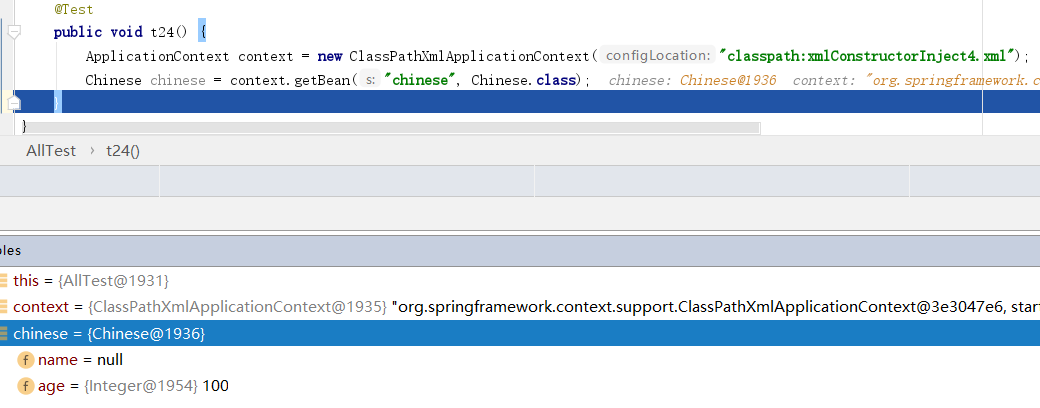
package com.datang.springcode.xmlConstructorInject1;

public class Chinese {
    private String name;
    private Integer age;

    public Chinese(Integer value) {
        this.age = value;
    }

    public Chinese(String value) {
        this.name = value;
    }


}
<?xml version="1.0" encoding="UTF-8"?>
<beans xmlns="http://www.springframework.org/schema/beans"
       xmlns:xsi="http://www.w3.org/2001/XMLSchema-instance"
       xsi:schemaLocation="http://www.springframework.org/schema/beans http://www.springframework.org/schema/beans/spring-beans.xsd">

    <bean class="com.datang.springcode.xmlConstructorInject1.Chinese" id="chinese">
        <constructor-arg name="value" type="java.lang.Integer" value="100"/>
    </bean>
</beans>
1.5 基于set注入依赖属性
set注入要求需要被注入依赖的属性必须有set()方法。注入复杂元素和pojo的方式和构造器类似。
package com.datang.springcode.setInject1;
public class Wallet {
}
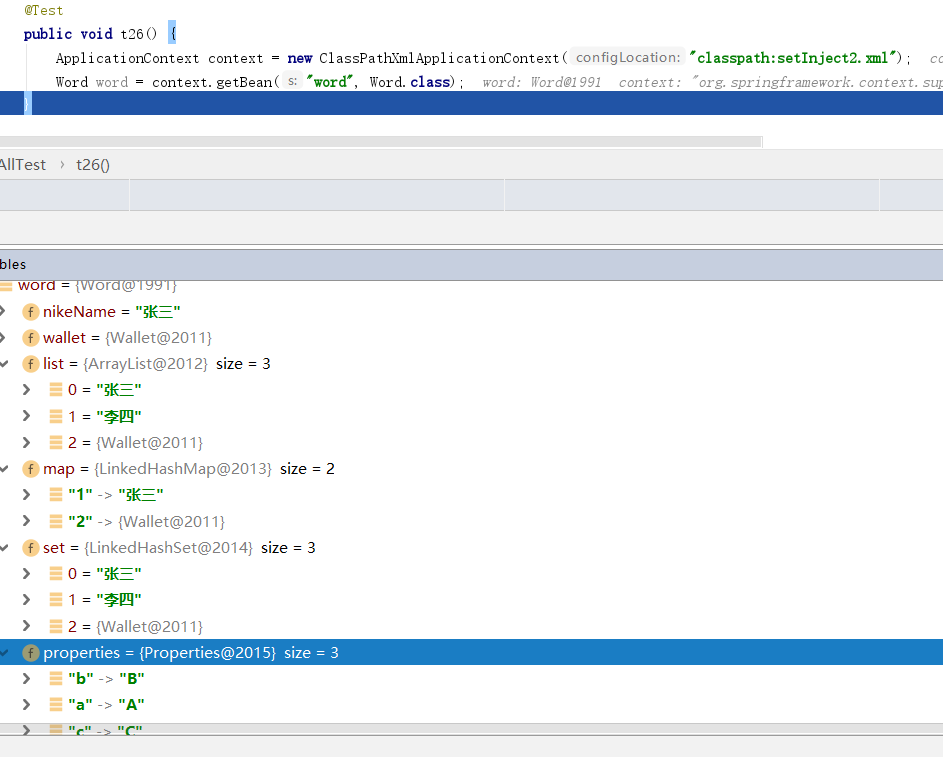
package com.datang.springcode.setInject1;

import java.util.List;
import java.util.Map;
import java.util.Properties;
import java.util.Set;

public class Word {
    private String nikeName;
    private Wallet wallet;
    private List list;
    private Map map;
    private Set set;
    private Properties properties;
    private String[] str;

    public void setNikeName(String nikeName) {
        this.nikeName = nikeName;
    }

    public void setWallet(Wallet wallet) {
        this.wallet = wallet;
    }

    public void setList(List list) {
        this.list = list;
    }

    public void setMap(Map map) {
        this.map = map;
    }

    public void setSet(Set set) {
        this.set = set;
    }

    public void setProperties(Properties properties) {
        this.properties = properties;
    }

    public void setStr(String[] str) {
        this.str = str;
    }
}
<?xml version="1.0" encoding="UTF-8"?>
<beans xmlns="http://www.springframework.org/schema/beans"
       xmlns:xsi="http://www.w3.org/2001/XMLSchema-instance"
       xsi:schemaLocation="http://www.springframework.org/schema/beans http://www.springframework.org/schema/beans/spring-beans.xsd">

    <bean class="com.datang.springcode.setInject1.Wallet" id="wallet"></bean>
    <bean class="com.datang.springcode.setInject1.Word" id="word">
        <property name="nikeName" value="张三"/>
        <property name="wallet" ref="wallet"/>
        <property name="list">
            <list>
                <value>aaa</value>
                <ref bean="wallet"/>
                <value>bbb</value>
            </list>
        </property>
        <property name="map">
            <map>
                <entry key="k1" value="v1"></entry>
                <entry key="k2" value-ref="wallet"></entry>
                <entry key="k3" value="v3"></entry>
            </map>
        </property>
        <property name="set">
            <set>
                <value>s1</value>
                <value>s2</value>
                <value>s3</value>
                <ref bean="wallet"/>
            </set>
        </property>
        <property name="properties">
            <props>
                <prop key="p1">pp1</prop>
                <prop key="p2">pp2</prop>
                <prop key="p3">pp3</prop>
            </props>
        </property>
        <property name="str">
            <array>
                <value>张三</value>
                <value>李四</value>
            </array>
        </property>
    </bean>
</beans>

同样我们也可以使用p命名空间来的方式注入属性。需要引入p命名空间url
<?xml version="1.0" encoding="UTF-8"?>
<beans xmlns="http://www.springframework.org/schema/beans"
       xmlns:xsi="http://www.w3.org/2001/XMLSchema-instance"
       xmlns:p="http://www.springframework.org/schema/p"
       xmlns:util="http://www.springframework.org/schema/util"
       xsi:schemaLocation="http://www.springframework.org/schema/beans
       http://www.springframework.org/schema/beans/spring-beans.xsd
       http://www.springframework.org/schema/util
       http://www.springframework.org/schema/util/spring-util.xsd">

    <bean class="com.datang.springcode.setInject1.Wallet" id="wallet"></bean>

    <util:list id="list">
        <value>张三</value>
        <value>李四</value>
        <ref bean="wallet"></ref>
    </util:list>

    <util:map id="map">
        <entry key="1" value="张三"/>
        <entry key="2" value-ref="wallet"/>
    </util:map>

    <util:set id="set">
        <value>张三</value>
        <value>李四</value>
        <ref bean="wallet"></ref>
    </util:set>


    <util:properties id="properties">
        <prop key="a">A</prop>
        <prop key="b">B</prop>
        <prop key="c">C</prop>
    </util:properties>
    <bean class="com.datang.springcode.setInject1.Word" id="word"
          p:nikeName="张三"
          p:wallet-ref="wallet"
          p:list-ref="list"
          p:map-ref="map"
          p:set-ref="set"
          p:properties-ref="properties"/>
</beans>
1.6 自动注入
xml方式可以自动注入引用类型,自动注入分为byName和byType,仅限于set方法构造器注入。要确保被依赖的bean确实存在。
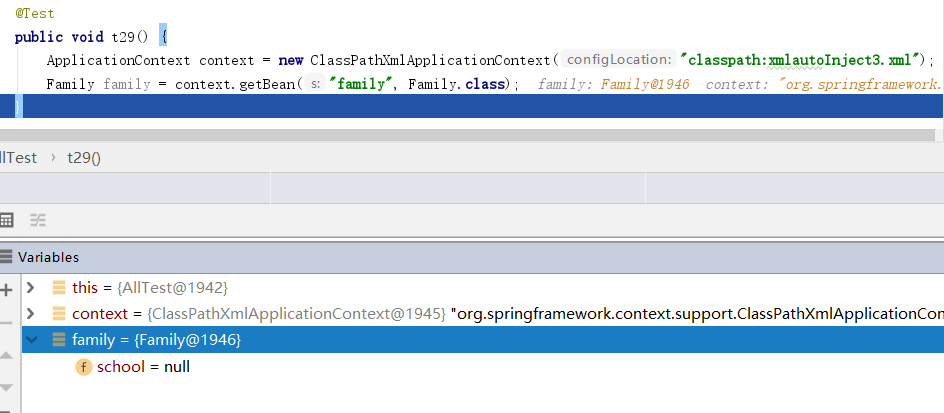
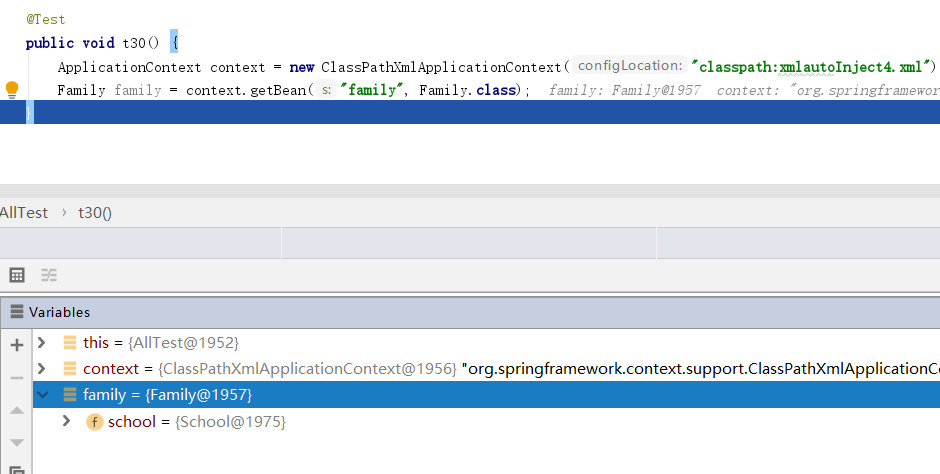
package com.datang.springcode.xmlautoInject1;
public class School {
}
package com.datang.springcode.xmlautoInject1;

public class Family {
    private School school;

    public void setSchool(School school) {
        this.school = school;
    }
}
<?xml version="1.0" encoding="UTF-8"?>
<beans xmlns="http://www.springframework.org/schema/beans"
       xmlns:xsi="http://www.w3.org/2001/XMLSchema-instance"
       xsi:schemaLocation="http://www.springframework.org/schema/beans http://www.springframework.org/schema/beans/spring-beans.xsd">
    <bean class="com.datang.springcode.xmlautoInject1.School" id="school"></bean>
    <bean class="com.datang.springcode.xmlautoInject1.Family" id="family" autowire="byType"></bean>
</beans>

以上测试代码片段为byType,也就是根据属性的类型,来注入依赖,那如果有两个类型相同的呢?此时如果我们在使用byType就会报错,因为spring无法从两个类型一样的bean中做出选择,此时用byName是合适的。
<?xml version="1.0" encoding="UTF-8"?>
<beans xmlns="http://www.springframework.org/schema/beans"
       xmlns:xsi="http://www.w3.org/2001/XMLSchema-instance"
       xsi:schemaLocation="http://www.springframework.org/schema/beans http://www.springframework.org/schema/beans/spring-beans.xsd">
    <bean class="com.datang.springcode.xmlautoInject1.School" id="school"></bean>
    <bean class="com.datang.springcode.xmlautoInject1.School" id="school2"></bean>
    <bean class="com.datang.springcode.xmlautoInject1.Family" id="family" autowire="byName"></bean>
</beans>

1.7 不参与自动注入
对于多个类型相同的bean,我们可以设置bean的autowire-candidate="false"不参与自动注入。此时有多个类型相同的bean,spring依然可以成功注入,因为参数自动注入的只有一个。
<?xml version="1.0" encoding="UTF-8"?>
<beans xmlns="http://www.springframework.org/schema/beans"
       xmlns:xsi="http://www.w3.org/2001/XMLSchema-instance"
       xsi:schemaLocation="http://www.springframework.org/schema/beans http://www.springframework.org/schema/beans/spring-beans.xsd">
    <bean class="com.datang.springcode.xmlautoInject1.School" id="school" autowire-candidate="false"></bean>
    <bean class="com.datang.springcode.xmlautoInject1.School" id="school2" autowire-candidate="false"></bean>
    <bean class="com.datang.springcode.xmlautoInject1.School" id="school3" autowire-candidate="false"></bean>
    <bean class="com.datang.springcode.xmlautoInject1.School" id="school4" autowire-candidate="false"></bean>
    <bean class="com.datang.springcode.xmlautoInject1.Family" id="family" autowire="byType"></bean>
</beans>
1.8 优先注入
使用primary属性,指定bean优先注入。
<?xml version="1.0" encoding="UTF-8"?>
<beans xmlns="http://www.springframework.org/schema/beans"
       xmlns:xsi="http://www.w3.org/2001/XMLSchema-instance"
       xsi:schemaLocation="http://www.springframework.org/schema/beans http://www.springframework.org/schema/beans/spring-beans.xsd">
    <bean class="com.datang.springcode.xmlautoInject1.School" id="school" primary="true"></bean>
    <bean class="com.datang.springcode.xmlautoInject1.School" id="school2"></bean>
    <bean class="com.datang.springcode.xmlautoInject1.School" id="school3"></bean>
    <bean class="com.datang.springcode.xmlautoInject1.School" id="school4"></bean>
    <bean class="com.datang.springcode.xmlautoInject1.Family" id="family" autowire="byType"></bean>
</beans>
1.9 构造器注入外部属性
首先注入要注入外部属性,必须注入spring的内置类,PropertySourcesPlaceholderConfigurer类,指定locations属性。读取外部文件。
db.driver=com.mysql.jdbc.Driver
db.url=localhost:3306/pet
db.username=root
db.password=123
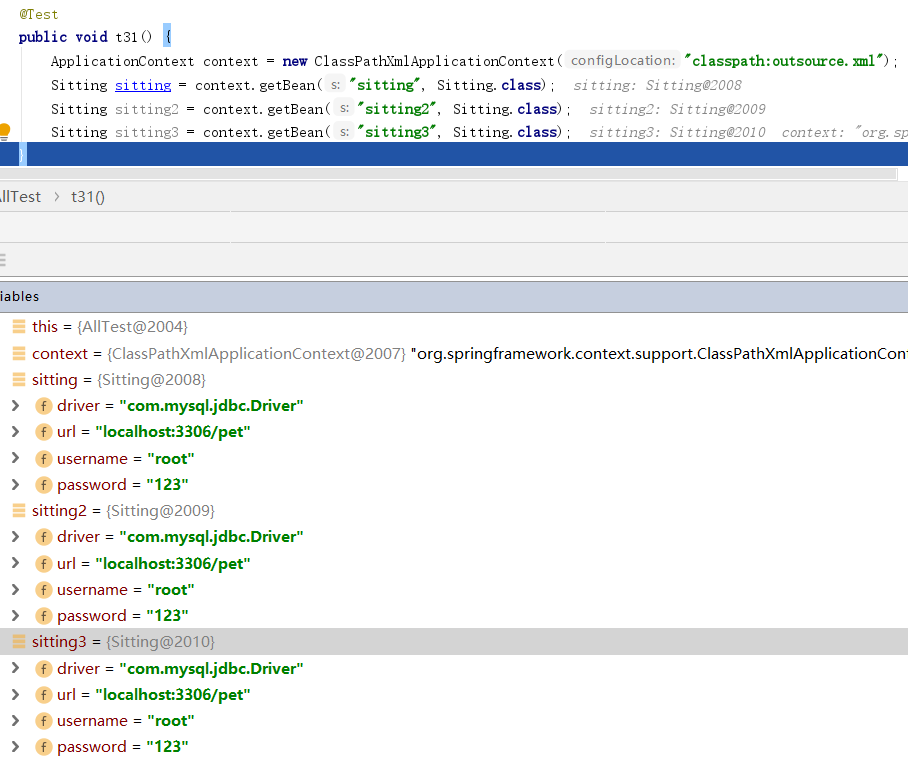
<?xml version="1.0" encoding="UTF-8"?>
<beans xmlns="http://www.springframework.org/schema/beans"
       xmlns:xsi="http://www.w3.org/2001/XMLSchema-instance"
       xmlns:c="http://www.springframework.org/schema/c"
       xsi:schemaLocation="http://www.springframework.org/schema/beans http://www.springframework.org/schema/beans/spring-beans.xsd">

    <bean class="org.springframework.context.support.PropertySourcesPlaceholderConfigurer">
        <property name="locations">
            <value>classpath:db.properties</value>
        </property>
    </bean>

    <bean class="com.datang.springcode.outsource.Sitting" id="sitting">
        <constructor-arg name="driver" value="${db.driver}"/>
        <constructor-arg name="url" value="${db.url}"/>
        <constructor-arg name="username" value="${db.username}"/>
        <constructor-arg name="password" value="${db.password}"/>
    </bean>

    <bean class="com.datang.springcode.outsource.Sitting" id="sitting2"
          c:_0="${db.driver}"
          c:_1="${db.url}"
          c:_2="${db.username}"
          c:_3="${db.password}"/>

    <bean class="com.datang.springcode.outsource.Sitting" id="sitting3"
          c:driver="${db.driver}"
          c:url="${db.url}"
          c:username="${db.username}"
          c:password="${db.password}"/>

</beans>
此方式同样适用c标签的格式
1.10 set方式注入外部属性
package com.datang.springcode.outsource;
public class Sitting2 {
    private String driver;
    private String url;
    private String username;
    private String password;

    public void setDriver(String driver) {
        this.driver = driver;
    }

    public void setUrl(String url) {
        this.url = url;
    }

    public void setUsername(String username) {
        this.username = username;
    }

    public void setPassword(String password) {
        this.password = password;
    }
}
<?xml version="1.0" encoding="UTF-8"?>
<beans xmlns="http://www.springframework.org/schema/beans"
       xmlns:xsi="http://www.w3.org/2001/XMLSchema-instance"
       xmlns:p="http://www.springframework.org/schema/p"
       xsi:schemaLocation="http://www.springframework.org/schema/beans http://www.springframework.org/schema/beans/spring-beans.xsd">

    <bean class="org.springframework.context.support.PropertySourcesPlaceholderConfigurer">
        <property name="locations">
            <value>classpath:db.properties</value>
        </property>
    </bean>

    <bean class="com.datang.springcode.outsource.Sitting2" id="sitting">
        <property name="driver" value="${db.driver}"/>
        <property name="url" value="${db.url}"/>
        <property name="username" value="${db.username}"/>
        <property name="password" value="${db.password}"/>
    </bean>

    <bean class="com.datang.springcode.outsource.Sitting2" id="sitting2"
          p:driver="${db.driver}"
          p:url="${db.url}"
          p:username="${db.username}"
          p:password="${db.password}"/>

</beans>

1.11 注入匿名内部类
内部bean没有id,因为他不能单独出现,不能给其他的bean使用.
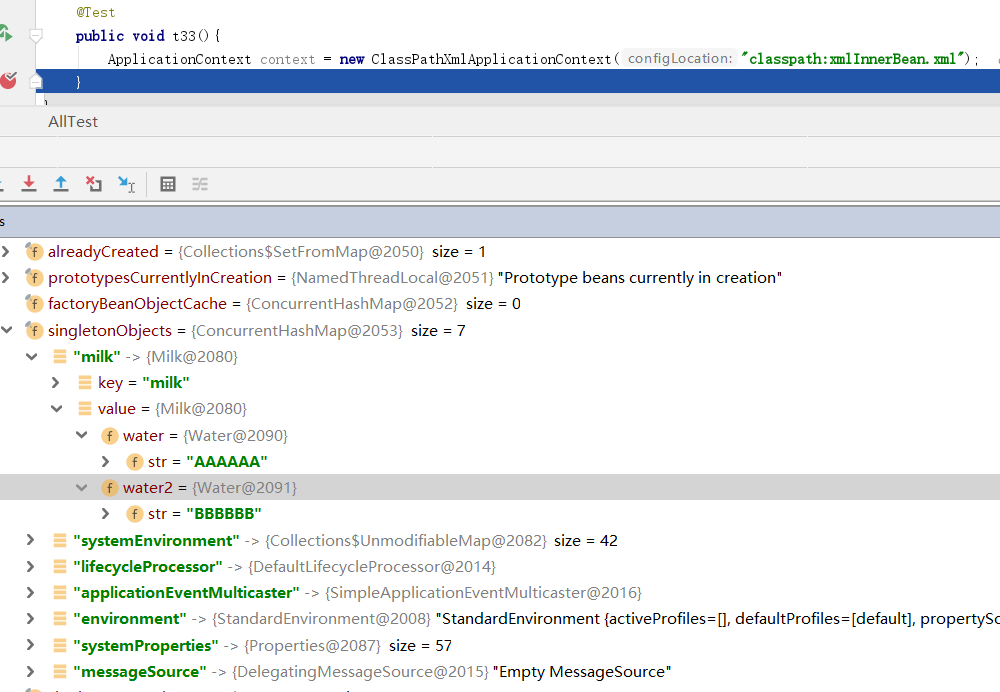
package com.datang.springcode.xmlInnerBean;
public class Water {
    public String str;

    public void setStr(String str) {
        this.str = str;
    }
}
package com.datang.springcode.xmlInnerBean;

public class Milk {
    public Water water;
    public Water water2;

    public Milk(Water water) {
        this.water = water;
    }

    public void setWater2(Water water2) {
        this.water2 = water2;
    }
}
<?xml version="1.0" encoding="UTF-8"?>
<beans xmlns="http://www.springframework.org/schema/beans"
       xmlns:xsi="http://www.w3.org/2001/XMLSchema-instance"
       xsi:schemaLocation="http://www.springframework.org/schema/beans http://www.springframework.org/schema/beans/spring-beans.xsd">

    <bean class="com.datang.springcode.xmlInnerBean.Milk" id="milk">
        <constructor-arg name="water">
            <bean class="com.datang.springcode.xmlInnerBean.Water">
                <property name="str" value="AAAAAA"/>
            </bean>
        </constructor-arg>
        <property name="water2">
            <bean class="com.datang.springcode.xmlInnerBean.Water">
                <property name="str" value="BBBBBB"/>
            </bean>
        </property>
    </bean>
</beans>
1.12 注入空字符串和null
package com.datang.springcode.emptyType;

public class Forget {

    private String name;
    private Object object;
    private String nikeName;
    private Object object2;

    public Forget(String nikeName, Object object2) {
        this.nikeName = nikeName;
        this.object2 = object2;
    }

    public void setName(String name) {
        this.name = name;
    }

    public void setObject(Object object) {
        this.object = object;
    }
}
<?xml version="1.0" encoding="UTF-8"?>
<beans xmlns="http://www.springframework.org/schema/beans"
       xmlns:xsi="http://www.w3.org/2001/XMLSchema-instance"
       xsi:schemaLocation="http://www.springframework.org/schema/beans http://www.springframework.org/schema/beans/spring-beans.xsd">

    <bean class="com.datang.springcode.emptyType.Forget" id="forget">
        <constructor-arg name="nikeName" value=""/>
        <constructor-arg name="object2">
            <null/>
        </constructor-arg>
        <property name="name" value=""/>
        <property name="object">
            <null/>
        </property>
    </bean>
</beans>

value值默认是空字符串,<null/>
1.13 静态工厂和构造器依赖注入
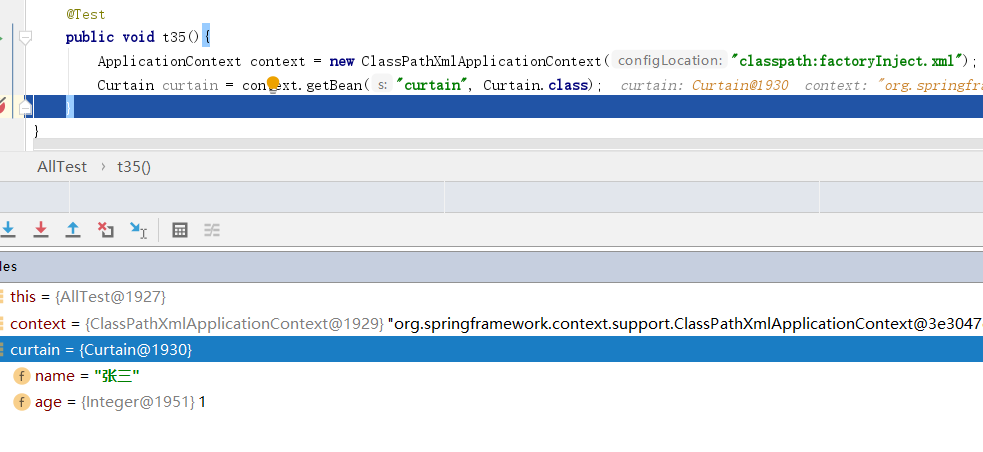
静态工厂注入需要保证工厂方法是静态的。参数可以是返回值的构造参数。
package com.datang.springcode.factoryInject;

public class Curtain {

    private String name;
    private Integer age;

    public Curtain(String name, Integer age) {
        this.name = name;
        this.age = age;
    }
}
package com.datang.springcode.factoryInject;

public class StaticFactoryBean {

    private StaticFactoryBean() {
    }

    public static Curtain getPerson(String name, Integer age) {
        return new Curtain(name, age);
    }
}
<?xml version="1.0" encoding="UTF-8"?>
<beans xmlns="http://www.springframework.org/schema/beans"
       xmlns:xsi="http://www.w3.org/2001/XMLSchema-instance"
       xsi:schemaLocation="http://www.springframework.org/schema/beans http://www.springframework.org/schema/beans/spring-beans.xsd">

    <bean class="com.datang.springcode.factoryInject.StaticFactoryBean" id="curtain" factory-method="getPerson">
        <constructor-arg name="name" value="张三"/>
        <constructor-arg name="age" value="1"/>
    </bean>
</beans>
1.14 value值为bean的id
package com.datang.springcode.citeRestBean;

public class Owe {
    private String name;

    private String nikeName;

    public Owe(String name) {
        this.name = name;
    }

    public void setNikeName(String nikeName) {
        this.nikeName = nikeName;
    }
}
<?xml version="1.0" encoding="UTF-8"?>
<beans xmlns="http://www.springframework.org/schema/beans"
       xmlns:xsi="http://www.w3.org/2001/XMLSchema-instance"
       xsi:schemaLocation="http://www.springframework.org/schema/beans http://www.springframework.org/schema/beans/spring-beans.xsd">

    <bean class="java.lang.Object" id="object"/>
    <bean class="com.datang.springcode.citeRestBean.Owe" id="owe">
        <constructor-arg name="name">
            <idref bean="object"/>
        </constructor-arg>
        <property name="nikeName">
            <idref bean="object"/>
        </property>
    </bean>
</beans>
定义value的值,一个bean的id。官方文档上说,这样可以保证value的值一定存在...确实我get不到这个点的意义。

2 注解注入
2.1 @Autowired注释成员变量
在默认的情况下,@Autowired注解的属性bean必须存在。
package com.datang.springcode.autowiredInject1;

import org.springframework.stereotype.Component;

@Component
public class Law {
}
package com.datang.springcode.autowiredInject1;

import org.springframework.beans.factory.annotation.Autowired;
import org.springframework.stereotype.Component;

@Component
public class Attorney {

    @Autowired
    public Law law;

}
package com.datang.springcode.autowiredInject1;

import org.springframework.context.annotation.ComponentScan;

@ComponentScan
public class AutowiredInject1Config {
}

2.2 @Autowired注释构造函数
package com.datang.springcode.autowiredInject1;

import org.springframework.beans.factory.annotation.Autowired;
import org.springframework.stereotype.Component;

@Component
public class Order {
    private Law law;

    @Autowired
    public Order(Law law) {
        this.law = law;
    }

    public Order(String name) {

    }
}

如果bean只有一个构造器,忽略@Autowired也是可以的。这主要依赖于@Component注解的作用,但是如果有两个构造器,其中一个必须使用@Autowired标注我们需要使用哪个构造器。
2.3 不是必须的注入
package com.datang.springcode.autowiredInject1;

import org.springframework.stereotype.Component;

@Component
public class Law {
}
package com.datang.springcode.autowiredInject1;


public class Train {
}
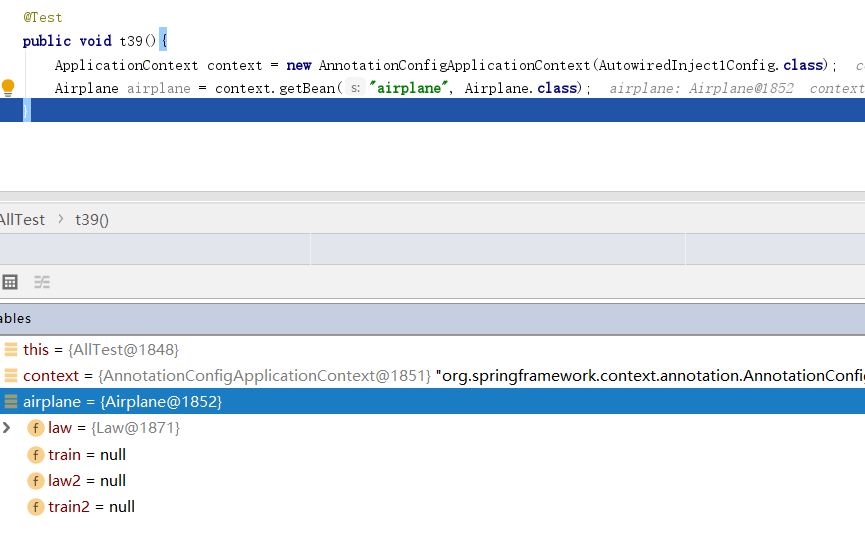
package com.datang.springcode.autowiredInject1;

import org.springframework.beans.factory.annotation.Autowired;
import org.springframework.stereotype.Component;

@Component
public class Airplane {
    @Autowired
    public Law law;
    @Autowired(required = false)
    public Train train;

    public Train train2;

    public Airplane() {
    }

    @Autowired(required = false)
    public Airplane(Train train2) {
        this.train2 = train2;
    }
}
在以上代码片段中,成员变量train使用@Autowired(required=false)表示属性不是非必须的,没有找到注入bean不报错。而构造函数使用@Autowired(required=false),则表示构造函数参数也不是必须的,但是这意味着spring创建bean会失败,所以必须要有一个空的构造函数才能保证创建bean成功。可以看到,当构造器注入属性失败时,spring使用的是空的构造函数创建bean。
2.4 byName还是byType
使用@Autowired注入属性时,通常我们要保证有可用bean被注入。当需要注入的pojo是接口时,会寻找该接口的实现类。
package com.datang.springcode.byNameorbyType;

public interface Fruits {
}
package com.datang.springcode.byNameorbyType;

import org.springframework.stereotype.Component;

@Component
public class Sugarcane implements Fruits{
}
package com.datang.springcode.byNameorbyType;

import org.springframework.beans.factory.annotation.Autowired;
import org.springframework.stereotype.Component;

@Component
public class User {
    @Autowired
    public Fruits fruits;
}
package com.datang.springcode.byNameorbyType;

import org.springframework.context.annotation.ComponentScan;

@ComponentScan
public class ByNameByTypeConfig {
}
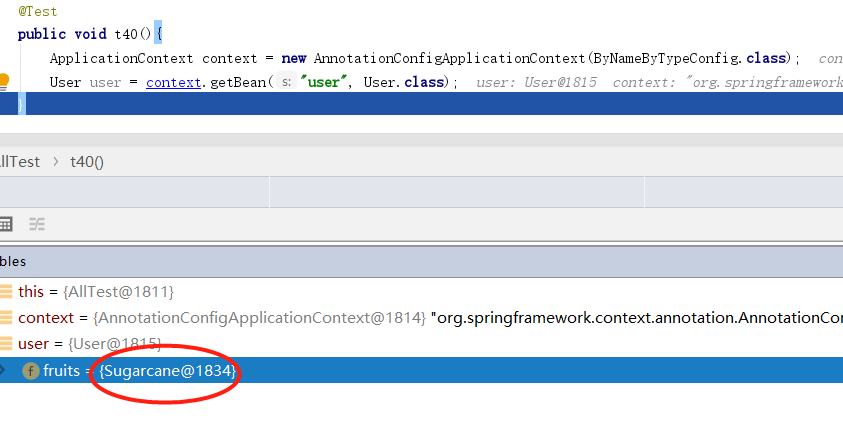
但是一个接口同时有两个实现类就会报错。
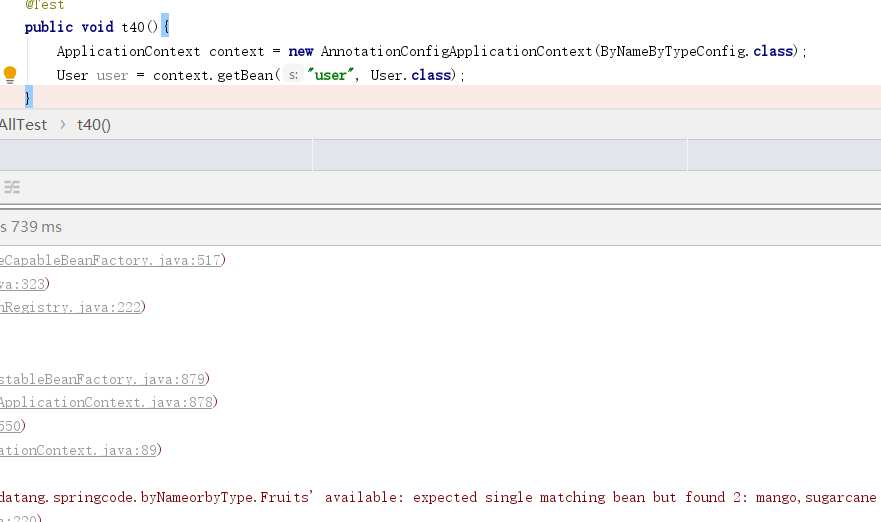
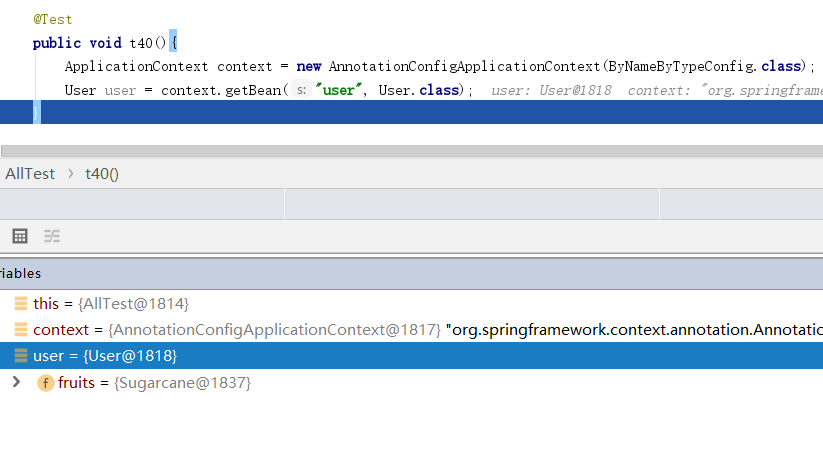
这时我们修改其中一个实现类的名称修改为@Autowired标注的属性名,则可以成功注入。由此可见,@Autowired先byType找到所有类型可以注入的,然后在byName找到其中名称一样的。
package com.datang.springcode.byNameorbyType;

import org.springframework.stereotype.Component;

@Component(value = "fruits")
public class Sugarcane implements Fruits {
}
2.5 @Nullable 可以为空的
当我们使用构造器注入时,属性bean不存在,则会报异常。使用@Nullable允许参数为null
package com.datang.springcode.cannull;
public class Cloud {
}
package com.datang.springcode.cannull;
public class Snow {
}
package com.datang.springcode.cannull;

import org.springframework.lang.Nullable;
import org.springframework.stereotype.Component;

@Component
public class Sky {
    public Cloud cloud;
    public Snow snow;

    public Sky(@Nullable Cloud cloud, @Nullable Snow snow) {
        this.cloud = cloud;
        this.snow = snow;
    }
}
package com.datang.springcode.cannull;

import org.springframework.context.annotation.ComponentScan;

@ComponentScan
public class CanNullConfig {
}
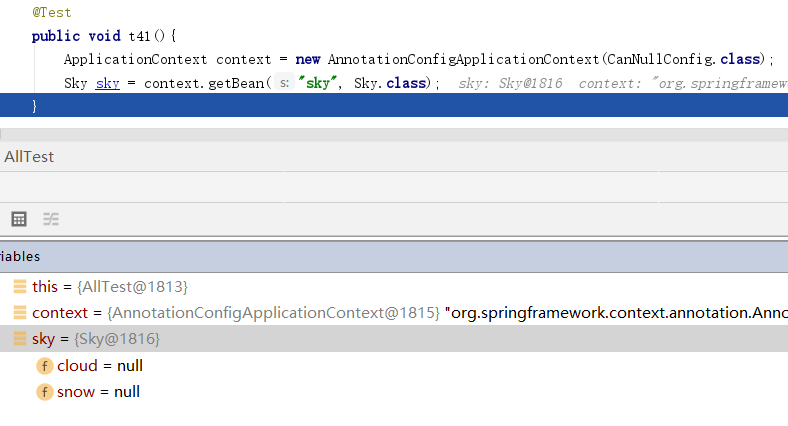
可以看出spring并没有使用带参构造函数实例化bean,并且我们也没有指定无参数构造函数。如果一个参数可以找到bean,一个找不到也是可以的。在Cloud类上加入@Component注解
package com.datang.springcode.cannull;

import org.springframework.stereotype.Component;

@Component
public class Cloud {
}
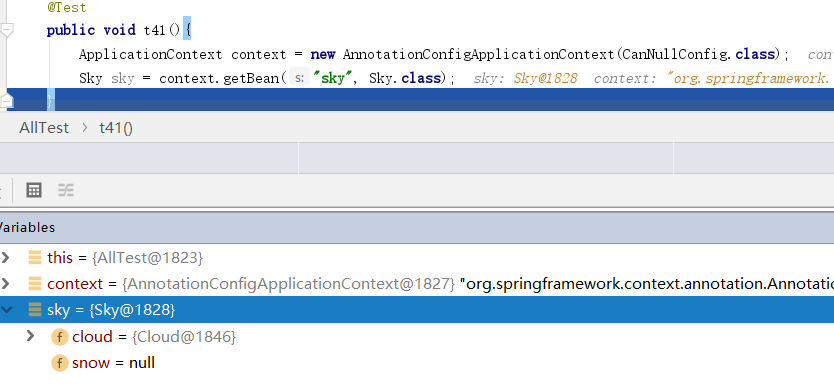
我们并没有定义Cloud单参数的构造函数,这是spring帮我们做的事情。
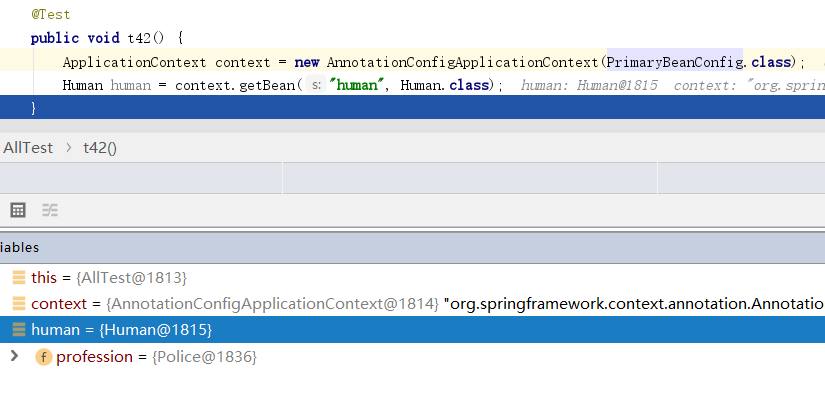
2.6 @Primary 优先注入
上边我们说过,如果一个接口有两个或以上实现类,我们需要保证byName能够找到bean。或者我们可以提高bean的优先级
package com.datang.springcode.primaryBean;
public interface Profession {
}
package com.datang.springcode.primaryBean;

import org.springframework.stereotype.Component;

@Component
public class Doctor implements Profession{
}
package com.datang.springcode.primaryBean;

import org.springframework.context.annotation.Primary;
import org.springframework.stereotype.Component;

@Component
@Primary
public class Police implements Profession{
}
package com.datang.springcode.primaryBean;

import org.springframework.beans.factory.annotation.Autowired;
import org.springframework.stereotype.Component;

@Component
public class Human {
    @Autowired
    private Profession profession;
}
package com.datang.springcode.primaryBean;

import org.springframework.context.annotation.ComponentScan;

@ComponentScan
public class PrimaryBeanConfig {
}
2.7 @Resource和@Autowired的区别
@Resource注解同样可以注入属性。
package com.datang.springcode.resourceInject;

import org.springframework.stereotype.Component;

@Component
public class Base {
}
package com.datang.springcode.resourceInject;

import org.springframework.stereotype.Component;

import javax.annotation.Resource;

@Component
public class Laugh {
    @Resource
    private Base base;
}
package com.datang.springcode.resourceInject;

import org.springframework.context.annotation.ComponentScan;

@ComponentScan
public class ResourceInjectConfig {
}
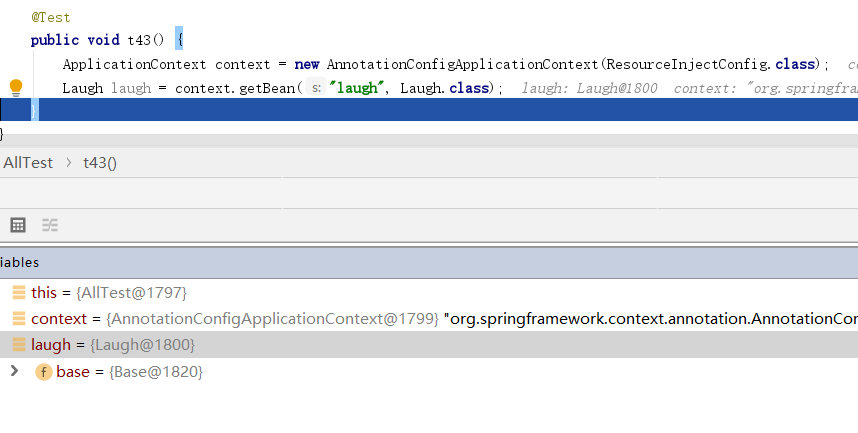
下面我们修改Base类的name。并且给@Resource增加name属性
package com.datang.springcode.resourceInject;

import org.springframework.stereotype.Component;

@Component(value = "base1")
public class Base {
}
package com.datang.springcode.resourceInject;

import org.springframework.stereotype.Component;

import javax.annotation.Resource;

@Component
public class Laugh {
    @Resource(name = "base")
    private Base base;
}
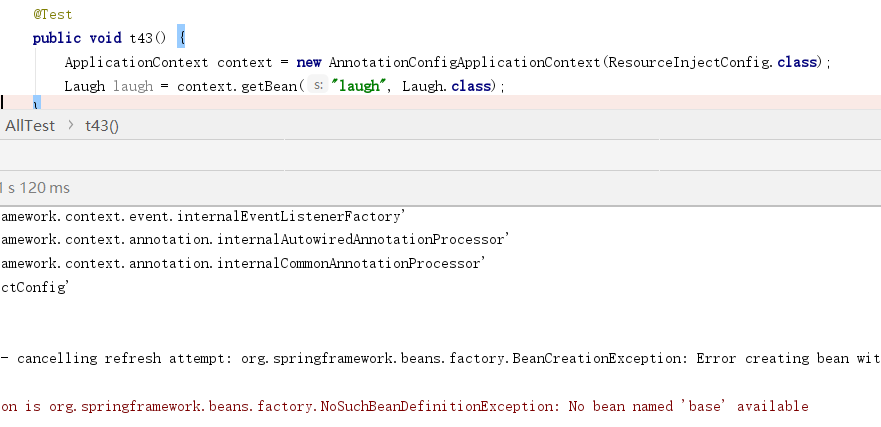
@Autowired章节我们说到@Autowired是先byType后byName。而@Resource注解则可以自己指定是byName还是byType。通过name和type属性。一下对@Resource注解的装配顺序
1. 如果同时指定了name和type,则从Spring上下文中找到唯一匹配的bean进行装配,找不到则抛出异常
2. 如果指定了name,则从上下文中查找名称(id)匹配的bean进行装配,找不到则抛出异常
3. 如果指定了type,则从上下文中找到类型匹配的唯一bean进行装配,找不到或者找到多个,都会抛出异常
4. 如果既没有指定name,又没有指定type,则自动按照byName方式进行装配;如果没有匹配,则回退为一个原始类型进行匹配,如果匹配则自动装配;
2.8 @PropertySource和@Value注入外部属性
db.driver=com.mysql.jdbc.Driver
db.url=localhost:3306/pet
db.username=root
db.password=123
package com.datang.springcode.propertySourceAndValue;

import org.springframework.beans.factory.annotation.Autowired;
import org.springframework.beans.factory.annotation.Value;
import org.springframework.stereotype.Component;

@Component
public class Lamp {

    public String driver;

    @Value("${db.url}")
    public String url;

    public Lamp(@Value("${db.driver}") String driver) {
        this.driver = driver;
    }
}
package com.datang.springcode.propertySourceAndValue;

import org.springframework.context.annotation.ComponentScan;
import org.springframework.context.annotation.PropertySource;

@ComponentScan
@PropertySource("classpath:db.properties")
public class propertySourceAndValueConfig {
}
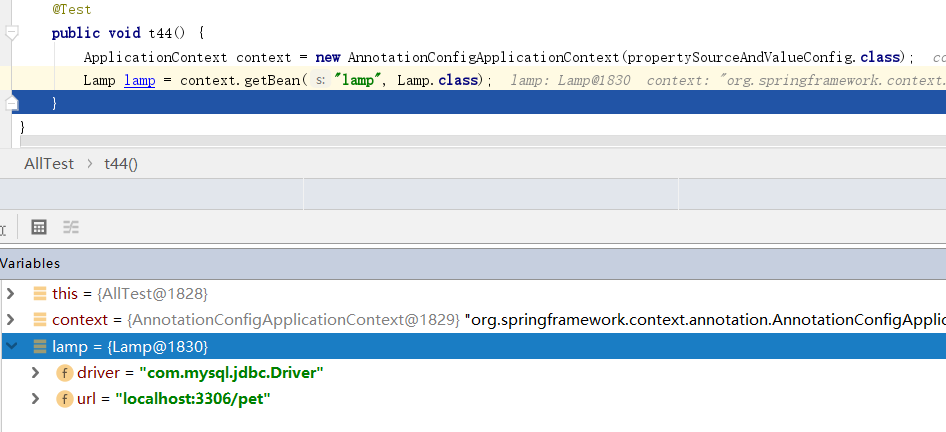
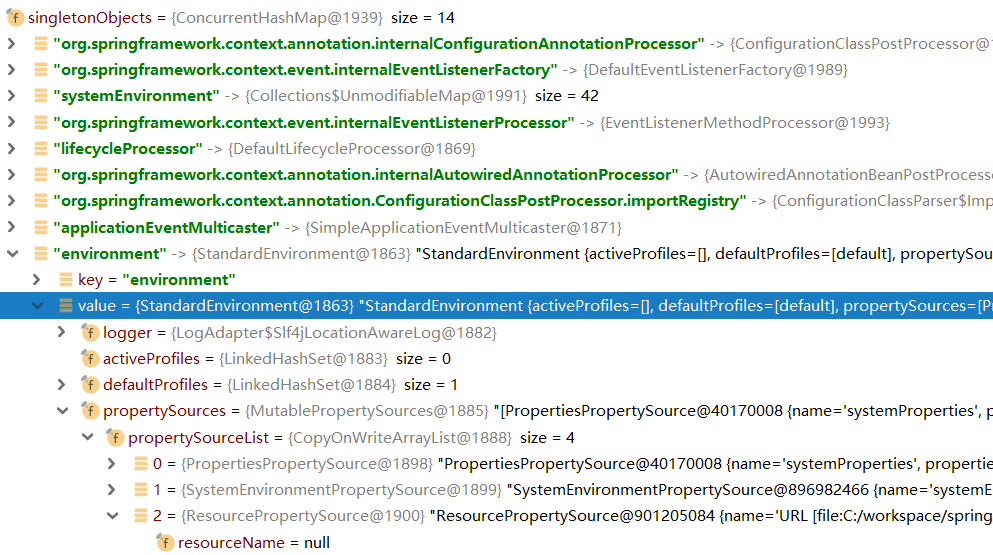
通过@PropertySource注解读取配置文件,然后通过@Value注入属性到bean。另外我们还可以配置本地路径@PropertySource(value = {"classpath:db.properties","file:C:\\workspace\\springcode-core-ioc\\src\\main\\resources\\db2.properties"})。classpath从类路径下寻找文件,file从服务器文件系统寻找文件。此外关于@PropertySource读取文件,spring将读取到的文件也封装成了对象。
context->environment->propertySource->propertySourceList
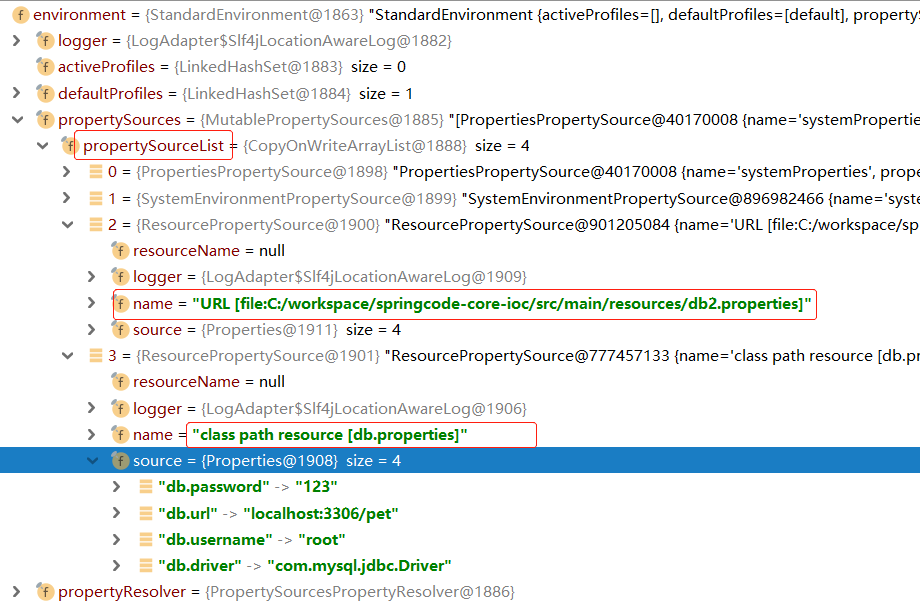
并且封装成了bean context->beanFactory->singletonObjects->environment->value->propertySource-propertySourceList
2.9 注入集合,收集bean
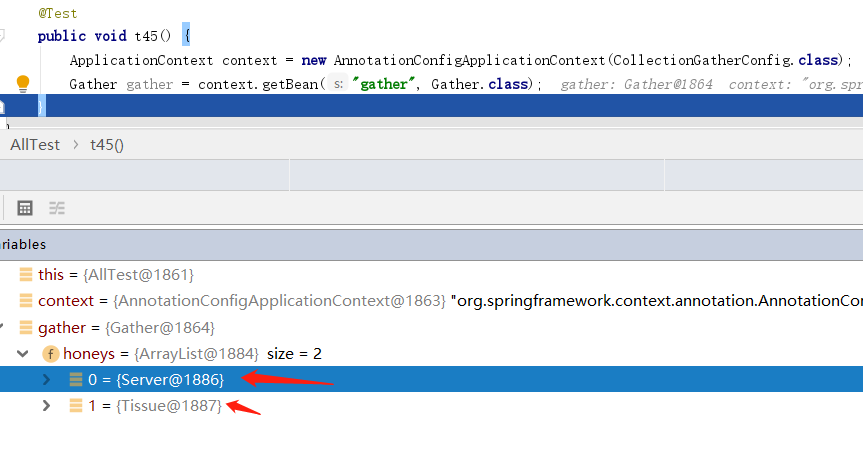
@Autowired注入集合类型,并不是像xml那样寻找集合的引用,而是收集context中所有相同类型的bean。
package com.datang.springcode.collectionGather;
public interface Honey {
}
package com.datang.springcode.collectionGather;

import org.springframework.stereotype.Component;

@Component
public class Tissue implements Honey{
}
package com.datang.springcode.collectionGather;

import org.springframework.stereotype.Component;

@Component
public class Server implements Honey{
}
package com.datang.springcode.collectionGather;

import org.springframework.beans.factory.annotation.Autowired;
import org.springframework.stereotype.Component;

import java.util.List;

@Component
public class Gather {

    @Autowired
    public List<Honey> honeys;
}
package com.datang.springcode.collectionGather;

import org.springframework.context.annotation.ComponentScan;
@ComponentScan
public class CollectionGatherConfig {
}
特性和功能
1 bean的继承
在java中,子类会继承父类的属性。那在spring中子bean是否也存在这种特性呢?先来看xml配置bean的方式。
package com.datang.springcode.beanextends;

public class Creation {
    public Object object;

    public void setObject(Object object) {
        this.object = object;
    }
}
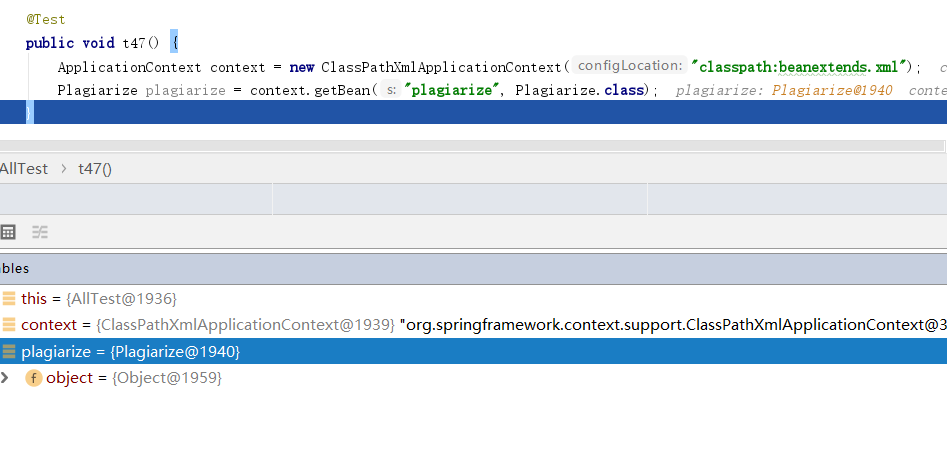
package com.datang.springcode.beanextends;


public class Plagiarize extends Creation{
}
<?xml version="1.0" encoding="UTF-8"?>
<beans xmlns="http://www.springframework.org/schema/beans"
       xmlns:xsi="http://www.w3.org/2001/XMLSchema-instance"
       xsi:schemaLocation="http://www.springframework.org/schema/beans http://www.springframework.org/schema/beans/spring-beans.xsd">
    <bean class="com.datang.springcode.beanextends.Creation" id="creation">
        <property name="object">
            <bean class="java.lang.Object"></bean>
        </property>
    </bean>
    <bean class="com.datang.springcode.beanextends.Plagiarize" id="plagiarize"></bean>
</beans>
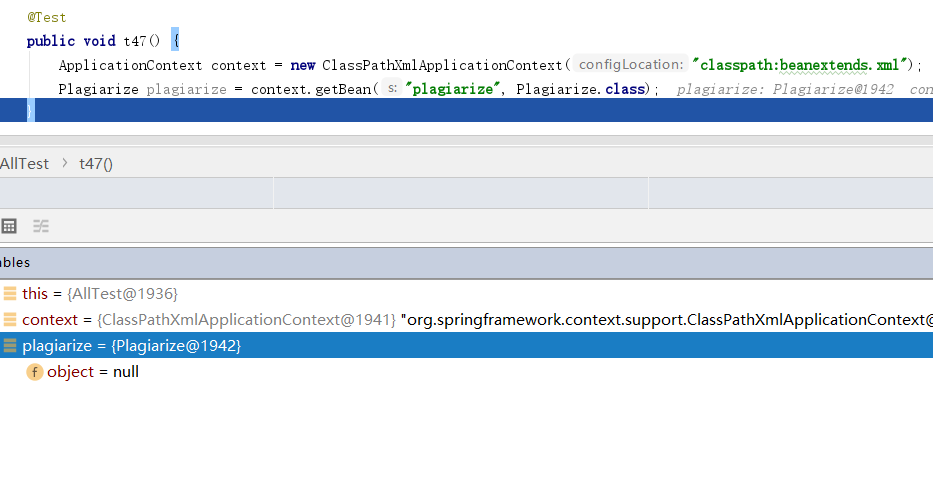
在父pojo中设置了属性object。子pojo并没有继承到。如果需要继承则需要给子bean加上parent属性。
<?xml version="1.0" encoding="UTF-8"?>
<beans xmlns="http://www.springframework.org/schema/beans"
       xmlns:xsi="http://www.w3.org/2001/XMLSchema-instance"
       xsi:schemaLocation="http://www.springframework.org/schema/beans http://www.springframework.org/schema/beans/spring-beans.xsd">
    <bean class="com.datang.springcode.beanextends.Creation" id="creation">
        <property name="object">
            <bean class="java.lang.Object"></bean>
        </property>
    </bean>
    <bean class="com.datang.springcode.beanextends.Plagiarize" id="plagiarize" parent="creation"></bean>
</beans>
使用注解方式创建bean则比较有意思。
package com.datang.springcode.beanextends;

import org.springframework.stereotype.Component;

@Component
public class Cities {
}
package com.datang.springcode.beanextends;

import org.springframework.beans.factory.annotation.Autowired;
public class City {
    @Autowired
    public Cities cities;
}
package com.datang.springcode.beanextends;

import org.springframework.stereotype.Component;

@Component
public class Capital extends City{
}
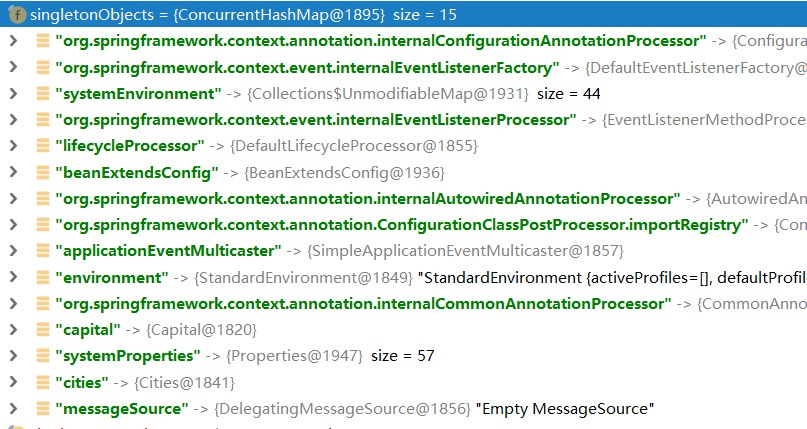
package com.datang.springcode.beanextends;

import org.springframework.context.annotation.ComponentScan;

@ComponentScan
public class BeanExtendsConfig {
}
上边代码片段,子bean的父类并没有增加@Component注解,看结果。
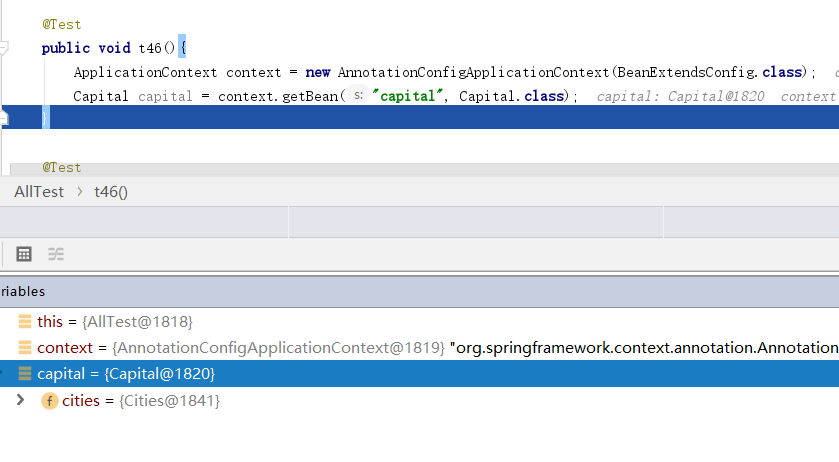
我们发现子bean的属性中有cities。在singletonObjects中也并没有city这个bean,由此可见,子类实际是继承了父类的@Autowried注解。自己把属性注入了。
最后java方式创建bean,则没有继承的概念。
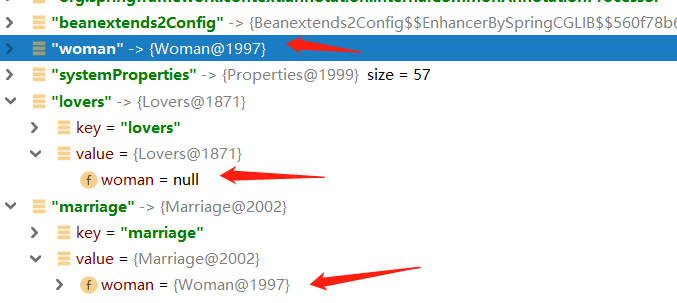
package com.datang.springcode.beanextends2;
public class Woman {
}
package com.datang.springcode.beanextends2;


public class Marriage {

    public Woman woman;

    public void setWoman(Woman woman) {
        this.woman = woman;
    }
}
package com.datang.springcode.beanextends2;
public class Lovers extends Marriage{
}
package com.datang.springcode.beanextends2;

import org.springframework.context.annotation.Bean;
import org.springframework.context.annotation.Configuration;

@Configuration
public class Beanextends2Config {

    @Bean
    public Lovers lovers(){
        return  new Lovers();
    }


    @Bean
    public Woman woman(){
        return new Woman();
    }

    @Bean
    public Marriage marriage(){
        Marriage marriage = new Marriage();
        marriage.setWoman(woman());
        return marriage;
    }
}
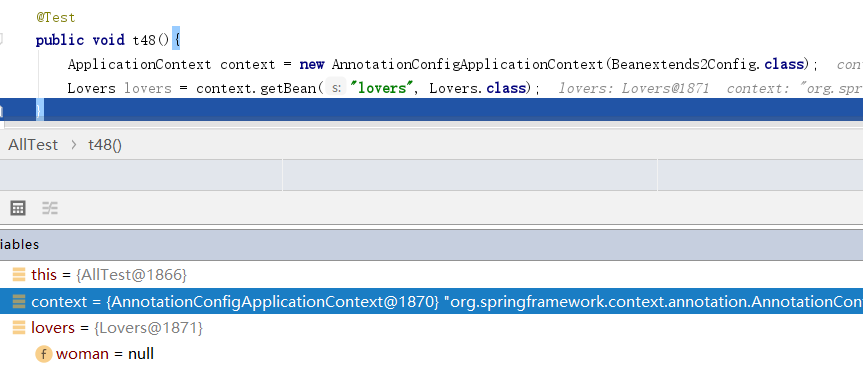
但是在父bean中确存在Woman属性。
2 多个配置间互相拾取
2.1 @Import java配置互相拾取
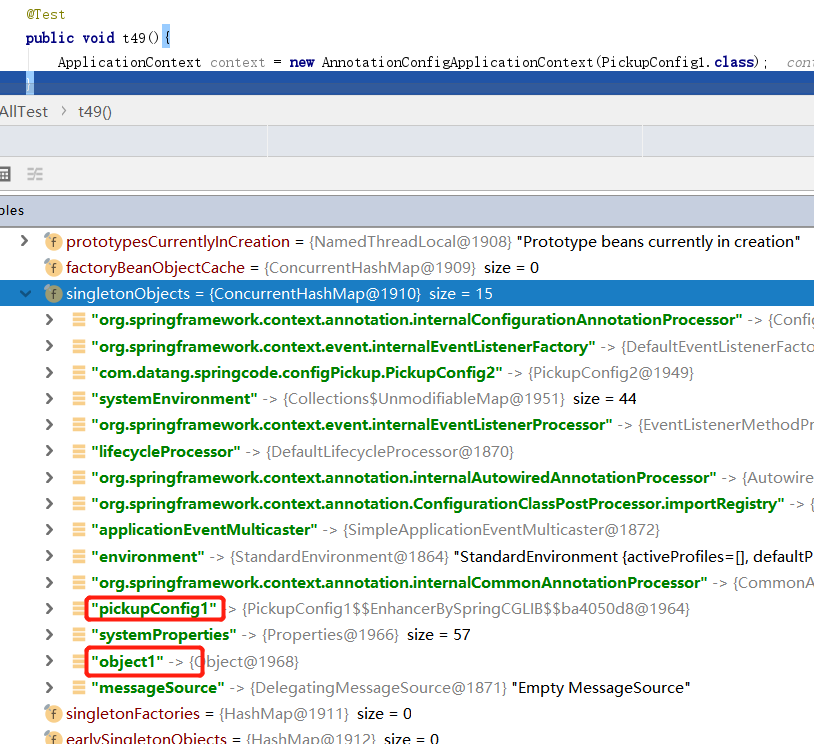
首先@Configuration注解除了能检测@Bean之外,还会把标记注解的class创建成bean,而这个class可能本身没有意义。如果我们又有多个@Bean类,这时使用@Import可以有效的创建多个类中的@Bean。
package com.datang.springcode.configPickup;


import org.springframework.context.annotation.Bean;

public class PickupConfig2 {
    @Bean
    public Object object1() {
        return new Object();
    }
}
package com.datang.springcode.configPickup;

import org.springframework.context.annotation.Configuration;
import org.springframework.context.annotation.Import;

@Configuration
@Import(value = {PickupConfig2.class})
public class PickupConfig1 {
}
2.2 <import> xml文件互相拾取
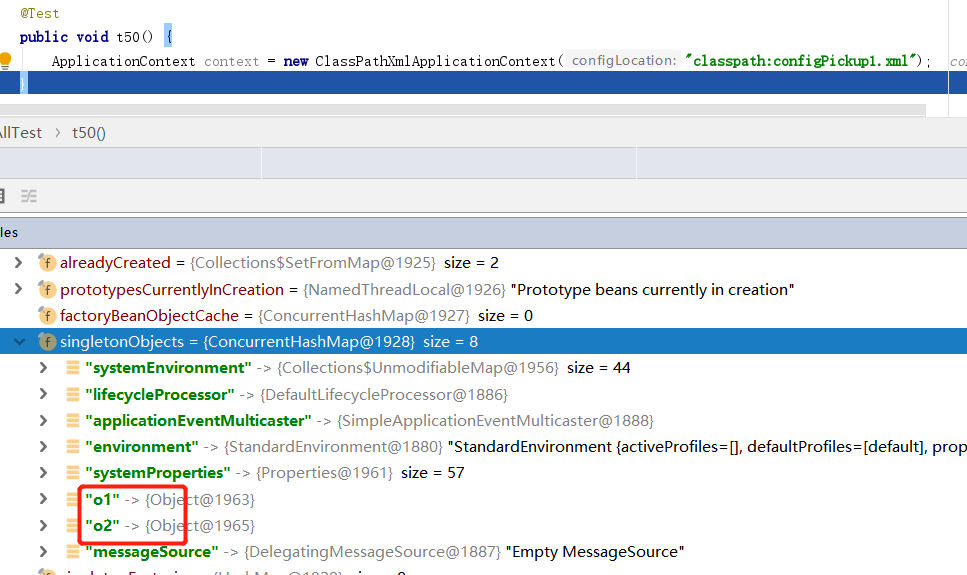
多个xml之间,可以使用import标签导入
<?xml version="1.0" encoding="UTF-8"?>
<beans xmlns="http://www.springframework.org/schema/beans"
       xmlns:xsi="http://www.w3.org/2001/XMLSchema-instance"
       xsi:schemaLocation="http://www.springframework.org/schema/beans http://www.springframework.org/schema/beans/spring-beans.xsd">

    <bean class="java.lang.Object" id="o2"></bean>
</beans>
<?xml version="1.0" encoding="UTF-8"?>
<beans xmlns="http://www.springframework.org/schema/beans"
       xmlns:xsi="http://www.w3.org/2001/XMLSchema-instance"
       xsi:schemaLocation="http://www.springframework.org/schema/beans http://www.springframework.org/schema/beans/spring-beans.xsd">

    <import resource="classpath:configPickup2.xml"/>
    <bean class="java.lang.Object" id="o1"></bean>
</beans>
2.3 @ImportResource java配置拾取xml
@ImportResource注解,用来导入其他的xml配置。
package com.datang.springcode.configPickup;

import org.springframework.context.annotation.Configuration;
import org.springframework.context.annotation.Import;
import org.springframework.context.annotation.ImportResource;

@Configuration
@Import(value = {PickupConfig2.class})
@ImportResource(locations = {"classpath:configPickup1.xml"})
public class PickupConfig1 {
}

2.4 <context:component-scan/> xml注解扫描
<?xml version="1.0" encoding="UTF-8"?>
<beans xmlns="http://www.springframework.org/schema/beans"
       xmlns:xsi="http://www.w3.org/2001/XMLSchema-instance"
       xmlns:context="http://www.springframework.org/schema/context"
       xsi:schemaLocation="http://www.springframework.org/schema/beans http://www.springframework.org/schema/beans/spring-beans.xsd http://www.springframework.org/schema/context https://www.springframework.org/schema/context/spring-context.xsd">

    <context:component-scan base-package="com.datang.springcode.configPickup"/>
    <import resource="classpath:configPickup2.xml"/>
    <bean class="java.lang.Object" id="o1"></bean>
</beans>

3 spring5.0生成候选组件的索引
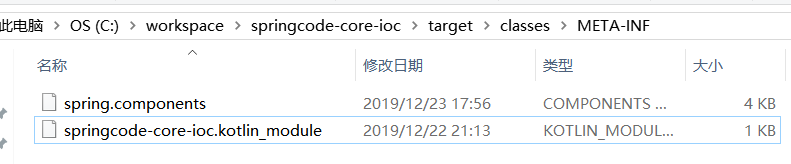
在正式开发中我们会把编译好的war包放到Tomcat中,然后启动Tomcat就运行项目,此时@ComponentScan就开始工作。但是如果我们这个项目有几千个Class那么扫描操作是很耗时的。Srping5引入了生成索引的方法。在编译期间对扫描到的类创建索引,在Tomcat启动时,就会直接从索引中创建类。加快启动速度。
在pom中增加依赖,成功编译项目后再classes\META-INF会产生一个spring.components。当项目启动时,则会根据这个索引去创建bean.
   <dependency>
            <groupId>org.springframework</groupId>
            <artifactId>spring-context-indexer</artifactId>
            <version>5.2.1.RELEASE</version>
            <optional>true</optional>
        </dependency>
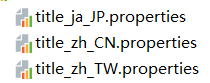
4 国际化
content=歓迎いたします{0}来到{1},现在的语言环境是:{2}
content=欢迎{0}来到{1},现在的语言环境是:{2}
content=歡迎{0}来到{1},现在的语言环境是:{2}
package com.datang.springcode.internationalization;

import org.springframework.beans.factory.annotation.Autowired;
import org.springframework.context.support.ResourceBundleMessageSource;
import org.springframework.stereotype.Component;

import java.util.Locale;

@Component
public class Operation {
    @Autowired
    private ResourceBundleMessageSource messageSource;

    public void getInternationalization() {
        String message1 = messageSource.getMessage("content", new Object[]{"赵六", "博客园", "简体中文"}, "欢迎用户来到网站", Locale.SIMPLIFIED_CHINESE);
        String message2 = messageSource.getMessage("content", new Object[]{"李四", "博客园", "繁体中文"}, "欢迎用户来到网站", Locale.TRADITIONAL_CHINESE);
        String message3 = messageSource.getMessage("content", new Object[]{"张三", "博客园", "日语"}, "欢迎用户来到网站", Locale.JAPAN);

        System.out.println(message1);
        System.out.println(message2);
        System.out.println(message3);
    }
}
package com.datang.springcode.internationalization;

import org.springframework.context.annotation.Bean;
import org.springframework.context.annotation.ComponentScan;
import org.springframework.context.support.ResourceBundleMessageSource;

@ComponentScan
public class InternationalizationConfig {
    @Bean
    public ResourceBundleMessageSource setMessageSource() {
        ResourceBundleMessageSource resourceBundleMessageSource = new ResourceBundleMessageSource();
        resourceBundleMessageSource.setBasenames("title");
        return resourceBundleMessageSource;
    }


}
首先我们需要创建spring ResourceBundleMessageSource内置对象,然后设置要加载的文件前缀。这里需要注意的是,除了前缀之外,后边的都是固定格式。语言类型必须是java.util.Locale类中的静态变量。其次,{0}这样的标记是替换字符串。在getMessage()方法参数对应的含义是 寻找的key,替换字符串,没有找到key设置的默认值,语言环境(这个语言环境只有和文件名设置的语言类型一样,才会找到)


5 @Profile环境抽象
package com.datang.springcode.environmentAbstract;

import org.springframework.context.annotation.Bean;
import org.springframework.context.annotation.Profile;

public class EnvironmentAbstractConfig {

    @Bean
    @Profile(value = {"prod"})
    public Object obj1(){
        return new Object();
    }

    @Bean
    @Profile(value = {"test"})
    public Object obj2(){
        return new Object();
    }
}

spring 提供的环境抽象,十分强大,供我们在不同的环境中注入不同的类,引用不同的配置信息。最典型的设置配置环境的方法是springboot中在properties文件中使用 spring.profiles.active= xxx
6 事件监听与订阅
在开发时,我们会有这样的需求,当一个对象改变,随即我们要改变其他的对象的状态。最常用的设计模式是观察者模式,详情请看 https://www.cnblogs.com/zumengjie/p/12054663.html spring对于这一套监听,订阅也封装了一套接口。来看官方文档的demo
package com.datang.springcode.incidentMonitor;

import org.springframework.context.ApplicationEvent;
//继承ApplicationEvent使其类成为一个事件类
public class BlackListEvent extends ApplicationEvent {
    private final String address;
    private final String content;

    public BlackListEvent(Object source, String address, String content) {
        super(source);
        this.address = address;
        this.content = content;
    }

    public String getAddress() {
        return address;
    }

    public String getContent() {
        return content;
    }
}
package com.datang.springcode.incidentMonitor;
import org.springframework.context.ApplicationListener;

//实现ApplicationListener使其成为监听类,监听的对象就是 BlackListEvent
public class BlackListNotifier  implements ApplicationListener<BlackListEvent> {
    @Override
    public void onApplicationEvent(BlackListEvent event) {
        System.out.println(event.getAddress() + "已被列入黑名单,不能发送邮件订阅者1");
    }
}
package com.datang.springcode.incidentMonitor;

import org.springframework.context.event.EventListener;
import org.springframework.stereotype.Component;

@Component
public class BlackListNotifier2 {

    //使用注解也可以监听事件
    @EventListener(value = {BlackListEvent.class})
    public void t(BlackListEvent event) {
        System.out.println("我是订阅者3,我啥都不干,就是随便监听");
    }
}
package com.datang.springcode.incidentMonitor;

import org.springframework.context.ApplicationEventPublisher;
import org.springframework.context.ApplicationEventPublisherAware;

import java.util.List;

//ApplicationEventPublisherAware实现 使其成为服务类
public class EmailService implements ApplicationEventPublisherAware {
    private List<String> blackList;
    private ApplicationEventPublisher publisher;

    public void setBlackList(List<String> blackList) {
        this.blackList = blackList;
    }

    @Override
    public void setApplicationEventPublisher(ApplicationEventPublisher publisher) {
        this.publisher = publisher;
    }

    // 主要逻辑就在这里,发送邮件之前先做一次判断,判断是否在黑名单内
    public void sendEmail(String address, String content) {
        if (blackList.contains(address)) {
            publisher.publishEvent(new BlackListEvent(this, address, content));
            return;
        }
        // send email...
        System.out.println(address + "邮件已被发送...");
    }
}
package com.datang.springcode.incidentMonitor;

import org.springframework.context.annotation.Bean;
import org.springframework.context.annotation.ComponentScan;
import org.springframework.context.annotation.Configuration;

import java.util.Arrays;

@Configuration
@ComponentScan(value = "com.datang.springcode.incidentMonitor")
public class ListenerConfig {
    @Bean
    public EmailService emailService() {

        EmailService emailService = new EmailService();
        // 在这里添加黑名单集合
        emailService.setBlackList(Arrays.asList("known.spammer@example.org", "known.hacker@example.org", "john.doe@example.org", "blackAddredd@123.com"));

        return emailService;
    }

    @Bean
    public BlackListNotifier blackListNotifier() {
        return new BlackListNotifier();
    }
}
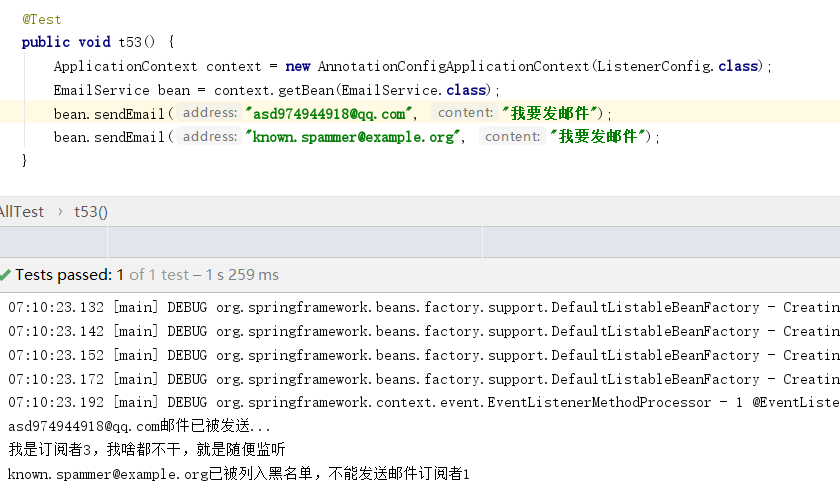
这里讲一下业务逻辑,当我们调用EmailService的sendEmail()方法时会先判断传入的邮件地址是否在黑名单中,黑名单在创建EmailService这个bean时初始化了。如果邮件地址在黑名单中,就new一个BlackListEvent对象,并且传入相关的参数。而BlackListNotifier BlackListNotifier2 两个类都监听的有BlackListEvent所以这时就会执行相应的方法。这里我们需要说下,使用@EventListener注解的方法,可以监听多个事件类。另外这些监听类都是同步执行的,一个执行完毕另一个才会后续执行。多个被@EventListener注释的方法可以用 @Order()指定顺序
7 ApplicationContext的父子关系
在springmvc中我们常常在web.xml中这么配置。
<!-- 加载spring容器 -->
<!-- 初始化加载application.xml的各种配置文件 -->
<context-param>
    <param-name>contextConfigLocation</param-name>
    <param-value>classpath:spring/application-*.xml</param-value>
</context-param>
<listener>
    <listener-class>org.springframework.web.context.ContextLoaderListener</listener-class>
</listener>
<!-- 配置springmvc前端控制器 -->
<servlet>
    <servlet-name>taotao-manager</servlet-name>
    <servlet-class>org.springframework.web.servlet.DispatcherServlet</servlet-class>
    <!-- contextConfigLocation不是必须的, 如果不配置contextConfigLocation
,     springmvc的配置文件默认在:WEB-INF/servlet的name+"-servlet.xml" -->
    <init-param>
    <param-name>contextConfigLocation</param-name>
        <param-value>classpath:spring/springmvc.xml</param-value>
    </init-param>
<load-on-startup>1</load-on-startup>
</servlet>
首先配置的是Spring容器的初始化加载的application文件,然后是SpringMVC的前端控制器(DispatchServlet),当配置完DispatchServlet后会在Spring容器中创建一个新的容器。其实这是两个容器,Spring作为父容器,SpringMVC作为子容器。对于传统的spring mvc来说,ServletDispatcher对应的容器为子容器,而web.xml中通过ContextLoaderListner的contextConfigLocation属性配置的为父容器。有了这个概念我们来尝试下做一个子父容器
package com.datang.springcode.parentContext;
public class ParentBean {
    private String name = "我是父bean";

    public String getName() {
        return name;
    }

    public void setName(String name) {
        this.name = name;
    }
}
package com.datang.springcode.parentContext;
public class ChildBean {
    private String name = "我是子bean";

    private ParentBean pBean;

    public String getName() {
        return name;
    }

    public void setName(String name) {
        this.name = name;
    }

    public ParentBean getpBean() {
        return pBean;
    }

    public void setpBean(ParentBean pBean) {
        this.pBean = pBean;
    }
}
<?xml version="1.0" encoding="UTF-8"?>
<beans xmlns="http://www.springframework.org/schema/beans"
       xmlns:xsi="http://www.w3.org/2001/XMLSchema-instance"
       xsi:schemaLocation="http://www.springframework.org/schema/beans http://www.springframework.org/schema/beans/spring-beans.xsd">

    <bean id="parentBean" class="com.datang.springcode.parentContext.ParentBean"></bean>


</beans>
<?xml version="1.0" encoding="UTF-8"?>
<beans xmlns="http://www.springframework.org/schema/beans"
       xmlns:xsi="http://www.w3.org/2001/XMLSchema-instance"
       xsi:schemaLocation="http://www.springframework.org/schema/beans http://www.springframework.org/schema/beans/spring-beans.xsd">

    <bean id="childBean" class="com.datang.springcode.parentContext.ChildBean">
        <property name="pBean" ref="parentBean"/>
    </bean>

</beans>
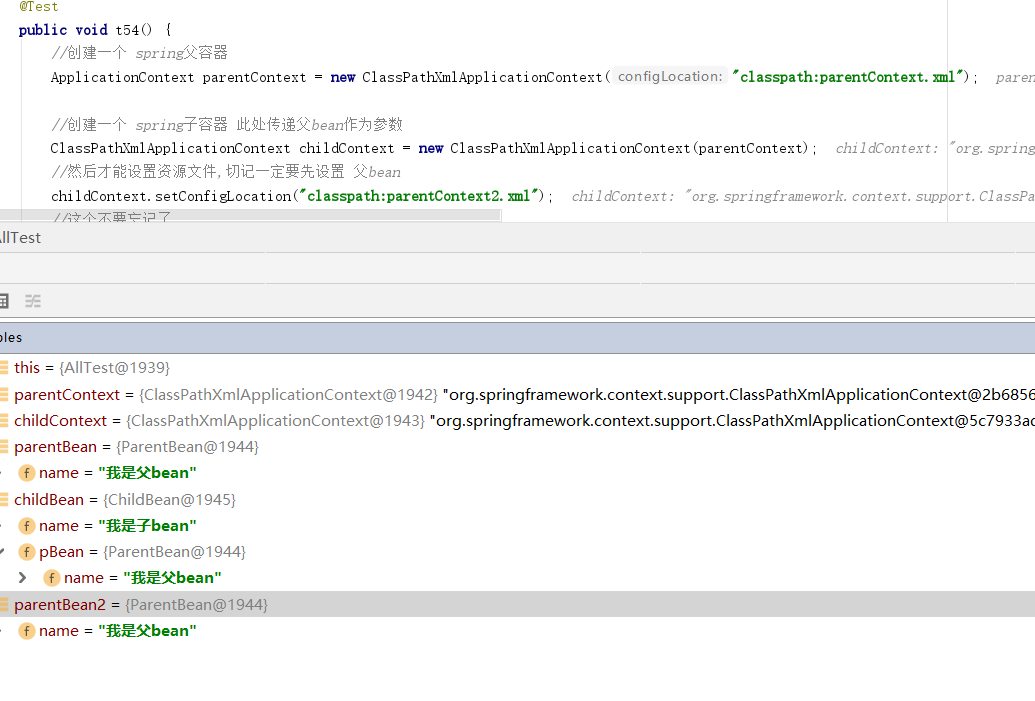
@Test
    public void t54() {
        //创建一个 spring父容器
        ApplicationContext parentContext = new ClassPathXmlApplicationContext("classpath:parentContext.xml");

        //创建一个 spring子容器 此处传递父bean作为参数
        ClassPathXmlApplicationContext childContext = new ClassPathXmlApplicationContext(parentContext);
        //然后才能设置资源文件,切记一定要先设置 父bean
        childContext.setConfigLocation("classpath:parentContext2.xml");
        //这个不要忘记了
        childContext.refresh();

        //父容器获取自己的bean
        ParentBean parentBean = parentContext.getBean("parentBean", ParentBean.class);

        //子容器获取自己的bean
        ChildBean childBean = childContext.getBean("childBean", ChildBean.class);

        //子容器获取父容器的bean,可以获取到
        ParentBean parentBean2 = childContext.getBean("parentBean", ParentBean.class);

        //父容器获取子容器的bean 此时是获取不
        // ChildBean childBean3 = parentContext.getBean("childBean", ChildBean.class);
    }