
Elasticsearch 如何实现索引的伪·命名空间
环境说明
-
jdk8
-
elasticsearch7.4.0
-
springboot 2.3.12.RELEASE
-
spring-data-elasticsearch 4.0.9.RELEASE
注:本文不做特殊说明的情况下,client1与client2使用相同配置
应用场景
在公司内部资源紧张的情况下,多个项目使用同一个elasticsearch并且数据互不干扰,实现资源的最大化利用,节约成本
集成Elasticsearch
pom(client1与client2相同)
<parent> <groupId>org.springframework.boot</groupId> <artifactId>spring-boot-starter-parent</artifactId> <version>2.3.12.RELEASE</version> <relativePath/> <!-- lookup parent from repository --> </parent> <properties> <java.version>1.8</java.version> </properties> <dependencies> <dependency> <groupId>org.springframework.boot</groupId> <artifactId>spring-boot-starter-web</artifactId> </dependency> <dependency> <groupId>org.springframework.boot</groupId> <artifactId>spring-boot-starter-test</artifactId> <scope>test</scope> </dependency> <dependency> <groupId>org.springframework.data</groupId> <artifactId>spring-data-elasticsearch</artifactId> <version>4.0.9.RELEASE</version> </dependency> </dependencies>
config(client1与client2相同)
@Configuration
public class RestClientConfig extends AbstractElasticsearchConfiguration {
@Bean
@Override
public RestHighLevelClient elasticsearchClient() {
final ClientConfiguration clientConfiguration = ClientConfiguration.builder()
.connectedTo("localhost:9200")
.build();
return RestClients.create(clientConfiguration).rest();
}
}
yml
client1
spring.data.elasticsearch.client.namespace=client1
server.port=8081
client2
spring.data.elasticsearch.client.namespace=client2
server.port=8082
索引名定义(client1与client2相同)
-
定义变量获取
@Configuration public class EsConst { @Value("${spring.data.elasticsearch.client.namespace}") private String elasticsearchNamespace; @Bean public String getElasticsearchNamespace(){ return elasticsearchNamespace; } } -
新建User 实体类,指定索引名称为
namespace.user@Document(indexName = "#{@getElasticsearchNamespace}.user") public class User { @Field(type = FieldType.Text) private String id; @Field(type = FieldType.Text) private String name; @Field(type = FieldType.Text) private String phone; @Field(type = FieldType.Text) private String namespace; // 省略get/set ...... }
增加测试方法findAll与save
client1
-
Dao
@Repository public interface UserDao extends CrudRepository<User,String> { } -
Service
@Service public class TestService { @Autowired private UserDao userDao; public void findAll(){ Iterable<User> all = userDao.findAll(); Iterator<User> iterator = userDao.findAll().iterator(); User next1 = iterator.next(); System.out.println(next1.toString()); } public void save(){ User user = new User(); user.setId("1"); user.setName("client1"); user.setNamespace("elasticsearch:client1"); user.setPhone("111"); User save = userDao.save(user); System.out.println(save.toString()); } } -
Test
@RunWith(SpringRunner.class) @SpringBootTest public class ClientApplicationTests { @Autowired private TestService testService; @Test public void findAll(){ testService.findAll(); } @Test public void save(){ testService.save(); } }
client2
-
Dao
@Repository public interface UserDao extends CrudRepository<User,String> { } -
Service
@Service public class TestService { @Autowired private UserDao userDao; public void findAll(){ Iterable<User> all = userDao.findAll(); Iterator<User> iterator = userDao.findAll().iterator(); User next1 = iterator.next(); System.out.println(next1.toString()); } public void save(){ User user = new User(); user.setId("2"); user.setName("client2"); user.setNamespace("elasticsearch:client2"); user.setPhone("222"); User save = userDao.save(user); System.out.println(save.toString()); } } -
Test
@RunWith(SpringRunner.class)
@SpringBootTest
public class DemoApplicationTests {
  @Autowired
  private TestService testService;
  @Test
  public void findAll(){
    testService.findAll();
  }
  @Test
  public void save(){
    testService.save();
  }
}
测试验证
-
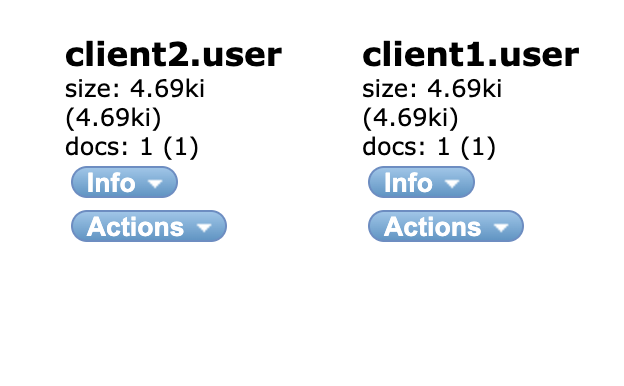
预期结果
-
生成client1.user与client2.user索引
-
访问8081返回client1用户信息,访问8082返回client2用户信息
-
-
实际结果
![]()


总结
我们通过增加一个配置类来获取自定义的namespace,然后在类指定索引名时通过获取变量的形式去读取,这样生成的索引就会带一个前缀,也就是我们想要的namespace·,也就实现了我们最初的目标,复用同一个elasticsearch,达到节省服务器资源的目的

 浙公网安备 33010602011771号