

Kubernetes Multi-Master Node Cluster
https://medium.com/@lubomir-tobek/kubernetes-multi-master-node-cluster-f2081e504983
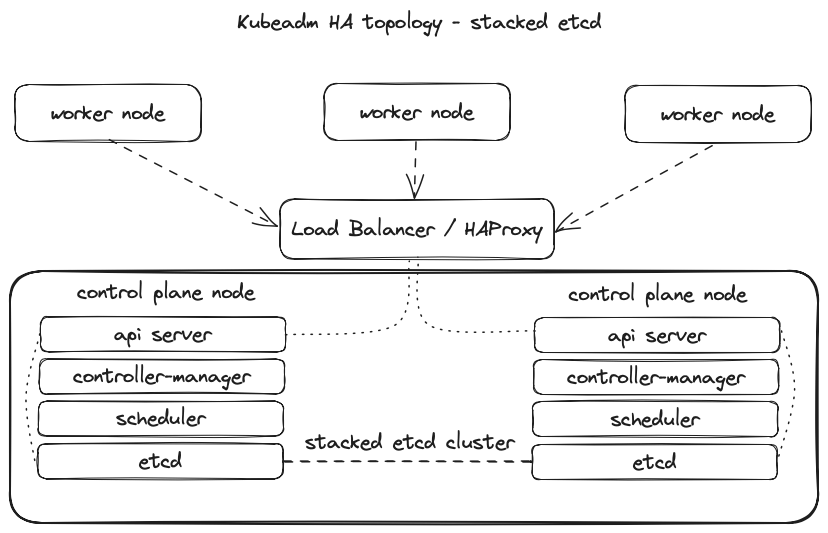
Creating and operating a highly available Kubernetes cluster requires multiple Kubernetes control plane nodes and “Master Nodes”. To achieve this, each “Master Node” must be able to communicate with every other Master and be addressable by a single IP address.
Kubernetes Master Node Components
Kube-apiserver:
- Provides an API that serves as the front end of a Kubernetes control plane.
- It handles external and internal requests that determine whether a request is valid and then processes it.
- The API can be accessed via the kubectl command-line interface or other tools like kubeadm, and via REST calls.
Kube-scheduler:
- This component schedules pods on specific nodes as per automated workflows and user-defined conditions.
Kube-controller-manager:
- The Kubernetes controller manager is a control loop that monitors and regulates the state of a Kubernetes cluster.
- It receives information about the current state of the cluster and objects within it and sends instructions to move the cluster towards the cluster operator’s desired state.
etcd:
- A key-value database that contains data about your cluster state and configuration.
- Etcd is fault-tolerant and distributed.
Kubernetes Worker Node Components
Kubelet:
- Each node contains a kubelet, which is a small application that can communicate with the Kubernetes control plane.
- The kubelet ensures that containers specified in pod configuration run on a specific node, and manage their lifecycle.
- It executes the actions commanded by your control plane.
Kube-proxy:
- All compute nodes contain kube-proxy, a network proxy that facilitates Kubernetes networking services.
- It handles all network communications outside and inside the cluster, and forwards traffic or replies on the packet filtering layer of the operating system.
Pods:
- A pod serves as a single application instance and is considered the smallest unit in the object model of Kubernetes.
Bastion Host:
- The computer generally hosts a single application or process, for example, a proxy server or load balancer, and all other services are removed or limited to reduce the threat to the computer.
Today, we will look at how to easily create an HA Kubernetes cluster with two master nodes that hold the control plane role.
I will use the HAProxy machine to manage the Kubernetes cluster and generate all the necessary certificates. Still, you can also use a dedicated bastion host as the client machine.
I will use a minimalistic configuration for a simple scenario and limited local resources.
I used three virtual machines with Ubuntu Server 22.04.3 with OpenSSH.
Each mini VM contained 2vCPUs, 4GB RAM, 20GB HDD, vNIC vmxnet3 Bridge running on VMware Fusion.
I used these servers:
* k8s-haproxy on IP: 192.168.1.116
* k8s-master-node-01 on IP: 192.168.1.112
* k8s-master-node-02 on IP: 192.168.1.123
In this blog post, I have already left out the creation of worker nodes as separate machines; in the end, I will mention the possibility of connecting worker nodes.
Let’s see together how to do it.
I installed client tools on the HAProxy machine and generated certificates; that was my bastion host.
I have already prepared all the necessary tools such as kubeadm, kubectl, docker, containerd, and others.
I started setting up client tools on the HAProxy machine.
Installing cfssl
CFSSL is an SSL tool by Cloudflare that lets us create our Certs and CAs.
Download the binaries
k8s-user@k8s-haproxy:~$ wget https://pkg.cfssl.org/R1.2/cfssl_linux-amd64
k8s-user@k8s-haproxy:~$ wget https://pkg.cfssl.org/R1.2/cfssljson_linux-amd64
Add the execution permission to the binaries
k8s-user@k8s-haproxy:~$ chmod +x cfssl*
Move the binaries to /usr/local/bin
k8s-user@k8s-haproxy:~$ sudo mv cfssl_linux-amd64 /usr/local/bin/cfssl
k8s-user@k8s-haproxy:~$ sudo mv cfssljson_linux-amd64 /usr/local/bin/cfssljson
Verify the installation
k8s-user@k8s-haproxy:~$ cfssl version
Installing kubectl
Get the binary
k8s-user@k8s-haproxy:~$ curl -LO https://storage.googleapis.com/kubernetes-release/release/v1.19.0/bin/linux/amd64/kubectl
Add the execution permission to the binary
k8s-user@k8s-haproxy:~$ chmod +x kubectl
Move the binary to /usr/local/bin
k8s-user@k8s-haproxy:~$ sudo mv kubectl /usr/local/bin
Installing HAProxy Load Balancer
Since I will be deploying 2 Kubernetes master nodes, I need to deploy a HAProxy Load Balancer in front of them to distribute the traffic.
Install HAProxy
k8s-user@k8s-haproxy:~$ sudo apt-get install -y haproxy
Configure HAProxy
k8s-user@k8s-haproxy:~$ sudo nano /etc/haproxy/haproxy.cfg
#Enter the following config: to /etc/haproxy/haproxy.cfg

global
...
default
...
frontend kubernetes
bind 192.168.1.116:6443
option tcplog
mode tcp
default_backend kubernetes-master-nodes

backend kubernetes-master-nodes
mode tcp
balance roundrobin
option tcp-check
server k8s-master-node-01 192.168.1.112:6443 check fall 3 rise 2
server k8s-master-node-02 192.168.1.123:6443 check fall 3 rise 2
Restart HAProxy
k8s-user@k8s-haproxy:~$ sudo systemctl restart haproxy
Generating the TLS certificates
Creating a Certificate Authority
Create the certificate authority configuration file
k8s-user@k8s-haproxy:~$ nano ca-config.json
{
  "signing": {
    "default": {
      "expiry": "8760h"
    },
    "profiles": {
      "kubernetes": {
        "usages": ["signing", "key encipherment", "server auth", "client auth"],
        "expiry": "8760h"
      }
    }
  }
}
Create the certificate authority signing request configuration file
k8s-user@k8s-haproxy:~$ nano ca-csr.json
{
  "CN": "Kubernetes",
  "key": {
    "algo": "rsa",
    "size": 2048
  },
  "names": [
  {
    "C": "SK",
    "L": "Bratislava",
    "O": "XYZ",
    "OU": "IT",
    "ST": "Slovakia"
  }
 ]
}
Generate the certificate authority certificate and private key
k8s-user@k8s-haproxy:~$ cfssl gencert -initca ca-csr.json | cfssljson -bare ca
Verify that the ca-key.pem and the ca.pem were generated
k8s-user@k8s-haproxy:~$ ls -la
Creating the certificate for the Etcd cluster
Create the certificate signing request configuration file
k8s-user@k8s-haproxy:~$ nano kubernetes-csr.json


{
  "CN": "Kubernetes",
  "key": {
    "algo": "rsa",
    "size": 2048
  },
  "names": [
  {
    "C": "SK",
    "L": "Bratislava",
    "O": "XYZ",
    "OU": "IT",
    "ST": "Slovakia"
  }
 ]
}
Generate the certificate and private key
k8s-user@k8s-haproxy:~$ cfssl gencert \
-ca=ca.pem \
-ca-key=ca-key.pem \
-config=ca-config.json \
-hostname=192.168.1.116,192.168.1.112,192.168.1.123,127.0.0.1,kubernetes.default \
-profile=kubernetes kubernetes-csr.json | \
cfssljson -bare kubernetes
Verify that the kubernetes-key.pem and the kubernetes.pem file were generated
k8s-user@k8s-haproxy:~$ ls -la
Copy the certificate to each node
scp ca.pem kubernetes.pem kubernetes-key.pem k8s-user@192.168.1.112:~
scp ca.pem kubernetes.pem kubernetes-key.pem k8s-user@192.168.1.123:~
Preparing the nodes for kubeadm
Initial Setup for all master and node machines
Copy the commands below and paste them into a setup.sh file and then execute it with . setup.sh.
k8s-user@k8s-master-node-01:~$ sudo nano setup.sh
k8s-user@k8s-master-node-02:~$ sudo nano setup.sh

k8s-user@k8s-master-node-01:~$ . setup.sh
k8s-user@k8s-master-node-02:~$ . setup.sh
sudo apt-get remove docker docker-engine docker.io containerd runc

sudo apt-get install -y \
    apt-transport-https \
    ca-certificates \
    curl \
    gnupg-agent \
    software-properties-common

curl -fsSL https://download.docker.com/linux/ubuntu/gpg | sudo apt-key add -

sudo add-apt-repository \
   "deb [arch=amd64] https://download.docker.com/linux/ubuntu \
   $(lsb_release -cs) \
   stable"

sudo apt-get install -y docker-ce docker-ce-cli containerd.io

sudo usermod -aG docker k8s-user

curl -s https://packages.cloud.google.com/apt/doc/apt-key.gpg | sudo apt-key add -
cat <<EOF | sudo tee /etc/apt/sources.list.d/kubernetes.list
deb https://apt.kubernetes.io/ kubernetes-xenial main
EOF
sudo apt-get update
sudo apt-get install -y kubelet kubeadm kubectl
sudo apt-mark hold kubelet kubeadm kubectl

sudo swapoff -a
Installing and configuring Etcd on all 2 Master Nodes
Download and move etcd files and certs to their respective places
k8s-user@k8s-master-node-01:~$ sudo mkdir /etc/etcd /var/lib/etcd

k8s-user@k8s-master-node-02:~$ sudo mkdir /etc/etcd /var/lib/etcd

k8s-user@k8s-master-node-01:~$ sudo mv ~/ca.pem ~/kubernetes.pem ~/kubernetes-key.pem /etc/etcd

k8s-user@k8s-master-node-02:~$ sudo mv ~/ca.pem ~/kubernetes.pem ~/kubernetes-key.pem /etc/etcd

k8s-user@k8s-master-node-01:~$ wget https://github.com/etcd-io/etcd/releases/download/v3.4.13/etcd-v3.4.13-linux-amd64.tar.gz

k8s-user@k8s-master-node-02:~$ wget https://github.com/etcd-io/etcd/releases/download/v3.4.13/etcd-v3.4.13-linux-amd64.tar.gz

k8s-user@k8s-master-node-01:~$ tar xvzf etcd-v3.4.13-linux-amd64.tar.gz

k8s-user@k8s-master-node-02:~$ tar xvzf etcd-v3.4.13-linux-amd64.tar.gz

k8s-user@k8s-master-node-01:~$ sudo mv etcd-v3.4.13-linux-amd64/etcd* /usr/local/bin/

k8s-user@k8s-master-node-02:~$ sudo mv etcd-v3.4.13-linux-amd64/etcd* /usr/local/bin/
Create an etcd systemd unit file
k8s-user@k8s-master-node-01:~$ sudo nano /etc/systemd/system/etcd.service
k8s-user@k8s-master-node-02:~$ sudo nano /etc/systemd/system/etcd.service
[Unit]
Description=etcd
Documentation=https://github.com/coreos


[Service]
ExecStart=/usr/local/bin/etcd \
  --name 192.168.1.112 \
  --cert-file=/etc/etcd/kubernetes.pem \
  --key-file=/etc/etcd/kubernetes-key.pem \
  --peer-cert-file=/etc/etcd/kubernetes.pem \
  --peer-key-file=/etc/etcd/kubernetes-key.pem \
  --trusted-ca-file=/etc/etcd/ca.pem \
  --peer-trusted-ca-file=/etc/etcd/ca.pem \
  --peer-client-cert-auth \
  --client-cert-auth \
  --initial-advertise-peer-urls https://192.168.1.112:2380 \
  --listen-peer-urls https://192.168.1.112:2380 \
  --listen-client-urls https://192.168.1.112:2379,http://127.0.0.1:2379 \
  --advertise-client-urls https://192.168.1.112:2379 \
  --initial-cluster-token etcd-cluster-0 \
  --initial-cluster 192.168.1.112=https://192.168.1.112:2380,192.168.1.123=https://192.168.1.123:2380 \
  --initial-cluster-state new \
  --data-dir=/var/lib/etcd
Restart=on-failure
RestartSec=5


[Install]
WantedBy=multi-user.target
Replace the IP address on all fields except the — initial-cluster field to match the machine IP.
Reload the daemon configuration
k8s-user@k8s-master-node-01:~$ sudo systemctl daemon-reload
k8s-user@k8s-master-node-02:~$ sudo systemctl daemon-reload
Enable etcd to start at boot time
k8s-user@k8s-master-node-01:~$ sudo systemctl enable etcd
k8s-user@k8s-master-node-02:~$ sudo systemctl enable etcd
Start etcd
k8s-user@k8s-master-node-01:~$ sudo systemctl start etcd
k8s-user@k8s-master-node-02:~$ sudo systemctl start etcd
Verify that the cluster is up and running
k8s-user@k8s-master-node-01:~$ ETCDCTL_API=3 etcdctl member list

1ec9f10bf28faf68, started, 192.168.1.112, https://192.168.1.112:2380, https://192.168.1.112:2379, false

7a9a899a0680e6b2, started, 192.168.1.123, https://192.168.1.123:2380, https://192.168.1.123:2379, false


k8s-user@k8s-master-node-02:~$ ETCDCTL_API=3 etcdctl member list

1ec9f10bf28faf68, started, 192.168.1.112, https://192.168.1.112:2380, https://192.168.1.112:2379, false

7a9a899a0680e6b2, started, 192.168.1.123, https://192.168.1.123:2380, https://192.168.1.123:2379, false
Initialising the Master Nodes
Initialising the first Master Node
Create the configuration file for kubeadm
k8s-user@k8s-master-node-01:~$ nano config.yaml
apiVersion: kubeadm.k8s.io/v1beta3
kind: ClusterConfiguration
kubernetesVersion: v1.28.0
controlPlaneEndpoint: "192.168.1.116:6443"
etcd:
  external:
    endpoints:
      - https://192.168.1.112:2379
      - https://192.168.1.123:2379
    caFile: /etc/etcd/ca.pem
    certFile: /etc/etcd/kubernetes.pem
    keyFile: /etc/etcd/kubernetes-key.pem
networking:
  podSubnet: 10.30.0.0/24
apiServer:
  certSANs:
    - "192.168.1.116"
  extraArgs:
    apiserver-count: "3"
Add any additional domains or IP Addresses that you would want to connect to the cluster under certSANs.
Initialise the machine as a master node
k8s-user@k8s-master-node-01:~$ sudo kubeadm init --config=config.yaml
Copy the certificates to the second master node
k8s-user@k8s-master-node-01:~$ sudo scp -r /etc/kubernetes/pki k8s-user@192.168.1.123:~
Initialising the second Master Node
Remove the apiserver.crt and apiserver.key
k8s-user@k8s-master-node-02:~$ rm ~/pki/apiserver.*
Move the certificates to the /etc/kubernetes directory
k8s-user@k8s-master-node-02:~$ sudo mv ~/pki /etc/kubernetes/
Create the configuration file for kubeadm
k8s-user@k8s-master-node-02:~$ nano config.yaml
apiVersion: kubeadm.k8s.io/v1beta3
kind: ClusterConfiguration
kubernetesVersion: v1.28.0
controlPlaneEndpoint: "192.168.1.116:6443"
etcd:
  external:
    endpoints:
      - https://192.168.1.112:2379
      - https://192.168.1.123:2379
    caFile: /etc/etcd/ca.pem
    certFile: /etc/etcd/kubernetes.pem
    keyFile: /etc/etcd/kubernetes-key.pem
networking:
  podSubnet: 10.30.0.0/24
apiServer:
  certSANs:
    - "192.168.1.116"
  extraArgs:
    apiserver-count: "3"
Initialise the machine as a master node
k8s-user@k8s-master-node-02:~$ sudo kubeadm init --config=config.yaml
Save the join command printed in the output after the above command (Example)
You can now join any number of control-plane nodes by copying certificate authorities
and service account keys on each node and then running the following as root:

sudo kubeadm join 192.168.1.116:6443 --token aksywy.on2927krgaf9hja1 \
 --discovery-token-ca-cert-hash sha256:d4b9bbd0e92ba973ffc22401cd537298961f5a05ed1c6094336116f3b44a9730 \
 --control-plane

Then you can join any number of worker nodes by running the following on each as root:

sudo kubeadm join 192.168.1.116:6443 --token aksywy.on2927krgaf9hja1 \
 --discovery-token-ca-cert-hash sha256:d4b9bbd0e92ba973ffc22401cd537298961f5a05ed1c6094336116f3b44a9730
Configure kubectl on the client machine
SSH to one of the master node
k8s-user@k8s-haproxy:~$ ssh k8s-user@192.168.1.112
Add permissions to the admin.conf file
k8s-user@k8s-master-node-01:~$ sudo chmod +r /etc/kubernetes/admin.conf
From the client machine, copy the configuration file
k8s-user@k8s-master-node-01:~$ scp k8s-user@192.168.1.112:/etc/kubernetes/admin.conf .
Create and configure the kubectl configuration directory
k8s-user@k8s-haproxy:/etc/kubernetes$ mv admin.conf ~/.kube/config
k8s-user@k8s-haproxy:/etc/kubernetes$ sudo mv admin.conf ~/.kube/config
k8s-user@k8s-haproxy:/etc/kubernetes$ sudo chmod 600 ~/.kube/config
Go back to the SSH session and revert the permissions of the config file
k8s-user@k8s-master-node-01:~$ sudo chmod 600 /etc/kubernetes/admin.conf
Test to see if you can access the Kubernetes API from the client machine
k8s-user@k8s-haproxy:~$ kubectl cluster-info

Kubernetes control plane is running at https://192.168.1.116:6443
CoreDNS is running at https://192.168.1.116:6443/api/v1/namespaces/kube-system/services/kube-dns:dns/proxy

To further debug and diagnose cluster problems, use 'kubectl cluster-info dump'.
k8s-user@k8s-haproxy:~$ kubectl get nodes

NAME                 STATUS     ROLES           AGE   VERSION
k8s-master-node-01   NotReady   control-plane   92m   v1.28.2
k8s-master-node-02   NotReady   control-plane   84m   v1.28.2
k8s-user@k8s-haproxy:~$ kubectl get pods -n kube-system

NAME                                         READY   STATUS    RESTARTS
coredns-5dd5756b68-j7n7x                     0/1     Pending   0
coredns-5dd5756b68-nmfmv                     0/1     Pending   0
kube-apiserver-k8s-master-node-01            1/1     Running   1 (46m ago)
kube-apiserver-k8s-master-node-02            1/1     Running   2 (46m ago)
kube-controller-manager-k8s-master-node-01   1/1     Running   1 (46m ago)
kube-controller-manager-k8s-master-node-02   1/1     Running   2 (46m ago)
kube-proxy-75zgk                             1/1     Running   1 (46m ago)
kube-proxy-m89j9                             1/1     Running   1 (46m ago)
kube-scheduler-k8s-master-node-01            1/1     Running   1 (46m ago)
kube-scheduler-k8s-master-node-02            1/1     Running   1 (46m ago)
Deploying the overlay network
We will be using Project Calico as the overlay network.
Apply the manifest to deploy calico overlay
k8s-user@k8s-master-node-01:~$ curl https://docs.projectcalico.org/manifests/calico.yaml -O
kubectl apply -f calico.yaml
k8s-user@k8s-haproxy:~$ kubectl get nodes

NAME                 STATUS   ROLES           AGE    VERSION
k8s-master-node-01   Ready    control-plane   136m   v1.28.2
k8s-master-node-02   Ready    control-plane   128m   v1.28.2
k8s-user@k8s-master-node-01:~$ kubectl get pod -n kube-system -w

NAME                                         READY   STATUS    RESTARTS
calico-kube-controllers-57758d645c-mhnkj     1/1     Running   0
calico-node-fzx64                            1/1     Running   0
calico-node-qj2hk                            1/1     Running   0
coredns-5dd5756b68-j7n7x                     1/1     Running   0
coredns-5dd5756b68-nmfmv                     1/1     Running   0
kube-apiserver-k8s-master-node-01            1/1     Running   1 (87m ago)
kube-apiserver-k8s-master-node-02            1/1     Running   2 (88m ago)
kube-controller-manager-k8s-master-node-01   1/1     Running   1 (87m ago)
kube-controller-manager-k8s-master-node-02   1/1     Running   2 (88m ago)
kube-proxy-75zgk                             1/1     Running   1 (87m ago)
kube-proxy-m89j9                             1/1     Running   1 (88m ago)
kube-scheduler-k8s-master-node-01            1/1     Running   1 (87m ago)
kube-scheduler-k8s-master-node-02            1/1     Running   1 (88m ago)
Initialise the worker nodes
SSH into each worker node and execute the kubeadm join command that you copied previously.
sudo kubeadm join 192.168.1.116:6443 --token aksywy.on2927krgaf9hja1 \
 --discovery-token-ca-cert-hash sha256:d4b9bbd0e92ba973ffc22401cd537298961f5a05ed1c6094336116f3b44a9730
Once all worker nodes have joined the cluster, test the API to check the available nodes from the client machine.
Now the HA Multi-Master Kubernetes Cluster is ready for use. The mentioned commands and their outputs are illustrative.

 浙公网安备 33010602011771号