
效果图:
代码:
<!DOCTYPE html>
<html lang="en">
<head>
<meta charset="UTF-8">
<title>Title</title>
</head>
<style>
* {
margin: 0;
padding: 0;
}
body {
background: rgb(0, 0, 0, 0.8);
}
div{
position: absolute;
left: 0;
right: 0;
bottom: 0;
top: 0;
margin: auto;
border-radius: 30px;
text-align: center;
line-height: 50px;
width: 140px;
height: 50px;
overflow: hidden;
/*禁止双击页面选中文本*/
user-select:none;
background: linear-gradient(to left, #6be585, #dd3e54); /* W3C, IE 10+/ Edge, Firefox 16+, Chrome 26+, Opera 12+, Safari 7+ */
}
span {
position: absolute;
background: #fff;
/*加上事件穿透,可以一直点击按钮*/
pointer-events: none;
border-radius: 50%;
/*平移span标签,平移到中心的位置*/
transform: translate(-50%,-50%);
animation: animation 1s linear infinite;
}
@keyframes animation {
0% {
width: 0;
height: 0;
opacity: 0.5;
}
100% {
width: 300px;
height: 300px;
opacity: 0;
}
}
</style>
<body>
<div>Button</div>
</body>
<script>
//获取div按钮
const btn = document.querySelector("div");
//绑定单击事件 => 也可以切换成悬停事件mouseover
btn.addEventListener('click', function (e) {
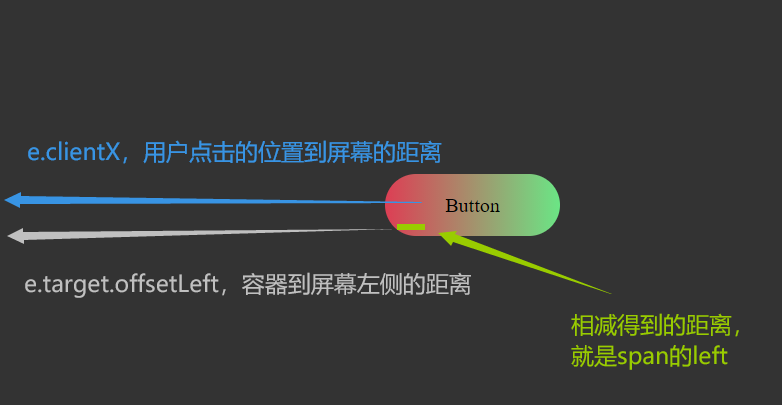
//定位获取鼠标点击的x,y轴,
//clientX 指的就是根据当前屏幕定位到的x轴
//e.target.offsetLeft 当前的容器的左边到屏幕最左边的距离
//相减就会得到我们要的span的left的距离
let x = e.clientX - e.target.offsetLeft;
let y = e.clientY - e.target.offsetTop;
//创建一个span标签
let span = document.createElement("span");
//将得到的left值和top值带进span的样式中去
span.style.left = x + "px";
span.style.top = y + "px";
//单击按钮新增一个span标签
this.appendChild(span);
//一秒后移除掉添加的span标签
setTimeout(() => {
span.remove();
}, 1000)
})
</script>
</html>
本文来自博客园,作者:最帅爸爸,转载请注明原文链接:https://www.cnblogs.com/zsbb

 浙公网安备 33010602011771号