
Nginx在LNMP架构中的作用与虚拟主机配置
1.LNMP架构的访问流程
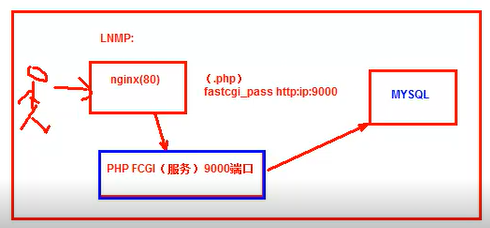
用户访问网站首先通过web访问Nginx,静态文件直接返回给客户,动态文件就通过PHP-FCGI服务来请求,这个需要在Nginx的配置文件写入相关配置,才可以跳转动态。
2.Nginx的应用场合
1、静态服务器(图片、视频服务)。并发:1-3W
html、js、css、.flv等。
2、动态服务,nginx+fastcgi的方式运行php、jsp。并发:500-1500
3、反向代理,负载均衡。日PV2000W一下,都可以直接用Nginx做代理。
4、缓存服务。Squid、varnish
3.Nginx和其他web服务器的对比
1)Apache
·目前的版本非常稳定强大。
·Prefork模式取消了进程的开销,性能很高。
·处理动态业务数据时,因关联到后端的引擎和数据库,瓶颈不在于Apache本身。
·高并发时消耗系统资源相对比较多一些。
·基于传统的select模型。
特点:功能多,更稳定,更安全,插件也多。
2)Nginx
·基于异步IO模型(epoll,kqueue),性能强,能够支持上万并发。
·对小文件支持很好,性能很高(限静态小文件)。
·代码优美,扩展库必须编译进主程序。
·消耗系统资源比较低。
3)Lighttpd(百度贴吧,豆瓣)
·基于异步IO模型。性能和Nginx相近
·扩展库时SO模式,比Nginx要灵活
·全球使用率比较低,安全性能没有上面两个好。
选择web服务器建议
·静态业务:高并发,采用Nginx或lighttpd,根据自己的掌握程度或公司要求。
·动态业务:采用nginx和apache均可。
·即有静态业务又有动态业务:Nginx或Apache,不要多选要单选。
·动态业务可以由前端代理(haproxy),根据页面元素的类型,向后转发相应的服务器进行处理。
·如果并发不是很大,对apache很熟悉,采用apache也是可以的,apache2.4版本也很强大,并发连接数也有所增加。
·nginx做web服务器,反向代理(haproxy,lvs nat)及缓存服务器(squid)也是非常不错的。
安装Nginx
1.在安装Nginx之前要安装一个软件pcre(perl兼容正则表达式),官方站点在http://www.pcre.org/,安装pcre库是为了使Nginx支持HTTP Rewrite(伪静态)模块。
yum install -y pcre pcre-devel
2.安装openssl,若服务器提供安全网页(https://)时,会用到OpenSSL库。
yum install -y openssl openssl-devel
3.创建Nginx用户和用户组
useradd -s /sbin/nologin -M
4.去Nginx官网下载安装包,官网是http://nginx.org复制包的地址然后wget,-O指定安装路径
mkdir -p /home/oldboy/tools
cd /home/oldboy/tools
tar xf nginx-1.6.2.tar.gz
cd nginx-1.6.2
/configure --user=nginx --group=nginx --prefix=/application/nginx1.6.2 --with-http_stub_status_module --with-http_ssl_module
echo $?
make &&make install
5.启动Nginx
/application/nginx/sbin/nginx
netstat -lntup|grep nginx
lsof -i :80
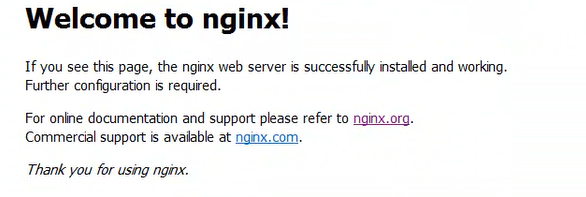
6.访问自己的服务器地址,可以看到Nginx欢迎页面
关于Nginx模块
Nginx使用不同的模块来实现不同的功能,主要有2组重要的模块:
1.Nginx core modules(必须的)
包括:Main、Events
2.Standard HTTP modules(虽然不是必须,但是缺省都会安装,不建议改动)
典型的包括:Core、Access、FastCGI、Gzip(压缩模块,性能优化作用)、log(日志模块)、Proxy、Rewrite(URL重写模块)、Upseteam(负载均衡模块)
通过官方http://nginx.org/en/docs/查看模块的使用帮助和配置范例。
关于Nginx的目录结构
├── client_body_temp#客户端内容的临时文件
├── conf#配置文件目录
│   ├── fastcgi.conf#动态配置文件,配合PHP使用
│   ├── fastcgi.conf.default
│   ├── fastcgi_params#Fastcgi的参数文件,配合php使用
│   ├── fastcgi_params.default
│   ├── koi-utf
│   ├── koi-win
│   ├── mime.types
│   ├── mime.types.default
│   ├── nginx.conf#Nginx的主配置文件
│   ├── nginx.conf.default#自动备份的配置文件
│   ├── scgi_params
│   ├── scgi_params.default
│   ├── uwsgi_params
│   ├── uwsgi_params.default
│   └── win-utf
├── fastcgi_temp
├── html#默认站点目录
│   ├── 50x.html#出错的页面
│   └── index.html#网页首页
├── logs
│   ├── access.log
│   ├── error.log
│   └── nginx.pid
├── proxy_temp
├── sbin
│   └── nginx#启动文件
├── scgi_temp
└── uwsgi_temp
Nginx的主配文件nginx.conf
Nginx的配置文件时一个纯文本文件,它位于Nginx安装目录的conf目录下,整个配置文件是以块的形式组织的。每个块一般以一个大括号“{}”来表示,块可以分为几个层次,整个配置文文件中Main指令位于最高层,在Main层下面可以有Events、HTTP等层级,而在HTTP层中又包含有Server层,即server block,server block中又分为location层,并且一个server block中可以包含多个location block。
#user  nobody;#运行用户
worker_processes  1;#进程数,和cpu核数相当

#error_log  logs/error.log;
#error_log  logs/error.log  notice;
#error_log  logs/error.log  info;

#pid        logs/nginx.pid;#nginx的进程号


events {#worker的连接数,处理链接请求的最大数量
    worker_connections  1024;
}


http {
    include       mime.types;
    default_type  application/octet-stream;
#下面的是日志的格式
    #log_format  main  '$remote_addr - $remote_user [$time_local] "$request" '
    #                  '$status $body_bytes_sent "$http_referer" '
    #                  '"$http_user_agent" "$http_x_forwarded_for"';

    #access_log  logs/access.log  main;#访问日志是不是要记录访问记录

    sendfile        on;
    #tcp_nopush     on;

    #keepalive_timeout  0;
    keepalive_timeout  65;

    #gzip  on;

    server {
        listen       80;
        server_name  localhost;

        #charset koi8-r;

        #access_log  logs/host.access.log  main;

        location / {
            root   html;
            index  index.html index.htm;
        }

        #error_page  404              /404.html;

        # redirect server error pages to the static page /50x.html
        #
        error_page   500 502 503 504  /50x.html;
        location = /50x.html {
            root   html;
        }

        # proxy the PHP scripts to Apache listening on 127.0.0.1:80
        #
        #location ~ \.php$ {
        #    proxy_pass   http://127.0.0.1;
        #}

        # pass the PHP scripts to FastCGI server listening on 127.0.0.1:9000
        #
        #location ~ \.php$ {
        #    root           html;
        #    fastcgi_pass   127.0.0.1:9000;
        #    fastcgi_index  index.php;
        #    fastcgi_param  SCRIPT_FILENAME  /scripts$fastcgi_script_name;
        #    include        fastcgi_params;
        #}

        # deny access to .htaccess files, if Apache's document root
        # concurs with nginx's one
        #
        #location ~ /\.ht {
        #    deny  all;
        #}
    }


    # another virtual host using mix of IP-, name-, and port-based configuration
    #
    #server {
    #    listen       8000;
    #    listen       somename:8080;
    #    server_name  somename  alias  another.alias;

    #    location / {
    #        root   html;
    #        index  index.html index.htm;
    #    }
    #}


    # HTTPS server
    #
    #server {
    #    listen       443 ssl;
    #    server_name  localhost;

    #    ssl_certificate      cert.pem;
    #    ssl_certificate_key  cert.key;

    #    ssl_session_cache    shared:SSL:1m;
    #    ssl_session_timeout  5m;

    #    ssl_ciphers  HIGH:!aNULL:!MD5;
    #    ssl_prefer_server_ciphers  on;

    #    location / {
    #        root   html;
    #        index  index.html index.htm;
    #    }
    #}

}
基于域名的虚拟主机
1.修改配置文件
vim nginx.conf
#修改此部分
server {
        listen       80;
        server_name  www.etiantian.org;
            root   html/www;
            index  index.html index.htm;
        }
server {
        listen       80;
        server_name  bbs.etiantian.org;
            root   html/bbs;
            index  index.html index.htm;
        }
server {
        listen       80;
        server_name  blg.etiantian.org;
            root   html/blg;
            index  index.html index.htm;
        }
2.创建站点目录及访问页面
mkdir html/{www,blg,bbs}
for n in www bbs blg;do echo "$n.etiantian.org" >html/$n/index.html;done
3.修改主机的host文件添加如下内容
192.168.157.142 www.etiantian.org bbs.etiantian.org blg.etiantian.org
4.重新优雅重启nginx
/sbin/nginx
5.用浏览器访问域名
Nginx日志轮询
vim Nginxrzlx.sh
cd /application/nginx/logs/ &&\
/bin/mv www._access.log www_access_$(date +%F -d -lday).log
/application/nginx/sbin/nginx  -s reload

 浙公网安备 33010602011771号