8. JSP
8.1 什么是JSP
Java Server Pages
Java服务器端页面,和Servlet一样,用于动态web技术
最大的特点:
-
写JSP就像在写HTML
-
区别:
-
HTML只给用户提供静态的数据
-
JSP页面中可以嵌入Java代码,为用户提供动态数据
-
8.2 JSP原理
服务器内部工作
tomcat中有一个work目录
apache-tomcat-9.0.45\work\Catalina\localhost\ROOT\org\apache\jsp,里边有index_jsp.java,打开后里边有一些配置信息。
IDEA使用Tomcat时产生
浏览器向服务器发送请求,不管访问什么资源,都是在访问Servlet
JSP最终也会被转换成为一个Java类
导入jar包
 <dependency>
   <groupId>javax.servlet.jsp</groupId>
   <artifactId>javax.servlet.jsp-api</artifactId>
   <version>2.3.3</version>
 </dependency>
public void _jspInit() {
}
public void _jspDestroy() {
}
public void _jspService(final javax.servlet.http.HttpServletRequest request, final javax.servlet.http.HttpServletResponse response)throws java.io.IOException, javax.servlet.ServletException{
}
-
判断请求
-
内置一些对象
 final javax.servlet.jsp.PageContext pageContext;//页面上下文
 javax.servlet.http.HttpSession ession = null;//session
     final javax.servlet.ServletContext application;//applicationContext
     final javax.servlet.ServletConfig config;//config
     javax.servlet.jsp.JspWriter out = null;//out
     final java.lang.Object page = this;//page:当前
 HttpServletRequest request//请求
 HttpServletResponce Responce//响应
     javax.servlet.jsp.JspWriter _jspx_out = null;
     javax.servlet.jsp.PageContext _jspx_page_context = null;
-
输出页面前增加的代码
 response.setContentType("text/html; charset=UTF-8");//设置响应的页面类型
       pageContext = _jspxFactory.getPageContext(this, request, response,
                 null, false, 8192, true);
       _jspx_page_context = pageContext;
       application = pageContext.getServletContext();
       config = pageContext.getServletConfig();
       out = pageContext.getOut();
       _jspx_out = out;
-
以上这些个对象可以在JSP有页面上直接使用
JSP的工作流程:输入在JSP页面上,直接到达服务中存在的web容器,经历转换(将JSP页面转换为Java文件)生成xxx_jsp.java文件,进行Java编译后生成xxx_jsp.class返回web容器执行。
用户真正拿到的,就是服务器处理完毕的class对象,就是Servlet
可以通过<% %>嵌入Java代码,写的代码进入_jspService方法中
在JSP页面中,只要是Java代码就会原封不动的输出
如果是HTML代码,就会被转换为:
out.write(“<html>\r\n”)
这样的格式,输出到前端
缺点:前端和后端未分离,混在一起
8.3 JSP基础语法
作为Java技术的一种应用,拥有一些自己补充的语法(了解,知道)
Java所有语法都支持,直接写语句即可
JSP表达式
定义函数:JSP声明,会被编译到JSP生成的Java的类中,其他的加入到_jspService方法中
<%%>
<%=%>
<%!%>
<%–注释–%>
JSP的注释,不会在客户界面显示,HTML的注释会
<%@page 可以导入import等功能%>
JSP声明:会被编译到JSP生成Java的类中
<%@ page contentType="text/html;charset=UTF-8" language="java" %> <html> <head> <title>$Title$</title> </head> <body> <%-- JSP表达式 作用:用来将程序的输出,输出到客户端 <%= 变量或者表达式%> --%> <%= new java.util.Date()%> <hr> <%-- jsp脚本片段--%> <% int sum = 0; for (int i = 0; i <= 100; i++) { sum+=i; } out.println("<h1>sum=" + sum + "</h1>"); %> <hr> <%-- 在代码嵌入HTML元素--%> <% for (int i = 0; i < 5; i++) { %> <h1>Hello,World!<%=i%></h1> <%--EL表达式:<%=i%>也可以写为${i}--%> <% } %> <%! static{ System.out.println("Loading Servlet!"); } private int globalVar = 0; public void method(){ System.out.println("进入了方法"); } %> </body> </html>
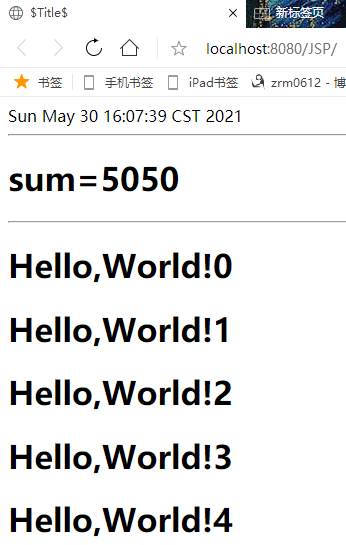
后台输出“Loading Servlet!”
8.4 JSP指令
1. 输出图片和创建错误响应网页
导入图片失败的解决方法:
加入${pageContext.request.contextPath}
<img src="${pageContext.request.contextPath}/img/404.png" alt="404">
创建一个引起500错误的文档
 <%@ page contentType="text/html;charset=UTF-8" language="java" %>
 <html>
 <head>
     <title>Title</title>
 </head>
 <body>
 <%
     int x = 1/0;
 %>
 </body>
 </html>
创建404和500错误输出图片文档
 <%@ page contentType="text/html;charset=UTF-8" language="java" %>
 <html>
 <head>
     <title>404</title>
 </head>
 <body>
 <img src="${pageContext.request.contextPath}/img/404.png" alt="404">
 </body>
 </html>
 <%@ page contentType="text/html;charset=UTF-8" language="java" %>
 <%--定制错误500画面--%>
 <html>
 <head>
     <title>500</title>
 </head>
 <body>
 <img src="${pageContext.request.contextPath}/img/500.png" alt="500">
 </body>
 </html>
配置
 <error-page>
     <error-code>404</error-code>
     <location>/Error/404.jsp</location>
 </error-page>
 <error-page>
     <error-code>500</error-code>
     <location>/Error/500.jsp</location>
 </error-page>
输入JSP2.jsp 运行1/0错误得到500错误,输入123找不到这个文件报404错误
输出结果:


2. 进行拼接操作
创建Header.jsp和Footer.jsp
 <%@ page contentType="text/html;charset=UTF-8" language="java" %>
 <html>
 <head>
     <title>Header</title>
 </head>
 <body>
 <h1>我是Header</h1>
 </body>
 </html>
 <%@ page contentType="text/html;charset=UTF-8" language="java" %>
 <html>
 <head>
     <title>Footer</title>
 </head>
 <body>
 <h1>我是Footer</h1>
 </body>
 </html>
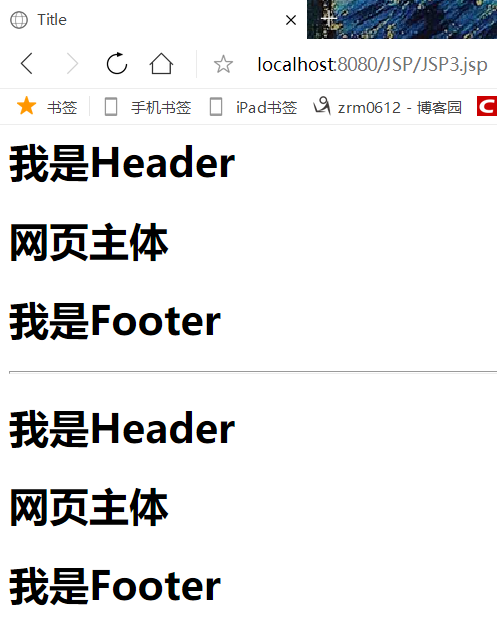
完成 拼接,两种方法效果相同
<%@ page contentType="text/html;charset=UTF-8" language="java" %> <html> <head> <title>Title</title> </head> <body> <%--include会将两个jsp页面合二为一,设置变量会重复报错--%> <%@include file="Commen/Header.jsp"%> <h1>网页主体</h1> <%@include file="Commen/Footer.jsp"%> <hr> <%-- JSP标签 jsp:include拼接页面,本质还是三个,设置变量互不影响--%> <jsp:include page="Commen/Header.jsp"/> <h1>网页主体</h1> <jsp:include page="Commen/Footer.jsp"/> </body> </html>
8.5 9大内置对象
-
PageContext存东西
-
Request存东西,客户端向服务器发送请求,产生的数据,用户看完就没用了,比如:新闻,用户看完就没用了
-
Responce
-
Session存东西,客户端向服务器发送请求,产生的数据,用户用完一会儿还有用,比如:购物车
-
Application(ServletContext)存东西,客户端向服务器发送请求,产生的数据,一个用户用完了,其他用户还可能使用,比如:聊天记录
-
Config(ServletConfig)
-
out
-
page
-
exception
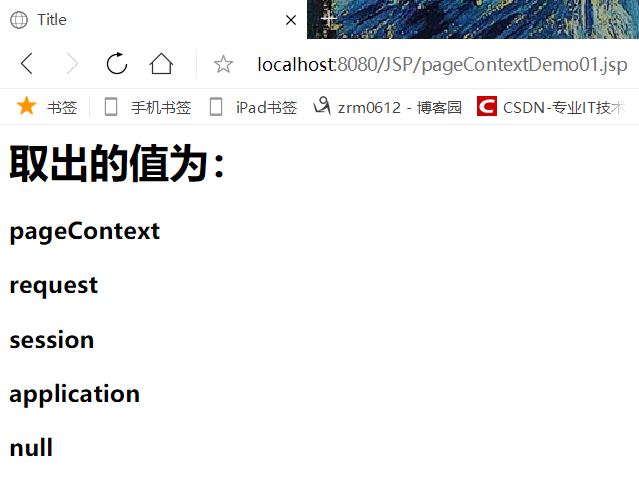
<%@ page contentType="text/html;charset=UTF-8" language="java" %> <html> <head> <title>Title</title> </head> <body> <%-- 存东西--%> <% pageContext.setAttribute("name1","pageContext"); request.setAttribute("name2","request"); session.setAttribute("name3","session"); application.setAttribute("name4","application"); %> <%--脚本片段中国的代码,会被原封不动生成到JSP.java 要求:这里的代码必须保证Java语法的正确性--%> <%-- public static final int PAGE_SCOPE = 1; public static final int REQUEST_SCOPE = 2; public static final int SESSION_SCOPE = 3; public static final int APPLICATION_SCOPE = 4; public void setAttribute(String name, Object attribute, int scope) { switch(scope) { case 1: this.mPage.put(name, attribute); break; case 2: this.mRequest.put(name, attribute); break; case 3: this.mSession.put(name, attribute); break; case 4: this.mApp.put(name, attribute); break; default: throw new IllegalArgumentException("Bad scope " + scope); } }--%> <% //通过pageContext取出保存的值 //从底层到高层(作用域):page->request->session->application String name1 = (String) pageContext.findAttribute("name1");//保存的数据只在一个页面中有效 String name2 = (String) pageContext.findAttribute("name2");//保存的数据只在一次请求中有效,请求转发会携带这个数据 String name3 = (String) pageContext.findAttribute("name3");//保存的数据只在一次会话中有效,从打开服务器到关闭服务器 String name4 = (String) pageContext.findAttribute("name4");//保存的数据只在服务器中有效,从打开服务器到关闭服务器 String name5 = (String) pageContext.findAttribute("name5");//不存在 // pageContext.forward("");转发 %> <%--使用EL表达式输出比较简单,且无输出的不会输出,用<%=%>会输出null ${}--%> <h1>取出的值为:</h1> <h3>${name1}</h3> <h3>${name2}</h3> <h3>${name3}</h3> <h3>${name4}</h3> <h3><%=name5%></h3> </body> </html>
输出结果:
8.6 JSP标签、JSTL标签
需要导入的包
 <dependencies>
         <dependency>
             <groupId>javax.servlet</groupId>
             <artifactId>servlet-api</artifactId>
             <version>2.5</version>
         </dependency>
         <dependency>
             <groupId>javax.servlet.jsp</groupId>
             <artifactId>javax.servlet.jsp-api</artifactId>
             <version>2.3.3</version>
         </dependency>
 <!--        JSTL 表达式的依赖-->
         <!-- https://mvnrepository.com/artifact/javax.servlet.jsp.jstl/jstl-api -->
         <dependency>
             <groupId>javax.servlet.jsp.jstl</groupId>
             <artifactId>jstl-api</artifactId>
             <version>1.2</version>
         </dependency>
 <!--        standard标签库-->
         <!-- https://mvnrepository.com/artifact/taglibs/standard -->
         <dependency>
             <groupId>taglibs</groupId>
             <artifactId>standard</artifactId>
             <version>1.1.2</version>
         </dependency>
     </dependencies>
EL表达式 ${}
-
获取数据
-
执行运算
-
获取web开发的常用对象
1. JSP标签
JSPtag.jsp 设置数据
 <%@ page contentType="text/html;charset=UTF-8" language="java" %>
 <html>
 <head>
     <title>JSPtag</title>
 </head>
 <body>
 <h1>1</h1>
 <%--jsp:include--%>
 <%--forward转发--%>
 <jsp:forward page="JSPtag2.jsp">
     <jsp:param name="name" value="zhou"/>
     <jsp:param name="age" value="20"/>
 </jsp:forward>
 </body>
 </html>
JSPtag2.jsp 输出数据
 <%@ page contentType="text/html;charset=UTF-8" language="java" %>
 <html>
 <head>
     <title>JSPtag2</title>
 </head>
 <body>
 <h2>2</h2>
 <%--取出参数--%>
 姓名:<%=request.getParameter("name")%>
 年龄:<%=request.getParameter("age")%>
 </body>
 </html>
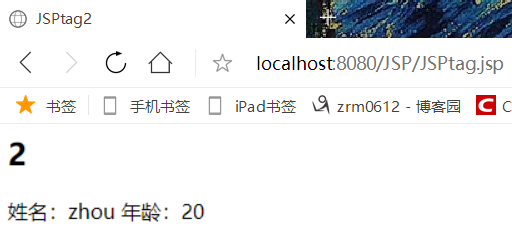
tag转发给tag2
2. JSTL标签
JSTL标签库的使用就是为了弥补HTML标签的不足,自定义了很多标签,可以供我们使用,标签的功能和Java代码一样
JSTL标签库使用步骤
-
引入对应的taglib
-
使用其中的方法
-
在tomcat中引入jstl、standard的包,否则会报错:JSTL解析错误
核心标签(掌握)
| 标签 | 描述 |
|---|---|
| <c.out> | 用于在JSP中显示数据,就像<%= ... > |
| <c.set> | 用于保存数据 |
| <c.remove> | 用于删除数据 |
| <c.catch> | 用来处理产生错误的异常状况,并且将错误信息储存起来 |
| <c.if> | 与我们在一般程序中用的if一样 |
| <c.choose> | 本身只当做c:when和c:otherwise的父标签 |
| <c.when> | c:choose的子标签,用来判断条件是否成立 |
| <c.otherwise> | c:choose的子标签,接在c:when标签后,当c:when标签判断为false时被执行 |
| <c.import> | 检索一个绝对或相对 URL,然后将其内容暴露给页面 |
| <c.forEach> | 基础迭代标签,接受多种集合类型 |
| <c.forTokens> | 根据指定的分隔符来分隔内容并迭代输出 |
| <c.param> | 用来给包含或重定向的页面传递参数 |
| <c.redirect> | 重定向至一个新的URL. |
| <c.url> | 使用可选的查询参数来创造一个URL |
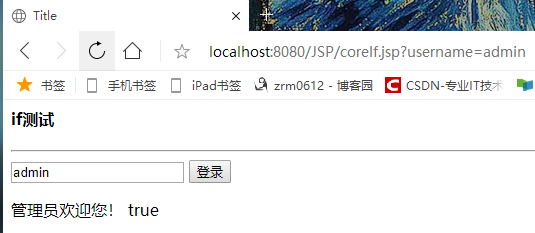
输入,判断,输出
 <%@ page contentType="text/html;charset=UTF-8" language="java" %>
 <%--引入JSTL核心标签库,才能使用JSTL标签core--%>
 <%@ taglib prefix="c" uri="http://java.sun.com/jsp/jstl/core" %>
 <html>
 <head>
     <title>Title</title>
 </head>
 <body>
 <h4>if测试</h4>
 <hr>
 <form action="coreIf.jsp" method="get">
 <%--    EL表达式获取表单中的数据
 ${param.参数名}--%>
     <input type="text" name="username" value="${param.username}">
     <input type="submit" value="登录">
 </form>
 <%--判断如果提交的用户时管理员,则登录成功--%>
 <c:if test="${param.username == 'admin'}" var="isAdmin">
     <c:out value="管理员欢迎您!"></c:out>
 </c:if>
 <c:out value="${isAdmin}"></c:out>
 </body>
 </html>
输出:
定义、判断,类似于switch
<%@ page contentType="text/html;charset=UTF-8" language="java" %> <%@ taglib prefix="c" uri="http://java.sun.com/jsp/jstl/core" %> <html> <head> <title>Title</title> </head> <body> <%--定义一个变量score,值为85--%> <c:set var="score" value="85"/> <c:choose> <c:when test="${score>=90}"> 你的成绩为优秀 </c:when> <c:when test="${score>=80}"> 你的成绩为良好 </c:when> <c:when test="${score>=70}"> 你的成绩为一般 </c:when> <c:when test="${score>=60}"> 你的成绩为普通 </c:when> <c:when test="${score<=60}"> 你的成绩为不及格 </c:when> </c:choose> </body> </html>
输出:你的成绩为良好
Foreach
 <%@ taglib prefix="c" uri="http://java.sun.com/jsp/jstl/core" %>
 <%@ page import="java.util.ArrayList" %>
 <%@ page contentType="text/html;charset=UTF-8" language="java" %>
 <html>
 <head>
     <title>Foreach</title>
 </head>
 <body>
 <%
     ArrayList<String> people = new ArrayList<>();
     people.add(0,"a");
     people.add(1,"b");
     people.add(2,"c");
     people.add(3,"d");
     people.add(4,"e");
     request.setAttribute("list",people);
 %>
 <%--
 var,每一次遍历出来的变量‘=
 item,要遍历的对象
 begin,哪里开始
 end,数到哪里
 step,步长--%>
 <%--全部遍历--%>
 <c:forEach var="people" items="${list}">
     <c:out value="${people}"/><br>
 </c:forEach>
 <hr>
 <%--部分--%>
 <c:forEach begin="1" end="3" step="1" var="people" items="${list}">
     <c:out value="${people}"/><br>
 </c:forEach>
 </body>
 </html>
输出所有abcde(各占一行)
格式化标签
SQL标签
XML标签
9. JavaBean
实体类
JavaBean有特定的写法,对应数据库里的一张表
-
必须有一个无参构造
-
属性必须私有化
-
必须有对应的get/set方法
一般用来和数据库的字段做映射ORM
ORM:对象关系映射
数据库的表:对应类
字段:对应类的属性
行记录:对应类的对象
people表
| id | name | age | address |
|---|---|---|---|
| 1 | 张三 | 33 | 北京 |
| 2 | 李四 | 44 | 上海 |
| 3 | 王五 | 55 | 广州 |
package com.zhou.pojo; //实体类 一般都是和数据库中的表一一对应 public class People { private int id; private String name; private int age; private String address; public People() { } public People(int id, String name, int age, String address) { this.id = id; this.name = name; this.age = age; this.address = address; } public int getId() { return id; } public void setId(int id) { this.id = id; } public String getName() { return name; } public void setName(String name) { this.name = name; } public int getAge() { return age; } public void setAge(int age) { this.age = age; } public String getAddress() { return address; } public void setAddress(String address) { this.address = address; } @Override public String toString() { return "People{" + "id=" + id + ", name='" + name + '\'' + ", age=" + age + ", address='" + address + '\'' + '}'; } }
<%@ page contentType="text/html;charset=UTF-8" language="java" %> <html> <head> <title>JavaBean</title> </head> <body> <%--<%--%> <%-- People people = new People();--%> <%-- people.setAddress();--%> <%-- people.setId();--%> <%-- people.setAge();--%> <%-- people.setName();--%> <%--%>--%> <jsp:useBean id="people" class="com.zhou.pojo.People" scope="page"/> <jsp:setProperty name="people" property="address" value="北京"/> <jsp:setProperty name="people" property="id" value="1"/> <jsp:setProperty name="people" property="age" value="33"/> <jsp:setProperty name="people" property="name" value="张三"/> <%--<%--%> <%-- //people.getAddress();--%> <%--%>--%> 姓名:<jsp:getProperty name="people" property="name"/> id:<jsp:getProperty name="people" property="id"/> 年龄:<jsp:getProperty name="people" property="age"/> 地址:<jsp:getProperty name="people" property="address"/> </body> </html>
10. MVC三层架构
Model View Controller 模型 视图 控制器
10.1 早期结构
Controller->Servlet
-
接收用户的请求
-
响应给客户端内容
-
重定向或者转发,视图跳转
View->JSP
-
展示数据
-
提供可以供我们操作的请求
Servlet和JSP都可以写Java代码,为了易于维护和使用
Servlet专注于处理请求,以及控制视图跳转
JSP专注于显示数据
用户直接访问控制层,控制层就可以直接操作数据库
servlet->CRUD->数据库
弊端:程序十分臃肿,不利于维护
Servlet的代码中,处理请求、响应、视图跳转、处理JDBC、处理业务代码、处理逻辑代码
10.2 MVC三层架构
架构:增加一层
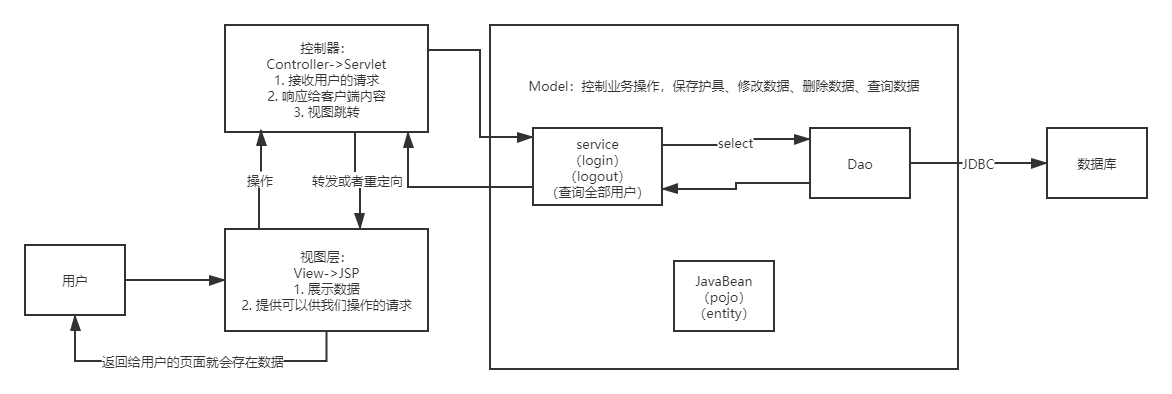
Model
-
业务处理:业务逻辑(Service)
-
数据持久层:CRUD(Dao)
View
-
展示数据
-
提供链接发起Servlet请求(a,form,img…)
Controller(Servlet)
-
接收用户的请求:(req:请求参数、Session信息…)
-
交给业务层处理对应的代码
-
控制视图的跳转
登录->接收用户的登录请求->处理用户的请求(获取用户登录的参数,username,password)->交给业务层处理登录业务(判断用户名密码是否争取:事务)->Dao层查询用户名和密码是否正确->数据库
11. 过滤器Filter(重点)
Filter:过滤器,用来过滤网站的数据
-
处理中文乱码
-
登录验证

创建一个空的maven项目后添加框架,选择web
导包:pom文件内
<?xml version="1.0" encoding="UTF-8"?> <project xmlns="http://maven.apache.org/POM/4.0.0" xmlns:xsi="http://www.w3.org/2001/XMLSchema-instance" xsi:schemaLocation="http://maven.apache.org/POM/4.0.0 http://maven.apache.org/xsd/maven-4.0.0.xsd"> <modelVersion>4.0.0</modelVersion> <groupId>com.zhou</groupId> <artifactId>JavaWeb-Filter</artifactId> <version>1.0-SNAPSHOT</version> <dependencies> <dependency> <groupId>javax.servlet</groupId> <artifactId>servlet-api</artifactId> <version>2.5</version> </dependency> <dependency> <groupId>javax.servlet.jsp</groupId> <artifactId>javax.servlet.jsp-api</artifactId> <version>2.3.3</version> </dependency> <dependency> <groupId>javax.servlet.jsp.jstl</groupId> <artifactId>jstl-api</artifactId> <version>1.2</version> </dependency> <dependency> <groupId>taglibs</groupId> <artifactId>standard</artifactId> <version>1.1.2</version> </dependency> <!-- 连接数据库--> <dependency> <groupId>mysql</groupId> <artifactId>mysql-connector-java</artifactId> <version>5.1.47</version> </dependency> </dependencies> </project>
编写过滤器
导入的filter是javax.servlet.Filter的包
实现Filter接口,重写对应的方法
package com.zhou.filter; import javax.servlet.*; import java.io.IOException; public class CharacterEncodingFilter implements Filter { //初始化 public void init(FilterConfig filterConfig) throws ServletException { System.out.println("CharacterEncodingFilter初始化"); } //chain:链 /* 1.过滤器中的所有代码,在过滤特定请求的时候都会执行 2.必须要让过滤器继续通行 */ public void doFilter(ServletRequest request, ServletResponse response, FilterChain chain) throws IOException, ServletException { request.setCharacterEncoding("utf-8"); response.setCharacterEncoding("utf-8"); response.setContentType("text/html;charset=utf-8"); System.out.println("CharacterEncodingFilter执行前..."); chain.doFilter(request,response);//让我们的请求继续走,如果不写,程序到这里就被拦截停止 System.out.println("CharacterEncodingFilter执行后..."); } public void destroy() { System.out.println("CharacterEncodingFilter销毁"); } }
在web.xml中配置过滤器
 <filter>
     <filter-name>CharacterEncodingFilter</filter-name>
     <filter-class>com.zhou.filter.CharacterEncodingFilter</filter-class>
 </filter>
 <filter-mapping>
     <filter-name>CharacterEncodingFilter</filter-name>
     <url-pattern>/servlet/*</url-pattern>
 </filter-mapping>
编写测试类
package com.zhou.servlet; import javax.servlet.ServletException; import javax.servlet.http.HttpServlet; import javax.servlet.http.HttpServletRequest; import javax.servlet.http.HttpServletResponse; import java.io.IOException; public class ShowServlet extends HttpServlet { @Override protected void doGet(HttpServletRequest req, HttpServletResponse resp) throws ServletException, IOException { resp.getWriter().write("你好呀,世界!"); } @Override protected void doPost(HttpServletRequest req, HttpServletResponse resp) throws ServletException, IOException { super.doPost(req, resp); } }
对应域名可以实现中文,之外的乱码
12. 监听器Listener
实现一个监听器的接口(有N种)
-
编写一个监听器,实现监听器接口
package com.zhou.listener; import javax.servlet.ServletContext; import javax.servlet.http.HttpSessionEvent; import javax.servlet.http.HttpSessionListener; //统计网站在线人数:统计Session个数 public class OnlineCountListener implements HttpSessionListener { //创建Session监听:看你的一举一动 //一旦创建Session就会触发一次这个事件 @Override public void sessionCreated(HttpSessionEvent se) { System.out.println(se.getSession().getId()); ServletContext ctx = se.getSession().getServletContext(); Integer onlineCount = (Integer) ctx.getAttribute("OnlineCount"); if (onlineCount==null){ onlineCount = new Integer(1); }else{ int count = onlineCount.intValue(); onlineCount = new Integer(count+1); } ctx.setAttribute("OnlineCount",onlineCount); } //销毁Session监听 //一旦销毁Session就会触发一次这个事件 @Override public void sessionDestroyed(HttpSessionEvent se) { ServletContext ctx = se.getSession().getServletContext(); Integer onlineCount = (Integer) ctx.getAttribute("OnlineCount"); if (onlineCount==null){ onlineCount = new Integer(0); }else{ int count = onlineCount.intValue(); onlineCount = new Integer(count-1); } ctx.setAttribute("OnlineCount",onlineCount); } /* Session销毁的情况: 1.手动销毁 se.getSession().invalidate(); 2.自动销毁 xml中设置session过期时间 <session-config> <session-timeout>1</session-timeout> </session-config> */ }
-
web中注册监听器
 <!--    注册监听器-->
     <listener>
         <listener-class>com.zhou.listener.OnlineCountListener</listener-class>
     </listener>
-
看情况使用哪种销毁Session的方式
使用不同的浏览器访问http://localhost:8080/,即可让Session数量增加
13. 过滤器、监听器常见应用
权限拦截
用户登录后才能进入登录成功界面,用户注销后就不能再进入
-
用户登录之后,向Session中放入用户的数据
-
进入主页的时候要判断用户是否已经登录;要求:在过滤器中实现。
创建登录成功页面、失败界面、登录界面
success.jsp
 <%@ page contentType="text/html;charset=UTF-8" language="java" %>
 <html>
 <head>
     <title>success</title>
 </head>
 <body>
 <h1>登录成功!</h1>
 <p><a href="/servlet/logout">注销</a></p>
 </body>
 </html>
Error.jsp

 <%@ page contentType="text/html;charset=UTF-8" language="java" %>
 <html>
 <head>
     <title>Error</title>
 </head>
 <body>
 <h1>错误</h1>
 <h3>没有权限,用户名错误</h3>
 <p><a href="/Login.jsp">返回登录页面</a></p>
 </body>
 </html>
Login.jsp
 <%@ page contentType="text/html;charset=UTF-8" language="java" %>
 <html>
 <head>
     <title>Login</title>
 </head>
 <body>
 <h1>登录</h1>
 <form action="/servlet/login" method="get">
     <input type="text" name="username">
     <input type="submit">
 </form>
 </body>
 </html>
判断登录是否成功LoginServlet类
package com.zhou.servlet; import com.zhou.util.Constant; import javax.servlet.ServletException; import javax.servlet.http.HttpServlet; import javax.servlet.http.HttpServletRequest; import javax.servlet.http.HttpServletResponse; import java.io.IOException; public class LoginServlet extends HttpServlet { @Override protected void doGet(HttpServletRequest req, HttpServletResponse resp) throws ServletException, IOException { //获取前端请求的参数 String username = req.getParameter("username"); if (username.equals("admin")){ //登录成功 req.getSession().setAttribute(Constant.USER_SESSION,req.getSession().getId()); resp.sendRedirect("/sys/success.jsp"); }else{ //登录失败 resp.sendRedirect("/Error.jsp"); } } @Override protected void doPost(HttpServletRequest req, HttpServletResponse resp) throws ServletException, IOException { super.doPost(req, resp); } }
登录失败后跳转回登录界面Logout类
package com.zhou.servlet; import com.zhou.util.Constant; import javax.servlet.ServletException; import javax.servlet.http.HttpServlet; import javax.servlet.http.HttpServletRequest; import javax.servlet.http.HttpServletResponse; import java.io.IOException; public class LogoutServlet extends HttpServlet { @Override protected void doGet(HttpServletRequest req, HttpServletResponse resp) throws ServletException, IOException { Object user_session = req.getSession().getAttribute(Constant.USER_SESSION); if (user_session!=null){ req.getSession().removeAttribute(Constant.USER_SESSION); } resp.sendRedirect("/Login.jsp"); } @Override protected void doPost(HttpServletRequest req, HttpServletResponse resp) throws ServletException, IOException { super.doPost(req, resp); } }
过滤器SysFilter类
package com.zhou.filter; import com.zhou.util.Constant; import javax.servlet.*; import javax.servlet.http.HttpServletRequest; import javax.servlet.http.HttpServletResponse; import java.io.IOException; public class SysFilter implements Filter { @Override public void init(FilterConfig filterConfig) throws ServletException { } @Override public void doFilter(ServletRequest req, ServletResponse resp, FilterChain chain) throws IOException, ServletException { //ServletRequest --> HttpServletRequest HttpServletRequest request = (HttpServletRequest) req; HttpServletResponse response = (HttpServletResponse) resp; if (request.getSession().getAttribute(Constant.USER_SESSION)==null){ response.sendRedirect("/Error.jsp"); } chain.doFilter(request,response); } @Override public void destroy() { } }
实现效果:正常登录Login.jsp后正确进入登录成功界面,失败进入失败界面,通过超链接进行跳转。如果登录失败,访问登录成功界面的网址会被拒绝并返回登录界面,实现了权限拦截。
未来可加入VIP拦截,加入switch选择。
14. JDBC
Java Database Connector
需要jar包的支持
-
java.sql
-
javax.sql
-
mysql-connector-java…连接驱动(必须要导入)
实验环境搭建
CREATE TABLE users( id INT(3) PRIMARY KEY, `name` VARCHAR(40), `password` VARCHAR(40), email VARCHAR(60), birthday DATE ); INSERT INTO users(id,`name`,`password`,email,birthday) VALUES(1,'张三','123456','zs@qq.com','2000-01-01'); INSERT INTO users(id,`name`,`password`,email,birthday) VALUES(2,'李四','123456','ls@qq.com','2001-01-01'); INSERT INTO users(id,`name`,`password`,email,birthday) VALUES(3,'王五','123456','ww@qq.com','2002-01-01'); SELECT * FROM users;
导入数据库依赖
<?xml version="1.0" encoding="UTF-8"?> <project xmlns="http://maven.apache.org/POM/4.0.0" xmlns:xsi="http://www.w3.org/2001/XMLSchema-instance" xsi:schemaLocation="http://maven.apache.org/POM/4.0.0 http://maven.apache.org/xsd/maven-4.0.0.xsd"> <modelVersion>4.0.0</modelVersion> <groupId>com.zhou</groupId> <artifactId>JavaWeb-JDBC</artifactId> <version>1.0-SNAPSHOT</version> <dependencies> <!-- mysql的驱动--> <dependency> <groupId>mysql</groupId> <artifactId>mysql-connector-java</artifactId> <version>5.1.47</version> </dependency> </dependencies> </project>
连接数据库

输入密码验证成功后在Schemas里选择数据库
JDBC固定步骤
package com.zhou.test; import java.sql.*; public class TestJdbc { public static void main(String[] args) throws ClassNotFoundException, SQLException { //配置信息,解决中文乱码 String url = "jdbc:mysql://localhost:3306/jdbc?useUnicode=true&characterEncoding=utf-8&&useSSL=false"; String username = "root"; String password = "12345678"; //1.加载驱动 Class.forName("com.mysql.jdbc.Driver"); //2.连接数据库,代表数据库 Connection connection = DriverManager.getConnection(url, username, password); //3.向数据库发送SQL的对象Statement,进行CRUD Statement statement = connection.createStatement(); //4.编写SQL(根据不同业务选择不同的SQL语句) String sql = "SELECT * FROM users"; //5.执行查询SQL,返回一个结果集ResultSet ResultSet rs = statement.executeQuery(sql); while (rs.next()){ System.out.println("id="+rs.getObject("id")); System.out.println("id="+rs.getObject("name")); System.out.println("id="+rs.getObject("password")); System.out.println("id="+rs.getObject("email")); System.out.println("id="+rs.getObject("birthday")); } //6.关闭连接,释放资源(一定要做)先开后关 rs.close(); statement.close(); connection.close(); } } /* Output: id=1 id=张三 id=123456 id=zs@qq.com id=2000-01-01 id=2 id=李四 id=123456 id=ls@qq.com id=2001-01-01 id=3 id=王五 id=123456 id=ww@qq.com id=2002-01-01 */
预编译sql
package com.zhou.test; import java.sql.*; public class TestJdbc2 { public static void main(String[] args) throws ClassNotFoundException, SQLException { //配置信息,解决中文乱码 String url = "jdbc:mysql://localhost:3306/jdbc?useUnicode=true&characterEncoding=utf-8&&useSSL=false"; String username = "root"; String password = "12345678"; //1.加载驱动 Class.forName("com.mysql.jdbc.Driver"); //2.连接数据库,代表数据库 Connection connection = DriverManager.getConnection(url, username, password); //3.编写SQL(根据不同业务选择不同的SQL语句) String sql = "insert into users(id, name, password, email, birthday) VALUES (?,?,?,?,?);"; //4.预编译 PreparedStatement preparedStatement = connection.prepareStatement(sql); preparedStatement.setInt(1,4);//给第一个占位符?的值赋值为4 preparedStatement.setString(2,"zhou"); preparedStatement.setString(3,"123456"); preparedStatement.setString(4,"zhou@qq.com"); preparedStatement.setDate(5,new Date(new java.util.Date().getTime()));//外边sql的Date //5.执行sql int i = preparedStatement.executeUpdate(); if (i>0){ System.out.println("插入成功!"); } //6.关闭连接,释放资源(一定要做)先开后关 preparedStatement.close(); connection.close(); } }
事务
要么都成功,要么都失败
ACID原则:保证数据的安全
开启事务
事务提交commit()
事务回滚rollback()
关闭事务
Junit单元测试
依赖:
 <!--        单元测试-->
         <dependency>
             <groupId>junit</groupId>
             <artifactId>junit</artifactId>
             <version>4.12</version>
         </dependency>
简单实用
@Test注解只有在方法上有效,只要加了这个注解的方法,就可以直接运行
创建银行账户转账数据库
CREATE TABLE account( id INT PRIMARY KEY AUTO_INCREMENT, `name` VARCHAR(40), money FLOAT ); INSERT INTO account(`name`,money) VALUES('A',1000); INSERT INTO account(`name`,money) VALUES('B',1000); INSERT INTO account(`name`,money) VALUES('C',1000);
创建事务,在出现错误时数据库不会更新
package com.zhou.test; import org.junit.Test; import java.sql.*; public class TestJdbc3 { @Test public void test(){ //配置信息,解决中文乱码 String url = "jdbc:mysql://localhost:3306/jdbc?useUnicode=true&characterEncoding=utf-8&&useSSL=false"; String username = "root"; String password = "12345678"; Connection connection = null; try { //1.加载驱动 Class.forName("com.mysql.jdbc.Driver"); //2.连接数据库,代表数据库 connection = DriverManager.getConnection(url, username, password); //3.通知数据库开启事务,false表示开启事务(不再自动提交) connection.setAutoCommit(false); //4.编写SQL(根据不同业务选择不同的SQL语句) String sql1= "update account set money = money - 100 where name = 'A';"; connection.prepareStatement(sql1).executeUpdate(); //制造错误 // int i = 1/0;//出现这个错误的时候数据库不会更新 String sql2= "update account set money = money + 100 where name = 'B';"; connection.prepareStatement(sql2).executeUpdate(); connection.commit();//以上两条SQL都执行成功了,就提交事务 System.out.println("Success!"); //6.关闭连接,释放资源(一定要做)先开后关 connection.close(); } catch (Exception e) { try { //如果出现异常,就通知数据库回滚事务 connection.rollback(); } catch (SQLException throwables) { throwables.printStackTrace(); } e.printStackTrace(); } } }


 浙公网安备 33010602011771号