


.NET nanoFramework 嵌入式学习随笔
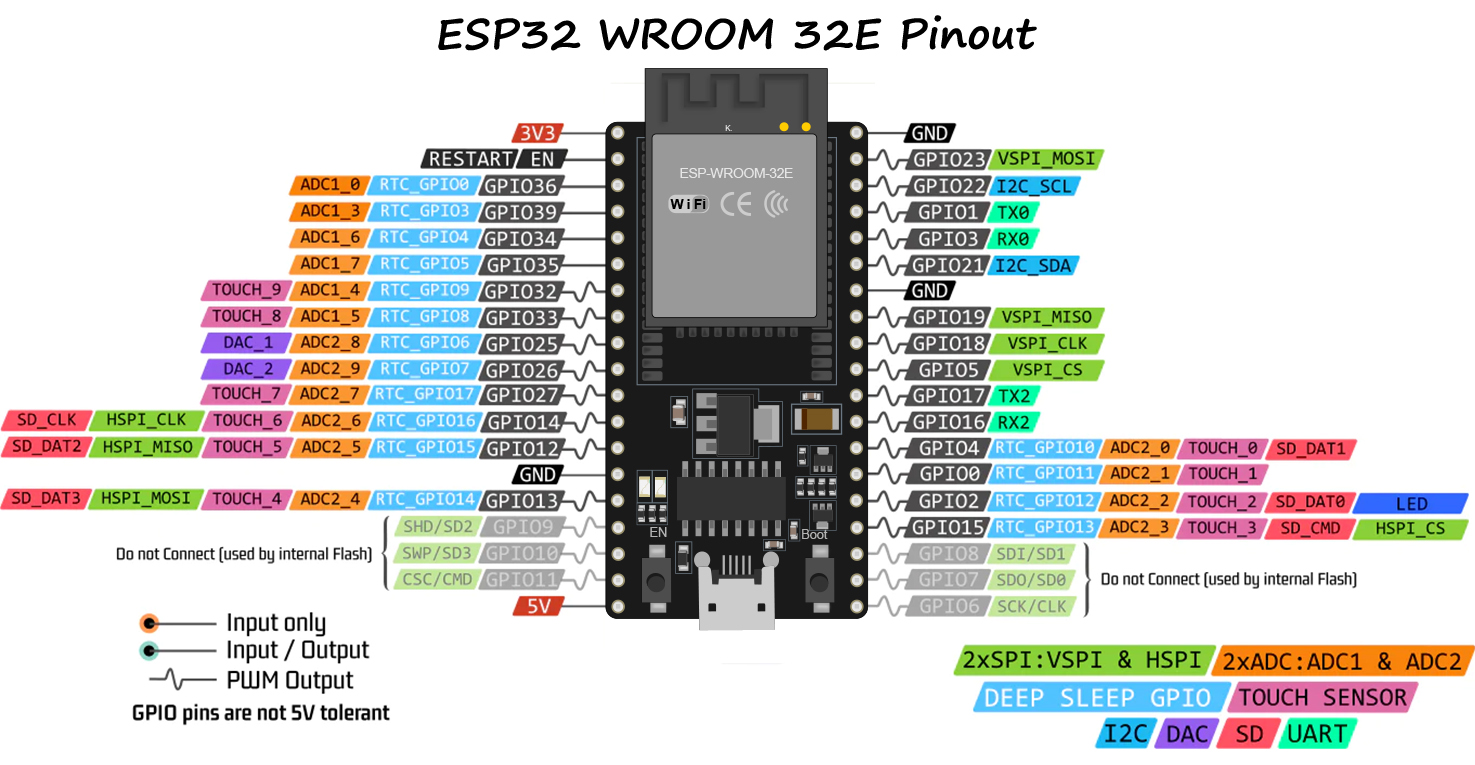
硬件: ESP-WROOM-32E
1.闪灯
  public class Program
  {

      public static void Main()
      {

         //单闪
  GpioPin led = new GpioController().OpenPin(15, PinMode.Output);
  led.Write(PinValue.Low);

  while (true)
  {
      led.Toggle();
      Thread.Sleep(125);
      led.Toggle();
      Thread.Sleep(125);
      led.Toggle();
      Thread.Sleep(125);
      led.Toggle();
      Thread.Sleep(525);
  }
  Thread.Sleep(Timeout.Infinite);


      }


  }
2.闪自带蓝灯
  public class Program
  {

      public static void Main()
      {

        //闪蓝光
  GpioPin led = new GpioController().OpenPin(2, PinMode.Output);

  while (true)
  {
      // Turn on the LED
      led.Write(PinValue.High);
      Thread.Sleep(500);
      // Turn off the LED
      led.Write(PinValue.Low);
      Thread.Sleep(500);
  }

  Thread.Sleep(Timeout.Infinite);

      }


  }
3.按钮控制灯光
  public class Program
  {

      public static void Main()
      {

       //按钮控制灯光
  Debug.WriteLine("Hello from nanoFramework!");
  var gpio = new GpioController();
  // Setup the GPIO pin to 2 as it is the embedded led in the ESP32
  // Open the pin in output mode
  // If your board has another pin, change here. If you are using an external led, change here as well.
  GpioPin led = gpio.OpenPin(15, PinMode.Output);

  // Initialize a new button with the corresponding button pin
  // You can adjust the pin number based on the pin you are using
  // As for the simple button sample, it is using pull up by default
  GpioButton button = new GpioButton(buttonPin: 13);
  Debug.WriteLine("Button is initialized, starting to read state");

  // Enable or disable holding or doublepress events
  button.IsDoublePressEnabled = true;
  button.IsHoldingEnabled = true;

  // Write to debug if the button is down
  button.ButtonDown += (sender, e) =>
  {
      Debug.WriteLine($"buttondown IsPressed={button.IsPressed}");
      led.Write(PinValue.High);
  };

  // Write to debug if the button is up
  button.ButtonUp += (sender, e) =>
  {
      Debug.WriteLine($"buttonup IsPressed={button.IsPressed}");
      led.Write(PinValue.Low);
  };

  // Write to debug if the button is pressed
  button.Press += (sender, e) =>
  {
      Debug.WriteLine($"Press");
  };

  // Write to debug if the button is double pressed
  button.DoublePress += (sender, e) =>
  {
      Debug.WriteLine($"Double press");
  };

  // Write to debug if the button is held and released
  button.Holding += (sender, e) =>
  {
      switch (e.HoldingState)
      {
          case ButtonHoldingState.Started:
              Debug.WriteLine($"Holding Started");
              break;
          case ButtonHoldingState.Completed:
              Debug.WriteLine($"Holding Completed");
              break;
      }
  };

  Thread.Sleep(Timeout.Infinite);

      }


  }
4. PWM调光
using Iot.Device.Button;
using System;
using System.Device.Gpio;
using System.Device.Pwm;
using System.Diagnostics;
using System.Threading;
using nanoFramework.Hardware.Esp32;
  public class Program
  {

      public static void Main()
      {

    //PWM调光
 // Pin 2 is the integrated LED in the ESP32, if you are using another board, change the pin number
 int pinLed = 2;

 // If you have an ESP32, you should setup the pin first to be used with PWM:
 Configuration.SetPinFunction(pinLed, DeviceFunction.PWM1);

 // Then you can create the PWM Channel from the pin:
 PwmChannel pwmPin = PwmChannel.CreateFromPin(pinLed, 40000, 0);
 // Note: even if possible, it is not recommended to adjust the frequency once created.

 // Start the PWM
 pwmPin.Start();

 // Now, we will loop to increase and decrease the duty cycle
 while (true)
 {
     // We will increase the duty cycle by 1 percent every 20 milliseconds
     for (int i = 0; i <= 100; i++)
     {
         pwmPin.DutyCycle = (double)i / 100;
         Thread.Sleep(20);
     }

     // We will decrease the duty cycle by 1 percent every 20 milliseconds
     for (int i = 100; i >= 0; i--)
     {
         pwmPin.DutyCycle = (double)i / 100;
         Thread.Sleep(20);
     }
 }

 Thread.Sleep(Timeout.Infinite);

      }


  }
5.湿度传感器
    AdcController adc1 = new AdcController();

    // Get the reference minimul and maximum values
    int max1 = adc1.MaxValue;
    int min1 = adc1.MinValue;

    Debug.WriteLine("min1=" + min1.ToString() + " max1=" + max1.ToString());

    // We will use the pin 34 which is already setup as ADC1_CH6
    // If you want to change to use another pin, this function needs to be used to setup the pin
    // Note, that not all configurations are possible. You'll have to refer to the ESP32 Technical Reference Manual
    // or the board you're using to see which pins can be used as ADC.
    // Configuration.SetPinFunction(34, DeviceFunction.ADC1_CH6);

    AdcChannel sensor = adc1.OpenChannel(6);

    while (true)
    {
        // Read the raw value
        int rawValue = sensor.ReadValue();
        // Calculate the voltage
        // The ESP32 is using 3.3 V as the reference voltage
        // The ADC has a 12-bit resolution, so the maximum value is 4095
        // Still, using the AdcController.MaxValue and MinValue is a good practice
        double voltage = ((double)(rawValue - min1) / (max1 - min1)) * 3.3;
        Debug.WriteLine($"Raw Value: {rawValue}, Voltage: {voltage}");

        // Here, it's more empirical, you can adjust to your own needs
        // You can also use directly the raw value to compare
        if (voltage < 1.5)
        {
            Debug.WriteLine("It's wet!");
        }
        else
        {
            Debug.WriteLine("It's dry!");
        }

        Thread.Sleep(1000);
    }

    Thread.Sleep(Timeout.Infinite);
6.继电器控制,注意供电是5v
  public class RelayUtils
  {
      // 继电器连接的GPIO引脚(可根据实际连接修改)
      private const int RELAY_PIN = 2;  // GPIO2

      // GPIO控制器
      private static GpioController gpio;
      private static GpioPin relayPin;

      // 继电器状态
      private static bool relayState = false;


      /// <summary>
      /// 初始化GPIO
      /// </summary>
      public static void InitializeGpio()
      {
          // 创建GPIO控制器
          gpio = new GpioController();

          // 配置继电器引脚为输出模式
          relayPin = gpio.OpenPin(RELAY_PIN, PinMode.Output);

          // 初始状态设置为关闭(低电平)
          relayPin.Write(PinValue.Low);
          relayState = false;

          Console.WriteLine("GPIO初始化完成");
      }

      /// <summary>
      /// 打开继电器
      /// </summary>
      public static void TurnOnRelay()
      {
          if (relayPin != null)
          {
              relayPin.Write(PinValue.High);
              relayState = true;
              Console.WriteLine("继电器已打开");
          }
      }

      /// <summary>
      /// 关闭继电器
      /// </summary>
      public static void TurnOffRelay()
      {
          if (relayPin != null)
          {
              relayPin.Write(PinValue.Low);
              relayState = false;
              Console.WriteLine("继电器已关闭");
          }
      }

      /// <summary>
      /// 切换继电器状态
      /// </summary>
      public static void ToggleRelay()
      {
          if (relayState)
          {
              TurnOffRelay();
          }
          else
          {
              TurnOnRelay();
          }
      }


      /// <summary>
      /// 获取继电器当前状态
      /// </summary>
      /// <returns>true为开启,false为关闭</returns>
      public static bool GetRelayState()
      {
          return relayState;
      }

      /// <summary>
      /// 定时控制继电器(开启指定时间后自动关闭)
      /// </summary>
      /// <param name="durationMs">开启持续时间(毫秒)</param>
      public static void TimedRelay(int durationMs)
      {
          Console.WriteLine($"定时开启继电器 {durationMs}ms");
          TurnOnRelay();
          Thread.Sleep(durationMs);
          TurnOffRelay();
      }


      /// <summary>
      /// 脉冲控制继电器
      /// </summary>
      /// <param name="pulseCount">脉冲次数</param>
      /// <param name="pulseWidth">脉冲宽度(毫秒)</param>
      /// <param name="interval">脉冲间隔(毫秒)</param>
      public static void PulseRelay(int pulseCount, int pulseWidth, int interval)
      {
          Console.WriteLine($"脉冲控制: {pulseCount}次, 宽度{pulseWidth}ms, 间隔{interval}ms");

          for (int i = 0; i < pulseCount; i++)
          {
              TurnOnRelay();
              Thread.Sleep(pulseWidth);
              TurnOffRelay();

              if (i < pulseCount - 1) // 最后一次不需要间隔
              {
                  Thread.Sleep(interval);
              }
          }
      }


      /// <summary>
      /// 清理GPIO资源
      /// </summary>
      public static void CleanupGpio()
      {
          try
          {
              if (relayPin != null)
              {
                  // 关闭继电器
                  relayPin.Write(PinValue.Low);
                  relayPin.Dispose();
              }

              if (gpio != null)
              {
                  gpio.Dispose();
              }

              Console.WriteLine("GPIO资源已清理");
          }
          catch (Exception ex)
          {
              Console.WriteLine($"清理资源时发生异常: {ex.Message}");
          }
      }
  }
7.通过网页控制继电器
using nanoFramework.Networking;
using System;
using System.Device.Gpio;
using System.Diagnostics;
using System.Net;
using System.Net.NetworkInformation;
using System.Text;
using System.Threading;
namespace ESP32RelayController
{
    public class Program
    {
        // WiFi配置
        private const string WIFI_SSID = "aaa";
        private const string WIFI_PASSWORD = "zqyo850619";

        // 服务器配置
        private const int SERVER_PORT = 8080;

        // 继电器引脚配置(根据你的硬件连接修改)
        private const int RELAY1_PIN = 15;   // 继电器1
        private const int RELAY2_PIN = 4;   // 继电器2
        private const int STATUS1_PIN = 17;   // 继电器1状态
        private const int STATUS2_PIN = 16;  // 继电器2状态

        // LED指示灯(可选)
        private const int LED_PIN = 2;

        private static GpioController _gpio;

        private static HttpListener _httpListener;


        public static void Main()
        {
            Console.WriteLine("ESP32 远程继电器控制器启动中...");

            // 初始化GPIO
            InitializeGpio();

            // 连接WiFi
            if (ConnectToWiFi())
            {
                Console.WriteLine("WiFi连接成功!");

                // 启动HTTP服务器
                StartHttpServer();
            }
            else
            {
                Console.WriteLine("WiFi连接失败!");
                return;
            }

            // 主循环
            while (true)
            {
                Thread.Sleep(1000);
                // 这里可以添加状态监控代码
            }
        }


        private static void InitializeGpio()
        {
            _gpio = new GpioController();

            // 初始化继电器引脚为输出模式,默认关闭(高电平)
         _gpio.OpenPin(RELAY1_PIN, PinMode.Output);
         _gpio.OpenPin(RELAY2_PIN, PinMode.Output);
         _gpio.OpenPin(STATUS1_PIN, PinMode.Input);
         _gpio.OpenPin(STATUS2_PIN, PinMode.Input);

            // 继电器默认关闭(假设低电平触发)
            _gpio.Write(RELAY1_PIN, PinValue.High);
            _gpio.Write(RELAY2_PIN, PinValue.High);


            // 初始化LED指示灯
            _gpio.OpenPin(LED_PIN, PinMode.Output);
            _gpio.Write(LED_PIN, PinValue.Low);

            Console.WriteLine("GPIO初始化完成");
        }

        private static bool ConnectToWiFi()
        {
            Console.WriteLine($"正在连接WiFi: {WIFI_SSID}");

            // 启用WiFi
            if (!WifiNetworkHelper.ConnectDhcp(WIFI_SSID, WIFI_PASSWORD, requiresDateTime: true))
            {
                return false;
            }

            // 获取网络接口信息
            NetworkInterface ni = NetworkInterface.GetAllNetworkInterfaces()[0];
            Console.WriteLine($"IP地址: {ni.IPv4Address}");
            Console.WriteLine($"网关: {ni.IPv4GatewayAddress}");
            Console.WriteLine($"DNS: {ni.IPv4DnsAddresses[0]}");

            return true;
        }

        private static void StartHttpServer()
        {
            _httpListener = new HttpListener("http", SERVER_PORT);
            _httpListener.Start();

            Console.WriteLine($"HTTP服务器已启动,监听端口: {SERVER_PORT}");

            // 显示访问地址
            NetworkInterface ni = NetworkInterface.GetAllNetworkInterfaces()[0];
            Console.WriteLine($"控制地址: http://{ni.IPv4Address}:{SERVER_PORT}/");

            // 启动请求处理线程
            new Thread(HandleRequests).Start();
        }


        private static void HandleRequests()
        {
            while (true)
            {
                HttpListenerContext context = null;
                try
                {
                     context = _httpListener.GetContext();
                    ProcessRequest(context);
                }
                catch (Exception ex)
                {
                    Debug.WriteLine($"请求处理异常: {ex.Message}");


                }
            }
        }


        private static void ProcessRequest(HttpListenerContext context)
        {
          HttpListenerRequest request = context.Request;
          HttpListenerResponse response = context.Response;

            string responseString = "";

            try
            {
                string url = request.RawUrl.ToLower();
                Console.WriteLine($"收到请求: {request.HttpMethod} {url}");

                if (request.HttpMethod == "GET")
                {
                    if (url == "/" || url == "/index.html")
                    {
                        // 返回控制界面
                        responseString = GetControlPageHtml();
                        response.ContentType = "text/html; charset=utf-8";
                    }
                    else if (url.StartsWith("/relay/"))
                    {
                        // 处理继电器控制命令
                        responseString = HandleRelayCommand(url);
                        response.ContentType = "application/json; charset=utf-8";
                    }
                    else if (url == "/status")
                    {
                        // 返回状态信息
                        responseString = GetStatusJson();
                        response.ContentType = "application/json; charset=utf-8";
                    }
                    else
                    {
                        response.StatusCode = 404;
                        responseString = "页面未找到";
                    }
                }
                else
                {
                    response.StatusCode = 405;
                    responseString = "方法不支持";
                }
                // 发送响应
                byte[] buffer = Encoding.UTF8.GetBytes(responseString);
                response.ContentLength64 = buffer.Length;
                response.OutputStream.Write(buffer, 0, buffer.Length);
                response.OutputStream.Close();
            }
            catch (Exception ex)
            {
                // 在nanoFramework中,确保在异常情况下也正确关闭
                if (context?.Response != null)
                {
                    try
                    {
                        response.StatusCode = 500;
                      //  responseString = $"服务器错误: {ex.Message}";
                        Console.WriteLine($"处理请求错误: {ex.Message}");
                        context.Response.Close();
                    }
                    catch
                    {
                        // 静默处理关闭异常
                    }
                }

            }
            finally
            {
                // 确保响应被关闭
                response?.Close();
            }


        }


        private static string HandleRelayCommand(string url)
        {
            try
            {
                // 解析URL: /relay/{relayNumber}/{action}
                string[] parts = url.Split('/');
                if (parts.Length < 4)
                {
                    return "{\"success\": false, \"message\": \"无效的命令格式\"}";
                }

                int relayNumber = int.Parse(parts[2]);
                string action = parts[3].ToLower();

                if (relayNumber < 1 || relayNumber > 2)
                {
                    return "{\"success\": false, \"message\": \"继电器编号必须在1-2之间\"}";
                }

                int pin = GetRelayPin(relayNumber);
                bool success = false;
                string message = "";

                switch (action)
                {
                    case "on":
                        _gpio.Write(pin, PinValue.Low);  // 低电平触发
                        success = true;
                        message = $"继电器{relayNumber}已开启";
                        Console.WriteLine(message);
                        break;

                    case "off":
                        _gpio.Write(pin, PinValue.High); // 高电平关闭
                        success = true;
                        message = $"继电器{relayNumber}已关闭";
                        Console.WriteLine(message);
                        break;

                    case "toggle":
                        bool currentState = ReadControlPinStatus(pin);
                        PinValue newState = currentState  ? PinValue.High : PinValue.Low;
                        _gpio.Write(pin, newState);
                        success = true;
                        message = $"继电器{relayNumber}已切换到{(newState == PinValue.Low ? "开启" : "关闭")}";
                        Console.WriteLine(message);
                        break;

                    default:
                        message = "无效的操作,支持: on/off/toggle";
                        break;
                }

                return $"{{\"success\": {success.ToString().ToLower()}, \"message\": \"{message}\"}}";
            }
            catch (Exception ex)
            {
                return $"{{\"success\": false, \"message\": \"处理命令错误: {ex.Message}\"}}";
            }
        }


        private static int GetRelayPin(int relayNumber)
        {
            switch (relayNumber)
            {
                case 1: return RELAY1_PIN;
                case 2: return RELAY2_PIN;

                default: throw new ArgumentException("无效的继电器编号");
            }
        }

        private static string GetStatusJson()
        {
            // 读取所有继电器状态
            bool relay1 = ReadControlPinStatus(RELAY1_PIN);
            bool relay2 = ReadControlPinStatus(RELAY2_PIN);


            return $@"{{
                ""relay1"": {relay1.ToString().ToLower()},
                ""relay2"": {relay2.ToString().ToLower()},
                ""uptime"": {TimeSpan.TicksPerMinute}
            }}";
        }

        private static bool ReadControlPinStatus(int pin)
        {

            if (pin==RELAY1_PIN)
            {
                return _gpio.Read(STATUS1_PIN) == PinValue.Low;
            }
            return _gpio.Read(STATUS2_PIN) == PinValue.Low;

        }


        private static string GetControlPageHtml()
        {
            return @"<!DOCTYPE html>
<html>
<head>
    <meta charset='utf-8'>
    <title>ESP32 继电器控制器</title>
    <meta name='viewport' content='width=device-width, initial-scale=1'>
    <style>
        body { font-family: Arial; text-align: center; margin: 20px; }
        .relay-box {
            display: inline-block;
            margin: 10px;
            padding: 20px;
            border: 2px solid #333;
            border-radius: 10px;
            width: 200px;
        }
        .btn {
            padding: 10px 20px;
            margin: 5px;
            font-size: 16px;
            border: none;
            border-radius: 5px;
            cursor: pointer;
        }
        .btn-on { background-color: #4CAF50; color: white; }
        .btn-off { background-color: #f44336; color: white; }
        .btn-toggle { background-color: #008CBA; color: white; }
        .status { margin: 10px 0; font-weight: bold; }
    </style>
</head>
<body>
    <h1>ESP32 继电器控制器</h1>

    <div id='relays'>
        <div class='relay-box'>
            <h3>继电器 1</h3>
            <div class='status' id='status1'>状态: 未知</div>
            <button class='btn btn-on' onclick='controlRelay(1, ""on"")'>开启</button>
            <button class='btn btn-off' onclick='controlRelay(1, ""off"")'>关闭</button>
            <button class='btn btn-toggle' onclick='controlRelay(1, ""toggle"")'>切换</button>
        </div>

        <div class='relay-box'>
            <h3>继电器 2</h3>
            <div class='status' id='status2'>状态: 未知</div>
            <button class='btn btn-on' onclick='controlRelay(2, ""on"")'>开启</button>
            <button class='btn btn-off' onclick='controlRelay(2, ""off"")'>关闭</button>
            <button class='btn btn-toggle' onclick='controlRelay(2, ""toggle"")'>切换</button>
        </div>

    </div>

    <div style='margin-top: 30px;'>
        <button class='btn' onclick='refreshStatus()' style='background-color: #555; color: white;'>刷新状态</button>
    </div>

    <script>
        function controlRelay(relayNumber, action) {
            fetch('/relay/' + relayNumber + '/' + action)
                .then(response => response.json())
                .then(data => {
                    alert(data.message);
                    refreshStatus();
                })
                .catch(error => {
                    alert('错误: ' + error);
                });
        }

        function refreshStatus() {
            fetch('/status')
                .then(response => response.json())
                .then(data => {
                    document.getElementById('status1').textContent = '状态: ' + (data.relay1 ? '开启' : '关闭');
                    document.getElementById('status2').textContent = '状态: ' + (data.relay2 ? '开启' : '关闭');

                })
                .catch(error => {
                    console.error('获取状态失败:', error);
                });
        }

        // 页面加载时刷新状态
        window.onload = function() {
            refreshStatus();
            // 每5秒自动刷新状态
            setInterval(refreshStatus, 10000);
        };
    </script>
</body>
</html>";
        }

    }
}

 浙公网安备 33010602011771号