
红帽7 虚拟主机功能
利用虚拟主机功能,可以把一台处于运行状态的物理服务器分割成多个“虚拟的服务器”。但是,该技术无法实现目前云主机技术的硬件资源隔离,让这些虚拟的服务器共同使用物理服务器的硬件资源,供应商只能限制硬盘的使用空间大小。Apache 的虚拟主机功能是服务器基于用户请求的不同 IP 地址、主机域名或端口号,实现提供多个网站同时为外部提供访问服务的技术,用户请求的资源不同,最终获取到的网页内容也各不相同。
1、基于 IP 地址
如果一台服务器有多个 IP 地址,而且每个 IP 地址与服务器上部署的每个网站一一对应,这样当用户请求访问不同的 IP 地址时,会访问到不同网站的页面资源。
首先把ip地址配置好,配置完并重启网卡服务,检查网络连通性,确保3个ip可正常访问。


第一步:分别在/home/wwwroot 中创建用于保存不同网站数据的 3 个目录,并向其中分别写入网站的首页文件。
[root@localhost Desktop]# mkdir -p /home/wwwroot/10
[root@localhost Desktop]# mkdir -p /home/wwwroot/20
[root@localhost Desktop]# mkdir -p /home/wwwroot/30
[root@localhost Desktop]# echo "101010101010" > /home/wwwroot/10/index.html
[root@localhost Desktop]# echo "202020202020" > /home/wwwroot/20/index.html
[root@localhost Desktop]# echo "303030303030" > /home/wwwroot/30/index.html
第二步:在 httpd 服务的配置文件中大约 113 行处开始,分别追加写入三个基于 IP 地址的虚拟主机网站参数,然后保存并退出。重启httpd服务,配置才生效
[root@localhost Desktop]# vim /etc/httpd/conf/httpd.conf
………………省略部分输出信息…………
113 <VirtualHost 192.168.10.10>
114 DocumentRoot /home/wwwroot/10
115 ServerName www.test1.com
116 <Directory /home/wwwroot/10>
117 AllowOverride None
118 Require all granted
119 </Directory>
120 </VirtualHost>
121 <VirtualHost 192.168.10.20>
122 DocumentRoot /home/wwwroot/20
123 ServerName www.test2.com
124 <Directory /home/wwwroot/20>
125 AllowOverride None
126 Require all granted
127 </Directory>
128 </VirtualHost>
129 <VirtualHost 192.168.10.30>
130 DocumentRoot /home/wwwroot/30
131 ServerName www.test3.com
132 <Directory /home/wwwroot/30>
133 AllowOverride None
134 Require all granted
135 </Directory>
136 </VirtualHost>
………………省略部分输出信息…………
[root@localhost Desktop]# systemctl restart network
第三步:此时访问网站,则会看到 httpd 服务程序的默认首页面。这是 SELinux 在捣鬼。由于当前的/home/wwwroot 目录及里面的网站数据目录的SELinux 安全上下文与网站服务不吻合,因此 httpd 服务程序无法获取到这些网站数据目录。我们需要手动把新的网站数据目录的 SELinux 安全上下文设置正确,并使用restorecon 命令让新设置的 SELinux 安全上下文立即生效,这样就可以立即看到网站的访问效果了
[root@localhost Desktop]# semanage fcontext -a -t httpd_sys_content_t /home/wwwroot
[root@localhost Desktop]# semanage fcontext -a -t httpd_sys_content_t /home/wwwroot/10
[root@localhost Desktop]# semanage fcontext -a -t httpd_sys_content_t /home/wwwroot/10/*
[root@localhost Desktop]# semanage fcontext -a -t httpd_sys_content_t /home/wwwroot/20
[root@localhost Desktop]# semanage fcontext -a -t httpd_sys_content_t /home/wwwroot/20/*
[root@localhost Desktop]# semanage fcontext -a -t httpd_sys_content_t /home/wwwroot/30
[root@localhost Desktop]# semanage fcontext -a -t httpd_sys_content_t /home/wwwroot/30/*
[root@localhost Desktop]# restorecon -Rv /home/wwwroot/
restorecon reset /home/wwwroot context unconfined_u:object_r:home_root_t:s0->unconfined_u:object_r:httpd_sys_content_t:s0
restorecon reset /home/wwwroot/10 context unconfined_u:object_r:home_root_t:s0->unconfined_u:object_r:httpd_sys_content_t:s0
restorecon reset /home/wwwroot/10/index.html context unconfined_u:object_r:home_root_t:s0->unconfined_u:object_r:httpd_sys_content_t:s0
restorecon reset /home/wwwroot/20 context unconfined_u:object_r:home_root_t:s0->unconfined_u:object_r:httpd_sys_content_t:s0
restorecon reset /home/wwwroot/20/index.html context unconfined_u:object_r:home_root_t:s0->unconfined_u:object_r:httpd_sys_content_t:s0
restorecon reset /home/wwwroot/30 context unconfined_u:object_r:home_root_t:s0->unconfined_u:object_r:httpd_sys_content_t:s0
restorecon reset /home/wwwroot/30/index.html context unconfined_u:object_r:home_root_t:s0->unconfined_u:object_r:httpd_sys_content_t:s0


2、基于主机域名
当服务器无法为每个网站都分配一个独立 IP 地址的时候,可以尝试让 Apache 自动识别用户请求的域名,从而根据不同的域名请求来传输不同的内容。在这种情况下的配置更加简
单,只需要保证位于生产环境中的服务器上有一个可用的 IP 地址就可以了。/etc/hosts 是 Linux 系统中用于强制把某个主机域名解析到指定 IP 地址的配置文件。简单来说,只要这个文件配置正确,即使网卡参数中没有 DNS 信息也依然能够将域名解析为某个 IP 地址。
第一步:手工定义 IP 地址与域名之间对应关系的配置文件,保存并退出后会立即生效。可以通过分别 ping 这些域名来验证域名是否已经成功解析为 IP 地址。
[root@localhost Desktop]# vim /etc/hosts
127.0.0.1   localhost localhost.localdomain localhost4 localhost4.localdomain4
::1         localhost localhost.localdomain localhost6 localhost6.localdomain6
192.168.10.10 www.test1.com www.test2.com www.test3.com
[root@localhost Desktop]# ping www.test1.com
PING www.test1.com (192.168.10.10) 56(84) bytes of data.
64 bytes from www.test1.com (192.168.10.10): icmp_seq=1 ttl=64 time=0.046 ms
64 bytes from www.test1.com (192.168.10.10): icmp_seq=2 ttl=64 time=0.106 ms
64 bytes from www.test1.com (192.168.10.10): icmp_seq=3 ttl=64 time=0.094 ms
64 bytes from www.test1.com (192.168.10.10): icmp_seq=4 ttl=64 time=0.091 ms
^C
--- www.test1.com ping statistics ---
4 packets transmitted, 4 received, 0% packet loss, time 3000ms
rtt min/avg/max/mdev = 0.046/0.084/0.106/0.023 ms
第二步:分别在/home/wwwroot 中创建用于保存不同网站数据的三个目录,并向其中分别写入网站的首页文件。
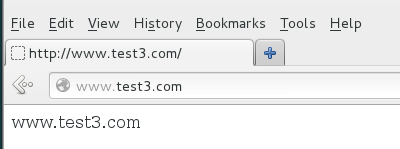
[root@localhost Desktop]# mkdir -p /home/wwwroot/test1
[root@localhost Desktop]# mkdir -p /home/wwwroot/test2
[root@localhost Desktop]# mkdir -p /home/wwwroot/test3
[root@localhost Desktop]# echo "www.test1.com" > /home/wwwroot/test1/index.html
[root@localhost Desktop]# echo "www.test2.com" > /home/wwwroot/test2/index.html
[root@localhost Desktop]# echo "www.test3.com" > /home/wwwroot/test3/index.html
第三步:在 httpd 服务的配置文件中大约 113 行处开始,分别追加写入三个基于主机名的虚拟主机网站参数,然后保存并退出。重启httpd服务,这些配置才生效
[root@localhost Desktop]# vim /etc/httpd/conf/httpd.conf
………………省略部分输出信息…………
113 <VirtualHost 192.168.10.10>
114 DocumentRoot "/home/wwwroot/test1"
115 ServerName "www.test1.com"
116 <Directory "/home/wwwroot/test1">
117 AllowOverride None
118 Require all granted
119 </Directory>
120 </VirtualHost>
121 <VirtualHost 192.168.10.10>
122 DocumentRoot "/home/wwwroot/test2"
123 ServerName "www.test2.com"
124 <Directory "/home/wwwroot/test2">
125 AllowOverride None
126 Require all granted
127 </Directory>
128 </VirtualHost>
129 <VirtualHost 192.168.10.10>
130 DocumentRoot "/home/wwwroot/test3"
131 ServerName "www.test3.com"
132 <Directory "/home/wwwroot/test3">
133 AllowOverride None
134 Require all granted
135 </Directory>
136 </VirtualHost>
………………省略部分输出信息…………
第四步:因为当前的网站数据目录还是在/home/wwwroot 目录中,因此还是必须要正确设置网站数据目录文件的 SELinux 安全上下文,使其与网站服务功能相吻合。最后记得用
restorecon 命令让新配置的 SELinux 安全上下文立即生效,这样就可以立即访问到虚拟主机网站了
[root@localhost Desktop]# semanage fcontext -a -t httpd_sys_content_t /home/wwwroot
[root@localhost Desktop]# semanage fcontext -a -t httpd_sys_content_t /home/wwwroot/test1
[root@localhost Desktop]# semanage fcontext -a -t httpd_sys_content_t /home/wwwroot/test1/*
[root@localhost Desktop]# semanage fcontext -a -t httpd_sys_content_t /home/wwwroot/test2
[root@localhost Desktop]# semanage fcontext -a -t httpd_sys_content_t /home/wwwroot/test2/*
[root@localhost Desktop]# semanage fcontext -a -t httpd_sys_content_t /home/wwwroot/test3
[root@localhost Desktop]# semanage fcontext -a -t httpd_sys_content_t /home/wwwroot/test3/*
[root@localhost Desktop]# restorecon -Rv /home/wwwroot
restorecon reset /home/wwwroot context unconfined_u:object_r:home_root_t:s0->unconfined_u:object_r:httpd_sys_content_t:s0
restorecon reset /home/wwwroot/test1 context unconfined_u:object_r:home_root_t:s0->unconfined_u:object_r:httpd_sys_content_t:s0
restorecon reset /home/wwwroot/test1/index.html context unconfined_u:object_r:home_root_t:s0->unconfined_u:object_r:httpd_sys_content_t:s0
restorecon reset /home/wwwroot/test2 context unconfined_u:object_r:home_root_t:s0->unconfined_u:object_r:httpd_sys_content_t:s0
restorecon reset /home/wwwroot/test2/index.html context unconfined_u:object_r:home_root_t:s0->unconfined_u:object_r:httpd_sys_content_t:s0
restorecon reset /home/wwwroot/test3 context unconfined_u:object_r:home_root_t:s0->unconfined_u:object_r:httpd_sys_content_t:s0
restorecon reset /home/wwwroot/test3/index.html context unconfined_u:object_r:home_root_t:s0->unconfined_u:object_r:httpd_sys_content_t:s0


3、基于端口号
基于端口号的虚拟主机功能可以让用户通过指定的端口号来访问服务器上的网站资源。一般来说,使用 80、443、8080 等端口号来提供网站访问服务是比较合理的,如果使用其他端口号则会受到 SELinux 服务的限制。不但要考虑到目录上应用的 SELinux 安全上下文的限制,还需要考虑 SELinux 域对 httpd 服务程序的管控。
第一步:分别在/home/wwwroot 中创建用于保存不同网站数据的两个目录,并向其中分别写入网站的首页文件。
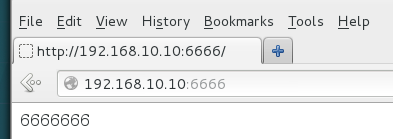
[root@localhost Desktop]# mkdir -p /home/wwwroot/6666
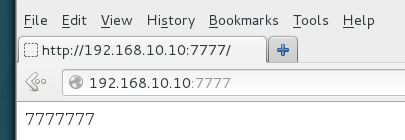
[root@localhost Desktop]# mkdir -p /home/wwwroot/7777
[root@localhost Desktop]# echo "6666666" > /home/wwwroot/6666/index.html
[root@localhost Desktop]# echo "7777777" > /home/wwwroot/7777/index.html
第二步:在 httpd 服务配置文件的第 43 行和第 44 行分别添加用于监听 6666 和 7777端口的参数
[root@localhost Desktop]# vim /etc/httpd/conf/httpd.conf
 ………………省略部分输出信息…………

 34 # Listen: Allows you to bind Apache to specific IP addresses and/or
 35 # ports, instead of the default. See also the <VirtualHost>
 36 # directive.
 37 #
 38 # Change this to Listen on specific IP addresses as shown below to
 39 # prevent Apache from glomming onto all bound IP addresses.
 40 #
 41 #Listen 12.34.56.78:80
 42 Listen 80
 43 Listen 6666
 44 Listen 7777
………………省略部分输出信息…………
第三步:在 httpd 服务的配置文件中大约 113 行处开始,分别追加写入两个基于端口号的虚拟主机网站参数,然后保存并退出。重启服务,使配置生效
[root@localhost Desktop]# vim /etc/httpd/conf/httpd.conf
113 <VirtualHost 192.168.10.10:6666>
114 DocumentRoot "/home/wwwroot/6666"
115 ServerName www.test1.com
116 <Directory "/home/wwwroot/6666">
117 AllowOverride None
118 Require all granted
119 </Directory>
120 </VirtualHost>
121 <VirtualHost 192.168.10.10:7777>
122 DocumentRoot "/home/wwwroot/7777"
123 ServerName www.test2.com
124 <Directory "/home/wwwroot/7777">
125 AllowOverride None
126 Require all granted
127 </Directory>
128 </VirtualHost>
第四步:因为我们把网站数据目录存放在/home/wwwroot 目录中,因此还是必须要正确设置网站数据目录文件的 SELinux 安全上下文,使其与网站服务功能相吻合。最后记得用
restorecon 命令让新配置的 SELinux 安全上下文立即生效。
[root@localhost Desktop]# semanage fcontext -a -t httpd_sys_content_t /home/wwwroot
[root@localhost Desktop]# semanage fcontext -a -t httpd_sys_content_t /home/wwwroot/6666
[root@localhost Desktop]# semanage fcontext -a -t httpd_sys_content_t /home/oot/6666/*
[root@localhost Desktop]# semanage fcontext -a -t httpd_sys_content_t /home/wwwroot/7777
[root@localhost Desktop]# semanage fcontext -a -t httpd_sys_content_t /home/wwwroot/7777/*
[root@localhost Desktop]# restorecon -Rv /home/wwwroot/
restorecon reset /home/wwwroot context unconfined_u:object_r:home_root_t:s0->unconfined_u:object_r:httpd_sys_content_t:s0
restorecon reset /home/wwwroot/6666 context unconfined_u:object_r:home_root_t:s0->unconfined_u:object_r:httpd_sys_content_t:s0
restorecon reset /home/wwwroot/6666/index.html context unconfined_u:object_r:home_root_t:s0->unconfined_u:object_r:httpd_sys_content_t:s0
restorecon reset /home/wwwroot/7777 context unconfined_u:object_r:home_root_t:s0->unconfined_u:object_r:httpd_sys_content_t:s0
restorecon reset /home/wwwroot/7777/index.html context unconfined_u:object_r:home_root_t:s0->unconfined_u:object_r:httpd_sys_content_t:s0
[root@localhost Desktop]# systemctl restart httpd
Job for httpd.service failed. See 'systemctl status httpd.service' and 'journalctl -xn' for details.
在妥当配置 httpd 服务程序和 SELinux 安全上下文并重启 httpd 服务后,竟然出现报错信息。这是因为 SELinux 服务检测到 6666 和 7777 端口原本不属于 Apache 服务应该需要的资源,但现在却以 httpd 服务程序的名义监听使用了,所以 SELinux 会拒绝使用 Apache服务使用这两个端口。我们可以使用 semanage 命令查询并过滤出所有与 HTTP 协议相关且SELinux 服务允许的端口列表。
[root@localhost Desktop]# semanage port -l | grep http
http_cache_port_t              tcp      8080, 8118, 8123, 10001-10010
http_cache_port_t              udp      3130
http_port_t                    tcp      80, 81, 443, 488, 8008, 8009, 8443, 9000
pegasus_http_port_t            tcp      5988
pegasus_https_port_t           tcp      5989
第五步:SELinux 允许的与 HTTP 协议相关的端口号中默认没有包含 6111 和 6222,因此需要将这两个端口号手动添加进去。该操作会立即生效,而且在系统重启过后依然有效。设置好后再重启 httpd 服务程序,然后就可以看到网页内容了。
[root@localhost Desktop]# semanage port -a -t http_port_t -p tcp 6666
[root@localhost Desktop]# semanage port -a -t http_port_t -p tcp 7777
[root@localhost Desktop]# semanage port -l | grep http
http_cache_port_t              tcp      8080, 8118, 8123, 10001-10010
http_cache_port_t              udp      3130
http_port_t                    tcp      7777, 6666, 80, 81, 443, 488, 8008, 8009, 8443, 9000
pegasus_http_port_t            tcp      5988
pegasus_https_port_t           tcp      5989
[root@localhost Desktop]# systemctl restart httpd

 浙公网安备 33010602011771号