Spring Security 入门(一):认证和原理分析
Spring Security是一种基于Spring AOP和Servlet Filter的安全框架,其核心是一组过滤器链,实现 Web 请求和方法调用级别的用户鉴权和权限控制。本文将会介绍该安全框架的身份认证和退出登录的基本用法,并对其相关源码进行分析。
表单认证
Spring Security提供了两种认证方式:HttpBasic 认证和 HttpForm 表单认证。HttpBasic 认证不需要我们编写登录页面,当浏览器请求 URL 需要认证才能访问时,页面会自动弹出一个登录窗口,要求用户输入用户名和密码进行认证。大多数情况下,我们还是通过编写登录页面进行 HttpForm 表单认证。
快速入门
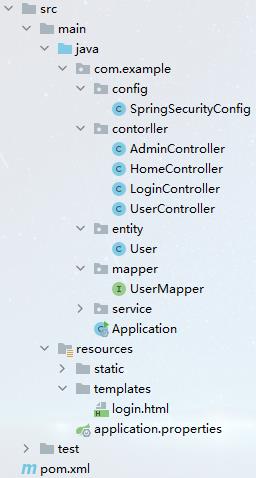
☕️ 工程的整体目录
☕️ 在 pom.xml 添加依赖
<parent>
    <groupId>org.springframework.boot</groupId>
    <artifactId>spring-boot-starter-parent</artifactId>
    <version>2.3.3.RELEASE</version>
    <relativePath/>
</parent>

<dependencies>
    <!-- spring web 依赖 -->
    <dependency>
        <groupId>org.springframework.boot</groupId>
        <artifactId>spring-boot-starter-web</artifactId>
    </dependency>

    <!-- spring security 依赖 -->
    <dependency>
        <groupId>org.springframework.boot</groupId>
        <artifactId>spring-boot-starter-security</artifactId>
    </dependency>

    <!-- thymeleaf 模板引擎 -->
    <dependency>
        <groupId>org.springframework.boot</groupId>
        <artifactId>spring-boot-starter-thymeleaf</artifactId>
    </dependency>

    <!-- 热部署 -->
    <dependency>
        <groupId>org.springframework.boot</groupId>
        <artifactId>spring-boot-devtools</artifactId>
        <scope>runtime</scope>
        <optional>true</optional>
    </dependency>

    <!-- lombok -->
    <dependency>
        <groupId>org.projectlombok</groupId>
        <artifactId>lombok</artifactId>
        <optional>true</optional>
    </dependency>

    <!-- 封装了一些常用的工具类 -->
    <dependency>
        <groupId>org.apache.commons</groupId>
        <artifactId>commons-lang3</artifactId>
        <version>3.10</version>
    </dependency>

    <!-- 测试 -->
    <dependency>
        <groupId>org.springframework.boot</groupId>
        <artifactId>spring-boot-starter-test</artifactId>
        <scope>test</scope>
        <exclusions>
            <exclusion>
                <groupId>org.junit.vintage</groupId>
                <artifactId>junit-vintage-engine</artifactId>
            </exclusion>
        </exclusions>
    </dependency>
</dependencies>
☕️ 在 application.properties 添加配置
# 关闭 thymeleaf 缓存
spring.thymeleaf.cache=false
☕️ 编写 Controller 层
package com.example.contorller;

import org.springframework.stereotype.Controller;
import org.springframework.web.bind.annotation.GetMapping;
import org.springframework.web.bind.annotation.ResponseBody;

@Controller
public class HomeController {

    @GetMapping({"/", "/index"})
    @ResponseBody
    public String index() {   // 跳转到主页
        return "欢迎您登录!!!";
    }
}
package com.example.contorller;

import org.springframework.stereotype.Controller;
import org.springframework.web.bind.annotation.GetMapping;

@Controller
public class LoginController {

    @GetMapping("/login/page")
    public String loginPage() {  // 获取登录页面
        return "login";
    }
}
☕️ 编写 login.html 页面
<!DOCTYPE html>
<html lang="en" xmlns:th="http://www.thymeleaf.org">
<head>
    <meta charset="UTF-8">
    <title>登录</title>
</head>
<body>
    <h3>表单登录</h3>
    <form method="post" th:action="@{/login/form}">
        <input type="text" name="name" placeholder="用户名"><br>
        <input type="password" name="pwd" placeholder="密码"><br>
        <div th:if="${param.error}">
            <span th:text="${session.SPRING_SECURITY_LAST_EXCEPTION.message}" style="color:red">用户名或密码错误</span>
        </div>
        <button type="submit">登录</button>
    </form>
</body>
</html>
☕️ 编写安全配置类 SpringSecurityConfig
package com.example.config;

import org.springframework.context.annotation.Bean;
import org.springframework.security.config.annotation.authentication.builders.AuthenticationManagerBuilder;
import org.springframework.security.config.annotation.web.builders.HttpSecurity;
import org.springframework.security.config.annotation.web.builders.WebSecurity;
import org.springframework.security.config.annotation.web.configuration.EnableWebSecurity;
import org.springframework.security.config.annotation.web.configuration.WebSecurityConfigurerAdapter;
import org.springframework.security.crypto.bcrypt.BCryptPasswordEncoder;

@EnableWebSecurity       // 开启 MVC Security 安全配置
public class SpringSecurityConfig extends WebSecurityConfigurerAdapter {

    /**
     * 密码编码器,密码不能明文存储
     */
    @Bean
    public BCryptPasswordEncoder passwordEncoder() {
        // 使用 BCryptPasswordEncoder 密码编码器,该编码器会将随机产生的 salt 混入最终生成的密文中
        return new BCryptPasswordEncoder();
    }

    /**
     * 定制用户认证管理器来实现用户认证
     */
    @Override
    protected void configure(AuthenticationManagerBuilder auth) throws Exception {
        // 采用内存存储方式,用户认证信息存储在内存中
        auth.inMemoryAuthentication()
                .withUser("admin").password(passwordEncoder()
                .encode("123456")).roles("ROLE_ADMIN");
    }

    /**
     * 定制基于 HTTP 请求的用户访问控制
     */
    @Override
    protected void configure(HttpSecurity http) throws Exception {
        // 启动 form 表单登录
        http.formLogin()
                // 设置登录页面的访问路径,默认为 /login,GET 请求;该路径不设限访问
                .loginPage("/login/page")
                // 设置登录表单提交路径,默认为 loginPage() 设置的路径,POST 请求
                .loginProcessingUrl("/login/form")
                // 设置登录表单中的用户名参数,默认为 username
                .usernameParameter("name")
                // 设置登录表单中的密码参数,默认为 password
                .passwordParameter("pwd")
                // 认证成功处理,如果存在原始访问路径,则重定向到该路径;如果没有,则重定向 /index
                .defaultSuccessUrl("/index")
                // 认证失败处理,重定向到指定地址,默认为 loginPage() + ?error;该路径不设限访问
                .failureUrl("/login/page?error");

        // 开启基于 HTTP 请求访问控制
        http.authorizeRequests()
                // 以下访问不需要任何权限,任何人都可以访问
                .antMatchers("/login/page").permitAll()
                // 其它任何请求访问都需要先通过认证
                .anyRequest().authenticated();

        // 关闭 csrf 防护
        http.csrf().disable();
    }

    /**
     * 定制一些全局性的安全配置,例如:不拦截静态资源的访问
     */
    @Override
    public void configure(WebSecurity web) throws Exception {
        // 静态资源的访问不需要拦截,直接放行
        web.ignoring().antMatchers("/**/*.css", "/**/*.js", "/**/*.png", "/**/*.jpg", "/**/*.jpeg");
    }
}
上述的安全配置类继承了WebSecurityConfigurerAdapter抽象类,并重写了三个重载的 configure() 方法:
/**
 * 定制用户认证管理器来实现用户认证
 *  1. 提供用户认证所需信息(用户名、密码、当前用户的资源权)
 *  2. 可采用内存存储方式,也可能采用数据库方式
 */
void configure(AuthenticationManagerBuilder auth);

/**
 * 定制基于 HTTP 请求的用户访问控制
 *  1. 配置拦截的哪一些资源
 *  2. 配置资源所对应的角色权限
 *  3. 定义认证方式:HttpBasic、HttpForm
 *  4. 定制登录页面、登录请求地址、错误处理方式
 *  5. 自定义 Spring Security 过滤器等
 */
void configure(HttpSecurity http);

/**
 * 定制一些全局性的安全配置,例如:不拦截静态资源的访问
 */
void configure(WebSecurity web);
安全配置类需要使用 @EnableWebSecurity 注解修饰,该注解是一个组合注解,内部包含了 @Configuration 注解,所以安全配置类不需要添加 @Configuration 注解即可被 Spring 容器识别。具体定义如下:
@Retention(RetentionPolicy.RUNTIME)
@Target({ElementType.TYPE})
@Documented
@Import({WebSecurityConfiguration.class, SpringWebMvcImportSelector.class, OAuth2ImportSelector.class})
@EnableGlobalAuthentication
@Configuration
public @interface EnableWebSecurity {
    boolean debug() default false;
}
☕️ 测试
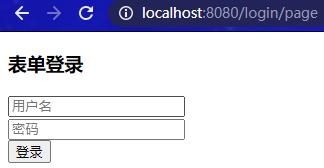
启动项目,访问localhost:8080,重定向到/login/page登录页面要求身份认证:
输入正确的用户名和密码认证成功后,重定向到原始访问路径:

UserDetailsService 和 UserDetails 接口
在实际开发中,Spring Security应该动态的从数据库中获取信息进行自定义身份认证,采用数据库方式进行身份认证一般需要实现两个核心接口 UserDetailsService 和 UserDetails。
⭐️ UserDetailService 接口
该接口只有一个方法 loadUserByUsername(),用于定义从数据库中获取指定用户信息的逻辑。如果未获取到用户信息,则需要手动抛出 UsernameNotFoundException 异常;如果获取到用户信息,则将该用户信息封装到 UserDetails 接口的实现类中并返回。
public interface UserDetailsService {
    // 输入参数 username 是前端传入的用户名
    UserDetails loadUserByUsername(String username) throws UsernameNotFoundException;
}
⭐️ UserDetails 接口
UserDetails 接口定义了用于描述用户信息的方法,具体定义如下:
public interface UserDetails extends Serializable {
    // 返回用户权限集合
    Collection<? extends GrantedAuthority> getAuthorities();

    // 返回用户的密码
    String getPassword();

    // 返回用户的用户名
    String getUsername();

    // 账户是否未过期(true 未过期, false 过期)
    boolean isAccountNonExpired();

    // 账户是否未锁定(true 未锁定, false 锁定)
    // 用户账户可能会被封锁,达到一定要求可恢复
    boolean isAccountNonLocked();

    // 密码是否未过期(true 未过期, false 过期)
    // 一些安全级别高的系统,可能要求 30 天更换一次密码
    boolean isCredentialsNonExpired();

    // 账户是否可用(true 可用, false 不可用)
    // 系统一般不会真正的删除用户信息,而是假删除,通过一个状态码标志用户是否被删除
    boolean isEnabled();
}
自定义用户认证
✏️ 数据库准备
DROP TABLE IF EXISTS `user`;
CREATE TABLE `user` (
      `id` bigint NOT NULL AUTO_INCREMENT COMMENT '主键',
      `username` varchar(50) NOT NULL COMMENT '用户名',
      `password` varchar(64) COMMENT '密码',
      `mobile` varchar(20) COMMENT '手机号',
      `enabled` tinyint NOT NULL DEFAULT '1' COMMENT '用户是否可用',
      `roles` text COMMENT '用户角色,多个角色之间用逗号隔开',
      PRIMARY KEY (`id`),
      KEY `index_username`(`username`),
      KEY `index_mobile`(`mobile`)
) COMMENT '用户表';

-- 密码明文都为 123456
INSERT INTO `user` VALUES ('1', 'admin', '$2a$10$JNVWTh5Yq56kJtrCZkcDk.DL/L/i8g3KrTAshcHW3mFf8//lnfG56', '11111111111', '1', 'ROLE_ADMIN,ROLE_USER');
INSERT INTO `user` VALUES ('2', 'user', '$2a$10$JNVWTh5Yq56kJtrCZkcDk.DL/L/i8g3KrTAshcHW3mFf8//lnfG56', '22222222222', '1', 'ROLE_USER');
我们将用户信息和角色信息放在同一张表中,roles 字段设定为 text 类型,多个角色之间用逗号隔开。
✏️ 在 pom.xml 中添加依赖
<!-- mysql 驱动 -->
<dependency>
    <groupId>mysql</groupId>
    <artifactId>mysql-connector-java</artifactId>
    <scope>runtime</scope>
</dependency>

<!-- mybatis -->
<dependency>
    <groupId>org.mybatis.spring.boot</groupId>
    <artifactId>mybatis-spring-boot-starter</artifactId>
    <version>2.1.3</version>
</dependency>
✏️ 在 application.properties 中添加配置
# 配置数据库连接的基本信息
spring.datasource.driver-class-name=com.mysql.cj.jdbc.Driver
spring.datasource.url=jdbc:mysql://localhost:3306/spring_security_test?characterEncoding=utf-8&useSSL=false&serverTimezone=Hongkong
spring.datasource.username=root
spring.datasource.password=123456

# 开启自动驼峰命名规则(camel case)映射
mybatis.configuration.map-underscore-to-camel-case=true
# 配置 Mapper 映射文件位置
mybatis.mapper-locations=classpath*:/mapper/**/*.xml
# 别名包扫描路径,通过该属性可以给指定包中的类注册别名
mybatis.type-aliases-package=com.example.entity
✏️ 创建 User 实体类,实现 UserDetails 接口
package com.example.entity;

import lombok.Data;
import org.springframework.security.core.GrantedAuthority;
import org.springframework.security.core.userdetails.UserDetails;
import java.util.Collection;
import java.util.List;

@Data
public class User implements UserDetails {

    private Long id;   // 主键

    private String username;  // 用户名

    private String password;   // 密码

    private String mobile;    // 手机号

    private String roles;    // 用户角色,多个角色之间用逗号隔开

    private boolean enabled;  // 用户是否可用

    private List<GrantedAuthority> authorities;  // 用户权限集合

    @Override
    public Collection<? extends GrantedAuthority> getAuthorities() {  // 返回用户权限集合
        return authorities;
    }

    @Override
    public boolean isAccountNonExpired() {  // 账户是否未过期
        return true;
    }

    @Override
    public boolean isAccountNonLocked() {  // 账户是否未锁定
        return true;
    }

    @Override
    public boolean isCredentialsNonExpired() {  // 密码是否未过期
        return true;
    }

    @Override
    public boolean isEnabled() {  // 账户是否可用
        return enabled;
    }

    @Override
    public boolean equals(Object obj) {  // equals() 方法一般要重写
        return obj instanceof User && this.username.equals(((User) obj).username);
    }

    @Override
    public int hashCode() {   // hashCode() 方法一般要重写
        return this.username.hashCode();
    }
}
✏️ 创建 UserMapper 接口
package com.example.mapper;

import com.example.entity.User;
import org.apache.ibatis.annotations.Select;

public interface UserMapper {
    @Select("select * from user where username = #{username}")
    User selectByUsername(String username);
}
Mapper 接口需要注册到 Spring 容器中,所以在启动类上添加 Mapper 的包扫描路径:
@SpringBootApplication
@MapperScan("com.example.mapper")
public class Application {

    public static void main(String[] args) {
        SpringApplication.run(Application.class, args);
    }
}
✏️ 创建 CustomUserDetailsService 类,实现 UserDetailsService 接口
package com.example.service;

import com.example.entity.User;
import com.example.mapper.UserMapper;
import org.springframework.beans.factory.annotation.Autowired;
import org.springframework.security.core.authority.AuthorityUtils;
import org.springframework.security.core.userdetails.UserDetails;
import org.springframework.security.core.userdetails.UserDetailsService;
import org.springframework.security.core.userdetails.UsernameNotFoundException;
import org.springframework.stereotype.Service;

@Service
public class CustomUserDetailsService implements UserDetailsService {

    @Autowired
    private UserMapper userMapper;

    @Override
    public UserDetails loadUserByUsername(String username) throws UsernameNotFoundException {
        //(1) 从数据库尝试读取该用户
        User user = userMapper.selectByUsername(username);
        // 用户不存在,抛出异常
        if (user == null) {
            throw new UsernameNotFoundException("用户不存在");
        }

        //(2) 将数据库形式的 roles 解析为 UserDetails 的权限集合
        // AuthorityUtils.commaSeparatedStringToAuthorityList() 是 Spring Security 提供的方法,用于将逗号隔开的权限集字符串切割为可用权限对象列表
        user.setAuthorities(AuthorityUtils.commaSeparatedStringToAuthorityList(user.getRoles()));

        //(3) 返回 UserDetails 对象
        return user;
    }
}
✏️ 修改安全配置类 SpringSecurityConfig
@EnableWebSecurity       // 开启 MVC Security 安全配置
public class SpringSecurityConfig extends WebSecurityConfigurerAdapter {
    //...
    @Autowired
    private CustomUserDetailsService userDetailsService;
    //...

    /**
     * 定制用户认证管理器来实现用户认证
     */
    @Override
    protected void configure(AuthenticationManagerBuilder auth) throws Exception {
        // 采用内存存储方式,用户认证信息存储在内存中
        // auth.inMemoryAuthentication()
        //        .withUser("admin").password(passwordEncoder()
        //        .encode("123456")).roles("ROLE_ADMIN");

        // 不再使用内存方式存储用户认证信息,而是动态从数据库中获取
        auth.userDetailsService(userDetailsService).passwordEncoder(passwordEncoder());
    }

    /**
     * 定制基于 HTTP 请求的用户访问控制
     */
    @Override
    protected void configure(HttpSecurity http) throws Exception {
	//...
        // 开启基于 HTTP 请求访问控制
        http.authorizeRequests()
                // 以下访问不需要任何权限,任何人都可以访问
                .antMatchers("/login/page").permitAll()
                // 以下访问需要 ROLE_ADMIN 权限
                .antMatchers("/admin/**").hasRole("ADMIN")
                // 以下访问需要 ROLE_USER 权限
                .antMatchers("/user/**").hasAuthority("ROLE_USER")
                // 其它任何请求访问都需要先通过认证
                .anyRequest().authenticated();
		//...
    }
    //...
}
此处需要简单介绍下Spring Security的授权方式,在Spring Security中角色属于权限的一部分。对于角色ROLE_ADMIN的授权方式有两种:hasRole("ADMIN")和hasAuthority("ROLE_ADMIN"),这两种方式是等价的。可能有人会疑惑,为什么在数据库中的角色名添加了ROLE_前缀,而 hasRole() 配置时不需要加ROLE_前缀,我们查看相关源码:
private static String hasRole(String role) {
    Assert.notNull(role, "role cannot be null");
    if (role.startsWith("ROLE_")) {
        throw new IllegalArgumentException("role should not start with 'ROLE_' since it is automatically inserted. Got '" + role + "'");
    } else {
        return "hasRole('ROLE_" + role + "')";
    }
}
由上可知,hasRole() 在判断权限时会自动在角色名前添加ROLE_前缀,所以配置时不需要添加ROLE_前缀,同时这也要求 UserDetails 对象的权限集合中存储的角色名要有ROLE_前缀。如果不希望匹配这个前缀,那么改为调用 hasAuthority() 方法即可。
✏️ 创建 AdminController 和 UserController
package com.example.contorller;

import org.springframework.stereotype.Controller;
import org.springframework.web.bind.annotation.GetMapping;
import org.springframework.web.bind.annotation.RequestMapping;
import org.springframework.web.bind.annotation.ResponseBody;

@Controller
@RequestMapping("/admin")
public class AdminController {   // 只能拥有 ROLE_ADMIN 权限的用户访问

    @GetMapping("/hello")
    @ResponseBody
    public String hello() {
        return "hello,admin!!!";
    }
}
package com.example.contorller;

import org.springframework.stereotype.Controller;
import org.springframework.web.bind.annotation.GetMapping;
import org.springframework.web.bind.annotation.RequestMapping;
import org.springframework.web.bind.annotation.ResponseBody;

@Controller
@RequestMapping("/user")
public class UserController {  // 只能拥有 ROLE_USER 权限的用户访问

    @GetMapping("/hello")
    @ResponseBody
    public String hello() {
        return "hello,User!!!";
    }
}
✏️ 测试
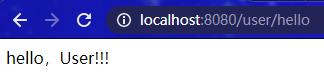
访问localhost:8080/user/hello,重定向到/login/page登录页面要求身份认证:
用户名输入 user,密码输入 123456,认证成功后重定向到原始访问路径:
访问localhost:8080/admin/hello,访问受限,页面显示 403。
基本流程分析
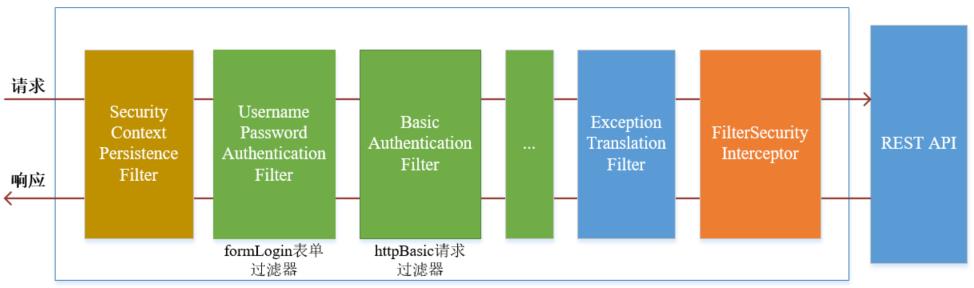
Spring Security采取过滤链实现认证与授权,只有当前过滤器通过,才能进入下一个过滤器:
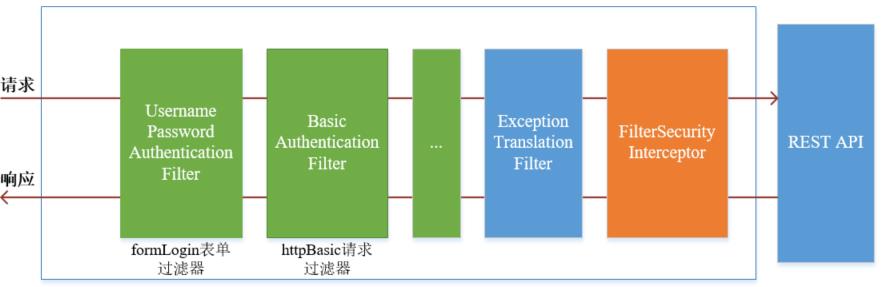
绿色部分是认证过滤器,需要我们自己配置,可以配置多个认证过滤器。认证过滤器可以使用Spring Security提供的认证过滤器,也可以自定义过滤器(例如:短信验证)。认证过滤器要在configure(HttpSecurity http)方法中配置,没有配置不生效。下面会重点介绍以下三个过滤器:
-
UsernamePasswordAuthenticationFilter过滤器:该过滤器会拦截前端提交的 POST 方式的登录表单请求,并进行身份认证。 -
ExceptionTranslationFilter过滤器:该过滤器不需要我们配置,对于前端提交的请求会直接放行,捕获后续抛出的异常并进行处理(例如:权限访问限制)。 -
FilterSecurityInterceptor过滤器:该过滤器是过滤器链的最后一个过滤器,根据资源权限配置来判断当前请求是否有权限访问对应的资源。如果访问受限会抛出相关异常,并由ExceptionTranslationFilter过滤器进行捕获和处理。
认证流程
认证流程是在UsernamePasswordAuthenticationFilter过滤器中处理的,具体流程如下所示:
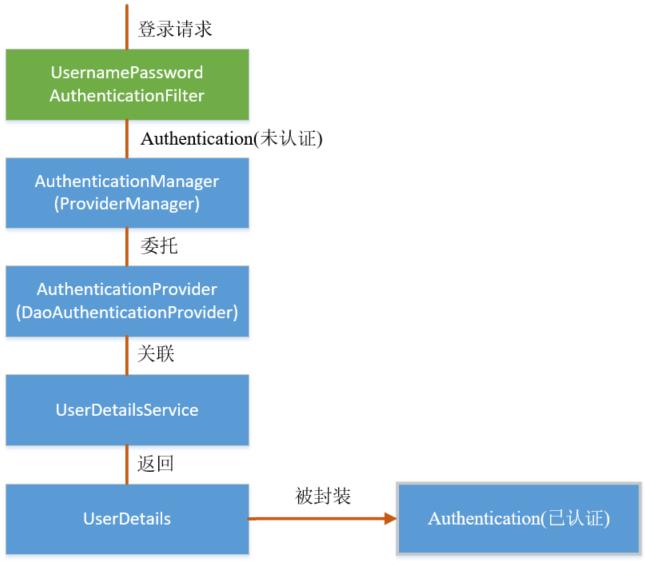
📚 UsernamePasswordAuthenticationFilter源码
当前端提交的是一个 POST 方式的登录表单请求,就会被该过滤器拦截,并进行身份认证。该过滤器的 doFilter() 方法实现在其抽象父类AbstractAuthenticationProcessingFilter中,查看相关源码:
public abstract class AbstractAuthenticationProcessingFilter extends GenericFilterBean implements ApplicationEventPublisherAware, MessageSourceAware {
    //...
    // 过滤器 doFilter() 方法
    public void doFilter(ServletRequest req, ServletResponse res, FilterChain chain) throws IOException, ServletException {
        HttpServletRequest request = (HttpServletRequest)req;
        HttpServletResponse response = (HttpServletResponse)res;
        if (!this.requiresAuthentication(request, response)) {
            //(1) 判断该请求是否为 POST 方式的登录表单提交请求,如果不是则直接放行,进入下一个过滤器
            chain.doFilter(request, response);
        } else {
            if (this.logger.isDebugEnabled()) {
                this.logger.debug("Request is to process authentication");
            }
	    // Authentication 是用来存储用户认证信息的类,后续会进行详细介绍
            Authentication authResult;
            try {
                //(2) 调用子类 UsernamePasswordAuthenticationFilter 重写的方法进行身份认证,
                // 返回的 authResult 对象封装认证后的用户信息
                authResult = this.attemptAuthentication(request, response);
                if (authResult == null) {
                    return;
                }
		//(3) Session 策略处理(如果配置了用户 Session 最大并发数,就是在此处进行判断并处理)
                this.sessionStrategy.onAuthentication(authResult, request, response);
            } catch (InternalAuthenticationServiceException var8) {
                this.logger.error("An internal error occurred while trying to authenticate the user.", var8);
                //(4) 认证失败,调用认证失败的处理器
                this.unsuccessfulAuthentication(request, response, var8);
                return;
            } catch (AuthenticationException var9) {
                this.unsuccessfulAuthentication(request, response, var9);
                return;
            }

            //(4) 认证成功的处理
            if (this.continueChainBeforeSuccessfulAuthentication) {
                // 默认的 continueChainBeforeSuccessfulAuthentication 为 false,所以认证成功之后不进入下一个过滤器
                chain.doFilter(request, response);
            }
	    // 调用认证成功的处理器
            this.successfulAuthentication(request, response, chain, authResult);
        }
    }
}
上述的(2)过程调用了UsernamePasswordAuthenticationFilter的 attemptAuthentication() 方法,源码如下:
public class UsernamePasswordAuthenticationFilter extends AbstractAuthenticationProcessingFilter {
    public static final String SPRING_SECURITY_FORM_USERNAME_KEY = "username";
    public static final String SPRING_SECURITY_FORM_PASSWORD_KEY = "password";
    private String usernameParameter = "username";  // 默认表单用户名参数为 username
    private String passwordParameter = "password";  // 默认密码参数为 password
    private boolean postOnly = true;   // 默认请求方式只能为 POST

    public UsernamePasswordAuthenticationFilter() {
        // 默认登录表单提交路径为 /login,POST 方式请求
        super(new AntPathRequestMatcher("/login", "POST"));
    }

    // 上述的 doFilter() 方法调用此 attemptAuthentication() 方法进行身份认证
    public Authentication attemptAuthentication(HttpServletRequest request, HttpServletResponse response) throws AuthenticationException {
        if (this.postOnly && !request.getMethod().equals("POST")) {
            //(1) 默认情况下,如果请求方式不是 POST,会抛出异常
            throw new AuthenticationServiceException("Authentication method not supported: " + request.getMethod());
        } else {
            //(2) 获取请求携带的 username 和 password
            String username = this.obtainUsername(request);
            String password = this.obtainPassword(request);
            if (username == null) {
                username = "";
            }

            if (password == null) {
                password = "";
            }

            username = username.trim();
            //(3) 使用前端传入的 username、password 构造 Authentication 对象,标记该对象未认证
            UsernamePasswordAuthenticationToken authRequest = new UsernamePasswordAuthenticationToken(username, password);
            //(4) 将请求中的一些属性信息设置到 Authentication 对象中,如:remoteAddress,sessionId
            this.setDetails(request, authRequest);
            //(5) 调用 ProviderManager 类的 authenticate() 方法进行身份认证
            return this.getAuthenticationManager().authenticate(authRequest);
        }
    }
    //...
}
上述的(3)过程创建的UsernamePasswordAuthenticationToken是 Authentication 接口的实现类,该类有两个构造器,一个用于封装前端请求传入的未认证的用户信息,一个用于封装认证成功后的用户信息:
public class UsernamePasswordAuthenticationToken extends AbstractAuthenticationToken {
    private static final long serialVersionUID = 530L;
    private final Object principal;
    private Object credentials;

    // 用于封装前端请求传入的未认证的用户信息,前面的 authRequest 对象就是调用该构造器进行构造的
    public UsernamePasswordAuthenticationToken(Object principal, Object credentials) {
        super((Collection)null);         // 用户权限为 null
        this.principal = principal;      // 前端传入的用户名
        this.credentials = credentials;  // 前端传入的密码
        this.setAuthenticated(false);    // 标记未认证
    }

    // 用于封装认证成功后的用户信息
    public UsernamePasswordAuthenticationToken(Object principal, Object credentials, Collection<? extends GrantedAuthority> authorities) {
        super(authorities);             // 用户权限集合
        this.principal = principal;     // 封装认证用户信息的 UserDetails 对象,不再是用户名
        this.credentials = credentials; // 前端传入的密码
        super.setAuthenticated(true);   // 标记认证成功
    }
    //...
}
Authentication 接口的实现类用于存储用户认证信息,查看该接口具体定义:
public interface Authentication extends Principal, Serializable {
    // 用户权限集合
    Collection<? extends GrantedAuthority> getAuthorities();
    // 用户密码
    Object getCredentials();
    // 请求携带的一些属性信息(例如:remoteAddress,sessionId)
    Object getDetails();
    // 未认证时为前端请求传入的用户名;认证成功后为封装认证用户信息的 UserDetails 对象
    Object getPrincipal();
    // 是否被认证(true:认证成功,false:未认证)
    boolean isAuthenticated();
    // 设置是否被认证(true:认证成功,false:未认证)
    void setAuthenticated(boolean var1) throws IllegalArgumentException;
}
📚 ProviderManager 源码
上述过程中,UsernamePasswordAuthenticationFilter过滤器的 attemptAuthentication() 方法的(5)过程将未认证的 Authentication 对象传入 ProviderManager 类的 authenticate() 方法进行身份认证。
ProviderManager 是 AuthenticationManager 接口的实现类,该接口是认证相关的核心接口,也是认证的入口。在实际开发中,我们可能有多种不同的认证方式,例如:用户名+密码、邮箱+密码、手机号+验证码等,而这些认证方式的入口始终只有一个,那就是 AuthenticationManager。在该接口的常用实现类 ProviderManager 内部会维护一个List<AuthenticationProvider>列表,存放多种认证方式,实际上这是委托者模式(Delegate)的应用。每种认证方式对应着一个 AuthenticationProvider,AuthenticationManager 根据认证方式的不同(根据传入的 Authentication 类型判断)委托对应的 AuthenticationProvider 进行用户认证。
public class ProviderManager implements AuthenticationManager, MessageSourceAware, InitializingBean {
    //...
    // 传入未认证的 Authentication 对象
    public Authentication authenticate(Authentication authentication) throws AuthenticationException {
        //(1) 获取传入的 Authentication 类型,即 UsernamePasswordAuthenticationToken.class
        Class<? extends Authentication> toTest = authentication.getClass();
        AuthenticationException lastException = null;
        AuthenticationException parentException = null;
        Authentication result = null;
        Authentication parentResult = null;
        boolean debug = logger.isDebugEnabled();
        //(2) 获取认证方式列表 List<AuthenticationProvider> 的迭代器
        Iterator var8 = this.getProviders().iterator();

	// 循环迭代
        while(var8.hasNext()) {
            AuthenticationProvider provider = (AuthenticationProvider)var8.next();
            //(3) 判断当前 AuthenticationProvider 是否适用 UsernamePasswordAuthenticationToken.class 类型的 Authentication 的认证
            if (provider.supports(toTest)) {
                if (debug) {
                    logger.debug("Authentication attempt using " + provider.getClass().getName());
                }

                // 成功找到适配当前认证方式的 AuthenticationProvider,此处为 DaoAuthenticationProvider
                try {
                    //(4) 调用 DaoAuthenticationProvider 的 authenticate() 方法进行认证;
                    // 如果认证成功,会返回一个标记已认证的 Authentication 对象
                    result = provider.authenticate(authentication);
                    if (result != null) {
                        //(5) 认证成功后,将传入的 Authentication 对象中的 details 信息拷贝到已认证的 Authentication 对象中
                        this.copyDetails(authentication, result);
                        break;
                    }
                } catch (InternalAuthenticationServiceException | AccountStatusException var13) {
                    this.prepareException(var13, authentication);
                    throw var13;
                } catch (AuthenticationException var14) {
                    lastException = var14;
                }
            }
        }

        if (result == null && this.parent != null) {
            try {
                //(5) 认证失败,使用父类型 AuthenticationManager 进行验证
                result = parentResult = this.parent.authenticate(authentication);
            } catch (ProviderNotFoundException var11) {
            } catch (AuthenticationException var12) {
                parentException = var12;
                lastException = var12;
            }
        }

        if (result != null) {
            //(6) 认证成功之后,去除 result 的敏感信息,要求相关类实现 CredentialsContainer 接口
            if (this.eraseCredentialsAfterAuthentication && result instanceof CredentialsContainer) {
                // 去除过程就是调用 CredentialsContainer 接口的 eraseCredentials() 方法
                ((CredentialsContainer)result).eraseCredentials();
            }
	    //(7) 发布认证成功的事件
            if (parentResult == null) {
                this.eventPublisher.publishAuthenticationSuccess(result);
            }

            return result;
        } else {
            //(8) 认证失败之后,抛出失败的异常信息
            if (lastException == null) {
                lastException = new ProviderNotFoundException(this.messages.getMessage("ProviderManager.providerNotFound", new Object[]{toTest.getName()}, "No AuthenticationProvider found for {0}"));
            }

            if (parentException == null) {
                this.prepareException((AuthenticationException)lastException, authentication);
            }

            throw lastException;
        }
    }
    //...
}
上述认证成功之后的(6)过程,调用 CredentialsContainer 接口定义的 eraseCredentials() 方法去除敏感信息。查看 UsernamePasswordAuthenticationToken 实现的 eraseCredentials() 方法,该方法实现在其父类中:
public abstract class AbstractAuthenticationToken implements Authentication, CredentialsContainer {
    // 父类实现了 CredentialsContainer 接口
    //...
    public void eraseCredentials() {
        // credentials(前端传入的密码)会置为 null
        this.eraseSecret(this.getCredentials());
        // principal 在已认证的 Authentication 中是 UserDetails 实现类;如果该实现类想要
        // 去除敏感信息,需要实现 CredentialsContainer 接口的 eraseCredentials() 方法;
        // 由于我们自定义的 User 类没有实现该接口,所以不进行任何操作。
        this.eraseSecret(this.getPrincipal());
        this.eraseSecret(this.details);
    }

    private void eraseSecret(Object secret) {
        if (secret instanceof CredentialsContainer) {
            ((CredentialsContainer)secret).eraseCredentials();
        }
    }
}
📚 DaoAuthenticationProvider 源码
上述的(4)过程,ProviderManager 将未认证的 Authentication 对象委托给 DaoAuthenticationProvider 进行身份认证。该类的 authenticate() 方法实现在其抽象父类 AbstractUserDetailsAuthenticationProvider 中,其源码如下:
public abstract class AbstractUserDetailsAuthenticationProvider implements AuthenticationProvider, InitializingBean, MessageSourceAware {
	//...
	// 入参为未认证的 Authentication 对象
    public Authentication authenticate(Authentication authentication) throws AuthenticationException {
        //(1) 如果入参的 Authentication 类型不是 UsernamePasswordAuthenticationToken,抛出异常
        Assert.isInstanceOf(UsernamePasswordAuthenticationToken.class, authentication, () -> {
            return this.messages.getMessage("AbstractUserDetailsAuthenticationProvider.onlySupports", "Only UsernamePasswordAuthenticationToken is supported");
        });
        // 获取用户名
        String username = authentication.getPrincipal() == null ? "NONE_PROVIDED" : authentication.getName();
        //(2) 从缓存中获取当前用户对应的 UserDetails 对象
        boolean cacheWasUsed = true;
        // 默认的 userCache 为 NullUserCache 类,该类的 getUserFromCache() 方法始终返回 null。
        // 也就是说默认情况下,Spring Security 不缓存用户信息对象 UserDetails
        UserDetails user = this.userCache.getUserFromCache(username);

        if (user == null) {
            cacheWasUsed = false;

            try {
                //(3) 当缓存没有 UserDetails,则调用子类 DaoAuthenticationProvider 重写的 retrieverUser() 方法获取;
                // 其内部调用对应的 UserDetailsService 的 loadUserByUsername() 方法进行获取
                user = this.retrieveUser(username, (UsernamePasswordAuthenticationToken)authentication);
            } catch (UsernameNotFoundException var6) {
                //(4) 未获取到 UserDetails,抛出相关异常
                this.logger.debug("User '" + username + "' not found");
                if (this.hideUserNotFoundExceptions) {
                    throw new BadCredentialsException(this.messages.getMessage("AbstractUserDetailsAuthenticationProvider.badCredentials", "Bad credentials"));
                }

                throw var6;
            }

            Assert.notNull(user, "retrieveUser returned null - a violation of the interface contract");
        }

        try {
            //(4) 成功获取 UserDetails 对象,进行前置检查,检查账号是否锁定、是否可用、是否过期
            this.preAuthenticationChecks.check(user);
            //(5) 调用子类 DaoAuthenticationProvider 重写的 additionalAuthenticationChecks() 方法;
            // 检查前端传入的密码是否正确,内部调用密码编码器 PasswordEncoder 的 matches() 方法进行判断
            this.additionalAuthenticationChecks(user, (UsernamePasswordAuthenticationToken)authentication);
        } catch (AuthenticationException var7) {
            //(6) 检查过程出现异常,重新进行认证
            if (!cacheWasUsed) {
                throw var7;
            }

            // 和前面一样,调用子类 DaoAuthenticationProvider 重写的 retrieverUser() 方法获取 UserDetails
            // 内部调用对应的 UserDetailsService 的 loadUserByUsername() 方法进行获取
            cacheWasUsed = false;
            user = this.retrieveUser(username, (UsernamePasswordAuthenticationToken)authentication);
            this.preAuthenticationChecks.check(user);
            this.additionalAuthenticationChecks(user, (UsernamePasswordAuthenticationToken)authentication);
        }

        //(6) 后置检查,检查用户密码是否过期
        this.postAuthenticationChecks.check(user);
        if (!cacheWasUsed) {
            //(7) 将从 UserDetailsService 中取出的用户信息对象 UserDetails 放入缓存中。
            // userCache 默认为 NullUserCache 类,该类的 putUserInCache() 是一个空方法,
            // 所以默认情况下,Spring Security 不缓存用户信息对象 UserDetails
            this.userCache.putUserInCache(user);
        }

        Object principalToReturn = user;
        if (this.forcePrincipalAsString) {
            // forcePrincipalAsString 默认为 false
            principalToReturn = user.getUsername();
        }

        //(8) 调用子类 DaoAuthenticationProvider 重写的 createSuccessAuthentication() 方法,
        // 该方法将认证成功后的用户信息封装成 Authentication 对象(标记已认证),并返回。
        // 需要注意,此处传入的 principal 是 UserDetails 对象,不再是 username
        return this.createSuccessAuthentication(principalToReturn, authentication, user);
    }

    // 该方法由子类 DaoAuthenticationProvider 同名方法调用
    protected Authentication createSuccessAuthentication(Object principal, Authentication authentication, UserDetails user) {
        // 构造 Authentication 对象(标记已认证),需要注意传入的 principal 是 UserDetails 对象
        UsernamePasswordAuthenticationToken result = new UsernamePasswordAuthenticationToken(principal, authentication.getCredentials(), this.authoritiesMapper.mapAuthorities(user.getAuthorities()));
        // 将传入的 Authentication 的 details 信息设置到新构造的 Authentication 对象中
        result.setDetails(authentication.getDetails());
        return result;
    }
    //...
}
上述的过程,调用了子类 DaoAuthenticationProvider 重写的方法,其源码如下:
public class DaoAuthenticationProvider extends AbstractUserDetailsAuthenticationProvider {
    //...
    // 上述的(3)过程调用的方法,根据用户名调用 UserDetailsService 的 loadUserByUsername() 方法获取 UserDetails 对象
    protected final UserDetails retrieveUser(String username, UsernamePasswordAuthenticationToken authentication) throws AuthenticationException {
        this.prepareTimingAttackProtection();

        try {
            // 调用 UserDetailsService 的 loadUserByUsername() 方法获取 UserDetails 对象
            UserDetails loadedUser = this.getUserDetailsService().loadUserByUsername(username);
            if (loadedUser == null) {
                throw new InternalAuthenticationServiceException("UserDetailsService returned null, which is an interface contract violation");
            } else {
                return loadedUser;
            }
        } catch (UsernameNotFoundException var4) {
            // 用户不存在异常的处理
            this.mitigateAgainstTimingAttack(authentication);
            throw var4;
        } catch (InternalAuthenticationServiceException var5) {
            throw var5;
        } catch (Exception var6) {
            throw new InternalAuthenticationServiceException(var6.getMessage(), var6);
        }
    }

    // 上述的(5)过程调用的方法,检查前端传入的密码是否正确
    protected void additionalAuthenticationChecks(UserDetails userDetails, UsernamePasswordAuthenticationToken authentication) throws AuthenticationException {
        if (authentication.getCredentials() == null) {
            this.logger.debug("Authentication failed: no credentials provided");
            throw new BadCredentialsException(this.messages.getMessage("AbstractUserDetailsAuthenticationProvider.badCredentials", "Bad credentials"));
        } else {
            // 使用密码编码器 passwordEncoder 的 matches() 方法检查密码是否正确
            String presentedPassword = authentication.getCredentials().toString();
            if (!this.passwordEncoder.matches(presentedPassword, userDetails.getPassword())) {
                this.logger.debug("Authentication failed: password does not match stored value");
                throw new BadCredentialsException(this.messages.getMessage("AbstractUserDetailsAuthenticationProvider.badCredentials", "Bad credentials"));
            }
        }
    }

    // 上述的(8)过程调用的方法,将认证成功后的用户信息封装成 Authentication 对象(标记已认证),并返回
    protected Authentication createSuccessAuthentication(Object principal, Authentication authentication, UserDetails user) {
        // 此处需要注意,传入的 principal 是一个 UserDetails 对象
        boolean upgradeEncoding = this.userDetailsPasswordService != null && this.passwordEncoder.upgradeEncoding(user.getPassword());
        if (upgradeEncoding) {
            String presentedPassword = authentication.getCredentials().toString();
            String newPassword = this.passwordEncoder.encode(presentedPassword);
            user = this.userDetailsPasswordService.updatePassword(user, newPassword);
        }
	// 调用父类同名的 createSuccessAuthentication() 方法
        return super.createSuccessAuthentication(principal, authentication, user);
    }
    //...
}
📚 认证成功/失败处理
上述过程就是认证流程的最核心部分,接下来重新回到UsernamePasswordAuthenticationFilter过滤器的 doFilter() 方法,查看认证成功/失败的处理:
public abstract class AbstractAuthenticationProcessingFilter extends GenericFilterBean implements ApplicationEventPublisherAware, MessageSourceAware {
    //...
    // 过滤器 doFilter() 方法
    public void doFilter(ServletRequest req, ServletResponse res, FilterChain chain) throws IOException, ServletException {
  	//...
        try {
            // 此处的 authResult 对象就是上述 DaoAuthenticationProvider 类的 authenticate() 方法返回的 Authentication 对象(标记已认证)
	    authResult = this.attemptAuthentication(request, response);
            //...
        } catch (AuthenticationException var9) {
            // 调用认证失败的处理器
            this.unsuccessfulAuthentication(request, response, var9);
            return;
        }

	//...
        // 调用认证成功的处理器
        this.successfulAuthentication(request, response, chain, authResult);
    }
    //...
}
查看 successfulAuthentication() 和 unsuccessfulAuthentication() 方法源码:
public abstract class AbstractAuthenticationProcessingFilter extends GenericFilterBean implements ApplicationEventPublisherAware, MessageSourceAware {
    //...
    // 认证成功后的处理
    protected void successfulAuthentication(HttpServletRequest request, HttpServletResponse response, FilterChain chain, Authentication authResult) throws IOException, ServletException {
        if (this.logger.isDebugEnabled()) {
            this.logger.debug("Authentication success. Updating SecurityContextHolder to contain: " + authResult);
        }

        //(1) 将认证成功的用户信息对象 Authentication 封装进 SecurityContext 对象中,并存入 SecurityContextHolder;
        // SecurityContextHolder 是对 ThreadLocal 的一个封装,后续会介绍
        SecurityContextHolder.getContext().setAuthentication(authResult);
        //(2) rememberMe 的处理
        this.rememberMeServices.loginSuccess(request, response, authResult);
        if (this.eventPublisher != null) {
            //(3) 发布认证成功的事件
            this.eventPublisher.publishEvent(new InteractiveAuthenticationSuccessEvent(authResult, this.getClass()));
        }
	//(4) 调用认证成功处理器
        this.successHandler.onAuthenticationSuccess(request, response, authResult);
    }

    // 认证失败后的处理
    protected void unsuccessfulAuthentication(HttpServletRequest request, HttpServletResponse response, AuthenticationException failed) throws IOException, ServletException {
        //(1) 清除该线程在 SecurityContextHolder 中对应的 SecurityContext 对象
        SecurityContextHolder.clearContext();
        if (this.logger.isDebugEnabled()) {
            this.logger.debug("Authentication request failed: " + failed.toString(), failed);
            this.logger.debug("Updated SecurityContextHolder to contain null Authentication");
            this.logger.debug("Delegating to authentication failure handler " + this.failureHandler);
        }
	//(2) rememberMe 的处理
        this.rememberMeServices.loginFail(request, response);
        //(3) 调用认证失败处理器
        this.failureHandler.onAuthenticationFailure(request, response, failed);
    }
}
📚 认证流程中各核心类和接口的关系图

权限访问流程
上一个部分通过源码的方式介绍了认证流程,下面介绍权限访问流程,主要是对ExceptionTranslationFilter过滤器和FilterSecurityInterceptor过滤器进行介绍。
✌ExceptionTranslationFilter过滤器
该过滤器是用于处理异常的,不需要我们配置,对于前端提交的请求会直接放行,捕获后续抛出的异常并进行处理(例如:权限访问限制)。具体源码如下:
public class ExceptionTranslationFilter extends GenericFilterBean {
    //...
    public void doFilter(ServletRequest req, ServletResponse res, FilterChain chain) throws IOException, ServletException {
        HttpServletRequest request = (HttpServletRequest)req;
        HttpServletResponse response = (HttpServletResponse)res;

        try {
            //(1) 对于前端提交的请求会直接放行,不进行拦截
            chain.doFilter(request, response);
            this.logger.debug("Chain processed normally");
        } catch (IOException var9) {
            throw var9;
        } catch (Exception var10) {
            //(2) 捕获后续出现的异常进行处理
            Throwable[] causeChain = this.throwableAnalyzer.determineCauseChain(var10);
            // 访问需要认证的资源,但当前请求未认证所抛出的异常
            RuntimeException ase = (AuthenticationException)this.throwableAnalyzer.getFirstThrowableOfType(AuthenticationException.class, causeChain);
            if (ase == null) {
                // 访问权限受限的资源所抛出的异常
                ase = (AccessDeniedException)this.throwableAnalyzer.getFirstThrowableOfType(AccessDeniedException.class, causeChain);
            }
	    // ...
        }
    }
    //...
}
✌FilterSecurityInterceptor过滤器
FilterSecurityInterceptor是过滤器链的最后一个过滤器,该过滤器是过滤器链的最后一个过滤器,根据资源权限配置来判断当前请求是否有权限访问对应的资源。如果访问受限会抛出相关异常,最终所抛出的异常会由前一个过滤器ExceptionTranslationFilter进行捕获和处理。具体源码如下:
public class FilterSecurityInterceptor extends AbstractSecurityInterceptor implements Filter {
    //...
    // 过滤器的 doFilter() 方法
    public void doFilter(ServletRequest request, ServletResponse response, FilterChain chain) throws IOException, ServletException {
        FilterInvocation fi = new FilterInvocation(request, response, chain);
        // 调用 invoke() 方法
        this.invoke(fi);
    }

    public void invoke(FilterInvocation fi) throws IOException, ServletException {
        if (fi.getRequest() != null && fi.getRequest().getAttribute("__spring_security_filterSecurityInterceptor_filterApplied") != null && this.observeOncePerRequest) {
            fi.getChain().doFilter(fi.getRequest(), fi.getResponse());
        } else {
            if (fi.getRequest() != null && this.observeOncePerRequest) {
                fi.getRequest().setAttribute("__spring_security_filterSecurityInterceptor_filterApplied", Boolean.TRUE);
            }

            //(1) 根据资源权限配置来判断当前请求是否有权限访问对应的资源。如果不能访问,则抛出相应的异常
            InterceptorStatusToken token = super.beforeInvocation(fi);

            try {
                //(2) 访问相关资源,通过 SpringMVC 的核心组件 DispatcherServlet 进行访问
                fi.getChain().doFilter(fi.getRequest(), fi.getResponse());
            } finally {
                super.finallyInvocation(token);
            }

            super.afterInvocation(token, (Object)null);
        }
    }
    //...
}
需要注意,Spring Security的过滤器链是配置在 SpringMVC 的核心组件 DispatcherServlet 运行之前。也就是说,请求通过Spring Security的所有过滤器,不意味着能够正常访问资源,该请求还需要通过 SpringMVC 的拦截器链。
请求间共享认证信息
一般认证成功后的用户信息是通过 Session 在多个请求之间共享,那么Spring Security中是如何实现将已认证的用户信息对象 Authentication 与 Session 绑定的,该部分会进行具体分析。
原理分析
✍ SecurityContext 和 SecurityContextHolder
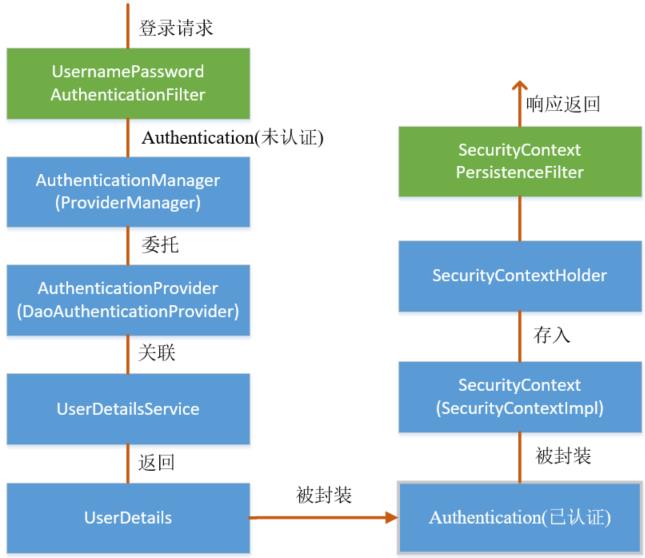
在前面讲解认证成功的处理方法 successfulAuthentication() 时,有以下代码:
public abstract class AbstractAuthenticationProcessingFilter extends GenericFilterBean implements ApplicationEventPublisherAware, MessageSourceAware {
    //...
    // 认证成功后的处理
    protected void successfulAuthentication(HttpServletRequest request, HttpServletResponse response, FilterChain chain, Authentication authResult) throws IOException, ServletException {
        //...
        // 将已认证的用户信息对象 Authentication 封装进 SecurityContext 对象中,并存入 SecurityContextHolder
        SecurityContextHolder.getContext().setAuthentication(authResult);
	//...
    }
}
查看 SecurityContext 接口及其实现类 SecurityContextImpl,该类其实就是对 Authentication 的封装:
public interface SecurityContext extends Serializable {
    Authentication getAuthentication();

    void setAuthentication(Authentication var1);
}
public class SecurityContextImpl implements SecurityContext {
    private static final long serialVersionUID = 520L;
    private Authentication authentication;

    public SecurityContextImpl() {
    }

    public SecurityContextImpl(Authentication authentication) {
        this.authentication = authentication;
    }

    public Authentication getAuthentication() {
        return this.authentication;
    }

    public void setAuthentication(Authentication authentication) {
        this.authentication = authentication;
    }
    //...
}
查看 SecurityContextHolder 类,该类其实是对 ThreadLocal 的封装,存储 SecurityContext 对象:
public class SecurityContextHolder {
    //...
    private static SecurityContextHolderStrategy strategy;
    private static int initializeCount = 0;

    public SecurityContextHolder() {
    }

    static {
        initialize();
    }

    private static void initialize() {
        if (!StringUtils.hasText(strategyName)) {
            // 默认使用 MODE_THREADLOCAL 模式
            strategyName = "MODE_THREADLOCAL";
        }

        if (strategyName.equals("MODE_THREADLOCAL")) {
            // 默认使用 ThreadLocalSecurityContextHolderStrategy 创建 strategy,其内部使用 ThreadLocal 对 SecurityContext 进行存储
            strategy = new ThreadLocalSecurityContextHolderStrategy();
        } else if (strategyName.equals("MODE_INHERITABLETHREADLOCAL")) {
            strategy = new InheritableThreadLocalSecurityContextHolderStrategy();
        } else if (strategyName.equals("MODE_GLOBAL")) {
            strategy = new GlobalSecurityContextHolderStrategy();
        } else {
            try {
                Class<?> clazz = Class.forName(strategyName);
                Constructor<?> customStrategy = clazz.getConstructor();
                strategy = (SecurityContextHolderStrategy)customStrategy.newInstance();
            } catch (Exception var2) {
                ReflectionUtils.handleReflectionException(var2);
            }
        }

        ++initializeCount;
    }

    public static SecurityContext getContext() {
        // 需要注意,如果当前线程对应的 ThreadLocal<SecurityContext> 没有任何对象存储,
        // strategy.getContext() 会创建并返回一个空的 SecurityContext 对象,
        // 并且该空的 SecurityContext 对象会存入 ThreadLocal<SecurityContext>
        return strategy.getContext();
    }

    public static void setContext(SecurityContext context) {
        // 设置当前线程对应的 ThreadLocal<SecurityContext> 的存储
        strategy.setContext(context);
    }

    public static void clearContext() {
        // 清空当前线程对应的 ThreadLocal<SecurityContext> 的存储
        strategy.clearContext();
    }

    public static SecurityContextHolderStrategy getContextHolderStrategy() {
        return strategy;
    }

    public static SecurityContext createEmptyContext() {
        return strategy.createEmptyContext();
    }

    //...
}
final class ThreadLocalSecurityContextHolderStrategy implements SecurityContextHolderStrategy {
    // 使用 ThreadLocal 对 SecurityContext 进行存储
    private static final ThreadLocal<SecurityContext> contextHolder = new ThreadLocal();

    ThreadLocalSecurityContextHolderStrategy() {
    }

    public SecurityContext getContext() {
        // 需要注意,如果当前线程对应的 ThreadLocal<SecurityContext> 没有任何对象存储,
        // getContext() 会创建并返回一个空的 SecurityContext 对象,
        // 并且该空的 SecurityContext 对象会存入 ThreadLocal<SecurityContext>
        SecurityContext ctx = (SecurityContext)contextHolder.get();
        if (ctx == null) {
            ctx = this.createEmptyContext();
            contextHolder.set(ctx);
        }
        return ctx;
    }

    public void setContext(SecurityContext context) {
        // 设置当前线程对应的 ThreadLocal<SecurityContext> 的存储
        Assert.notNull(context, "Only non-null SecurityContext instances are permitted");
        contextHolder.set(context);
    }

    public void clearContext() {
        // 清空当前线程对应的 ThreadLocal<SecurityContext> 的存储
        contextHolder.remove();
    }

    public SecurityContext createEmptyContext() {
        // 创建一个空的 SecurityContext 对象
        return new SecurityContextImpl();
    }
}
✍ SecurityContextPersistenceFilter过滤器
前面提到过,在UsernamePasswordAuthenticationFilter过滤器认证成功之后,会在认证成功的处理方法中将已认证的用户信息对象 Authentication 封装进 SecurityContext,并存入 SecurityContextHolder。之后,响应会通过SecurityContextPersistenceFilter过滤器,该过滤器的位置在所有过滤器的最前面,请求到来先进它,响应返回最后一个通过它,所以在该过滤器中处理已认证的用户信息对象 Authentication 与 Session 绑定。
认证成功的响应通过SecurityContextPersistenceFilter过滤器时,会从 SecurityContextHolder 中取出封装了已认证用户信息对象 Authentication 的 SecurityContext,放进 Session 中。当请求再次到来时,请求首先经过该过滤器,该过滤器会判断当前请求的 Session 是否存有 SecurityContext 对象,如果有则将该对象取出再次放入 SecurityContextHolder 中,之后该请求所在的线程获得认证用户信息,后续的资源访问不需要进行身份认证;当响应再次返回时,该过滤器同样从 SecurityContextHolder 取出 SecurityContext 对象,放入 Session 中。具体源码如下:
public class SecurityContextPersistenceFilter extends GenericFilterBean {
    //...
    // 过滤器的 doFilter() 方法
    public void doFilter(ServletRequest req, ServletResponse res, FilterChain chain) throws IOException, ServletException {
        HttpServletRequest request = (HttpServletRequest)req;
        HttpServletResponse response = (HttpServletResponse)res;
        if (request.getAttribute("__spring_security_scpf_applied") != null) {
            chain.doFilter(request, response);
        } else {
            boolean debug = this.logger.isDebugEnabled();
            request.setAttribute("__spring_security_scpf_applied", Boolean.TRUE);
            if (this.forceEagerSessionCreation) {
                HttpSession session = request.getSession();
                if (debug && session.isNew()) {
                    this.logger.debug("Eagerly created session: " + session.getId());
                }
            }
            HttpRequestResponseHolder holder = new HttpRequestResponseHolder(request, response);
            //(1) 请求到来时,检查当前 Session 中是否存有 SecurityContext 对象,
            // 如果有,从 Session 中取出该对象;如果没有,创建一个空的 SecurityContext 对象
            SecurityContext contextBeforeChainExecution = this.repo.loadContext(holder);
            boolean var13 = false;

            try {
                var13 = true;
                //(2) 将上述获得 SecurityContext 对象放入 SecurityContextHolder 中
                SecurityContextHolder.setContext(contextBeforeChainExecution);
                //(3) 进入下一个过滤器
                chain.doFilter(holder.getRequest(), holder.getResponse());
                var13 = false;
            } finally {
                if (var13) {
                    SecurityContext contextAfterChainExecution = SecurityContextHolder.getContext();
                    SecurityContextHolder.clearContext();
                    this.repo.saveContext(contextAfterChainExecution, holder.getRequest(), holder.getResponse());
                    request.removeAttribute("__spring_security_scpf_applied");
                    if (debug) {
                        this.logger.debug("SecurityContextHolder now cleared, as request processing completed");
                    }

                }
            }

            //(4) 响应返回时,从 SecurityContextHolder 中取出 SecurityContext
            SecurityContext contextAfterChainExecution = SecurityContextHolder.getContext();
            //(5) 移除 SecurityContextHolder 中的 SecurityContext 对象
            SecurityContextHolder.clearContext();
            //(6) 将取出的 SecurityContext 对象放进 Session
            this.repo.saveContext(contextAfterChainExecution, holder.getRequest(), holder.getResponse());
            request.removeAttribute("__spring_security_scpf_applied");
            if (debug) {
                this.logger.debug("SecurityContextHolder now cleared, as request processing completed");
            }
        }
    }
    //...
}
获取认证用户信息
由前文可知,封装了已认证用户信息对象 Authentication 的 SecurityContext 即存储在 SecurityContextHolder 中,也存储在 Session 中,所以可以有两种方式获取用户信息。
💡 使用 SecurityContextHolder 获取
@Controller
public class TestController {
    @GetMapping("/test1")
    @ResponseBody
    public Object test1() {
        // 从 SecurityContextHolder 获取认证用户信息对象 Authentication
        Authentication authentication = SecurityContextHolder.getContext().getAuthentication();
        return authentication;
    }
}
访问localhost:8080/test1,使用 admin 的用户名和密码认证之后,浏览器页面显示:
{
    "authorities": [
        {
            "authority": "ROLE_ADMIN"
        },
        {
            "authority": "ROLE_USER"
        }
    ],
    "details": {
        "remoteAddress": "0:0:0:0:0:0:0:1",
        "sessionId": null
    },
    "authenticated": true,
    "principal": {
        "id": 1,
        "username": "admin",
        "password": "$2a$10$JNVWTh5Yq56kJtrCZkcDk.DL/L/i8g3KrTAshcHW3mFf8//lnfG56",
        "mobile": "11111111111",
        "roles": "ROLE_ADMIN,ROLE_USER",
        "enabled": true,
        "authorities": [
            {
                "authority": "ROLE_ADMIN"
            },
            {
                "authority": "ROLE_USER"
            }
        ],
        "accountNonExpired": true,
        "credentialsNonExpired": true,
        "accountNonLocked": true
    },
    "credentials": null,
    "name": "admin"
}
由上可以验证我们前面的分析,敏感信息 credentials 被去除,principal 存储的为 UserDetails 实现类,可以通过强转获取 UserDetails 对象:
@GetMapping("/test2")
@ResponseBody
public Object test2() {
    // 从 SecurityContextHolder 获取认证用户信息对象 Authentication
    Authentication authentication = SecurityContextHolder.getContext().getAuthentication();
    // 从 Authentication 中获取 UserDetails
    UserDetails user = (UserDetails) authentication.getPrincipal();
    return user;
}
{
    "id": 1,
    "username": "admin",
    "password": "$2a$10$JNVWTh5Yq56kJtrCZkcDk.DL/L/i8g3KrTAshcHW3mFf8//lnfG56",
    "roles": "ROLE_ADMIN,ROLE_USER",
	"mobile": "11111111111",
    "enabled": true,
    "authorities": [
        {
            "authority": "ROLE_ADMIN"
        },
        {
            "authority": "ROLE_USER"
        }
    ],
    "accountNonExpired": true,
    "credentialsNonExpired": true,
    "accountNonLocked": true
}
💡 使用 HttpSession 获取
@GetMapping("/test3")
@ResponseBody
public Object test3(HttpSession session) {
    // 获取 Session 获取 SecurityContext
    SecurityContext context = (SecurityContext) session.getAttribute("SPRING_SECURITY_CONTEXT");
    // 从 Authentication 中获取 UserDetails
    UserDetails user = (UserDetails) context.getAuthentication().getPrincipal();
    return user;
}
{
    "id": 1,
    "username": "admin",
    "password": "$2a$10$JNVWTh5Yq56kJtrCZkcDk.DL/L/i8g3KrTAshcHW3mFf8//lnfG56",
    "roles": "ROLE_ADMIN,ROLE_USER",
    "mobile": "11111111111",
    "enabled": true,
    "authorities": [
        {
            "authority": "ROLE_ADMIN"
        },
        {
            "authority": "ROLE_USER"
        }
    ],
    "accountNonExpired": true,
    "credentialsNonExpired": true,
    "accountNonLocked": true
}
自定义认证成功/失败处理器
登录处理的方法介绍
此处先对http.formLogin()返回值的主要方法进行说明,这些方法涉及用户登录的处理,具体如下:
loginPage(String loginPage):设置用户登录页面的访问路径,默认为 GET 请求的/login。loginProcessingUrl(String loginProcessingUrl):设置登录表单提交的路径,默认为是 POST 请求的 loginPage() 设置的路径successForwardUrl(String forwordUrl):设置用户认证成功后转发的地址。successHandler(AuthenticationSuccessHandler successHandler):配置用户认证成功后的自定义处理器。defaultSuccessUrl(String defaultSuccessUrl):设置用户认证成功后重定向的地址。这里需要注意,该路径是用户直接访问登录页面认证成功后重定向的路径,如果是其他路径跳转到登录页面认证成功后会重定向到原始访问路径。可设置第二个参数为 true,使认证成功后始终重定向到该地址。failureForwrad(String forwardUrl):设置用户认证失败后转发的地址。failureHandler(AuthenticationFailureHandler authenticationFailureHandler):设置用户登录失败后的自定义错误处理器。failureUrl(String authenticationFailureUrl):设置用户登录失败后重定向的地址,指定的路径要能匿名访问,默认为loginPage() + ?error。usernameParamter(String usernameParamter):设置登录表单中的用户名参数,默认为 username。passwordParamter(String passwordParamter):设置登录表单中的密码参数,默认为 password。
内置的处理器介绍
前面的 defaultSuccessUrl() 和 failureUrl() 方法使用的是Spring Security内置的认证成功和失败处理器。我们也可以自定义认证成功和失败处理器,根据前端请求方式返回不同的响应类型数据,如果客户端是 ajax 请求,响应 JSON 数据通知前端认证成功或失败;如果客户端是正常的表单提交请求,认证成功时重定向到该请求的原始访问路径或指定路径,认证失败时重定向到登录页面显示错误信息。
在自定义认证成功和失败处理器之前,我们先对 defaultSuccessUrl() 和 failureUrl() 方法使用的认证和失败处理器进行介绍。
defaultSuccessUrl() 方法的处理器
public final T defaultSuccessUrl(String defaultSuccessUrl) {
    return this.defaultSuccessUrl(defaultSuccessUrl, false);
}

public final T defaultSuccessUrl(String defaultSuccessUrl, boolean alwaysUse) {
    // 该 Handler 就是 defaultSuccessUrl() 方法使用的认证成功处理器
    SavedRequestAwareAuthenticationSuccessHandler handler = new SavedRequestAwareAuthenticationSuccessHandler();
    // 设置用户认证成功后重定向的地址。需要注意,该路径是用户直接访问登录页面认证成功后重定向的路径,
    // 如果是其他路径跳转到登录页面认证成功后会重定向到原始访问路径
    handler.setDefaultTargetUrl(defaultSuccessUrl);
    // 设置用户认证成功后是否始终重定向到 defaultSuccessUrl
    handler.setAlwaysUseDefaultTargetUrl(alwaysUse);
    this.defaultSuccessHandler = handler;
    return this.successHandler(handler);
}
查看SavedRequestAwareAuthenticationSuccessHandler处理器:
public class SavedRequestAwareAuthenticationSuccessHandler extends SimpleUrlAuthenticationSuccessHandler {
    protected final Log logger = LogFactory.getLog(this.getClass());
    private RequestCache requestCache = new HttpSessionRequestCache();

    public SavedRequestAwareAuthenticationSuccessHandler() {
    }

    public void onAuthenticationSuccess(HttpServletRequest request, HttpServletResponse response, Authentication authentication) throws ServletException, IOException {
        //(1) 从 Session 中获取 SavedRequest 对象,该对象中存储着用户的原始访问路径
        SavedRequest savedRequest = this.requestCache.getRequest(request, response);
        if (savedRequest == null) {
            // 不存在原始访问路径的处理,重定向指定路径
            super.onAuthenticationSuccess(request, response, authentication);
        } else {
            // 存在原始访问路径
            String targetUrlParameter = this.getTargetUrlParameter();
            if (!this.isAlwaysUseDefaultTargetUrl() && (targetUrlParameter == null || !StringUtils.hasText(request.getParameter(targetUrlParameter)))) {
                //(2) 清除 Session 中名为 SPRING_SECURITY_LAST_EXCEPTION 的属性,该属性用于存储认证错误信息
                this.clearAuthenticationAttributes(request);
                //(3) 获取原始访问路径
                String targetUrl = savedRequest.getRedirectUrl();
                this.logger.debug("Redirecting to DefaultSavedRequest Url: " + targetUrl);
                //(4) 重定向到原始访问路径
                this.getRedirectStrategy().sendRedirect(request, response, targetUrl);
            } else {
                this.requestCache.removeRequest(request, response);
                super.onAuthenticationSuccess(request, response, authentication);
            }
        }
    }

    public void setRequestCache(RequestCache requestCache) {
        this.requestCache = requestCache;
    }
}
查看上述的(1)过程实现源码:
public class HttpSessionRequestCache implements RequestCache {
    //...
    private String sessionAttrName;
    //...

    public HttpSessionRequestCache() {
        this.requestMatcher = AnyRequestMatcher.INSTANCE;
        this.sessionAttrName = "SPRING_SECURITY_SAVED_REQUEST";
    }
    //...
    public SavedRequest getRequest(HttpServletRequest currentRequest, HttpServletResponse response) {
        HttpSession session = currentRequest.getSession(false);
        // 当未登录用户访问需要认证才能访问的路径时,会自动跳转登录页面,要求用户登录认证,
        // 并在 Session 中会使用名为 SPRING_SECURITY_SAVED_REQUEST 的属性存储该原始访问路径;

        // 当用户认证成功后,从 Session 中取出该属性值,客户端重定向到原始访问路径,
        // 并且认证成功的后续处理会将该属性从 Session 中移除
        return session != null ? (SavedRequest)session.getAttribute(this.sessionAttrName) : null;
    }
    //...
}
failureUrl() 方法的处理器
public final T failureUrl(String authenticationFailureUrl) {
    // 该 Handler 就是 failureUrl() 方法使用的认证失败处理器
    T result = this.failureHandler(new SimpleUrlAuthenticationFailureHandler(authenticationFailureUrl));
    this.failureUrl = authenticationFailureUrl;
    return result;
}
查看SimpleUrlAuthenticationFailureHandler处理器:
public class SimpleUrlAuthenticationFailureHandler implements AuthenticationFailureHandler {
    //...
    private boolean forwardToDestination = false;
    private RedirectStrategy redirectStrategy = new DefaultRedirectStrategy();
    //...

    public SimpleUrlAuthenticationFailureHandler(String defaultFailureUrl) {
        // 设置默认重定向的地址,用户认证失败后会重定向到该路径
        this.setDefaultFailureUrl(defaultFailureUrl);
    }

    public void onAuthenticationFailure(HttpServletRequest request, HttpServletResponse response, AuthenticationException exception) throws IOException, ServletException {
        if (this.defaultFailureUrl == null) {
            this.logger.debug("No failure URL set, sending 401 Unauthorized error");
            response.sendError(HttpStatus.UNAUTHORIZED.value(), HttpStatus.UNAUTHORIZED.getReasonPhrase());
        } else {
            //(1) 将认证错误信息存储在 Session 中,属性名为 SPRING_SECURITY_LAST_EXCEPTION,可用于页面错误信息显示
            this.saveException(request, exception);
            if (this.forwardToDestination) {
                //(2) forwardToDestination 默认值为 false,不使用转发
                this.logger.debug("Forwarding to " + this.defaultFailureUrl);
                request.getRequestDispatcher(this.defaultFailureUrl).forward(request, response);
            } else {
                this.logger.debug("Redirecting to " + this.defaultFailureUrl);
                //(3) 重定向到 defaultFailureUrl
                this.redirectStrategy.sendRedirect(request, response, this.defaultFailureUrl);
            }
        }
    }

    protected final void saveException(HttpServletRequest request, AuthenticationException exception) {
        if (this.forwardToDestination) {
            // forwardToDestination 默认值为 false,不使用转发
            // 转发,认证错误信息保存在 request 域中,属性名为 SPRING_SECURITY_LAST_EXCEPTION
            request.setAttribute("SPRING_SECURITY_LAST_EXCEPTION", exception);
        } else {
            // 重定向,认证错误信息保存在 session 域中,属性名为 SPRING_SECURITY_LAST_EXCEPTION
            HttpSession session  = request.getSession(false);
            if (session != null || this.allowSessionCreation) {
                request.getSession().setAttribute("SPRING_SECURITY_LAST_EXCEPTION", exception);
            }
        }
    }
    //...
}
自定义处理器
在自定义认证成功和失败处理器时,不用完全自己实现,在Spring Security内置的认证成功和失败处理器基础上进行功能扩充即可。
☕️ 定义统一返回的 JSON 结构
package com.example.entity;

import lombok.Getter;

@Getter
public class ResultData<T> {
    private T data;
    private int code;
    private String msg;

    /**
     * 若没有数据返回,默认状态码为0,提示信息为:操作成功!
     */
    public ResultData() {
        this.code = 0;
        this.msg = "发布成功!";
    }

    /**
     * 若没有数据返回,可以人为指定状态码和提示信息
     */
    public ResultData(int code, String msg) {
        this.code = code;
        this.msg = msg;
    }

    /**
     * 有数据返回时,状态码为0,默认提示信息为:操作成功!
     */
    public ResultData(T data) {
        this.data = data;
        this.code = 0;
        this.msg = "发布成功!";
    }

    /**
     * 有数据返回,状态码为0,人为指定提示信息
     */
    public ResultData(T data, String msg) {
        this.data = data;
        this.code = 0;
        this.msg = msg;
    }
}
☕️ 自定义 jackson 配置
package com.example.config;

import com.fasterxml.jackson.annotation.JsonInclude;
import com.fasterxml.jackson.databind.DeserializationFeature;
import com.fasterxml.jackson.databind.ObjectMapper;
import com.fasterxml.jackson.databind.module.SimpleModule;
import com.fasterxml.jackson.databind.ser.std.ToStringSerializer;
import org.springframework.context.annotation.Bean;
import org.springframework.context.annotation.Configuration;
import org.springframework.context.annotation.Primary;
import org.springframework.http.converter.json.Jackson2ObjectMapperBuilder;
import java.text.SimpleDateFormat;

@Configuration
public class JacksonConfig {

    @Bean
    @Primary
    public ObjectMapper jacksonObjectMapper(Jackson2ObjectMapperBuilder builder) {
        ObjectMapper objectMapper = builder.createXmlMapper(false).build();
        // 设置日期转换
        objectMapper.setDateFormat(new SimpleDateFormat("yyyy-MM-dd HH:mm:ss"));
        // 设置时区
        // objectMapper.setTimeZone(TimeZone.getTimeZone("GMT+8"));

        // 序列化时,值为 null 的属性不序列化
        // Include.Include.ALWAYS 默认
        // Include.NON_DEFAULT 属性为默认值不序列化
        // Include.NON_EMPTY 属性为空("" 或 null)都不序列化
        // Include.NON_NULL 属性为 null 不序列化
        objectMapper.setSerializationInclusion(JsonInclude.Include.NON_NULL);
        // 反序列化时,遇到未知属性的时候不抛出异常
        objectMapper.disable(DeserializationFeature.FAIL_ON_UNKNOWN_PROPERTIES);

        // 序列化成 json 时,将 Long 转换成 String(防止 js 丢失精度)
        // Java 的 Long 能表示的范围比 js 中 number 大,意味着部分数值在 js 会变成不准确的值
        SimpleModule simpleModule = new SimpleModule();
        simpleModule.addSerializer(Long.class, ToStringSerializer.instance);
        simpleModule.addSerializer(Long.TYPE, ToStringSerializer.instance);
        objectMapper.registerModule(simpleModule);
        return objectMapper;
    }
}
☕️ 自定义认证成功处理器 CustomAuthenticationSuccessHandler
package com.example.config.security;

import com.example.entity.ResultData;
import com.fasterxml.jackson.databind.ObjectMapper;
import org.springframework.beans.factory.annotation.Autowired;
import org.springframework.security.core.Authentication;
import org.springframework.security.web.authentication.SavedRequestAwareAuthenticationSuccessHandler;
import org.springframework.stereotype.Component;
import javax.servlet.ServletException;
import javax.servlet.http.HttpServletRequest;
import javax.servlet.http.HttpServletResponse;
import java.io.IOException;

/**
 * 继承 SavedRequestAwareAuthenticationSuccessHandler 类,该类是 defaultSuccessUrl() 方法使用的认证成功处理器
 */
@Component
public class CustomAuthenticationSuccessHandler extends SavedRequestAwareAuthenticationSuccessHandler {

    @Autowired
    private ObjectMapper objectMapper;

    @Override
    public void onAuthenticationSuccess(HttpServletRequest request, HttpServletResponse response, Authentication authentication) throws ServletException, IOException {
        String xRequestedWith = request.getHeader("x-requested-with");
        // 判断前端的请求是否为 ajax 请求
        if ("XMLHttpRequest".equals(xRequestedWith)) {
            // 认证成功,响应 JSON 数据
            response.setContentType("application/json;charset=utf-8");
            response.getWriter().write(objectMapper.writeValueAsString(new ResultData<>(0, "认证成功!")));
        }else {
            // 以下配置等同于前文中的 defaultSuccessUrl("/index")

            // 认证成功后,如果存在原始访问路径,则重定向到该路径;如果没有,则重定向 /index
            // 设置默认的重定的路径
            super.setDefaultTargetUrl("/index");
            // 调用父类的 onAuthenticationSuccess() 方法
            super.onAuthenticationSuccess(request, response, authentication);
        }
    }
}
☕️ 自定义认证失败处理器 CustomAuthenticationFailureHandler
package com.example.config.security;

import com.example.entity.ResultData;
import com.fasterxml.jackson.databind.ObjectMapper;
import org.springframework.beans.factory.annotation.Autowired;
import org.springframework.security.core.AuthenticationException;
import org.springframework.security.web.authentication.SimpleUrlAuthenticationFailureHandler;
import org.springframework.stereotype.Component;
import javax.servlet.ServletException;
import javax.servlet.http.HttpServletRequest;
import javax.servlet.http.HttpServletResponse;
import java.io.IOException;

/**
 * 继承 SimpleUrlAuthenticationFailureHandler 处理器,该类是 failureUrl() 方法使用的认证失败处理器
 */
@Component
public class CustomAuthenticationFailureHandler extends SimpleUrlAuthenticationFailureHandler {

    @Autowired
    private ObjectMapper objectMapper;

    @Override
    public void onAuthenticationFailure(HttpServletRequest request, HttpServletResponse response, AuthenticationException e) throws IOException, ServletException {
        String xRequestedWith = request.getHeader("x-requested-with");
        // 判断前端的请求是否为 ajax 请求
        if ("XMLHttpRequest".equals(xRequestedWith)) {
            // 认证失败,响应 JSON 数据
            response.setContentType("application/json;charset=utf-8");
            response.getWriter().write(objectMapper.writeValueAsString(new ResultData<>(1, "认证失败!")));
        }else {
            // 以下配置等同于前文的 failureUrl("/login/page?error")

            // 认证失败后,重定向到指定地址
            // 设置默认的重定向路径
            super.setDefaultFailureUrl("/login/page?error");
            // 调用父类的 onAuthenticationFailure() 方法
            super.onAuthenticationFailure(request, response, e);
        }
    }
}
☕️ 修改安全配置类 SpringSecurityConfig,使用自定义认证成功和失败处理器
@EnableWebSecurity       // 开启 MVC Security 安全配置
public class SpringSecurityConfig extends WebSecurityConfigurerAdapter {
    //...
    @Autowired
    private CustomAuthenticationSuccessHandler authenticationSuccessHandler;

    @Autowired
    private CustomAuthenticationFailureHandler authenticationFailureHandler;
    //...

    /**
     * 定制基于 HTTP 请求的用户访问控制
     *
     * @param http
     * @throws Exception
     */
    @Override
    protected void configure(HttpSecurity http) throws Exception {
        // 启动 form 表单登录
        http.formLogin()
                // 设置登录页面的访问路径,默认为 /login,GET 请求;该路径不设限访问
                .loginPage("/login/page")
                // 设置登录表单提交路径,默认为 loginPage() 设置的路径,POST 请求
                .loginProcessingUrl("/login/form")
                // 设置登录表单中的用户名参数,默认为 username
                .usernameParameter("name")
                // 设置登录表单中的密码参数,默认为 password
                .passwordParameter("pwd")
                // 认证成功处理,如果存在原始访问路径,则重定向到该路径;如果没有,则重定向 /index
                //.defaultSuccessUrl("/index")
                // 认证失败处理,重定向到指定地址,默认为 loginPage() + ?error;该路径不设限访问
                //.failureUrl("/login/page?error");
                // 不再使用 defaultSuccessUrl() 和 failureUrl() 方法进行认证成功和失败处理,
                // 使用自定义的认证成功和失败处理器
                .successHandler(authenticationSuccessHandler)
                .failureHandler(authenticationFailureHandler);
        //...
    }
}
完整的安全配置类 SpringSecurityConfig 如下:
package com.example.config;

import com.example.config.security.CustomAuthenticationFailureHandler;
import com.example.config.security.CustomAuthenticationSuccessHandler;
import com.example.service.CustomUserDetailsService;
import org.springframework.beans.factory.annotation.Autowired;
import org.springframework.context.annotation.Bean;
import org.springframework.security.config.annotation.authentication.builders.AuthenticationManagerBuilder;
import org.springframework.security.config.annotation.web.builders.HttpSecurity;
import org.springframework.security.config.annotation.web.builders.WebSecurity;
import org.springframework.security.config.annotation.web.configuration.EnableWebSecurity;
import org.springframework.security.config.annotation.web.configuration.WebSecurityConfigurerAdapter;
import org.springframework.security.crypto.bcrypt.BCryptPasswordEncoder;

@EnableWebSecurity       // 开启 MVC Security 安全配置
public class SpringSecurityConfig extends WebSecurityConfigurerAdapter {

    @Autowired
    private CustomUserDetailsService userDetailsService;

    @Autowired
    private CustomAuthenticationSuccessHandler authenticationSuccessHandler;

    @Autowired
    private CustomAuthenticationFailureHandler authenticationFailureHandler;

    /**
     * 密码编码器,密码不能明文存储
     */
    @Bean
    public BCryptPasswordEncoder passwordEncoder() {
        // 使用 BCryptPasswordEncoder 密码编码器,该编码器会将随机产生的 salt 混入最终生成的密文中
        return new BCryptPasswordEncoder();
    }

    /**
     * 定制用户认证管理器来实现用户认证
     */
    @Override
    protected void configure(AuthenticationManagerBuilder auth) throws Exception {
        // 采用内存存储方式,用户认证信息存储在内存中
        // auth.inMemoryAuthentication()
        //        .withUser("admin").password(passwordEncoder()
        //        .encode("123456")).roles("ROLE_ADMIN");

        // 不再使用内存方式存储用户认证信息,而是动态从数据库中获取
        auth.userDetailsService(userDetailsService).passwordEncoder(passwordEncoder());
    }

    /**
     * 定制基于 HTTP 请求的用户访问控制
     */
    @Override
    protected void configure(HttpSecurity http) throws Exception {
        // 启动 form 表单登录
        http.formLogin()
                // 设置登录页面的访问路径,默认为 /login,GET 请求;该路径不设限访问
                .loginPage("/login/page")
                // 设置登录表单提交路径,默认为 loginPage() 设置的路径,POST 请求
                .loginProcessingUrl("/login/form")
                // 设置登录表单中的用户名参数,默认为 username
                .usernameParameter("name")
                // 设置登录表单中的密码参数,默认为 password
                .passwordParameter("pwd")
                // 认证成功处理,如果存在原始访问路径,则重定向到该路径;如果没有,则重定向 /index
                //.defaultSuccessUrl("/index")
                // 认证失败处理,重定向到指定地址,默认为 loginPage() + ?error;该路径不设限访问
                //.failureUrl("/login/page?error");
                // 不再使用 defaultSuccessUrl() 和 failureUrl() 方法进行认证成功和失败处理,
                // 使用自定义的认证成功和失败处理器
                .successHandler(authenticationSuccessHandler)
                .failureHandler(authenticationFailureHandler);

        // 开启基于 HTTP 请求访问控制
        http.authorizeRequests()
                // 以下访问不需要任何权限,任何人都可以访问
                .antMatchers("/login/page").permitAll()
                // 以下访问需要 ROLE_ADMIN 权限
                .antMatchers("/admin/**").hasRole("ADMIN")
                // 以下访问需要 ROLE_USER 权限
                .antMatchers("/user/**").hasAuthority("ROLE_USER")
                // 其它任何请求访问都需要先通过认证
                .anyRequest().authenticated();

        // 关闭 csrf 防护
        http.csrf().disable();
    }

    /**
     * 定制一些全局性的安全配置,例如:不拦截静态资源的访问
     */
    @Override
    public void configure(WebSecurity web) throws Exception {
        // 静态资源的访问不需要拦截,直接放行
        web.ignoring().antMatchers("/**/*.css", "/**/*.js", "/**/*.png", "/**/*.jpg", "/**/*.jpeg", "/**/*.ico");
    }
}
☕️ 测试
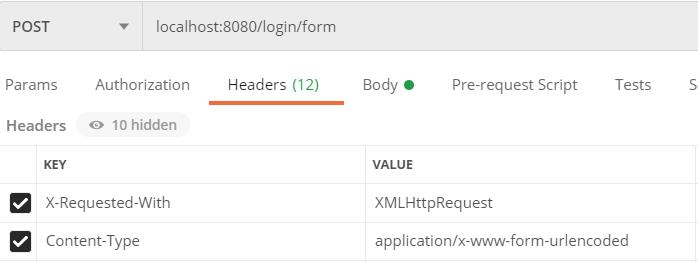
ajax 请求
使用 postman 模拟 ajax 请求进行测试:
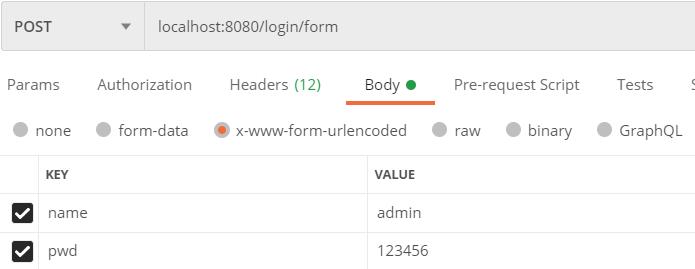
返回的 JSON 数据如下:
{
    "code": 0,
    "msg": "认证成功!"
}
表单请求
访问localhost:8080/login/page,输入错误的用户名和密码,重定向到/login/page?error:
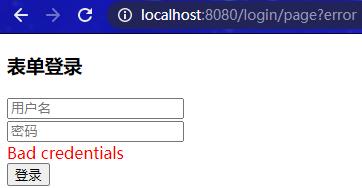
这里的错误信息就是前面源码分析中提到的存储在 Session 中认证错误信息,用户认证失败后,重定向到登录页面,从 Session 域中获取认证错误信息并在页面展示:
<div th:if="${param.error}">
    <span th:text="${session.SPRING_SECURITY_LAST_EXCEPTION.message}" style="color:red">用户名或密码错误</span>
</div>
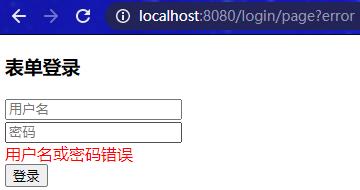
Spring Security默认加载 message.properties 英文配置文件,所以显示的是英文错误提示信息。我们可以自定义配置类让Spring Security加载官方提供的 message_zh_CN.properties 中文配置文件:
package com.example.config;

import org.springframework.context.annotation.Bean;
import org.springframework.context.annotation.Configuration;
import org.springframework.context.support.ReloadableResourceBundleMessageSource;

/**
 * 加载中文认证信息提示配置
 */
@Configuration
public class ReloadZhMessageConfig {
    @Bean
    public ReloadableResourceBundleMessageSource messageSource() {
        // 加载中文的认证提示信息
        ReloadableResourceBundleMessageSource messageSource = new ReloadableResourceBundleMessageSource();
        // 不需要添加 .properties 后缀
        messageSource.setBasename("classpath:org/springframework/security/messages_zh_CN");
        return messageSource;
    }
}
再次访问localhost:8080/login/page,输入错误的用户名和密码,重定向到/login/page?error:

 浙公网安备 33010602011771号