Ubuntu-base 根文件系统构建
根文件系统下载地址http://cdimage.ubuntu.com/ubuntu-base/releases/
Ubuntu 针对不同的 CPU 架构提供相应的 ubuntu base 根文件系统,
有 amd64(64 位 X86)、 armhf、 i386(32 位 X86)、 powerpc、 ppc64el 等系统的
我这边使用的是ubuntu-base-16.04.6-base-arm64.tar.gz
1:cd /home/s/Desktop
mkdir ubuntu_rootfs
2:cp ubuntu-base-16.04.6-base-arm64.tar.gz /home/s/Desktop/ubuntu_rootfs
3:sudo tar -vzxf ubuntu-base-16.04.6-base-arm64.tar.gz
4: 需要在 PC 的 Ubuntu 上安装 qemu 工具,命令如下:
sudo apt-get install qemu-user-static
将刚刚安装的 qemu-user-static 拷贝到刚刚解压出来的 ubuntu base 目录中,也就是
ubuntu_rootfs/usr/bin 目录下,命令如下:
arm:
sudo cp /usr/bin/qemu-arm-static /home/s/Desktop/ubuntu_rootfs/usr/bin/
arm64:
sudo cp /usr/bin/qemu-aarch64-static /home/s/Desktop/ubuntu_rootfs/usr/bin/
5:设置软件源
我们在 ubuntu 下使用 apt-get 安装软件的时候,是从网上下载软件并安装的,因此需要指
定软件源。
sudo cp /etc/resolv.conf /home/s/Desktop/ubuntu_rootfs/etc/resolv.conf
sudo gedit /home/s/Desktop/ubuntu_rootfs/etc/apt/sources.list 在此文件最后面添加软件源
 1 #中科大源
 2 deb http://mirrors.ustc.edu.cn/ubuntu-ports/ xenial main multiverse restricted universe
 3 deb http://mirrors.ustc.edu.cn/ubuntu-ports/ xenial-backports main multiverse restricted universe
 4 deb http://mirrors.ustc.edu.cn/ubuntu-ports/ xenial-proposed main multiverse restricted universe
 5 deb http://mirrors.ustc.edu.cn/ubuntu-ports/ xenial-security main multiverse restricted universe
 6 deb http://mirrors.ustc.edu.cn/ubuntu-ports/ xenial-updates main multiverse restricted universe
 7 deb-src http://mirrors.ustc.edu.cn/ubuntu-ports/ xenial main multiverse restricted universe
 8 deb-src http://mirrors.ustc.edu.cn/ubuntu-ports/ xenial-backports main multiverse restricted universe
 9 deb-src http://mirrors.ustc.edu.cn/ubuntu-ports/ xenial-proposed main multiverse restricted universe
10 deb-src http://mirrors.ustc.edu.cn/ubuntu-ports/ xenial-security main multiverse restricted universe
11 deb-src http://mirrors.ustc.edu.cn/ubuntu-ports/ xenial-updates main multiverse restricted universe
6:在主机挂载并配置根文件系统
(1)编写一个mount脚本
1 #!/bin/bash
2 echo "MOUNTING"
3 sudo mount -t proc /proc /home/s/Desktop/ubuntu_rootfs/proc
4 sudo mount -t sysfs /sys /home/s/Desktop/ubuntu_rootfs/sys
5 sudo mount -o bind /dev /home/s/Desktop/ubuntu_rootfs/dev
6 sudo mount -o bind /dev/pts /home/s/Desktop/ubuntu_rootfs/dev/pts
7 sudo chroot /home/s/Desktop/ubuntu_rootfs
(2)编写一个unmount脚本
1 #!/bin/bash
2 echo "UNMOUNTING"
3 sudo umount /home/s/Desktop/ubuntu_rootfs/proc
4 sudo umount /home/s/Desktop/ubuntu_rootfs/sys
5 sudo umount /home/s/Desktop/ubuntu_rootfs/dev
6 sudo umount /home/s/Desktop/ubuntu_rootfs/dev/pts
最后给予 mount.sh 和 unmount.sh 这两个 shell 脚本可执行权限,命令如下:
sudo chmod 777 mount.sh unmount.sh
7:执行
./mount
8:安装常用的命令和软件
apt update
apt install sudo
apt install vim
apt install kmod
apt install net-tools
apt install ethtool
apt install ifupdown
apt install language-pack-en-base
apt install rsyslog
apt install htop
制作过程中遇到的问题
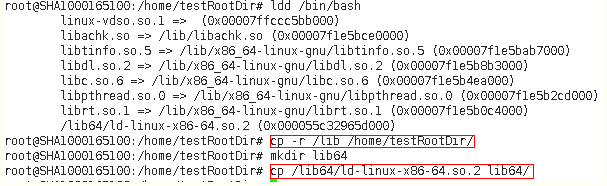
1:直接执行chroot MyRootDir出现错误:chroot: failed to run command ‘/bin/bash’: No such file or directory
原因是缺少bash相关的库,使用ldd查看库并拷贝
转载自:https://www.cnblogs.com/charlieroro/p/9259675.html
2:bash: /usr/bin/groups: No such file or directory
这个错误是因为在安装 qemu 工具出了问题,
我要制作的是64位的系统,所以应该拷贝的是qemu-aarch64-static,出问题的原因是拷贝的是qemu-arm-static

 浙公网安备 33010602011771号