
S2. Android 常用控件
【概述】
- Button(普通按钮):点击事件处理
- Toast(消息提示)
- Menu(菜单): Menu + Fragment 实现菜单切换
【Button】
- 在 MainActivity 对应的布局文件 activity_main.xml 中,使用图形编辑器加入一个按钮,如下图所示:
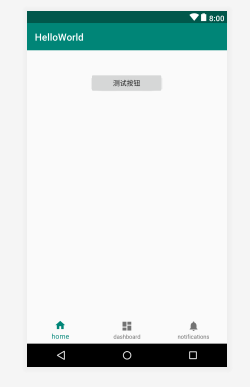
- activity_main.xml 中会添加 Button 的代码,手动修改 id,text 信息,添加 onClick 事件
    <Button
        android:id="@+id/testBtn"
        android:layout_width="150dp"
        android:layout_height="43dp"
        android:onClick="onClick"
        android:text="测试按钮"
        tools:layout_editor_absoluteX="130dp"
        tools:layout_editor_absoluteY="46dp" />
- 在 MainActivity.java 文件中添加 onClick 方法:同一个 Activity 的 click 事件可以使用同一个 onClick 方法来响应,通过 switch/case 进行分发。
    protected void onClick(View v){
        switch (v.getId()){
            case R.id.testBtn:
                Toast.makeText(this, "测试按钮被点击", Toast.LENGTH_SHORT).show();
        }
    }
- 还有其他响应 click 事件的写法,可以参考:https://www.jb51.net/article/55329.htm
【Toast】
- 应用场景:例如打开手机淘宝,按一下返回键退出时,手机淘宝会提示“再按一次返回键退出手机淘宝”;同样 B站 App 也会在按一下返回键退出时提示 “再按一次退出”;这样的实现,是为了防止用户错按到返回键而退出,当然也有很多 App 并没有实现这一功能,或者说取消了这一功能,某程度上错按返回键的可能性不大,在不错按的时候 “阻止” 用户退出的行为多少用点影响用户体验。
- 下面使用 Toast 来实现一下这个提示功能:Toast.makeText 三个参数:
1). 消息展示的 Context 实例,一般指当前 Activity 实例;
2). 消息提示的内容:字符串格式,也可以写到 R资源中;
3). 消息提示的时间长度:Toast.LENGTH_SHORT 和 Toast.LENGTH_LONG
    //用户点击返回键时触发
    private static final int TIME_INTERVAL = 2000;
    private long mBackPressed = 0;
    public void onBackPressed(){
        long cMills = System.currentTimeMillis();
        if(cMills - mBackPressed > TIME_INTERVAL){//如果两次点击时间间隔超过 TIME_INTERVAL,则执行“提示退出”操作
            mBackPressed = cMills;
            Toast.makeText(this, "再按一次退出", Toast.LENGTH_SHORT).show();
        }else{//如果两次点击在 TIME_INTERVAL 时间间隔内,则执行“退出”操作
            super.onBackPressed();
        }
    }
【Menu】
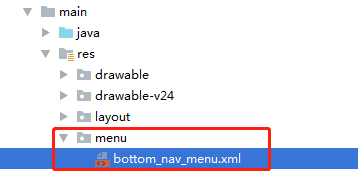
- 文件结构:在 main/res/menu 文件夹下创建 bottom_nav_menu.xml。如果没有 menu 文件夹则先创建 menu 文件夹,选中 menu 文件夹,右键进行 “New” --> “Menu resource file”

创建 bottom_nav_menu.xml 完成。
- 编辑 bottom_nav_menu.xml 如下:
- bottom_nav_menu.xml 对应代码:item 标签中主要定义了 id,icon(图标,在 drawable 文件夹中定义),title(标题,在 values/strings.xml 中定义)
<?xml version="1.0" encoding="utf-8"?>
<menu xmlns:app="http://schemas.android.com/apk/res-auto"
    xmlns:android="http://schemas.android.com/apk/res/android">

    <item
        android:id="@+id/navigation_home"
        android:icon="@drawable/ic_home_black_24dp"
        android:title="@string/title_home" />

    <item
        android:id="@+id/navigation_dashboard"
        android:icon="@drawable/ic_dashboard_black_24dp"
        android:title="@string/title_dashboard" />

    <item
        android:id="@+id/navigation_notifications"
        android:icon="@drawable/ic_notifications_black_24dp"
        android:title="@string/title_notifications" />

</menu>
- 对应的 drawable 文件,注意文件命名与 xml 配置是对应的
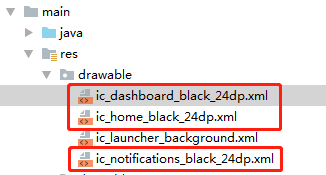
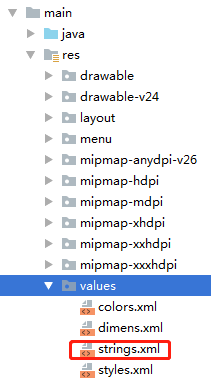
- 对应的 string 文件,注意strings.xml 与 bottom_nav_menu.xml 配置是对应的
<resources>
    <string name="app_name">HelloWorld</string>
    <string name="title_home">home</string>
    <string name="title_dashboard">dashboard</string>
    <string name="title_notifications">notifications</string>
</resources>
【menu + fragment 实现菜单切换】
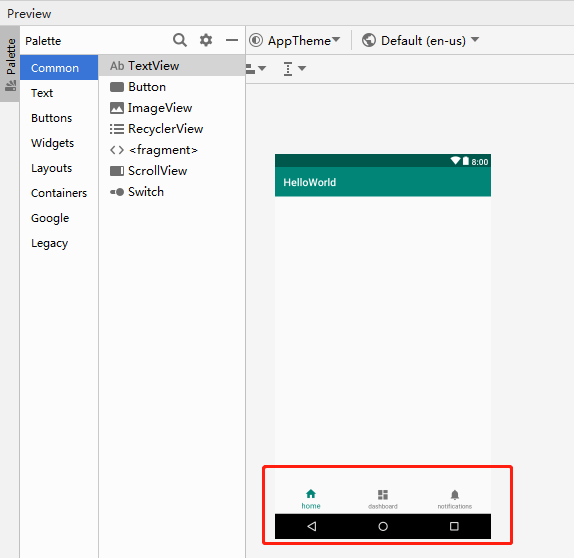
- 在 activity_main.xml 中定义一个 layout,如下图所示;
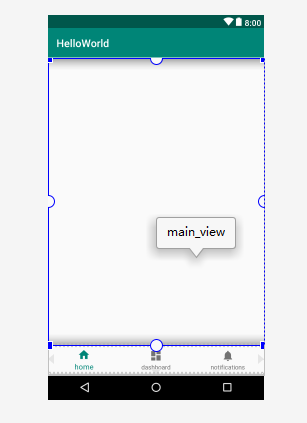
- 添加 layout 的 id 为 main_view,代码如下:
    <LinearLayout
        android:id="@+id/main_view"
        android:layout_width="411dp"
        android:layout_height="546dp"
        android:layout_weight="1"
        android:orientation="vertical"
        tools:layout_editor_absoluteX="0dp"
        tools:layout_editor_absoluteY="0dp" />
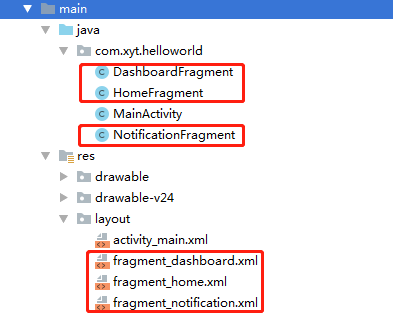
- 例子:创建三个 Fragment 分别为 HomeFragment、DashFragment、NotificationFragment。
- fragment_home.xml 放置了一个 TextView 文本
<?xml version="1.0" encoding="utf-8"?>
<FrameLayout xmlns:android="http://schemas.android.com/apk/res/android"
    xmlns:tools="http://schemas.android.com/tools"
    android:layout_width="match_parent"
    android:layout_height="match_parent"
    tools:context=".HomeFragment">

    <!-- TODO: Update blank fragment layout -->
    <TextView
        android:id="@+id/title"
        android:layout_width="match_parent"
        android:layout_height="match_parent"
        android:text="Hello Home!" />

</FrameLayout>
- FragmentHome.java 代码如下:
package com.xyt.helloworld;

import android.os.Bundle;

import androidx.annotation.Nullable;
import androidx.fragment.app.Fragment;

import android.view.LayoutInflater;
import android.view.View;
import android.view.ViewGroup;
import android.widget.TextView;


public class HomeFragment extends Fragment {
    private TextView textView;
    @Nullable
    @Override
    public View onCreateView(LayoutInflater inflater, @Nullable ViewGroup container, @Nullable Bundle savedInstanceState) {
        View view=inflater.inflate(R.layout.fragment_home,container,false);
        return view;
    }

    @Override
    public void onActivityCreated(@Nullable Bundle savedInstanceState) {
        super.onActivityCreated(savedInstanceState);
        textView=(TextView)getActivity().findViewById(R.id.title);
    }
}
- 在 MainActivity.java 中实现菜单切换
package com.xyt.helloworld;

import android.content.Intent;
import android.os.Bundle;

import com.google.android.material.bottomnavigation.BottomNavigationView;

import androidx.appcompat.app.AppCompatActivity;
import androidx.annotation.NonNull;
import androidx.fragment.app.Fragment;
import androidx.fragment.app.FragmentTransaction;

import android.view.MenuItem;
import android.view.View;
import android.webkit.WebView;
import android.widget.Button;
import android.widget.FrameLayout;
import android.widget.TextView;
import android.widget.Toast;

import java.util.*;

public class MainActivity extends AppCompatActivity {

    private BottomNavigationView.OnNavigationItemSelectedListener mOnNavigationItemSelectedListener
            = new BottomNavigationView.OnNavigationItemSelectedListener() {

        @Override
        public boolean onNavigationItemSelected(@NonNull MenuItem item) {
            switch (item.getItemId()) {
                case R.id.navigation_home:
                    switchFragment(0);
                    return true;
                case R.id.navigation_dashboard:
                    switchFragment(1);
                    return true;
                case R.id.navigation_notifications:
                    switchFragment(2);
                    return true;
            }
            return false;
        }
    };

    private Fragment[] mFragments = new Fragment[5];
    private void initMainView(){
        mFragments[0] = new HomeFragment();
        mFragments[1] = new DashboardFragment();
        mFragments[2] = new NotificationFragment();
        //初始化第一个 fragment
        FragmentTransaction transaction = getSupportFragmentManager().beginTransaction();
        transaction.add(R.id.main_view, mFragments[0]);
        transaction.show(mFragments[0]).commitAllowingStateLoss();
    }

    private int preIdx = 0;
    private void switchFragment(int curIdx){
        if(preIdx != curIdx){//切换内容
            FragmentTransaction transaction = getSupportFragmentManager().beginTransaction();
            transaction.hide(mFragments[preIdx]);//隐藏上个Fragment
            if(!mFragments[curIdx].isAdded()){
                transaction.add(R.id.main_view, mFragments[curIdx]);
            }
            transaction.show(mFragments[curIdx]).commitAllowingStateLoss();
            preIdx = curIdx;//更新 index
        }
    }

    @Override
    protected void onCreate(Bundle savedInstanceState) {
        super.onCreate(savedInstanceState);
        setContentView(R.layout.activity_main);
        BottomNavigationView navView = findViewById(R.id.nav_view);
        navView.setOnNavigationItemSelectedListener(mOnNavigationItemSelectedListener);
        initMainView();
    }

}
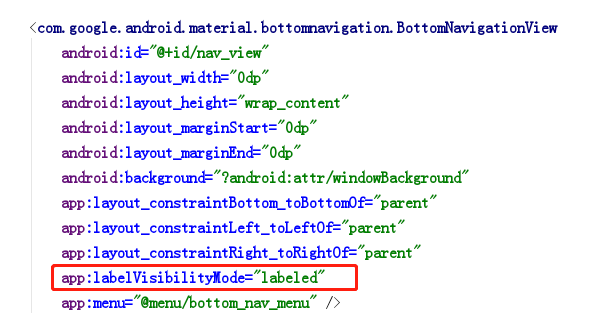
- 注意:使用 BottomNavigationView 时若 item 超过三个,只会被选中的 item 才会显示 title 的文字,其他 item 不会显示。在 BottomNavigationView 定义的标签下添加 app:labelVisibilityMode="labeled" 可以解决这个问题。

 浙公网安备 33010602011771号