SpringBoot集成ShardingSphere‐JDBC搭配Dynamic多数据源
概述
本文章主要是用SpringBoot 3.3.4 集成 ShardingSphere‐JDBC 5.5.2 并且搭配Dynamic使用的一个应用场景,为什么用了分库分表了还会用到多数据源呢?我们在做一些监控系统、集成系统、工具系统、统计系统等需要去连接多个项目数据库的时候,每个项目都有自己的数据库,而且部分系统又刚好用到了分库分表,那如果我们查询数据是用程序逻辑去适应分库分表的查询是相当的麻烦,这个时候当前应用场景就相当有意义了。之前我发过一篇单独集成shardingsphere-jdbc的文章,有需要的可以移步:Spring Boot 集成 ShardingSphere-JDBC 配置示例
代码
说明
官网地址:http://shardingsphere.apache.org/index_zh.html
shardingsphere主流为YMAL配置和JAVA API配置,本文用的YMAL配置,如果需要了解分库分表的详细逻辑和深入了解功能,可以去官网。
引入maven
        <!--    多数据源    -->
        <dependency>
            <groupId>com.baomidou</groupId>
            <artifactId>dynamic-datasource-spring-boot-starter</artifactId>
            <version>3.6.1</version>
        </dependency>

        <!--  shardingsphere   -->
        <dependency>
            <groupId>org.apache.shardingsphere</groupId>
            <artifactId>shardingsphere-jdbc</artifactId>
            <version>5.5.2</version>
        </dependency>
application.yaml配置
server:
  port: 8095
spring:
  datasource:
    dynamic:
      primary: master
      strict: false #严格匹配数据源,默认false. true未匹配到指定数据源时抛异常,false使用默认数据源
      datasource:
        master:
          driverClassName: com.mysql.cj.jdbc.Driver
          url: jdbc:mysql://localhost:3306/secure?useUnicode=true&characterEncoding=utf8&zeroDateTimeBehavior=convertToNull&useSSL=true&serverTimezone=GMT%2B8
          username: root
          password: 123456
        sharding:
          driverClassName: org.apache.shardingsphere.driver.ShardingSphereDriver
          url: jdbc:shardingsphere:classpath:sharding-dev.yaml
        other:
          driverClassName: com.mysql.cj.jdbc.Driver
          url: jdbc:mysql://localhost:3306/system?useUnicode=true&characterEncoding=utf8&zeroDateTimeBehavior=convertToNull&useSSL=true&serverTimezone=GMT%2B8
          username: root
          password: 123456
# 其他配置省略
sharding-dev.yaml配置
这里只是做了一个分表的基本配置,一个info主表关联info_audio、info_audit关联表,algorithmClassName的地址是自己分表的自定义算法地址。如果还需要分库分表其他的功能,也只需要在这个配置文件补充就可以了。
dataSources:
  center:
    dataSourceClassName: com.zaxxer.hikari.HikariDataSource
    driverClassName: com.mysql.cj.jdbc.Driver
    url: jdbc:mysql://localhost:3306/center?useUnicode=true&characterEncoding=utf8&zeroDateTimeBehavior=convertToNull&useSSL=true&serverTimezone=GMT%2B8
    username: root
    password: 123456

rules:
  - !SHARDING
    tables:
      # 主表特殊配置 (使用id分片)
      info:
        actualDataNodes: center.info_${0..9}
        tableStrategy:
          standard:
            shardingColumn: id  # 特殊分片键
            shardingAlgorithmName: newsInfoShardingAlgorithm

      # 其他表使用默认策略 (news_id分片)
      info_audio:
        actualDataNodes: center.info_audio_${0..9}
      info_audit:
        actualDataNodes: center.info_audit_${0..9}

    # 绑定表组配置
    bindingTables:
      - info,info_audio,info_audit

    # 默认分表策略 (适用于所有表)
    defaultTableStrategy:
      standard:
        shardingColumn: news_id  # 默认分片键
        shardingAlgorithmName: newsInfoShardingAlgorithm

    # 默认主键生成策略
    defaultKeyGenerateStrategy:
      column: id
      keyGeneratorName: snowflake

    # 分片算法配置
    shardingAlgorithms:
      newsInfoShardingAlgorithm:
        type: CLASS_BASED
        props:
          strategy: STANDARD
          algorithmClassName: com.monitor.config.sharding.InfoSharding
          newsInfoShardingTableNum: 10

    # 分布式序列配置
    keyGenerators:
      snowflake:
        type: SNOWFLAKE
使用
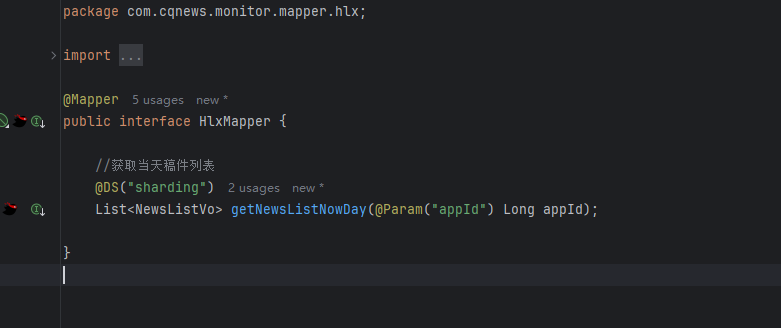
我们配置完成后,就可以正常使用dynamic一样去切换数据库了,在mapper文件使用注解@DS("sharding"),就会使用分表的逻辑去查询数据了。

 浙公网安备 33010602011771号