

spring 整合 rabbitmq
一、基本配置
1、pom添加以下jar
<dependency>
   <groupId>com.fasterxml.jackson.core</groupId>
   <artifactId>jackson-databind</artifactId>
   <version>2.7.5</version>
</dependency>
<!-- https://mvnrepository.com/artifact/org.springframework.amqp/spring-rabbit -->
<dependency>
   <groupId>org.springframework.amqp</groupId>
   <artifactId>spring-rabbit</artifactId>
   <version>2.1.7.RELEASE</version>
</dependency>
2、spring配置文件springContext.xml添加以下配置
<?xml version="1.0" encoding="UTF-8"?>
<beans xmlns="http://www.springframework.org/schema/beans"
    xmlns:xsi="http://www.w3.org/2001/XMLSchema-instance" xmlns:tx="http://www.springframework.org/schema/tx"
    xmlns:task="http://www.springframework.org/schema/task" xmlns:context="http://www.springframework.org/schema/context"
    xmlns:aop="http://www.springframework.org/schema/aop"
    xsi:schemaLocation="http://www.springframework.org/schema/beans
           http://www.springframework.org/schema/beans/spring-beans-3.0.xsd
           http://www.springframework.org/schema/context
           http://www.springframework.org/schema/context/spring-context-3.0.xsd
           http://www.springframework.org/schema/tx http://www.springframework.org/schema/tx/spring-tx-3.0.xsd
           http://www.springframework.org/schema/aop
           http://www.springframework.org/schema/aop/spring-aop-3.0.xsd
           http://www.springframework.org/schema/task http://www.springframework.org/schema/task/spring-task-3.0.xsd
           ">


    <!-- 激活spring的注解. -->
    <context:annotation-config />
    <context:component-scan base-package="com.pinghengxing..*">
    </context:component-scan>
    <!-- rabbitmq producer配置 -->
   <import resource="classpath*:com/config/rabbitmq_producer.xml" />

       <!-- rabbitmq consumer配置 -->
   <import resource="classpath*:com/config/rabbitmq_consumer.xml" />

</beans>
3、rabbitmq_producer.xml生产者配置如下(其中配置了exchange的三种类型:fanout,direct,topic)
<?xml version="1.0" encoding="UTF-8"?>
<beans xmlns="http://www.springframework.org/schema/beans"
    xmlns:xsi="http://www.w3.org/2001/XMLSchema-instance" xmlns:context="http://www.springframework.org/schema/context"
    xmlns:rabbit="http://www.springframework.org/schema/rabbit"
    xsi:schemaLocation="http://www.springframework.org/schema/beans
     http://www.springframework.org/schema/beans/spring-beans.xsd
      http://www.springframework.org/schema/context
       http://www.springframework.org/schema/context/spring-context-4.3.xsd
            http://www.springframework.org/schema/rabbit
            http://www.springframework.org/schema/rabbit/spring-rabbit.xsd">


    <!-- 引入rabbitmq配置文件 -->
    <context:property-placeholder  location="classpath:/com/config/rabbitmq.properties" />

    <!--连接工厂 publisher-confirms,publisher-returns等参数,用于消息确认-->
    <rabbit:connection-factory id="rabbitConnectionFactory"
    host="140.143.xx.xx" username="ww" password="ww" port="5672"
    virtual-host="ww" channel-cache-size="25" cache-mode="CHANNEL"
    publisher-confirms="true" publisher-returns="true" connection-timeout="200" />

    <!--定义admin,producer中的exchange,queue会自动的利用该admin自动在mq中生成 -->
    <rabbit:admin id="rabbitAdmin" connection-factory="rabbitConnectionFactory"/>

    <bean id="retryTemplate" class="org.springframework.retry.support.RetryTemplate">
        <property name="backOffPolicy">
            <bean class="org.springframework.retry.backoff.ExponentialBackOffPolicy">
                <property name="initialInterval" value="200" />
                <property name="maxInterval" value="30000" />
            </bean>
        </property>
        <property name="retryPolicy">
            <bean class="org.springframework.retry.policy.SimpleRetryPolicy">
                <property name="maxAttempts" value="5"/>
            </bean>
        </property>
    </bean>


    <!--定义rabbitmq模板,可以指定连接工厂、exchange、queue等 -->
    <rabbit:template id="amqpTemplate" connection-factory="rabbitConnectionFactory" retry-template="retryTemplate"
     message-converter="jsonMessageConverter" confirm-callback="confirmCallback" return-callback="returnCallback" mandatory="true"
    />

<!--     <rabbit:template id="amqpTemplate" connection-factory="rabbitConnectionFactory" retry-template="retryTemplate"  -->
<!--      message-converter="jsonMessageConverter" confirm-callback="confirmCallback" return-callback="returnCallback" mandatory="true"  -->
<!--      exchange="myTopicExchange" routing-key="error.1"/> -->


    <!--队列声明:durable:true、false true:在服务器重启时,能够存活 exclusive:是否私有队列,如果私有,其他通道不能访问当前队列
    autodelete:当没有任何消费者使用时,自动删除该队列 ,当连接关闭后是否自动删除队列;-->
    <!--用于发布/订阅模式的队列-->
    <rabbit:queue name="myFanoutQueue" durable="true" exclusive="false" auto-delete="false"/>
    <rabbit:queue name="myFanoutQueue2" durable="true" exclusive="false" auto-delete="false"/>
    <!-- 用于路由模式的队列 -->
    <rabbit:queue name="myDirectQueue" durable="true" exclusive="false" auto-delete="false" />
    <!-- 用于主题模式的队列 -->
    <rabbit:queue name="myTopicQueue_error" durable="true" exclusive="false" auto-delete="false"/>
    <rabbit:queue name="myTopicQueue_warn" durable="true" exclusive="false" auto-delete="false"/>
    <!-- 定义交换机 发布/订阅模式 -->
    <rabbit:fanout-exchange name="myFanoutExchange" durable="true" auto-delete="false">
        <rabbit:bindings>
            <rabbit:binding queue="myFanoutQueue"></rabbit:binding>
            <rabbit:binding queue="myFanoutQueue2"></rabbit:binding>
        </rabbit:bindings>
    </rabbit:fanout-exchange>


    <!-- 定义交换机 路由模式(需要routing-key-->
    <rabbit:direct-exchange name="myDirectExchange" durable="true" auto-delete="false">
        <rabbit:bindings>
            <rabbit:binding queue="myDirectQueue" key="direct"></rabbit:binding>
        </rabbit:bindings>
    </rabbit:direct-exchange>
    <!--定义交换机 主题模式-->
    <rabbit:topic-exchange  name="myTopicExchange" durable="true" auto-delete="false">
        <rabbit:bindings>
            <rabbit:binding queue="myTopicQueue_error"  pattern="error.#"></rabbit:binding>
            <rabbit:binding queue="myTopicQueue_error" pattern="warn.#"></rabbit:binding>
            <rabbit:binding queue="myTopicQueue_warn" pattern="warn.*"></rabbit:binding>
        </rabbit:bindings>
    </rabbit:topic-exchange>

    <!--消息转换器,转成json格式-->
    <bean id="jsonMessageConverter" class="org.springframework.amqp.support.converter.Jackson2JsonMessageConverter"></bean>


    <!-- 也可以通过注解方式 -->
    <!--confirmCallback回调 -->
<!--     <bean id="confirmCallback" class="com.pinghengxing.callback.ConfirmCallBack"/> -->
    <!--returnCallback回调 -->
<!--     <bean id="returnCallback" class="com.pinghengxing.callback.ReturnCallBack"/> -->


</beans>
3、rabbitmq_consumer.xml消费者配置如下:(其中定义了三种exchange类型对应队列的消费者 ,)
<?xml version="1.0" encoding="UTF-8"?>
<beans xmlns="http://www.springframework.org/schema/beans"
    xmlns:xsi="http://www.w3.org/2001/XMLSchema-instance" xmlns:context="http://www.springframework.org/schema/context"
    xmlns:rabbit="http://www.springframework.org/schema/rabbit"
    xsi:schemaLocation="http://www.springframework.org/schema/beans
     http://www.springframework.org/schema/beans/spring-beans.xsd
      http://www.springframework.org/schema/context
       http://www.springframework.org/schema/context/spring-context-4.3.xsd
            http://www.springframework.org/schema/rabbit
            http://www.springframework.org/schema/rabbit/spring-rabbit.xsd">


    <!-- 引入rabbitmq配置文件 -->
    <context:property-placeholder  location="classpath:/com/config/rabbitmq.properties" />

    <!--连接工厂 publisher-confirms,publisher-returns等参数,用于消息确认-->
    <rabbit:connection-factory id="rabbitConnectionFactory"
    host="140.143.xx.xx" username="ww" password="ww" port="5672"
    virtual-host="ww" channel-cache-size="25" cache-mode="CHANNEL"
     connection-timeout="200" />


    <!--定义监听-->
    <!-- concurrency设置的是对每个listener在初始化的时候设置的并发消费者的个数, prefetch是每次从一次性从broker里面取的待消费的消息的个数
        每个消费者对应的listener有个Exclusive参数,默认为false, 如果设置为true,concurrency就必须设置为1, 即只能单个消费者消费队列里的消息,
        适用于必须严格执行消息队列的消费顺序(先进先出)。 -->
    <rabbit:listener-container connection-factory="rabbitConnectionFactory" acknowledge="manual"
    prefetch="1" concurrency="1"  >
        <!-- 发布订阅模式监听 -->
        <rabbit:listener ref="fanOutReceiver" queue-names="myFanoutQueue" />
        <rabbit:listener ref="fanOutReceiver2" queue-names="myFanoutQueue2" />

        <!-- 路由模式监听 -->
        <rabbit:listener ref="directReceiver" queue-names="myDirectQueue"  />
        <rabbit:listener ref="directReceiver2" queue-names="myDirectQueue"  />
        <!-- 主题模式监听 -->
        <rabbit:listener ref="topicErrorReceiver" queue-names="myTopicQueue_error"/>
        <rabbit:listener ref="topicWarnReceiver" queue-names="myTopicQueue_warn"/>
    </rabbit:listener-container>

    <!--消费者实现类,也可以使用注解方式 -->
<!--     <bean id="directReceiver" class="com.pinghengxing.direct.DirectReceiver"/> -->
<!--     <bean id="fanOutReceiver" class="com.pinghengxing.fanout.FanOutReceiver"/> -->
<!--     <bean id="fanOutReceiver2" class="com.pinghengxing.fanout.FanOutReceiver2"/> -->
<!--     <bean id="topicErrorReceiver" class="com.pinghengxing.topic.TopicErrorReceiver"/> -->
<!--     <bean id="topicWarnReceiver" class="com.pinghengxing.topic.TopicWarnReceiver"/> -->

</beans>
二、编写测试代码(在此只进行Direct类型 交换机测试代码的表写,其他类型仿照此示例即可)
1、定义消息生产者(DirectProducer)
package com.pinghengxing.direct;

import org.springframework.amqp.rabbit.core.RabbitTemplate;
import org.springframework.context.ApplicationContext;
import org.springframework.context.support.ClassPathXmlApplicationContext;

/**
 * @author ww
 */

public class DirectProducer {


    private static ApplicationContext ac;

    public static void sendMessage(String exchange,String routingKey,Object message){
        ac = new ClassPathXmlApplicationContext("classpath:com/config/springContext.xml");
        RabbitTemplate rt = ac.getBean(RabbitTemplate.class);

        for(int i=0;i<10;i++){
            rt.convertAndSend(exchange, routingKey, message+""+i);
        }
    }

    public static void main(String[] args) {
        DirectProducer.sendMessage("myDirectExchange","direct","路由模式");
    }


}
2、定义消息消费者(DirectReceiver1,DirectReceiver1 )-多个消费者
消费者1
package com.pinghengxing.direct;

import org.springframework.amqp.core.Message;
import org.springframework.amqp.rabbit.listener.api.ChannelAwareMessageListener;
import org.springframework.stereotype.Component;

import com.rabbitmq.client.Channel;
@Component("directReceiver")
public class DirectReceiver implements ChannelAwareMessageListener{
    @Override
    public void onMessage(Message message, Channel channel) throws Exception {
        System.out.println("************************direct111********************************");
        System.out.println("路由模式direct111 接收信息:"+new String(message.getBody()));
        System.out.println("********************************************************");
        //设置手工应答
//        if(true){
//            throw new Exception();
//        }
        channel.basicAck(message.getMessageProperties().getDeliveryTag(),false);

    }


}
消费者2
package com.pinghengxing.direct;

import org.springframework.amqp.core.Message;
import org.springframework.amqp.rabbit.listener.api.ChannelAwareMessageListener;
import org.springframework.stereotype.Component;

import com.rabbitmq.client.Channel;
@Component("directReceiver2")
public class DirectReceiver2 implements ChannelAwareMessageListener{
    @Override
    public void onMessage(Message message, Channel channel) throws Exception {
        System.out.println("************************direct222********************************");
        System.out.println("路由模式direct222 接收信息:"+new String(message.getBody()));
        System.out.println("********************************************************");
        //设置手工应答
//        if(true){
//            throw new Exception();
//        }
        channel.basicAck(message.getMessageProperties().getDeliveryTag(),false);

    }


}
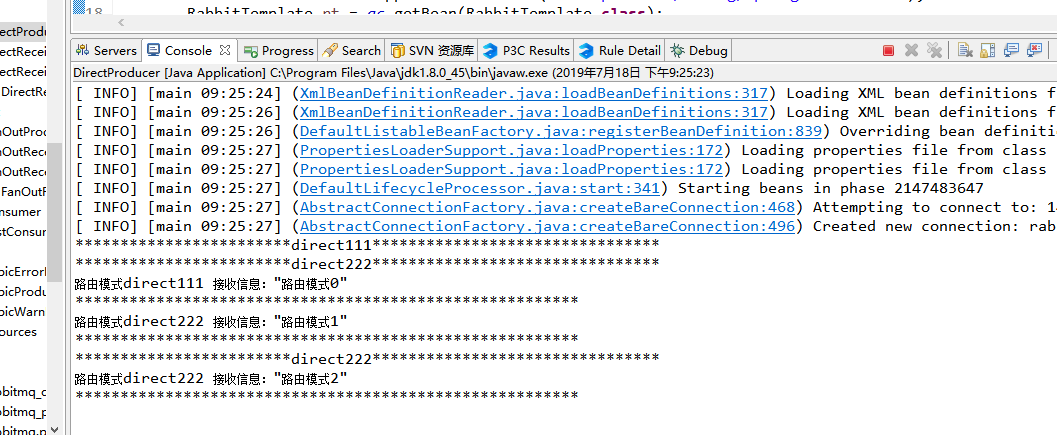
三、测试
1、进行测试,结果如下:(两个消费者都可以从队列中取到数据,且数据不重复)
四、confirm-callback监听(用于监听exchange是否接收成功)
1、在配置工厂连接的时候,设置publisher-confirms="true"
<rabbit:connection-factory id="rabbitConnectionFactory"
host="140.143.xx.xx" username="ww" password="ww" port="5672"
virtual-host="ww" channel-cache-size="25" cache-mode="CHANNEL"
publisher-confirms="true" publisher-returns="true" connection-timeout="200" />
2、在定义rabbitmq模板时,指定confirm-callback的实现类
<rabbit:template id="amqpTemplate" connection-factory="rabbitConnectionFactory" retry-template="retryTemplate"
message-converter="jsonMessageConverter" confirm-callback="confirmCallback" return-callback="returnCallback" mandatory="true"
/>
3、创建实现类ConfirmCallback,实现RabbitTemplate.ConfirmCallback接口
package com.pinghengxing.callback;
import org.springframework.amqp.rabbit.connection.CorrelationData;
import org.springframework.amqp.rabbit.core.RabbitTemplate;
import org.springframework.stereotype.Component;
/**
* confirm-callback监听(用于监听exchange是否接收成功)
* @author ww
*
*/
@Component("confirmCallback")
public class ConfirmCallBack implements RabbitTemplate.ConfirmCallback{
/**
* CorrelationData 是在发送消息时传入回调方法的参数,可以用于区分消息对象。 CorrelationData对象中只有一个属性 String id。
* 通过这个参数,我们可以区分当前是发送哪一条消息时的回调,并通过ack参数来进行失败重发功能
* @param correlationData 回调的相关数据.
* @param ack true for ack, false for nack
* @param cause 专门给NACK准备的一个可选的原因,其他情况为null。
*/
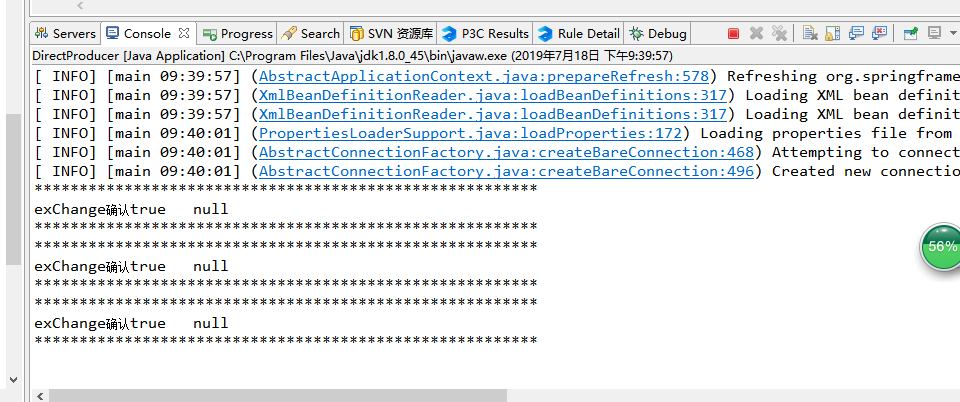
public void confirm(CorrelationData correlationData, boolean ack,String cause) {
System.out.println("********************************************************");
System.out.println("exChange确认" + ack + " " + cause);
System.out.println("********************************************************");
}
}
4、测试
五、returnCallback监听(basicpublish推送消息到queue失败时回调)
1、在配置工厂连接的时候,设置publisher-returns="true"
<rabbit:connection-factory id="rabbitConnectionFactory"
host="140.143.xx.xx" username="ww" password="ww" port="5672"
virtual-host="ww" channel-cache-size="25" cache-mode="CHANNEL"
publisher-confirms="true" publisher-returns="true" connection-timeout="200" />
2、在定义rabbitmq模板时,指定return-callback的实现类,并且设置mandatory="true"
<rabbit:template id="amqpTemplate" connection-factory="rabbitConnectionFactory" retry-template="retryTemplate"
 message-converter="jsonMessageConverter" confirm-callback="confirmCallback" return-callback="returnCallback" mandatory="true"
/>
3、创建实现类ReturnCallBack,实现RabbitTemplate.ReturnCallback接口
package com.pinghengxing.callback;

import org.springframework.amqp.core.Message;
import org.springframework.amqp.rabbit.core.RabbitTemplate;
import org.springframework.stereotype.Component;

/**
 * 推送消息到queue失败时回调
 * @author ww
 *
 */
@Component("returnCallback")
public class ReturnCallBack implements RabbitTemplate.ReturnCallback {


        @Override
        public void returnedMessage(Message message, int replyCode, String replyText, String exchange, String routingKey) {
            System.out.println("********************************************************");
            System.out.println("失败确认:"+message+" | "+replyCode+" | "+replyText+" | "+exchange+" | "+routingKey);
            System.out.println("********************************************************");
        }


}
4、测试(更改routing_key的值为direct123,由于找不到对应的队列,报以下错误)

六、json转换(可以将map等自动转换成json格式)
1、pom.xml添加以下maven依赖
<dependency>
 <groupId>com.fasterxml.jackson.core</groupId>
 <artifactId>jackson-databind</artifactId>
 <version>2.7.5</version>
</dependency>
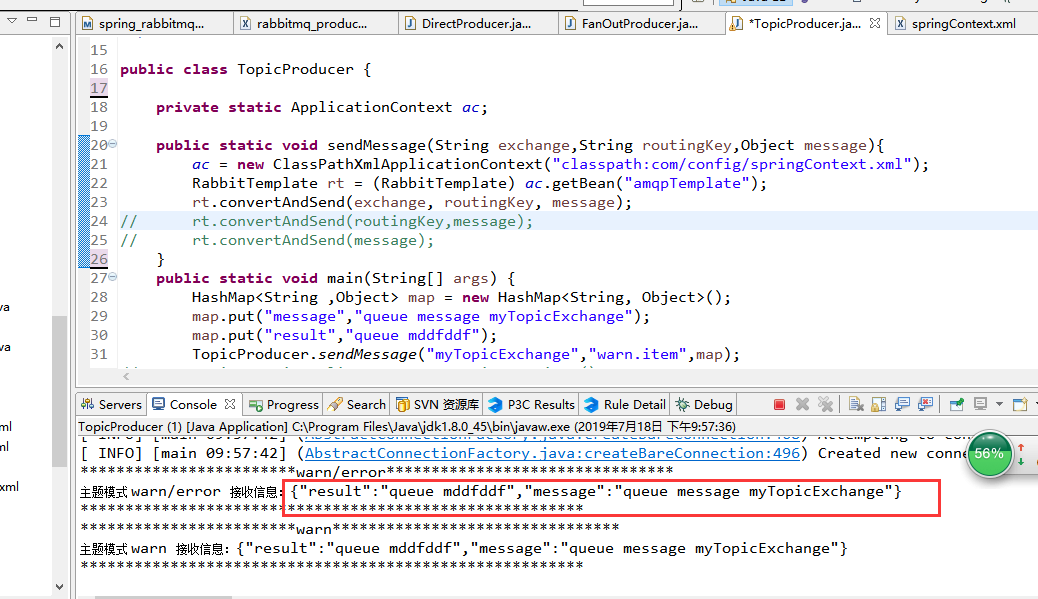
2、定义消息转换器,转成json格式
<bean id="jsonMessageConverter" class="org.springframework.amqp.support.converter.Jackson2JsonMessageConverter"></bean>
3、在定义rabbitmq模板时,指定转换器message-converter="jsonMessageConverter"
<rabbit:template id="amqpTemplate" connection-factory="rabbitConnectionFactory" retry-template="retryTemplate"
 message-converter="jsonMessageConverter" confirm-callback="confirmCallback" return-callback="returnCallback" mandatory="true"
/>
4、测试,创建map,进行生产,消费者接收到的信息如下:为json格式

 浙公网安备 33010602011771号