Spring Boot 6. 与数据访问
spring boot与数据访问
jdbc、mybatis、spring data jpa
代码地址
ssh git@gitee.com:Ding_DangMao/learn-spring-bot.git
一、简介
- 对于数据访问层,无论是SQL还是NOSQL,Spring Boot默认采用整合Spring Data的方式进行统一处理,添加大量自动配置,屏蔽了很多设置。引入各种xxxTemplate,xxxRepository来简化我们对数据访问层的操作。对我们来说只需要进行简单的设置即可。我们将在数据访问章节测试使用SQL相关、NOSQL在缓存、消息、检索等章节测试。
- JDBC
- MyBatis
- JPA
二、整合基本JDBC与数据源
1、引入starter
pom.xml
    <parent>
        <artifactId>spring-boot-starter-parent</artifactId>
        <groupId>org.springframework.boot</groupId>
        <version>1.5.10.RELEASE</version>
    </parent>
    <properties>
        <project.build.sourceEncoding>utf-8</project.build.sourceEncoding>
        <project.reporting.outputEncoding>utf-8</project.reporting.outputEncoding>
        <java.version>1.8</java.version>
    </properties>

    <dependencies>
        <!--引入web模块 spring-boot-starter :springboot场景启动器,帮我们导入了web模块正常运行所依赖的 jar包-->
        <dependency>
            <groupId>org.springframework.boot</groupId>
            <artifactId>spring-boot-starter-web</artifactId>
        </dependency>
        <!--jdbc-->
        <dependency>
            <groupId>org.springframework.boot</groupId>
            <artifactId>spring-boot-starter-jdbc</artifactId>
        </dependency>
        <!--mysql-->
        <dependency>
            <groupId>mysql</groupId>
            <artifactId>mysql-connector-java</artifactId>
        </dependency>
        <!--单元测试-->
        <dependency>
            <groupId>org.springframework.boot</groupId>
            <artifactId>spring-boot-starter-test</artifactId>
        </dependency>
        <!--导入配置文件处理器,配置文件进行绑定就会有提示-->
        <dependency>
            <groupId>org.springframework.boot</groupId>
            <artifactId>spring-boot-configuration-processor</artifactId>
            <optional>true</optional>
        </dependency>
    </dependencies>

    <!--这个插件,可用将应用打包成一个可执行的 jar包-->
    <build>
        <plugins>
            <plugin>
                <groupId>org.springframework.boot</groupId>
                <artifactId>spring-boot-maven-plugin</artifactId>
            </plugin>
        </plugins>
    </build>
- spring-boot-starter-jdbc
2、配置application.yml
spring:
  datasource:
    driver-class-name: com.mysql.jdbc.Driver
    url: jdbc:mysql://localhost:3306/test
    password: root
    username: root
3、测试
@RunWith(SpringRunner.class)
@SpringBootTest
public class Demo1 {

    @Autowired
    DataSource dataSource;

    @Test
    public void contextLoads() throws SQLException {
        System.out.println(dataSource);
        Connection connection = dataSource.getConnection();
        System.out.println("connection = " + connection);
        /*
        * org.apache.tomcat.jdbc.pool.DataSource@552ed807{ConnectionPool[defaultAutoCommit=null; \
        *   defaultReadOnly=null; defaultTransactionIsolation=-1; defaultCatalog=null;
        *   driverClassName=com.mysql.jdbc.Driver; maxActive=100; maxIdle=100; minIdle=10;
        *   initialSize=10; maxWait=30000; testOnBorrow=true; testOnReturn=false;
        *   timeBetweenEvictionRunsMillis=5000; numTestsPerEvictionRun=0;
        *   minEvictableIdleTimeMillis=60000; testWhileIdle=false; testOnConnect=false;
        *    password=********; url=jdbc:mysql://localhost:3306/test; username=root;
        *   validationQuery=SELECT 1; validationQueryTimeout=-1; validatorClassName=null;
        *    validationInterval=3000; accessToUnderlyingConnectionAllowed=true; removeAbandoned=false;
        *   removeAbandonedTimeout=60; logAbandoned=false; connectionProperties=null; initSQL=null;
        *   jdbcInterceptors=null; jmxEnabled=true; fairQueue=true; useEquals=true;
        *   abandonWhenPercentageFull=0; maxAge=0; useLock=false; dataSource=null; dataSourceJNDI=null;
        *   suspectTimeout=0; alternateUsernameAllowed=false; commitOnReturn=false; rollbackOnReturn=false;
        *    useDisposableConnectionFacade=true; logValidationErrors=false; propagateInterruptState=false;
        *    ignoreExceptionOnPreLoad=false; useStatementFacade=true; }
        * connection = ProxyConnection[PooledConnection[com.mysql.jdbc.JDBC4Connection@771cbb1a]]
        * */
    }
}
- 效果
默认使用org.apache.tomcat.jdbc.pool.DataSource作为数据源
数据源的相关配置在 DataSourceProperties里面 - 自动配置原理
org.springframework.boot.autoconfigure.jdbc- 参考 DataSourceConfiguration,根据配置创建数据源,默认使用 tomcat连接池:可以使用 spring.datasource.type 指定自定义的数据源类型。
- springbot 默认可以支持
org.apache.tomcat.jdbc.pool.DataSource、HikarDataSource、DasicDataSource、 - 自定义数据源类系
/** * Generic DataSource configuration. */ @ConditionalOnMissingBean(DataSource.class) @ConditionalOnProperty(name = "spring.datasource.type") static class Generic { @Bean public DataSource dataSource(DataSourceProperties properties) { //使用 DataSourceBuilder创建数据源,利用反射创建响应 type的数据源,并且绑定属性 return properties.initializeDataSourceBuilder().build(); } }- DataSourceAutoConfiguration.dataSourceInitializer
作用:是一个监听器。ApplicationListener- runSchemaScripts(); 运行建表语句
- runDataScripts(); 运行插入数据的语句
- 默认只需要将文件命名为:
schema-.sql、data-.sql
默认规则:schema.sql、schea-all.sql
或者使用spring.datasource.schema:- classpath:department.sql
- 操作数据库:自动配置了 jdbcTemplate
@Controller
public class HelloController{
    @Autowired
    JdbcTemplate jdbcTemplate;

    @ResponseBody
    @GetMapping("/query")
    public Map<String,Ojbect> map(){
        List<Map<String,Object>> list =jdbcTemplate.queryForList("select * from department");
        return list;
    }
}
4、高级配置:使用druid数据源
- 引入druid
<!--引入 druid 数据源-->
<dependency>
    <groupId>com.alibaba</groupId>
    <artifactId>druid</artifactId>
    <version>1.1.19</version>
</dependency>
- 配置属性
# 其他配置
spring:
datasource:
# 数据源基本配置
username: root
password: 123456
driver-class-name: com.mysql.jdbc.Driver
url: jdbc:mysql://localhost:3306/ssm_crud
type: com.alibaba.druid.pool.DruidDataSource #切换不使用默认的
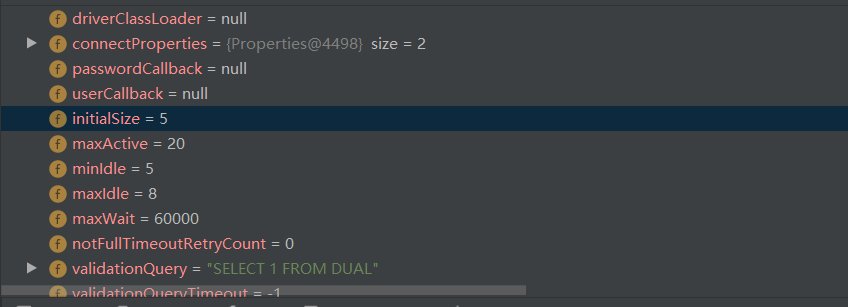
# 数据源其他配置
initialSize: 5
minIdle: 5
maxActive: 20
maxWait: 60000
timeBetweenEvictionRunsMillis: 60000
minEvictableIdleTimeMillis: 300000
validationQuery: SELECT 1 FROM DUAL
testWhileIdle: true
testOnBorrow: false
testOnReturn: false
poolPreparedStatements: true
# 配置监控统计拦截的filters,去掉后监控界面sql无法统计,'wall'用于防火墙
filters: stat,wall,log4j
maxPoolPreparedStatementPerConnectionSize: 20
useGlobalDataSourceStat: true
connectionProperties: druid.stat.mergeSql=true;druid.stat.slowSqlMillis=500
如果这时候去测试拿不到 yml设置的属性值,还需这样配置
@Configuration
public class DruidConfig {
    @Bean
    @ConfigurationProperties(prefix = "spring.datasource")
    public DataSource druid() {
        return new DruidDataSource();
    }
}
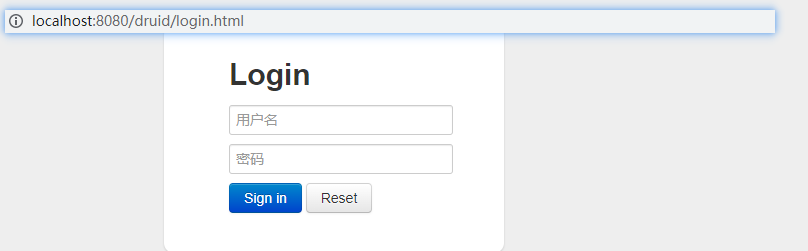
5、配置druid数据源监控
@Configuration
public class DruidConfig {
    @Bean
    @ConfigurationProperties(prefix = "spring.datasource")
    public DataSource druid() {
        return new DruidDataSource();
    }

    //配置 druid 的监控
    /*
     * 1. 配置一个管理后台的 servlet
     * 2. 配置一个监控 filter
     * */
    @Bean
    public ServletRegistrationBean statViewServlet() {
        ServletRegistrationBean bean = new ServletRegistrationBean(new StatViewServlet(),"/druid/*");
        //设置数初始化参数 ResourceServlet 类下
        Map<String, String> initParams = new HashMap<>();
        initParams.put("loginUsername", "admin");
        initParams.put("loginPassword", "123456");
        initParams.put("allow", "");//默认就是允许访问所有
        initParams.put("deny", "192.168.217.13"); //拒绝谁访问
        bean.setInitParameters(initParams);
        return bean;
    }

    @Bean
    public FilterRegistrationBean webStatFilter() {
        FilterRegistrationBean bean = new FilterRegistrationBean();
        bean.setFilter(new WebStatFilter());
        //设置初始化参数 WebStatFilter类下
        Map<String, String> initParams = new HashMap<>();
        initParams.put("exclusions", "*.js,*.css,/druid/*");
        bean.setInitParameters(initParams);
        bean.setUrlPatterns(Arrays.asList("/*"));//拦截所有请求
        return bean;
    }
}
三、整合 MyBatis
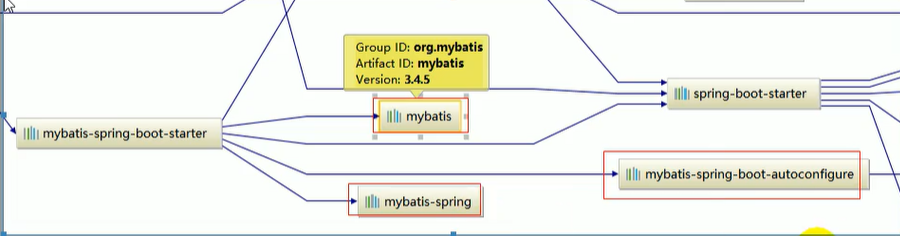
1、引入mybatis-starter
- mybatis-spring-boot-starter
<!--mybatis 与springboot整合-->
<dependency>
    <groupId>org.mybatis.spring.boot</groupId>
    <artifactId>mybatis-spring-boot-starter</artifactId>
    <version>2.2.0</version>
</dependency>
步骤
- 配置数据相关的属性(上面那个 配置bean)
- 给数据库建表

- 创建 JavaBean
2、注解模式
mapper
- 或者在程序入口 main方法 ,批量注册 maper接口
@MapperScan(value = "com.cainiao.mapper")
//这是一个操作数据库的 mapper
@Mapper
public interface DepartmentMapper {
    @Select("select * from department where id=#{id}")
    public Department getDeptById(Integer id);

    @Delete("delete from  department where id=#{id}")
    public int deleteDeptById(Integer id);

    //       是不是使用自动生成的主键    封装的主键的
    @Options(useGeneratedKeys = true, keyProperty = "id")
    @Insert("insert into department(departmentName) values(#{departmentName})")
    public int insertDept(Department department);

    @Update("update department set departmentName=#{departmentName} where id =#{id}")
    public int updateDept(Department department);
}
controller
@RestController
public class DeptController {
@Autowired
DepartmentMapper departmentMapper;
@GetMapping("/dept/{id}")
public Department getDepartment(@PathVariable("id") Integer id) {
return departmentMapper.getDeptById(id);
}
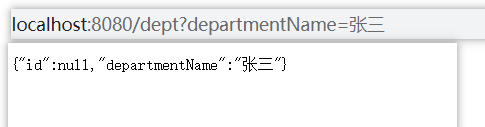
@GetMapping("/dept")
public Department insertDetp(Department department) {
departmentMapper.insertDept(department);
return department;
}
}
- 自定义Mybatis的配置规则:给容器中太你家一个 ConfigurationCustomizer
//自定义 mybatis的全局设置 ==》驼峰命名 MybatisAutoConfiguration
public class MybatisConfig {
    @Bean
    public ConfigurationCustomizer configurationCustomizer() {

        //函数式编程
        return configuration -> configuration.setMapUnderscoreToCamelCase(true);
        /*return new ConfigurationCustomizer() {
            @Override
            public void customize(Configuration configuration) {
                configuration.setMapUnderscoreToCamelCase(true);
            }
        };*/
    }
}
3、配置文件模式
mybatis:
  config-location: classpath:mybatis/mybatis-config.xml #指定全局文件的位置
  mapper-locations: classpath:mybatis/mappers/*.xml #指定 sql文件的位置
server:
  port: 8081
4、测试

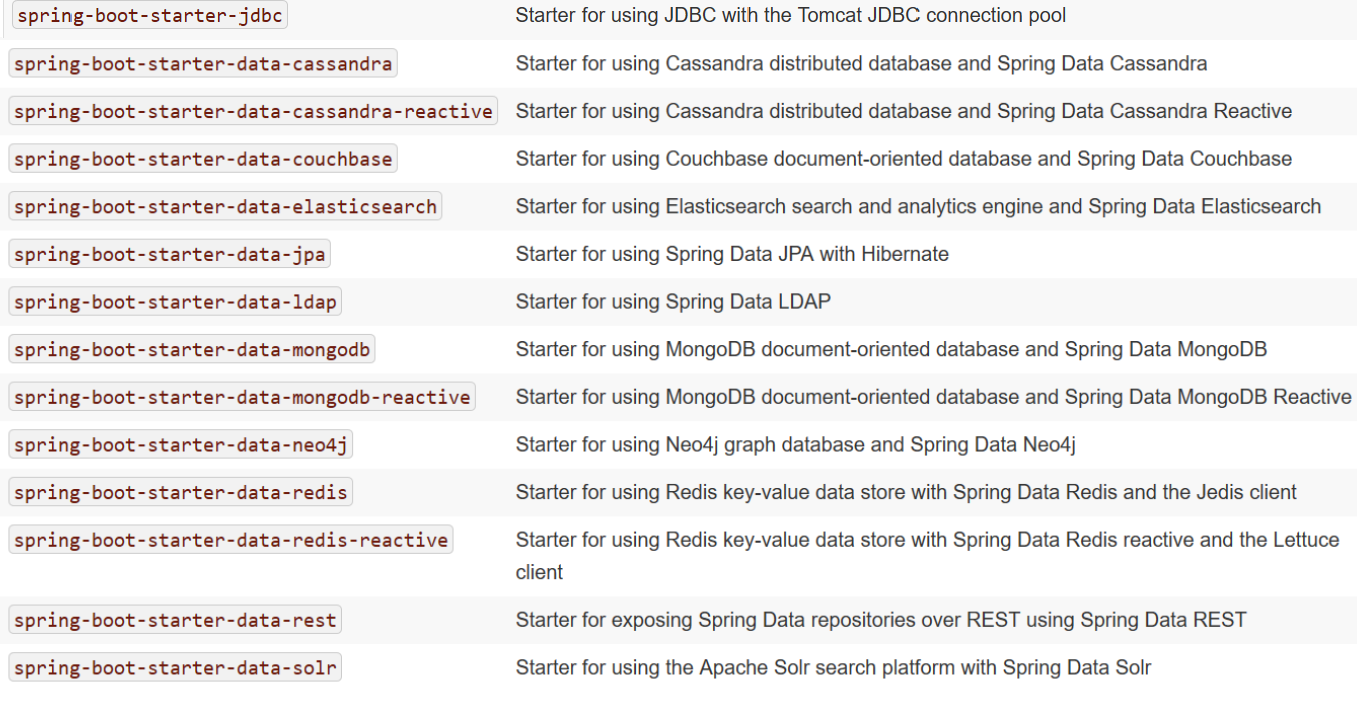
四、Spring Dta
简介:
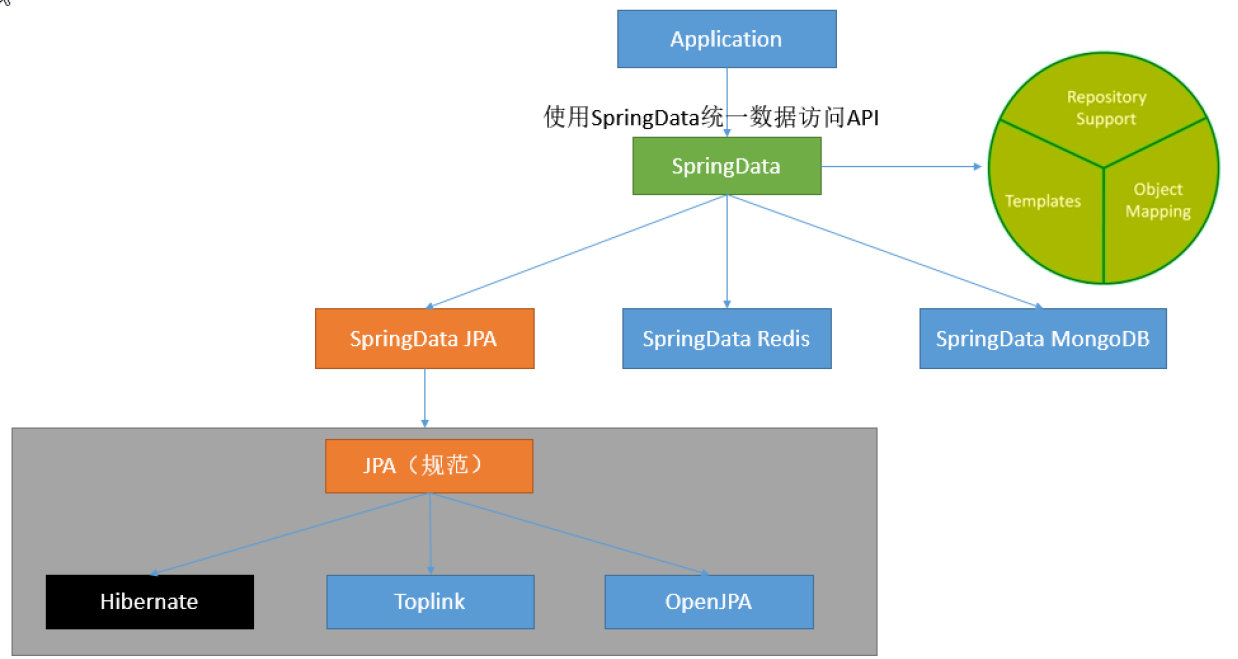
- Spring Data 项目的目的是为了简化构建基于Spring 框架应用的数据访问技术,包括非关系数据库、Map-Reduce 框架、云数据服务等等;另外也包含对关系数据库的访问支持。
- Spring Data 包含多个子项目:
- Spring Data Commons
- Spring Data JPA
- Spring Data KeyValue
- Spring Data LDAP
- Spring Data MongoDB
- Spring Data Gemfire
- Spring Data REST
- Spring Data Redis
- Spring Data for Apache Cassandra
- Spring Data for Apache Solr
- Spring Data Couchbase (community module)
- Spring Data Elasticsearch (community module)
- Spring Data Neo4j (community module)
-
SpringData特点
SpringData为我们提供使用统一的API来对数据访问层进行操作;这主要是Spring Data Commons项目来实现的。Spring Data Commons让我们在使用关系型或者非关系型数据访问技术时都基于Spring提供的统一标准,标准包含了CRUD(创建、获取、更新、删除)、查询、排序和分页的相关操作。 -
统一的Repository接口
Repository<T, ID extends Serializable>:
	提供了方法名称命名查询方式提供了基于@Query注解查询与更新
RevisionRepository<T, ID extends Serializable, N extends Number & Comparable<N>>:
	基于乐观锁机制
CrudRepository<T, ID extends Serializable>:
	CrudRepository接口,主要是完成一些增删改查的操作。注意:CrudRepository接口继承了Repository接口
PagingAndSortingRepository<T, ID extends Serializable>:
	该接口提供了分页与排序的操作,注意:该接口继承了CrudRepository接口
JpaRepository接口
	该接口继承了PagingAndSortingRepository。对继承的父接口中方法的返回值进行适配。
JPASpecificationExecutor接口
	该接口主要是提供了多条件查询的支持,并且可以在查询中添加排序与分页。注意JPASpecificationExecutor是单独存在的。完全独立
-
提供数据访问模板类xxxTemplate;
如:MongoTemplate、RedisTemplate等 -
JPA与Spring Data
1)、JpaRepository基本功能
编写接口继承JpaRepository既有crud及分页等基本功能
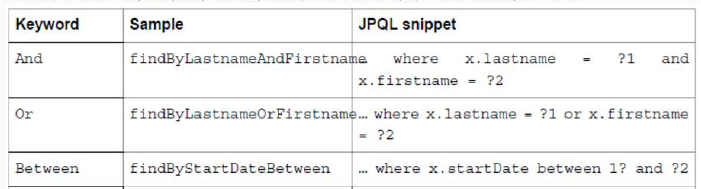
2)、定义符合规范的方法命名
在接口中只需要声明符合规范的方法,即拥有对应的功能
3)、@Query自定义查询,定制查询SQL
4)、Specifications查询(Spring Data JPA支持JPA2.0的Criteria查询)
五、整合 spring data jpa
推荐这个博客整合
JPA:ORM(Object Relational Mapping);
    <properties>
        <project.build.sourceEncoding>utf-8</project.build.sourceEncoding>
        <project.reporting.outputEncoding>utf-8</project.reporting.outputEncoding>
        <java.version>1.8</java.version>
    </properties>
    <parent>
        <artifactId>spring-boot-starter-parent</artifactId>
        <groupId>org.springframework.boot</groupId>
        <version>2.2.1.RELEASE</version>
    </parent>
    <dependencies>
        <!--jap-->
        <!-- https://mvnrepository.com/artifact/org.springframework.boot/spring-boot-starter-data-jpa -->
        <dependency>
            <groupId>org.springframework.boot</groupId>
            <artifactId>spring-boot-starter-data-jpa</artifactId>
        </dependency>
        <!-- https://mvnrepository.com/artifact/antlr/antlr -->
 <!--       <dependency>
            <groupId>antlr</groupId>
            <artifactId>antlr</artifactId>
            <version>2.7.7</version>
        </dependency>-->
        <!--引入web模块 spring-boot-starter :springboot场景启动器,帮我们导入了web模块正常运行所依赖的 jar包-->
        <dependency>
            <groupId>org.springframework.boot</groupId>
            <artifactId>spring-boot-starter-web</artifactId>
        </dependency>
        <!--jdbc-->
        <dependency>
            <groupId>org.springframework.boot</groupId>
            <artifactId>spring-boot-starter-jdbc</artifactId>
        </dependency>

        <!--mysql-->
        <dependency>
            <groupId>mysql</groupId>
            <artifactId>mysql-connector-java</artifactId>
            <version>5.1.43</version>
            <scope>runtime</scope>
        </dependency>

        <!--单元测试-->
        <dependency>
            <groupId>org.springframework.boot</groupId>
            <artifactId>spring-boot-starter-test</artifactId>
            <scope>test</scope>
        </dependency>
        <!--导入配置文件处理器,配置文件进行绑定就会有提示-->
        <dependency>
            <groupId>org.springframework.boot</groupId>
            <artifactId>spring-boot-configuration-processor</artifactId>
            <optional>true</optional>
        </dependency>

    </dependencies>

    <!--这个插件,可用将应用打包成一个可执行的 jar包-->
    <build>
        <plugins>
            <plugin>
                <groupId>org.springframework.boot</groupId>
                <artifactId>spring-boot-maven-plugin</artifactId>
            </plugin>
        </plugins>
    </build>
1)、编写一个实体类(bean)和数据表进行映射,并且配置好映射关系;
//使用JPA注解配置映射关系
@Entity //告诉JPA这是一个实体类(和数据表映射的类)
@Table(name = "tbl_user") //@Table来指定和哪个数据表对应;如果省略默认表名就是user;
public class User {
    @Id //这是一个主键
    @GeneratedValue(strategy = GenerationType.IDENTITY)//自增主键
    private Integer id;
    @Column(name = "last_name",length = 50) //这是和数据表对应的一个列
    private String lastName;
    @Column //省略默认列名就是属性名
    private String email;
}
2)、编写一个Dao接口来操作实体类对应的数据表(Repository)
//继承 extends Repository<那个实体类,主键类型>
public interface UserRepository extends Repository<User, Integer> {
    //方法名称必须要遵循驼峰式命名规则,findBy(关键字) + 属性名称(首字母大写) + 条件查询(首字母大写)
    User findUserById(Integer id);
}
3)、基本的配置JpaProperties
spring:
  datasource:
    driver-class-name: com.mysql.jdbc.Driver
    url: jdbc:mysql://localhost:3306/test
    password: root
    username: root
  jpa:
    hibernate:
    # 更新或者创建数据表结构
      ddl-auto: update
    #控制台 显示sql
    show-sql: true
@RestController
public class UserController {
    @Autowired
    UserRepository userRepository;

    @GetMapping("/user/{id}")
    public User getUser(@PathVariable("id") Integer id) {
        return userRepository.findUserById(id);
    }
}


 浙公网安备 33010602011771号