


springBoot整合Sentinel实现降级限流熔断
由于hystrix的停止更新,以及阿里Sentinel在历年双十一的贡献。项目中使用了Sentinel,今天我们来讲讲Sentinel的入门教程,本文使用1.6.3版本进行讲解
本文通过Sentinel_dashBoard进行讲解,当然不引入监控看板也能实现限流熔断降级功能,但是监控看板能够直观的看到请求的QPS,成功率等等,同时可以实时的进行降级限流策略的修改与新建。
1.sentinel_dashboard的引入
https://github.com/alibaba/Sentinel/releases,下载sentinel-dashboard-1.6.3.jar
由于dashboard是springboot的项目,在CMD模式下使用命令
java -Dserver.port=8080
-Dcsp.sentinel.dashboard.server=localhost:8080
-Dproject.name=sentinel-dashboard
-jar sentinel-dashboard-1.6.3.jar
进行控制看板服务的启动。
其中,-Dserver.port=8080 代表看板项目的端口号,-Dcsp.sentinel.dashboard.server=localhost:8080代表本看板服务将会注册到自己的看板上,-Dproject.name=sentinel-dashboard代表本看板服务的项目名称。
访问localhost:8080;输入用户名,密码,均是sentinel,如果要自定义用户名和密码,在启动命令加上-Dsentinel.dashboard.auth.username=sentinel,
-Dsentinel.dashboard.auth.password=123456即可。
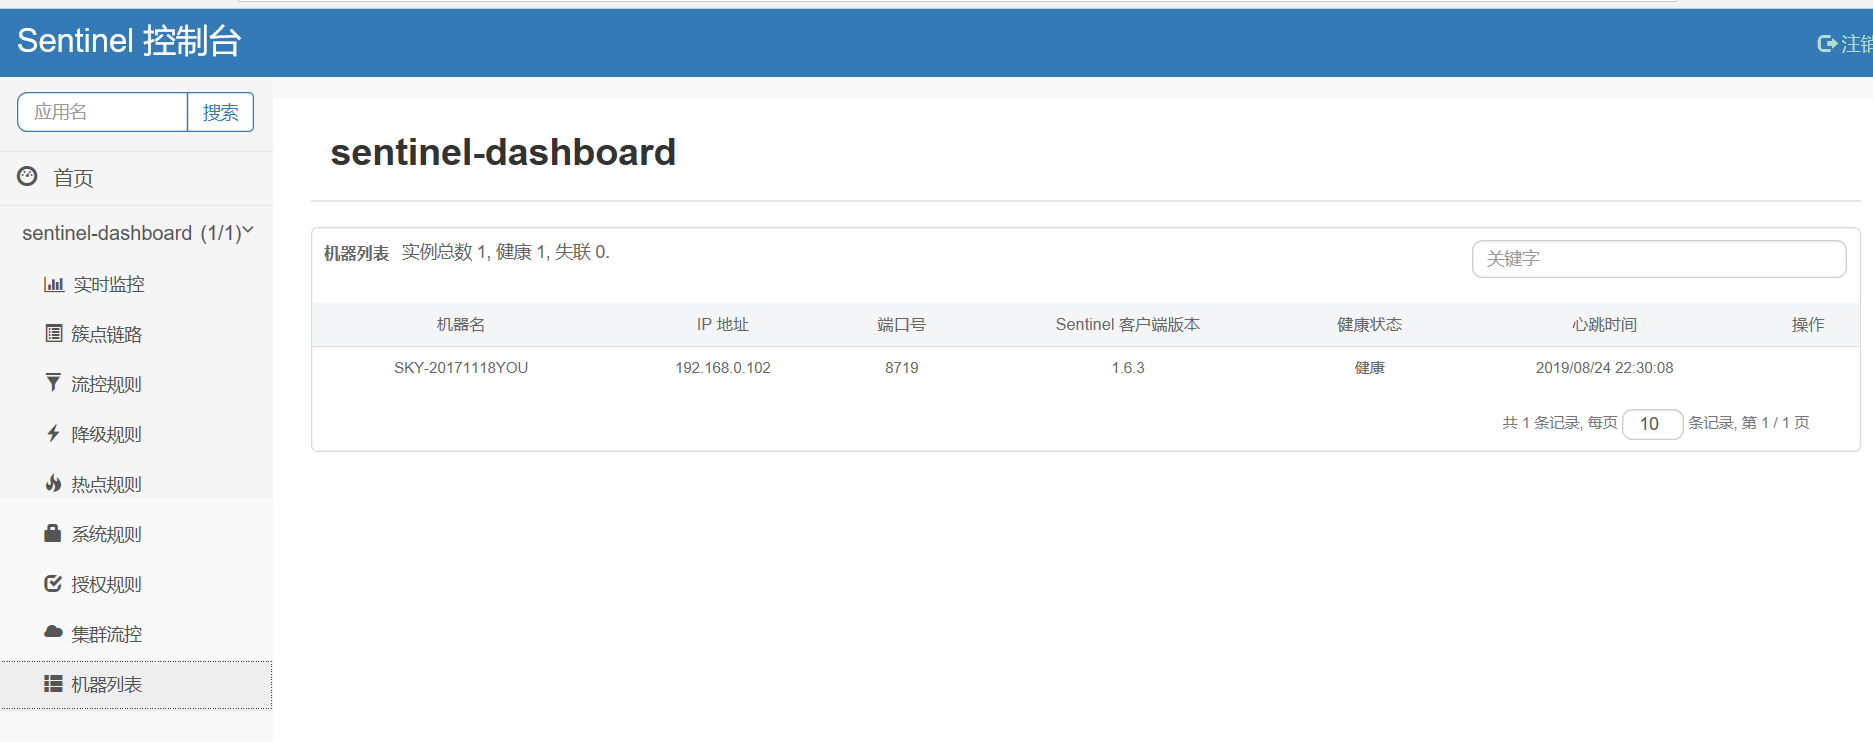
我们可以看到控制台自身的服务已经注册到了控制台上。
2. 接下来,引入需要接入sentinel功能的项目。
3.maven依赖
<?xml version="1.0" encoding="UTF-8"?>
<project xmlns="http://maven.apache.org/POM/4.0.0"
         xmlns:xsi="http://www.w3.org/2001/XMLSchema-instance"
         xsi:schemaLocation="http://maven.apache.org/POM/4.0.0 http://maven.apache.org/xsd/maven-4.0.0.xsd">
    <modelVersion>4.0.0</modelVersion>

    <groupId>spring.sentinel</groupId>
    <artifactId>spring-sentinel</artifactId>
    <version>1.0-SNAPSHOT</version>

    <parent>
        <groupId>org.springframework.boot</groupId>
        <artifactId>spring-boot-starter-parent</artifactId>
        <version>2.0.5.RELEASE</version>
        <relativePath/> <!-- lookup parent from repository -->
    </parent>


    <properties>
        <maven.compiler.source>1.8</maven.compiler.source>
        <maven.compiler.target>1.8</maven.compiler.target>
        <project.build.sourceEncoding>UTF-8</project.build.sourceEncoding>
    </properties>

    <dependencies>
        <dependency>
            <groupId>org.springframework.boot</groupId>
            <artifactId>spring-boot-starter-web</artifactId>
        </dependency>
        <dependency>
            <groupId>org.springframework.boot</groupId>
            <artifactId>spring-boot-starter</artifactId>
        </dependency>

        <dependency>
            <groupId>com.alibaba.csp</groupId>
            <artifactId>sentinel-annotation-aspectj</artifactId>
            <version>1.6.3</version>
        </dependency>
        <dependency>
            <groupId>com.alibaba.csp</groupId>
            <artifactId>sentinel-core</artifactId>
            <version>1.6.3</version>
        </dependency>

        <dependency>
            <groupId>com.alibaba.csp</groupId>
            <artifactId>sentinel-transport-simple-http</artifactId>
            <version>1.6.3</version>
        </dependency>
    </dependencies>
</project>
4. 编写启动类
package sentile;

import org.springframework.boot.SpringApplication;
import org.springframework.boot.autoconfigure.SpringBootApplication;

@SpringBootApplication
public class SentileApp {

    public static void main(String[] args) {
        SpringApplication.run(SentileApp.class, args);
    }
}
5. 编写配置类
package sentile.config;

import com.alibaba.csp.sentinel.annotation.aspectj.SentinelResourceAspect;
import com.alibaba.csp.sentinel.slots.block.RuleConstant;
import com.alibaba.csp.sentinel.slots.block.flow.FlowRule;
import org.springframework.context.annotation.Bean;
import org.springframework.context.annotation.Configuration;

import javax.annotation.PostConstruct;
import java.util.ArrayList;
import java.util.List;

@Configuration
public class SentileConfig {

    @Bean
    public SentinelResourceAspect sentinelResourceAspect() {
        return new SentinelResourceAspect();
    }

    @PostConstruct
    private void initRules() throws Exception {
        FlowRule rule1 = new FlowRule();
        rule1.setResource("test.hello");
        rule1.setGrade(RuleConstant.FLOW_GRADE_QPS);
        rule1.setCount(1);   // 每秒调用最大次数为 1 次

        List<FlowRule> rules = new ArrayList<>();
        rules.add(rule1);

        // 将控制规则载入到 Sentinel
        com.alibaba.csp.sentinel.slots.block.flow.FlowRuleManager.loadRules(rules);
    }
}
6. 编写测试入口
package sentile.controller;

import com.alibaba.csp.sentinel.annotation.SentinelResource;
import org.springframework.stereotype.Controller;
import org.springframework.web.bind.annotation.GetMapping;
import org.springframework.web.bind.annotation.ResponseBody;

@Controller
@ResponseBody
public class TestController {

    @GetMapping("hello")
    @SentinelResource(value = "test.hello", fallback = "helloError")
    public String hello(String name){
        return "hello,"+name;
    }

    public String helloError(String name, Throwable e){
        return "error,"+name;
    }

}
7. 添加启动参数,启动服务
-Dproject.name=app1
-Dcsp.sentinel.dashboard.server=localhost:8080
-Dserver.port=9090
(由于8080已经被控制台服务占据,我们修改客户端服务端口为9090)
由于注册是懒加载的,所以我们先访问一下服务,再去看控制台看板
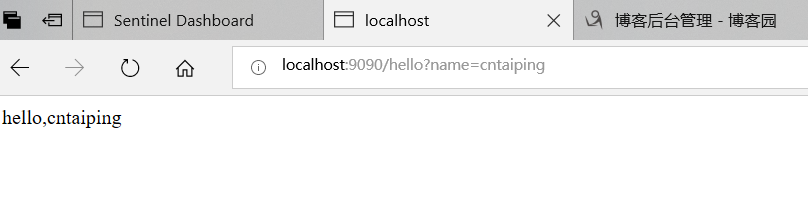
服务正常访问
通过同
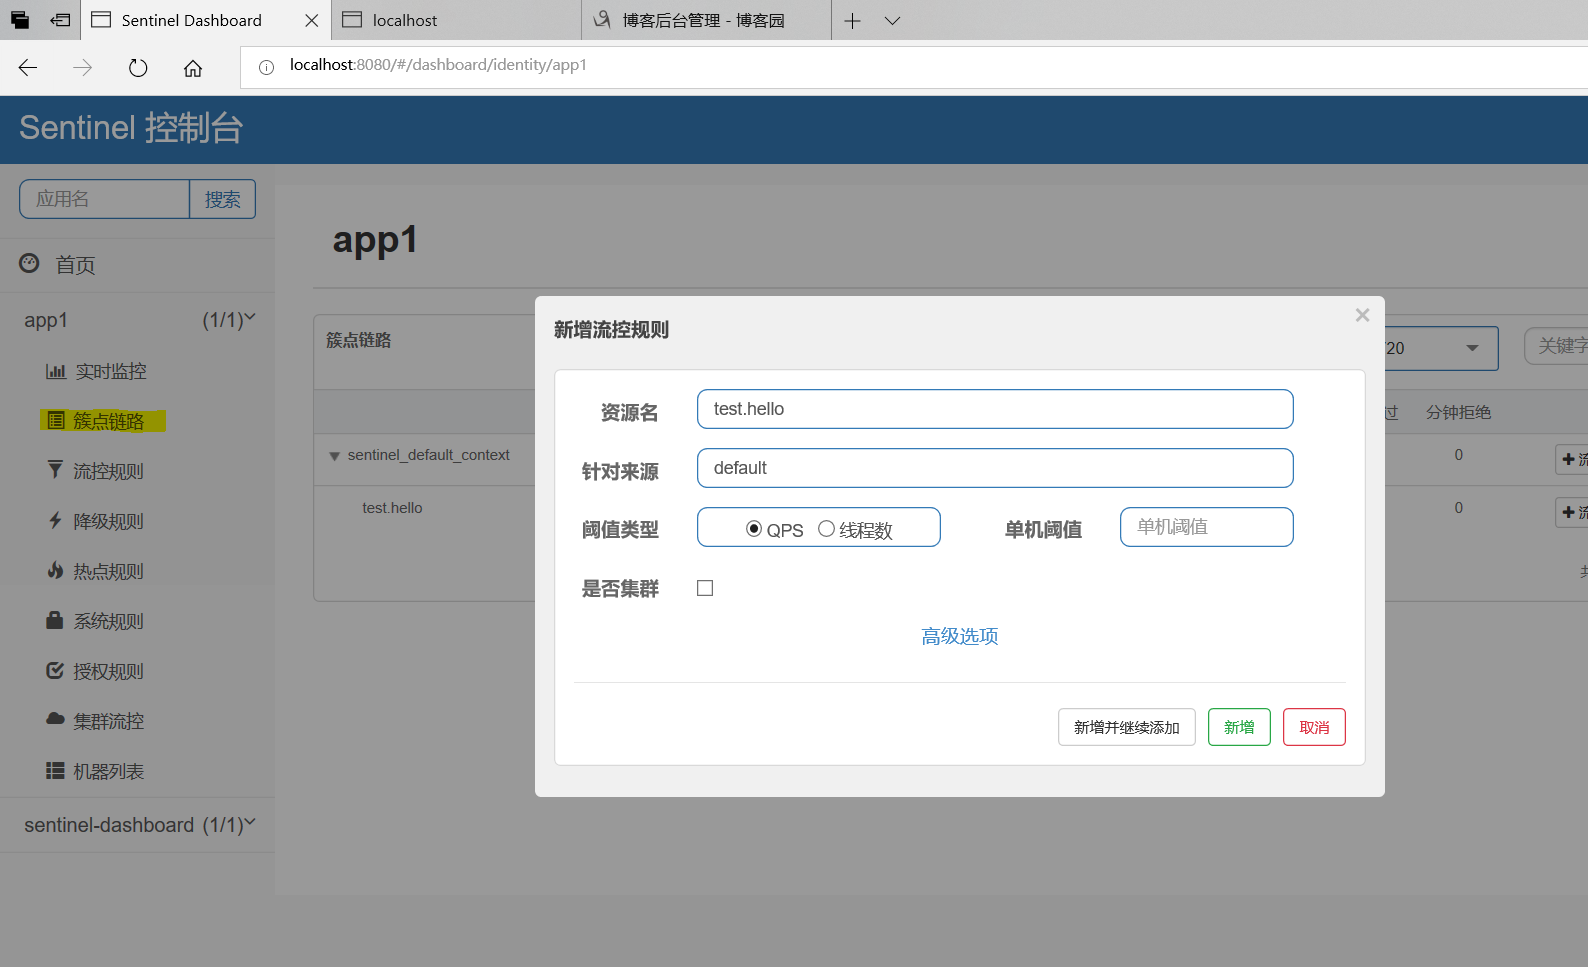
通过观察控制台,我们发现我们的项目名为app1的项目已经注册到了控制台
接下来,我们就可以在卒簇族链路进行规则设置啦
以上的方法适合非springboot,springcloud的项目实现,如果项目本身是springboot,springcloud项目,可以直接引入
spring-cloud-starter-alibaba-sentinel

添加配置文件application.yml:
spring:
  application:
    name: baobanserver
  cloud:
    sentinel:
      transport:
        dashboard: localhost:9999
      #eager: true
往后甚至不用写@SentinelResource注解,直接按照正常的springboot写法即可实现。然后再Sentinel的控制台进行链路规则设置即可!

 浙公网安备 33010602011771号