00Fuzzing学习之手搓Fuzzer
使用Python3编写基于变异的模糊测试器
通过使用python编写一个简单的模糊测试器来学习fuzz,并使用这个模糊测试器找到一些漏洞。
针对能够从图片中解析exif数据的程序进行模糊测试器的编写。
模糊测试器对进行了Exif填充的JPEG文件进行修改,然后传给解析器,看是否发生崩溃。
首先,我们需要一个正常的进行了Exif填充的JPEG文件。我在谷歌上搜索了“Sample JPEG with Exif”,然后找到了这个项目,接下来的测试使用的是 Canon_40D.jpg这张图片。
JPEG以及EXIF规范
在开始编写Python代码之前,我们先来看一下JPEG和EXIF规范,这样我们就可以避免一些更明显的陷阱,以至于解析器不尝试解析它并浪费宝贵的模糊测试周期。
从前面引用的规范概述中可以知道的一件事是,所有 JPEG 图像都以字节值 0xFFD8 开头,以字节值 0xFFD9 结尾。前几个字节就是所谓的“魔术字节”,在 *Nix 系统上能通过这几个“魔术字节”识别文档类型。
使用Linux里的file查看文件信息:file Canon_40D.jpg

在使用windows下的16进制查看器进行查看,linux中的hexdump也能查看到类似信息:
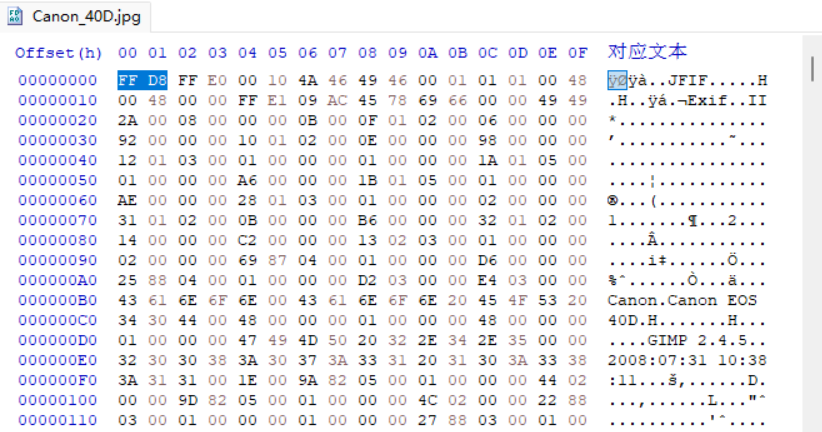
规范中还提到一个有趣的信息,所有的“标记(marker)”都是以 0xFF开头的,下面是几个已知的静态标记:
- 图像开始(SOI)标记:
0xFFD8 - APP1标记:
0xFFE1 - 通用标记:
0xFFXX - 图像结束(EOI)标记:
0xFFD9
因为我们并不想改变图像的长度或者文件类型,所以我们希望保持SOI和EOI标记完整不变。比如说,我们不会在图像的中间插入 0xFFD9,因为这样会直接截断图像,使解析器工作异常。
开始编写模糊测试器
我们要做的第一件事是从JPEG文件中提取出所有字节信息,该JPEG文件就是我们接下来要进行修改的有效输入样本。
#!/usr/bin/env python3

import sys

# read bytes from our valid JPEG and return them in a mutable bytearray
def get_bytes(filename):
    with open(filename, "rb") as r:
        f = r.read()
    return bytearray(f)

if len(sys.argv) < 2:
    print("Usage: JPEGfuzz.py <valid_jpg>")
else:
    filename = sys.argv[1]
    data = get_bytes(filename)
    print(data.hex(' ', 2)) # 以16进制,2字节为单位打印

可以看到我们程序读取的内容与我们用16进制查看器一样。
def create_new(data):
    with open("mutated.jpg", "wb+") as w:
        w.write(data)
创建新图片。
在创建 mutated.jpg之前,先对其中的数据进行修改,即图像文件变异。
变异
因为要保持模糊测试器的简洁,我们只实现两种变异方法,分别为:
- 位翻转
- 使用Gynvael的“Magic Numbers”覆盖字节序列
位翻转
255(0xFF)的二进制格式是 11111111,如果我们翻转其中的任意一位,例如第3个二进制位,会得到 11011111,这个新的数字是 223(0xDF)。
也可以在0-255之间随机选择一个数,覆盖任意一个字节,我不知道这两种方法有多大的区别。
现在,假设我们只想翻转1%的字节,该个数可以由如下代码计算得出:
num_of_flips = int((len(data) - 4) * 0.01)
因为文件的开头和结尾分别存在两个字节的SOI和EOI标记,我们希望保持这四个字节不动,所以不考虑这四个字节,因此要在字节数组的长度上减去4。
下一步我们随机选出要进行位翻转的位置。可以看到,这里我们只对中间的位置进行选取。
indexes = range(4, (len(data) - 4))
chosen_indexes = []

# iterate selecting indexes until we've hit our num_of_flips number
counter = 0
while counter < num_of_flips:
	chosen_indexes.append(random.choice(indexes))
	counter += 1
接下来我们需要对上述位置的字节进行修改,即位翻转。首先我们将这些索引位置的字节转化为了二进制字符串,在前面补零形成8位的长度。可以使用如下代码,将字节值(十进制数字)转换为二进制字符串,如果长度小于8位,就在前面补零。
for x in chosen_indexes:
    current = data[x]
    current = (bin(current).replace("0b",""))
    current = "0" * (8 - len(current)) + current
打印输出查看:

对上面的每个值,我们需要随意选择一位并进行翻转,例如第一个值 10110101,如果我们选择第一个二进制位,该处的位数原本是1,那就应该修改为0。
还有一点需要考虑,这些数值实际上并不是整型数,而是字符串,所以最后我们还需要把它们转换为整型数。
首先创建一个空的列表,把每位上的数字加到列表中,翻转选择的位,再构建新的字符串(之所以要使用列表,是因为字符串是不可变的)。最后,将字符串转为整型数,将值返回给 create_new()函数,用以创建新的JPEG文件。
完整代码如下:
#!/usr/bin/env python3

import sys
import random

# read bytes from our valid JPEG and return them in a mutable bytearray
def get_bytes(filename):
    with open(filename, "rb") as r:
        f = r.read()
    return bytearray(f)


def bit_flip(data):

    num_of_flips = int((len(data) - 4) * .01)
    indexes = range(4, (len(data) - 4))
    chosen_indexes = []

    # iterate selecting indexes until we've hit our num_of_flips number
    counter = 0
    while counter < num_of_flips:
        chosen_indexes.append(random.choice(indexes))
        counter += 1

    for x in chosen_indexes:
        current = data[x]
        current = (bin(current).replace("0b",""))
        current = "0" * (8 - len(current)) + current

        picked_index = random.randint(0, 7)
        new_number = []
        for i in current:
            new_number.append(i)
        # 进行位翻转
        if new_number[picked_index] == '1':
            new_number[picked_index] = '0'
        else:
            new_number[picked_index] = '1'

        new_number = int(''.join(new_number), 2) # 拼接回二进制字符串,并转为整型
        data[x] = new_number # 替换原始数据

    return data


def create_new(data):
    with open("mutated.jpg", "wb+") as w:
        w.write(data)


if __name__ == "__main__":
    if len(sys.argv) < 2:
        print("Usage: JPEGfuzz.py <valid_jpg>")
    else:
        filename = sys.argv[1]
        data = get_bytes(filename)
        mutated_data = bit_flip(data)
        create_new(mutated_data)
比较生成的文件:
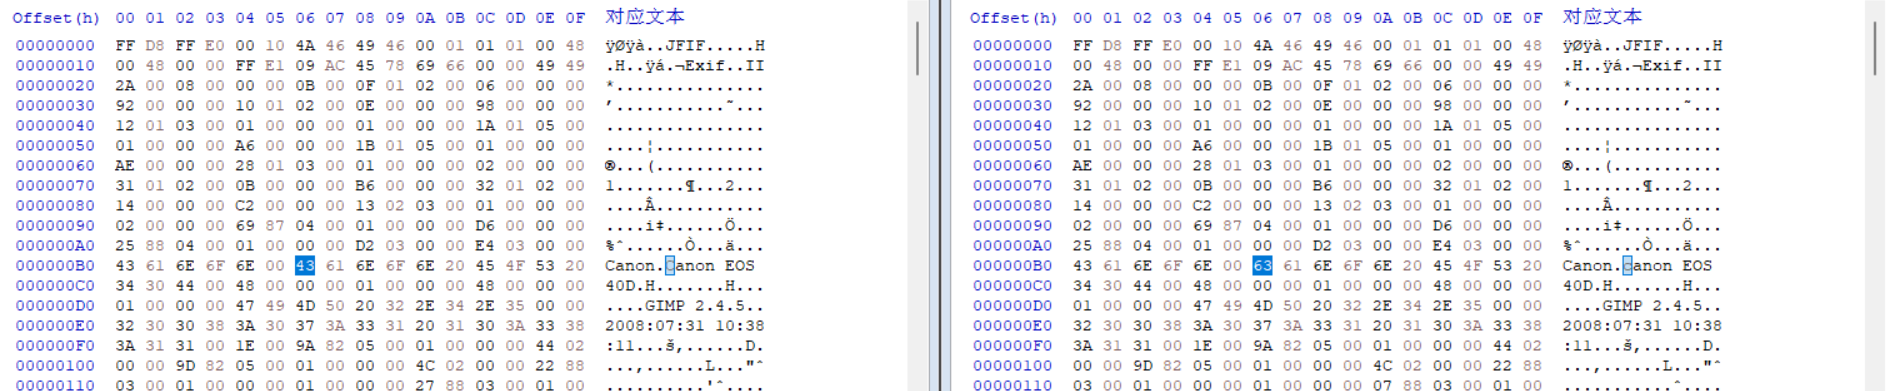
可以看到变更的字节,往下搜索可以看到其他变更点。
Gynvael的Magic Numbers
Gynvael的fuzzing基础视频,在这个视频中,他提到了几个会对程序产生破坏性影响的“magic number”,这些数字通常与数据类型大小以及算数引起的错误有关,涉及到的数字有:
0xFF0x7F0x000xFFFF0x00000xFFFFFFFF0x000000000x80000000——最小的32位整型数0x40000000——数值的一半0x7FFFFFFF——最大的32位整型数
如果在 malloc()或者其他类型的操作中存在任何这些类型数值的算术运算,则很容易发生溢出。比如说,如果你在一个一字节的寄存器上将 0x1加到 0xFF上,数值会回滚到 0x00,HEVD有一个类似的整数溢出漏洞。
如果我们的模糊测试器选择 0x7FFFFFFF作为magic number,这个值有四字节长,所以在我们找到数组中的一个字节索引后,我们需要覆盖该字节以及接下来连续的三个字节。下面我们开始实现这个变异方法了。
首先我们要像Gynvael一样创建一个元组列表,元组中的第一个数字是magic number的字节大小,第二个数字是magic number中第一个字节的十进制值。
def magic(data):

    magic_vals = [
    (1, 255),
    (1, 127),
    (1, 0),
    (2, 255),
    (2, 0),
    (4, 255),
    (4, 0),
    (4, 128),
    (4, 64),
    (4, 127)
    ]

    picked_magic = random.choice(magic_vals)
    print(picked_magic)
执行上述代码,可以看到函数随机选择了一个元组:

现在我们需要用这个选择的magic number随机覆盖JPEG文件中的1-4个字节,像前一个方法一样,我们设置可能的变更的字节位,选择一个字节变更位,然后使用 picked_magic覆盖该索引值处的字节。
举例来说,如果我们选择的元组是 (4, 128),我们知道这是一个四字节数,magic number是 0x80000000,所以接下来的操作是:
byte[x] = 128
byte[x+1] = 0
byte[x+2] = 0
byte[x+3] = 0
完整函数如下:
def magic(data):

    magic_vals = [
    (1, 255),
    (1, 127),
    (1, 0),
    (2, 255),
    (2, 0),
    (4, 255),
    (4, 0),
    (4, 128),
    (4, 64),
    (4, 127)
    ]

    picked_magic = random.choice(magic_vals)

    length = len(data) - 8
    picked_index = random.randint(0, length-1)

    # here we are hardcoding all the byte overwrites for all of the tuples that begin (1, )
    if picked_magic[0] == 1:
        if picked_magic[1] == 255:            # 0xFF
            data[picked_index] = 255
        elif picked_magic[1] == 127:            # 0x7F
            data[picked_index] = 127
        elif picked_magic[1] == 0:            # 0x00
            data[picked_index] = 0
    # here we are hardcoding all the byte overwrites for all of the tuples that begin (2, )
    elif picked_magic[0] == 2:
        if picked_magic[1] == 255:            # 0xFFFF
            data[picked_index] = 255
            data[picked_index + 1] = 255
        elif picked_magic[1] == 0:            # 0x0000
            data[picked_index] = 0
            data[picked_index + 1] = 0
    # here we are hardcoding all of the byte overwrites for all of the tuples that being (4, )
    elif picked_magic[0] == 4:
        if picked_magic[1] == 255:            # 0xFFFFFFFF
            data[picked_index] = 255
            data[picked_index + 1] = 255
            data[picked_index + 2] = 255
            data[picked_index + 3] = 255
        elif picked_magic[1] == 0:            # 0x00000000
            data[picked_index] = 0
            data[picked_index + 1] = 0
            data[picked_index + 2] = 0
            data[picked_index + 3] = 0
        elif picked_magic[1] == 128:            # 0x80000000
            data[picked_index] = 128
            data[picked_index + 1] = 0
            data[picked_index + 2] = 0
            data[picked_index + 3] = 0
        elif picked_magic[1] == 64:            # 0x40000000
            data[picked_index] = 64
            data[picked_index + 1] = 0
            data[picked_index + 2] = 0
            data[picked_index + 3] = 0
        elif picked_magic[1] == 127:            # 0x7FFFFFFF
            data[picked_index] = 127
            data[picked_index + 1] = 255
            data[picked_index + 2] = 255
            data[picked_index + 3] = 255

    return data
更换函数运行代码,查看生成的文件差异:

开始模糊测试
现在我们已经有了两种进行可靠变异的方法,接下来需要做的是:
- 使用变异方法对数据进行修改;
- 用变异后数据创建新的图像;
- 将变异后图像传给二进制文件进行解析;
- 捕捉任何
Segmentation faults,并记录引发错误的图像。
目标程序
为了找到合适的目标二进制程序,我在谷歌搜索 site:github.com "exif" language:c,该语句在github上查找用C编写且包含exif索引的项目工程。
我很快找到了一个项目:https://github.com/mkttanabe/exif
使用 git clone以及 building with gcc对该项目进行编译。(为了方便使用,可以将编译后的二进制文件放到了 /usr/bin中。)
项目的readme中有编译指令和使用方法。
先看一下这个程序怎么处理原始的有效JPEG文件:
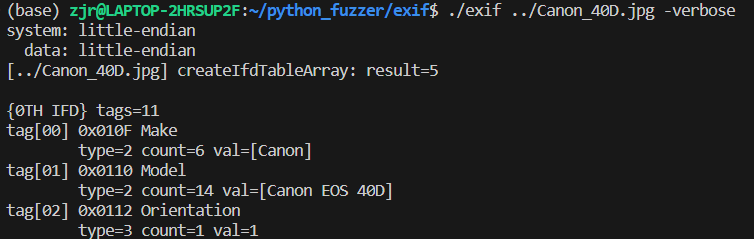
可以看到程序解析出了所有的tag,并输出了与每个tag有关的字节值,这正是我们需要的功能。
寻找段错误
理想情况下,我们希望的是给该二进制文件传入变异数据,引发该程序的段错误,这意味着程序中存在漏洞。问题在于,在我监控stdout以及stderr时,一个 Segmentation fault都没有出现,之所以会出现这个问题,是因为 Segmentation fault信息来源于shell而不是我们的二进制文件,即shell收到一个SIGSEGV的信号,作为响应输出了段错误信息。
我想到的一种监控这种错误的方法是使用python模块pexpect中的run()以及pipes模块中的quote()。
我们要添加一个新函数,该函数包含一个 counter参数,用来记录模糊测试的迭代次数,另一个参数表示变异后 data。如果 run()的输出中出现 Segentation,就把变异后数据写入到文件中,该文件就是能引起二进制文件崩溃的JPEG图像。
接下来创建一个叫做 crashes的文件夹,所有引发崩溃的图像都保存在里面,命名格式为 crash.<fuzzing iteration (counter)>.jpg,所以如果模糊测试的迭代次数是100的话,应该有一个文件 /crashes/crash.100.jpg。
终端的输出每100次迭代另起一行,函数如下:
def exif(counter,data):

    command = "exif mutated.jpg -verbose"
    out, returncode = run("sh -c " + quote(command), withexitstatus=1)

    if b"Segmentation" in out:
        with open("crashes/crash.{}.jpg".format(str(counter)), "ab+") as w:
            w.write(data)

    if counter % 100 == 0:
        print(counter)
需要修改脚本中最下面的代码执行流程,实现多次的模糊测试,当时执行到第1000次迭代时,停止模糊测试。
同时,模糊测试器要随机选择变异方法,或者是位翻转,或者使用magic number。
if __name__ == "__main__":
    if len(sys.argv) < 2:
        print("Usage: JPEGfuzz.py <valid_jpg>")
    else:
        filename = sys.argv[1]
        data = get_bytes(filename)
        for i in range(1000):
            select_mutation = random.randint(0, 1) # 随机选择变异方法
            if select_mutation == 0:
                mutated_data = bit_flip(data)
            else:
                mutated_data = magic(data)
            create_new(mutated_data)
            exif(i+1, mutated_data)
现在执行脚本并查看 crashes文件夹中的内容。

这里只找到5个崩溃,可以增加执行次数以得到更多的崩溃。
我们可以用一句命令测试该结果:for i in *.jpg; do exif "$i" -verbose > /dev/null 2>&1; done,注意,我们可以把STDOUT和STDERR重定向到 /drv/null上,因为段错误来源于命令行,而不是二进制文件。

不同崩溃的分类
现在我们有11个崩溃,以及引起崩溃的JPEG文件,下一步要分析这些崩溃的不同类型,这里我们要使用Brandon Faulk的视频中的知识。通过Brandon Faulk的崩溃示例,这11个崩溃中大多数是因为 bit_flip()变异方法而不是 magic()变异方法。我们可以在过程中取消选择变异方法的随机性,直接使用 magic()方法执行100,000次迭代,看看会发生多少次崩溃。
使用ASan分析崩溃类型
ASan就是“地址消毒(Address Sanitizer)”,是一个装有最新版gcc的内存检测工具,用户可以使用 -fsanitize=address标签对二进制文件进行编译,这样如果发生了内存访问错误,用户可以获得一份十分详尽的事件信息。
为了使用ASan,我按照这个教程 ,使用 gcc -fsanitize=address -ggdb -o exifsan sample_main.c exif.c重新编译了 exif。
之后我把 exifsan移动到 /usr/bin,如果使用这个新编译的二进制文件处理引发崩溃的图像,会获得如下输出结果:
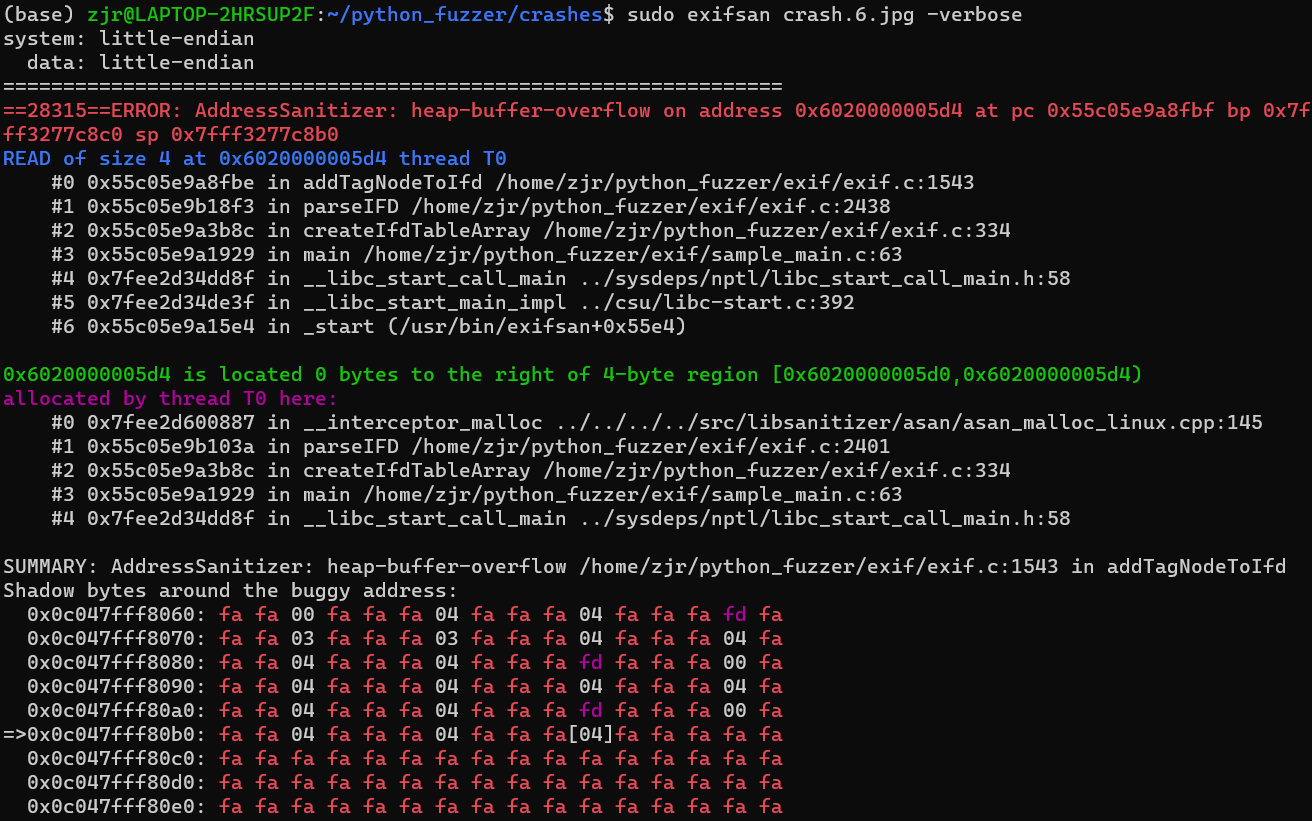
在这个输出结果中,我们不但获得了详尽的信息,ASan还对漏洞类别进行了分类,给出了崩溃发生的地址以及堆栈跟踪。可以看到,漏洞发生时,exif.c中的addTagNodeToIfd函数正在进行4字节读取操作。

因为现在已经得到了标准的二进制输出,我们可以对崩溃进行分类了。首先去除重复的崩溃,很有可能所有的11个崩溃都是同一个漏洞引起的,也有可能11个崩溃都不同。
还是用python脚本解决,我们需要遍历整个文件夹,使用新编译的 exifsan对每个引发崩溃的图像进行解析,记录崩溃地址,同时查看崩溃发生时是否存在读或写操作。例如,对于crash.6.jpg文件,我们把日志文件命名为 crash.6.HBO.6020000005d4.READ,并将ASan的输出结果写入该日志文件,这样即使不打开日志文件,我们也知道是哪张图片引发了崩溃,漏洞类型,崩溃地址,以及执行的操作。(我会把这个代码脚本放到最后,这段代码太长了。)
执行完该分类脚本后,可以发现我们已经对所有崩溃进行了分类。

完整代码
JPEGfuzz.py
#!/usr/bin/env python3

import sys
import random
from pexpect import run
from shlex import quote

# read bytes from our valid JPEG and return them in a mutable bytearray
def get_bytes(filename):
    with open(filename, "rb") as r:
        f = r.read()
    return bytearray(f)


def bit_flip(data):

    num_of_flips = int((len(data) - 4) * .01)
    indexes = range(4, (len(data) - 4))
    chosen_indexes = []

    # iterate selecting indexes until we've hit our num_of_flips number
    counter = 0
    while counter < num_of_flips:
        chosen_indexes.append(random.choice(indexes))
        counter += 1

    for x in chosen_indexes:
        current = data[x]
        current = (bin(current).replace("0b",""))
        current = "0" * (8 - len(current)) + current

        picked_index = random.randint(0, 7)
        new_number = []
        for i in current:
            new_number.append(i)
        # 进行位翻转
        if new_number[picked_index] == '1':
            new_number[picked_index] = '0'
        else:
            new_number[picked_index] = '1'

        new_number = int(''.join(new_number), 2) # 拼接回二进制字符串,并转为整型
        data[x] = new_number # 替换原始数据

    return data


def magic(data):

    magic_vals = [
    (1, 255),
    (1, 127),
    (1, 0),
    (2, 255),
    (2, 0),
    (4, 255),
    (4, 0),
    (4, 128),
    (4, 64),
    (4, 127)
    ]

    picked_magic = random.choice(magic_vals)

    length = len(data) - 8
    picked_index = random.randint(0, length-1)

    # here we are hardcoding all the byte overwrites for all of the tuples that begin (1, )
    if picked_magic[0] == 1:
        if picked_magic[1] == 255:            # 0xFF
            data[picked_index] = 255
        elif picked_magic[1] == 127:            # 0x7F
            data[picked_index] = 127
        elif picked_magic[1] == 0:            # 0x00
            data[picked_index] = 0
    # here we are hardcoding all the byte overwrites for all of the tuples that begin (2, )
    elif picked_magic[0] == 2:
        if picked_magic[1] == 255:            # 0xFFFF
            data[picked_index] = 255
            data[picked_index + 1] = 255
        elif picked_magic[1] == 0:            # 0x0000
            data[picked_index] = 0
            data[picked_index + 1] = 0
    # here we are hardcoding all of the byte overwrites for all of the tuples that being (4, )
    elif picked_magic[0] == 4:
        if picked_magic[1] == 255:            # 0xFFFFFFFF
            data[picked_index] = 255
            data[picked_index + 1] = 255
            data[picked_index + 2] = 255
            data[picked_index + 3] = 255
        elif picked_magic[1] == 0:            # 0x00000000
            data[picked_index] = 0
            data[picked_index + 1] = 0
            data[picked_index + 2] = 0
            data[picked_index + 3] = 0
        elif picked_magic[1] == 128:            # 0x80000000
            data[picked_index] = 128
            data[picked_index + 1] = 0
            data[picked_index + 2] = 0
            data[picked_index + 3] = 0
        elif picked_magic[1] == 64:            # 0x40000000
            data[picked_index] = 64
            data[picked_index + 1] = 0
            data[picked_index + 2] = 0
            data[picked_index + 3] = 0
        elif picked_magic[1] == 127:            # 0x7FFFFFFF
            data[picked_index] = 127
            data[picked_index + 1] = 255
            data[picked_index + 2] = 255
            data[picked_index + 3] = 255

    return data

def create_new(data):
    with open("mutated.jpg", "wb+") as w:
        w.write(data)


def exif(counter,data):

    command = "exif mutated.jpg -verbose"
    out, returncode = run("sh -c " + quote(command), withexitstatus=1)

    if b"Segmentation" in out:
        with open("crashes/crash.{}.jpg".format(str(counter)), "ab+") as w:
            w.write(data)

    if counter % 100 == 0:
        print(counter)


if __name__ == "__main__":
    if len(sys.argv) < 2:
        print("Usage: JPEGfuzz.py <valid_jpg>")
    else:
        filename = sys.argv[1]
        data = get_bytes(filename)
        for i in range(1000):
            select_mutation = random.randint(0, 1) # 随机选择变异方法
            if select_mutation == 0:
                mutated_data = bit_flip(data)
            else:
                mutated_data = magic(data)
            create_new(mutated_data)
            exif(i+1, mutated_data)
triage.py
#!/usr/bin/env python3

import os
from os import listdir

def get_files():

    files = os.listdir("./crashes/")

    return files

def triage_files(files):

    for x in files:

        x = os.path.join("./crashes", x)

        original_output = os.popen("exifsan " + x + " -verbose 2>&1").read()
        output = original_output

        # Getting crash reason
        crash = ''
        if "SEGV" in output:
            crash = "SEGV"
        elif "heap-buffer-overflow" in output:
            crash = "HBO"
        else:
            crash = "UNKNOWN"


        if crash == "HBO":
            output = output.split("\n")
            counter = 0
            while counter < len(output):
                if output[counter] == "=================================================================":
                    target_line = output[counter + 1]
                    target_line2 = output[counter + 2]
                    counter += 1
                else:
                    counter += 1
            target_line = target_line.split(" ")
            address = target_line[5].replace("0x","")

            target_line2 = target_line2.split(" ")
            operation = target_line2[0]
        elif crash == "SEGV":
            output = output.split("\n")
            counter = 0
            while counter < len(output):
                if output[counter] == "=================================================================":
                    target_line = output[counter + 1]
                    target_line2 = output[counter + 2]
                    counter += 1
                else:
                    counter += 1
            if "unknown address" in target_line:
                address = "00000000"
            else:
                address = ""

            if "READ" in target_line2:
                operation = "READ"
            elif "WRITE" in target_line2:
                operation = "WRITE"
            else:
                operation = ""

        log_name = (x.replace(".jpg","") + "." + crash + "." + address + "." + operation)
        f = open(log_name,"w+")
        f.write(original_output)
        f.close()

if __name__ == "__main__":
    files = get_files()
    triage_files(files)
目前的模糊测试器只用于演示基本的基于变异的模糊测试,还很粗糙,可以进行大量优化。漏洞分类的过程也很混乱,使用的方法很烂,看来我还需要观看更多@gamozolabs的视频。或许下一次进行模糊测试的时候,我们可以选择一个更难的目标,用更酷的语言,例如Rust或者Go,编写模糊测试器,并且优化整个漏洞分类的过程,尝试对其中一个漏洞进行利用。
Reference
Fuzzing Like A Caveman - The Human Machine Interface (h0mbre.github.io)

 浙公网安备 33010602011771号