


maven总结三: 常用插件
本文为博主原创,转载请注明出处:
目录:
1. maven-release-plugin
2. maven-compiler-plugin
3. maven-assembly-plugin
4. spring-boot-maven-plugin
5. maven-resources-plugin
6. maven-dependency-plugin
1.maven -release-plugin
提供自动化发布功能,自动升级版本,并将代码提交git服务器
<plugin>
    <groupId>org.apache.maven.plugins</groupId>
    <artifactId>maven-release-plugin</artifactId>
    <version>2.5.3</version>
    <configuration>
        <tagBase>http://git.spt.com/team/supply.git</tagBase>
        <connectionUrl>http://git.spt.com/team/supply.git</connectionUrl>
        <useReleaseProfile>false</useReleaseProfile>
        <autoVersionSubmodules>true</autoVersionSubmodules>
        <preparationGoals>clean deploy</preparationGoals>
      <!--git用户名-->
        <username>xxxxx@aikucun.com</username>
        <!--git密码-->
        <password>xxxx</password>
    </configuration>
</plugin>
2.maven-compiler-plugin
指定maven 编译的jdk 版本及编译时的配置。以下为简约配置。通过指定maven 中jdk 编译的版本,可以避免代码工具的jdk 版本变更后,项目编译出现问题
<plugin>
    <groupId>org.apache.maven.plugins</groupId>
    <artifactId>maven-compiler-plugin</artifactId>
    <version>3.8.0</version>
    <configuration>
        <!-- 一般而言,target与source是保持一致 -->
        <source>1.8</source> <!-- 源代码使用的JDK版本 -->
        <target>1.8</target> <!-- 需要生成的目标class文件的编译版本 -->
        <encoding>UTF-8</encoding><!-- 字符集编码,防止中文乱码 -->
        <skipTests>true</skipTests><!-- 跳过测试 -->
        <verbose>true</verbose>
        <showWarnings>true</showWarnings>
    </configuration>
</plugin>
3.maven-assembly-plugin
在Maven中,主要有3个插件可以用来打包:
-
-
- maven-jar-plugin,默认的打包插件,用来打普通的project JAR包;
- maven-shade-plugin,用来打可执行JAR包,也就是所谓的fat JAR包;
- maven-assembly-plugin,支持自定义的打包结构,也可以定制依赖项等。
-
我们日常使用的以maven-assembly-plugin为最多,因为大数据项目中往往有很多shell脚本、SQL脚本、.properties及.xml配置项等,采用assembly插件可以让输出的结构清晰而标准化。
示例:
    <build>
        <plugins>
            <plugin>
                <groupId>org.apache.maven.plugins</groupId>
                <artifactId>maven-assembly-plugin</artifactId>
                <version>${maven-assembly-plugin.version}<version>
                <executions>
                    <execution>
                        <id>make-assembly</id>
                        <!-- 绑定到package生命周期 -->
                        <phase>package</phase>
                        <goals>
                            <!-- 只运行一次 -->
                            <goal>single</goal>
                        </goals>
                    </execution>
                </executions>
                <configuration>
                    <!-- 配置描述符文件 -->
                    <descriptor>src/main/assembly/assembly.xml</descriptor>
                    <!-- 也可以使用Maven预配置的描述符
                    <descriptorRefs>
                        <descriptorRef>jar-with-dependencies</descriptorRef>
                    </descriptorRefs> -->
                </configuration>
            </plugin>
        </plugins>
    </build>
assembly插件的打包方式是通过descriptor(描述符)来定义的。
Maven预先定义好的描述符有bin,src,project,jar-with-dependencies等。比较常用的是jar-with-dependencies,它是将所有外部依赖JAR都加入生成的JAR包中,比较傻瓜化。
但要真正达到自定义打包的效果,就需要自己写描述符文件,格式为XML。下面是我们的项目中常用的一种配置。
<assembly>
    <id>assembly</id>

    <formats>
        <format>tar.gz</format>
    </formats>

    <includeBaseDirectory>true</includeBaseDirectory>

    <fileSets>
        <fileSet>
            <directory>src/main/bin</directory>
            <includes>
                <include>*.sh</include>
            </includes>
            <outputDirectory>bin</outputDirectory>
            <fileMode>0755</fileMode>
        </fileSet>
        <fileSet>
            <directory>src/main/conf</directory>
            <outputDirectory>conf</outputDirectory>
        </fileSet>
        <fileSet>
            <directory>src/main/sql</directory>
            <includes>
                <include>*.sql</include>
            </includes>
            <outputDirectory>sql</outputDirectory>
        </fileSet>
        <fileSet>
            <directory>target/classes/</directory>
            <includes>
                <include>*.properties</include>
                <include>*.xml</include>
                <include>*.txt</include>
            </includes>
            <outputDirectory>conf</outputDirectory>
        </fileSet>
    </fileSets>

    <files>
        <file>
            <source>target/${project.artifactId}-${project.version}.jar</source>
            <outputDirectory>.</outputDirectory>
        </file>
    </files>

    <dependencySets>
        <dependencySet>
            <unpack>false</unpack>
            <scope>runtime</scope>
            <outputDirectory>lib</outputDirectory>
        </dependencySet>
    </dependencySets>
</assembly>
id与formats
formats是assembly插件支持的打包文件格式,有zip、tar、tar.gz、tar.bz2、jar、war。可以同时定义多个format。
id则是添加到打包文件名的标识符,用来做后缀。
也就是说,如果按上面的配置,生成的文件就是 a r t i f a c t I d − {artifactId}-artifactId−{version}-assembly.tar.gz。
fileSets/fileSet
用来设置一组文件在打包时的属性。
directory:源目录的路径。
includes/excludes:设定包含或排除哪些文件,支持通配符。
fileMode:指定该目录下的文件属性,采用Unix八进制描述法,默认值是0644。
outputDirectory:生成目录的路径。
files/file
与fileSets大致相同,不过是指定单个文件,并且还可以通过destName属性来设置与源文件不同的名称。
dependencySets/dependencySet
用来设置工程依赖文件在打包时的属性。也与fileSets大致相同,不过还有两个特殊的配置:
unpack:布尔值,false表示将依赖以原来的JAR形式打包,true则表示将依赖解成*.class文件的目录结构打包。
scope:表示符合哪个作用范围的依赖会被打包进去。compile与provided都不用管,一般是写runtime。
按照以上配置打包好后,将.tar.gz文件上传到服务器,解压之后就会得到bin、conf、lib等规范化的目录结构,十分方便。
4.spring-boot-maven-plugin
能够以Maven的方式为应用提供Spring Boot的支持,即为Spring Boot应用提供了执行Maven操作的可能。
Spring Boot Maven plugin的5个Goals
- spring-boot:repackage,默认goal。在mvn package之后,再次打包可执行的jar/war,同时保留mvn package生成的jar/war为.origin
- spring-boot:run,运行Spring Boot应用
- spring-boot:start,在mvn integration-test阶段,进行Spring Boot应用生命周期的管理
- spring-boot:stop,在mvn integration-test阶段,进行Spring Boot应用生命周期的管理
- spring-boot:build-info,生成Actuator使用的构建信息文件build-info.properties
配置pom.xml文件
<build>
        <plugins>
            <plugin>
                <groupId>org.springframework.boot</groupId>
                <artifactId>spring-boot-maven-plugin</artifactId>
                <version>2.0.1.RELEASE</version>
                <executions>
                    <execution>
                        <goals>
                            <goal>repackage</goal>
                        </goals>
                    </execution>
                </executions>
            </plugin>
        </plugins>
    </build>
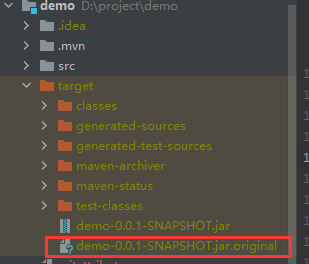
使用该插件打包之后,会生成一个 以 original 的软件包:
5. maven-resources-plugin
Resources插件负责处理项目资源文件并拷贝到输出目录。Maven将main resources和test resources分开,一般main resources关联main source code,而test resources关联test source code。
Resources插件目标有三个:
- resources:resources,拷贝main resources到main output directory。它绑定了process-resources生命周期阶段,当执行Compiler:compile插件目标前就会执行此阶段。
- resources:testResources,拷贝test resources到test output directory。它绑定了process-test-resources生命周期阶段,当执行surefire:test插件目标前就会执行此阶段。
- resources:copy-resources,手动拷贝资源到输出目录
pom 简约配置示例:
<build>
    <plugins>
        <plugin>
            <artifactId>maven-resources-plugin</artifactId>
            <version>3.0.2</version>
            <configuration>
                <encoding>UTF-8</encoding>
            </configuration>
        </plugin>
    </plugins>
</build>
可能用到的配置:
<plugin>
    <groupId>org.apache.maven.plugins</groupId>
    <artifactId>maven-resources-plugin</artifactId>
    <version>2.6</version>
    <executions>
        <!-- 一个execution就是一个目标输入位置,如果想把各种资源拆开放的话,就
        可以创建多个execution,一个资源文件可以被拷贝多份 -->
        <execution>
            <id>copy-resources</id>
            <phase>package</phase>
            <goals>
                <goal>copy-resources</goal>
            </goals>
            <configuration>
                <encoding>UTF-8</encoding>
                <!-- 资源文件的输出目录 -->
                <outputDirectory>{project.build.directory}/config</outputDirectory>
                <resources>
                    <!-- 资源文件的原始目录,有多个的话就多配几个 -->
                    <resource>
                        <!-- 原始目录 -->
                        <directory>src/main/resources</directory>
                        <!-- 是否使用过滤器,如果是的话,需要配置一下才行
                        这个后续再研究,这边没有使用到 -->
                        <filtering>true</filtering>
                        <!-- 包含哪些文件以及去除调哪些文件等等 -->
                        <includes>
                            <include>**/*.*</include>
                        </includes>
                        <excludes>
                            <exclude>**/*.json</exclude>
                        </excludes>
                    </resource>
                </resources>
            </configuration>
        </execution>
    </executions>
</plugin>
6. maven-dependency-plugin
用来拷贝项目所有依赖,可能会用到的一些配置如下:
<plugin>
    <groupId>org.apache.maven.plugins</groupId>
    <artifactId>maven-dependency-plugin</artifactId>
    <executions>
        <execution>
            <id>copy-dependencies</id>
            <phase>package</phase>
            <goals>
                <goal>copy-dependencies</goal>
            </goals>
            <configuration>
                <!-- 拷贝项目依赖包到lib/目录下 -->
                <outputDirectory>${project.build.directory}/lib</outputDirectory>
                <!-- 间接依赖也拷贝 -->
                <excludeTransitive>false</excludeTransitive>
                <!-- 带上版本号 -->
                <stripVersion>false</stripVersion>
            </configuration>
        </execution>
    </executions>
</plugin>


 浙公网安备 33010602011771号