
Spring登录实例
项目结构首先看一下整个项目的目录结构,如下:
导入Jar包
工欲善必先利其器,导入一下Jar包,对应的jar包我已经分享在百度云网盘,大家可以下载,网址如下:
链接:https://pan.baidu.com/s/1m5NCIQeiKZn5llosp7Iv6A 提取码:s5l2 
配置文件
web.xml
配置 web.xml配置文件,如下:
[XML] 纯文本查看 复制代码
|
01
02
03
04
05
06
07
08
09
10
11
12
13
14
15
16
|
<?xml version="1.0" encoding="UTF-8"?><web-app version="3.0" xmlns="http://java.sun.com/xml/ns/javaee" xmlns:xsi="http://www.w3.org/2001/XMLSchema-instance" xsi:schemaLocation="http://java.sun.com/xml/ns/javaee [url=http://java.sun.com/xml/ns/javaee/web-app_3_0.xsd]http://java.sun.com/xml/ns/javaee/web-app_3_0.xsd[/url]"> <!-- 上下文参数 --> <context-param> <param-name>contextConfigLocation</param-name> <!-- spring配置文件 --> <param-value>classpath:applicationContext.xml</param-value> </context-param> <!-- 封装了一个监听器,帮助加载Spring的配置文件 --> <listener> <listener-class>org.springframework.web.context.ContextLoaderListener</listener-class> </listener></web-app> |
applicationContext.xml
创建applicationContext.xml配置文件,如下:
获取数据源,数据库相关配置(注意:要配置自己的数据库相关信息),beanID:dataSource。
创建 SqlSessionFactory,beanID:factory。
扫描器配置,扫描接口,并创建接口对象。
由spring管理service实现类,beanID:userService。
[XML] 纯文本查看 复制代码
|
01
02
03
04
05
06
07
08
09
10
11
12
13
14
15
16
17
18
19
20
21
22
23
24
25
26
27
28
29
30
31
32
33
34
|
<?xml version="1.0" encoding="UTF-8"?><beans xmlns="http://www.springframework.org/schema/beans" xmlns:xsi="http://www.w3.org/2001/XMLSchema-instance" xsi:schemaLocation="http://www.springframework.org/schema/beans [url=http://www.springframework.org/schema/beans/spring-beans.xsd]http://www.springframework.org/schema/beans/spring-beans.xsd[/url]"> <!-- 数据源封装类,数据源:获取数据库连接 --> <bean id="dataSouce" class="org.springframework.jdbc.datasource.DriverManagerDataSource"> <property name="driverClassName" value="com.mysql.jdbc.Driver"></property> <property name="url" value="jdbc:mysql://localhost:3306/spring"></property> <property name="username" value="root"></property> <property name="password" value="123456"></property> </bean> <!--spring帮助创建SqlSessionFactory--> <bean id="factory"class="org.mybatis.spring.SqlSessionFactoryBean"> <property name="dataSource" ref="dataSouce"></property> </bean> <!-- 扫描器相当于mybatis.xml中的mappers下package标签 --> <bean class="org.mybatis.spring.mapper.MapperScannerConfigurer"> <!-- 要扫描哪个包 --> <property name="basePackage" value="com.spring.mapper"></property> <!-- 和factory产生关系 --> <property name="sqlSessionFactory" ref="factory"></property> </bean> <!-- 由spring管理service实现类 --> <bean id="userService" class="com.spring.service.impl.UsersServiceImpl"> <property name="usersMapper" ref="usersMapper"></property> </bean></beans> |
创建数据库
创建对应的用户表,如下: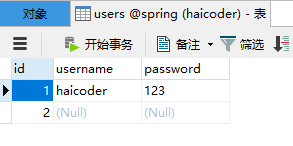
数据库信息为:spring库,users表。
代码实现
创建Users类
先创建一个用户类Users,如下:
[Java] 纯文本查看 复制代码
|
01
02
03
04
05
06
07
08
09
10
11
12
13
14
15
16
17
18
19
20
21
22
23
24
|
public class Users { private int user; private String username; private String password; public int getUser() { return user; } public void setUser(int user) { this.user = user; } public String getUsername() { return username; } public void setUsername(String username) { this.username = username; } public String getPassword() { return password; } public void setPassword(String password) { this.password = password; } } |
创建UsersMapper类
创建UsersMapper类,如下:
[Java] 纯文本查看 复制代码
|
1
2
3
4
|
public interface UsersMapper { @Select("select * from users where username=#{username} and password=#{password}") Users selByUsersPwd(Users users);} |
创建UsersService接口
创建UsersService类,如下:
[Java] 纯文本查看 复制代码
|
1
2
3
4
5
6
7
8
|
public interface UsersService { /** * 登录 * @param users * @return */ Users login(Users users);} |
创建UsersServiceImpl类
创建UsersService接口实现类,如下:
[Java] 纯文本查看 复制代码
|
01
02
03
04
05
06
07
08
09
10
11
12
13
14
15
16
17
18
|
public class UsersServiceImpl implements UsersService { private UsersMapper usersMapper; public UsersMapper getUsersMapper() { return usersMapper; } public void setUsersMapper(UsersMapper usersMapper) { this.usersMapper = usersMapper; } @Override public Users login(Users users) { // TODO Auto-generated method stub return usersMapper.selByUsersPwd(users); }} |
创建LoginServlet类
创建LoginServlet类,如下:
[Java] 纯文本查看 复制代码
|
01
02
03
04
05
06
07
08
09
10
11
12
13
14
15
16
17
18
19
20
21
22
23
24
25
26
27
28
29
30
31
32
33
34
35
36
37
38
39
40
41
|
@WebServlet("/login")public class LoginServlet extends HttpServlet { private UsersService usersService; //从spring中取出UsersServiceImpl public void init()throws ServletException{ ApplicationContext ac = WebApplicationContextUtils.getRequiredWebApplicationContext(getServletContext()); usersService = ac.getBean("usersService",UsersServiceImpl.class); } protected void service(HttpServletRequest req,HttpServletResponse resp)throws ServletException,IOException { req.setCharacterEncoding("utf-8"); //获取验证码 String code = req.getParameter("code"); //到session中获取验证码 String codeSession = req.getSession().getAttribute("code").toString(); //判断验证码是否正确 if(codeSession.equals(code)) { //获取用户名 String username = req.getParameter("username"); //获取密码 String password = req.getParameter("password"); //创建users对象 Users users = new Users(); users.setUsername(username); users.setPassword(password); //登录 Users user = usersService.login(users); if(user!=null) { resp.sendRedirect("main.jsp"); }else { req.setAttribute("error", "用户名或密码不正确!"); req.getRequestDispatcher("index.jsp").forward(req, resp); } }else { req.setAttribute("error", "验证码不正确"); req.getRequestDispatcher("index.jsp").forward(req, resp); } }} |
测试实例
成功页面,如下:
更多Java学习资料可关注:itheimaGZ获取

 浙公网安备 33010602011771号