
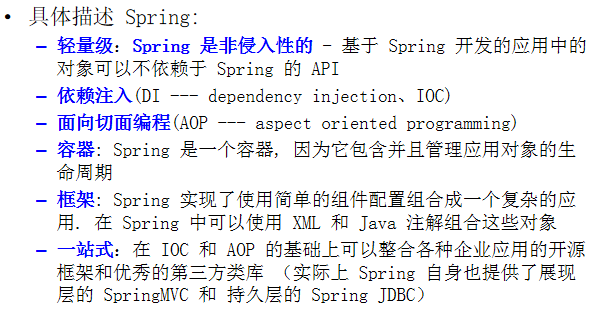
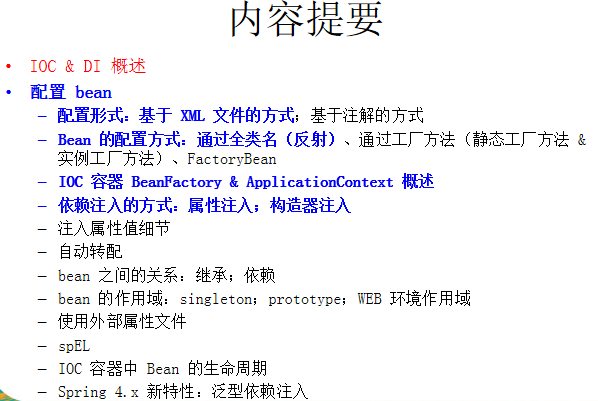
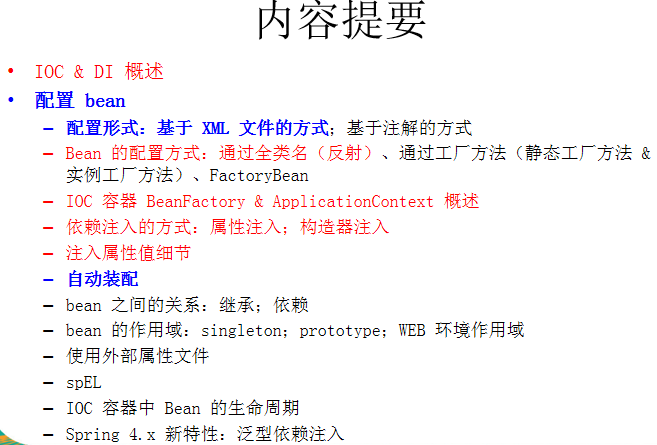
JavaEE基础01-spring4(IOC)
本章内容的学习与研究都基于spring4

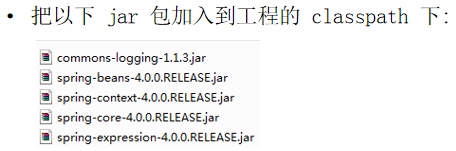
可以到spring官网去下载最新的spring扎包。
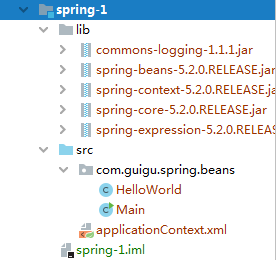
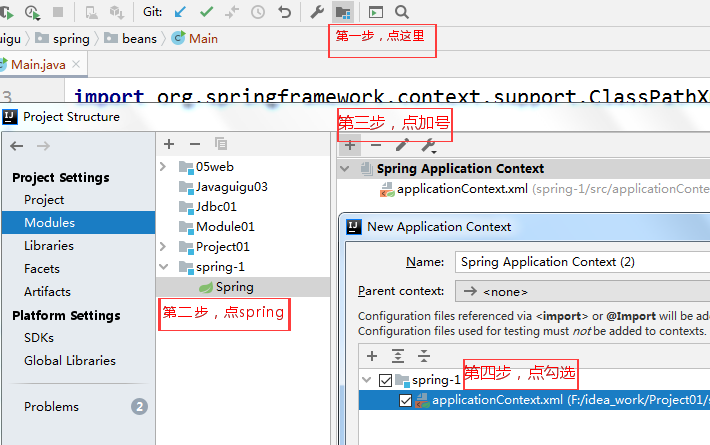
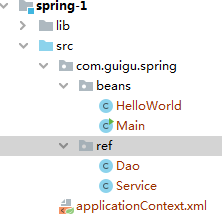
现在作一个简单测试类,我使用的是idea,创建module时,勾选spring,写一个applicationContext.xml文件。

.xml文件里加入
<bean id="helloWorld" class="com.guigu.spring.beans.HelloWorld">
    <property name="name" value="spring"></property>
</bean>
把.xml文件和spring建立联系。


package com.guigu.spring.beans;

/**
 * Created by Zhuxiang on 2020/5/9.
 */
public class HelloWorld {
    public String name;

    public HelloWorld() {
        System.out.println("HelloWorld is construct!");
    }

    public void setName(String name) {
        this.name = name;
    }

    @Override
    public String toString() {
        return "HelloWorld{" +
                "name='" + name + '\'' +
                '}';
    }

}
package com.guigu.spring.beans;

import org.springframework.context.support.ClassPathXmlApplicationContext;

/**
 * Created by Zhuxiang on 2020/5/9.
 */
public class Main {
    public static void main(String[] args) {
//        HelloWorld helloWorld = new HelloWorld();
//        helloWorld.setName("123");
        ClassPathXmlApplicationContext c = new ClassPathXmlApplicationContext("applicationContext.xml");
        HelloWorld helloWorld = (HelloWorld) c.getBean("helloWorld");
        System.out.println(helloWorld);
    }
}
运行之后成功。

IOC 前生 --- 分离接口与实现
IOC 前生 --- 采用工厂设计模式
IOC --- 采用反转控制
上面的例子就是用的ClassPathXmlApplicationContext类。
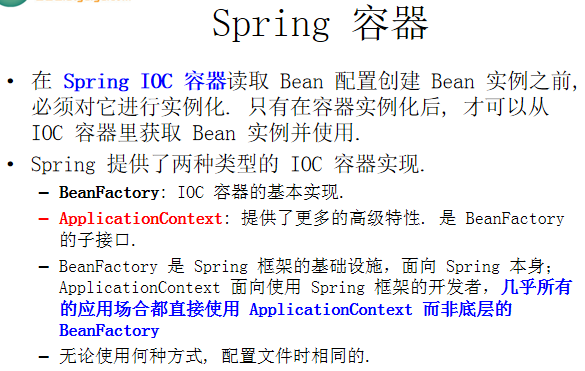
ApplicationContext 的主要实现类:
ClassPathXmlApplicationContext:从 类路径下加载配置文件
FileSystemXmlApplicationContext: 从文件系统中加载配置文件
ConfigurableApplicationContext 扩展于 ApplicationContext,新增加两个主要方法:refresh() 和 close(), 让 ApplicationContext 具有启动、刷新和关闭上下文的能力
ApplicationContext 在初始化上下文时就实例化所有单例的 Bean。 WebApplicationContext 是专门为 WEB 应用而准备的,它允许从相对于 WEB 根目录的路径中完成初始化工作
依赖注入的方式
Spring 支持 3 种依赖注入的方式
属性注入
构造器注入
工厂方法注入(很少使用,不推荐)
属性注入
属性注入即通过 setter 方法注入Bean 的属性值或依赖的对象(上面.xml中的<property name="name" value="spring">"name"就是指bean里的setter方法的名字)
属性注入使用 <property> 元素, 使用 name 属性指定 Bean 的属性名称,value 属性或 <value> 子节点指定属性值
属性注入是实际应用中最常用的注入方式
构造器注入
通过构造方法注入Bean 的属性值或依赖的对象,它保证了 Bean 实例在实例化后就可以使用。
构造器注入在 <constructor-arg> 元素里声明属性, <constructor-arg> 中没有 name 属性
按索引匹配入参:
按类型匹配入参:
注入属性值的细节
字面值:可用字符串表示的值,可以通过 <value> 元素标签或 value 属性进行注入。例子:<property name="name" value="spring">中的"spring"
基本数据类型及其封装类、String 等类型都可以采取字面值注入的方式。例子:<constructor-arg value="奥迪" type="java.lang.String"/>
若字面值中包含特殊字符,可以使用 <![CDATA[]]> 把字面值包裹起来。例子:把这样一个值显示出来<spring^^>,<property name="name" ><value><![CDATA[<spring^^>]]></value></property>
引用其它 Bean
组成应用程序的 Bean 经常需要相互协作以完成应用程序的功能. 要使 Bean 能够相互访问, 就必须在 Bean 配置文件中指定对 Bean 的引用
在 Bean 的配置文件中, 可以通过 <ref> 元素或 ref 属性为 Bean 的属性或构造器参数指定对 Bean 的引用.
也可以在属性或构造器里包含 Bean 的声明, 这样的 Bean 称为内部 Bean
<!-- 配置 bean --> <bean id="dao5" class="com.guigu.spring.ref.Dao"> <property name="dataSource" value="data"></property> </bean> <bean id="service" class="com.guigu.spring.ref.Service"> <!-- 通过 ref 属性值指定当前属性指向哪一个 bean! --> <property name="dao" ref="dao5"></property> </bean> <!--以下为内部引用--> <!-- <!–内部bean–>--> <!-- <bean id="service" class="com.guigu.spring.ref.Service">--> <!-- <property name="dao">--> <!-- <bean class="com.guigu.spring.ref.Dao">--> <!-- <property name="dataSource" value="内部beandata"></property>--> <!-- </bean>--> <!-- </property>--> <!-- </bean>-->
注入参数详解:null 值和级联属性
可以使用专用的 <null/> 元素标签为 Bean 的字符串或其它对象类型的属性注入 null 值(不写例子了,用的也少)
和 Struts、Hiberante 等框架一样,Spring 支持级联属性的配置。
    <bean id="service2" class="com.guigu.spring.ref.Service">
<!--    <property name="dao" ref="dao5"></property>--><!--用属性注入和下面用构造器同效果-->
    <constructor-arg ref="dao5"></constructor-arg><!--必须先关联非空的bean,属性需要先初始化,才可以这样赋值。不然会报错。同时记得在本bean(Service)里写空参构造器-->
    <property name="dao.dataSource" value="service为级联属性dao.dataSource赋值"></property>
    </bean>
public class Dao {
    private String dataSource;

    public void setDataSource(String dataSource) {
            this.dataSource = dataSource;
        }

        public void save(){
            System.out.println("save by " + dataSource);
        }

        public Dao() {
            System.out.println("Dao's Constructor...");
        }


}
public class Service {
    private Dao dao;

    public Service(Dao dao) {
        this.dao = dao;
    }
    public Service() {
    }

    public void setDao(Dao dao) {
        this.dao = dao;
    }

    public Dao getDao() {
        return dao;
    }

    public void save(){
        System.out.println("Service's save");
        dao.save();
    }
}
public class Main {
    public static void main(String[] args) {
//        HelloWorld helloWorld = new HelloWorld();
//        helloWorld.setName("123");
        ClassPathXmlApplicationContext c = new ClassPathXmlApplicationContext("applicationContext.xml");

        HelloWorld helloWorld = (HelloWorld) c.getBean("helloWorld");
        System.out.println(helloWorld);

        Service service = (Service) c.getBean("service");
        service.save();

        Service service2 = (Service) c.getBean("service2");
        service2.save();
    }
}
集合属性
在 Spring中可以通过一组内置的 xml 标签(例如: <list>, <set> 或 <map>) 来配置集合属性.
配置 java.util.List 类型的属性, 需要指定 <list> 标签, 在标签里包含一些元素. 这些标签可以通过 <value> 指定简单的常量值, 通过 <ref> 指定对其他 Bean 的引用. 通过<bean> 指定内置 Bean 定义. 通过 <null/> 指定空元素. 甚至可以内嵌其他集合.
数组的定义和 List 一样, 都使用 <list>
配置 java.util.Set 需要使用 <set> 标签, 定义元素的方法与 List 一样.
<!--集合-->
    <bean id="car1" class="com.guigu.spring.beans.Car">
        <property name="name" value="car1"></property>
        <property name="price" value="1000"></property>
    </bean>
    <bean id="person1" class="com.guigu.spring.beans.Person">
        <property name="name" value="p1"></property>
        <property name="cars">
            <list>
                <!--引入bean-->
                <ref bean="car1"/>
                <!--内部bean-->
                <bean class="com.guigu.spring.beans.Car">
                    <constructor-arg value="car2" type="java.lang.String"></constructor-arg>
                    <constructor-arg value="2000" type="java.lang.Integer"></constructor-arg>
                </bean>
            </list>
        </property>
    </bean>
补充:不写class了,应该可以直接看出来。person类属性有String name和list<car> cars。car类有name和price。main方法不多说了。
Java.util.Map 通过 <map> 标签定义, <map> 标签里可以使用多个 <entry> 作为子标签. 每个条目包含一个键和一个值.
必须在 <key> 标签里定义键
因为键和值的类型没有限制, 所以可以自由地为它们指定 <value>, <ref>, <bean> 或 <null> 元素.
可以将 Map 的键和值作为 <entry> 的属性定义: 简单常量使用 key 和 value 来定义; Bean 引用通过 key-ref 和 value-ref 属性定义
使用 <props> 定义 java.util.Properties, 该标签使用多个 <prop> 作为子标签. 每个 <prop> 标签必须定义 key 属性.
    <!--Map集合-->
    <bean id="person2" class="com.guigu.spring.beans.Person">
        <property name="name" value="p1"></property>
        <property name="mcars">
            <map>
                <!--引入bean-->
                <entry key="AA" value-ref="car1"/>
                <!--内部bean-->
                <entry key="BB" >
                    <bean class="com.guigu.spring.beans.Car">
                    <constructor-arg value="car2" type="java.lang.String"></constructor-arg>
                    <constructor-arg value="2000" type="java.lang.Integer"></constructor-arg>
                    </bean>
                </entry>
            </map>
        </property>
    </bean>
    <!--properties-->
    <bean id="dataSource" class="com.guigu.spring.beans.DataSource">
        <property name="pro">
            <props>
                <prop key="user">root</prop>
                <prop key="password"></prop>
                <prop key="jdbcUrl">jdbc:mysql:///test</prop>
                <prop key="driverClass">com.mysql.jdbc.Driver</prop>
            </props>
        </property>
    </bean>
使用 utility scheme 定义集合
使用基本的集合标签定义集合时, 不能将集合作为独立的 Bean 定义, 导致其他 Bean 无法引用该集合, 所以无法在不同 Bean 之间共享集合.
可以使用 util schema 里的集合标签定义独立的集合 Bean. 需要注意的是, 必须在 <beans> 根元素里添加 util schema 定义
    <!--配置单例的集合bean,以供多个bean进行引用-->
    <util:list id="cars">
        <ref bean="car1"></ref>
        <ref bean="car1"></ref>
        <bean class="com.guigu.spring.beans.Car">
            <constructor-arg value="car2" type="java.lang.String"></constructor-arg>
            <constructor-arg value="2000" type="java.lang.Integer"></constructor-arg>
        </bean>
    </util:list>
    <bean id="person3" class="com.guigu.spring.beans.Person">
        <property name="name" value="p1"></property>
        <property name="cars" ref="cars"></property>
    </bean>
XML 配置里的 Bean 自动装配(开发很少使用,但整合第三方框架时会用到,需要了解)
Spring IOC 容器可以自动装配 Bean. 需要做的仅仅是在 <bean> 的 autowire 属性里指定自动装配的模式
byType(根据类型自动装配): 若 IOC 容器中有多个与目标 Bean 类型一致的 Bean. 在这种情况下,Spring 将无法判定哪个 Bean 最合适该属性, 所以不能执行自动装配.
byName(根据名称自动装配): 必须将目标 Bean 的名称和属性名设置的完全相同.
<!--autowire
byName 根据bean的名字和当前bean的setter风格的属性名进行自动装配,有匹配则装配,没就不装配。
byType 根据bean的类型和当前bean的属性的类型进行自动装配,若ioc容器中有一个以上的类型匹配的bean,就抛异常。
-->
    <bean id="person4" class="com.guigu.spring.beans.Person" autowire="byName">
        <property name="name" value="p1"></property>
        <!--因为cars属性的setter方法名为cars,所以自动寻找id=cars的bean来装配-->
        <!--<property name="cars" ref="cars"></property>-->
    </bean>
缺点:
在 Bean 配置文件里设置 autowire 属性进行自动装配将会装配 Bean 的所有属性. 然而, 若只希望装配个别属性时, autowire 属性就不够灵活了.
autowire 属性要么根据类型自动装配, 要么根据名称自动装配, 不能两者兼而有之.
一般情况下,在实际的项目中很少使用自动装配功能,因为和自动装配功能所带来的好处比起来,明确清晰的配置文档更有说服力一些

继承 Bean 配置
Spring 允许继承 bean 的配置, 被继承的 bean 称为父 bean. 继承这个父 Bean 的 Bean 称为子 Bean
子 Bean从父 Bean 中继承配置, 包括 Bean 的属性配置
子 Bean 也可以覆盖从父 Bean 继承过来的配置
父 Bean可以作为配置模板, 也可以作为 Bean 实例. 若只想把父 Bean 作为模板, 可以设置 <bean> 的abstract 属性为 true, 这样 Spring 将不会实例化这个 Bean
并不是 <bean> 元素里的所有属性都会被继承. 比如: autowire, abstract 等. 也可以忽略父 Bean 的 class 属性, 让子 Bean 指定自己的类, 而共享相同的属性配置. 但此时 abstract 必须设为 true
<!--bean之间的关系-->
    <bean id="car1" class="com.guigu.spring.beans.Car">
        <property name="name" value="大众"></property>
        <property name="price" value="10000"></property>
    </bean>
    <bean id="car2" class="com.guigu.spring.beans.Car" parent="car1">
        <property name="price" value="20000"></property>
    </bean>
Car{name='大众', price=10000}
Car{name='大众', price=20000}
把一个bean定为配置模板。
<bean id="car1" abstract="true">
抽象bean不能被实例化(在ioc容器里)。main方法里不再能实例化car1(运行时会抛异常)。
如果bean的class属性没有指定,则该bean必须是一个抽象bean。
Car{name='大众', price=20000}
依赖 Bean 配置
Spring 允许用户通过 depends-on 属性设定 Bean 前置依赖的Bean,前置依赖的 Bean 会在本 Bean 实例化之前创建好
如果前置依赖于多个 Bean,则可以通过逗号,空格或的方式配置 Bean 的名称
    <!--要求配置person时,必须有一个关联的car。换句话说person的bean必须依赖car这个bean
    如果没有这个bean那么初始化时就报错-->
    <bean id="person" class="com.guigu.spring.beans.Person" depends-on="car2">
        <property name="name" value="p1"></property>
    </bean>
只是依赖关系,不会赋值。


使用singleton,main方法里实例化car01和car02,car01=car02;
使用prototype,main方法里实例化car01和car02,car01!=car02;
在 Spring 中, 可以在 <bean> 元素的 scope 属性里设置 Bean 的作用域.
默认情况下, Spring 只为每个在 IOC 容器里声明的 Bean 创建唯一一个实例, 整个 IOC 容器范围内都能共享该实例:所有后续的 getBean() 调用和 Bean 引用都将返回这个唯一的 Bean 实例.该作用域被称为 singleton, 它是所有 Bean 的默认作用域.

例子:创建连接池连接数据库。

    <!--连接数据库-->
    <bean id="dataSource" class="com.alibaba.druid.pool.DruidDataSource">
        <property name="username" value="root"></property>
        <property name="password" value=""></property>
        <property name="driverClassName" value="com.mysql.jdbc.Driver"></property>
        <property name="url" value="jdbc:mysql://localhost:3306/girls?rewriteBatchedStatements=true"></property>
    </bean>
main方法里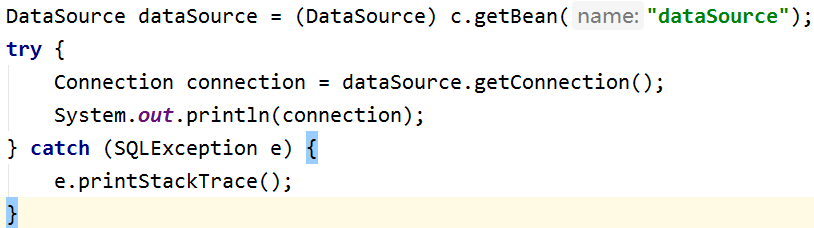
这样可以连接数据库,但是不利于修改和维护。
在配置文件里配置 Bean 时, 有时需要在 Bean 的配置里混入系统部署的细节信息(例如: 文件路径, 数据源配置信息等). 而这些部署细节实际上需要和 Bean 配置相分离
Spring 提供了一个 PropertyPlaceholderConfigurer 的 BeanFactory 后置处理器, 这个处理器允许用户将 Bean 配置的部分内容外移到属性文件中. 可以在 Bean 配置文件里使用形式为 ${var} 的变量, PropertyPlaceholderConfigurer 从属性文件里加载属性, 并使用这些属性来替换变量.
Spring 还允许在属性文件中使用 ${propName},以实现属性之间的相互引用。
具体方法:
Spring 2.0:已经不建议使用了。
Spring 2.5 之后: 可通过 <context:property-placeholder> 元素简化: <beans> 中添加 context Schema 定义 在配置文件中加入如下配置:

在beans里做配置,虽然直接写在idea里会自动导入,不过还是要了解一下。补充一下,p标签是用来在bean里赋值的,简化代码。但是我这里没有使用。
<beans xmlns="http://www.springframework.org/schema/beans"
       xmlns:xsi="http://www.w3.org/2001/XMLSchema-instance"
       xmlns:p="http://www.springframework.org/schema/p"
       xmlns:context="http://www.springframework.org/schema/context">
<!--连接数据库-->
<!--    <context:property-placeholder location="classpath:druid.properties"/>-->
    <bean class="org.springframework.beans.factory.config.PropertyPlaceholderConfigurer">
        <property name="location" value="classpath:druid.properties"></property>
    </bean>
    <bean id="dataSource" class="com.alibaba.druid.pool.DruidDataSource">
        <property name="username" value="${username}"></property>
        <property name="password" value="${password}"></property>
        <property name="driverClassName" value="${driverClassName}"></property>
        <property name="url" value="${url}"></property>
    </bean>
我不知道是什么地方出了问题,反正我写<context:property-placeholder>没有用,要么是mysql的版本要么是druid数据连接池包不兼容的问题。反正我代码是没问题。

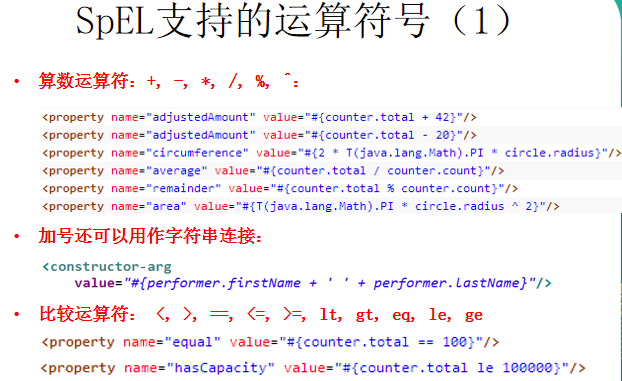
Spring表达式语言:SpEL
语法类似于 EL:SpEL 使用 #{…} 作为定界符,所有在大框号中的字符都将被认为是 SpEL
字面量的表示:
整数:<property name="count" value="#{5}"/>
小数:<property name="frequency" value="#{89.7}"/>
科学计数法:<property name="capacity" value="#{1e4}"/>
String可以使用单引号或者双引号作为字符串的定界符号:<property name=“name” value="#{'Chuck'}"/> 或 <property name='name' value='#{"Chuck"}'/>
Boolean:<property name="enabled" value="#{false}"/>
SpEL:引用 Bean、属性和方法(1)
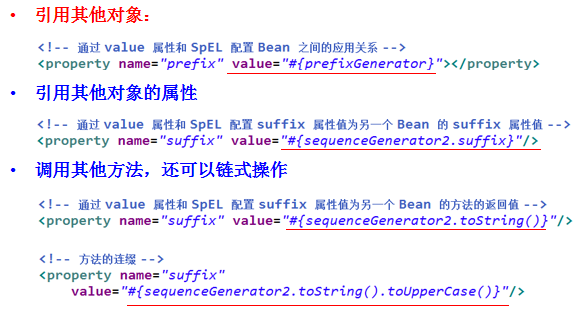
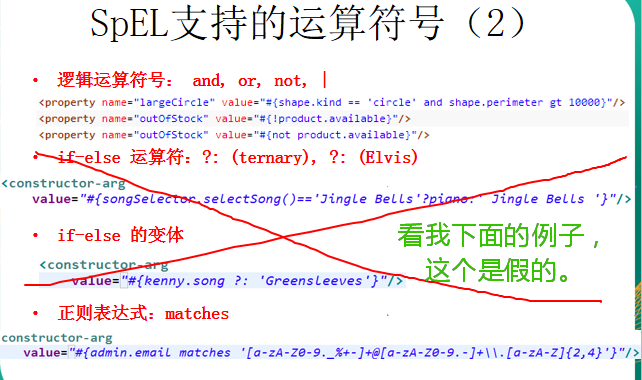
上面的if-else运算符真的没用,其实就是三元运算符而已了,像ppt里那样写直接报错啊。
注意:下面例子里引用的是car3的价格,不能引用自己bean的。
<!--spEl-->
    <bean id="car4" class="com.guigu.spring.beans.Car" >
        <property name="name" value="oooo"></property>
        <property name="price" value="9999"></property>
        <property name="info" value="#{car3.price>1000?'豪车':'代步车'}"></property>
    </bean>

public final class Math {//java.lang.math的源码
public static final double PI = 3.14159265358979323846;

Spring IOC 容器可以管理 Bean 的生命周期, Spring 允许在 Bean 生命周期的特定点执行定制的任务.
Spring IOC 容器对 Bean 的生命周期进行管理的过程:
1,通过构造器或工厂方法创建 Bean 实例
2,为 Bean 的属性设置值和对其他 Bean 的引用
3,调用 Bean 的初始化方法
4,Bean 可以使用了
5,当容器关闭时, 调用 Bean 的销毁方法
在 Bean 的声明里设置 init-method 和 destroy-method 属性, 为 Bean 指定初始化和销毁方法.
public class Car {
    public String name;
    public Integer price;

    public Car() {
        System.out.println("car的构造器");
    }
    public void setName(String name) {
        System.out.println("setName");
        this.name = name;
    }
    public void setPrice(Integer price) {
        this.price = price;
    }
    public void init(){
        System.out.println("init");
    }
    public void destroy(){
        System.out.println("destroy");
    }
    @Override
    public String toString() {
        return "Car{" +
                "name='" + name + '\'' +
                ", price=" + price +
                '}';
    }
}
    <bean id="car6" class="com.guigu.spring.beans.Car" init-method="init" destroy-method="destroy">
        <property name="name" value="奥迪666"></property>
        <property name="price" value="66666"></property>
    </bean>
main
ClassPathXmlApplicationContext c = new ClassPathXmlApplicationContext("bean.xml");
        Car car6 = (Car) c.getBean("car6");
        System.out.println(car6);
        c.close();
结果是这样的,正好对应上面的五点。
car的构造器
setName
init
Car{name='奥迪666', price=66666}
destroy
创建 Bean 后置处理器
Bean 后置处理器允许在调用初始化方法前后对 Bean 进行额外的处理.
Bean 后置处理器对 IOC 容器里的所有 Bean 实例逐一处理, 而非单一实例. 其典型应用是: 检查 Bean 属性的正确性或根据特定的标准更改 Bean 的属性.
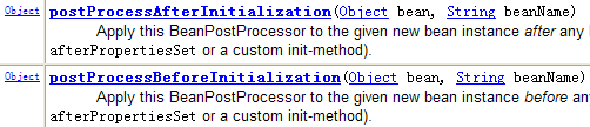
对Bean 后置处理器而言, 需要实现
接口. 在初始化方法被调用前后, Spring 将把每个 Bean 实例分别传递给上述接口的以下两个方法:
Spring IOC 容器对 Bean 的生命周期进行管理的过程:
1,通过构造器或工厂方法创建 Bean 实例,
2,为 Bean 的属性设置值和对其他 Bean 的引用
3,将 Bean 实例传递给 Bean 后置处理器的 postProcessBeforeInitialization 方法
4,调用 Bean 的初始化方法
5,将 Bean 实例传递给 Bean 后置处理器的 postProcessAfterInitialization方法
6,Bean 可以使用了
7,当容器关闭时, 调用 Bean 的销毁方法
//bean:bean实例本身
//beanName:IOC容器配置的bean名字。
//返回值:是实际返回给用户的那个bean,注意:可以在以上两个方法中修改返回的bean,甚至返回一个新的bean

public class MyBeanPostProcessor implements BeanPostProcessor {
    @Override
    public Object postProcessBeforeInitialization(Object bean, String beanName) throws BeansException {
        System.out.println("postProcessBeforeInitialization"+bean+","+beanName);
        return bean;

    }

    @Override
    public Object postProcessAfterInitialization(Object bean, String beanName) throws BeansException {
        System.out.println("postProcessAfterInitialization"+bean+","+beanName);
        return bean;
    }
}
    <bean id="car6" class="com.guigu.spring.beans.Car" init-method="init" destroy-method="destroy">
        <property name="name" value="奥迪666"></property>
        <property name="price" value="66666"></property>
    </bean>
    <bean class="com.guigu.spring.beans.MyBeanPostProcessor"></bean>
   <!--配置bean后置处理器;不需要id-->
结果是:
car的构造器
setName
postProcessBeforeInitializationCar{name='奥迪666', price=66666},car6
init
postProcessAfterInitializationCar{name='奥迪666', price=66666},car6
Car{name='奥迪666', price=66666}
destroy

通过调用静态工厂方法创建 Bean
调用静态工厂方法创建 Bean是将对象创建的过程封装到静态方法中. 当客户端需要对象时, 只需要简单地调用静态方法, 而不同关心创建对象的细节.
要声明通过静态方法创建的 Bean, 需要在 Bean 的 class 属性里指定拥有该工厂的方法的类, 同时在 factory-method 属性里指定工厂方法的名称. 最后, 使用 <constrctor-arg> 元素为该方法传递方法参数.
public class StaticCarFactory {
    private  static Map<String,Car> cars=new HashMap<String, Car>();
    static {
        cars.put("1",new Car("奥迪",20000));
        cars.put("2",new Car("奥迪2",40000));
    }
    public static Car getCar(String name){
        return cars.get(name);
    }
}
    <!--
        class属性:指向静态工厂方法的全类名
        factory-method:指向静态工厂方法的名字
        constructor-arg:如果工厂方法需要传入参数,则使用constructor-arg来配置参数。
    -->
    <bean id="car1" class="com.guigu.spring.beans.StaticCarFactory" factory-method="getCar">
        <constructor-arg value="1"></constructor-arg>
    </bean>
main
        ClassPathXmlApplicationContext c = new ClassPathXmlApplicationContext("beans-factory.xml");
        Car car1 = (Car)c.getBean("car1");
        System.out.println(car1);
Car{name='奥迪', price=20000}
通过调用实例工厂方法创建 Bean
实例工厂方法: 将对象的创建过程封装到另外一个对象实例的方法里. 当客户端需要请求对象时, 只需要简单的调用该实例方法而不需要关心对象的创建细节.
要声明通过实例工厂方法创建的 Bean
在 bean 的 factory-bean 属性里指定拥有该工厂方法的 Bean
在 factory-method 属性里指定该工厂方法的名称
使用 construtor-arg 元素为工厂方法传递方法参数
public class InstanceCarFactory {
    private Map<String ,Car> cars=null;

    public InstanceCarFactory() {
        cars = new HashMap<String ,Car>();
        cars.put("1",new Car("奥迪",20000));
        cars.put("2",new Car("奥迪2",40000));
    }
    public Car getCar(String s){
        return cars.get(s);
    }
}
    <!--配置工厂的实例-->
    <bean id="carFactory" class="com.guigu.spring.beans.InstanceCarFactory"></bean>
    <!--
    factory-bean属性:指向实例工厂方法的bean
    factory-method:指向实例工厂方法的名字
    constructor-arg:如果工厂方法需要传入参数,则使用constructor-arg来配置参数。
    -->
    <bean id="car2" factory-bean="carFactory" factory-method="getCar">
        <constructor-arg value="2"></constructor-arg>
    </bean>
main
        ClassPathXmlApplicationContext c = new ClassPathXmlApplicationContext("beans-factory.xml");
        Car car2= (Car)c.getBean("car2");
        System.out.println(car2);

实现 FactoryBean 接口在 Spring IOC 容器中配置 Bean
Spring 中有两种类型的 Bean, 一种是普通Bean, 另一种是工厂Bean, 即FactoryBean.
工厂 Bean 跟普通Bean不同, 其返回的对象不是指定类的一个实例, 其返回的是该工厂 Bean 的 getObject 方法所返回的对象
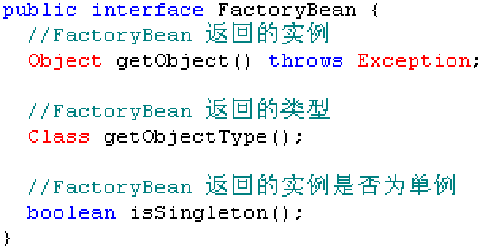
public class CarFactoryBean implements FactoryBean {
    private String brand;

    public void setBrand(String brand) {
        this.brand = brand;
    }

    @Override
    public Car getObject() throws Exception {
        return new Car(brand,20000);
    }

    @Override
    public Class<?> getObjectType() {
        return null;
    }
    public boolean isSingleton(){
        return true;
    }
}
    <!--
        通过FactoryBean来配置bean的实例
        class:指向FactoryBean的全类名
        property:配置FactoryBean的属性

        但实际返回的实例确是FactoryBean的 getObject() 方法返回的实例!
    -->
    <bean id="car" class="com.guigu.spring.beans.CarFactoryBean">
        <property name="brand" value="bmw"></property>
    </bean>
Car{name='bmw', price=20000}

之前的都是基于xml文件的方式。现在学习用注解。
组件扫描(component scanning): Spring 能够从 classpath 下自动扫描, 侦测和实例化具有特定注解的组件.
特定组件包括:
@Component: 基本注解, 标识了一个受 Spring 管理的组件
@Respository: 标识持久层组件
@Service: 标识服务层(业务层)组件
@Controller: 标识表现层组件
对于扫描到的组件, Spring 有默认的命名策略: 使用非限定类名, 第一个字母小写. 也可以在注解中通过 value 属性值标识组件的名称
当在组件类上使用了特定的注解之后, 还需要在 Spring 的配置文件中声明 <context:component-scan> :
base-package 属性指定一个需要扫描的基类包,Spring 容器将会扫描这个基类包里及其子包中的所有类.
当需要扫描多个包时, 可以使用逗号分隔.
如果仅希望扫描特定的类而非基包下的所有类,可使用 resource-pattern 属性过滤特定的类,示例:

使用idea用这个需要再导一个包,把这个包导入才可以使用<context:>。spring-aop-5.2.0.RELEASE.jar
<context:include-filter> 子节点表示要包含的目标类
<context:exclude-filter> 子节点表示要排除在外的目标类
<context:component-scan> 下可以拥有若干个 <context:include-filter> 和 <context:exclude-filter> 子节点
----------代码-------------

//基本注解
@Component
public class TestObject {
}
//标识表现层组件
@Controller
public class UserController {
}
//标识服务层(业务层)组件
@Service
public class UserService {
}
//标识持久层组件
@Repository("userRepository")
public class UserRepositoryImpl implements UserRepository{
}
<context:component-scan base-package="com.guigu.spring.annotation"></context:component-scan>
 //获得bean
 public static void main(String[] args) {
        ApplicationContext c = new ClassPathXmlApplicationContext("beans-annotation.xml");
        TestObject t = (TestObject) c.getBean("testObject");
        UserController u = (UserController) c.getBean("userController");
        UserRepositoryImpl u2 = (UserRepositoryImpl) c.getBean("userRepository");
        UserService u3 = (UserService) c.getBean("userService");

    }
上面是annotation包下的所有bean都可以获得。这个是指定controller包下的bean来获得。
    <context:component-scan base-package="com.guigu.spring.annotation"
    resource-pattern="controller/*.class"></context:component-scan>
两个子节点。
    <context:component-scan
        base-package="com.guigu.spring.annotation"
        use-default-filters="false">
        <!--1.除了注释为@Controller的类。-->
<!--        <context:exclude-filter type="annotation" expression="org.springframework.stereotype.Controller"/>-->
        <!--2.包括注释为@Controller的类。因为都在annotation包里,所以其他类也可以获取。
        为了测试效果,我们加上use-default-filters="false"这样annotation包里的bean都不能获取了-->
        <context:include-filter type="annotation" expression="org.springframework.stereotype.Controller"/>
    </context:component-scan>
<!--上面是根据注解,这里是根据类名,效果一样。-->
<context:exclude-filter type="assignable" expression="com.guigu.spring.annotation.controller.UserController"/>
<context:include-filter type="assignable" expression="com.guigu.spring.annotation.controller.UserController"/>
用注解来关联bean与bean
<context:component-scan> 元素还会自动注册 AutowiredAnnotationBeanPostProcessor 实例, 该实例可以自动装配具有 @Autowired 和 @Resource 、@Inject注解的属性.
使用 @Autowired 自动装配 Bean(自动去ioc容器里面找满足条件的bean)
@Autowired 注解自动装配具有兼容类型的单个 Bean属性
构造器, 普通字段(即使是非 public), 一切具有参数的方法都可以应用@Authwired 注解
默认情况下, 所有使用 @Authwired 注解的属性都需要被设置(在ioc容器里面). 当 Spring 找不到匹配的 Bean 装配属性时, 会抛出异常, 若某一属性允许不被设置, 可以设置 @Authwired 注解的 required 属性为 false
默认情况下, 当 IOC 容器里存在多个类型兼容的 Bean 时, 通过类型的自动装配将无法工作. 此时可以在 @Qualifier 注解里提供 Bean 的名称. Spring 允许对方法的入参标注 @Qualifiter 已指定注入 Bean 的名称
@Authwired 注解也可以应用在数组类型的属性上, 此时 Spring 将会把所有匹配的 Bean 进行自动装配.
@Authwired 注解也可以应用在集合属性上, 此时 Spring 读取该集合的类型信息, 然后自动装配所有与之兼容的 Bean.
@Authwired 注解用在 java.util.Map 上时, 若该 Map 的键值为 String, 那么 Spring 将自动装配与之 Map 值类型兼容的 Bean, 此时 Bean 的名称作为键值
--------代码,例子说明-------

在UserController类里调用UserService类里的方法,在UserService类里调用UserRepository接口的方法,两个实现类去实现UserRepository接口。
//标识表现层组件
@Controller
public class UserController {
    @Autowired//自动在ioc容器里装配下面的bean
    private UserService userService;
    public void execute(){
        System.out.println("UserController execute...");
        userService.add();
    }
}
//标识服务层(业务层)组件
@Service
public class UserService {
    @Autowired
    //当有两个实现类时如何装配?
    //方法一:在本类中声明的接口的名字与实现类里为注解起的名字一样。
    //声明UserRepository接口为userRepository;
    //实现类里注解名一样@Repository("userRepository")
    //方法二:用@Qualifier("里面写实现类的类名,首字母小写")
    @Qualifier("userRepositoryImpl")
    private UserRepository userRepository;

    public void add(){
        System.out.println("add....");
        userRepository.save();
    }
}
//标识持久层组件
//@Repository("userRepository")方法一
@Repository
public class UserRepositoryImpl implements UserRepository{
    @Override
    public void save() {
        System.out.println("UserRepositoryImpl save" );
    }
}
//标识持久层组件
//@Repository("userJdbc")方法一
    @Repository
public class UserJdbcImpl implements UserRepository{
    @Override
    public void save() {
        System.out.println("UserJdbcImpl save" );
    }
}
//main方法
ApplicationContext c = new ClassPathXmlApplicationContext("beans-annotation.xml");
UserController u = (UserController) c.getBean("userController");
u.execute();
//xml文件<context:component-scan base-package="com.guigu.spring.annotation"></context:component-scan>

Spring 4.x 中可以为子类注入子类对应的泛型类型的成员变量的引用

------代码,说明-------
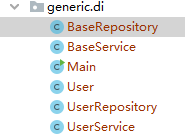
//@Repository
public class BaseRepository<T> {
}
--------------------------------------
//@Service
public class BaseService<T> {
    //为什么不在上面写注解?
    //因为那样注解也会被子类继承。无法在子类定义注解,就无法在ioc容器里获得子类bean
    //那样就不好测试效果了,所以我们把注解写在子类里,方便调用。
    //在idea里,上面不写注解,下面又写@Autowired会导致报红,不过不影响运行看效果。
    @Autowired
    private BaseRepository<T> repository;
    public void add(){
        System.out.println("add......");
        System.out.println(repository);
    }
}
--------------------------------------
public class User {
}
--------------------------------------
@Repository
public class UserRepository extends BaseRepository<User>{
    @Override
    public String toString() {
        return "UserRepository{}";
    }
}
--------------------------------------
@Service
public class UserService extends BaseService<User>{
}
--------------------------------------
public class Main {
    public static void main(String[] args) {
        ApplicationContext c=new ClassPathXmlApplicationContext("beans-generic-di.xml");
        UserService u=(UserService) c.getBean("userService");
        u.add();
    }
}
--------------------------------------
控制台打印:
add......
UserRepository{}

 浙公网安备 33010602011771号