
使用Spring Cloud搭建服务注册中心
作者: 江南一点雨 原文地址:https://mp.weixin.qq.com/s?__biz=MzI1NDY0MTkzNQ==&mid=2247483878&idx=1&sn=d49f2eb61bada3d34443a0a4017a7b72&scene=21#wechat_redirect
Spring Cloud也包含了许多个子项目,Eureka只是其中的一个子项目,Eureka的功能有点类似于我们之前写过的zookeeper,它是一个服务治理组件,包含了服务注册中心、服务注册与发现机制。
创建服务注册中心
创建一个普通的Spring Boot工程
首先我们需要创建一个普通的Spring Boot工程,命名为eureka-server,普通到什么程度呢?就是一个starter都不需要添加,创建成功之后就只引用了一个父starter。
添加Eureka依赖
工程创建成功之后,向pom.xml文件中添加eureka-server的依赖,目前eureka的稳定版本是Dalston.SR3,添加完依赖之后,pom.xml文件如下所示:
<?xml version="1.0" encoding="UTF-8"?>
<project xmlns="http://maven.apache.org/POM/4.0.0" xmlns:xsi="http://www.w3.org/2001/XMLSchema-instance"
    xsi:schemaLocation="http://maven.apache.org/POM/4.0.0 http://maven.apache.org/xsd/maven-4.0.0.xsd">
    <modelVersion>4.0.0</modelVersion>

    <groupId>org.sang</groupId>
    <artifactId>eureka-server</artifactId>
    <version>0.0.1-SNAPSHOT</version>
    <packaging>jar</packaging>

    <name>eureka-server</name>
    <description>Demo project for Spring Boot</description>

    <parent>
        <groupId>org.springframework.boot</groupId>
        <artifactId>spring-boot-starter-parent</artifactId>
        <version>1.5.6.RELEASE</version>
        <relativePath/> <!-- lookup parent from repository -->
    </parent>

    <properties>
        <project.build.sourceEncoding>UTF-8</project.build.sourceEncoding>
        <project.reporting.outputEncoding>UTF-8</project.reporting.outputEncoding>
        <java.version>1.8</java.version>
    </properties>

    <dependencies>
        <dependency>
            <groupId>org.springframework.boot</groupId>
            <artifactId>spring-boot-starter</artifactId>
        </dependency>

        <dependency>
            <groupId>org.springframework.cloud</groupId>
            <artifactId>spring-cloud-starter-eureka-server</artifactId>
        </dependency>

        <dependency>
            <groupId>org.springframework.boot</groupId>
            <artifactId>spring-boot-starter-test</artifactId>
            <scope>test</scope>
        </dependency>
    </dependencies>

    <dependencyManagement>
        <dependencies>
            <dependency>
                <groupId>org.springframework.cloud</groupId>
                <artifactId>spring-cloud-dependencies</artifactId>
                <version>Dalston.SR3</version>
                <type>pom</type>
                <scope>import</scope>
            </dependency>
        </dependencies>
    </dependencyManagement>
    <build>
        <plugins>
            <plugin>
                <groupId>org.springframework.boot</groupId>
                <artifactId>spring-boot-maven-plugin</artifactId>
            </plugin>
        </plugins>
    </build>
</project>
那么这里依赖的添加我主要参考了Eureka官网的 http://projects.spring.io/spring-cloud/。
启动一个服务注册中心
启动一个服务注册中心的方式很简单,就是在Spring Boot的入口类上添加一个@EnableEurekaServer注解,如下:


package com.zd.registerServer;

import org.springframework.boot.SpringApplication;
import org.springframework.boot.autoconfigure.SpringBootApplication;
import org.springframework.cloud.netflix.eureka.server.EnableEurekaServer;

@EnableEurekaServer
@SpringBootApplication
public class EurekaServerApplication {
    public static void main(String[] args) {
        SpringApplication.run(EurekaServerApplication.class, args);
    }
}
配置服务注册中心
最后我们再做一点简单的配置就可以了,配置就写在Spring Boot的配置文件application.properties中,写法如下:
server.port=1111
eureka.instance.hostname=localhost
eureka.client.register-with-eureka=false
eureka.client.fetch-registry=false
eureka.client.service-url.defaultZone=http://${eureka.instance.hostname}:${server.port}/eureka/
OK,那么关于这几行注释,我说如下几点:
1.server.port=1111表示设置该服务注册中心的端口号
2.eureka.instance.hostname=localhost表示设置该服务注册中心的hostname
3.eureka.client.register-with-eureka=false,由于我们目前创建的应用是一个服务注册中心,而不是普通的应用,默认情况下,这个应用会向注册中心(也是它自己)注册它自己,设置为false表示禁止这种默认行为
4.eureka.client.fetch-registry=false,表示不去检索其他的服务,因为服务注册中心本身的职责就是维护服务实例,它也不需要去检索其他服务
测试
OK,做完这一切之后,我们就可以启动这一个Spring Boot 服务,服务启动成功之后,在浏览器中输入:http://localhost:1111就能够看到如下页面:

OK,看到上面这个页面之后,表示你的服务注册中心已经搭建好了。
小结
我们之前专门有一篇博客介绍如何在Linux上安装zookeeper【Linux上安装Zookeeper以及一些注意事项】,但是对于Eureka却不存在这样的问题,因为Eureka中的服务注册中心实际上是一个Spring Boot工程,而Spring Boot工程我们知道可以直接打成一个jar包,然后java -jar命令就可以运行,不管Windows还是Linux上,运行方式都是一致的。
注册服务提供者
OK,那么现在服务注册中心有了之后,我们可以考虑向这个服务注册中心注册一个服务提供者了。
创建一个新的Spring Boot工程
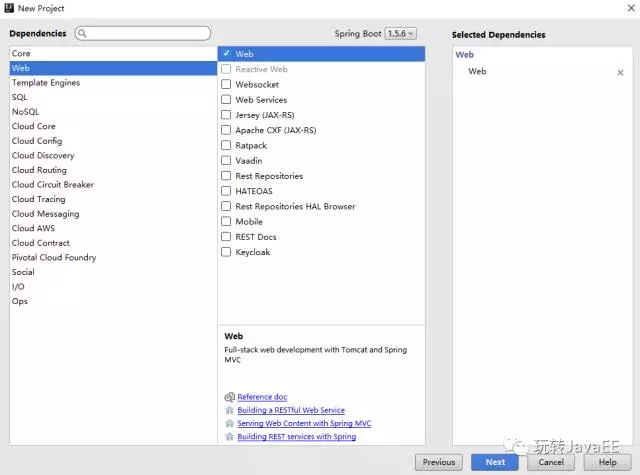
还是创建一个Spring Boot工程,这次创建比之前创建多一个步骤,在创建的时候选中web的starter,我们来创建一个web工程,在IntelliJ IDEA中创建的时候选中web,如下:
添加Eureka依赖
在创建好的工程中,我们需要添加Eureka依赖,添加方式如下:
<?xml version="1.0" encoding="UTF-8"?>
<project xmlns="http://maven.apache.org/POM/4.0.0" xmlns:xsi="http://www.w3.org/2001/XMLSchema-instance"
    xsi:schemaLocation="http://maven.apache.org/POM/4.0.0 http://maven.apache.org/xsd/maven-4.0.0.xsd">
    <modelVersion>4.0.0</modelVersion>
    <groupId>org.sang</groupId>
    <artifactId>provider</artifactId>
    <version>0.0.1-SNAPSHOT</version>
    <packaging>jar</packaging>
    <name>provider</name>
    <description>Demo project for Spring Boot</description>
    <parent>
        <groupId>org.springframework.boot</groupId>
        <artifactId>spring-boot-starter-parent</artifactId>
        <version>1.5.6.RELEASE</version>
        <relativePath/> <!-- lookup parent from repository -->
    </parent>
    <properties>
        <project.build.sourceEncoding>UTF-8</project.build.sourceEncoding>
        <project.reporting.outputEncoding>UTF-8</project.reporting.outputEncoding>
        <java.version>1.8</java.version>
    </properties>
    <dependencies>
        <dependency>
            <groupId>org.springframework.boot</groupId>
            <artifactId>spring-boot-starter-web</artifactId>
        </dependency>
        <dependency>
            <groupId>org.springframework.boot</groupId>
            <artifactId>spring-boot-starter-test</artifactId>
            <scope>test</scope>
        </dependency>
        <dependency>
            <groupId>org.springframework.cloud</groupId>
            <artifactId>spring-cloud-starter-eureka</artifactId>
        </dependency>
    </dependencies>
    <dependencyManagement>
        <dependencies>
            <dependency>
                <groupId>org.springframework.cloud</groupId>
                <artifactId>spring-cloud-dependencies</artifactId>
                <version>Dalston.SR3</version>
                <type>pom</type>
                <scope>import</scope>
            </dependency>
        </dependencies>
    </dependencyManagement>
    <build>
        <plugins>
            <plugin>
                <groupId>org.springframework.boot</groupId>
                <artifactId>spring-boot-maven-plugin</artifactId>
            </plugin>
        </plugins>
    </build>
</project>
创建应用的入口
这是一个web工程,所以我们添加一个Controller,在该Controller中提供一个访问入口,如下:
package org.zd;

import org.apache.log4j.Logger;
import org.springframework.beans.factory.annotation.Autowired;
import org.springframework.cloud.client.ServiceInstance;
import org.springframework.cloud.client.discovery.DiscoveryClient;
import org.springframework.web.bind.annotation.RequestMapping;
import org.springframework.web.bind.annotation.RequestMethod;
import org.springframework.web.bind.annotation.RestController;
import java.util.List;

/**
 * Created by sang on 2017/9/2.
 */
@RestController
public class HelloController {
    private final Logger logger = Logger.getLogger(getClass());
    @Autowired
    private DiscoveryClient client;

    @RequestMapping(value = "/hello", method = RequestMethod.GET)
    public String index() {
        List<ServiceInstance> instances = client.getInstances("hello-service");
        for (int i = 0; i < instances.size(); i++) {
            logger.info("/hello,host:" + instances.get(i).getHost() + ",service_id:" + instances.get(i).getServiceId());
        }
        return "Hello World";
    }
}
这里创建服务之后,在日志中将服务相关的信息打印出来。
激活Eureka中的DiscoveryClient
在Spring Boot的入口函数处,通过添加@EnableDiscoveryClient注解来激活Eureka中的DiscoveryClient实现(因为我们在HelloController中注入了DiscoveryClient)。
package org.zd;

import org.springframework.boot.SpringApplication;
import org.springframework.boot.autoconfigure.SpringBootApplication;
import org.springframework.cloud.client.discovery.EnableDiscoveryClient;

@EnableDiscoveryClient
@SpringBootApplication
public class ProviderApplication {

    public static void main(String[] args) {
        SpringApplication.run(ProviderApplication.class, args);
    }
}
配置服务名称和注册中心地址
最后的最后,我们在application.properties文件中配置一下服务名和注册中心地址即可,如下:
spring.application.name=hello-service
eureka.client.service-url.defaultZone=http://localhost:1111/eureka
这两行代码的含义很简单,我就不多说了。
测试
做完这一切之后,我们就可以来测试了,直接运行这个Spring Boot工程,运行成功之后,我们刷新刚才的http://localhost:1111,就可以看到有一个服务已经注册成功了。如下: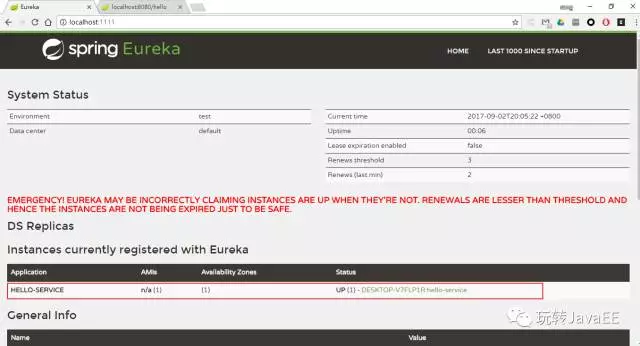
同时,我们查看这个服务提供者运行日志,也可以看到服务的信息,如下:

小结
OK,如此之后,我们一个服务注册中心就搭建成功了,同时也有一个服务提供者成功的注册了。但是这样还有一个小问题,那就是我们这里是一个单节点的服务注册中心,一旦发生了故障整个服务就瘫痪了,所以在实际应用中,我们需要搭建高可用注册中心,那么关于高可用注册中心如何搭建的问题,我们将在下篇文章中来介绍。
本文案例地址:https://github.com/lenve/SimpleSpringCloud

 浙公网安备 33010602011771号