
FreeSWITCH 入门
教程
wiki : https://freeswitch.org/confluence/display/FREESWITCH/FreeSWITCH+Explained
You can provide FreeSWITCH with your own directory (dynamically generated by a webserver). This is done by using the mod_xml_curl module. For additional information, look here: mod_xml_curl
推荐:
https://blog.csdn.net/u011745859/article/details/81941674
安装
Ubuntu安装:
https://www.cnblogs.com/zhuminghui/p/10980406.html
win10 安装Freeswitch
下载地址:http://files.freeswitch.org/windows/installer/
详细请看:
作者:graceup 来源:CSDN
原文:https://blog.csdn.net/graceup/article/details/79485976
多租户
conf/sip_profiles/internal.xml 和 conf/sip_profiles/external.xml
默认配置中,下述参数是生效的,不管你的Domain怎么配置,都让他强制成了默认的Domain。因此注释掉,此时我们的客户端注册不上了。
    <!--all inbound reg will look in this domain for the users -->
    <param name="force-register-domain" value="$${domain}"/>
    <!--force the domain in subscriptions to this value -->
    <param name="force-subscription-domain" value="$${domain}"/>
    <!--all inbound reg will stored in the db using this domain -->
    <param name="force-register-db-domain" value="$${domain}"/>
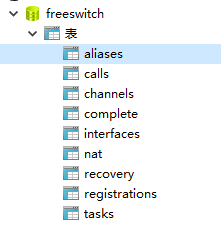
freeswitch使用mysql数据库
环境:win10
1、window odbc下载地址:https://dev.mysql.com/downloads/connector/odbc/
2、mysql建立一个表名freeswitch
3、windows进控制面板->管理工具->数据源ODBC

4、创建用户DSN 连接mysql freeswitch库
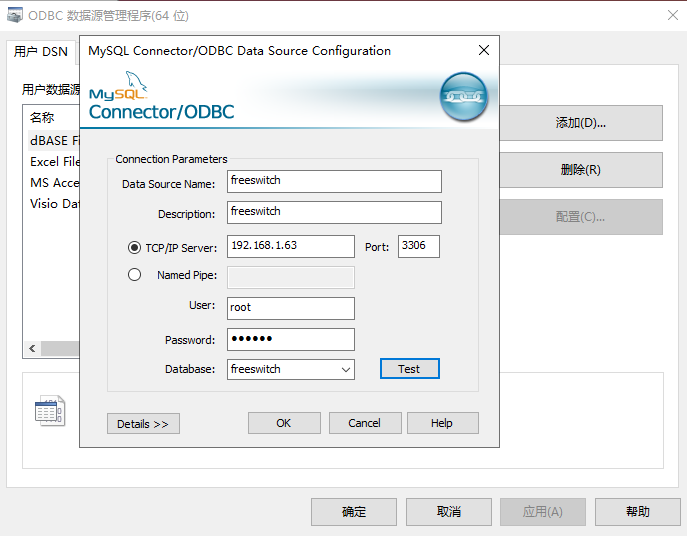
5、修改conf\autoload_configs\switch.conf.xml下的
<param name=”core-db-dsn” value=”freeswitch(数据库名):root(数据库用户):’(数据库密码)’ />
6、重启下FS,自动在数据内生成表
JSsip入门
作者:爱清清 来源:CSDN
原文:https://blog.csdn.net/ErErFei/article/details/78873660
// Create our JsSIP instance and run it
/**
* 创建websocket连接,连接地址最好是wss,本地测试可以使用ws,
* 如果信令服务使用FreeSWITCH,那么websocket连接地址如下:
* ws://FreeSWITCH所在服务器IP:5066 或
* wss://FreeSWITCH所在服务器IP:7443
*/
var socket = new JsSIP.WebSocketInterface('wss://sip.myhost.com');

/**
* User Agent配置参数,sockets表示信令服务器的连接集合,即可以
* 注册多个信令服务器;uri即注册用户的SIP地址,password为连接密
* 码;常用的参数还有register(true/false)表示是否直接注册;
* no_answer_timeout无应答超时时间等。具体的可参考:
* http://www.jssip.net/documentation/3.0.x/api/ua_configuration_parameters/
*/
var configuration = {
  sockets  : [ socket ],
  uri      : 'sip:alice@example.com',
  password : 'superpassword'
};

//使用上述配置创建User Agent
var ua = new JsSIP.UA(configuration);

/**
* 连接到信令服务器,如果是之前停止则恢复到停止之前的状态,如果是刷新操作‘’
* 而且configuration的register参数设置为true则直接注册到信令服务器
*/
ua.start();

// 注册监听事件监听各个连接状态
var eventHandlers = {
  'progress': function(e) {
    console.log('call is in progress');
  },
  'failed': function(e) {
    console.log('call failed with cause: '+ e.data.cause);
  },
  'ended': function(e) {
    console.log('call ended with cause: '+ e.data.cause);
  },
  'confirmed': function(e) {
    console.log('call confirmed');
  }
};

/**
* 拨打参数配置,eventHandlers是注册事件监听的回调;mediaConstraints
* 是多媒体配置,详细配置可以参考:https://developer.mozilla.org/en-US/docs/Web/API/MediaDevices/getUserMedia;
* pcConfig可以配置ICE服务器地址,适用于需要穿透的网络环境
*/
var options = {
  'eventHandlers'    : eventHandlers,
  'mediaConstraints' : { 'audio': true, 'video': true },
  'pcConfig': {
    'iceServers': [
      { 'urls': ['stun:a.example.com', 'stun:b.example.com'] },
      { 'urls': 'turn:example.com', 'username': 'foo', 'credential': ' 1234' }
    ]
  }
};

// 拨打音视频电话给'sip:bob@example.com'
var session = ua.call('sip:bob@example.com', options);
常用命令:
#列出internal SIP Profile的状态
sofia status profile internal

#列出某个Profile上所有已注册用户
sofia status profile internal reg

#过滤某些符合条件
sofia status profile internal reg 1000
sofia status profile internal user 1000

#列出网关状态
sofia status gateway gw1

#以上命令都可以将status用xmlstatus来代替,以列出XML格式的状态,这样比较容易用于其他程序解析

#启动、停止、重启某个Profile的命令
sofia profile internal start #启动
sofia profile internal stop #停止
sofia profile internal restart #重启

#有时候修改了某个Profile的某个参数,不需要重启(重启是影响通话的),可以使用下列命令让FreeSWITCH重读sofia的配置
#注意并不是所有的参数都能生效
sofia profile internal rescan

#添加了一个新的gateway以后,也可以使用rescan指令读取
sofia profile external rescan

#如果是修改了一个网关,则可以先删除该网关,再rescan
sofia profile external killgw gw1
sofia profile external rescan

#下列命令可以指定某个网关立即向外注册或注销
sofia profile external register gw1
sofia profile external unregister

#开启该Profile的SIP跟踪功能抓SIP包
sofia profile internal siptrace on

#有时候,希望将已经注册的用户清理掉,可以使用如下命令,注意此命令只是临时清理,客户端重新注册的话还是可以注册成功的
sofia profile internal flush_inbound_reg 1000@192.168.1.7

#也可以根据call-id来清理
sofia profile internal reg 1000 #通过此命令查找到call-id的值
sofia profile flush_inbound_reg zsfsdfhdfgdfsdfsdfsdfsdf #清楚call-id=zsfsdfhdfgdfsdfsdfsdfsdf的用户
抓包及debug
1、抓包
#在是用sofia命令和siptrace子命令进行抓包时,用户经常搞不清该对那个Profile进行抓包,通过如下global参数使命令对所有
#Profile都有效
sofia global siptrace on #开启
sofia global siptrace off #关闭

sofia global capture on
sofia global capture off
2、debug
有时候可能是协议栈更底层的原因引起的问题,由于收到或者发送非法的消息会导致协议栈出错,这可能会使消息丢弃,当然也可能是协议层的bug,在这种情况即使开启了详细的FreeSWITCH日志以及SIP跟踪也查找不到问题的原因,这个时候可以使用如下命令打开更低级别的调试器
#如下,将开启详细的sofia sip底层调试信息,在控制台上打印日志,其中日志级别为0~9
sofia loglevel all 9

#如果你对sofia比较熟悉,也可以开启相关模块的日志,如下仅开启nua的调试信息
sofia loglevel nua 9

#loglevel的其他参数可以在sofia的命令帮助中找到

#在默认情况下sofia的日志是console级别的,它会直接打印到相关信息控制台,而不会写到日志文件中(log/freeswitch.log)
#如果需要将这些日志也写入日志文件中,可以为这些日志制定一个级别,如下分别将sofia的日志映射到debug和notice级别
sofia tracelevel debug
sofia tracelevel notice

sofia loglevel all 0 #最后可以使用此命令关闭调试
freeswitch ##启动,带日志输出
freeswitch -nc ##后台启动
/exit ##退出fs_cli
shutdown ##关闭freeswitch
./fs_cli ##启动日志窗口
sofia status profile internal reg ##显示注册用户
# freeswitch 查看当前注册用户命令
sofia status profile internal reg
sofia profile internal siptrace on # sip呼叫流程 详细:https://www.jianshu.com/p/c8bc9a89fd18
- version ,显示版本
- show codecs ,显示编解码器
- sofia status profile internal ,查看
- shutdown ,退出
- help ,显示帮助
4、链接启动方式
默认的安装位置在/usr/local/freeswitch上,如果不做链接,我们要启动bin文件下的命令时,只能cd到此目录下或者以完整路径名来执行,我们为了方便,进行链接后可以在随意目录下执行,系统会自动去搜寻相关文件来执行命令,配置命令如下:
ln -sf /usr/local/freeswitch/bin/freeswitch /usr/bin/
ln -sf /usr/local/freeswitch/bin/fs_cli /usr/bin/
接下来就可以启动freeswitch了,常用命令有:
测试
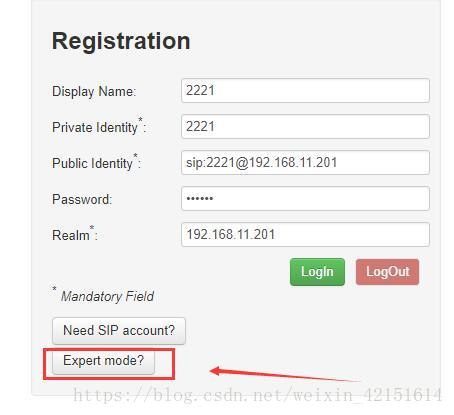
sipML5+asterisk 14,基于websocket通话
sipml5 下载地址:https://github.com/DoubangoTelecom/sipml5
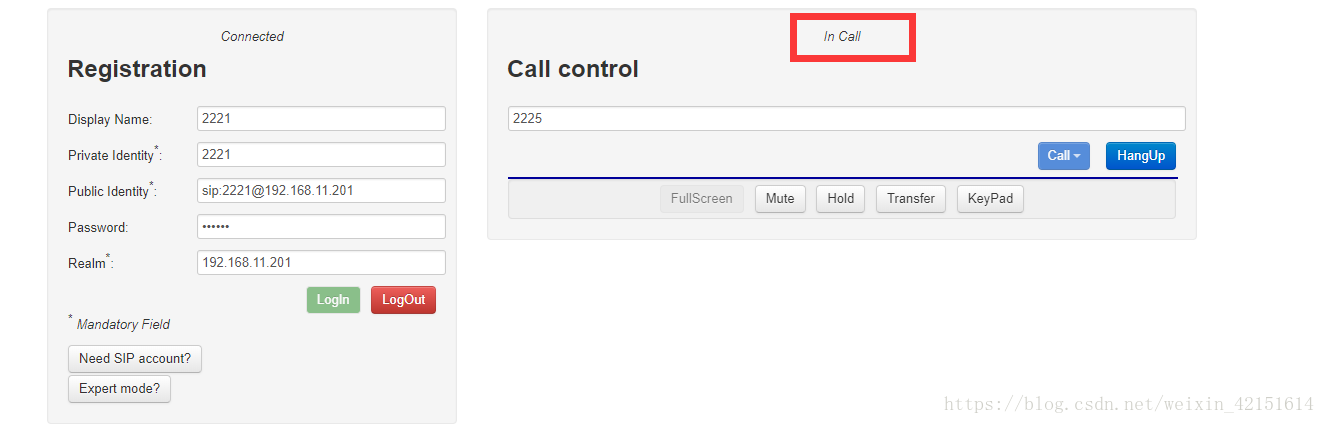
下载完成后建议直接解压到桌面上,找到call.htm,直接把它拖到chrome浏览器中打开,这里建议使用谷歌浏览器或者火狐,其他的就不要用了,打开后是如下界面 ,按照你刚刚在sip.conf中配置分机号,按照以下格式换成你自己的,

然后再点击Expert mode?

点击Login登录,应该会出现
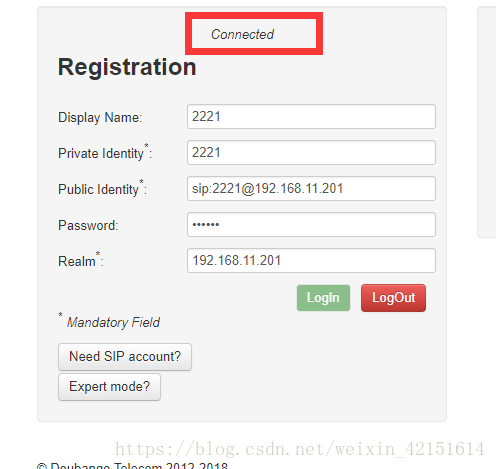
此时asterik的控制台应该会有日志输出
在使用浏览器打开一个call.htm,然后再输入另外一个sip,conf分机号,登录
拨号,此时左上角会提示是否允许麦克风,点允许,出现in call说明通话已经建立
asterisk控制台输出信息
---------------------
作者:weixin_42151614
来源:CSDN
原文:https://blog.csdn.net/weixin_42151614/article/details/82592095
JSsip + X-lite测试
详细请看:
作者:tanyo-tangyu 来源:CSDN
原文:https://blog.csdn.net/qq_16121827/article/details/80381745
环境 Google浏览器
JSsip 官网:https://jssip.net/documentation/3.0.x/getting_started/
X- lite 下载地址 :http://counterpath.s3.amazonaws.com/downloads/X-Lite_5.2.0_90534.exe
连接SIP电话
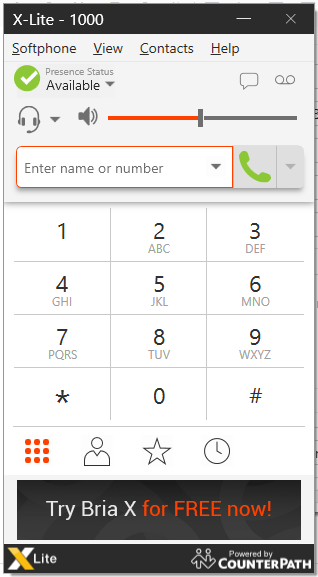
1:下载软电话:X-Lite 下载地址
2:软电话配置
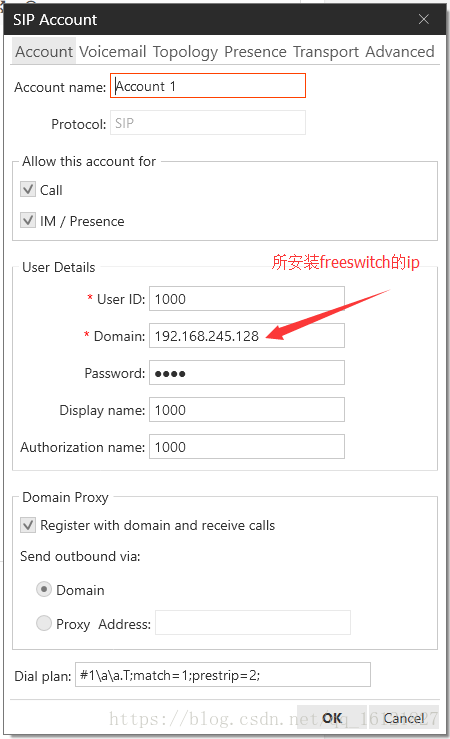
注册成功
3:在使用软电话时注意需要关闭服务器的防火墙
输入9664可以听到保持音乐,如果听不到,在控制台看有没有错误提示,如有“File Net Found”之类的提示,多半是没有安装声音文件,进入FreeSWITCH源码目录执行
make hd-sounds-install && make hd-moh-install && make samples
前端代码


<!DOCTYPE html>
<html>
<head>
  <title>JsSIP + WebRTC + freeSWITCH</title>
  <meta http-equiv="Content-Type" content="text/html; charset=utf-8" />
  <meta name="Author" content="foruok" />
  <meta name="description" content="JsSIP based example web application." />
  <script src="jssip-3.0.13.min.js" type="text/javascript"></script>
  <style type="text/css">
  </style>
</head>


<body>

  <div id="login-page" style="width: 424px; height: 260px; background-color: #f2f4f4; border: 1px solid grey; padding-top: 4px">
    <table border="0" frame="void" width="418px">
      <tr>
        <td class="td_label" width="160px" align="right"><label for="sip_uri">SIP URI:</label></td>
        <td width="258px"><input style="width:250px" id="sip_uri" type="text" placeholder="SIP URI (i.e: sip:alice@example.com)"/></td>
      </tr>
      <tr>
        <td class="td_label"  align="right"><label for="sip_password">SIP Password:</label></td>
        <td><input style="width:250px" id="sip_password" type="password" placeholder="SIP password"/></td>
      </tr>
      <tr>
        <td class="td_label" align="right"><label for="ws_uri">WSS URI:</label></td>
        <td><input style="width:250px" id="ws_uri" class="last unset" type="text" placeholder="WSS URI (i.e: wss://example.com)"/></td>
      </tr>
      <tr>
        <td class="td_label"  align="right"><label class="input_label" for="sip_phone_number">SIP Phone Info:</label></td>
        <td><input style="width:250px" id="sip_phone_number" type="text" placeholder="sip:3000@192.168.40.96:5060"></td>
      </tr>
      <tr>
        <td colspan="2" align="center"><button onclick="testStart()"> Initialize </button></td>
      </tr>
      <tr>
        <td colspan="2" align="center"><button onclick="testCall()"> Call </button></td>
      </tr>
      <tr>
        <td  colspan="2" align="center"><button onclick="captureLocalMedia()"> Capture Local Media</button></td>
      </tr>
    </table>
  </div>

  <div style="width: 424px; height: 324px;background-color: #333333; border: 2px solid blue; padding:0px; margin-top: 4px;">
        <video id="videoView" width="420px" height="320px" autoplay ></video>
  </div>

</body>
  <script type="text/javascript">
    var outgoingSession = null;
    var incomingSession = null;
    var currentSession = null;
    var videoView = document.getElementById('videoView');

    var constraints = {
      audio: true,
      video: true,
      mandatory: {
        maxWidth: 640,
        maxHeight: 360
      }
    };
    URL = window.URL || window.webkitURL;

    var localStream = null;
    var userAgent = null;

    function gotLocalMedia(stream) {
      console.info('Received local media stream');
      localStream = stream;
      videoView.src = URL.createObjectURL(stream);
    }

    function captureLocalMedia() {
      console.info('Requesting local video & audio');
      navigator.webkitGetUserMedia(constraints, gotLocalMedia, function(e){
        alert('getUserMedia() error: ' + e.name);
      });
    }

    function testStart(){

      var sip_uri_ = document.getElementById("sip_uri").value.toString();
      var sip_password_ = document.getElementById("sip_password").value.toString();
      var ws_uri_ = document.getElementById("ws_uri").value.toString();

      console.info("get input info: sip_uri = ", sip_uri_, " sip_password = ", sip_password_, " ws_uri = ", ws_uri_);

      var socket = new JsSIP.WebSocketInterface(ws_uri_);
      var configuration = {
        sockets: [ socket ],
        outbound_proxy_set: ws_uri_,
        uri: sip_uri_,
        password: sip_password_,
        register: true,
        session_timers: false
      };

      userAgent = new JsSIP.UA(configuration);

      userAgent.on('registered', function(data){
        console.info("registered: ", data.response.status_code, ",", data.response.reason_phrase);
      });

      userAgent.on('registrationFailed', function(data){
        console.log("registrationFailed, ", data);
        //console.warn("registrationFailed, ", data.response.status_code, ",", data.response.reason_phrase, " cause - ", data.cause);
      });

      userAgent.on('registrationExpiring', function(){
        console.warn("registrationExpiring");
      });

      userAgent.on('newRTCSession', function(data){
        console.info('onNewRTCSession: ', data);
        if(data.originator == 'remote'){ //incoming call
          console.info("incomingSession, answer the call");
          incomingSession = data.session;
          data.session.answer({'mediaConstraints' : { 'audio': true, 'video': true,       mandatory: { maxWidth: 640, maxHeight: 360 } }, 'mediaStream': localStream});
        }else{
          console.info("outgoingSession");
          outgoingSession = data.session;
          outgoingSession.on('connecting', function(data){
            console.info('onConnecting - ', data.request);
            currentSession = outgoingSession;
            outgoingSession = null;
          });
        }
          data.session.on('accepted', function(data){
            console.info('onAccepted - ', data);
            if(data.originator == 'remote' && currentSession == null){
              currentSession = incomingSession;
              incomingSession = null;
              console.info("setCurrentSession - ", currentSession);
            }
          });
          data.session.on('confirmed', function(data){
            console.info('onConfirmed - ', data);
            if(data.originator == 'remote' && currentSession == null){
              currentSession = incomingSession;
              incomingSession = null;
              console.info("setCurrentSession - ", currentSession);
            }
          });
        data.session.on('sdp', function(data){
          console.info('onSDP, type - ', data.type, ' sdp - ', data.sdp);
          //data.sdp = data.sdp.replace('UDP/TLS/RTP/SAVPF', 'RTP/SAVPF');
          //console.info('onSDP, changed sdp - ', data.sdp);
        });
        data.session.on('progress', function(data){
          console.info('onProgress - ', data.originator);
          if(data.originator == 'remote'){
            console.info('onProgress, response - ', data.response);
          }
        });
        data.session.on('peerconnection', function(data){
          console.info('onPeerconnection - ', data.peerconnection);
          data.peerconnection.onaddstream = function(ev){
              console.info('onaddstream from remote - ', ev);
              videoView.src = URL.createObjectURL(ev.stream);
          };
        });
      });

      userAgent.on('newMessage', function(data){
        if(data.originator == 'local'){
          console.info('onNewMessage , OutgoingRequest - ', data.request);
        }else{
          console.info('onNewMessage , IncomingRequest - ', data.request);
        }
      });

      console.info("call register");
      userAgent.start();
    }

    // Register callbacks to desired call events
    var eventHandlers = {
      'progress': function(e) {
          console.log('call is in progress');
        },
      'failed': function(e) {
          console.log('call failed: ', e);
      },
      'ended': function(e) {
          console.log('call ended : ', e);
      },
      'confirmed': function(e) {
        console.log('call confirmed');
      }
    };

    function testCall(){
      var sip_phone_number_ = document.getElementById("sip_phone_number").value.toString();

      var options = {
        'eventHandlers'    : eventHandlers,
        'mediaConstraints' : { 'audio': true, 'video': true ,
                               mandatory: { maxWidth: 640, maxHeight: 360 }
          },
        'mediaStream': localStream
      };

      //outgoingSession = userAgent.call('sip:3000@192.168.40.96:5060', options);
      outgoingSession = userAgent.call(sip_phone_number_, options);
    }
  </script>
</html>
本次测试 jssip 呼叫 X-lite
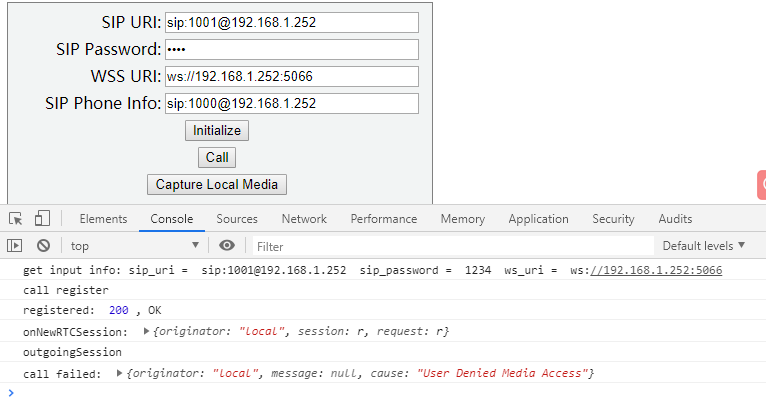
initialize: 注册成功,呼叫失败,用户拒绝媒体访问
https://groups.google.com/forum/#!topic/jssip/wU0Vr_fAH00
开始---设置---麦克风

X-lite 呼叫 jssip , 测试通过
问题:
google问题讨论组
https://groups.google.com/forum/#!topic/jssip/wU0Vr_fAH00
未知用户注册时,后台没有记录
如:2019-07-05 11:35:42.773446 [WARNING] sofia_reg.c:2906 Can't find user [80002@192.168.1.252] from 192.168.1.252
You must define a domain called '192.168.1.252' in your directory and add a user with the id="80002" attribute
and you must configure your device to use the proper domain in it's authentication credentials.
解决方案:在window环境中,freeswitch控制台中,按几次回车键
海康报警盒DS_PEA01_F填写SIP服务器,Freeswitch没有任何反应
有可能是以前的错误配置导致的,初始化设备后重新配置
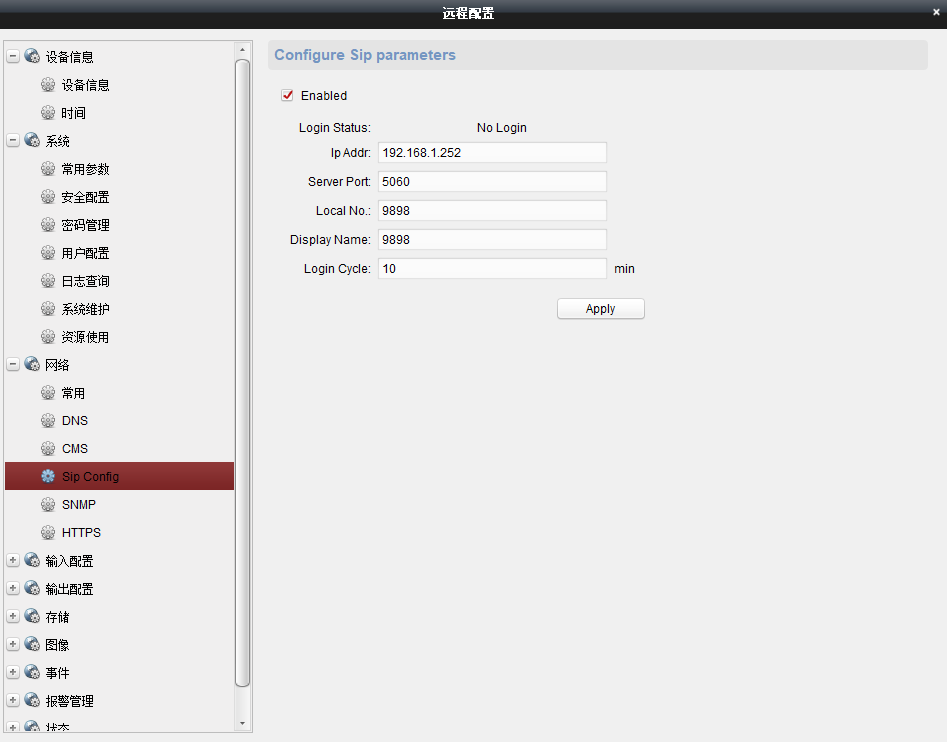
2019-07-05 19:13:14.813499 [WARNING] sofia_presence.c:221 Not sending to local box for sipCmd@192.168.1.252
2019-07-05 19:13:14.813499 [ERR] sofia_presence.c:272 Chat proto [sip]
from [<sip:9898@192.168.1.196>;tag=341488872]
to [sipCmd@192.168.1.252]
<videoIntercomMsg>
...
</videoIntercomMsg>
Nobody to send to: Profile internal
解决方案:添加一个sipCmd用户
可以参考:https://groups.google.com/forum/#!topic/sip_js/RWrwKclU00c
Freeswitch 1.6 fails to install on Ubuntu 16.04
没解决:问题介绍地址:https://freeswitch.org/jira/si/jira.issueviews:issue-html/FS-10819/FS-10819.html
freeswitch: NET::ERR_CERT_AUTHORITY_INVALID
How use sipML5 in freeswitch - Media stream permission denied
you need to use secure transport HTTPS for webrtc communication, when you publish your webphone on domain or ip. (it is not required when you use localhost.)
JSsip原因表
https://jssip.net/documentation/0.2.x/api/causes/
403 Forbidden(Invalid domain in From: header
https://www.cnblogs.com/yoyotl/p/6552891.html
404 Not found
原因:freeswtich没有启动或者端口被占用,总之X-lite不能到达指定domain
解决方法:
确保freeswitch已经启动并且5060端口没被占用
#freeswitch/bin/freeswitch -nc
#netstat -napl | grep 5060
输出
tcp 0 0 ip_address:5060 0.0.0.0:* LISTEN 3056/freeswitch // ipv4 监听
tcp6 0 0 ::1:5060 :::* LISTEN 3056/freeswitch // ipv6监听
再重试X-lite SIP注册
403 forbidden
用户名密码错误
原因:freeswitch一开始安装好 默认会给你配置好20个account (1000-1019),密码统一是1234,这个可以在freeswitch/conf/vars.xml里面修改
解决方法:
检查用户名密码是否错误
408 timeout
连接超时
原因:X-lite上配置的domain不正确, 或者网络有问题
解决方法:
a、确保所填的domain是正确的ip地址
b、确保已经关闭防火墙(Ubuntu下)
#ufw disable
#ufw status
输出:状态 不活动 //说明防火墙已经关闭
c、查看iptables
freeswitch官方文档:https://freeswitch.org/confluence/display/FREESWITCH/Client+and+Developer+Interfaces
推荐CSDN :https://blog.csdn.net/ErErFei/article/details/78873660
freeswitch下载地址:http://files.freeswitch.org/windows/installer/
FreeSWITCH默认号码
默认号码及说明
号码 说明
9664 保持音乐
9191 注册ClueCon
9192 在log中显示Channel
9195 echo,回音测试,延迟5秒
9196 echo,回音测试
9197 milliwatte extension, 铃音生成
9198 TGML 铃音生成实例
9180 铃音测试,使用远端生成的回铃音
9181 铃音测试,产生英式铃音
9182 铃音测试。使用音乐当铃音,彩铃
9183 先应答,然后发送英式彩铃
9184 先应答,然后发送音乐彩铃
9178 发传真
9179 收传真
5000 实例IVR
4000 听取语音信箱
33xx 电话会议,48kHz(其中xx可为00~99,下同)
32xx 电话会议,32kHz
31xx 电话会议,16kHz
30xx 电话会议,8kHz
2000-2002 呼叫组
1000-1019 默认分机号(密码默认为1234)
参考地址:
FreeSWITCH学习第一课(安装和测试):https://blog.csdn.net/qq_16121827/article/details/80381745
基于freeSWITCH的sip协议利用WebRTC 实现实时视频聊天:https://blog.csdn.net/graceup/article/details/79485976
参考:https://asterisk-pbx.ru/wiki/artikle/webrtc_freeswitch

 浙公网安备 33010602011771号