

springboot基本用法
1. 四、SpringBoot的配置文件
4.1 SpringBoot配置文件类型
4.1.1 SpringBoot配置文件类型和作用
SpringBoot是基于约定的,所以很多配置都有默认值,但如果想使用自己的配置替换默认配置的话,就可以使用 application.properties或者application.yml(application.yaml)进行配置。
SpringBoot默认会从Resources目录下加载application.properties或application.yml(application.yaml)文件
其中,application.properties文件是键值对类型的文件,之前一直在使用,所以此处不在对properties文件的格式 进行阐述。除了properties文件外,SpringBoot还可以使用yml文件进行配置,下面对yml文件进行讲解。
4.1.2 application.yml配置文件
4.1.2.1 yml配置文件简介
YML文件格式是YAML (YAML Aint Markup Language)编写的文件格式,YAML是一种直观的能够被电脑识别的的数 据数据序列化格式,并且容易被人类阅读,容易和脚本语言交互的,可以被支持YAML库的不同的编程语言程序导 入,比如: C/C++, Ruby, Python, Java, Perl, C#, PHP等。YML文件是以数据为核心的,比传统的xml方式更加简 洁。
YML文件的扩展名可以使用.yml或者.yaml。
4.1.2.2 yml配置文件的语法
4.1.2.2.1 配置普通数据 语法: key: value
示例代码:

注意:value之前有一个空格
4.1.2.2.2 配置对象数据 语法:
key:
key1: value1 key2: value2
或者:
key: {key1: value1,key2: value2}
示例代码:
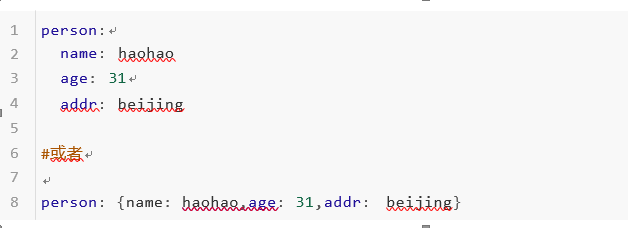
注意:key1前面的空格个数不限定,在yml语法中,相同缩进代表同一个级别
4.1.2.2.2配置Map数据同上面的对象写法
4.1.2.2.3 配置数组(List、Set)数据
语法:
key:
- value1
- value2
或者:
key: [value1,value2]
示例代码:
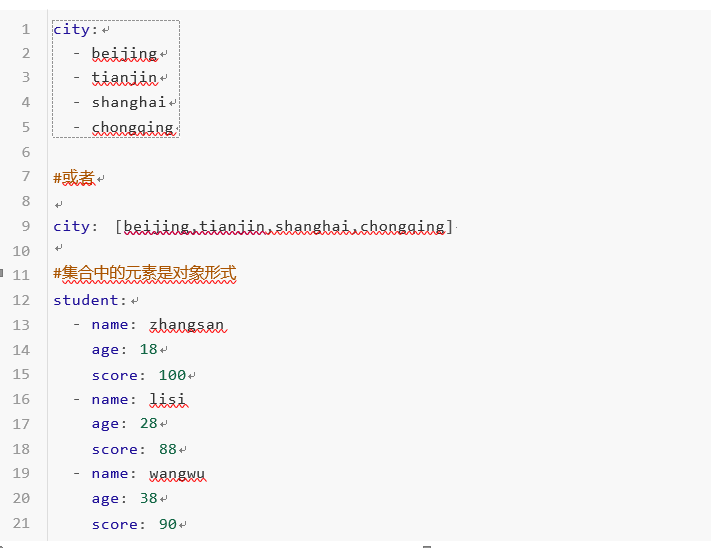
注意:value1与之间的 - 之间存在一个空格
4.1.3 SpringBoot配置信息的查询
上面提及过,SpringBoot的配置文件,主要的目的就是对配置信息进行修改的,但在配置时的key从哪里去查询 呢?我们可以查阅SpringBoot的官方文档
常用的配置摘抄如下:
|
1 |
# QUARTZ SCHEDULER (QuartzProperties) |
|
2 |
spring.quartz.jdbc.initialize-schema=embedded # Database schema initialization mode. |
|
3 |
spring.quartz.jdbc.schema=classpath:org/quartz/impl/jdbcjobstore/tables_@@platform@@. |
|
|
sql # Path to the SQL file to use to initialize the database schema. |
|
4 |
spring.quartz.job-store-type=memory # Quartz job store type. |
|
5 |
spring.quartz.properties.*= # Additional Quartz Scheduler properties. |
|
6 |
|
|
7 |
# ---------------------------------------- |
|
8 |
# WEB PROPERTIES |
|
9 |
# ---------------------------------------- |
|
10 |
|
|
11 |
# EMBEDDED SERVER CONFIGURATION (ServerProperties) |
|
12 |
server.port=8080 # Server HTTP port. |
|
13 |
server.servlet.context-path= # Context path of the application. |
|
14 |
server.servlet.path=/ # Path of the main dispatcher servlet. |
|
15 |
|
|
16 |
# HTTP encoding (HttpEncodingProperties) |
|
17 |
spring.http.encoding.charset=UTF-8 # Charset of HTTP requests and responses. Added to |
|
|
the "Content-Type" header if not set explicitly. |
|
18 |
|
|
19 |
# JACKSON (JacksonProperties) |
|
20 |
spring.jackson.date-format= # Date format string or a fully-qualified date format |
|
|
class name. For instance, `yyyy-MM-dd HH:mm:ss`. |
|
21 |
|
|
22 |
# SPRING MVC (WebMvcProperties) |
|
23 |
spring.mvc.servlet.load-on-startup=-1 # Load on startup priority of the dispatcher |
|
|
servlet. |
|
24 |
spring.mvc.static-path-pattern=/** # Path pattern used for static resources. |
|
25 |
spring.mvc.view.prefix= # Spring MVC view prefix. |
|
26 |
spring.mvc.view.suffix= # Spring MVC view suffix. |
|
27 |
|
|
28 |
# DATASOURCE (DataSourceAutoConfiguration & DataSourceProperties) |
|
29 |
spring.datasource.driver-class-name= # Fully qualified name of the JDBC driver. Auto- |
|
|
detected based on the URL by default. |
|
30 |
spring.datasource.password= # Login password of the database. |
|
31 |
spring.datasource.url= # JDBC URL of the database. |
|
32 |
spring.datasource.username= # Login username of the database. |
|
33 |
|
|
34 |
# JEST (Elasticsearch HTTP client) (JestProperties) |
|
35 |
spring.elasticsearch.jest.password= # Login password. |
|
36 |
spring.elasticsearch.jest.proxy.host= # Proxy host the HTTP client should use. |
|
37 |
spring.elasticsearch.jest.proxy.port= # Proxy port the HTTP client should use. |
|
38 |
spring.elasticsearch.jest.read-timeout=3s # Read timeout. |
|
39 |
spring.elasticsearch.jest.username= # Login username. |
|
40 |
|
我们可以通过配置application.poperties 或者 application.yml 来修改SpringBoot的默认配置
例如:
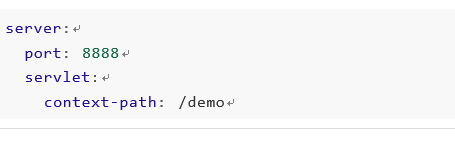
application.properties文件

application.yml文件
4.2 配置文件与配置类的属性映射方式
4.2.1 使用注解@Value映射
我们可以通过@Value注解将配置文件中的值映射到一个Spring管理的Bean的字段上 例如:
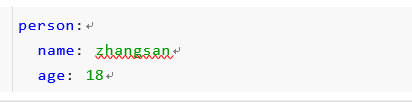
application.properties配置如下:

或者,application.yml配置如下:
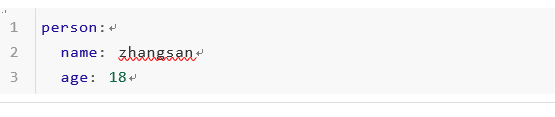
实体Bean代码如下:
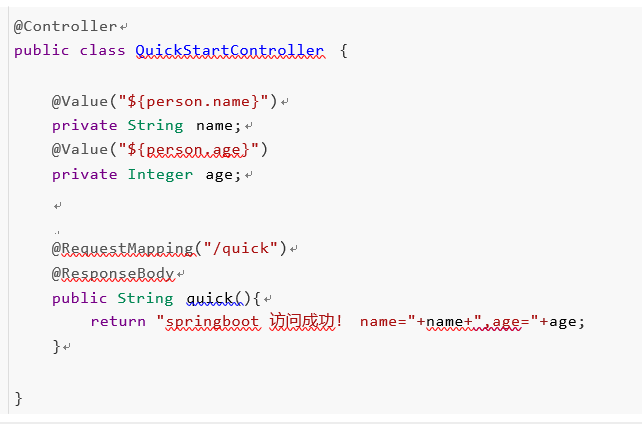
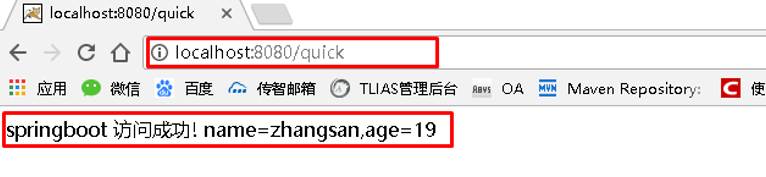
浏览器访问地址:http://localhost:8080/quick 结果如下:

4.2.2 使用注解@ConfigurationProperties映射
通过注解@ConfigurationProperties(prefix="配置文件中的key的前缀")可以将配置文件中的配置自动与实体进行映 射
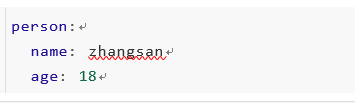
application.properties配置如下:
或者,application.yml配置如下:
实体Bean代码如下:
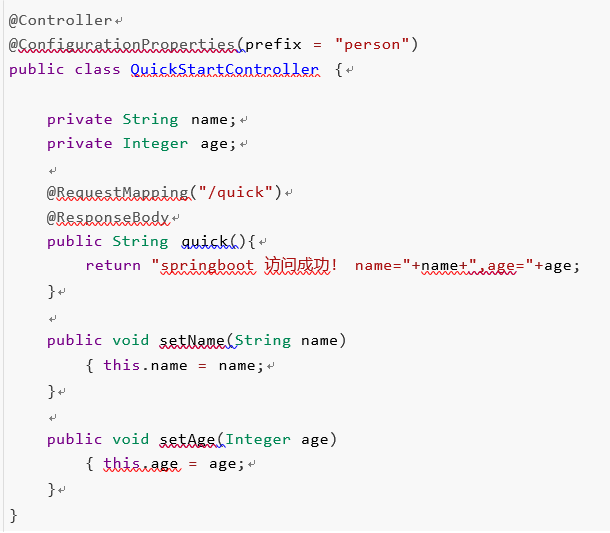
浏览器访问地址:http://localhost:8080/quick 结果如下:
注意:使用@ConfigurationProperties方式可以进行配置文件与实体字段的自动映射,但需要字段必须提供set方 法才可以,而使用@Value注解修饰的字段不需要提供set方法
Springboot中使用过滤器
过滤器是servlet的,是进入dispatcherServlet之前,进入容器之后的请求,所以过滤器访问不了spring容器里的对象,
1.新建一个过滤器
public class LogCostFilter implements Filter {
@Override
public void init(FilterConfig filterConfig) throws ServletException {
}
@Override
public void doFilter(ServletRequest servletRequest, ServletResponse servletResponse, FilterChain filterChain) throws IOException, ServletException {
long start = System.currentTimeMillis();
filterChain.doFilter(servletRequest,servletResponse);
System.out.println("Execute cost="+(System.currentTimeMillis()-start));
}
@Override
public void destroy() {
}
}
配置过滤器
@Configuration
public class FilterConfig {
@Bean
public FilterRegistrationBean registFilter() {
FilterRegistrationBean registration = new FilterRegistrationBean();
registration.setFilter(new LogCostFilter());
registration.addUrlPatterns("/*");
registration.setName("LogCostFilter");
registration.setOrder(1);
return registration;
}
}
- 方式二增加过滤器,采用serlvet3.0规范
@WebFilter(urlPatterns = "/*", filterName = "logFilter2")
public class LogCostFilter2 implements Filter {
@Override
public void init(FilterConfig filterConfig) throws ServletException {
}
@Override
public void doFilter(ServletRequest servletRequest, ServletResponse servletResponse, FilterChain filterChain) throws IOException, ServletException {
long start = System.currentTimeMillis();
filterChain.doFilter(servletRequest, servletResponse);
System.out.println("LogFilter2 Execute cost=" + (System.currentTimeMillis() - start));
}
@Override
public void destroy() {
}
}
然后再配置中扫描
@SpringBootApplication
@MapperScan("com.pandy.blog.dao")
@ServletComponentScan("com.pandy.blog.filters") //扫面上面的注解
public class Application {
public static void main(String[] args) throws Exception {
SpringApplication.run(Application.class, args);
}
}
三、拦截器的配置
上面我们已经介绍了过滤器的配置方法,接下来我们再来看看如何配置一个拦截器。我们使用拦截器来实现上面同样的功能,记录请求的执行时间。首先我们实现拦截器类:
|
1 2 3 4 5 6 7 8 9 10 11 12 13 14 15 16 17 |
public class LogCostInterceptor implements HandlerInterceptor { long start = System.currentTimeMillis(); @Override public boolean preHandle(HttpServletRequest httpServletRequest, HttpServletResponse httpServletResponse, Object o) throws Exception { start = System.currentTimeMillis(); return true; }
@Override public void postHandle(HttpServletRequest httpServletRequest, HttpServletResponse httpServletResponse, Object o, ModelAndView modelAndView) throws Exception { System.out.println("Interceptor cost="+(System.currentTimeMillis()-start)); }
@Override public void afterCompletion(HttpServletRequest httpServletRequest, HttpServletResponse httpServletResponse, Object o, Exception e) throws Exception { } } |
这里我们需要实现HandlerInterceptor这个接口,这个接口包括三个方法,preHandle是请求执行前执行的,postHandler是请求结束执行的,但只有preHandle方法返回true的时候才会执行,afterCompletion是视图渲染完成后才执行,同样需要preHandle返回true,该方法通常用于清理资源等工作。除了实现上面的接口外,我们还需对其进行配置:
|
1 2 3 4 5 6 7 8 9 |
@Configuration public class InterceptorConfig extends WebMvcConfigurerAdapter {
@Override public void addInterceptors(InterceptorRegistry registry) { registry.addInterceptor(new LogCostInterceptor()).addPathPatterns("/**"); super.addInterceptors(registry); } } |

 浙公网安备 33010602011771号