
AI探索(四)NumPy库的使用
NumPy(Numerical Python)
是 Python 语言的一个扩展程序库,支持大量的维度数组与矩阵运算,此外也针对数组运算提供大量的数学函数库。
umPy 是一个运行速度非常快的数学库,主要用于数组计算,包含:
- 一个强大的N维数组对象 ndarray
- 广播功能函数
- 整合 C/C++/Fortran 代码的工具
- 线性代数、傅里叶变换、随机数生成等功能
NumPy 通常与 SciPy(Scientific Python)和 Matplotlib(绘图库)一起使用, 这种组合广泛用于替代 MatLab,是一个强大的科学计算环境,有助于我们通过 Python 学习数据科学或者机器学习。
SciPy 是一个开源的 Python 算法库和数学工具包。
SciPy 包含的模块有最优化、线性代数、积分、插值、特殊函数、快速傅里叶变换、信号处理和图像处理、常微分方程求解和其他科学与工程中常用的计算。
Matplotlib 是 Python 编程语言及其数值数学扩展包 NumPy 的可视化操作界面。它为利用通用的图形用户界面工具包,如 Tkinter, wxPython, Qt 或 GTK+ 向应用程序嵌入式绘图提供了应用程序接口(API)。
NumPy 最重要的一个特点是其 N 维数组对象 ndarray,它是一系列同类型数据的集合,以 0 下标为开始进行集合中元素的索引。
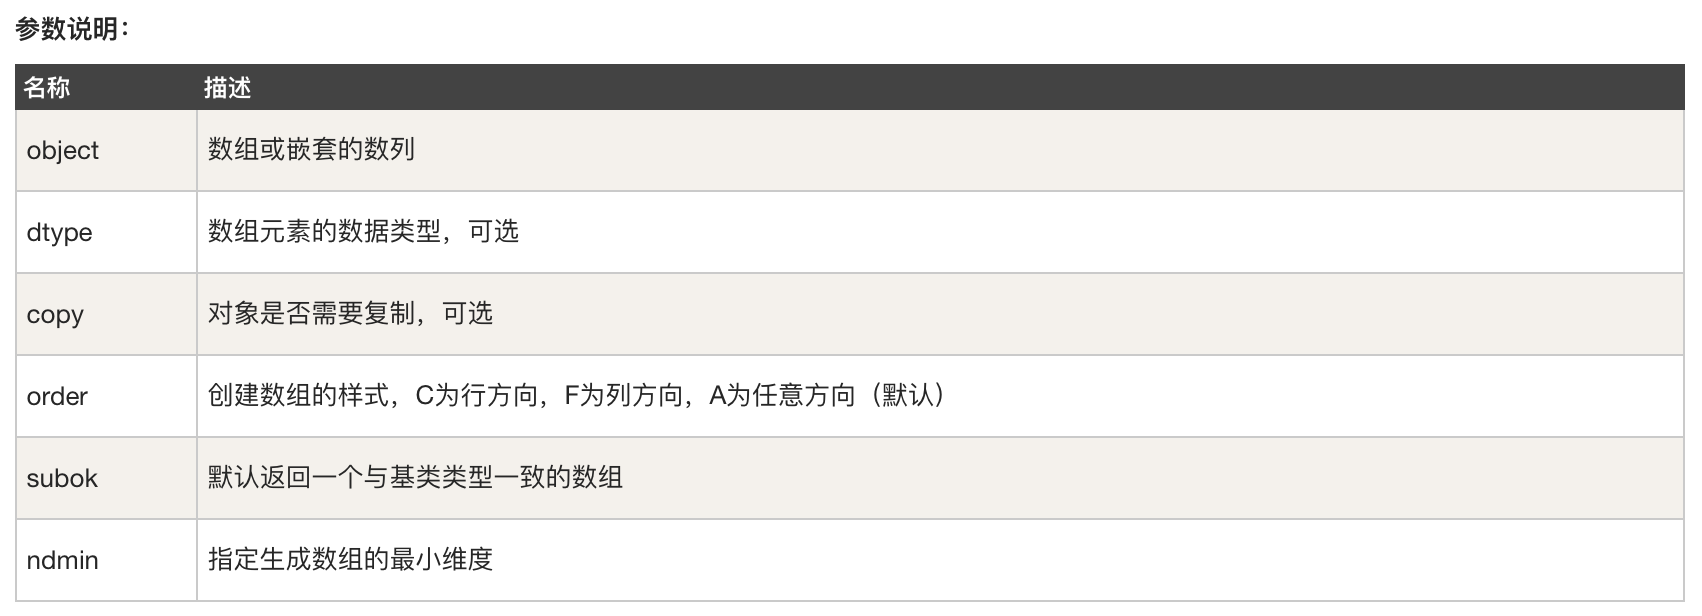
创建一个 ndarray 只需调用 NumPy 的 array 函数即可:
numpy.array(object, dtype = None, copy = True, order = None, subok = False, ndmin = 0)
示例1: 一维数组
import numpy as np

a = np.array([1,2,3])
print a
输出:
/usr/bin/python2.7 /Users/jackey/Documents/python/tensorflow/numpydemo.py
[1 2 3]
Process finished with exit code 0
示例2:二维数组
import numpy as np

a = np.array([[1,2,3],[4,5,6]])
print a
输出:
/usr/bin/python2.7 /Users/jackey/Documents/python/tensorflow/numpydemo.py
[[1 2 3]
 [4 5 6]]

Process finished with exit code 0
示例3:二维数组
import numpy as np

a = np.array([1,2,3],ndmin = 2)
print a
输出:
/usr/bin/python2.7 /Users/jackey/Documents/python/tensorflow/numpydemo.py
[[1 2 3]]

Process finished with exit code 0
示例4:二维数组
import numpy as np

a = np.array([1,2,3],ndmin = 2, dtype = complex)
print a
输出:
/usr/bin/python2.7 /Users/jackey/Documents/python/tensorflow/numpydemo.py
[[1.+0.j 2.+0.j 3.+0.j]]

Process finished with exit code 0
NumPy 数据类型
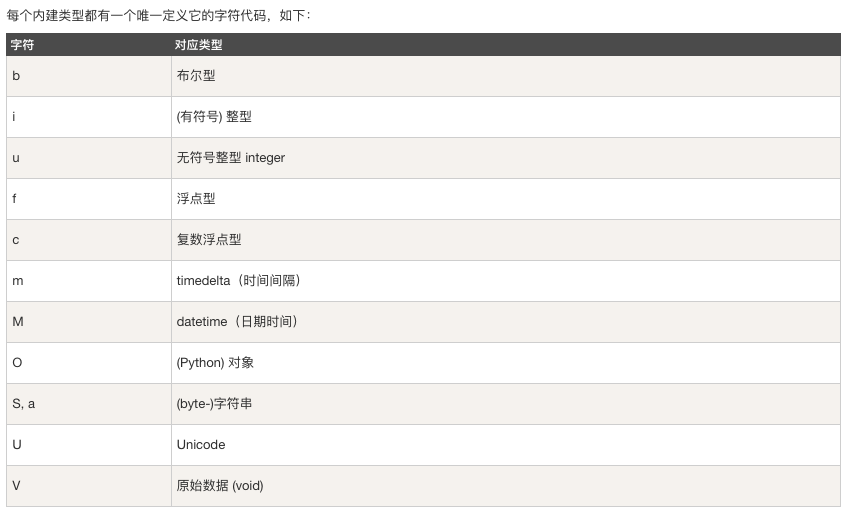
numpy 支持的数据类型比 Python 内置的类型要多很多,基本上可以和 C 语言的数据类型对应上,其中部分类型对应为 Python 内置的类型。
下表列举了常用 NumPy 基本类型。

数据类型对象(dtype)
numpy.dtype(object, align, copy)
- object - 要转换为的数据类型对象
- align - 如果为true, 填充字段使其类似C的结构体
- copy - 复制dtype对象, 如果为false,则是对内置数据类型对象的引用
示例:
# -*- coding: UTF-8 -*-

import numpy as np

#使用标量类型
dt = np.dtype(np.int32)
print(dt)

# int8, int16, int32, int64 四种数据类型可以使用字符串 'i1', 'i2','i4','i8' 代替
dt = np.dtype('i8')
print(dt)
输出:
/usr/bin/python2.7 /Users/jackey/Documents/python/tensorflow/numpydemo.py
int32
int64

Process finished with exit code 0
下面实例展示结构化数据类型的使用,类型字段和对应的实际类型将被创建
# -*- coding: UTF-8 -*-

import numpy as np

dt = np.dtype([('age',np.int8)])
print(dt)

a = np.array([(10,),(20,),(30,)], dtype=dt)
print(a)

print(a['age'])
输出:
/usr/bin/python2.7 /Users/jackey/Documents/python/tensorflow/numpydemo.py
[('age', 'i1')]
[(10,) (20,) (30,)]
[10 20 30]

Process finished with exit code 0
示例:
# -*- coding: utf-8 -*-

import numpy as np

student = np.dtype([('name','S20'), ('age','i1'), ('marks','f4')])
print(student)

a = np.array([('abc',21,50),('xyz',18,75)], dtype=student)
print(a)
输出:
/usr/bin/python2.7 /Users/jackey/Documents/python/tensorflow/numpydemo.py
[('name', 'S20'), ('age', 'i1'), ('marks', '<f4')]
[('abc', 21, 50.) ('xyz', 18, 75.)]

Process finished with exit code 0
Numpy数组
NumPy 数组的维数称为秩(rank),一维数组的秩为 1,二维数组的秩为 2,以此类推。
在 NumPy中,每一个线性的数组称为是一个轴(axis),也就是维度(dimensions)。比如说,二维数组相当于是两个一维数组,其中第一个一维数组中每个元素又是一个一维数组。所以一维数组就是 NumPy 中的轴(axis),第一个轴相当于是底层数组,第二个轴是底层数组里的数组。而轴的数量——秩,就是数组的维数。
很多时候可以声明 axis。axis=0,表示沿着第 0 轴进行操作,即对每一列进行操作;axis=1,表示沿着第1轴进行操作,即对每一行进行操作。
NumPy 的数组中比较重要 ndarray 对象属性有:
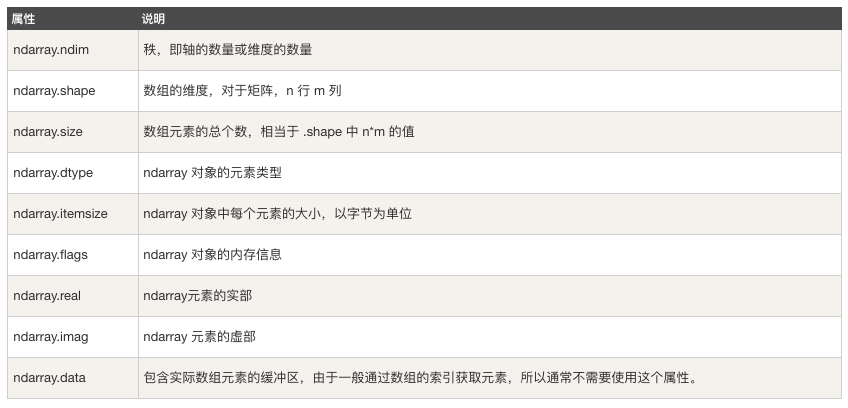
ndarray.ndim用于返回数组的维数,等于秩
示例:
# -*- coding: utf-8 -*-

import numpy as np

a = np.arange(24)   #a现在只有1个纬度
print(a.ndim)
输出:
/usr/bin/python2.7 /Users/jackey/Documents/python/tensorflow/numpydemo.py
1

Process finished with exit code 0
ndarray.shape
ndarray.shape 表示数组的维度,返回一个元组,这个元组的长度就是维度的数目,即 ndim 属性(秩)。比如,一个二维数组,其维度表示"行数"和"列数"。
ndarray.shape 也可以用于调整数组大小。
示例:
# -*- coding: utf-8 -*-

import numpy as np

a = np.array([[1,2,3],[4,5,6]])
print(a.shape)

a.shape = (6,1)
print(a)

a.shape = (1,6)
print(a)
输出:
/usr/bin/python2.7 /Users/jackey/Documents/python/tensorflow/numpydemo.py
(2, 3)
[[1]
 [2]
 [3]
 [4]
 [5]
 [6]]
[[1 2 3 4 5 6]]

Process finished with exit code 0
ndarray.itemsize
ndarray.itemsize 以字节的形式返回数组中每一个元素的大小。
例如,一个元素类型为 float64 的数组 itemsiz 属性值为 8(float64 占用 64 个 bits,每个字节长度为 8,所以 64/8,占用 8 个字节),又如,一个元素类型为 complex32 的数组 item 属性为 4(32/8)。
示例:
# -*- coding: utf-8 -*-

import numpy as np

x = np.array([1,2,3,4,5],dtype=np.int8)
print(x)
print(x.itemsize)

y = np.array([1,2,3,4,5], dtype=np.float64)
print(y)
print(y.itemsize)
输出:
/usr/bin/python2.7 /Users/jackey/Documents/python/tensorflow/numpydemo.py
[1 2 3 4 5]
1
[1. 2. 3. 4. 5.]
8

Process finished with exit code 0
ndarray 数组除了可以使用底层 ndarray 构造器来创建外,也可以通过以下几种方式来创建。
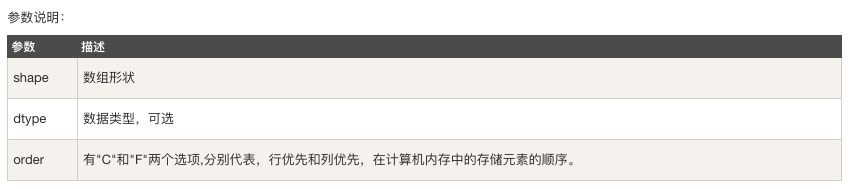
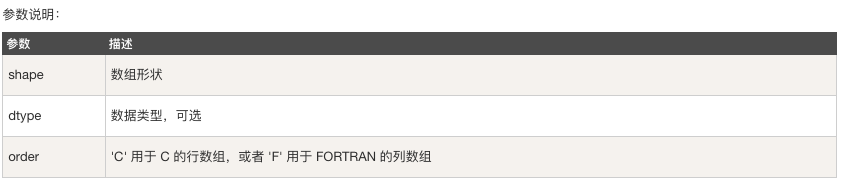
numpy.empty 方法用来创建一个指定形状(shape)、数据类型(dtype)且未初始化的数组:
numpy.empty(shape, dtype = float, order = 'C')
示例:
# -*- coding: utf-8 -*-

import numpy as np

x = np.empty([3,2], dtype=int)
print(x)
输出:
/usr/bin/python2.7 /Users/jackey/Documents/python/tensorflow/numpydemo.py
[[                   0 -9223363263373412019]
 [     140375703420932      140375703442528]
 [          4345035248      140375703442504]]

Process finished with exit code 0
注意 − 数组元素为随机值,因为它们未初始化。
numpy.zeros
创建指定大小的数组,数组元素以 0 来填充:
numpy.zeros(shape, dtype = float, order = 'C')
示例:
# -*- coding: utf-8 -*-

import numpy as np

# 默认为浮点数
x = np.zeros(5)
print(x)

# 设置类型为整数
y = np.zeros((5,), dtype=np.int)
print(y)

# 自定义类型
z = np.zeros((2,2), dtype=[('x', 'i4'), ('y','i4')])
print(z)
输出:
/usr/bin/python2.7 /Users/jackey/Documents/python/tensorflow/numpydemo.py
[0. 0. 0. 0. 0.]
[0 0 0 0 0]
[[(0, 0) (0, 0)]
 [(0, 0) (0, 0)]]

Process finished with exit code 0
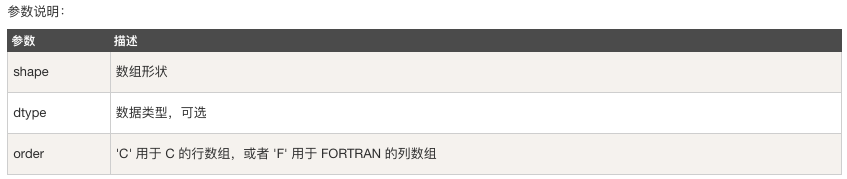
numpy.ones
创建指定形状的数组,数组元素以 1 来填充:
numpy.ones(shape, dtype = None, order = 'C')
示例:
# -*- coding: utf-8 -*-

import numpy as np

# 默认为浮点数
x = np.ones(5)
print(x)

# 自定义类型
x = np.ones([2,2],dtype=int)
print(x)
输出:
/usr/bin/python2.7 /Users/jackey/Documents/python/tensorflow/numpydemo.py
[1. 1. 1. 1. 1.]
[[1 1]
 [1 1]]

Process finished with exit code 0
创建标准正态分布数组:
# -*- coding: utf-8 -*-

import numpy as np

a = np.random.randn(2,3)
print(a)
输出:
/usr/bin/python2.7 /Users/jackey/Documents/python/tensorflow/numpydemo.py
[[-0.16777072  1.15536929  0.15206009]
 [ 0.36466659  0.39643679 -1.06021005]]

Process finished with exit code 0
创建随机分布整数型数组。
利用 randint([low,high],size) 创建一个整数型指定范围在 [low.high] 之间的数组:
# -*- coding: utf-8 -*-

import numpy as np

a = np.random.randint(100,200,(3,3))
print(a)
输出:
/usr/bin/python2.7 /Users/jackey/Documents/python/tensorflow/numpydemo.py
[[172 166 115]
 [191 126 165]
 [195 171 198]]

Process finished with exit code 0
从已有的数组创建数组
numpy.asarray
numpy.asarray 类似 numpy.array,但 numpy.asarray 只有三个,比 numpy.array 少两个。
numpy.asarray(a, dtype = None, order = None)

示例:
# -*- coding: utf-8 -*-

import numpy as np

# 将列表转换为ndarray
x = [1,2,3]
a = np.asarray(x)
print(a)

# 将元组列表转换为 ndarray
x = [(1,2,3),(4,5)]
a = np.asarray(x)
print(a)

# 设置了dtype参数
x = [1,2,3]
a = np.asarray(x, dtype=float)
print(a)
输出:
/usr/bin/python2.7 /Users/jackey/Documents/python/tensorflow/numpydemo.py
[1 2 3]
[(1, 2, 3) (4, 5)]
[1. 2. 3.]

Process finished with exit code 0
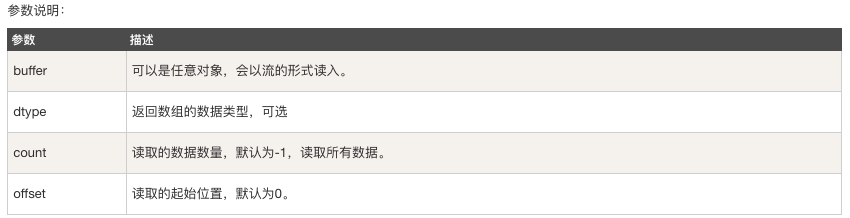
numpy.frombuffer
numpy.frombuffer 用于实现动态数组。
numpy.frombuffer 接受 buffer 输入参数,以流的形式读入转化成 ndarray 对象。
numpy.frombuffer(buffer, dtype = float, count = -1, offset = 0)
注意:buffer 是字符串的时候,Python3 默认 str 是 Unicode 类型,所以要转成 bytestring 在原 str 前加上 b。
示例:
# -*- coding: utf-8 -*-

import numpy as np

s = 'Hello world!'
a = np.frombuffer(s, dtype='S1')
print(a)
输出:
/usr/bin/python2.7 /Users/jackey/Documents/python/tensorflow/numpydemo.py
['H' 'e' 'l' 'l' 'o' ' ' 'w' 'o' 'r' 'l' 'd' '!']

Process finished with exit code 0
numpy.fromiter
numpy.fromiter 方法从可迭代对象中建立 ndarray 对象,返回一维数组。
numpy.fromiter(iterable, dtype, count=-1)

示例:
# -*- coding: utf-8 -*-

import numpy as np

# 使用 range 函数创建列表对象
list = range(5)
it = iter(list)

# 使用迭代器创建 ndarray
x = np.fromiter(it, dtype=float)
print(x)
输出:
/usr/bin/python2.7 /Users/jackey/Documents/python/tensorflow/numpydemo.py
[0. 1. 2. 3. 4.]

Process finished with exit code 0
从数值范围创建数组
numpy.arange
numpy 包中的使用 arange 函数创建数值范围并返回 ndarray 对象,函数格式如下:
numpy.arange(start, stop, step, dtype)

# -*- coding: utf-8 -*-

import numpy as np

x = np.arange(5)
print(x)

x = np.arange(1,5,2,'float')
print(x)
输出:
/usr/bin/python2.7 /Users/jackey/Documents/python/tensorflow/numpydemo.py
[0 1 2 3 4]
[1. 3.]

Process finished with exit code 0
numpy.linspace
numpy.linspace 函数用于创建一个一维数组,数组是一个等差数列构成的,格式如下:
np.linspace(start, stop, num=50, endpoint=True, retstep=False, dtype=None)

示例:
# -*- coding: utf-8 -*-

import numpy as np

a = np.linspace(1,10,10)
print(a)

a = np.linspace(1,1,10)
print(a)

a = np.linspace(10,20,5,endpoint=False)
print(a)

a = np.linspace(10,20,5,endpoint=True)
print(a)
输出:
/usr/bin/python2.7 /Users/jackey/Documents/python/tensorflow/numpydemo.py
[ 1.  2.  3.  4.  5.  6.  7.  8.  9. 10.]
[1. 1. 1. 1. 1. 1. 1. 1. 1. 1.]
[10. 12. 14. 16. 18.]
[10.  12.5 15.  17.5 20. ]

Process finished with exit code 0

 浙公网安备 33010602011771号