
适配器模式
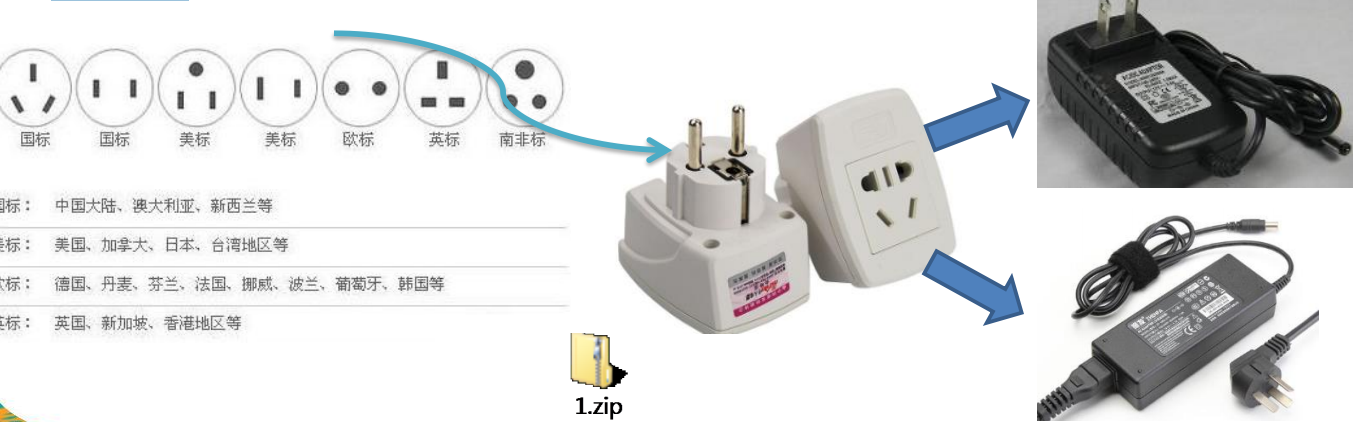
现实生活中的适配器例子
泰国插座用的是两孔的(欧标),可以买个多功能转换插头 (适配器) ,这样就可以
使用了。
基本介绍
1) 适配器模式( Adapter Pattern )将某个类的接口转换成客户端期望的另一个接口表示,主的目的是兼容性,让原本因接口不匹配不能一起工作的两个类可以协同工作。其别名为包装器(Wrapper)
2) 适配器模式属于结构型模式
3) 主要分为三类:类适配器模式、对象适配器模式、接口适配器模式
工作原理
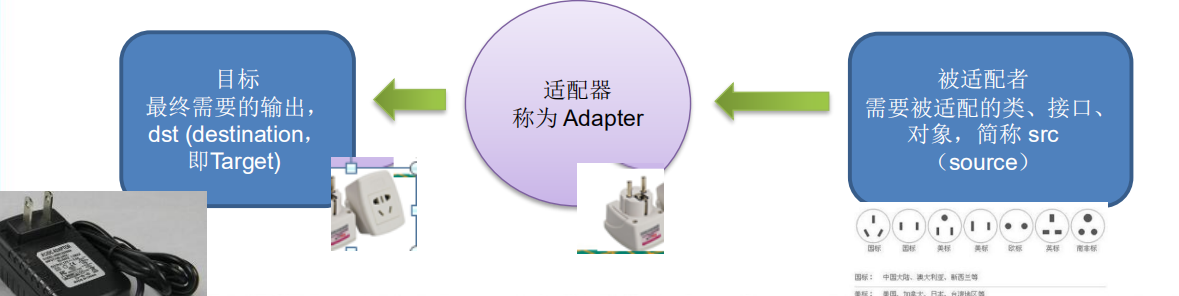
1) 适配器模式:将一个类的接口转换成另一种接口.让原本接口不兼容的类可以兼容
2) 从用户的角度看不到被适配者,是解耦的
3) 用户调用适配器转化出来的目标接口方法,适配器再调用被适配者的相关接口方法
4) 用户收到反馈结果,感觉只是和目标接口交互,如图(关键词:src,adapter,dst )
类适配器模式
基本介绍:
Adapter 类,通过继承 src 类,实现 dst 类接口,完成 src->dst 的适配。
(Adapter extends src implements dst )
应用实例:
1) 应用实例说明
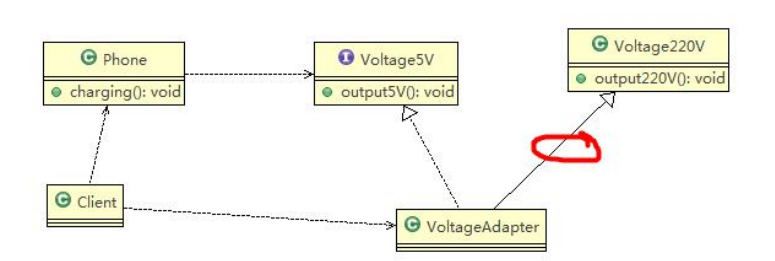
以生活中充电器的例子来讲解适配器,充电器本身相当于Adapter,220V交流电相当于src (即被适配者),我们的目dst(即 目标)是5V直流电
2) 思路分析(类图)
3) 代码实现
//被适配的类
public class Voltage220V {
	//输出220V的电压
	public int output220V() {
		int src = 220;
		System.out.println("电压=" + src + "伏");
		return src;
	}
}
//适配接口
public interface IVoltage5V {
	public int output5V();
}
//适配器类
public class VoltageAdapter extends Voltage220V implements IVoltage5V {
	@Override
	public int output5V() {
		//获取到220V电压
		int srcV = output220V();
		int dstV = srcV / 44 ; //转成 5v
		return dstV;
	}
}
public class Phone {
	//充电
	public void charging(IVoltage5V iVoltage5V) {
		if(iVoltage5V.output5V() == 5) {
			System.out.println("电压为5V, 可以充电~~");
		} else if (iVoltage5V.output5V() > 5) {
			System.out.println("电压大于5V, 不能充电~~");
		}
	}
}
public class Client {
	public static void main(String[] args) {
		// TODO Auto-generated method stub
		System.out.println(" === 类适配器模式 ====");
		Phone phone = new Phone();
		phone.charging(new VoltageAdapter());
	}
}
类适配器模式注意事项和细节
1) Java 是单继承机制,所以类适配器需要 继承 src 类这一点算是一个缺点, 因为这要求 dst 必须是接口,有一定局限性;
2) src 类的方法在 Adapter 中都会暴露出来,也增加了使用的成本。
3) 由于其继承了 src 类,所以它可以根据需求重写 src 类的方法,使得 Adapter 的灵活性增强了。
对象适配器模式
基本介绍:
1) 基本思路 和 类的适配器模式 相同,只是将 Adapter 类作修改,不是继承src类,而是持有src类的实例,以解决兼容性的问题。 即:持有 src类,实现 dst 类接口,完成src->dst的适配
2) 根据“合成复用原则”,在系统中尽量使用 关联关系 来替代 继承关系。
3) 对象适配器模式是适配器模式常用的一种
应用实例:
1) 应用实例说明
以生活中充电器的例子来讲解适配器,充电器本身相当于Adapter,220V交流电相当于src (即被适配者),我们的目dst(即目标)是5V直流电,使用对象适配器模式完成。
2) 思路分析(类图):只需修改适配器即可, 如下:

3)代码实现
//被适配的类
public class Voltage220V {
	//输出220V的电压,不变
	public int output220V() {
		int src = 220;
		System.out.println("电压=" + src + "伏");
		return src;
	}
}
//适配接口
public interface IVoltage5V {
	public int output5V();
}
//适配器类
public class VoltageAdapter  implements IVoltage5V {
	private Voltage220V voltage220V; // 关联关系-聚合
	//通过构造器,传入一个 Voltage220V 实例
	public VoltageAdapter(Voltage220V voltage220v) {
		this.voltage220V = voltage220v;
	}
	@Override
	public int output5V() {
		int dst = 0;
		if(null != voltage220V) {
			int src = voltage220V.output220V();//获取220V 电压
			System.out.println("使用对象适配器,进行适配~~");
			dst = src / 44;
			System.out.println("适配完成,输出的电压为=" + dst);
		}
		return dst;
	}
}
public class Phone {
	//充电
	public void charging(IVoltage5V iVoltage5V) {
		if(iVoltage5V.output5V() == 5) {
			System.out.println("电压为5V, 可以充电~~");
		} else if (iVoltage5V.output5V() > 5) {
			System.out.println("电压大于5V, 不能充电~~");
		}
	}
}
public class Client {
	public static void main(String[] args) {
		System.out.println(" === 对象适配器模式 ====");
		Phone phone = new Phone();
		phone.charging(new VoltageAdapter(new Voltage220V()));
	}
}
对象适配器模式注意事项和细节
1) 对象适配器和类适配器其实算是同一种思想,只不过实现方式不同。根据合成复用原则,使用组合替代继承, 所以它解决了类适配器必须继承src的局限性问题,也不再要求 dst 必须是接口。
2) 使用成本更低,更灵活。
接口适配器模式
基本介绍:
1) 一些书籍称为:适配器模式(Default Adapter Pattern)或缺省适配器模式。
2) 当不需要全部实现接口提供的方法时,可先设计一个抽象类实现接口,并为该接口中每个方法提供一个默认实现(空方法),那么该抽象类的子类可有选择地覆盖父类的某些方法来实现需求
3) 适用于一个接口不想使用其所有的方法的情况。
应用实例:
1) Android中的属性动画 ValueAnimator 类可以通过 addListener ( AnimatorListener listener )方法添加监听器, 那么常规写法如下:
ValueAnimator valueAnimator = ValueAnimator.ofInt(0,100);
valueAnimator.addListener(new Animator.AnimatorListener() {
    @Override
    public void onAnimationStart(Animator animation) {
    }
    @Override
    public void onAnimationEnd(Animator animation) {
    }
    @Override
    public void onAnimationCancel(Animator animation) {
    }
    @Override
    public void onAnimationRepeat(Animator animation) {
    }
});
valueAnimator.start();
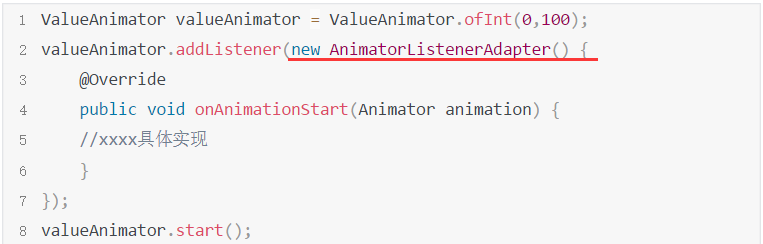
2) 有时候我们不想实现 Animator.AnimatorListener 接口的全部方法,我们只想监听 onAnimationStart,我们会如下写:
ValueAnimator valueAnimator = ValueAnimator.ofInt(0,100);
valueAnimator.addListener(new AnimatorListenerAdapter() {
    @Override
    public void onAnimationStart(Animator animation) {
    //xxxx具体实现
    }
});
valueAnimator.start();
应用实例:
3) AnimatorListenerAdapter 类,就是一个接口适配器,代码如右图:它空实现了
Animator.AnimatorListener类(src)的所有方法.
4) AnimatorListener 是一个接口.
public abstract class AnimatorListenerAdapter implements
Animator.AnimatorListener{
    @Override //默认实现
    public void onAnimationCancel(Animator animation) {
    }
    @Override
    public void onAnimationEnd(Animator animation) {
    }
    @Override
    public void onAnimationRepeat(Animator animation) {
    }
    @Override
    public void onAnimationStart(Animator animation) {
    }
    @Override
    public void onAnimationPause(Animator animation) {
    }
    @Override
    public void onAnimationResume(Animator animation) {
    }
}
public static interface AnimatorListener {
    void onAnimationStart(Animator animation);
    void onAnimationEnd(Animator animation);
    void onAnimationCancel(Animator animation);
    void onAnimationRepeat(Animator animation);
}
5) 程序里的匿名内部类就是Listener 具体实现类
案例说明:

public interface Interface4 {
	public void m1();
	public void m2();
	public void m3();
	public void m4();
}
//在AbsAdapter 我们将 Interface4 的方法进行默认实现
public abstract class AbsAdapter implements Interface4 {
	//默认实现
	public void m1() {}
	public void m2() {}
	public void m3() {}
	public void m4() {}
}

public class Client {
	public static void main(String[] args) {
		AbsAdapter absAdapter = new AbsAdapter() {
			//只需要去覆盖我们 需要使用 接口方法
			@Override
			public void m1() {
				System.out.println("使用了m1的方法");
			}
		};
		absAdapter.m1();
	}
}
适配器模式在SpringMVC框架应用的源码分析
1) SpringMvc 中的 HandlerAdapter , 就使用了适配器模式
2) SpringMVC 处理请求的流程回顾:(https://www.cnblogs.com/sanjun/p/9966666.html)(参考使用,侵删)

3) 使用 HandlerAdapter 的原因分析:
可以看到处理器的类型不同,有多重实现方式,那么调用方式就不是确定的,如果需要直接调用
Controller方法,需要调用的时候就得不断是使用if else来进行判断是哪一种子类然后执行。那么如果后面要扩展Controller,就得修改原来的代码,这样违背了OCP原则。
4) 代码分析+Debug源码

5) 动手写 SpringMVC 通过 适配器设计模式 获取到对应的 Controller 的源码
说明:
• Spring 定义了一个适配接口,使得每一种 Controller 有一种对应的适配器实现类
• 适配器代替controller执行相应的方法
• 扩展 Controller 时,只需要增加一个适配器类就完成了SpringMVC的扩展了,
• 这就是设计模式的力量

适配器模式的注意事项和细节
1) 三种命名方式,是根据 src是以怎样的形式给到Adapter(在Adapter里的形式)来命名的。
2) 类适配器:以类给到,在Adapter里,就是将src当做类,继承;
对象适配器:以对象给到,在Adapter里,将src作为一个对象,持有
接口适配器:以接口给到,在Adapter里,将src作为一个接口,实现
3) Adapter模式最大的作用还是将原本不兼容的接口融合在一起工作。
4) 实际开发中,实现起来不拘泥于我们讲解的三种经典形式
