Git
Introduction
Definition
Git is a distributed version-control system for tracking changes in source code during software development. It is designed for coordinating work among programmers, but it can be used to track changes in any set of files. Its goals include speed, data integrity, and support for distributed, non-linear workflows.
Related term
Version Control
Version control is a system that records changes to a file or set of files over time so that you can recall specific version later.
For someone who is a graphic or web designer and wants to keep every version of am image or layout which you would most certainly want to, a Version Control System(VCS) is a very wise thing to use. It allows you to revert selected files back to a previous state, revert the entire project back to a previous state, compare changes over time, see who last modified something that might be causing a problem, who introduced an issue and when, and more. Using a VCS also generally means taht if you screw things up or lose files, you can easily recover. In addition, you get all this for very little overhead.
Commit
Git thinks of its data more like a series of snapshots of a miniature filesystem. With Git, every time you commit, or save the state of your project, Git basically takes a picture of what all your files look like at that moment and stores a reference to that snapshot. To be efficient, if files have not changed, Git doesn't store the file again, just a link to the previous identical file it has already sotred. Git thinks about its data more like a stream of snapshots.
Commit can be considerated a basic unit in Git.
Repository
Repository is file which contains several content and files (usually it's widen in Mac OS) using for contacting to Git. Repository can storage on local or save on other computers as a remote copy.
Repository is consisted of commits.
Working Directory
Working Directory means files which you can see in your computer file system. When you use code editor to open some project files, you are handling files in Working Directory.
How to use
Install Git
There are too many ways to install Git on your PC. However, different OS usually uses diffent ways to install. Usually, it is best to install a software on its official website if it doesn't take too long time. Git is an exception. I have tried some measures to install it on official website, but it takes too long and even go offline. Here is a fast way on installing Git on WINDOWS×64.
- Using mirrors of Alibaba: https://npm.taobao.org/mirrors/git-for-windows/v2.22.0.windows.1/
- Download the most suitable version of for your PC
- Install it, after choosing the correct directory, you can click next till the install progress finished.
Getting Started
After installing Git on your PC, you'll want to do a few thiings to customize your Git environment. You should have to do these things only once on any given computer; they’ll stick around between upgrades. You can also change them at any time by running through the commands again.
1、Set Your Identity
Open the file you set when it is installing, and you will find a couple of projects.
Choosing git-bash.exeorgit-cmd.exe which depends your habit.
The first thing you should do when you install Git is to set your user name and email address. This is important because every Git commit uses this information, and it’s immutably baked into the commits you start creating:
$ git config --global user.name "MyName"
$ git config --global user.email "MyEmail@example.com"
2、Set Your Editor
You can configure the default editor that will be used when Git needs you to type in a message. If not configure, Git uses your system's default editor.
If you want to use a different text editor, such as VScode, you can do the following:
git config --global core.editor "code --wait"
3、Checking Your Setting
using following to check alll configuration settings
git config --list
BTW: If you need any help use following:
$ git help <verb>
$ git <verb> --help
$ man git-<verb>
three of them are equivalent ways to get the comprehensive manual page.
For example, if you need some help for git config you can use command:
git help config
Getting a Git Repository
You typically obtain a Git repository in one of two ways:
- You can take a local directory that is currently not under version control, and turn it into a Git repository, or
- You can clone an existing Git repository from elsewhere.
Before we commit or do some other things, we need build an actual repository in your PC. To create an actual repository, we need use following command:
ls        #using to list all files and directory
mkdir     #using to create a new directory
cd        #using to change files and directory
rm        #using to delete files and directory
pwd       #using to list the current director
1、Create a Project Directory
Creating a directory called se2020-git-course. In this directory, creating an other directory called new-git-project, using cd command into the directory new-git-project
mkdir -p se2020-git-course/new-git-project && cd $_
Cause I have already created the file, so here is using cd command directly go into the specific directory

2、Git Init
Now you can use the command git init which is the easiest command using for creating a blank Git Repository in your current directory.
**Attention: Do not editor or change any files includiing files'name in the directory which promotes a "master" in the terminal. **
3、Clone an existed repository
Before cloning, make sure you are under the correct directory which doesn't located in another Git Repository because Git Repository cann't be nested in another Git Repository. Using following command:
git clone https://github.com/udacity/course-git-blog-project
4、View what you have done
Opening the specifi directory which you did just now and you can see a list below:
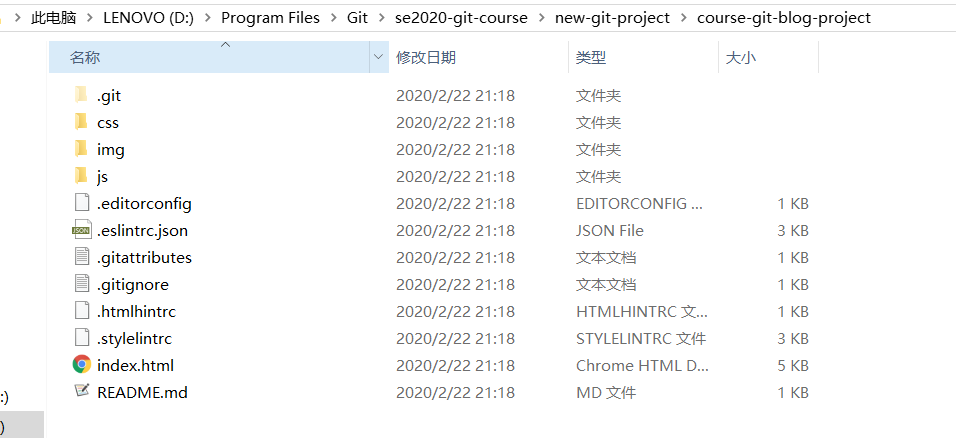
then, click on index.html, you can see the webpage you have cloned from the url you input.
Here is the index.html page:

*、Check the Status of Your Files
The main tool you use to determine which files are in which state is the git status command. If you run this command directly after a clone, or you cd to the specific directory. you should see something like this:

This means you have a clean working directory; in other words, none of your tracked files are modified.
Git Log
After cloning the repository of "course-git-blog-project", using command to go into its directory.
At first, it prints "nothing to commit, working directory clean" when you using the git status command, which means we can continue going on and check what we need.
Opening this project at your favorite code editor(as for me, VScode is my favorite). Spending some time on watching them including the CSS file and the JS file especially the HTML file.
If you want to look back to see what has happened in your repository, command git log can help you. After using this command, you may see a list about operating history as follow:
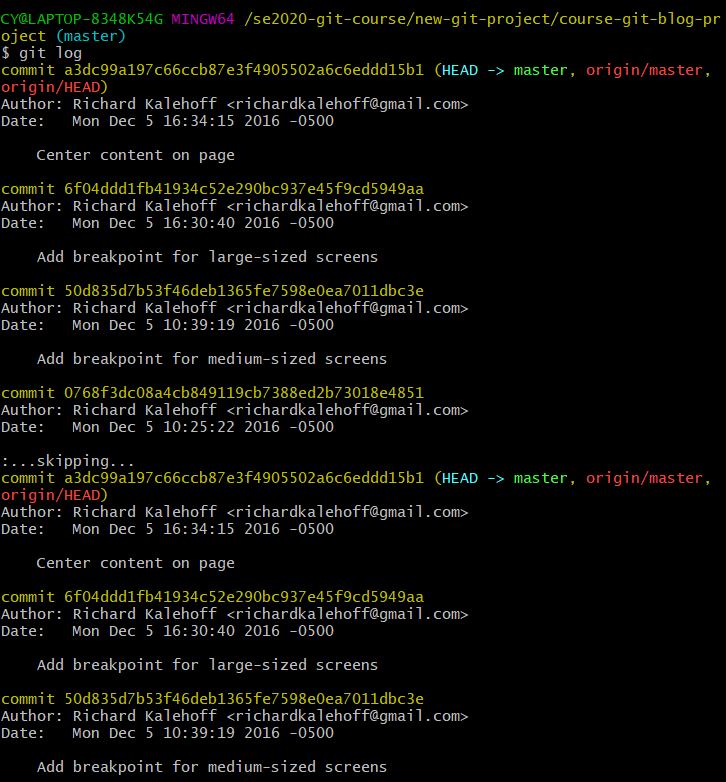
the list is too long to show completely.
Here are some tips to use git log command to achieve your requirement:
By default, this command shows following information about each commit:
SHA, author, date, message
git uses less pager which contains following important shortcuts to view all information
- scroll down by row using "j" or "↓"
- scroll up by row using "k" or "↑"
- scroll down by page using button "blank" or "Page Down"
- scroll up by page using button "b" or "Page Up"
- Exit using "q"
git log --oneline
git log --oneline shows one commit in each line, the former 7 characters of each SHA and the message of commit
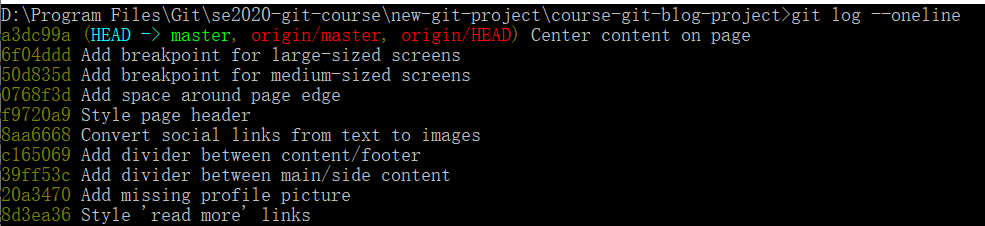
It is a simple list about every commit in order to save time and spaces.
git log --stat
git log --stat is a command using to show changed files and add or delete line in each commit
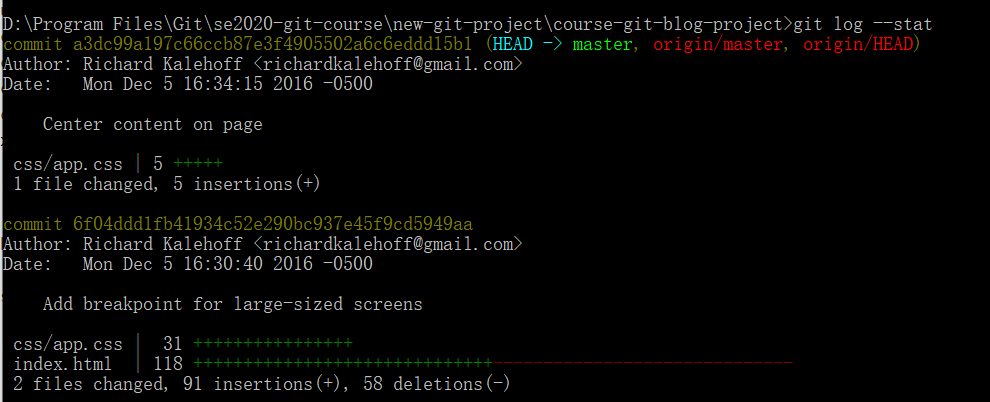
It counts the number of modification including how much files have been changed and how much code has been inserted besides the author and the date.
git log -p
This is a command to show the detail about modification.
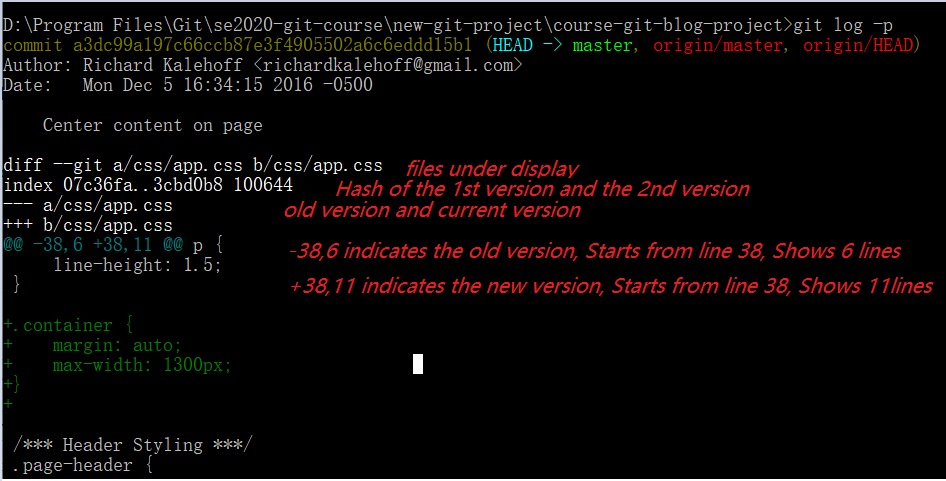
Actual changing in commit:
- line in red and beginning with a "-" is in the original version, but it has been deleted
- line in green and beginning with a "+" is the new line added by the commit
Query specific commit
Here are two usual query measures:
- query by SHA
- query by string
If you have specific SHA you want to query, using the following command, taking 8d3ea3 as the SHA for instance:
git log -p 8d3ea3

If you have spcific message in commit you want to query, using the following command, taking "Set article timestamp color" for example:
git log --grep "Set article timestamp color"

Usually, you needn't input the whole message. It means that "--grep" only shows commits with a commit message containing the string which is following.
More details and commands, please click here
git add & git commit & git diff
Add files
First of all, enter the "new-git-project" directory, create one file named index.html and two folders named css and js, then create a file named app.css in the css folder and create a film named app.js in the js folder.

Open the terminal and enter the specific directory to check its status by using command git status
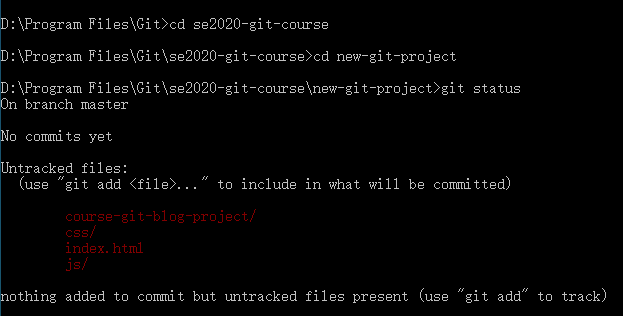
You can observe what you have created in the directory while you don't do any operation on them.
the output of git status indicates that git doesn't trace these films.
Stage files
Using command git add index.html to stage index.html. In the terminal, there is nothing to output, however, we can use git status to check the statu of this directory

As we can see, the "index.html" is under the directory "Changes to be committed" which means it storages in the category temporarily.
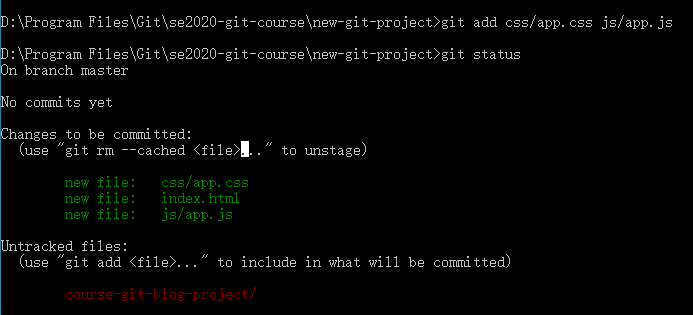
Then, stage other files
git add css/app.css js/app.js
OR
git add.    #it means adding all files in the current directory including nesting directory
Commit
Using git commit to commit what you have storaged in the above directory.
Before using the command, make sure you have already set the correct code editor because this command will open the editor you have set.


During this time, terminal is frozen and you need text code in your editor.
type a title "Initial Commit" (is not special, you can type any words you like), and delete "#" before the files which you want to commit

save and close editor, you may see this in terminal:

Now, you finish your first commit!
If you don't want to open editor because of short message, you can use
-m <message>to skip it.
For examplegit commit -m helloworld
Commit new files
Now, modify something at index.html, save, exit, and commit it
after modification, check the status
It prompts the index.html has been modified.
git commit index.html -m "Add header to blog"

We success!
git diff
git diff is a tool to tell us what the exact modification is which is different from git status which tells us what files have been modified but not the details.

git diffseemsgit log -p, in fact,git lop -pusesgit diffbackstage.
git ignore
If you don't want git trace some files, you can add them into ".addignore"
Using following steps
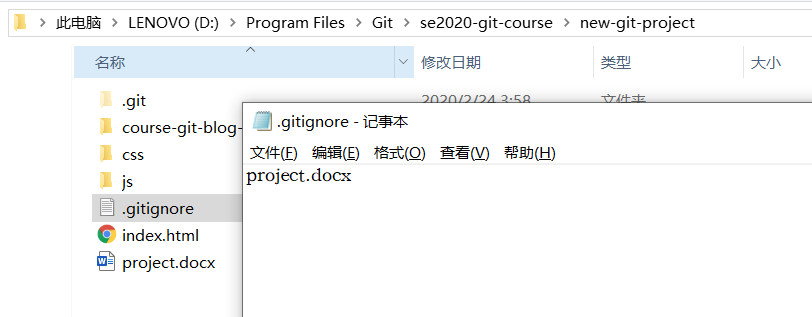
First, create a file named ".gitignore"
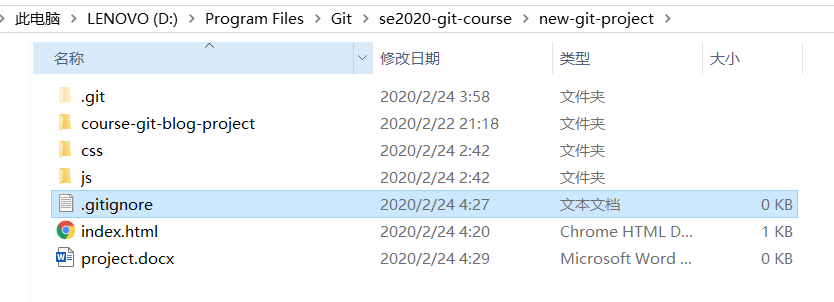
Second, add "project.docx" into ".gitignore"
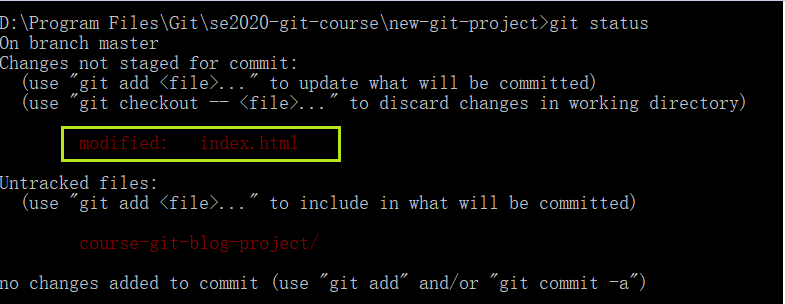
Third, using git status to check status
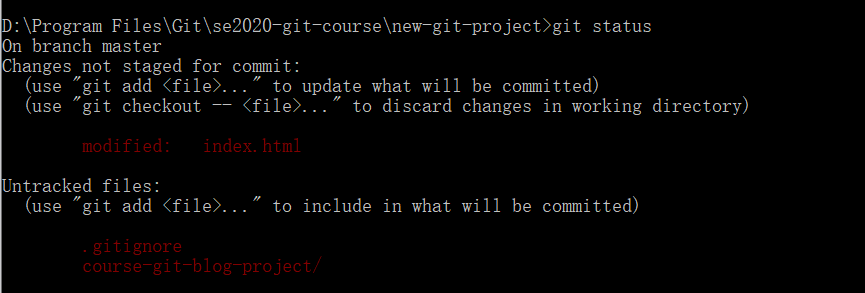
".gitignore" is under the untrack directory and the "project.docx" isn't on show
Wildcard
Wildcards allow you to use special characters to represent certain formats / characters
in ".gitignore", you can use following to indicate files you don't want to trace:
| Symbol | Meaning |
|---|---|
| as blackspace | |
| # | Mark lines as comments |
| * | Match 0 or more characters |
| ? | Match one characters |
| [abc] | Match a、b or c |
| ** | Match nested directory |
| a/**/z | Match a/z; a/b/z; a/b/c/z |
If you have 50 JPEG pictures, which are located under "samples" folder, you can add following sentence in ".gitignore" to make git ignore all the 50 pictures.
samples/*.jpg

 浙公网安备 33010602011771号