podman
podman
目录
容器— — — 一种轻量化操作系统,他与虚拟化技术不同,虚拟化是在物理机上虚拟出一个完整的主机,包括cpu,硬盘,网卡等等,但容器,他在拥有虚拟化技术的灵活性的同时,还避免了虚拟化技术的缺点:沉重的负载。
随着容器的不断发展,市场上出现了由Red Hat 推出了podman容器技术。
podman【pod管理器】是一种用户管理容器和映像、安装到这些容器中的卷以及由容器组成的pod工具。通俗来讲,podman就是一个管理工具。
podman是一个无守护进程的容器引擎,而这,也是与docker最大的不同。
podman命令所有的操作都可以由root或者非root用户实行,注意,非root用户不需要配置podman提权,因为普通用户本身就可以使用podman。
安装与使用
在rehl8后,podman就被默认安装在系统中了,但由于podman独特的模块化管理,导致系统本身存在的podman其实是不完整的。
这个时候就需要安装container-tools安装包,这个包里包含了podman、skopeo、buildah
[root@localhost ~]# dnf install container-tools -y
Updating Subscription Management repositories.
Unable to read consumer identity

This system is not registered with an entitlement server. You can use subscription-manager to register.

Last metadata expiration check: 0:22:06 ago on Sun 14 Jul 2024 03:10:09 PM CST.
Dependencies resolved.
====================================================================================================================================================================================
 Package                                       Architecture                         Version                                           Repository                               Size
====================================================================================================================================================================================
Installing:
 container-tools                               noarch                               1-10.el9                                          AppStream                               8.7 k
Installing dependencies:
 aardvark-dns                                  x86_64                               2:1.0.1-34.el9_0                                  AppStream                               1.0 M
 netavark                                      x86_64                               2:1.0.1-34.el9_0                                  AppStream                               1.9 M
 podman-docker                                 noarch                               2:4.0.2-6.el9_0                                   AppStream                                41 k
 podman-remote                                 x86_64                               2:4.0.2-6.el9_0                                   AppStream                               8.1 M
 python3-podman                                noarch                               3:4.0.0-1.el9                                     AppStream                               171 k
 python3-pyxdg                                 noarch                               0.27-3.el9                                        AppStream                               108 k
 python3-toml                                  noarch                               0.10.2-6.el9                                      AppStream                                46 k
 skopeo                                        x86_64                               2:1.6.1-2.el9_0                                   AppStream                               6.6 M
 toolbox                                       x86_64                               0.0.99.3-3.el9_0                                  AppStream                               2.2 M
 udica                                         noarch                               0.2.6-4.el9                                       AppStream                                54 k

Transaction Summary
====================================================================================================================================================================================
Install  11 Packages

Total size: 20 M
Installed size: 76 M
Downloading Packages:
Running transaction check
Transaction check succeeded.
Running transaction test
Transaction test succeeded.
Running transaction
  Preparing        :                                                                                                                                                            1/1
  Installing       : aardvark-dns-2:1.0.1-34.el9_0.x86_64                                                                                                                      1/11
  Installing       : netavark-2:1.0.1-34.el9_0.x86_64                                                                                                                          2/11
  Installing       : udica-0.2.6-4.el9.noarch                                                                                                                                  3/11
  Installing       : toolbox-0.0.99.3-3.el9_0.x86_64                                                                                                                           4/11
  Installing       : skopeo-2:1.6.1-2.el9_0.x86_64                                                                                                                             5/11
  Installing       : python3-toml-0.10.2-6.el9.noarch                                                                                                                          6/11
  Installing       : python3-pyxdg-0.27-3.el9.noarch                                                                                                                           7/11
  Installing       : python3-podman-3:4.0.0-1.el9.noarch                                                                                                                       8/11
  Installing       : podman-remote-2:4.0.2-6.el9_0.x86_64                                                                                                                      9/11
  Installing       : podman-docker-2:4.0.2-6.el9_0.noarch                                                                                                                     10/11
  Installing       : container-tools-1-10.el9.noarch                                                                                                                          11/11
  Running scriptlet: container-tools-1-10.el9.noarch                                                                                                                          11/11
  Verifying        : aardvark-dns-2:1.0.1-34.el9_0.x86_64                                                                                                                      1/11
  Verifying        : container-tools-1-10.el9.noarch                                                                                                                           2/11
  Verifying        : netavark-2:1.0.1-34.el9_0.x86_64                                                                                                                          3/11
  Verifying        : podman-docker-2:4.0.2-6.el9_0.noarch                                                                                                                      4/11
  Verifying        : podman-remote-2:4.0.2-6.el9_0.x86_64                                                                                                                      5/11
  Verifying        : python3-podman-3:4.0.0-1.el9.noarch                                                                                                                       6/11
  Verifying        : python3-pyxdg-0.27-3.el9.noarch                                                                                                                           7/11
  Verifying        : python3-toml-0.10.2-6.el9.noarch                                                                                                                          8/11
  Verifying        : skopeo-2:1.6.1-2.el9_0.x86_64                                                                                                                             9/11
  Verifying        : toolbox-0.0.99.3-3.el9_0.x86_64                                                                                                                          10/11
  Verifying        : udica-0.2.6-4.el9.noarch                                                                                                                                 11/11
Installed products updated.

Installed:
  aardvark-dns-2:1.0.1-34.el9_0.x86_64 container-tools-1-10.el9.noarch netavark-2:1.0.1-34.el9_0.x86_64 podman-docker-2:4.0.2-6.el9_0.noarch podman-remote-2:4.0.2-6.el9_0.x86_64
  python3-podman-3:4.0.0-1.el9.noarch  python3-pyxdg-0.27-3.el9.noarch python3-toml-0.10.2-6.el9.noarch skopeo-2:1.6.1-2.el9_0.x86_64        toolbox-0.0.99.3-3.el9_0.x86_64
  udica-0.2.6-4.el9.noarch

Complete!

 podman的安装
查看podman版本
[root@localhost ~]# podman --version
podman version 4.0.2
镜像管理
查看podman镜像仓库配置文件
[root@localhost ~]# vim /etc/containers/registries.conf
unqualified-search-registries = ["registry.fedoraproject.org", "registry.access.redhat.com", "registry.centos.org", "quay.io", "docker.io"]
查找镜像
[root@localhost ~]# podman search ubi
NAME                                                                                    DESCRIPTION
registry.access.redhat.com/ubi8/go-toolset                                              Platform for building and running Go 1.11.5 based applications
registry.access.redhat.com/ubi9/go-toolset                                              rhcc_registry.access.redhat.com_ubi9/go-toolset
registry.access.redhat.com/ubi8/dotnet-70-runtime                                       rhcc_registry.access.redhat.com_ubi8/dotnet-70-runtime
registry.access.redhat.com/ubi8/openjdk-8-runtime                                       OpenJDK 1.8 runtime-only image on Red Hat Universal Base Image 8.
拉取镜像
[root@localhost ~]# podman pull uhub.service.ucloud.cn/first/ubi8:latest
Trying to pull uhub.service.ucloud.cn/first/ubi8:latest...
Getting image source signatures
Copying blob 8694db102e5b done
Copying config 269749ad51 done
Writing manifest to image destination
Storing signatures
269749ad516c02c74689248f7c5f36fb1672af857f84b1e0baf2a35e5b0fa6bb
查看镜像
[root@localhost ~]# podman images
REPOSITORY                         TAG         IMAGE ID      CREATED      SIZE
uhub.service.ucloud.cn/first/ubi8  latest      269749ad516c  2 weeks ago  212 MB
查看本地镜像详细信息
[root@localhost ~]# podman inspect uhub.service.ucloud.cn/first/ubi8:latest
[
     {
          "Id": "269749ad516c02c74689248f7c5f36fb1672af857f84b1e0baf2a35e5b0fa6bb",
          "Digest": "sha256:0a95276776dc776fc42ebaa0ce79aa0b3ac72ab762df1d262beef7b092c2b23e",
          "RepoTags": [
               "uhub.service.ucloud.cn/first/ubi8:latest"
          ],
          "RepoDigests": [
               "uhub.service.ucloud.cn/first/ubi8@sha256:0a95276776dc776fc42ebaa0ce79aa0b3ac72ab762df1d262beef7b092c2b23e"
          ],
          "Parent": "",
          "Comment": "",
          "Created": "2024-06-27T11:22:58.741902708Z",
          "Config": {
               "Env": [
                    "PATH=/usr/local/sbin:/usr/local/bin:/usr/sbin:/usr/bin:/sbin:/bin",
                    "container=oci"

...
查看远程镜像详细信息
[root@localhost ~]# skopeo inspect   docker://uhub.service.ucloud.cn/ucloud/centos6-ssh:echo
{
    "Name": "uhub.service.ucloud.cn/ucloud/centos6-ssh",
    "Digest": "sha256:4cc1dee01717667a2aa30f259f4b6ee30baa11f8e4e752a60c93319bf23b4c30",
    "RepoTags": [
        "latest",
        "echo"
    ],
    "Created": "2018-04-04T10:06:50.262259211Z",
    "DockerVersion": "17.03.2-ce",
    "Labels": {
        "build-date": "20170801",
        "license": "GPLv2",
        "name": "CentOS Base Image",
        "vendor": "CentOS"
    },
    "Architecture": "amd64",
    "Os": "linux",
    "Layers": [
        "sha256:5e67f88440c2f2bf08cc9266cf1dcf4dbe6927805598f99db90337d6d0380f42",
        "sha256:cb45608fb14b92ca0266db6ecc1fd0d4b4fc828e32683ee485b8bf3e299e100e",
        "sha256:1a6aadffd02ad76d442457e100407c1b3285c3ff708ec85b5a35ef12f3dad15d",
        "sha256:d483e2b525e55d89692cb924fbaa1b6988893036ede15b233f8f75ae1eb1ac79",
        "sha256:022c5103abdcd247d139bdabd2764c734344da3f9a6f49d71720956fc361ec2c",
        "sha256:c0f76edb1bbf6bdefe58f0552d39a34fe9418c7f170aff24383d843146b419d5",
        "sha256:dd3a125d9eca9bac98afd399d5ed253e93b1a8ae6d4e679eba75be40143f97ba",
        "sha256:8512d2688e881e704eb298b0a7d683db4efe6084d57b736602696220bed4c30a",
        "sha256:5fd8cbc05590317fe8224e176a1286858ce78c90e874c9ee6e4c4ef62029d409",
        "sha256:2966b623d9f79d9993fb275eb434b783c952c76350cf0b749a3160a37cf2572e",
        "sha256:f5b81ed0e1589baf7ec920aaa188482c221d13cc8396a568bc98a7b5dc76538e"
    ],
    "Env": [
        "PATH=/usr/local/sbin:/usr/local/bin:/usr/sbin:/usr/bin:/sbin:/bin",
        "LANG=en_US.UTF-8",
        "LC_ALL=en_US.UTF-8",
        "TZ=Asia/Shanghai"
    ]
}
登录与退出镜像仓库
[root@localhost ~]# podman login  uhub.service.ucloud.cn
[root@localhost ~]# podman logout  uhub.service.ucloud.cn
🤪登录有什么用?为了推送镜像至镜像仓库。
修改镜像名
[root@localhost ~]# podman tag uhub.service.ucloud.cn/first/ubi8:latest registry.cn-hangzhou.aliyuncs.com/rehl9/ubi8:latest
上传镜像
[root@localhost ~]# podman login --username=zhfb99 registry.cn-hangzhou.aliyuncs.com
Password:
Login Succeeded!
[root@localhost ~]# podman push registry.cn-hangzhou.aliyuncs.com/rehl9/golang:latest
Getting image source signatures
Copying blob 5f70bf18a086 done
Copying blob 6dd1d3bfe031 done
Copying blob 1c64540d1da0 done
Copying blob 933412459c62 done
Copying blob 371fc2764eb9 done
Copying config af95bf031d done
Writing manifest to image destination
Storing signatures
删除镜像
[root@localhost ~]# podman rmi registry.cn-hangzhou.aliyuncs.com/rehl9/golang:latest
Untagged: registry.cn-hangzhou.aliyuncs.com/rehl9/golang:latest
打包镜像【可以用于在其他主机直接导入】
[root@localhost ~]# podman save -o ubi8.tar registry.cn-hangzhou.aliyuncs.com/rehl9/ubi8:latest
Copying blob 41fdab9a4e32 done
Copying config 269749ad51 done
Writing manifest to image destination
Storing signatures
导入镜像
[root@node1 ~]# scp ubi8.tar root@192.168.96.171:/root/
root@192.168.96.171's password:
ubi8.tar                                                                                                                                          100%  202MB  31.4MB/s   00:06
[root@node2 ~]# ls
anaconda-ks.cfg  Desktop  Documents  Downloads  Music  Pictures  Public  Templates  ubi8.tar  Videos
[root@node2 ~]# podman load < ubi8.tar
Getting image source signatures
Copying blob 41fdab9a4e32 done
Copying config 269749ad51 done
Writing manifest to image destination
Storing signatures
Loaded image(s): registry.cn-hangzhou.aliyuncs.com/rehl9/ubi8:latest
[root@node2 ~]# podman images
REPOSITORY                                    TAG         IMAGE ID      CREATED      SIZE
registry.cn-hangzhou.aliyuncs.com/rehl9/ubi8  latest      269749ad516c  3 weeks ago  212 MB
查看镜像运行层级【在构建镜像的时候】
[root@node1 html]# podman history uhub.service.ucloud.cn/library/httpd:2.4.10
ID            CREATED       CREATED BY                                     SIZE                COMMENT
c6a0629d3ea7  9 years ago   /bin/sh -c #(nop) CMD [httpd-foreground]       1.02 kB
<missing>     9 years ago   /bin/sh -c #(nop) EXPOSE map[80/tcp:{}]        1.02 kB
<missing>     9 years ago   /bin/sh -c #(nop) COPY file:005d6e3e5ad83b...  3.58 kB
<missing>     9 years ago   /bin/sh -c buildDeps='                                             ca-certificates   ...         32.2 MB
<missing>     9 years ago   /bin/sh -c #(nop) ENV HTTPD_BZ2_URL=https:...  1.02 kB
<missing>     9 years ago   /bin/sh -c #(nop) ENV HTTPD_VERSION=2.4.10     1.02 kB
<missing>     9 years ago   /bin/sh -c gpg --keyserver pool.sks-keyser...  129 kB
<missing>     9 years ago   /bin/sh -c apt-get update                      && apt-get inst...  5.65 MB
<missing>     9 years ago   /bin/sh -c #(nop) WORKDIR /usr/local/apache2   1.02 kB
<missing>     9 years ago   /bin/sh -c mkdir -p "$HTTPD_PREFIX"            && ch...            2.56 kB
<missing>     9 years ago   /bin/sh -c #(nop) ENV PATH=/usr/local/sbin...  1.02 kB
<missing>     9 years ago   /bin/sh -c #(nop) ENV HTTPD_PREFIX=/usr/lo...  1.02 kB
<missing>     9 years ago   /bin/sh -c #(nop) CMD [/bin/bash]              1.02 kB
<missing>     9 years ago   /bin/sh -c #(nop) ADD file:215491c933af92b...  129 MB
<missing>     11 years ago                                                 1.02 kB             Imported from -
容器管理
启动容器
[root@node1 ~]# podman ps -a
CONTAINER ID  IMAGE                                     COMMAND     CREATED        STATUS                    PORTS       NAMES
2fd88ee277d1  uhub.service.ucloud.cn/first/ubi8:latest  /bin/bash   6 seconds ago  Exited (0) 5 seconds ago              funny_solomon


2fd88ee277d1 容器ID
uhub.service.ucloud.cn/first/ubi8:latest 通过这个镜像启动的
/bin/bash  最后执行的命令是
6 seconds ago 创建是在什么时候
Exited (0) 5 seconds ago 现在是什么状态
【如果是Exited,则需要-a才可以查看,因为ps只可以查看正在运行的容器,-a是查看所有】
funny_solomon 容器名字
该状态为Existed
说明我们仅仅只是创建了这个容器,他并没有运行,而是退出状态。
🤪为什么是Exited的状态,而不是UP呢?
因为容器为服务而生,服务运行结束了,容器也会直接退出。
为了解决这个问题,可以给他一个bashshell终端
[root@node1 ~]# podman run -it uhub.service.ucloud.cn/first/ubi8:latest  /bin/bash
[root@fcb81013b5cb /]#

-i 表示以交互式的方式
-t 分配一个终端
/bin/bash 分配什么样的终端

那么为什么主机名变了?
因为我们进入到了这个容器当中,所以我们可以通过让他在后台运行的方式保持UP状态的同时,也不登录


[root@fcb81013b5cb /]# exit
[root@node1 ~]# podman ps -a
CONTAINER ID  IMAGE                                     COMMAND     CREATED         STATUS                     PORTS       NAMES
2fd88ee277d1  uhub.service.ucloud.cn/first/ubi8:latest  /bin/bash   11 minutes ago  Exited (0) 11 minutes ago              funny_solomon
fcb81013b5cb  uhub.service.ucloud.cn/first/ubi8:latest  /bin/bash   2 minutes ago   Exited (0) 4 seconds ago               jovial_pare

在我们退出之后,容器状态也变成退出状态,这是因为容器因服务而生,如果服务结束,那么容器也结束。
因此-d也可以解决这个问题
-d 后台运行
[root@node1 ~]# podman run -it -d   uhub.service.ucloud.cn/first/ubi8:latest  /bin/bash
29a51b1678cfef5f08737ef09dd8f9ae7dc99f616b04a89e352c191212e12f19
[root@node1 ~]# podman ps
CONTAINER ID  IMAGE                                     COMMAND     CREATED        STATUS            PORTS       NAMES
29a51b1678cf  uhub.service.ucloud.cn/first/ubi8:latest  /bin/bash   4 seconds ago  Up 3 seconds ago              elastic_chebyshev


这样他在我们后台就可以一直运行,因为他会一直执行我们-it分配的/bin/bash终端
🤪如果/bin/bash执行失败,说明某些镜像不支持/bash终端,换成/bin/sh即可
🤪注意,如果拉取的镜像本身就带有命令,那么一定不要加/bin/bash!!!这会覆盖掉镜像本身自带的命令!!!
指定容器名
[root@node1 ~]# podman run -it -d  --name lo01   uhub.service.ucloud.cn/first/ubi8:latest  /bin/bash
6be3eea6b6341aeda9c907f4dcac1062c27b21f6e88c6c156b87fa9389537b5d

[root@node1 ~]# podman ps
CONTAINER ID  IMAGE                                     COMMAND     CREATED        STATUS            PORTS       NAMES
29a51b1678cf  uhub.service.ucloud.cn/first/ubi8:latest  /bin/bash   4 minutes ago  Up 4 minutes ago              elastic_chebyshev
6be3eea6b634  uhub.service.ucloud.cn/first/ubi8:latest  /bin/bash   4 seconds ago  Up 5 seconds ago               lo01
通过create创建的容器
[root@node1 ~]# podman create -it  --name lo02   uhub.service.ucloud.cn/first/ubi8:latest  /bin/bash
f4894fd240ce1c680f9ef22b17100c30a8517daeba507171a9b6f2b8caa3058e

[root@node1 ~]# podman ps -a
CONTAINER ID  IMAGE                                     COMMAND     CREATED         STATUS                     PORTS       NAMES
2fd88ee277d1  uhub.service.ucloud.cn/first/ubi8:latest  /bin/bash   23 minutes ago  Exited (0) 23 minutes ago              funny_solomon
fcb81013b5cb  uhub.service.ucloud.cn/first/ubi8:latest  /bin/bash   15 minutes ago  Exited (0) 12 minutes ago              jovial_pare
29a51b1678cf  uhub.service.ucloud.cn/first/ubi8:latest  /bin/bash   10 minutes ago  Up 10 minutes ago                      elastic_chebyshev
6be3eea6b634  uhub.service.ucloud.cn/first/ubi8:latest  /bin/bash   6 minutes ago   Up 6 minutes ago                       lo01
f4894fd240ce  uhub.service.ucloud.cn/first/ubi8:latest  /bin/bash   9 seconds ago   Created                                lo02

[root@node1 ~]# podman ps
CONTAINER ID  IMAGE                                     COMMAND     CREATED         STATUS             PORTS       NAMES
29a51b1678cf  uhub.service.ucloud.cn/first/ubi8:latest  /bin/bash   10 minutes ago  Up 10 minutes ago              elastic_chebyshev
6be3eea6b634  uhub.service.ucloud.cn/first/ubi8:latest  /bin/bash   6 minutes ago   Up 6 minutes ago               lo01
这里通过create创建的容器,状态既不是UP也不是Exited,则需要通过别的方法启动。
启动容器
[root@node1 ~]# podman start lo02
lo02
[root@node1 ~]# podman ps
CONTAINER ID  IMAGE                                     COMMAND     CREATED         STATUS             PORTS       NAMES
29a51b1678cf  uhub.service.ucloud.cn/first/ubi8:latest  /bin/bash   13 minutes ago  Up 13 minutes ago              elastic_chebyshev
6be3eea6b634  uhub.service.ucloud.cn/first/ubi8:latest  /bin/bash   9 minutes ago   Up 9 minutes ago               lo01
f4894fd240ce  uhub.service.ucloud.cn/first/ubi8:latest  /bin/bash   3 minutes ago   Up 5 seconds ago               lo02
停止容器
[root@node1 ~]# podman stop lo02
lo02


f4894fd240ce  uhub.service.ucloud.cn/first/ubi8:latest  /bin/bash   4 minutes ago    Exited  (0) 8 seconds ago               lo02
重启容器
[root@node1 ~]# podman restart lo02
f4894fd240ce1c680f9ef22b17100c30a8517daeba507171a9b6f2b8caa3058e


f4894fd240ce  uhub.service.ucloud.cn/first/ubi8:latest  /bin/bash   5 minutes ago   Up 3 seconds ago               lo02
挂起容器
[root@node1 ~]# podman pause lo02
f4894fd240ce1c680f9ef22b17100c30a8517daeba507171a9b6f2b8caa3058e

f4894fd240ce  uhub.service.ucloud.cn/first/ubi8:latest  /bin/bash   6 minutes ago   Paused                                 lo02
回复容器
[root@node1 ~]# podman unpause lo02
f4894fd240ce1c680f9ef22b17100c30a8517daeba507171a9b6f2b8caa3058e


f4894fd240ce  uhub.service.ucloud.cn/first/ubi8:latest  /bin/bash   6 minutes ago   Up About a minute ago              lo02
查看容器详细信息【以IP为例】
[root@node1 ~]# podman inspect lo02

 "NetworkSettings": {
               "EndpointID": "",
               "Gateway": "10.88.0.1",
               "IPAddress": "10.88.0.7",
               "IPPrefixLen": 16,
删除容器
[root@node1 ~]# podman rm 2fd88ee277d1
2fd88ee277d17c3964fe1f87f4f618f713a5ad9d572fe842e4cd19cebb63b1e6


如果正在运行,可以强制删除
[root@node1 ~]# podman rm -f   lo01
6be3eea6b6341aeda9c907f4dcac1062c27b21f6e88c6c156b87fa9389537b5d
如果容器过多,可以删除全部容器
[root@node1 ~]# podman rm -f $(podman ps -aq)
fcb81013b5cb18c2fb7d7ca08cc39d5e16d25e6878fb96d635fe813b69bc70fa
29a51b1678cfef5f08737ef09dd8f9ae7dc99f616b04a89e352c191212e12f19
f4894fd240ce1c680f9ef22b17100c30a8517daeba507171a9b6f2b8caa3058e


-q 只显示ID号
进入容器
两种方式
1、
[root@node1 ~]# podman exec -it lc01 /bin/bash
[root@2973ef41907b /]#

2、
[root@node1 ~]# podman attach lc01
[root@2973ef41907b /]# exit
exit

exec进入后,退出容器仍然运行
attach进入后,退出容器,容器也退出
退出容器
[root@2973ef41907b ~]# exit
exit
导出容器【为了导入为镜像】
[root@node1 ~]# podman export lc01 > test.tar
[root@node1 ~]# ls
anaconda-ks.cfg  Desktop  Documents  Downloads  Music  Pictures  Public  Templates  test.tar  ubi8.tar  Videos
导入容器为镜像【变容器为镜像】
[root@node1 ~]# podman import test.tar
Getting image source signatures
Copying blob 1b22e5b2d547 done
Copying config 8f86bdb8af done
Writing manifest to image destination
Storing signatures
sha256:8f86bdb8af9540a8bde1dd17dd6b6682ec567f3c393503be8205f094ed668eed

[root@node1 ~]# podman images
REPOSITORY                                    TAG         IMAGE ID      CREATED        SIZE
<none>                                        <none>      8f86bdb8af95  9 minutes ago  212 MB
这里为镜像,有几个好处:
1、在容器中预配置的东西,在导出后,他人导入时依然存在。
2、节省配置的时间
这里是none,也可以修改成别的名字,
[root@node1 ~]# podman tag  8f86bdb8af95   example1:latest
[root@node1 ~]# podman images
REPOSITORY                                    TAG         IMAGE ID      CREATED         SIZE
localhost/example1                            latest      8f86bdb8af95  14 minutes ago  212 MB
由于没有配置仓库地址,所以他会默认为localhost。
rootless无根容器
通过普通用户创建和管理容器
🤪使用普通用户时,必须使用ssh登录
无根容器的优势
- 当普通用户运行的容器被入侵的时候,入侵者最多只能得到普通用户的权限
- 允许多个用户在同一个系统上运行容器
- 支持嵌套,在创建的容器中还可以创建容器【例如ubi9】
无根容器如果要做端口映射,只能映射1024以上的端口【非特权端口】
配置用户镜像仓库
[puser1@node1 ~]$ mkdir -p .config/containers
[puser1@node1 ~]$ cd .config/containers/
[puser1@node1 containers]$ cp -a /etc/containers/registries.conf .
容器的持久化存储
容器无法实现持久化存储,删除容器后,容器内文件丢失。
容器镜像构建好了后,内容不变,相当于模板。
有两种方法可以实现持久化存储
- 使用卷持久化存储
- 使用本地目录持久化存储
使用卷持久化存储
查看当前存储卷
[root@node1 ~]# podman volume list
[root@node1 ~]# podman volume ls
创建存储卷
[root@node1 ~]# podman volume create lv01
lv01
[root@node1 ~]# podman volume ls
DRIVER      VOLUME NAME
local       lv01
查看卷的详细信息
[root@node1 ~]# podman volume inspect lv01
[
     {
          "Name": "lv01",
          "Driver": "local",
           "Mountpoint": "/var/lib/containers/storage/volumes/lv01/_data",
          "CreatedAt": "2024-07-19T15:47:23.78420006+08:00",
          "Labels": {},
          "Scope": "local",
          "Options": {},
          "MountCount": 0,
          "NeedsCopyUp": true,
          "NeedsChown": true
     }
]
容器只有在启动的时候才可以使用卷。
[root@node1 ~]# podman run -it -d --name lo01 -v lv01:/opt/   uhub.service.ucloud.cn/first/ubi8:latest  /bin/bash
c8bcc354580e63e2029d75b666a57b2309516caf3b90d874616e9f9111382f4b

 -v lv01:/opt/
 -v 是--volume的缩写
 lv01 是卷名
 /opt是容器内的目录
验证效果
[root@c8bcc354580e /]# cd /opt/
[root@c8bcc354580e opt]# ls
[root@c8bcc354580e opt]# touch file{2..10}
[root@c8bcc354580e opt]# ls
file1  file10  file2  file3  file4  file5  file6  file7  file8  file

[root@node1 ~]# podman volume inspect lv01
[
     {
          "Name": "lv01",
          "Driver": "local",
           "Mountpoint": "/var/lib/containers/storage/volumes/lv01/_data",
          "CreatedAt": "2024-07-19T15:47:23.78420006+08:00",
          "Labels": {},
          "Scope": "local",
          "Options": {},
          "MountCount": 0,
          "NeedsCopyUp": true
     }
]
[root@node1 ~]# ll /var/lib/containers/storage/volumes/lv01/_data
total 0
-rw-r--r--. 1 root root 0 Jul 19 15:54 file1
-rw-r--r--. 1 root root 0 Jul 19 15:54 file10
-rw-r--r--. 1 root root 0 Jul 19 15:54 file2
-rw-r--r--. 1 root root 0 Jul 19 15:54 file3
-rw-r--r--. 1 root root 0 Jul 19 15:54 file4
-rw-r--r--. 1 root root 0 Jul 19 15:54 file5
-rw-r--r--. 1 root root 0 Jul 19 15:54 file6
-rw-r--r--. 1 root root 0 Jul 19 15:54 file7
-rw-r--r--. 1 root root 0 Jul 19 15:54 file8
-rw-r--r--. 1 root root 0 Jul 19 15:54 file9
实际上,在/opt创建的文件,都可以在通过podman volume inspect lv01查看到的挂载点上查看到。
验证是否是持久化存储
[root@node1 ~]# podman rm -f c8bcc354580e
c8bcc354580e63e2029d75b666a57b2309516caf3b90d874616e9f9111382f4b
[root@node1 ~]# podman run -it -d --name lo01 -v lv01:/opt uhub.service.ucloud.cn/first/ubi8:latest /bin/bash
6da0707f4ea1c47ac2db397cab7ddc8925fcedf748fbf82bbe004772fc6366e9
[root@node1 ~]# podman exec -it lo01 /bin/bash
[root@6da0707f4ea1 /]# cd /opt/
[root@6da0707f4ea1 opt]# ls
file1  file10  file2  file3  file4  file5  file6  file7  file8  file9
可以看到在删除容器后,重新创建后,/opt目录下所有的东西仍然存在。
相当于将本机目录挂载到容器目录上面。
删除卷
[root@node1 ~]# podman volume rm lv02
将宿主机的文件拷贝到容器当中
[root@node1 ~]# podman cp /etc/shadow lo01:/opt/
使用本地目录实现持久化存储
使用
[root@node1 ~]# mkdir /ld01
[root@node1 ~]# podman run -it -d --name lo02 -v  /ld01/:/opt/   uhub.service.ucloud.cn/first/ubi8:latest  /bin/bash
8de5ddb4d73d70b698a40b4563b4866207c5a473b25aadc2aebdf66370357d99
selinux导致的问题
[root@node1 ~]# podman exec -it lo02 /bin/bash
[root@8de5ddb4d73d /]# cd /opt/
[root@8de5ddb4d73d opt]# ls
ls: cannot open directory '.': Permission denied


[root@node1 ~]# ll -Zd /ld01/
drwxr-xr-x. 2 root root unconfined_u:object_r: default_t :s0 6 Jul 19 16:38 /ld01/
[root@8de5ddb4d73d opt]# ls -ldZ
drwxr-xr-x. 2 root root unconfined_u:object_r: default_t :s0 6 Jul 19 08:38 .
虽然两者都是default_t,但仍然不可访问,因为在容器中这里不应该是default_t.
这里以刚刚卷的容器为例
[root@6da0707f4ea1 /]# ls -ldZ /opt/
drwxr-xr-x. 2 root root system_u:object_r: container_file_t :s0 151 Jul 19 08:20 /opt/
[root@node1 ~]# ll -dZ /var/lib/containers/storage/volumes/lv01/_data
drwxr-xr-x. 2 root root system_u:object_r: container_file_t :s0 151 Jul 19 16:20 /var/lib/containers/storage/volumes/lv01/_data
他们的标签都是container_file_t
只有如此,才可以正常使用
解决方法:
- 开启的时候修改
- 创建后手动修改
[root@node1 ~]# podman run -it -d --name lo03 -v  /ld03:/opt:Z  uhub.service.ucloud.cn/first/ubi8:latest /bin/bash

[root@node1 ~]# podman exec -it lo03 /bin/bash
[root@ed60baa79f9a /]# ls -ldZ /opt/
drwxr-xr-x. 2 root root system_u:object_r:container_file_t:s0:c348,c691 6 Jul 19 16:19 /opt/
[root@node1 ~]# ll -dZ /ld03/
drwxr-xr-x. 2 root root system_u:object_r:container_file_t:s0:c348,c691 6 Jul 20 00:19 /ld03/


 开启时修改
通过【Z】可以将宿主机文件标签和容器文件标签保持一致
**Z ** 大Z 表示不允许其他容器使用这个目录
**z ** 小z表示可以让其他容器也使用这个目录
容器网络
在创建容器后,容器本身是有网卡的,也是可以上网的。默认为桥接模式。
同时他也有网络源仓库。
不过上述情况并非全部容器都有,如果镜像没有,那么容器也没有。
【如果ping命令没有,安装即可】
容器的网卡流量走的是宿主机的网卡
容器
[root@6da0707f4ea1 /]# ip route
default via  10.88.0.1  dev eth0 proto static
10.88.0.0/16 dev eth0 proto kernel scope link src 10.88.0.10


宿主机
 podman0: <BROADCAST,MULTICAST,UP,LOWER_UP> mtu 1500 qdisc noqueue state UP group default qlen 1000
    link/ether 16:e3:29:2a:30:b6 brd ff:ff:ff:ff:ff:ff
    inet  10.88.0.1 /16 brd 10.88.255.255 scope global podman0
       valid_lft forever preferred_lft forever
    inet6 fe80::ec16:5dff:fe79:9b60/64 scope link
       valid_lft forever preferred_lft forever

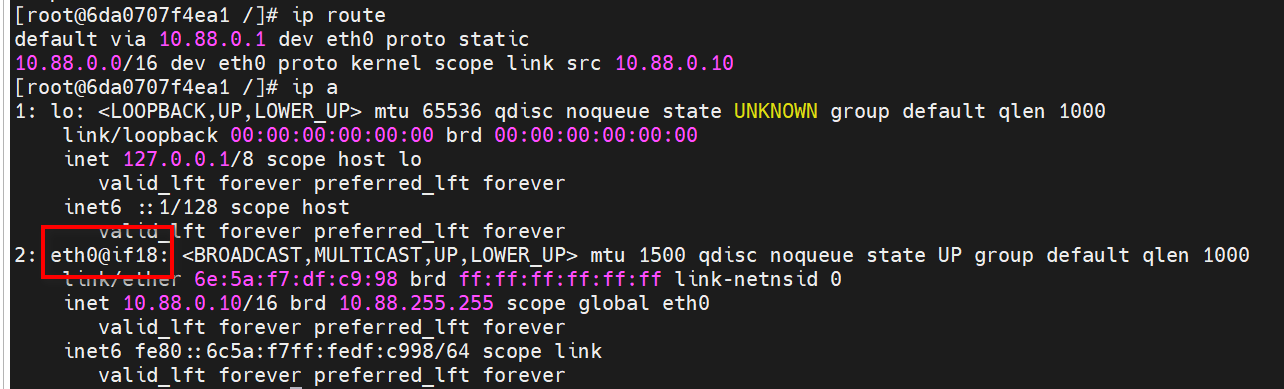
这里的eth0@if18 就是宿主机红框的18
这张网卡当创建虚拟机的时候就会创建,如果将他down掉,那么容器将不能上网。
查找方式如上图所示,根据最后的数字来查找。
当然也可以按照2: eth0@if18和~~~@if2 ,这样来判断
查找网卡设备
[root@node1 ~]# podman network ls
NETWORK ID    NAME        DRIVER
2f259bab93aa  podman      bridge
查看详细信息
[root@node1 ~]# podman network inspect podman
[
     {
          "name": "podman",
          "id": "2f259bab93aaaaa2542ba43ef33eb990d0999ee1b9924b557b7be53c0b7a1bb9",
          "driver": "bridge",
          "network_interface": "podman0",
          "created": "2024-07-20T00:58:03.955169659+08:00",
          "subnets": [
               {
                    "subnet": "10.88.0.0/16",
                    "gateway": "10.88.0.1"
               }
          ],
          "ipv6_enabled": false,
          "internal": false,
          "dns_enabled": false,
          "ipam_options": {
               "driver": "host-local"
          }
     }
]
- 桥接网络bridge【默认是桥接,叫做podman】
- 仅主机网络host【使用宿主机网络】
- none 没有网络
创建网络—bridge
[root@node1 ~]# podman network create --subnet 10.0.100.0/16 --gateway 10.0.100.1 --driver bridge example1
example1
--subnet 指定子网
--gateway 指定网关
--driver 指定网络模式【如果不指定,默认就是桥接】
example1 是网卡的名字
[root@node1 ~]# podman network ls
NETWORK ID    NAME        DRIVER
8b30ea84b24b  example1    bridge
2f259bab93aa  podman      bridge
但如果不指定外网,他不会显示出网卡,并且也不能上网。
创建容器-指定网卡
[root@node1 ~]# podman run -it -d --name lo-example --network=example1 uhub.service.ucloud.cn/first/ubi8:latest /bin/bash
[root@node1 ~]# podman inspect lo-example  | grep example1 -C 4
               "LinkLocalIPv6PrefixLen": 0,
               "Ports": {},
               "SandboxKey": "/run/netns/netns-2d9a22ec-7755-1392-e5ff-f22839c4ef96",
               "Networks": {
                    "example1": {
                         "EndpointID": "",
                         "Gateway": "10.0.100.1",
                         "IPAddress": "10.0.0.1",
                         "IPPrefixLen": 16,
                         "IPv6Gateway": "",
可以看到容器使用了这张网卡。
创建容器—指定host模式【使用宿主机网络】
[root@node1 ~]# podman run -it -d --name host-podman --network=host uhub.service.ucloud.cn/first/ubi9:latest /bin/bash
创建容器—指定none模式【没有网络】
[root@node1 ~]# podman run -it -d --name none-podman --network=none uhub.service.ucloud.cn/first/ubi9:latest /bin/bash
删除网卡
[root@node1 ~]# podman network rm -f   example1
也可以删除使用该网卡的容器,再删除网卡
端口映射
将宿主机的某一个端口和容器内的端口进行映射
例如 宿主机8080 容器80
访问宿主机的8080端口就是访问到了容器中的80端口。【类似端口转发】
通过apache 镜像来做端口映射实验
【网上拉取的镜像可能被他人二次开发,所以目录不一定在默认位置,需自己查找httpd.conf文件确认】
[root@node1 ~]# podman  pull uhub.service.ucloud.cn/first/httpd:latest
 拉取镜像
[root@node1 html]# podman run -it -d --name httpd-example -v /var/www/html:/usr/local/apache2/htdocs:Z -p 8080:80 uhub.service.ucloud.cn/first/httpd:latest 创建容器
这里指定的目录是容器内规定的目录,这个需要手动查看,并且此处不需要/bin/bash,因为httpd镜像本身是有命令了,如果使用/bin/bash则会覆盖。
-p 将访问宿主机8080端口的流量全部转发到容器的80端口。
通过ps查看
[root@node1 ~]# podman ps

CONTAINER ID  IMAGE                                      COMMAND           CREATED     STATUS                 PORTS                 NAMES
a218102c55ca  uhub.service.ucloud.cn/first/httpd:latest  httpd-foreground  3 days ago  Up About a minute ago   0.0.0.0:8080->80/tcp   httpd-example
验证效果
[root@node1 ~]# cd /var/www/html/
[root@node1 html]# echo "hello linux" > index.html
[root@node1 html]# curl localhost:8080
hello linux
【拓展】
-P 将宿主机某个端口随机分配给容器中的端口
容器中的端口是根据容器内的服务决定的。
[root@node1 html]# podman run -it -d --name httpd02 -P uhub.service.ucloud.cn/library/httpd:2.4.10
[root@node1 html]# podman ps
CONTAINER ID  IMAGE                                        COMMAND           CREATED        STATUS             PORTS

8f738a0b2eff  uhub.service.ucloud.cn/library/httpd:2.4.10  httpd-foreground  3 seconds ago  Up 3 seconds ago    0.0.0.0:41307->80/tcp   httpd02
如果使用普通用户映射端口,只可以使用1024以上的非特权端口。
systemd和容器集成
将容器做成systemd服务,通过systemctl去管理这个容器服务。
当容器被做成systemd服务时,podman rm -f 将无法删除容器,只可以通过systemctl来将其停止。
停止即意味着删除。
root用户配置集成容器
给容器创建单元服务配置文件的时候,这个容器必须是运行的状态。
存放位置:
1、/etc/systemd/system/
2、~username/.config/systemd/user
想把容器做成服务,第一步就是要有启动服务的配置文件
[root@node1 system]# podman generate systemd httpd-example --files --name --new
/etc/systemd/system/container-httpd-example.service
 生成配置文件
generate systemd 选择做一个systemd服务
httpd-example 指定容器名
--files 生成文件,如果不加,则是直接输出内容
--name 将文件名与容器保持一致
--new 每次启动容器都是从镜像里重新拉取一个新的容器
【如果不加,则相当于先停止,再启动】
🤪注意,一定要在正确的保存路径下生成文件,在别的目录下生成selinux会不一致。
在每次创建新的配置文件后,都需要重新加载systemd
[root@node1 system]# systemctl daemon-reload
启动创建的服务
[root@node1 system]# systemctl start container-httpd-example.service
无根容器配置systemd
创建配置文件
~username/.config/systemd/user
[puser1@node1 ~]$ mkdir .config/systemd/user -p

[puser1@node1 user]$ podman run -it -d --name httpd01 uhub.service.ucloud.cn/library/httpd:2.4.10
55e47ba67ccebbc385ddfb611d99c3588786234da3a57b0b7f1db6a57b9b8c8f
[puser1@node1 user]$ podman generate systemd httpd01 --files --new --name
/home/puser1/.config/systemd/user/container-httpd01.service
重新加载
[puser1@node1 user]$ systemctl --user daemon-reload
--user 说明要加载的是普通用户创建的,如果不加,则看不见创建的服务
启动服务
[puser1@node1 user]$ systemctl --user start container-httpd01.service
[puser1@node1 user]$ podman ps
CONTAINER ID  IMAGE                                        COMMAND           CREATED        STATUS            PORTS       NAMES
bf1663bab984  uhub.service.ucloud.cn/library/httpd:2.4.10  httpd-foreground  2 seconds ago  Up 3 seconds ago              httpd01

 浙公网安备 33010602011771号