SpringBoot——模板引擎及原理

更多内容,前往 IT-BLOG

一、模板引擎的思想


模板是为了将显示与数据分离,模板技术多种多样,但其本质都是将模板文件和数据通过模板引擎生成最终的 HTML代码。
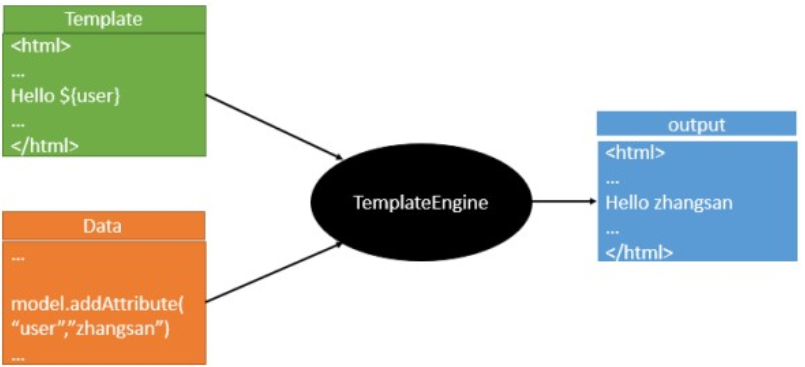
二、SpringBoot模板引擎


SpringBoot 推荐的模板引擎是Thymeleaf——>语法简单,功能强大。
【1】引入 thymeleaf的 starter启动器。

<dependency>
    <groupId>org.springframework.boot</groupId>
    <artifactId>spring-boot-starter-thymeleaf</artifactId>
</dependency>

<!-- 默认版本号在parent的dependents中配置,如果要替换其中的版本,设置如下 -->
<properties>
    <thymeleaf.version>3.0.2.RELEASE</thymeleaf.version>
    <!-- 布局功能的支持程序 thymeleaf3主程序,适配layout2以上版本 -->
    <thymeleaf-layout-dialect.version>2.1.1</thymeleaf-layout-dialect.version>
</properties>

【2】查看 thymeleaf 的默认配置:进入ThymeleafAutoConfiguration的 ThymeleafProperties配置文件中,如下:

 1 @ConfigurationProperties(
 2     prefix = "spring.thymeleaf"
 3 )
 4 public class ThymeleafProperties {
 5     private static final Charset DEFAULT_ENCODING = Charset.forName("UTF-8");
 6     private static final MimeType DEFAULT_CONTENT_TYPE = MimeType.valueOf("text/html");
 7     public static final String DEFAULT_PREFIX = "classpath:/templates/";
 8     public static final String DEFAULT_SUFFIX = ".html";
 9     private boolean checkTemplate = true;
10     private boolean checkTemplateLocation = true;
11     //只要我们吧HTML页面放在classpath:/templates/下就能够自动渲染
12     private String prefix = "classpath:/templates/";
13     private String suffix = ".html";
14 }

【3】测试:创建 controller如下:同时在 templates文件夹下创建 suceess.html与返回值相同。启动后输入:http://localhost:8080/success 便可跳转到 success.html页面。

@Controller
public class success {
    @RequestMapping("/success")
    public String success(){
        return "success";
    }
}

三、thymeleaf 使用


【1】导入 thymeleaf的名称空间:就会具有 thymeleaf的语法提示,不导入也可以,只是么有语法提示了。

<html lang="en"  xmlns:th="http://www.thymeleaf.org">

【2】写一个简单的 demo上个手,如下 controller层,给返回的页面添加数据,如下:

1 @Controller
2 public class success {
3     @RequestMapping("/success")
4     public String success(Map<String,String> map){
5         map.put("hello","你好");
6         return "success";
7     }
8 }

【3】打开我们的静态页面 success.html,根据 thymeleaf模板引擎语法,获取 hello的值,如下:

<body>
    <h1>成功</h1>
    <div th:text="${hello}">
        这是成功页面
    </div>
</body>

【4】需要注意的是:当 hello有值时,显示 hello获取到的值,如果单独只访问 success.html时,只显示前端页面的内容 “这是成功页面” 能够非常友好的结合前后端进行编程。
​    

四、thymeleaf语法规则


【1】th:text:改变当前元素里面的文本内容。语法文档:https://www.thymeleaf.org/doc/tutorials/3.0/thymeleafspring.pdf
th:任意html属性:可以替换原生的 HTML的元素。
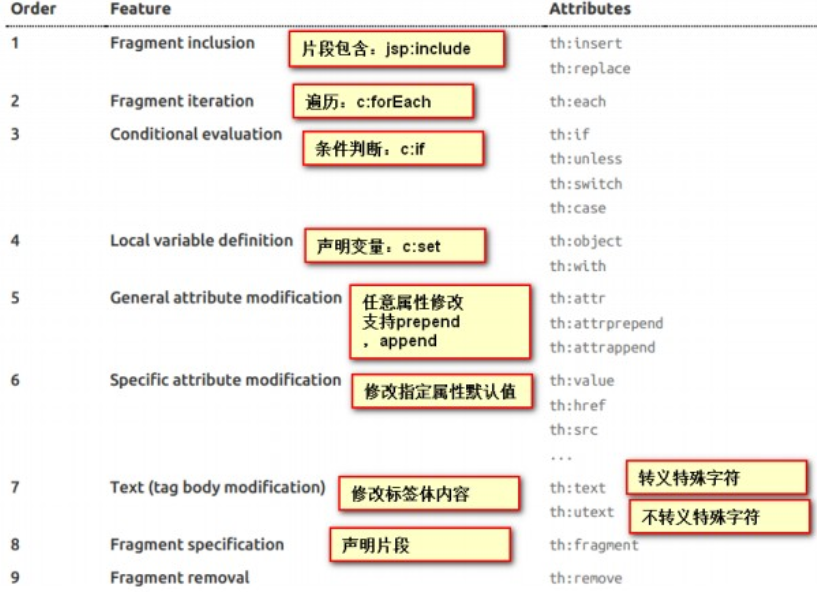


【2】表达式语法:行里表达式:[[xx]] —>相当于 th:text , [(xx)]—>相当于th:utext

 1 ● Simple expressions:(表达式语法)
 2     ○ Variable Expressions: ${...}:获取变量值,底层时OGNL;
 3         1)、获取对象的属性、调用方法;
 4         2)、使用内置的基本对象;#location...
 5         3)、内置的一些工具对象;#strings...
 6     ○ Selection Variable Expressions: *{...}:选择表达式,与${}的功能一样,有一个不同,可以参考文档。
 7     ○ Message Expressions: #{...}:用来获取国际化信息
 8     ○ Link URL Expressions: @{...}:用来定义URL连接
 9     ○ Fragment Expressions: ~{...}:片段引入表达式
10 ● Literals(字面量)
11     ○ Text literals: 'one text' , 'Another one!' ,…
12     ○ Number literals: 0 , 34 , 3.0 , 12.3 ,…
13     ○ Boolean literals: true , false
14     ○ Null literal: null
15     ○ Literal tokens: one , sometext , main ,…
16 ● Text operations:(文本操作)
17     ○ String concatenation: +
18     ○ Literal substitutions: |The name is ${name}|
19 ● Arithmetic operations:(数学运算)
20     ○ Binary operators: + , - , * , / , %
21     ○ Minus sign (unary operator): -
22 ● Boolean operations:(布尔运算)
23     ○ Binary operators: and , or
24     ○ Boolean negation (unary operator): ! , not
25 ● Comparisons and equality:(比较运算)
26     ○ Comparators: > , < , >= , <= ( gt , lt , ge , le )
27     ○ Equality operators: == , != ( eq , ne )
28 ● Conditional operators:(条件运算)
29     ○ If-then: (if) ? (then)
30     ○ If-then-else: (if) ? (then) : (else)
31     ○ Default: (value) ?: (defaultvalue)
32     ○ Special tokens:
33     ○ Page 17 of 106
34 ● No-Operation: _:(特殊操作)

【3】公共页面抽取

1 <!--抽取公共片段-->
2 <div th:fragment="copy">
3      2011 The Good Thymes Virtual Grocery
4 </div>
5 
6 <!--引入公共片段: ~{templatename::fragmentname} 片段 ~{templatename::selector} 选择器-->
7 <div th:insert="~{footer :: copy}"></div>
8 <-- or -->
9 <div th:insert="footer :: copy"></div>

三种引入功能片段的区别
 ▶ th:insert:将公共片段整个插入到声明引入的元素中。
 ▶ th:replace:将声明引入的元素替换成公共片段。
 ▶ th:include:将被引入的片段的内容包含进这个标签中。

 1 <footer th:fragment="copy">
 2     2011 The Good Thymes Virtual Gro
 3 </footer>
 4 
 5 <!--引入方式-->
 6 <div th:insert="footer :: copy"></di>
 7 <div th:replace="footer :: copy"></div>
 8 <div th:include="footer :: copy"></div>
 9 
10 <!--效果-->
11 <div>
12     <footer>
13         2011 The Good Thymes Virtual Grocery
14     </footer>
15 </div>
16 
17 <footer>
18     2011 The Good Thymes Virtual Grocery
19 </footer>
20 
21 <div>
22     2011 The Good Thymes Virtual Grocery
23 </div>

【4】日期格式化:通过内置对象 dates进行格式化。

<td th:text="${#dates.format(emp.birth,'yyyy-MM-dd')}"></td>

【5】通过 PUT请求提交数据:
     ● SpringMVC 中配置 HiddenHttpMethodFilter,(SpringBoot自动配置好)。
     ● 页面创建一个 post表单。
     ● 创建一个 input项,name="_method",值就是我们指定的方式。

 1 private String methodParam = "_method";
 2 protected void doFilterInternal(HttpServletRequest request, HttpServletResponse response, FilterChain filterChain) throws ServletException, IOException {
 3     HttpServletRequest requestToUse = request;
 4     if("POST".equals(request.getMethod()) && request.getAttribute("javax.servlet.error.exception") == null) {
 5         //重点:获取_method传过来的值
 6         String paramValue = request.getParameter(this.methodParam);
 7         if(StringUtils.hasLength(paramValue)) {
 8             String method = paramValue.toUpperCase(Locale.ENGLISH);
 9             if(ALLOWED_METHODS.contains(method)) {
10                 requestToUse = new HiddenHttpMethodFilter.HttpMethodRequestWrapper(request, method);
11             }
12         }
13     }
14 
15     filterChain.doFilter((ServletRequest)requestToUse, response);
16 }

页面实际操作:

<input type="hidden" name="_method" value="put" th:if="${emp}!=null">


 ----关注公众号,获取更多内容----

 
posted @ 2020-11-22 00:44  Java程序员进阶  阅读(131)  评论(0编辑  收藏  举报