
SpringBootAdmin部署
SpringBootAdmin配置过程
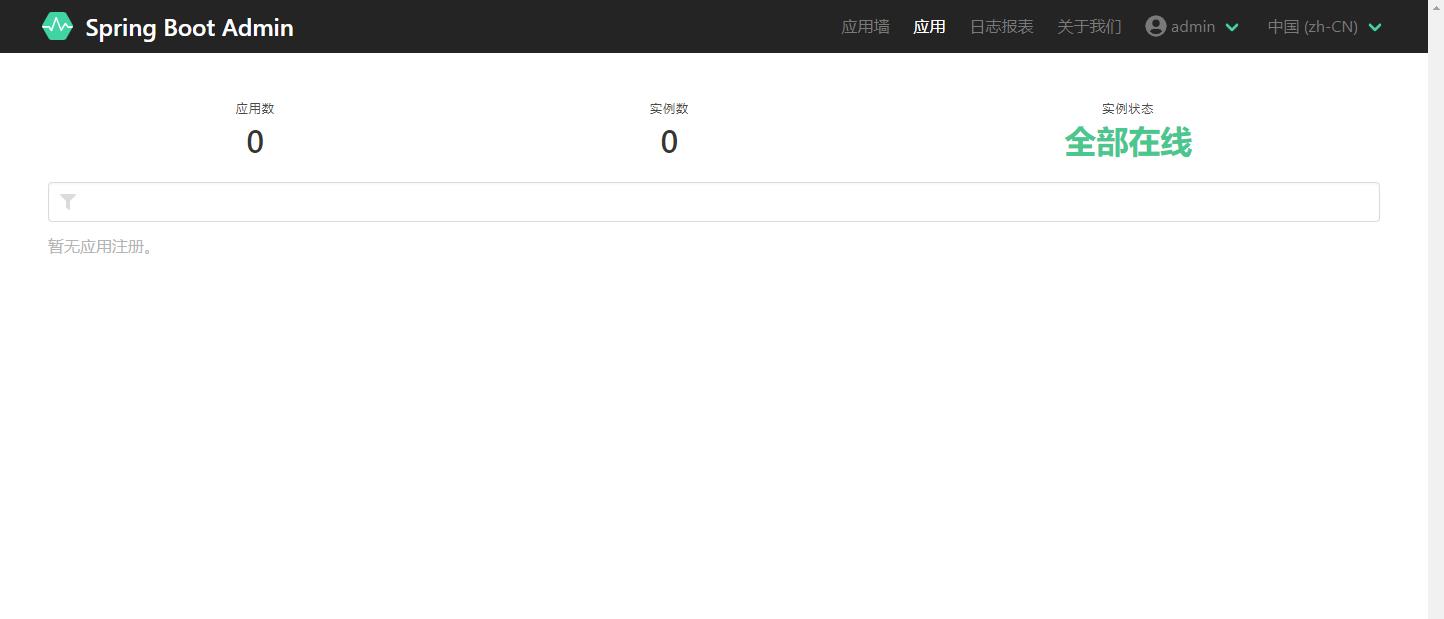
1.什么是SpringBootAdmin(SBA)?
Spring Boot Admin 是 codecentric 公司开发的一款开源社区项目,目标是让用户更方便的管理以及监控 Spring Boot ® 应用。 应用可以通过我们的Spring Boot Admin客户端(通过HTTP的方式)或者使用Spring Cloud ®(比如Eureka,consul的方式)注册。 而前端UI则是使用Vue.js,基于Spring Boot Actuator默认接口开发的。
2.入门配置
2.1服务端程序
第一步:添加依赖。你需要配置你的服务端程序。 为此,只需要配置一个基础的boot项目(使用 start.spring.io 生成脚手架)。 由于Spring Boot Admin Server同时支持servlet和webflux,所以你需要在其中进行选择,并添加对应的Spring Boot Starter。 在本例中,我们使用servlet作为web starter。
<dependency>
    <groupId>de.codecentric</groupId>
    <artifactId>spring-boot-admin-starter-server</artifactId>
    <version>2.6.6</version>
</dependency>
<dependency>
    <groupId>org.springframework.boot</groupId>
    <artifactId>spring-boot-starter-web</artifactId>
</dependency>
第二步:在main class(主启动类)上添加@EnableAdminServer注解,启用SBA服务器端配置。
@Configuration
@EnableAutoConfiguration
@EnableAdminServer
public class SpringBootAdminApplication {
    public static void main(String[] args) {
        SpringApplication.run(SpringBootAdminApplication.class, args);
    }
}
2.2客户端应用程序
要想在SBA服务端注册你的应用,你需要引入SBA客户端,或者是使用 Spring Cloud服务发现 (例如 Eureka、Consul等等)。 这里有一个 在SBA服务端使用静态配置的简单选项。
方法一:SBA程序客户端主动暴露
第一步:注册的应用都需要添加Spring Boot Admin客户端依赖。
<dependency>
    <groupId>de.codecentric</groupId>
    <artifactId>spring-boot-admin-starter-client</artifactId>
    <version>2.6.6</version>
</dependency>
<dependency>
    <groupId>org.springframework.boot</groupId>
    <artifactId>spring-boot-starter-security</artifactId>
</dependency>
第二步:配置Spring Boot Admin服务端的URL来开启SBA客户端。
spring.boot.admin.client.url=http://localhost:8080  #将要注册到的Spring Boot Admin 服务端URL地址。
management.endpoints.web.exposure.include=*      #与Spring Boot 2一样,大部分默认接口都没有通过http暴露出来,这里我们将它们全部暴露。在生产环境,您应该酌情选择您要公开的接口。
management.info.env.enabled=true       #在Spring Boot 2.6版本之后,env信息默认是关闭的。所以我们必须启用它们
安全配置先忽略
方法二:SBA服务端主动寻找,使用Spring Cloud Discovery(理解错误,不是服务端主动寻找,还是客户端寻找)
唯一的区别就是不用再用注入依赖spring-boot-admin-starter-client,只用在客户端启动类上加注解@EnableDiscoveryClient //主要是这个
什么是Spring Cloud Discovery?
服务发现是微服务架构体系中最关键的组件之一。
如果尝试着用手动的方式来给每一个客户端来配置所有服务提供者的服务列表是一件非常困难的事,而且也不利于服务的动态扩缩容。Spring Cloud Discovery 可以帮助用户将服务自动注册到SBA 服务端并且能够动态感知和刷新某个服务实例的服务列表。
Spring Cloud Discovery主流的有Eureka、Zookeeper。 其优点是客户端不必依赖 `` 了。 你只需在admin服务端添加一个 DiscoveryClient 的实现 - 其它一切都会自动配置完成。
第一步:在依赖中添加spring-cloud-starter-eureka
<dependency>
    <groupId>org.springframework.cloud</groupId>
    <artifactId>spring-cloud-starter-netflix-eureka-client</artifactId>
</dependency>
第二步:在配置类中添加 @EnableDiscoveryClient 注解以启用服务发现 X(被发现)
@Configuration
@EnableAutoConfiguration
@EnableDiscoveryClient //主要是这个
@EnableScheduling
@EnableAdminServer
public class SpringBootAdminApplication {
    public static void main(String[] args) {
        SpringApplication.run(SpringBootAdminApplication.class, args);
    }

    //让所有的actuator接口都可以访问:
    @Configuration
    public static class SecurityPermitAllConfig extends WebSecurityConfigurerAdapter {
        @Override
        protected void configure(HttpSecurity http) throws Exception {
            http.authorizeRequests().anyRequest().permitAll()
                .and().csrf().disable();
        }
    }
}
第三步:服务端配置文件:告诉去哪里找客户端 X 高客户端去哪里找服务 √
eureka:
  instance:
    leaseRenewalIntervalInSeconds: 10
    health-check-url-path: /actuator/health
    metadata-map:
      startup: ${random.int}    #needed to trigger info and endpoint update after restart
  client:
    registryFetchIntervalSeconds: 5
    serviceUrl:
      defaultZone: ${EUREKA_SERVICE_URL:http://localhost:8761}/eureka/

management:
  endpoints:
    web:
      exposure:
        include: "*"
  endpoint:
    health:
      show-details: ALWAYS
3.具体使用
3.1客户端应用程序
显示版本号
对于 Spring Boot 应用程序,显示版本号最简单的办法,就是使用 spring-boot-maven-plugin maven插件,然后配置 goal build-info,之后该插件就会生成 META-INF/build-info.properties 文件了
<build>
    <plugins>
        <plugin>
            <groupId>org.springframework.boot</groupId>
            <artifactId>spring-boot-maven-plugin</artifactId>
            <executions>
                <execution>
                    <goals>
                        <goal>build-info</goal>
                    </goals>
                </execution>
            </executions>
        </plugin>
    </plugins>
</build>
查看日志文件
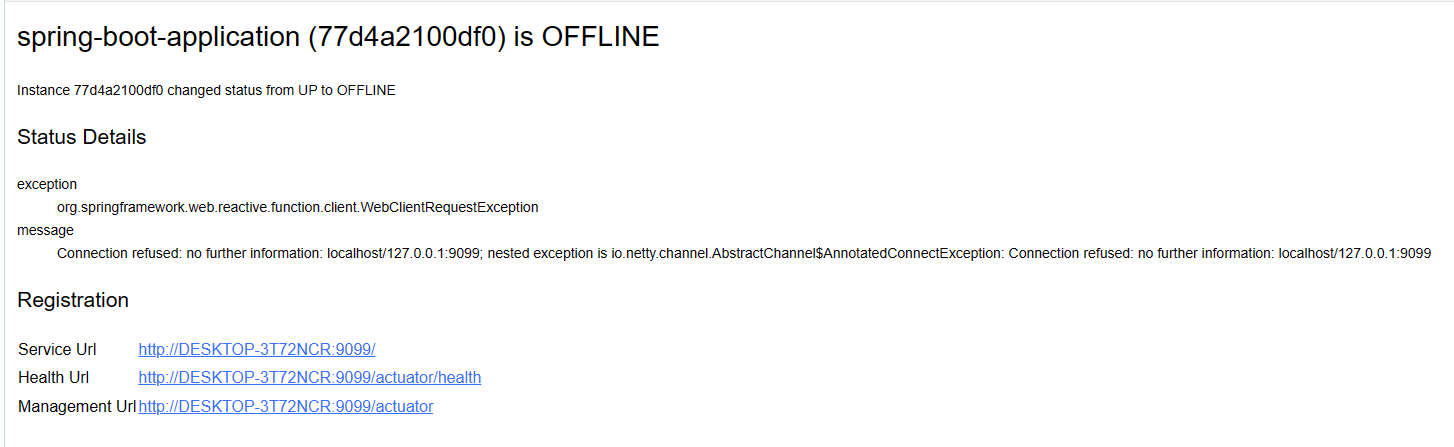
默认情况下,无法通过actuator接口访问日志文件,因此默认Spring Boot Admin中是看不到日志文件的。 要想启用actuator的日志文件接口,需要设置 logging.file.path 或 logging.file.name 来配置Spring Boot读写日志文件。
logging.file.path=D:\\localLog\\special-work.log
关于日志文件配置的区别
https://blog.csdn.net/catoop/article/details/119421514
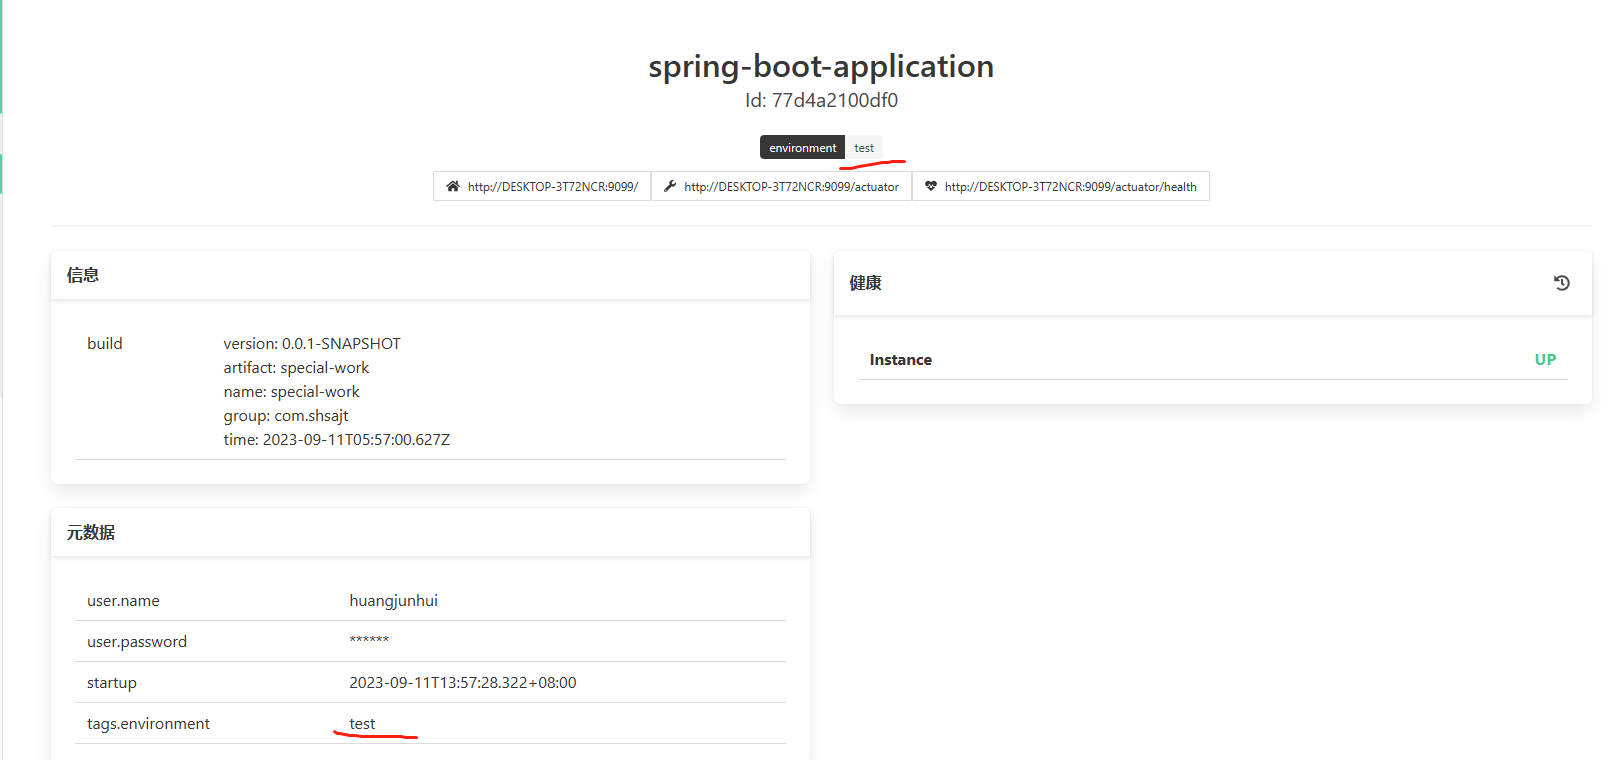
显示实例的标签
您可以为每个实例添加一个 标签(Tags) 来提高其可读性,它们会显示在应用列表以及实例试图中。 默认情况下实例不会被添加任何标签,它取决与客户端有没有向metadata元数据中添加标签或是向其它info接口中指定标签。
#使用metadata元数据
spring.boot.admin.client.instance.metadata.tags.environment=test

#使用info接口
info.tags.environment=test
3.2SBA服务端
SpringClound服务发现
静态配置:
Spring Cloud提供了一个 SimpleDiscoveryClient。它允许我们通过静态配置的方式指定客户端应用。就是新增一个客户端应用,就该配置文件,加上一个客服端应用的路径
<dependency>
    <groupId>org.springframework.cloud</groupId>
    <artifactId>spring-cloud-starter</artifactId>
</dependency>
spring:
  cloud:
    discovery:
      client:
        simple:
          instances:
            test:
              - uri: http://instance1.intern:8080
                metadata:
                  management.context-path: /actuator
              - uri: http://instance2.intern:8080
                metadata:
                  management.context-path: /actuator
其他方式发现服务端:见2.2方法二
消息通知
邮件通知是以HTML格式渲染的电子邮件,它使用 Thymeleaf 作为模板。 要想开启邮件通知,需要使用 spring-boot-starter-mail 配置 JavaMailSender 并设置一个收件人
第一步:将spring-boot-starter-mail添加到依赖中。
<dependency>
    <groupId>org.springframework.boot</groupId>
    <artifactId>spring-boot-starter-mail</artifactId>
</dependency>
第二步:配置一个JavaMailSender
spring.mail.host=smtp.example.com
spring.boot.admin.notify.mail.to=admin@example.com
第三步:根据下面的可选项配置邮件
| 属性名 | 说明 | |
|---|---|---|
| spring.boot.admin.notify.mail.enabled | 开启邮件提醒 | true |
| spring.boot.admin.notify.mail.ignore-changes | 要忽略的状态变化,使用逗号分割。格式是: " |
"UNKNOWN:UP" |
| spring.boot.admin.notify.mail.template | 用于渲染的Thymeleaf模板路径 | "classpath:/META-INF/spring-boot-admin-server/mail/status-changed.html" |
| spring.boot.admin.notify.mail.to | 收件人列表 | "root@localhost" |
第四步:最终正确的配置文件
服务端
spring:
  mail:
    host: smtp.163.com
    port: 25
    username: zhengs920@163.com
    password: ADS***QBVQ
    default-encoding: UTF-8
    properties:
      mail:
        smtp:
          connectiontimeout: 600000
          timeout: 600000
          writetimeout: 600000
          auth: true
          socketFactory:
            class: javax.net.ssl.SSLSocketFactory
            port: 25
  boot:
    admin:
      notify:
        mail:
          enabled : true
          to: ["zhengs920@163.com"]
          from : zhengs920@163.com
      monitor:
        default-timeout: 30000
客户端:
management.endpoints.health.db.enabled=true
management.endpoints.health.mail.enabled=true
4.安全
访问路径控制
对于本公司而言:因为公司项目springCurity和token的存在,我们再如下的类中设置好即可:
public class AccessDecisionManagerImpl implements AccessDecisionManager, FilterInvocationSecurityMetadataSource {

    private static final String[] openApi = {"/actuator/**"};//对于spring监控核心的请求全部放行
}
对于本公司的用户中心:只有在继承这个类中的extends WebSecurityConfigurerAdapter加一个方法即可
 @Override
 public void configure(WebSecurity web) {
      web.ignoring().antMatchers("/actuator/**");
 }
或者在继承了FilterInvocationSecurityMetadataSource这个类下面的opemApi括号里加入这个:
private static final String[] openApi = {"/actuator/**"};//对于spring监控核心的请求全部放行
FilterInvocationSecurityMetadataSource 和 WebSecurityConfigurerAdapter.configure方法之后会进行研究。
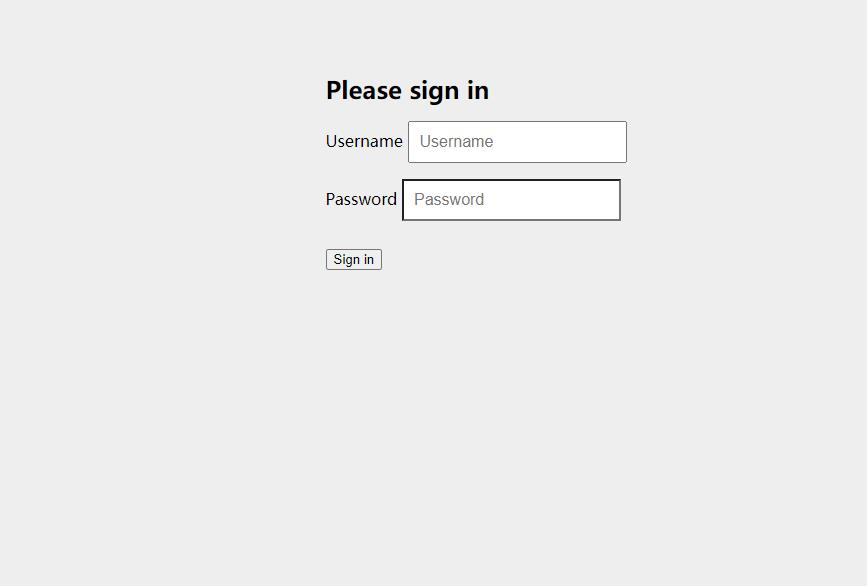
登录控制
为了给SBA的监控平台加上一层保险,不是谁都可以访问。操作如下:
第一步:服务端:pom文件加上
<dependency>
    <groupId>org.springframework.boot</groupId>
    <artifactId>spring-boot-starter-security</artifactId>
</dependency> //安全控制

<dependency>
    <groupId>de.codecentric</groupId>
    <artifactId>spring-boot-admin-server-ui-login</artifactId>
    <version>1.5.7</version>
</dependency> //登录页面ui
第二步:增加配置类WebSecurityConfig:
package com.shsajt.config;

import java.util.UUID;

import org.springframework.boot.autoconfigure.security.SecurityProperties;
import org.springframework.context.annotation.Configuration;
import org.springframework.http.HttpMethod;
import org.springframework.security.config.Customizer;
import org.springframework.security.config.annotation.web.builders.HttpSecurity;
import org.springframework.security.config.annotation.web.configuration.WebSecurityConfigurerAdapter;
import org.springframework.security.web.authentication.SavedRequestAwareAuthenticationSuccessHandler;
import org.springframework.security.web.csrf.CookieCsrfTokenRepository;
import org.springframework.security.web.util.matcher.AntPathRequestMatcher;

import de.codecentric.boot.admin.server.config.AdminServerProperties;

@Configuration(proxyBeanMethods = false)
public class WebSecurityConfig extends WebSecurityConfigurerAdapter{

	private final AdminServerProperties adminServer;

	private final SecurityProperties security;

	public WebSecurityConfig(AdminServerProperties adminServer, SecurityProperties security) {
		super();
		this.adminServer = adminServer;
		this.security = security;
	}


	@Override
	protected void configure(HttpSecurity http) throws Exception {
    SavedRequestAwareAuthenticationSuccessHandler successHandler = new SavedRequestAwareAuthenticationSuccessHandler();
    successHandler.setTargetUrlParameter("redirectTo");
    successHandler.setDefaultTargetUrl(this.adminServer.path("/"));

    http.authorizeRequests(
        (authorizeRequests) -> authorizeRequests.antMatchers(this.adminServer.path("/assets/**")).permitAll()
            .antMatchers(this.adminServer.path("/actuator/info")).permitAll()
            .antMatchers(this.adminServer.path("/actuator/health")).permitAll()
            .antMatchers(this.adminServer.path("/login")).permitAll().anyRequest().authenticated()
    ).formLogin(
        (formLogin) -> formLogin.loginPage(this.adminServer.path("/login")).successHandler(successHandler).and()
    ).logout((logout) -> logout.logoutUrl(this.adminServer.path("/logout"))).httpBasic(Customizer.withDefaults())
        .csrf((csrf) -> csrf.csrfTokenRepository(CookieCsrfTokenRepository.withHttpOnlyFalse())
            .ignoringRequestMatchers(
                new AntPathRequestMatcher(this.adminServer.path("/instances"),
                    HttpMethod.POST.toString()),
                new AntPathRequestMatcher(this.adminServer.path("/instances/*"),
                    HttpMethod.DELETE.toString()),
                new AntPathRequestMatcher(this.adminServer.path("/actuator/**"))
            ))
        .rememberMe((rememberMe) -> rememberMe.key(UUID.randomUUID().toString()).tokenValiditySeconds(1209600));
  }

}
第三步:配置文件yml加上:
server:
  port: 8083
spring:
  security:
    user:
      name: admin
      password: admin
客服端:应用程序配置文件加上(加上这个。才能在监控平台的服务器页面被显示出来)
  boot:
    admin:
      client:
        url: http://localhost:8000
        username: admin
        password: admin
5.总结
想要使用SBA,
1.服务端应用程序要在pom文件中配置依赖spring-boot-admin-starter-server:
<dependency>
    <groupId>de.codecentric</groupId>
    <artifactId>spring-boot-admin-starter-server</artifactId>
    <version>2.6.6</version>
</dependency>
<dependency>
    <groupId>org.springframework.boot</groupId>
    <artifactId>spring-boot-starter-web</artifactId>
</dependency>
2.客服端程序要在pom文件里面配置依赖spring-boot-admin-starter-client。
<dependency>
    <groupId>de.codecentric</groupId>
    <artifactId>spring-boot-admin-starter-client</artifactId>
    <version>2.6.6</version>
</dependency>
<dependency>
    <groupId>org.springframework.boot</groupId>
    <artifactId>spring-boot-starter-security</artifactId>
</dependency>
3.然后主启动类加注解
@Configuration
@EnableAutoConfiguration
@EnableAdminServer //主启动类加注解
public class SpringBootAdminApplication {
    public static void main(String[] args) {
        SpringApplication.run(SpringBootAdminApplication.class, args);
    }
}
4.和服务端配置文件
# 应用程序名称
# 应用程序端口
server:
  port: 8083
spring:
  mail:
    host: smtp.163.com
    port: 25
    username: ***@163.com
    password: ***
    properties:
      mail:
        smtp:
          auth: true
  boot:
    admin:
      notify:
        mail:
          enabled : true
          template : "classpath:/META-INF/spring-boot-admin-server/mail/status-changed.html"
          to: ***@163.com
          cc: ***@163.com
          from : Spring Boot Admin<zhengs920@163.com>
      monitor:
        default-timeout: 30000
5.客户端应用程序配置开放路径openApi
见4.安全:访问路径控制
6.客户端配置文件。
logging.file.path=D:\\localLog\\special-work.log  //路径以及名字
spring.boot.admin.client.instance.metadata.tags.environment=have security but openApi actuator  //标签
logging.pattern.file='%clr(%d{yyyy-MM-dd HH:mm:ss.SSS}){faint} %clr(%5p) %clr(${PID}){magenta} %clr(---){faint} %clr([%15.15t]){faint} %clr(%-40.40logger{39}){cyan} %clr(:){faint} %m%n%wEx'   //日志文件显示设置
spring.boot.admin.client.url=http://192.168.0.25:8083            //服务端接口路径
spring.boot.admin.client.username=admin                          //等上安控制之后的密码
spring.boot.admin.client.password=admin
management.endpoints.web.exposure.include=*
management.endpoints.health.show-details: ALWAYS
management.info.env.enabled=true
7.加上安全控制后的最终版本(有登录页面)
服务端加pom依赖
<?xml version="1.0" encoding="UTF-8"?>
<project xmlns="http://maven.apache.org/POM/4.0.0" xmlns:xsi="http://www.w3.org/2001/XMLSchema-instance"
	xsi:schemaLocation="http://maven.apache.org/POM/4.0.0 https://maven.apache.org/xsd/maven-4.0.0.xsd">
	<modelVersion>4.0.0</modelVersion>
	<parent>
		<groupId>org.springframework.boot</groupId>
		<artifactId>spring-boot-starter-parent</artifactId>
		<version>2.7.8</version>
		<relativePath/> <!-- lookup parent from repository -->
	</parent>
	<groupId>com.shsajt</groupId>
	<artifactId>sba</artifactId>
	<version>0.0.1-SNAPSHOT</version>
	<name>sba</name>
	<description>Demo project for Spring Boot</description>
	<properties>
		<java.version>1.8</java.version>
		<spring-boot-admin.version>2.5.0</spring-boot-admin.version>
	</properties>
	<dependencies>
		<dependency>
			<groupId>org.springframework.boot</groupId>
			<artifactId>spring-boot-starter-web</artifactId>
		</dependency>
		<dependency>
			<groupId>de.codecentric</groupId>
			<artifactId>spring-boot-admin-starter-server</artifactId>
		</dependency>
		<dependency>
                <groupId>org.springframework.boot</groupId>
                <artifactId>spring-boot-starter-mail</artifactId>
            </dependency>

            <dependency>
            <groupId>org.springframework.boot</groupId>
            <artifactId>spring-boot-starter-security</artifactId>
            </dependency>

        <dependency>
            <groupId>de.codecentric</groupId>
            <artifactId>spring-boot-admin-server-ui-login</artifactId>
            <version>1.5.7</version>
        </dependency>

	</dependencies>
	<dependencyManagement>
		<dependencies>
			<dependency>
				<groupId>de.codecentric</groupId>
				<artifactId>spring-boot-admin-dependencies</artifactId>
				<version>${spring-boot-admin.version}</version>
				<type>pom</type>
				<scope>import</scope>
			</dependency>

		</dependencies>
	</dependencyManagement>

	<build>
		<plugins>
			<plugin>
				<groupId>org.springframework.boot</groupId>
				<artifactId>spring-boot-maven-plugin</artifactId>
			</plugin>
		</plugins>
	</build>

</project>
然后服务端增加控制类,登录过一次就不用再次输入密码了。
package com.shsajt.config;

import java.util.UUID;
import org.springframework.boot.autoconfigure.security.SecurityProperties;
import org.springframework.context.annotation.Configuration;
import org.springframework.http.HttpMethod;
import org.springframework.security.config.Customizer;
import org.springframework.security.config.annotation.web.builders.HttpSecurity;
import org.springframework.security.config.annotation.web.configuration.WebSecurityConfigurerAdapter;
import org.springframework.security.web.authentication.SavedRequestAwareAuthenticationSuccessHandler;
import org.springframework.security.web.csrf.CookieCsrfTokenRepository;
import org.springframework.security.web.util.matcher.AntPathRequestMatcher;

import de.codecentric.boot.admin.server.config.AdminServerProperties;

@Configuration(proxyBeanMethods = false)
public class WebSecurityConfig extends WebSecurityConfigurerAdapter{

	private final AdminServerProperties adminServer;

	private final SecurityProperties security;

	public WebSecurityConfig(AdminServerProperties adminServer, SecurityProperties security) {
		super();
		this.adminServer = adminServer;
		this.security = security;
	}


	@Override
	protected void configure(HttpSecurity http) throws Exception {
    SavedRequestAwareAuthenticationSuccessHandler successHandler = new SavedRequestAwareAuthenticationSuccessHandler();
    successHandler.setTargetUrlParameter("redirectTo");
    successHandler.setDefaultTargetUrl(this.adminServer.path("/"));

    http.authorizeRequests(
        (authorizeRequests) -> authorizeRequests.antMatchers(this.adminServer.path("/assets/**")).permitAll()
            .antMatchers(this.adminServer.path("/actuator/info")).permitAll()
            .antMatchers(this.adminServer.path("/actuator/health")).permitAll()
            .antMatchers(this.adminServer.path("/login")).permitAll().anyRequest().authenticated()
    ).formLogin(
        (formLogin) -> formLogin.loginPage(this.adminServer.path("/login")).successHandler(successHandler).and()
    ).logout((logout) -> logout.logoutUrl(this.adminServer.path("/logout"))).httpBasic(Customizer.withDefaults())
        .csrf((csrf) -> csrf.csrfTokenRepository(CookieCsrfTokenRepository.withHttpOnlyFalse())
            .ignoringRequestMatchers(
                new AntPathRequestMatcher(this.adminServer.path("/instances"),
                    HttpMethod.POST.toString()),
                new AntPathRequestMatcher(this.adminServer.path("/instances/*"),
                    HttpMethod.DELETE.toString()),
                new AntPathRequestMatcher(this.adminServer.path("/actuator/**"))
            ))
        .rememberMe((rememberMe) -> rememberMe.key(UUID.randomUUID().toString()).tokenValiditySeconds(1209600));
  }
}
只有springsecurity,没有配置类
参考网址:https://blog.csdn.net/F_angT/article/details/131661667
现在的关键就是服务端如何携带把token放入客户端,然后客户端可以访问

 浙公网安备 33010602011771号