十六、shell编程-LNMP动态网站设计
1.LINUX部署
stop firewalld
disable selinux
2.Nginx部署
yum install -y nginx
netstat -anpt | grep 80 查看是否为80端口,答案为否
systemctl start nginx
netstat -anpt | grep 80 有80端口了
用别的客户端登录该ip可以看到网站,但该网站是静态的
3.php-fpm部署
部署方法
一.rpm部署
yum install -y php-fpm php-mysql php-gd
systemctl restart php-fpm
systemctl enable php-fpm
netstat -anpt | grep php-fpm 会发现php-fpm的端口是9000
rm -rf /usr/share/nginx/html/*
vim /usr/share/nginx/html/index.php
<?php
phpinfo();
?>
你会发现,直接把index.php下载下来了,因为nginx本身不负责处理php
vim /etc/nginx/nginx.conf
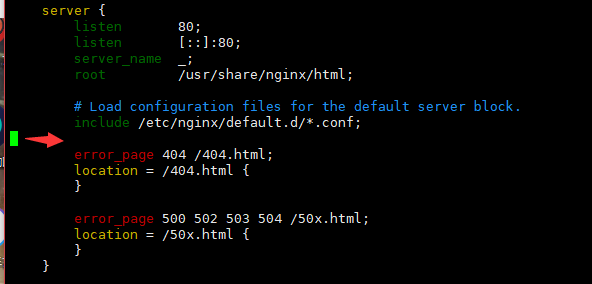
location / {
index index.php;
}
location ~ \.php$ {
root /usr/share/nginx/html;
fastcgi_pass 127.0.0.1:9000;
fastcgi_index index.php;
fastcgi_param SCRIPT_FILENAME $document_root$fastcgi_script_name;
include fastcgi_params;
}
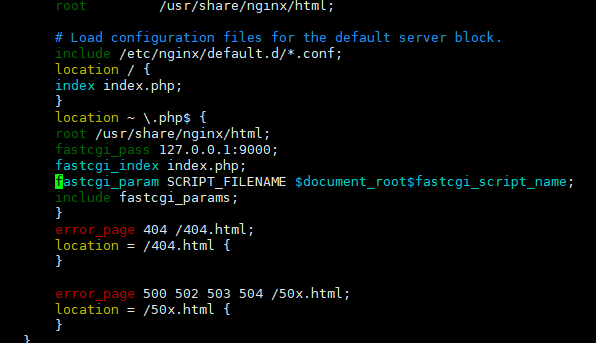
就是以.php结尾的文件pass到9000端口处理
systemctl restart nginx
如果重启失败可以去/var/log/messages日志里看看原因
4.mysql部署
yum install -y mariadb-server mariadb
systemctl start mariadb
systemctl enadble mariadb
mysqladmin password '123456'
mysql -uroot -p'123456'
————————
>create database bbs;
>grant all on bbs.* to phptest@'192.168.56.128' identified by '123456'; 给权限别的账号
>flush privileges; 刷新
>exit
————————
vim /usr/share/nginx/html/index.php
————————
<?php
$link=mysql_connect('192.168.56.128','phptest';'123456');
if ($link)
echo "Successfuly";
else
echo "Faile";
mysql_close();
?>
————————
5.业务上线
上传app
wget https://cn.wordpress.org/wordpress-4.9.1-zh_CN.zip
unzip wordpress-4.9.1-zh_CN.zip
ls /root/wordpress/wp-admin/images 可以发现很多图片
rm -rf /usr/share/nginx/html/*
cp -rf /root/wordpress/* /usr/share/nginx/html/
chown -R nginx.nginx /usr/share/nginx/html/*
chmod -R 777 /usr/share/nginx/html/
本局域网主机浏览192.168.56.128
示范案例
1.准备前台html页面
rm -rf /usr/share/nginx/html/*
vim /usr/share/nginx/html/index.html
————————
<html>
<head>
<meta charset="utf-8"/> # 定页面编码类型utf-8
</head>
<body>
<img src="logo.jpg"/> # 图片
<form action="insert.php" method="post"> # 数据通过insert.php以post方式传给后端
请输入您的姓:<input type="text" name="firstname"/> # firstname的数据
请输入您的名:<input type="text" name="lastname"/> # lastname的数据
请输入您的年龄:<input type="text" name="age"/> # age的数据
<input type="submit"/> # 确认传输数据的按钮
</form>
</body>
</html>
————————
2.准备php中间件insert.php
vim /usr/share/nginx/html/insert.php
————————
<?php
$con = mysql_connect("192.168.56.128","root","123456"); # 把数据库的账号密码地址赋值给$con
if ($con)
{
die("数据库没连上!".mysql_error()); # 如果没连上显示错误编号
}
mysql_select_db("my_db",$con); #
$sql="INSERT INTO Persons(FirstName,LastName,Age) VALUES ('$_POSTfirstname]','$_POST[lastname]','$_POST[age]')"; # 插入数据到Persons表;以POSE传入的firstname的值插到FirstName里;以POSE传入的lasttname的值插到LastName里;以POSE传入的age的值插到Age里。并赋值给$sql
if (!mysql_query($sql,$con)) # 如果数据库的选择和插入不成功,报错误编号
{
die('Error:'.mysql_error());
}
echo "1 record added"; # 一行数据以添加成功
————————
3.准备表和库
mysql -uroot -p'123456'
————————
create database my_db;
use my_db;
create table Persons (FirstName varchar(50),LastName char(50),Age int(12));
desc Persons;
grant all on *.* to root@'%' identified by '123456'; # 给别的地址用户也可以登录过来
————————
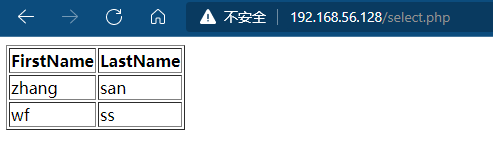
4.输出页面
vim /usr/share/nginx/html/select.php
————————————
<?php
$con = mysql_connect("192.168.56.128","root","123456");
if (!$con)
{
die('无法查询数据库:'.mysql_error());
}
mysql_select_db("my_db", $con);
$result = mysql_query("SELECT * FROM Persons");
echo "<table border='1'>
<tr>
<th>FirstName</th>
<th>LastName</th>
</tr>"
while($row = mysql_fetch_array($result))
{
echo "<tr>";
echo "<td>".$row['FirstName']."</td>";
echo "<td>".$row['LastName']."</td>";
echo"</tr>";
}
echo "</table>";
?>
————————————
打开192.168.56.128/select.php就可以看到输出的表格

 浙公网安备 33010602011771号