


SpringBoot初识
SpringBoot特点
SpringBoot可以说是Spring MVC的升级版,化繁为简,简化配置,让很复杂的一些操作变得简便,SpringBoot也逐渐成为下一代框架。它也是微服务的入门级框架,Spring为微服务架构提供了一整套组件,统称为SpringCloud,而SpringCloud是建立在SpringBoot基础之上的。
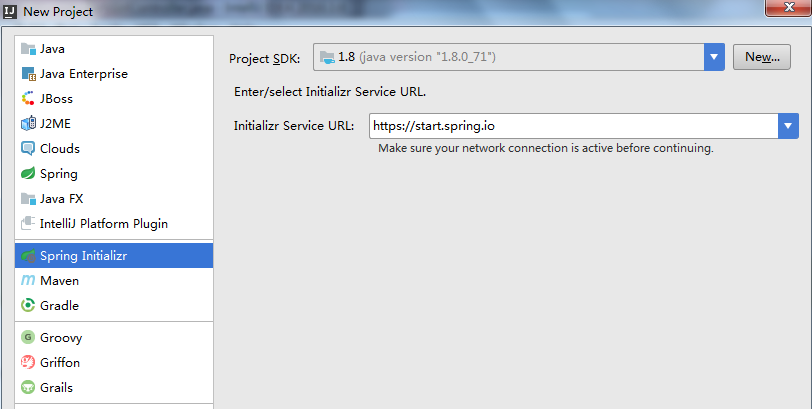
项目搭建
- IDE:idea
- jdk:1.8
- Maven:3.3.9


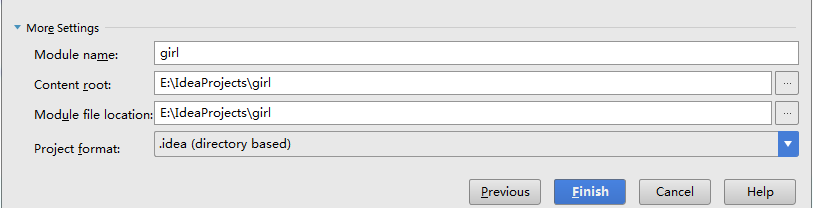
创建好项目以后,把.mvn文件夹,mvnw和mvnw.cmd文件删除,第一次创建项目target文件夹是没有的,以后会自动生成。

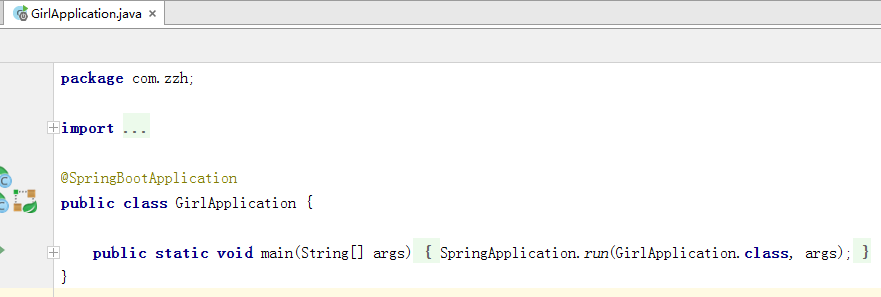
运行启动类

tomcat服务已打开,端口为8080.
新建类Helloworld
package com.zzh.controller;

import org.springframework.web.bind.annotation.RequestMapping;
import org.springframework.web.bind.annotation.RequestMethod;
import org.springframework.web.bind.annotation.RestController;

/**
 * Created by Administrator on 2017/4/8.
 */
@RestController
public class HelloWorld {

    @RequestMapping(value = "/helloworld", method = RequestMethod.GET)
    public String say() {
        return "This is SpringBoot! ";
    }
}
重新启动

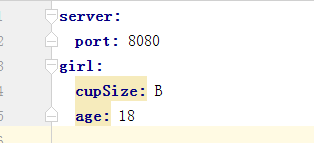
属性配置
为了达到简便,将resources下的application.properties删除,自己创建一个application.yml
新建类GirlProperties
里面的 @ConfigurationProperties(prefix = "girl")即获取前缀是girl的配置,也就是会将上面application.yml中出现girl的两个属性值,映射到这里。
还要注意添加 @Component注解,这样在其他类里使用 @Autowired才能注入成功。
package com.zzh.properties;

import org.springframework.boot.context.properties.ConfigurationProperties;
import org.springframework.stereotype.Component;


@Component
@ConfigurationProperties(prefix = "girl")
public class GirlProperties {

    private String cupSize;

    private Integer age;

    public String getCupSize() {
        return cupSize;
    }

    public void setCupSize(String cupSize) {
        this.cupSize = cupSize;
    }

    public Integer getAge() {
        return age;
    }

    public void setAge(Integer age) {
        this.age = age;
    }
}
HelloWorld类输出配置中的属性
package com.zzh.controller;

import com.zzh.properties.GirlProperties;
import org.springframework.beans.factory.annotation.Autowired;
import org.springframework.web.bind.annotation.RequestMapping;
import org.springframework.web.bind.annotation.RequestMethod;
import org.springframework.web.bind.annotation.RestController;

/**
 * Created by Administrator on 2017/4/8.
 */
@RestController
public class HelloWorld {

    @Autowired
    private GirlProperties girlProperties;

    @RequestMapping(value = "/helloworld", method = RequestMethod.GET)
    public String say() {
        return girlProperties.getCupSize()+girlProperties.getAge();
    }
}

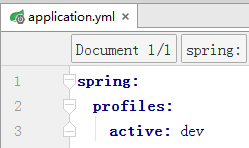
多环境配置
不同的环境可以设置不同的属性值,也就不需要每次修改都要改动yml总文件了。


通过在application.yml中spring.profiles.active使用不同的配置(比如dev或者prod)。
@RestController与 @Controller的区别
如果将上面HelloWorld类上的RestController注解换成Controller注解后会怎么样呢,启动时不会有什么错误,但是当我打开网页后,页面就不能正常显示了。那是因为之前用的RestController注解,它是Spring4之后新加的注解,原来返回json需要 @ResponseBody配合 @Controller,所以相当于 @Controller和 @ResponseBody的组合。
@RequestMapping注解
这个注解跟Spring MVC中差别不到,如果需要不同的地址都可以访问到这个方法,直接在value = {"/helloworld,"/hi"}写成集合形式就可以。
URL参数处理
- @PathVariable获取url中的数据
package com.zzh.controller;

import com.zzh.properties.GirlProperties;
import org.springframework.beans.factory.annotation.Autowired;
import org.springframework.web.bind.annotation.PathVariable;
import org.springframework.web.bind.annotation.RequestMapping;
import org.springframework.web.bind.annotation.RequestMethod;
import org.springframework.web.bind.annotation.RestController;

@RestController
@RequestMapping("/helloworld")
public class HelloWorld {

    @Autowired
    private GirlProperties girlProperties;

    @RequestMapping(value = "/{id}/say", method = RequestMethod.GET)
    public String say(@PathVariable("id") Integer myId) {
        return "id: " + myId;
    }
}

可以看到url上的待传参数与PathVariable中的值相同,而后面的形参可以随意设置。
- @RequestParam获取请求参数的值
这个注解可以为参数设置默认值,如果当用户选择不传入值而没有设置默认值时,系统会给自动赋为null。
@RequestMapping(value = "/talk" , method = RequestMethod.GET)//等同于@GetMapping(value="/talk")
    public String talk(@RequestParam(value = "id",required = false,defaultValue = "0") Integer myId) {
        return "id: " + myId;
    }
required=false表示不必传值,defaultValue即为默认值。

- @GetMapping组合注解
即 @RequestMapping(value = "/talk" , method = RequestMethod.GET)等同于 @GetMapping(value="/talk"),相应的也有 @PostMapping等等。
数据库操作
- 添加pom依赖
		<dependency>
			<groupId>org.springframework.boot</groupId>
			<artifactId>spring-boot-starter-data-jpa</artifactId>
		</dependency>

		<dependency>
			<groupId>mysql</groupId>
			<artifactId>mysql-connector-java</artifactId>
		</dependency>
- Spring-Data-Jpa
JPA(Java Persistence API)定义了一系列对象持久化标准,实现这一规范的产品有Hibernate,TopLink等。
- 添加数据库和jpa相应配置
在application.yml中添加:

创建数据库一个数据库,编码选择utf8mb4。
- 添加实体
数据库中现在并没有表,我们也不需要自己写sql去创建,只要创建相应的实体类就可以映射到数据库中。
package com.zzh.domain;


import javax.persistence.Entity;
import javax.persistence.GeneratedValue;
import javax.persistence.Id;


@Entity
public class Girl {

    @Id
    @GeneratedValue
    private Integer id;

    private String cupSize;

    private Integer age;

    public Girl() {
    }

    public Integer getId() {
        return id;
    }

    public void setId(Integer id) {
        this.id = id;
    }

    public String getCupSize() {
        return cupSize;
    }

    public void setCupSize(String cupSize) {
        this.cupSize = cupSize;
    }

    public Integer getAge() {
        return age;
    }

    public void setAge(Integer age) {
        this.age = age;
    }

}
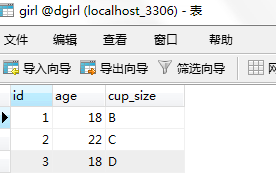
重新启动之后就会发现数据库中有表了。

- 创建操作数据库接口GirlRepository并继承JpaRepository
package com.zzh.repository;

import com.zzh.domain.Girl;
import org.springframework.data.jpa.repository.JpaRepository;


public interface GirlRepository extends JpaRepository<Girl,Integer>{

}
查询女生列表
创建GirlController类:

通过idea自带的REST Client进行测试,查询成功并返回了结果。

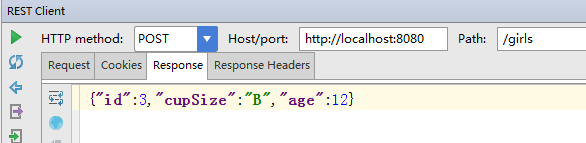
添加一个女生

注意:测试的时候需要给出参数

得到刚才添加的返回结果
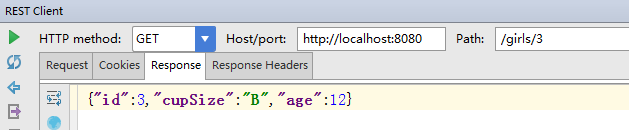
通过id查询一个女生

测试返回该女生:
通过id更新一个女生
更新有两种方法,一种就是new一个对象去替换原有的对象,还有一种就是被我注释了的,先通过ID查询到那个女生,然后修改里面的数据。

这里将3号女生的cupSize改为F:


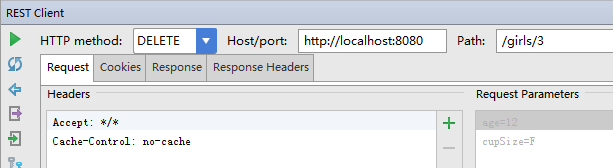
通过id删除女生

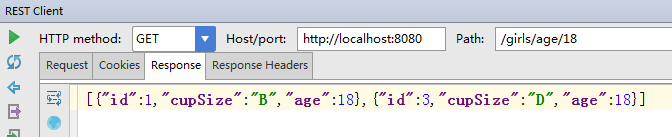
通过age来查询
之前都是通过id来查询,现在要通过年龄来查询,只要扩展一下GirlRepository接口即可。接口里面的方法名是有规定的,不能乱写。

在数据库中多存入一条18岁的信息进行查询
事务管理
现在需要同时插入两个女生,两者要么同时成功,要么同时失败,先按正常的套路来先设计一个Service类, @Transactional注解也暂时不加,把数据库中cupSize字段的长度改为1,然后故意在下面插入操作中,将girlA的cupSize设置为一个错误的数进行插入,因为正确的girlB先执行插入,所以girlB插入成功了,而girlA字段有错则插入不成功。这时违背了预先设定的同时成功同时失败准则,所以需要在这个方法上加上 @Transactional注解。
package com.zzh.service;

import com.zzh.domain.Girl;
import com.zzh.repository.GirlRepository;
import org.springframework.beans.factory.annotation.Autowired;
import org.springframework.stereotype.Service;
import org.springframework.transaction.annotation.Transactional;


@Service
public class GirlService {

    @Autowired
    private GirlRepository girlRepository;

    @Transactional
    public void insertTwo() {
        /**
         * 如果没有事务注解
         * 正确的girlB放在girlA前面
         * 数据库还是会存储girlB的信息
         */
        Girl girlB = new Girl();
        girlB.setCupSize("G");
        girlB.setAge(19);
        girlRepository.save(girlB);

        Girl girlA = new Girl();
        girlA.setCupSize("DDDD");
        girlA.setAge(18);
        girlRepository.save(girlA);

    }
}

测试后发现都没有插入成功,事务发挥了作用。
总结
这篇文章简单介绍了一些springBoot配置方面的事情,同时也介绍了部分主要的SpringBoot的注解,最主要的还是介绍了数据库的相关操作,通过使用spring-data-Jpa来实现对数据库的增删改查。下一篇文章将会进一步讲解springBoot表单验证和AOP异常处理。
作者:六月的余晖
出处:http://www.cnblogs.com/zhaozihan/
本文版权归作者和博客园共有,欢迎转载,但未经作者同意必须保留此段声明,且在文章页面明显位置给出原文链接,否则保留追究法律责任的权利。

 浙公网安备 33010602011771号