

20172311 2018-2019-1《程序设计与数据结构》实验二报告
课程:《程序设计与数据结构》
班级: 1723
姓名: 赵晓海
学号:20172311
实验教师:王志强
实验日期:2018年11月2日
必修/选修: 必修
1.实验内容
实验二-1-实现二叉树
参考教材p212,完成链树LinkedBinaryTree的实现(getRight,contains,toString,preorder,postorder)
用JUnit或自己编写驱动类对自己实现的LinkedBinaryTree进行测试,提交测试代码运行截图,要全屏,包含自己的学号信息
课下把代码推送到代码托管平台
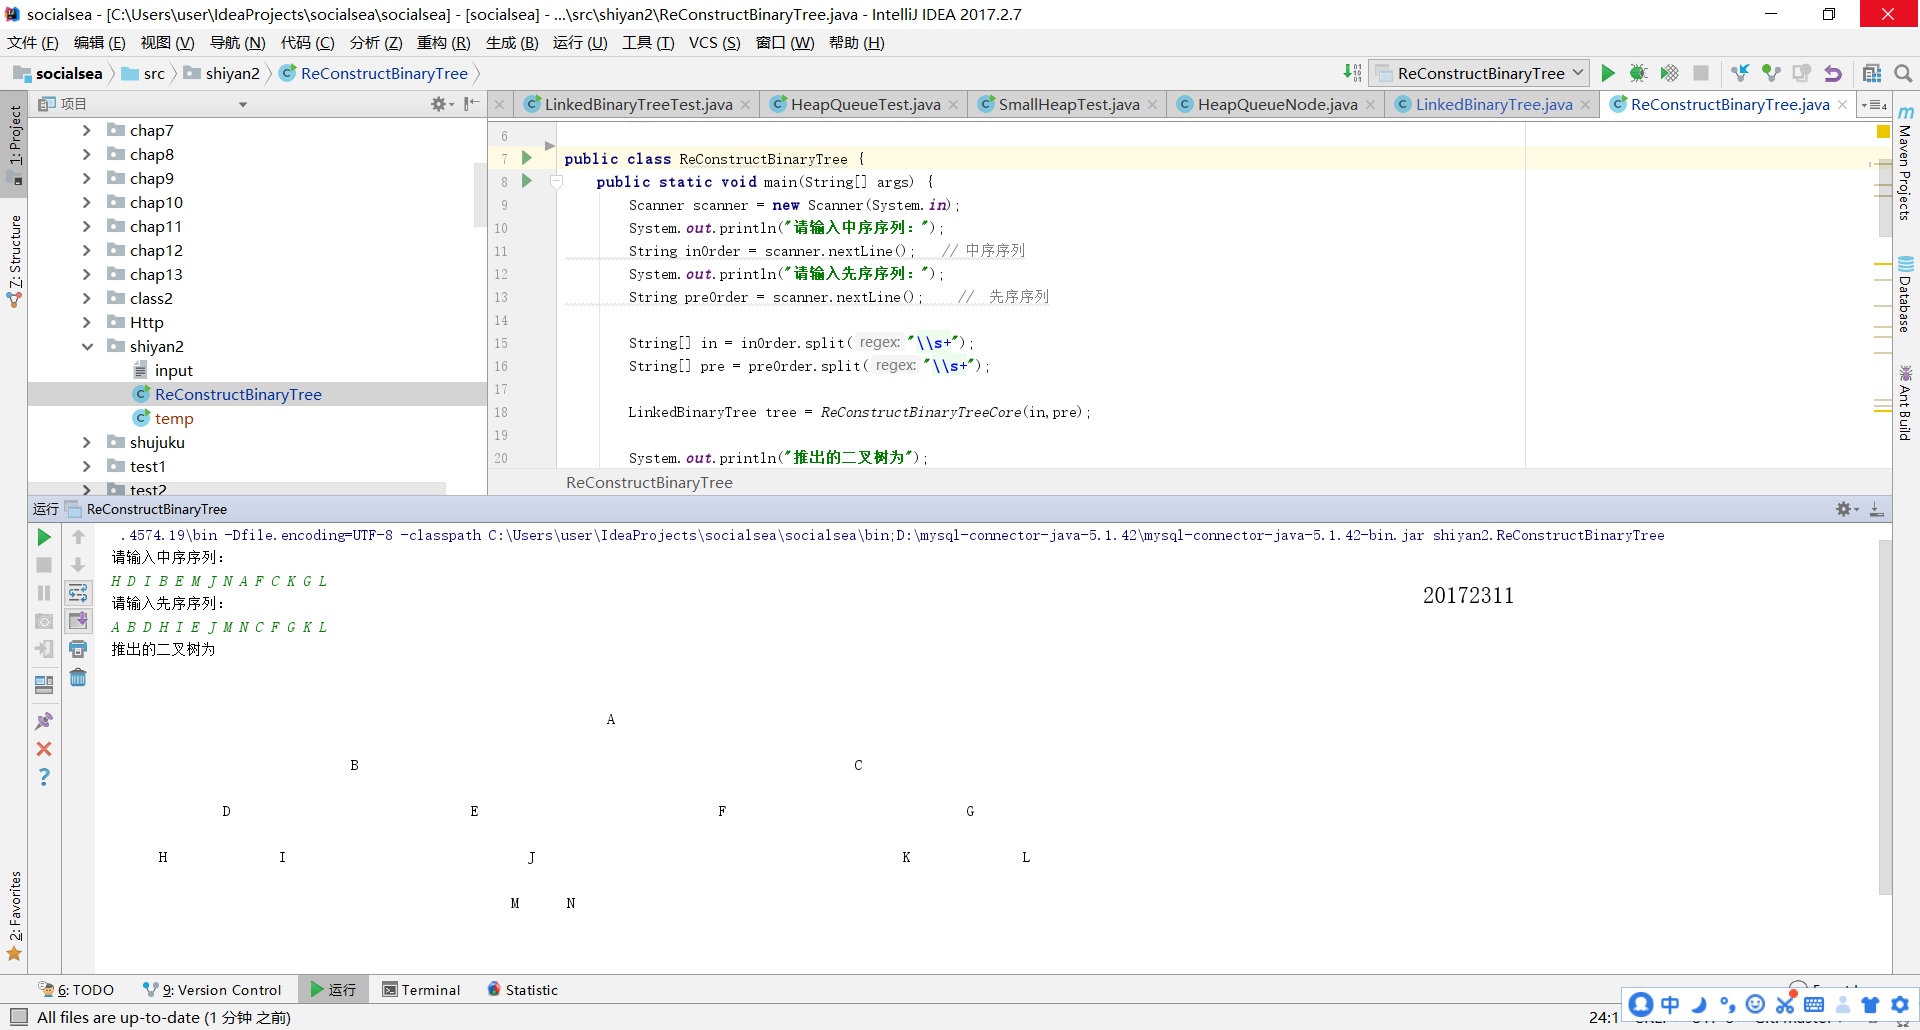
实验二 树-2-中序先序序列构造二叉树
基于LinkedBinaryTree,实现基于(中序,先序)序列构造唯一一棵二㕚树的功能,比如给出中序HDIBEMJNAFCKGL和后序ABDHIEJMNCFGKL,构造出附图中的树
用JUnit或自己编写驱动类对自己实现的功能进行测试,提交测试代码运行截图,要全屏,包含自己的学号信息
课下把代码推送到代码托管平台
实验二 树-3-决策树
自己设计并实现一颗决策树
提交测试代码运行截图,要全屏,包含自己的学号信息
课下把代码推送到代码托管平台
实验二 树-4-表达式树
输入中缀表达式,使用树将中缀表达式转换为后缀表达式,并输出后缀表达式和计算结果(如果没有用树,则为0分)
提交测试代码运行截图,要全屏,包含自己的学号信息
课下把代码推送到代码托管平台
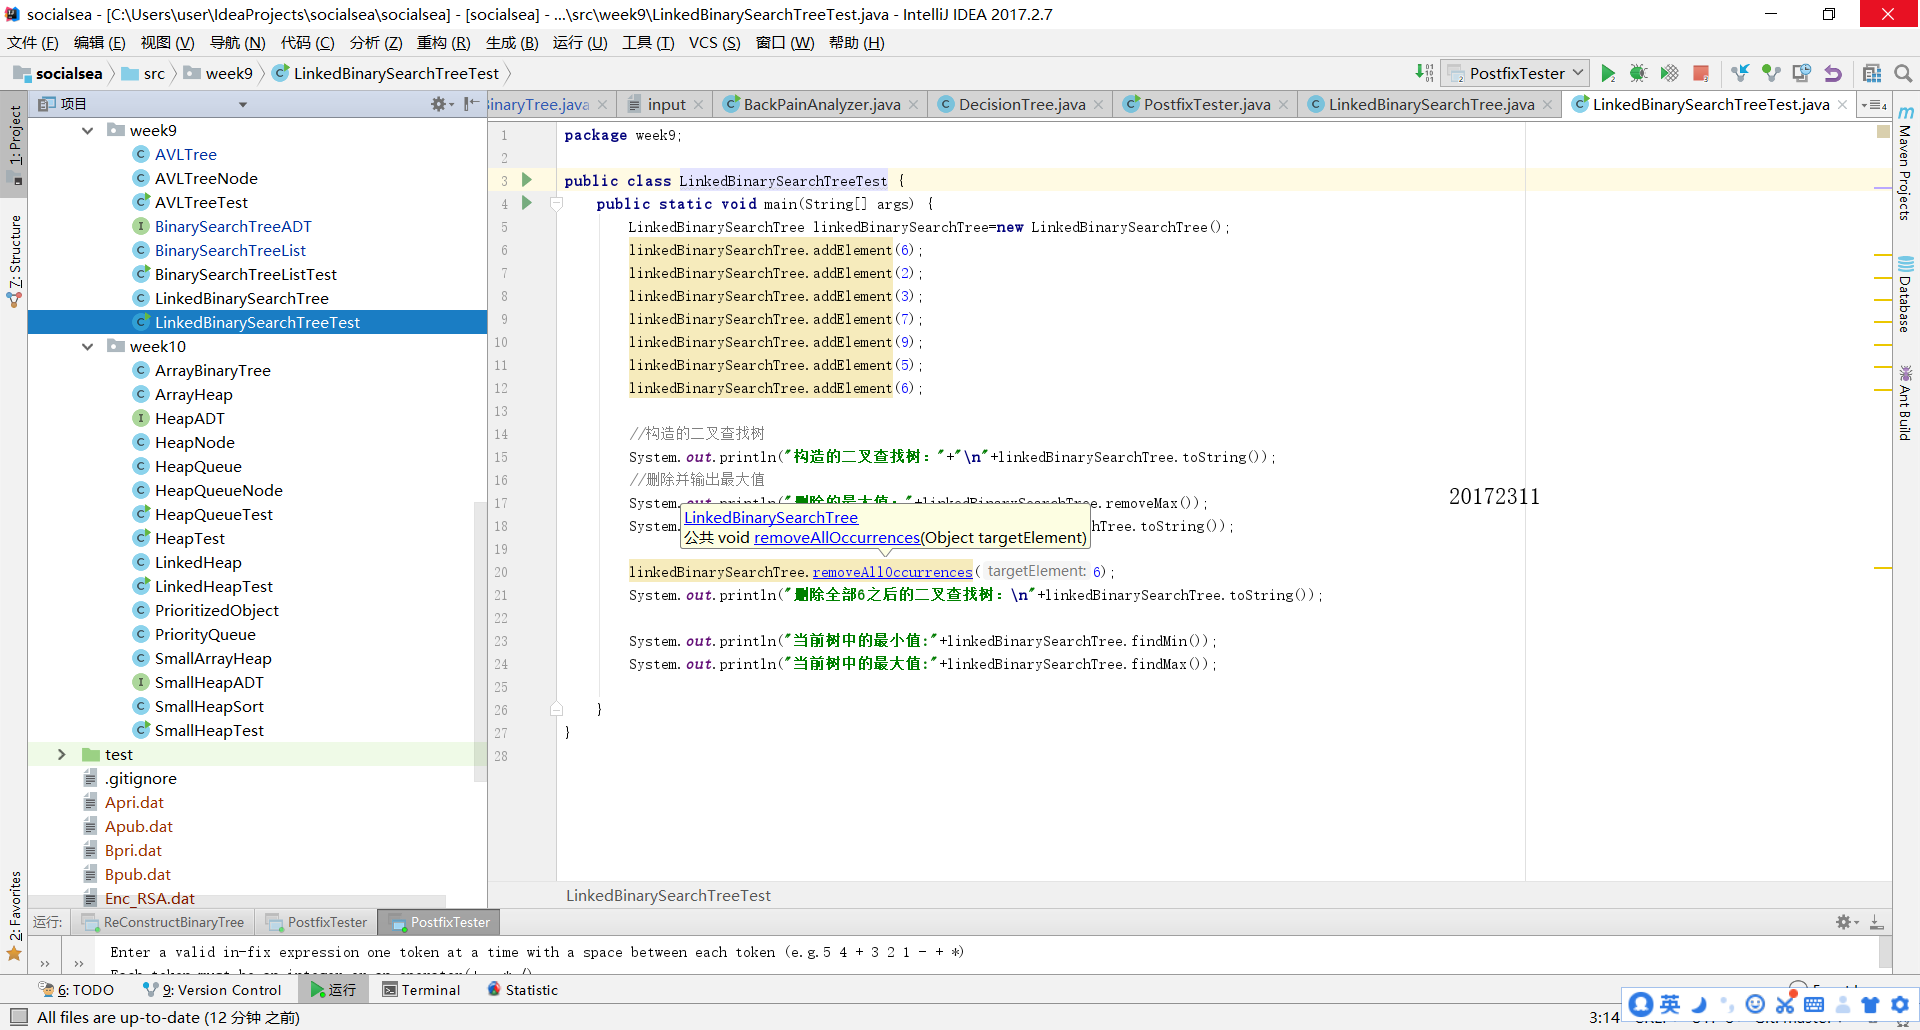
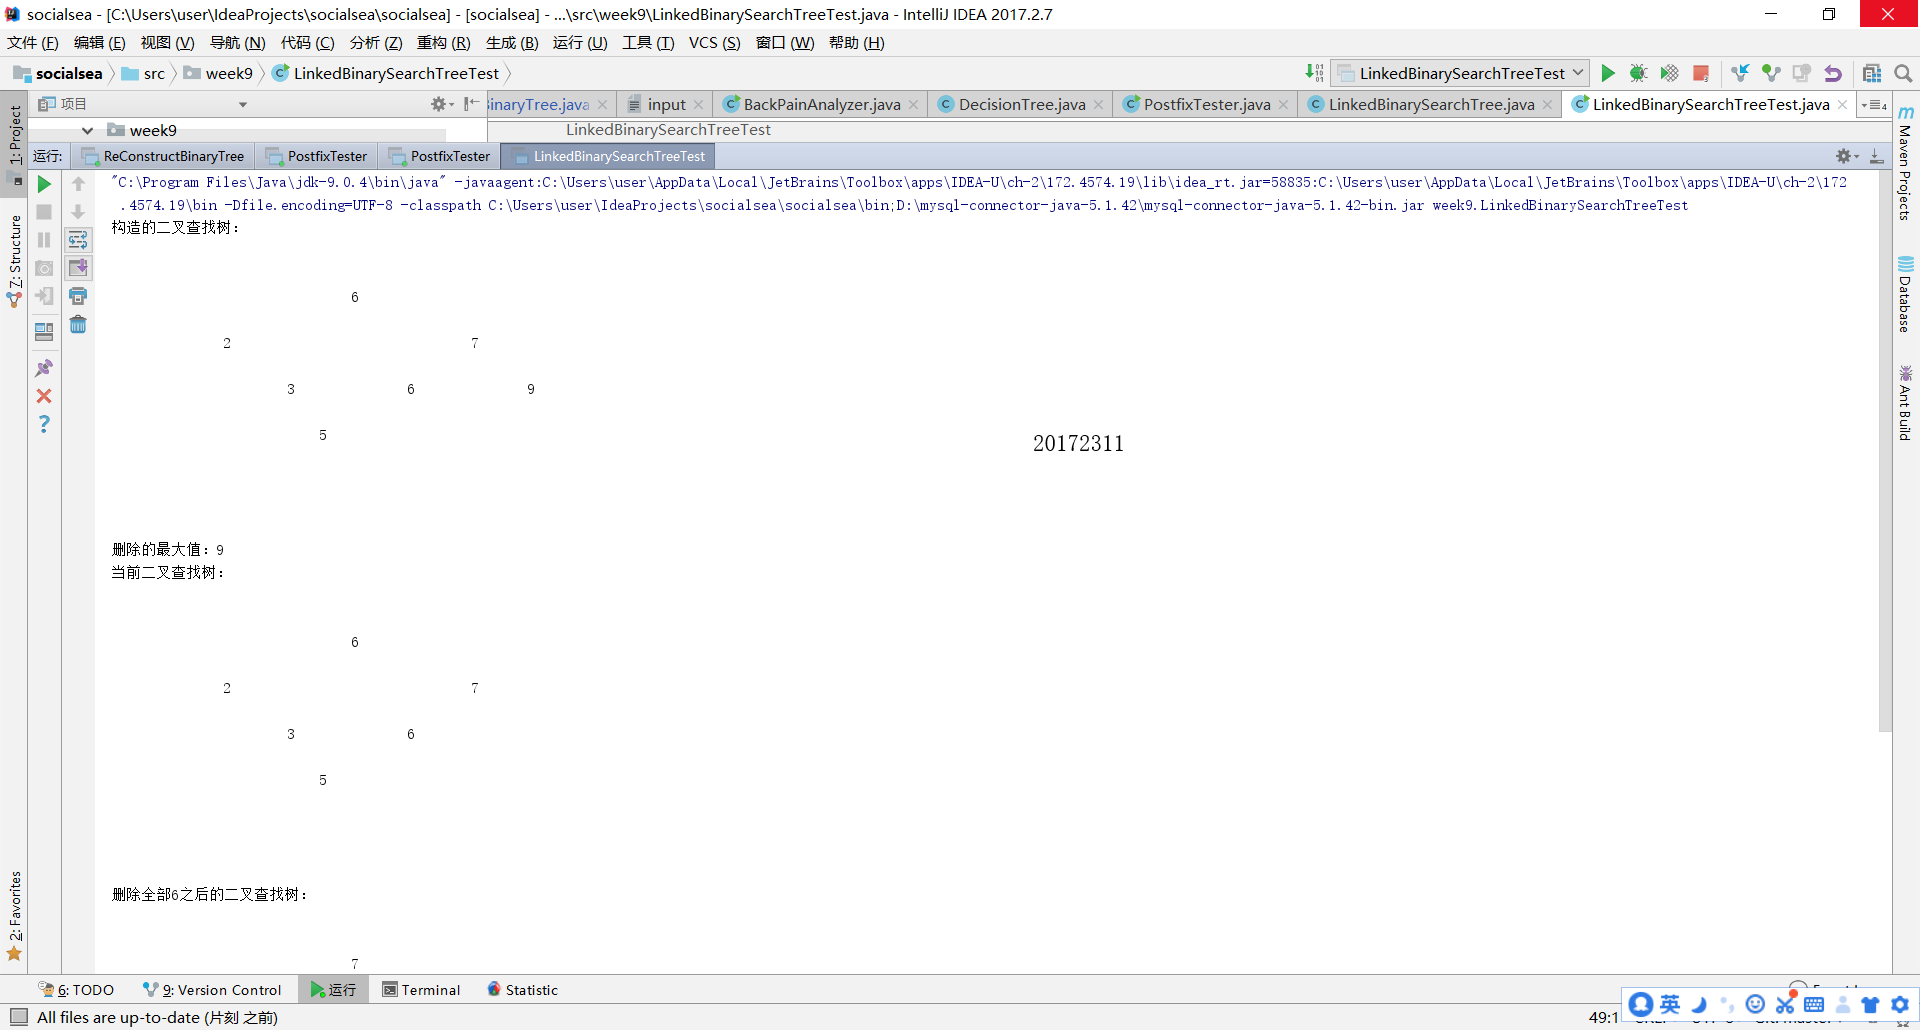
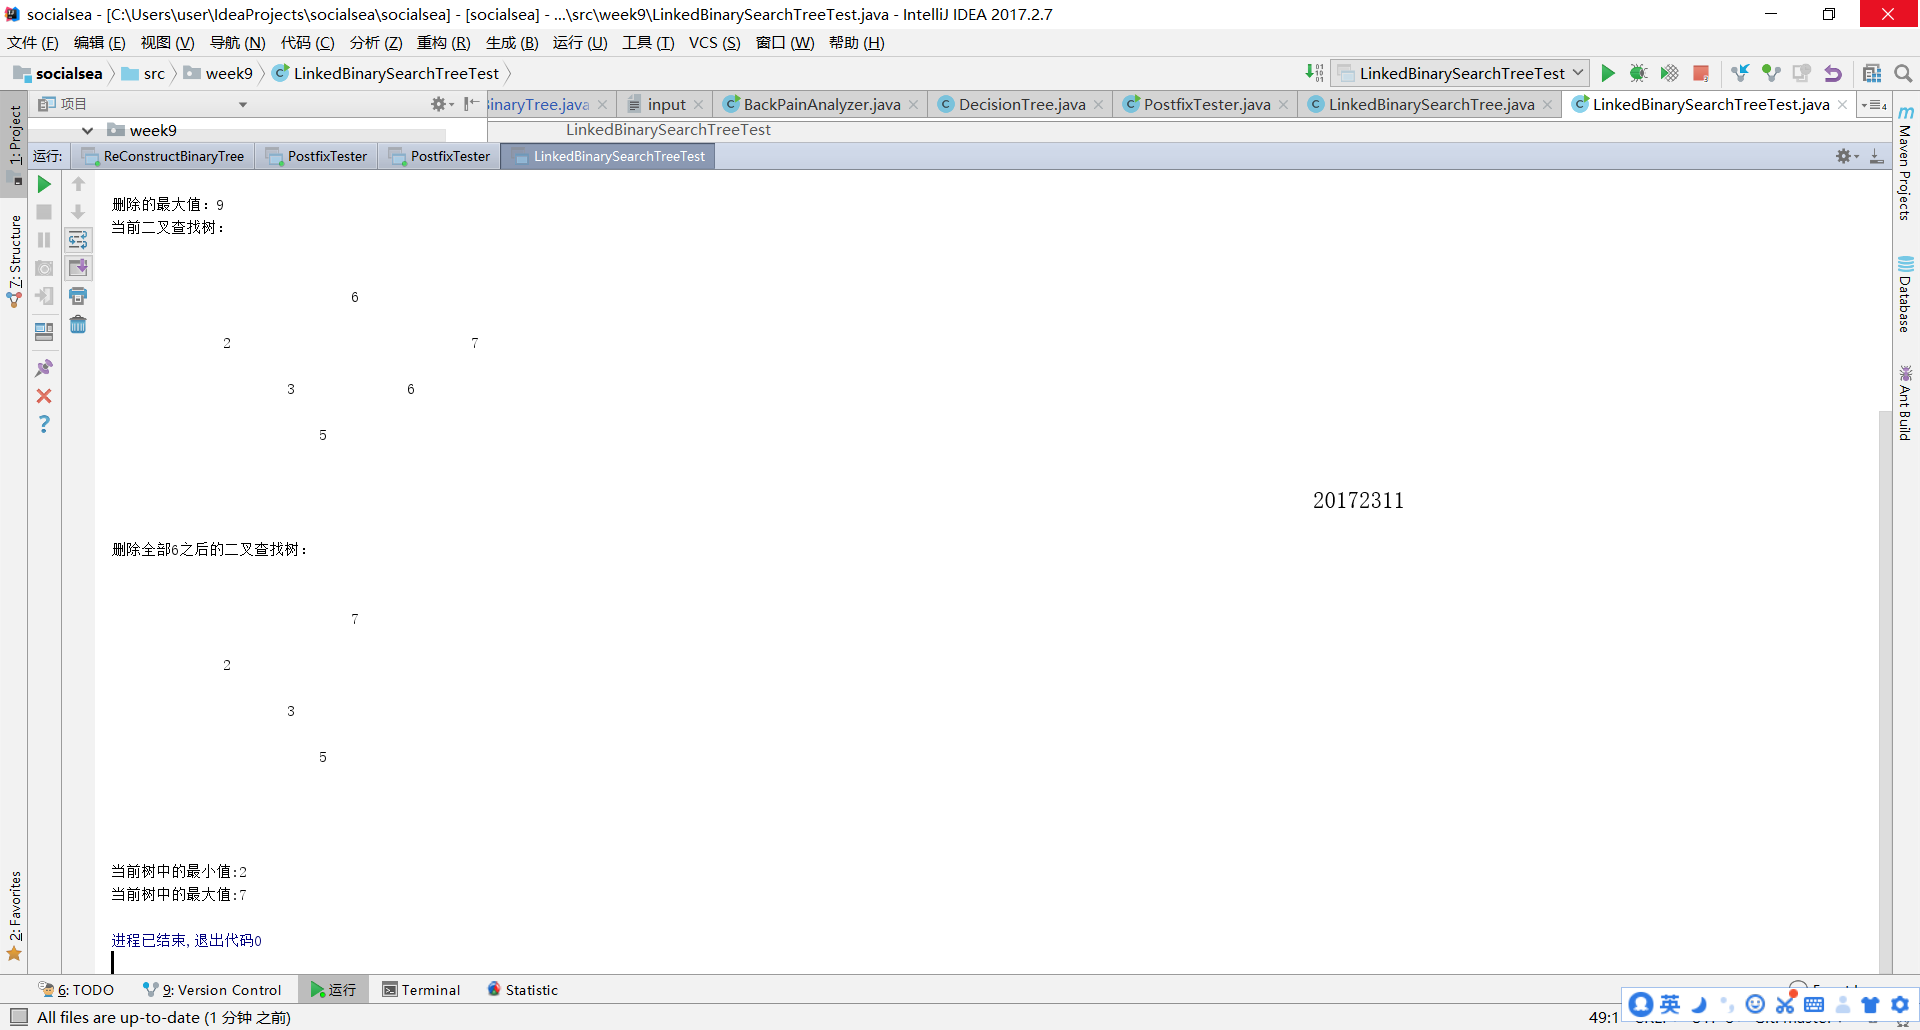
实验二 树-5-二叉查找树
完成PP11.3
提交测试代码运行截图,要全屏,包含自己的学号信息
课下把代码推送到代码托管平台
实验二 树-6-红黑树分析
参考http://www.cnblogs.com/rocedu/p/7483915.html对Java中的红黑树(TreeMap,HashMap)进行源码分析,并在实验报告中体现分析结果。
(C:\Program Files\Java\jdk-11.0.1\lib\src\java.base\java\util)
2.实验过程及结果
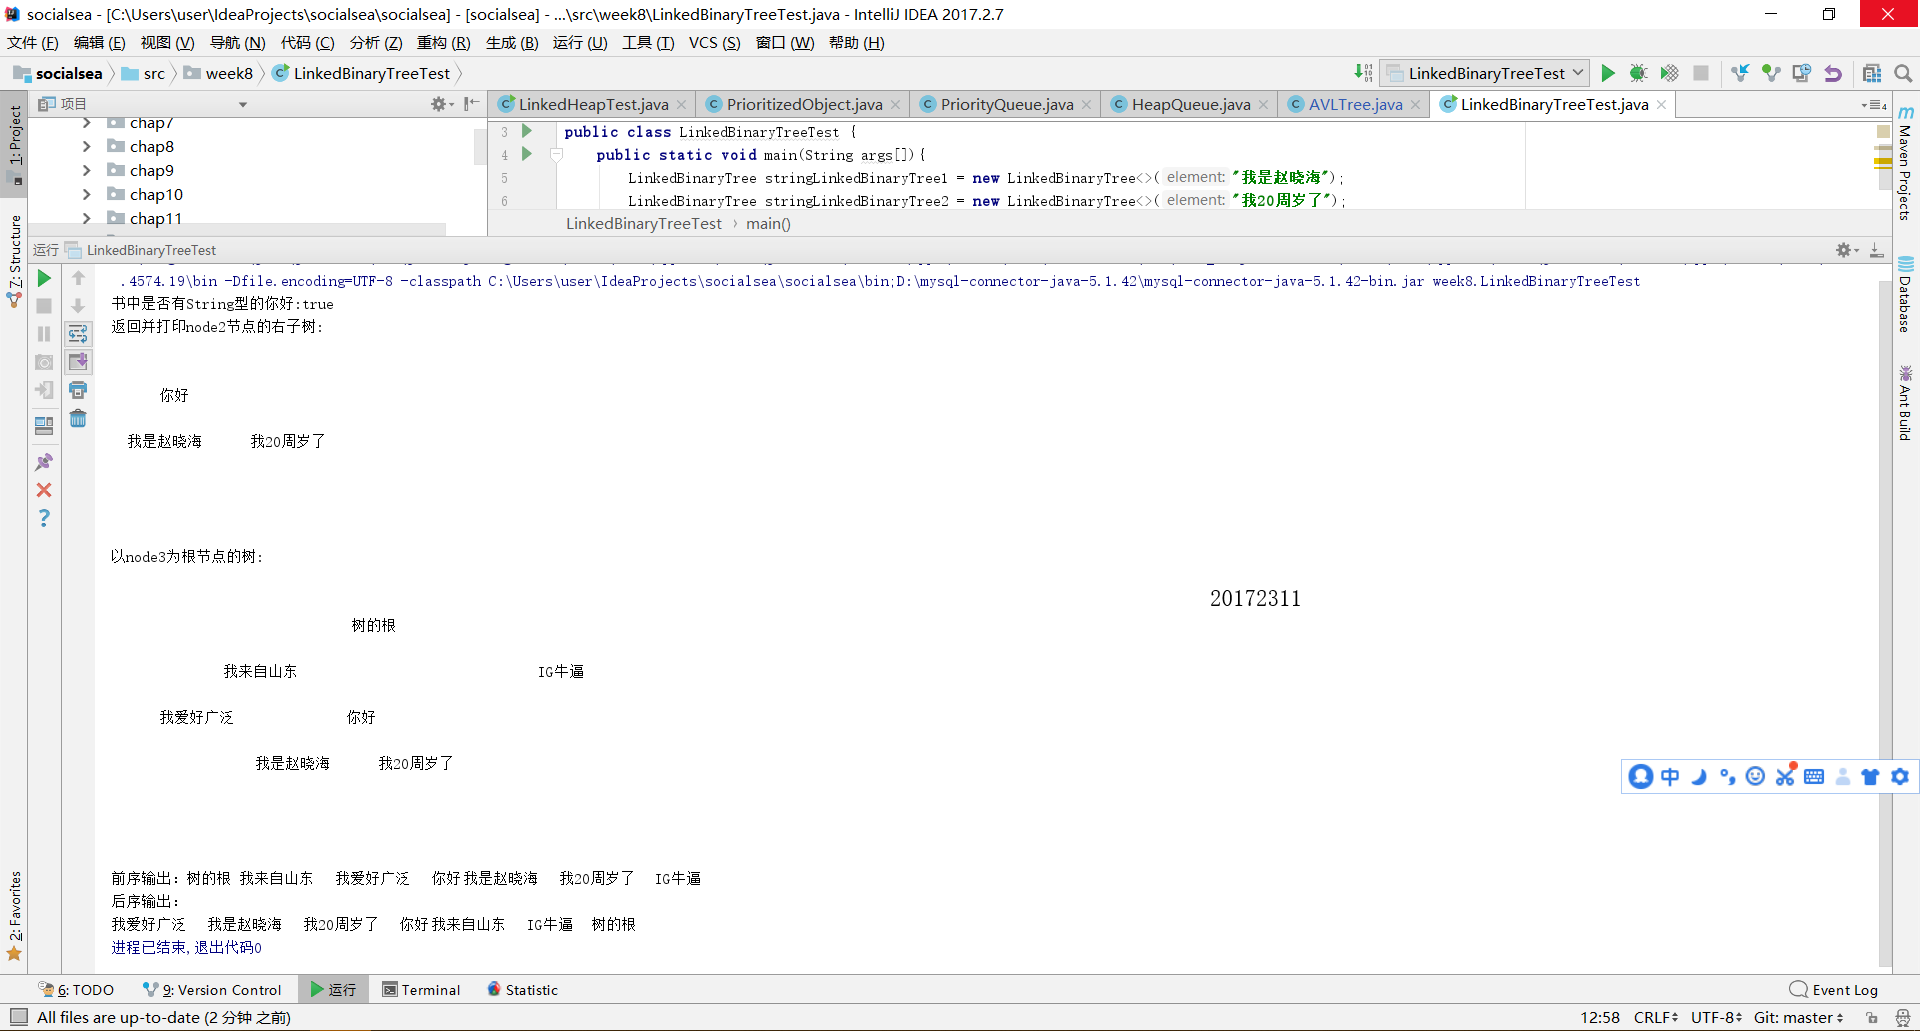
实验二-1-实现二叉树
结果提交截图:
1.测试类代码:
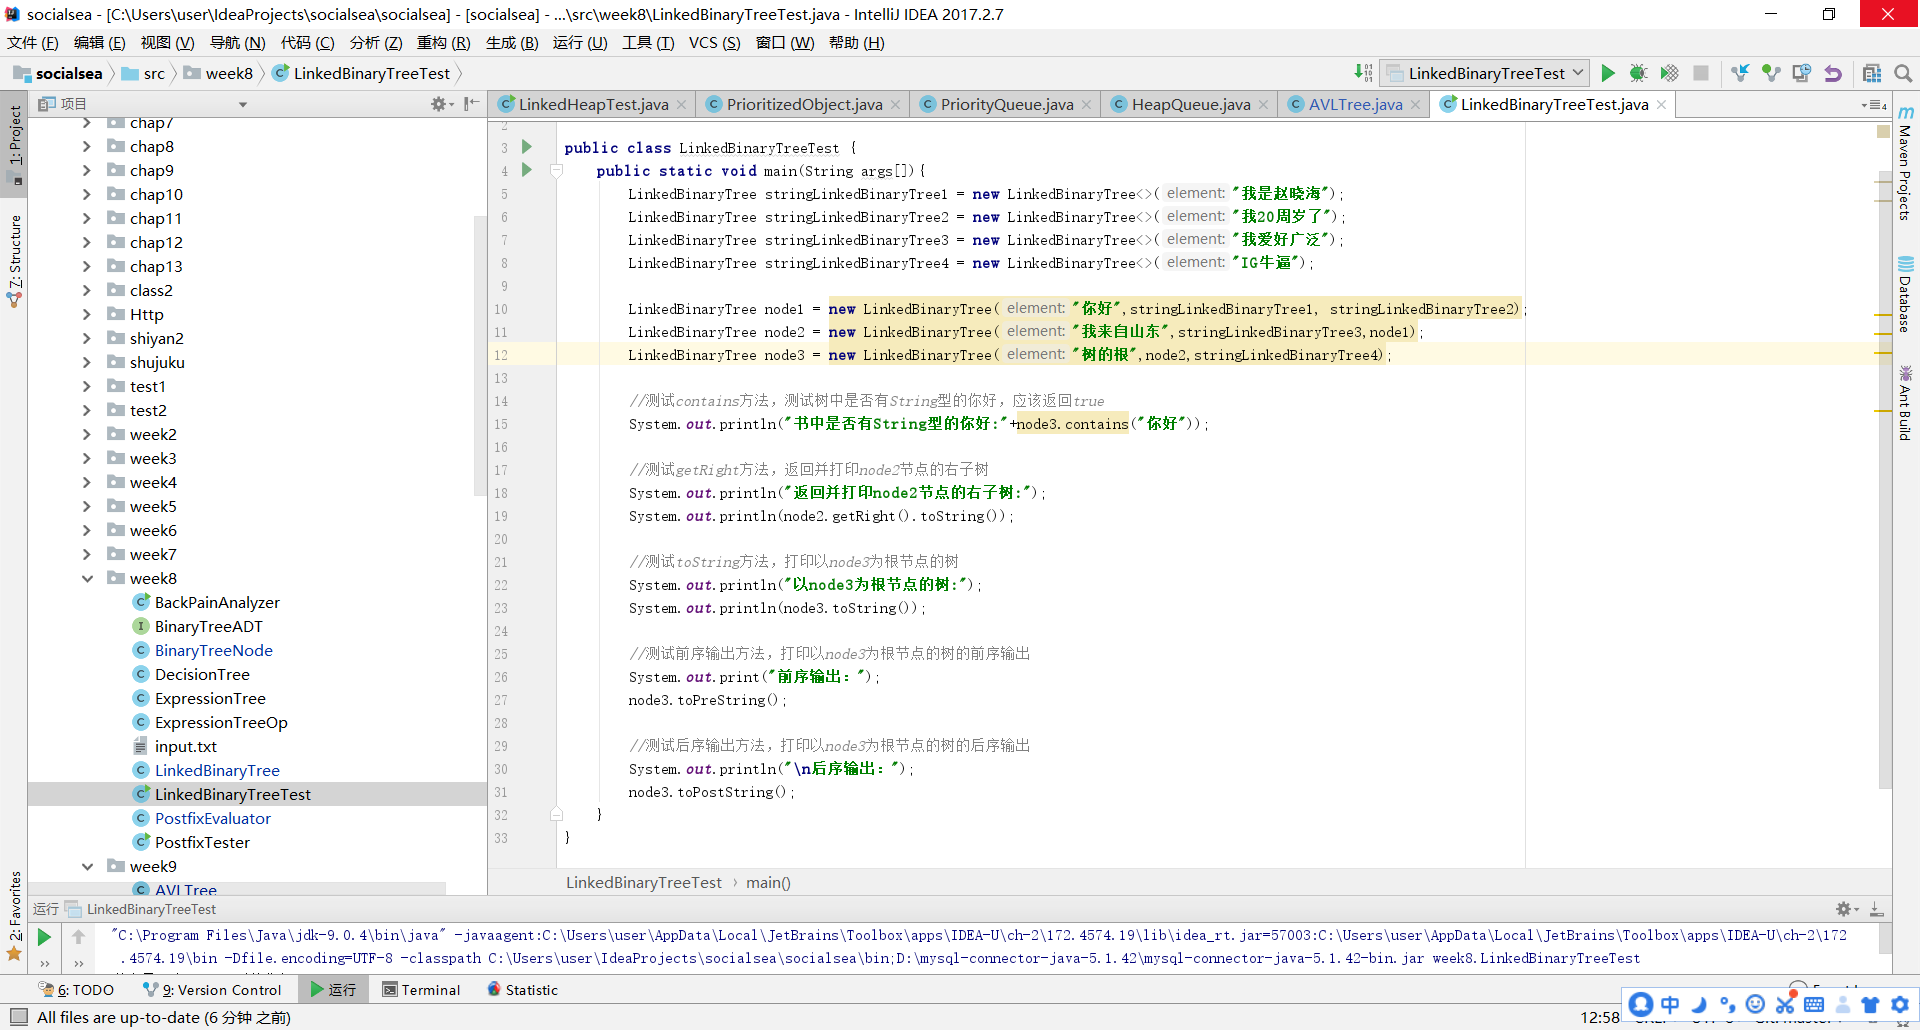
2.运行结果:
实验最终代码链接:
LinkedBinaryTree
LinkedBinaryTreeTest
本实验收获:
对链式二叉树的实现及应用有了较为深入的认识。
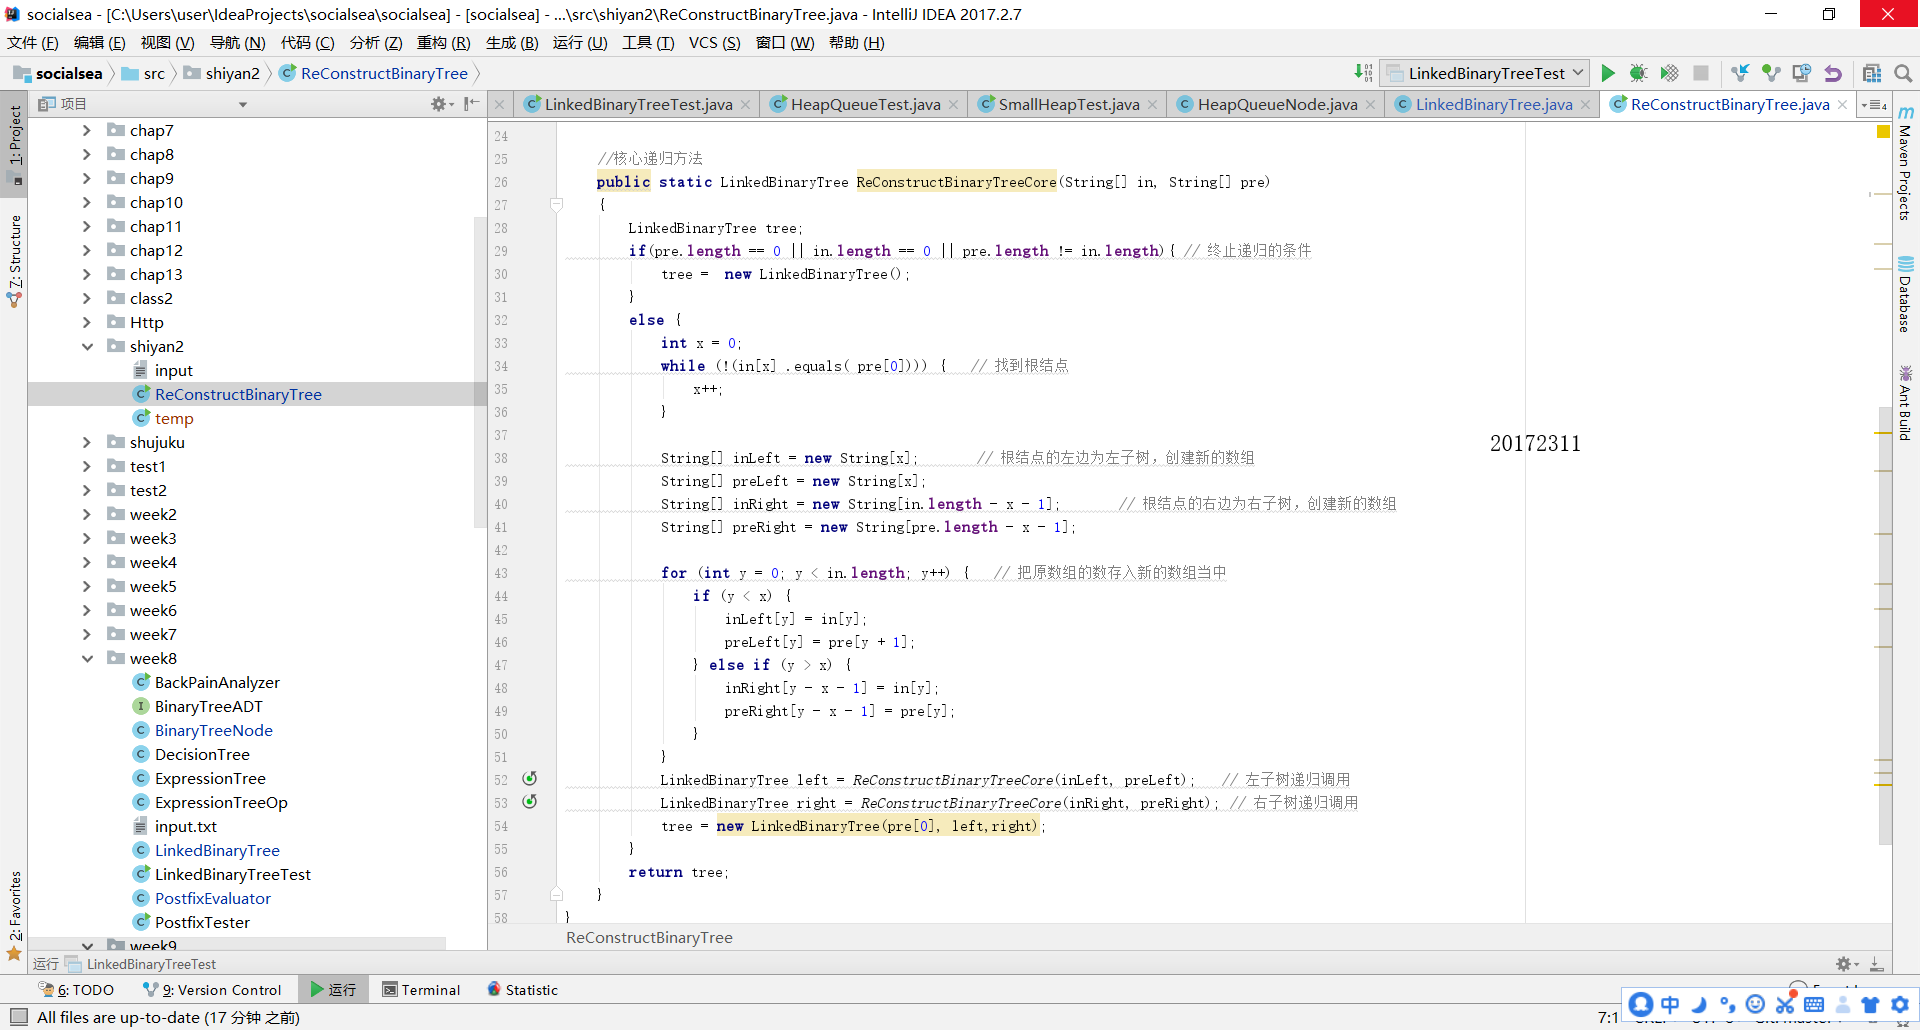
实验二 树-2-中序先序序列构造二叉树
结果提交截图:
1.测试类代码:
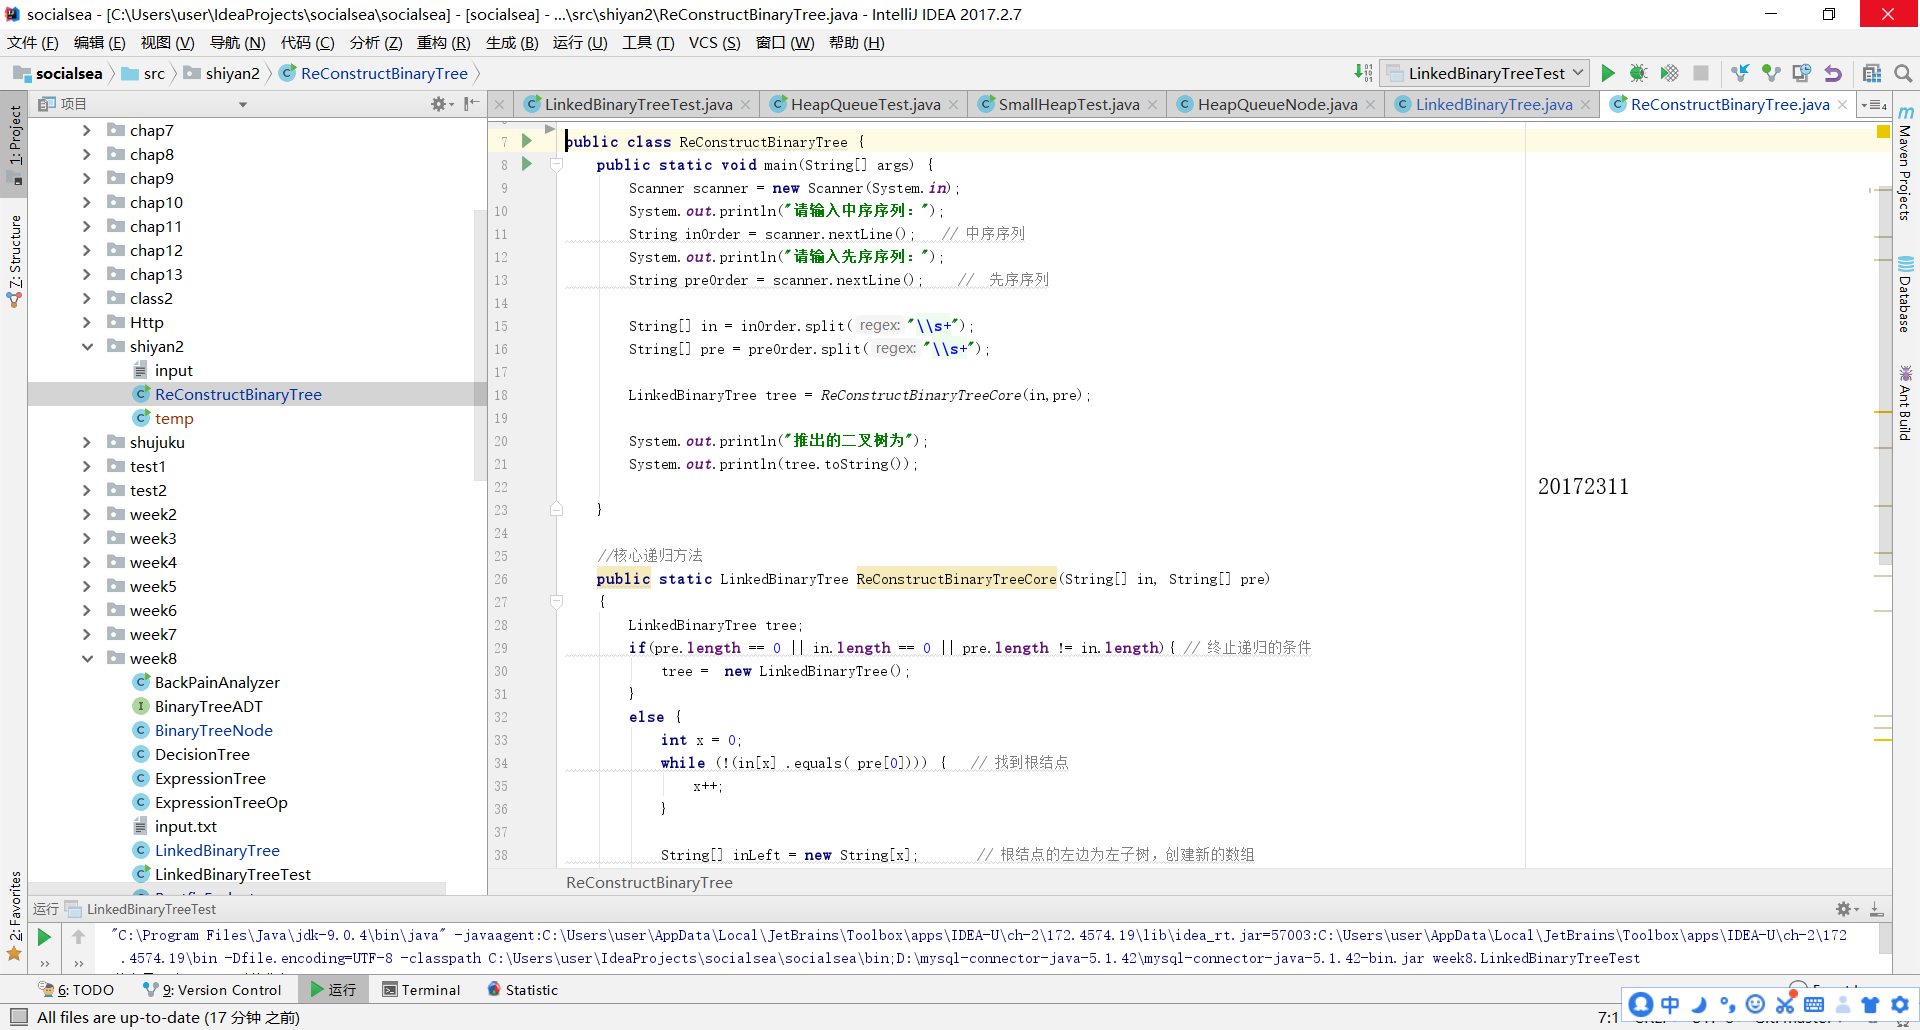
2.核心方法代码:
3.运行截图:
实验最终代码链接:
本实验收获:
想起我们课堂上亲手做这个题的速度,嗯!和计算机的差距还是蛮大的! 
实验二 树-3-决策树
结果提交截图:
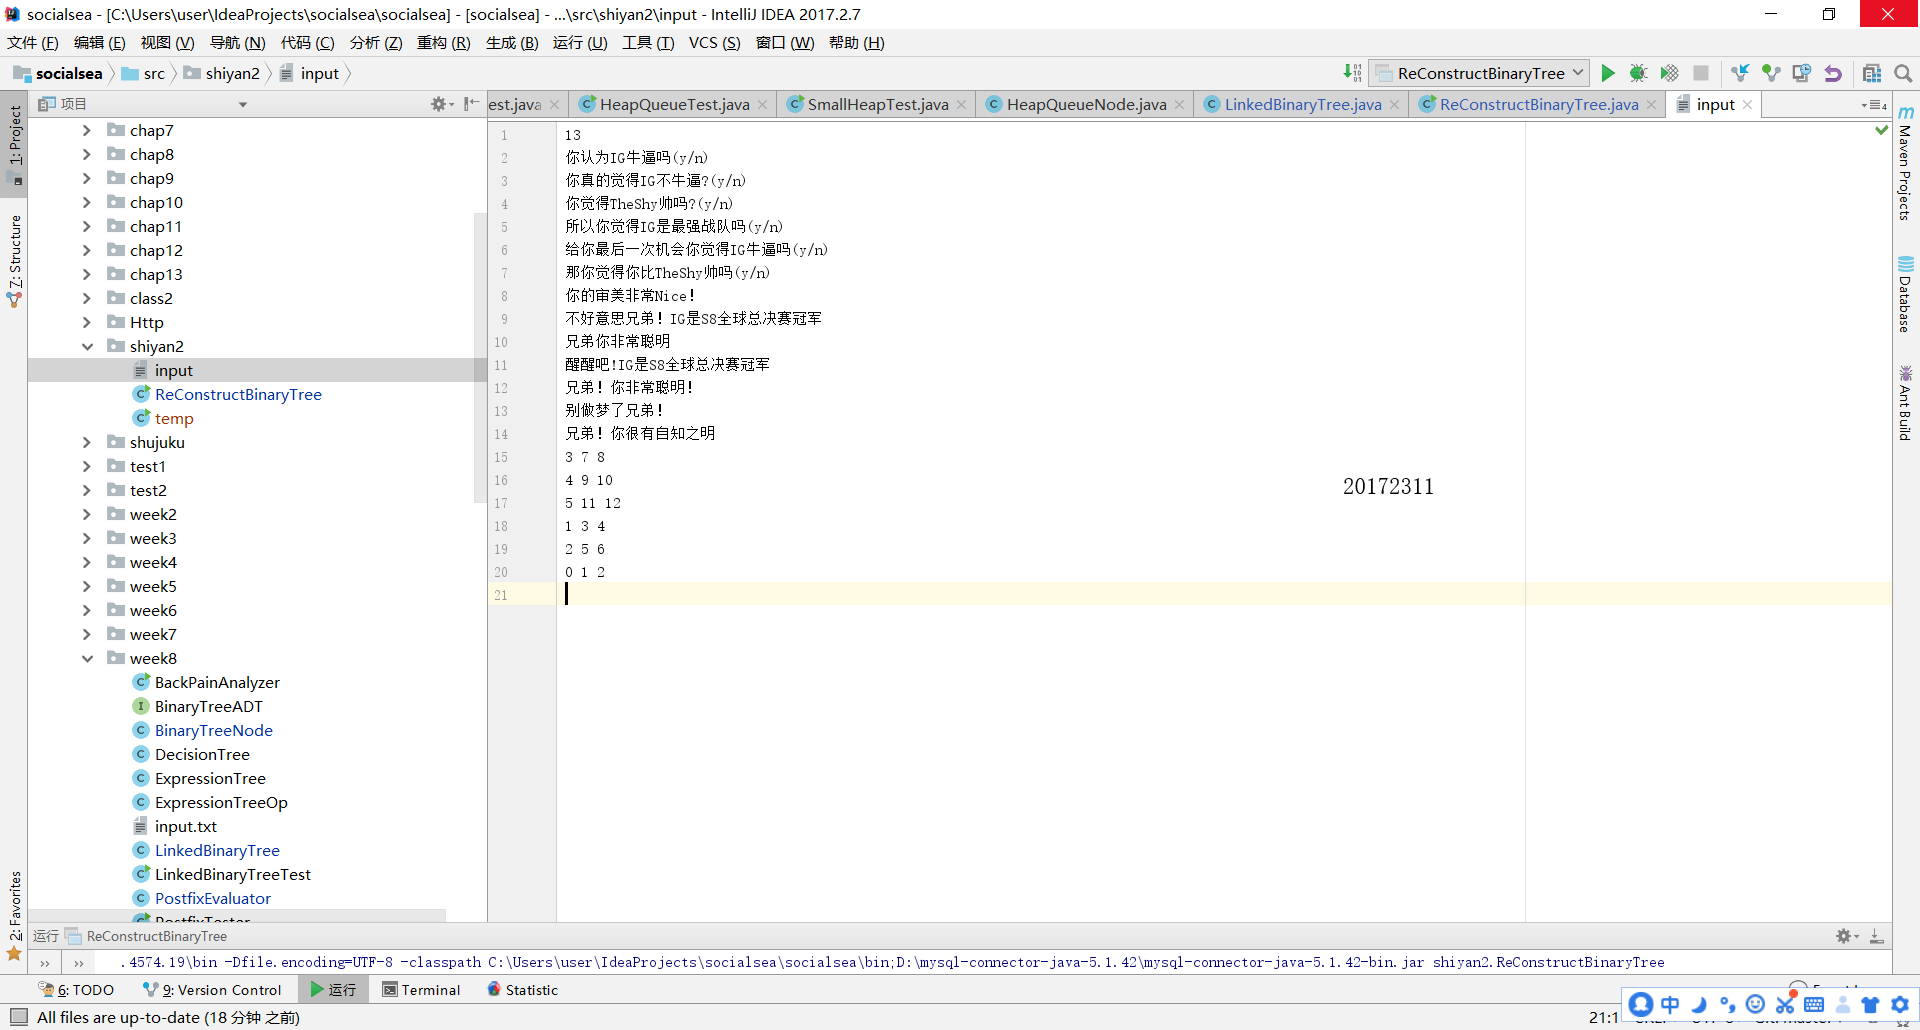
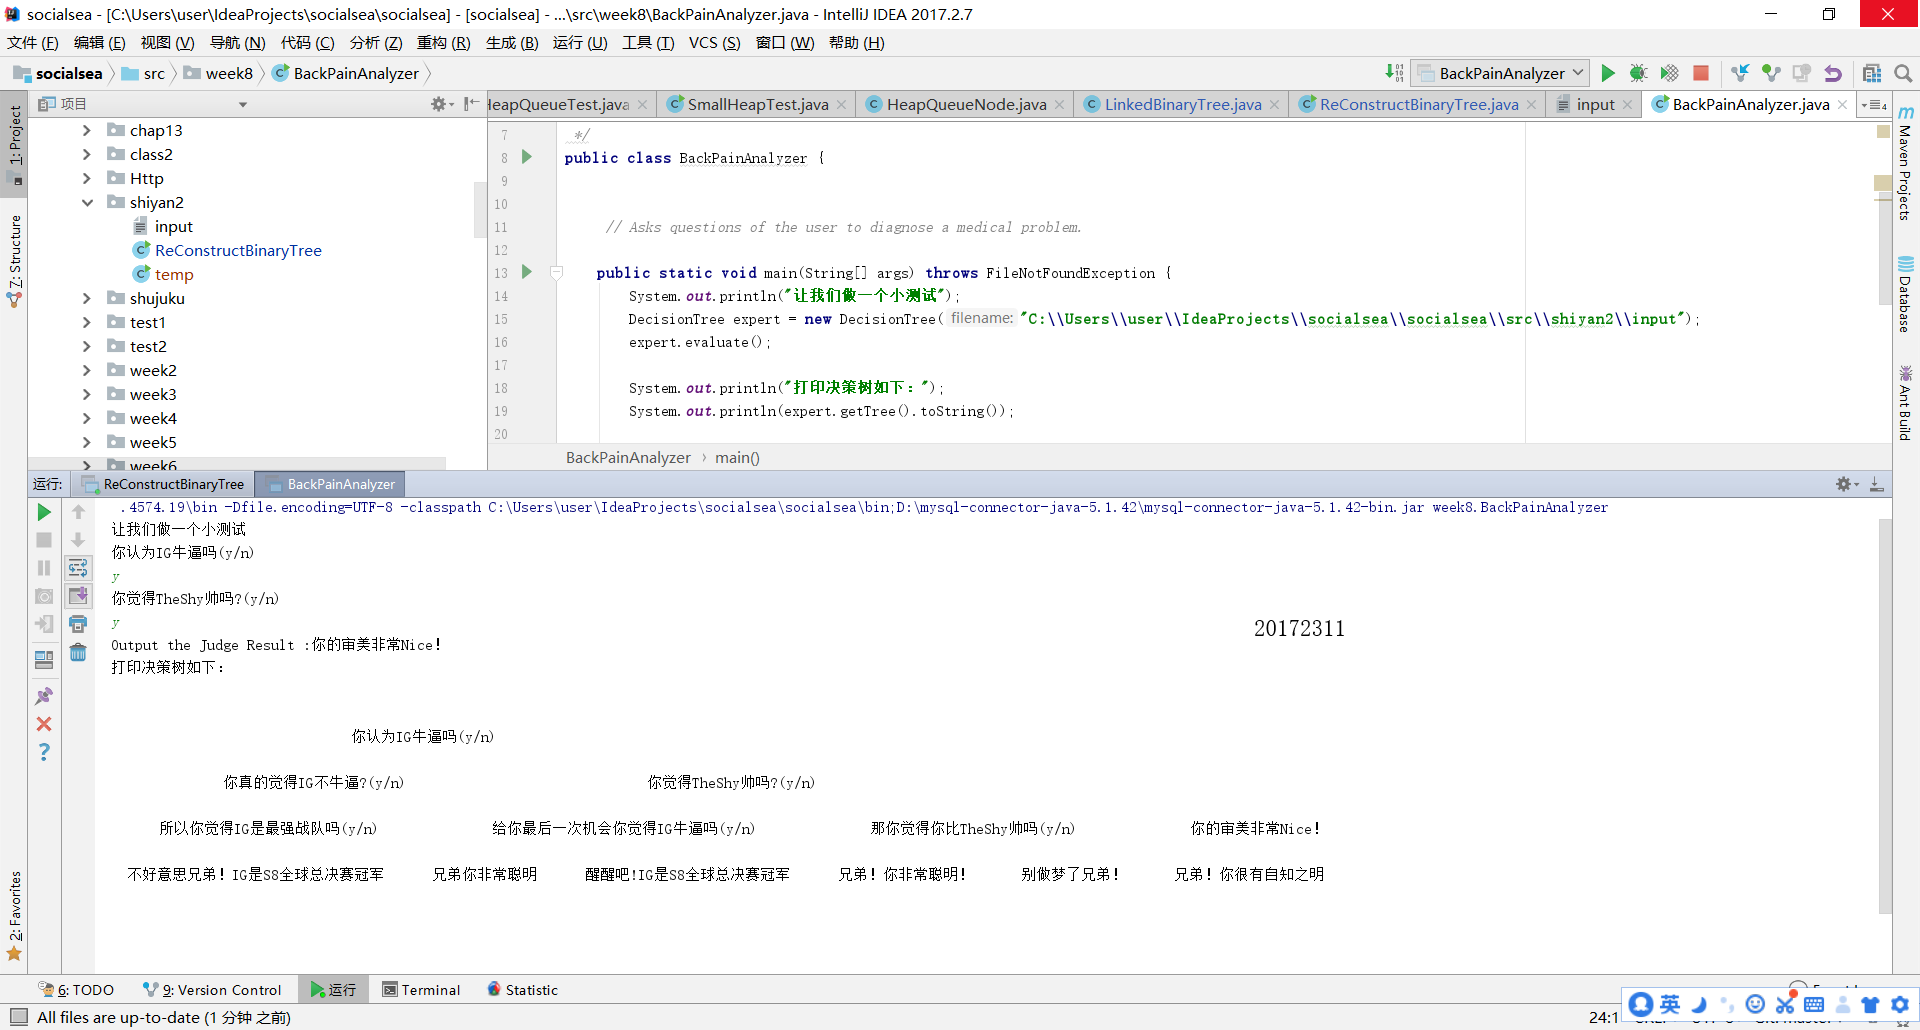
1.写入文件:
2.测试类代码及运行结果:
实验最终代码链接:
input
BackPainAnalyzer
DecisionTree
本实验收获:
利用树创建了自己的一个决策树,还是比较开心的。
实验二 树-4-表达式树
结果提交截图:
1.测试类代码:
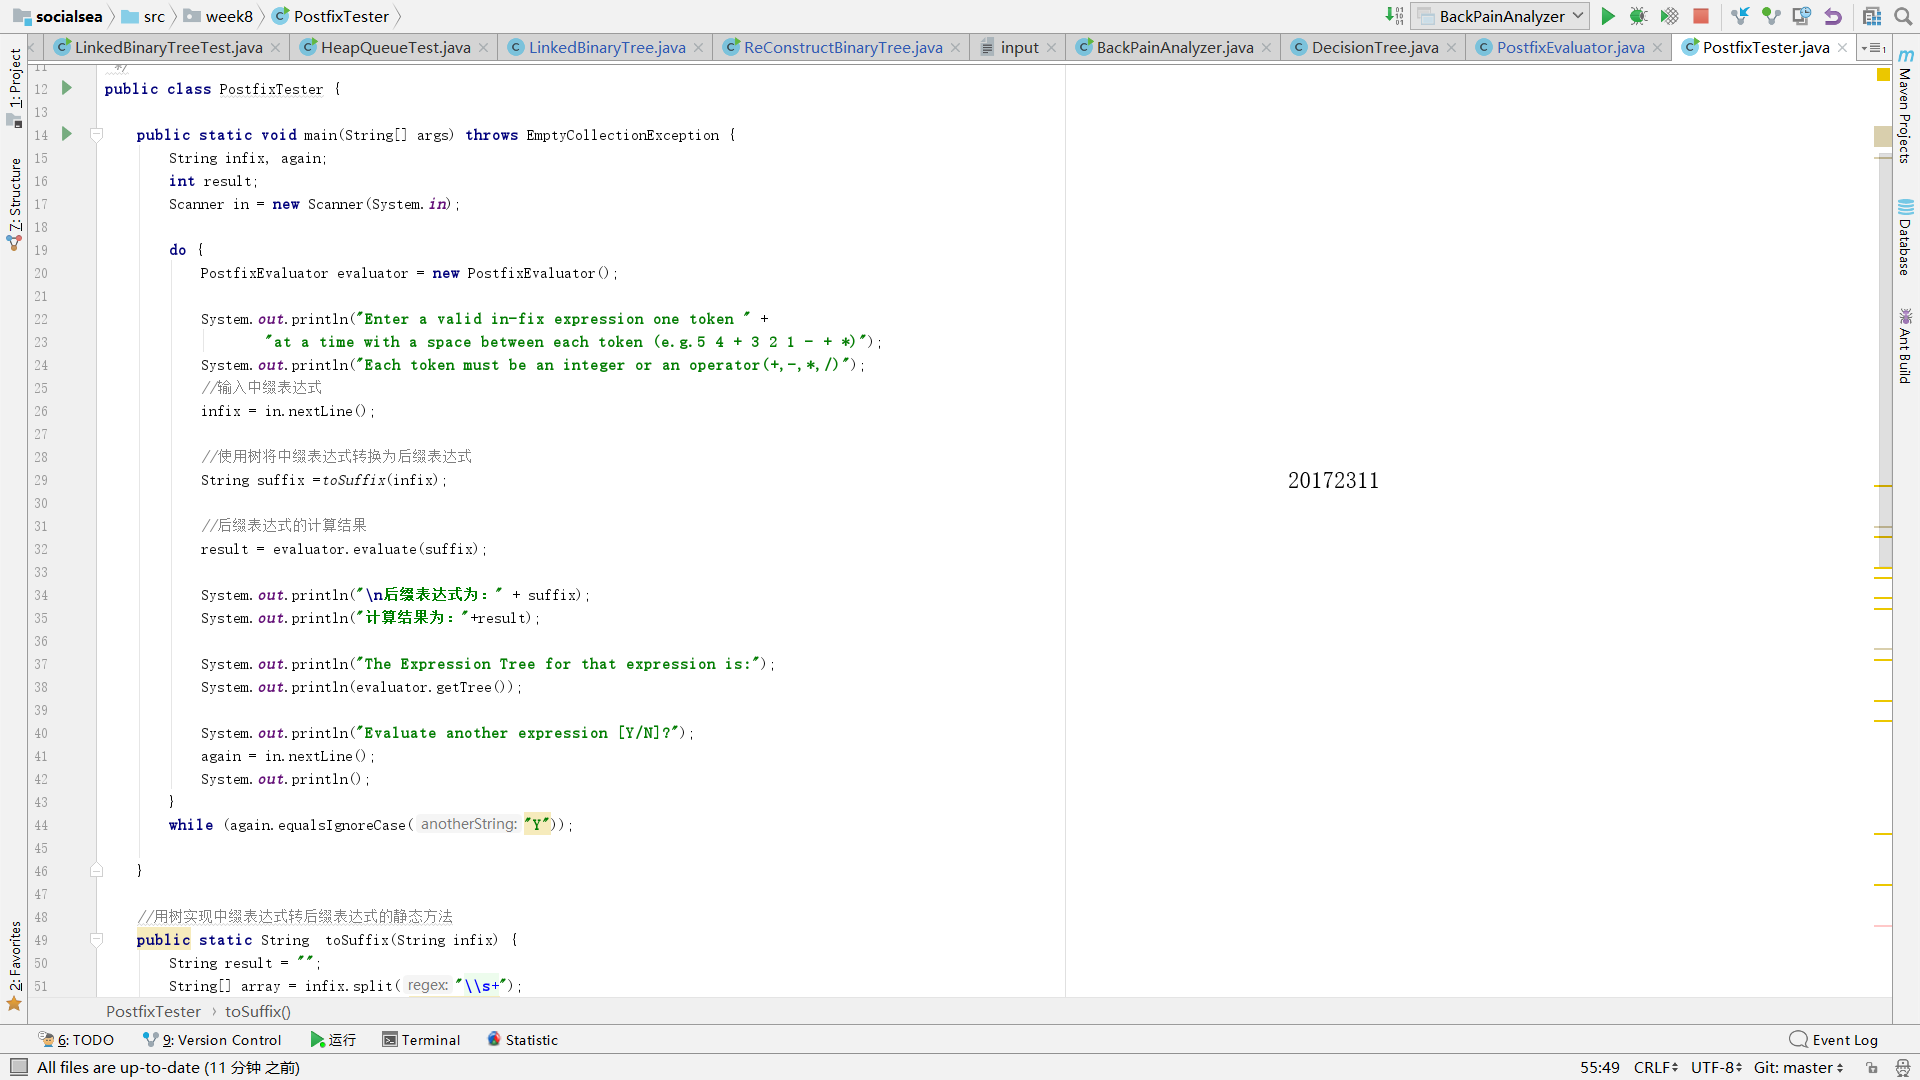
2.用树将中缀表达式转换为后缀表达式代码:

3.测试结果代码:
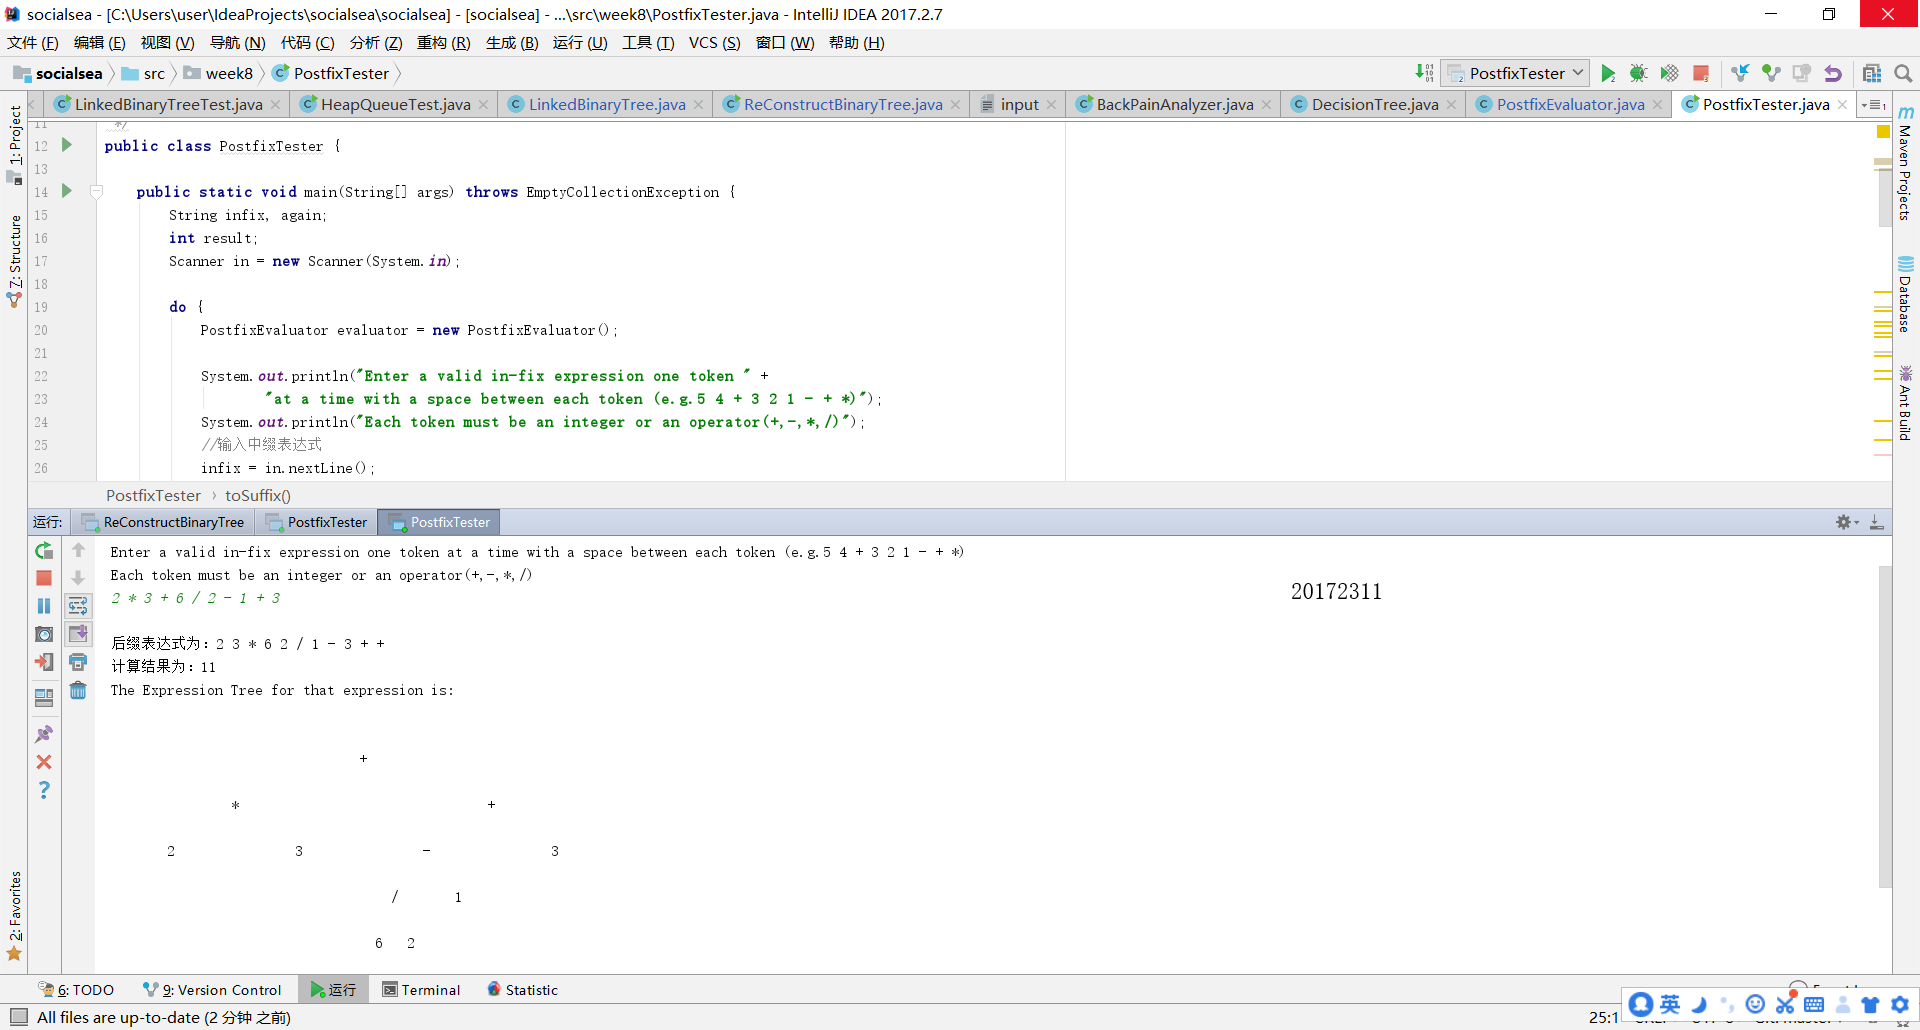
实验最终代码链接:
PostfixTester
PostfixEvaluator
本实验收获
实现了使用树将中缀表达式转为后缀表达式的方法,虽然不包含有括号的情况,但还是挺开心的!
实验二 树-5-二叉查找树
结果提交截图:
1.测试类代码:
2.测试结果:
实验最终代码链接:
LinkedBinarySearchTree
LinkedBinarySearchTreeTest
本实验收获:
较为深入的理解并实现了二叉查找树。
实验二 树-6-红黑树分析
分析目的:
有了10000行代码的基础,后面的学习提高要依靠代码阅读了,比如JUnit的源码,JHotdraw的源码,Java Collection API的源码,Java JCE的源码等
侯捷老师在《STL源码剖析(jjhou)》一书中说:
我开玩笑地对朋友说,这本书出版,给大学课程中的“数据结构”和“算法”两门授课老师出了个难题。几乎所有可能的作业题目(复杂度证明题除外),本书都有了详尽的解答。然而,如果学生能够从庞大>的 SGI STL 源码中干净抽出某一部份,加上自己的包装,做为呈堂作业,也足以证明你有资格获得学分和高分。事实上,追踪一流作品并于其中吸取养份,远比自己关起门来写个三流作品,价值高得多 >— 我的确认为99.99 % 的程序员所写的程序,在 SGI STL 面前都是三流水准。
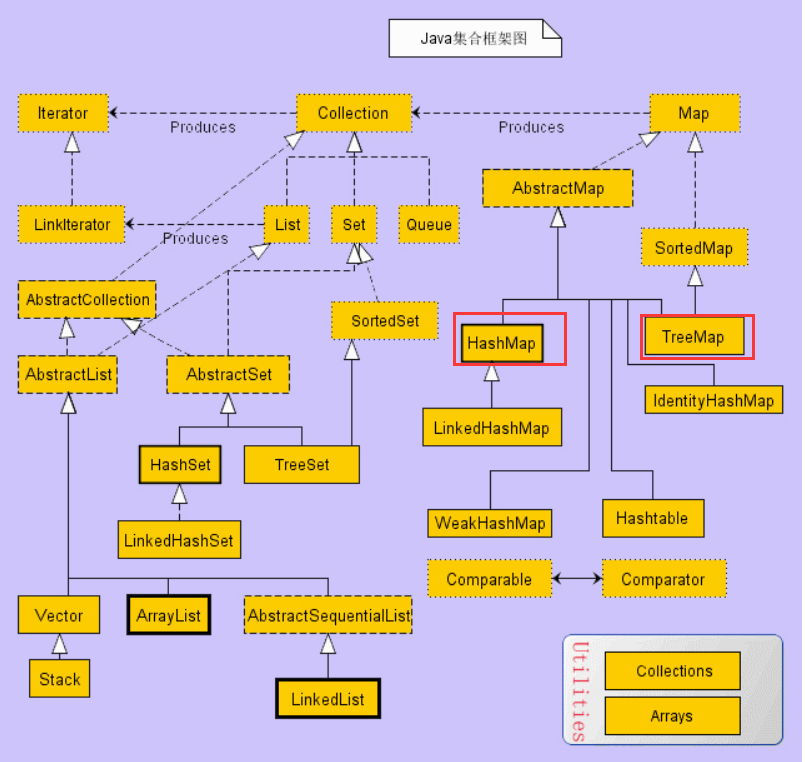
Java Collection API框架图:
分析过程 :
1.首先查看HashMap和TreeMap的源代码之后感觉它们的一大特点就是注释写的非常完善而且格式有统一的标准,来一段HashMap的开头感受一下
package java.util;

import java.io.IOException;
import java.io.InvalidObjectException;
import java.io.Serializable;
import java.lang.reflect.ParameterizedType;
import java.lang.reflect.Type;
import java.util.function.BiConsumer;
import java.util.function.BiFunction;
import java.util.function.Consumer;
import java.util.function.Function;
import jdk.internal.misc.SharedSecrets;

/**
 * Hash table based implementation of the {@code Map} interface.  This
 * implementation provides all of the optional map operations, and permits
 * {@code null} values and the {@code null} key.  (The {@code HashMap}
 * class is roughly equivalent to {@code Hashtable}, except that it is
 * unsynchronized and permits nulls.)  This class makes no guarantees as to
 * the order of the map; in particular, it does not guarantee that the order
 * will remain constant over time.
 *
 * <p>This implementation provides constant-time performance for the basic
 * operations ({@code get} and {@code put}), assuming the hash function
 * disperses the elements properly among the buckets.  Iteration over
 * collection views requires time proportional to the "capacity" of the
 * {@code HashMap} instance (the number of buckets) plus its size (the number
 * of key-value mappings).  Thus, it's very important not to set the initial
 * capacity too high (or the load factor too low) if iteration performance is
 * important.
 *
 * <p>An instance of {@code HashMap} has two parameters that affect its
 * performance: <i>initial capacity</i> and <i>load factor</i>.  The
 * <i>capacity</i> is the number of buckets in the hash table, and the initial
 * capacity is simply the capacity at the time the hash table is created.  The
 * <i>load factor</i> is a measure of how full the hash table is allowed to
 * get before its capacity is automatically increased.  When the number of
 * entries in the hash table exceeds the product of the load factor and the
 * current capacity, the hash table is <i>rehashed</i> (that is, internal data
 * structures are rebuilt) so that the hash table has approximately twice the
 * number of buckets.
 *
 * <p>As a general rule, the default load factor (.75) offers a good
 * tradeoff between time and space costs.  Higher values decrease the
 * space overhead but increase the lookup cost (reflected in most of
 * the operations of the {@code HashMap} class, including
 * {@code get} and {@code put}).  The expected number of entries in
 * the map and its load factor should be taken into account when
 * setting its initial capacity, so as to minimize the number of
 * rehash operations.  If the initial capacity is greater than the
 * maximum number of entries divided by the load factor, no rehash
 * operations will ever occur.
 *
 * <p>If many mappings are to be stored in a {@code HashMap}
 * instance, creating it with a sufficiently large capacity will allow
 * the mappings to be stored more efficiently than letting it perform
 * automatic rehashing as needed to grow the table.  Note that using
 * many keys with the same {@code hashCode()} is a sure way to slow
 * down performance of any hash table. To ameliorate impact, when keys
 * are {@link Comparable}, this class may use comparison order among
 * keys to help break ties.
 *
 * <p><strong>Note that this implementation is not synchronized.</strong>
 * If multiple threads access a hash map concurrently, and at least one of
 * the threads modifies the map structurally, it <i>must</i> be
 * synchronized externally.  (A structural modification is any operation
 * that adds or deletes one or more mappings; merely changing the value
 * associated with a key that an instance already contains is not a
 * structural modification.)  This is typically accomplished by
 * synchronizing on some object that naturally encapsulates the map.
 *
 * If no such object exists, the map should be "wrapped" using the
 * {@link Collections#synchronizedMap Collections.synchronizedMap}
 * method.  This is best done at creation time, to prevent accidental
 * unsynchronized access to the map:<pre>
 *   Map m = Collections.synchronizedMap(new HashMap(...));</pre>
 *
 * <p>The iterators returned by all of this class's "collection view methods"
 * are <i>fail-fast</i>: if the map is structurally modified at any time after
 * the iterator is created, in any way except through the iterator's own
 * {@code remove} method, the iterator will throw a
 * {@link ConcurrentModificationException}.  Thus, in the face of concurrent
 * modification, the iterator fails quickly and cleanly, rather than risking
 * arbitrary, non-deterministic behavior at an undetermined time in the
 * future.
 *
 * <p>Note that the fail-fast behavior of an iterator cannot be guaranteed
 * as it is, generally speaking, impossible to make any hard guarantees in the
 * presence of unsynchronized concurrent modification.  Fail-fast iterators
 * throw {@code ConcurrentModificationException} on a best-effort basis.
 * Therefore, it would be wrong to write a program that depended on this
 * exception for its correctness: <i>the fail-fast behavior of iterators
 * should be used only to detect bugs.</i>
 *
 * <p>This class is a member of the
 * <a href="{@docRoot}/java/util/package-summary.html#CollectionsFramework">
 * Java Collections Framework</a>.
 *
 * @param <K> the type of keys maintained by this map
 * @param <V> the type of mapped values
 *
 * @author  Doug Lea
 * @author  Josh Bloch
 * @author  Arthur van Hoff
 * @author  Neal Gafter
 * @see     Object#hashCode()
 * @see     Collection
 * @see     Map
 * @see     TreeMap
 * @see     Hashtable
 * @since   1.2
 */
public class HashMap<K,V> extends AbstractMap<K,V>
    implements Map<K,V>, Cloneable, Serializable {

    private static final long serialVersionUID = 362498820763181265L;
2.经过自己的一番分析之后感觉毫无头绪,不知道HashMap和TreeMap是用来干嘛的,细节代码更是看不懂。
3.上网查阅相关资料帮助理解分析。
分析结果:
HashMap简介
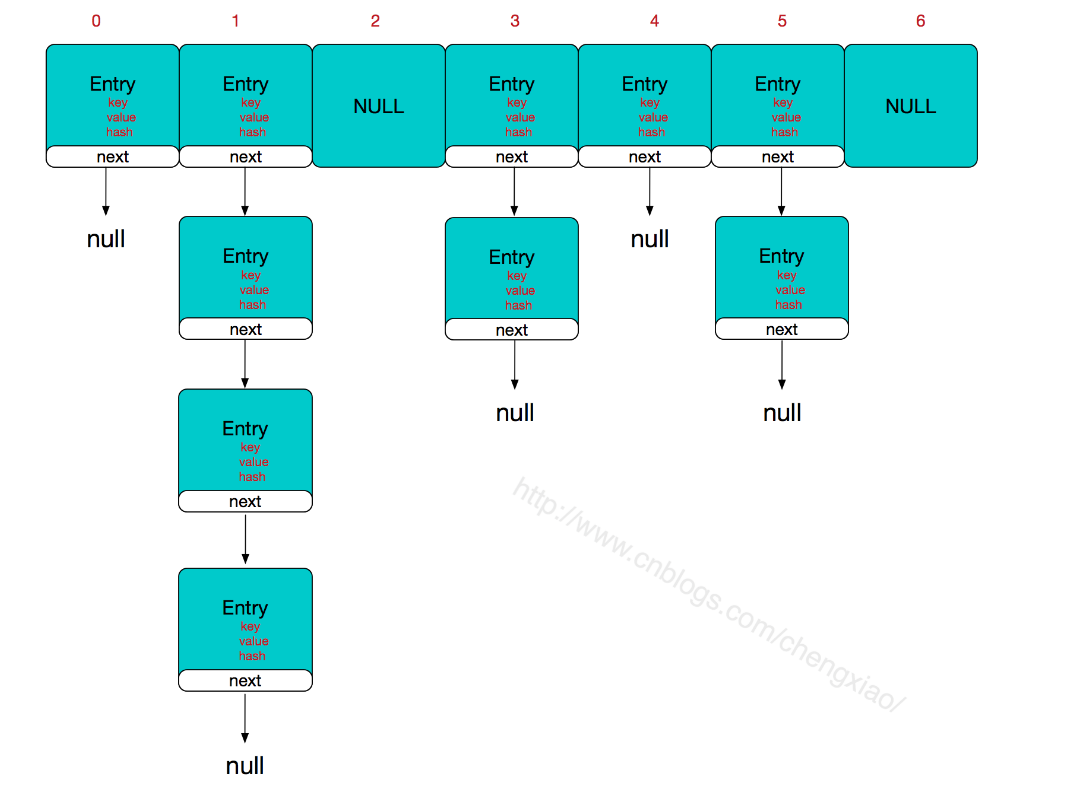
HashMap 是一个散列表,它存储的内容是键值对(key-value)映射。HashMap 继承于AbstractMap,实现了Map、Cloneable、java.io.Serializable接口。简单来说,HashMap由数组+链表组成的,数组是HashMap的主体,链表则是主要为了解决哈希冲突而存在的,如果定位到的数组位置不含链表(当前entry的next指向null),那么对于查找,添加等操作很快,仅需一次寻址即可;如果定位到的数组包含链表,对于添加操作,其时间复杂度为O(n),首先遍历链表,存在即覆盖,否则新增;对于查找操作来讲,仍需遍历链表,然后通过key对象的equals方法逐一比对查找。所以,性能考虑,HashMap中的链表出现越少,性能才会越好。
什么是哈希表
我们知道,数据结构的物理存储结构只有两种:顺序存储结构和链式存储结构(像栈,队列,树,图等是从逻辑结构去抽象的,映射到内存中,也这两种物理组织形式),而在上面我们提到过,在数组中根据下标查找某个元素,一次定位就可以达到,哈希表利用了这种特性,哈希表的主干就是数组。
比如我们要新增或查找某个元素,我们通过把当前元素的关键字 通过某个函数映射到数组中的某个位置,通过数组下标一次定位就可完成操作。存储位置 = f(关键字)其中,这个函数f一般称为哈希函数,这个函数的设计好坏会直接影响到哈希表的优劣。
哈希冲突
然而万事无完美,如果两个不同的元素,通过哈希函数得出的实际存储地址相同怎么办?也就是说,当我们对某个元素进行哈希运算,得到一个存储地址,然后要进行插入的时候,发现已经被其他元素占用了,其实这就是所谓的哈希冲突,也叫哈希碰撞。前面我们提到过,哈希函数的设计至关重要,好的哈希函数会尽可能地保证 计算简单和散列地址分布均匀,但是,我们需要清楚的是,数组是一块连续的固定长度的内存空间,再好的哈希函数也不能保证得到的存储地址绝对不发生冲突。那么哈希冲突如何解决呢?哈希冲突的解决方案有多种:开放定址法(发生冲突,继续寻找下一块未被占用的存储地址),再散列函数法,链地址法,而HashMap即是采用了链地址法,也就是数组+链表的方式。
HashMap的整体结构
HashMap的构造函数
HashMap共有4个构造函数,如下:
// 默认构造函数。
HashMap()

// 指定“容量大小”的构造函数
HashMap(int capacity)

// 指定“容量大小”和“加载因子”的构造函数
HashMap(int capacity, float loadFactor)

// 包含“子Map”的构造函数
HashMap(Map<? extends K, ? extends V> map)
HashMap的API
void                 clear()
Object               clone()
boolean              containsKey(Object key)
boolean              containsValue(Object value)
Set<Entry<K, V>>     entrySet()
V                    get(Object key)
boolean              isEmpty()
Set<K>               keySet()
V                    put(K key, V value)
void                 putAll(Map<? extends K, ? extends V> map)
V                    remove(Object key)
int                  size()
Collection<V>        values()
HashMap的继承关系
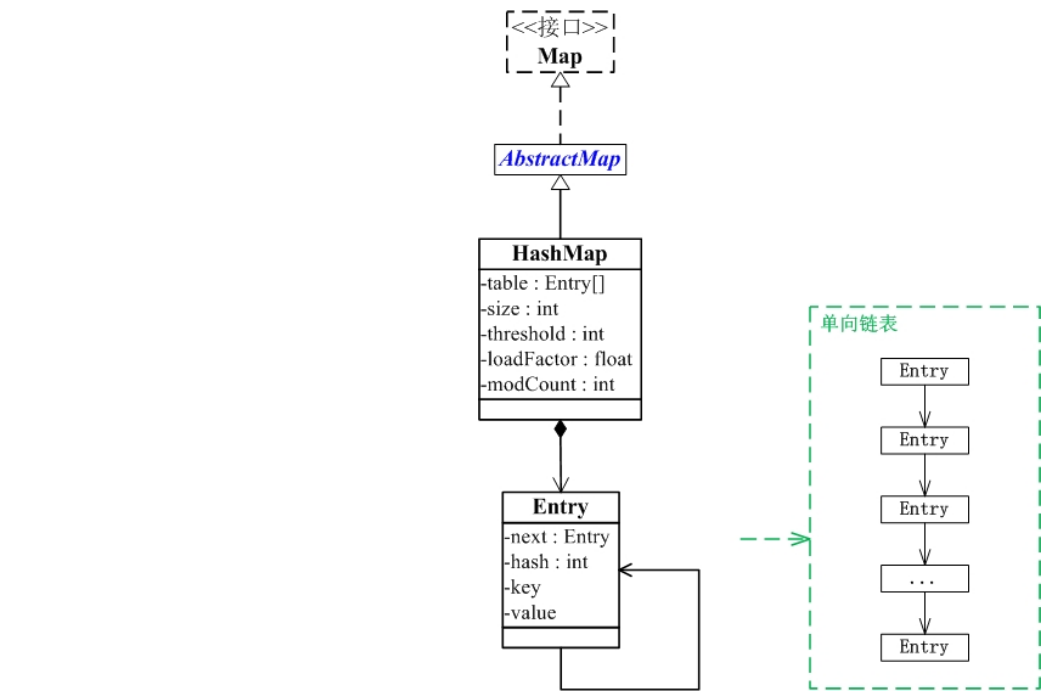
从图中可以看出:
(01) HashMap继承于AbstractMap类,实现了Map接口。Map是"key-value键值对"接口,AbstractMap实现了"键值对"的通用函数接口。
(02) HashMap是通过"拉链法"实现的哈希表。它包括几个重要的成员变量:table, size, threshold, loadFactor, modCount。
table是一个Entry[]数组类型,而Entry实际上就是一个单向链表。哈希表的"key-value键值对"都是存储在Entry数组中的。
size是HashMap的大小,它是HashMap保存的键值对的数量。
threshold是HashMap的阈值,用于判断是否需要调整HashMap的容量。threshold的值="容量*加载因子",当HashMap中存储数据的数量达到threshold时,就需要将HashMap的容量加倍。
loadFactor就是加载因子。
modCount是用来实现fail-fast机制的。
数据节点Entry的数据结构
static class Entry<K,V> implements Map.Entry<K,V> {
    final K key;
    V value;
    // 指向下一个节点
    Entry<K,V> next;
    final int hash;

    // 构造函数。
    // 输入参数包括"哈希值(h)", "键(k)", "值(v)", "下一节点(n)"
    Entry(int h, K k, V v, Entry<K,V> n) {
        value = v;
        next = n;
        key = k;
        hash = h;
    }

    public final K getKey() {
        return key;
    }

    public final V getValue() {
        return value;
    }

    public final V setValue(V newValue) {
        V oldValue = value;
        value = newValue;
        return oldValue;
    }

    // 判断两个Entry是否相等
    // 若两个Entry的“key”和“value”都相等,则返回true。
    // 否则,返回false
    public final boolean equals(Object o) {
        if (!(o instanceof Map.Entry))
            return false;
        Map.Entry e = (Map.Entry)o;
        Object k1 = getKey();
        Object k2 = e.getKey();
        if (k1 == k2 || (k1 != null && k1.equals(k2))) {
            Object v1 = getValue();
            Object v2 = e.getValue();
            if (v1 == v2 || (v1 != null && v1.equals(v2)))
                return true;
        }
        return false;
    }

    // 实现hashCode()
    public final int hashCode() {
        return (key==null   ? 0 : key.hashCode()) ^
               (value==null ? 0 : value.hashCode());
    }

    public final String toString() {
        return getKey() + "=" + getValue();
    }

    // 当向HashMap中添加元素时,绘调用recordAccess()。
    // 这里不做任何处理
    void recordAccess(HashMap<K,V> m) {
    }

    // 当从HashMap中删除元素时,绘调用recordRemoval()。
    // 这里不做任何处理
    void recordRemoval(HashMap<K,V> m) {
    }
}
HashMap的主要对外接口
1.clear()
clear() 的作用是清空HashMap。它是通过将所有的元素设为null来实现的。
2.containsKey(Object key)
containsKey(Object key) 的作用是判断HashMap是否包含key。
3.containsValue(Object value)
containsValue(Object value) 的作用是判断HashMap是否包含“值为value”的元素。
4.entrySet()、values()、keySet()
entrySet()的作用是返回“HashMap中所有Entry的集合”,它是一个集合.
5.get(Object key)
get(Object key) 的作用是获取key对应的value。
6.put(K key, V value)
put(K key, V value) 的作用是对外提供接口,让HashMap对象可以通过put()将“key-value”添加到HashMap中。
7.putAll(Map<? extends K, ? extends V> m)
putAll(Map<? extends K, ? extends V> m) 的作用是将"m"的全部元素都添加到HashMap中。
8.remove(Object key)
remove(Object key) 的作用是删除“键为key”元素。
TreeMap 简介
TreeMap 是一个有序的key-value集合,它是通过红黑树实现的。
TreeMap 继承于AbstractMap,所以它是一个Map,即一个key-value集合。
TreeMap基于红黑树(Red-Black tree)实现。该映射根据其键的自然顺序进行排序,或者根据创建映射时提供的 Comparator 进行排序,具体取决于使用的构造方法。
TreeMap的基本操作 containsKey、get、put 和 remove 的时间复杂度是 log(n) 。
TreeMap的继承关系
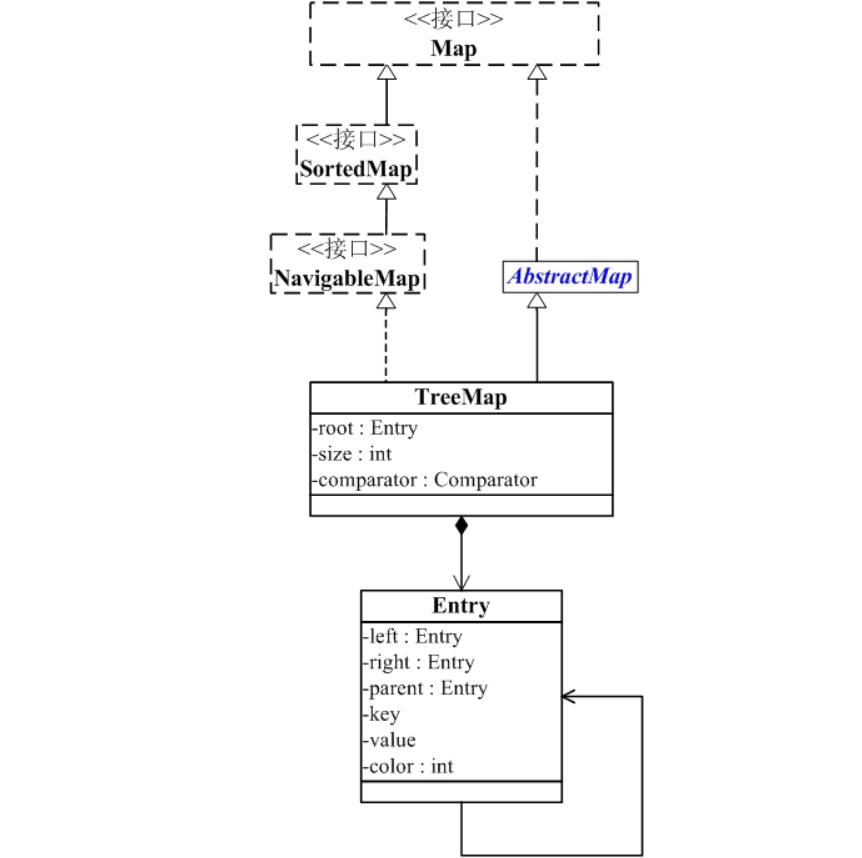
从图中可以看出:
(01) TreeMap实现继承于AbstractMap,并且实现了NavigableMap接口。
(02) TreeMap的本质是R-B Tree(红黑树),它包含几个重要的成员变量: root, size, comparator。
root 是红黑数的根节点。它是Entry类型,Entry是红黑数的节点,它包含了红黑数的6个基本组成成分:key(键)、value(值)、left(左孩子)、right(右孩子)、parent(父节点)、color(颜色)。Entry节点根据key进行排序,Entry节点包含的内容为value。
红黑数排序时,根据Entry中的key进行排序;Entry中的key比较大小是根据比较器comparator来进行判断的。
size是红黑数中节点的个数。
TreeMap的构造函数
// 默认构造函数。使用该构造函数,TreeMap中的元素按照自然排序进行排列。
TreeMap()

// 创建的TreeMap包含Map
TreeMap(Map<? extends K, ? extends V> copyFrom)

// 指定Tree的比较器
TreeMap(Comparator<? super K> comparator)

// 创建的TreeSet包含copyFrom
TreeMap(SortedMap<K, ? extends V> copyFrom)
TreeMap的API
Entry<K, V>                ceilingEntry(K key)
K                          ceilingKey(K key)
void                       clear()
Object                     clone()
Comparator<? super K>      comparator()
boolean                    containsKey(Object key)
NavigableSet<K>            descendingKeySet()
NavigableMap<K, V>         descendingMap()
Set<Entry<K, V>>           entrySet()
Entry<K, V>                firstEntry()
K                          firstKey()
Entry<K, V>                floorEntry(K key)
K                          floorKey(K key)
V                          get(Object key)
NavigableMap<K, V>         headMap(K to, boolean inclusive)
SortedMap<K, V>            headMap(K toExclusive)
Entry<K, V>                higherEntry(K key)
K                          higherKey(K key)
boolean                    isEmpty()
Set<K>                     keySet()
Entry<K, V>                lastEntry()
K                          lastKey()
Entry<K, V>                lowerEntry(K key)
K                          lowerKey(K key)
NavigableSet<K>            navigableKeySet()
Entry<K, V>                pollFirstEntry()
Entry<K, V>                pollLastEntry()
V                          put(K key, V value)
V                          remove(Object key)
int                        size()
SortedMap<K, V>            subMap(K fromInclusive, K toExclusive)
NavigableMap<K, V>         subMap(K from, boolean fromInclusive, K to, boolean toInclusive)
NavigableMap<K, V>         tailMap(K from, boolean inclusive)
SortedMap<K, V>            tailMap(K fromInclusive)
TreeMap的红黑树相关内容
1 数据结构
1.1 红黑树的节点颜色--红色
private static final boolean RED = false;
1.2 红黑树的节点颜色--黑色
private static final boolean BLACK = true;
1.3 “红黑树的节点”对应的类。
static final class Entry<K,V> implements Map.Entry<K,V> { ... }
2 相关操作
2.1 左旋
private void rotateLeft(Entry<K,V> p) { ... }
2.2 右旋
private void rotateRight(Entry<K,V> p) { ... }
2.3 插入操作
public V put(K key, V value) { ... }
2.4 插入修正操作
红黑树执行插入操作之后,要执行“插入修正操作”。
目的是:保红黑树在进行插入节点之后,仍然是一颗红黑树
private void fixAfterInsertion(Entry<K,V> x) { ... }
2.5 删除操作
private void deleteEntry(Entry<K,V> p) { ... }
2.6 删除修正操作
红黑树执行删除之后,要执行“删除修正操作”。
目的是保证:红黑树删除节点之后,仍然是一颗红黑树
private void fixAfterDeletion(Entry<K,V> x) { ... }
TreeMap的Entry相关函数
TreeMap的 firstEntry()、 lastEntry()、 lowerEntry()、 higherEntry()、 floorEntry()、 ceilingEntry()、 pollFirstEntry() 、 pollLastEntry() 原理都是类似的;下面以firstEntry()来进行详细说明
我们先看看firstEntry()和getFirstEntry()的代码:
public Map.Entry<K,V> firstEntry() {
    return exportEntry(getFirstEntry());
}

final Entry<K,V> getFirstEntry() {
    Entry<K,V> p = root;
    if (p != null)
        while (p.left != null)
            p = p.left;
    return p;
}
从中,我们可以看出 firstEntry() 和 getFirstEntry() 都是用于获取第一个节点。
但是,firstEntry() 是对外接口; getFirstEntry() 是内部接口。而且,firstEntry() 是通过 getFirstEntry() 来实现的。那为什么外界不能直接调用 getFirstEntry(),而需要多此一举的调用 firstEntry() 呢?
先告诉大家原因,再进行详细说明。这么做的目的是:防止用户修改返回的Entry。getFirstEntry()返回的Entry是可以被修改的,但是经过firstEntry()返回的Entry不能被修改,只可以读取Entry的key值和value值。
现在我们清晰的了解到:
(01) firstEntry()是对外接口,而getFirstEntry()是内部接口。
(02) 对firstEntry()返回的Entry对象只能进行getKey()、getValue()等读取操作;而对getFirstEntry()返回的对象除了可以进行读取操作之后,还可以通过setValue()修改值。
`
TreeMap的key相关函数
TreeMap的firstKey()、lastKey()、lowerKey()、higherKey()、floorKey()、ceilingKey()原理都是类似的;下面以ceilingKey()来进行详细说明
ceilingKey(K key)的作用是“返回大于/等于key的最小的键值对所对应的KEY,没有的话返回null”,它的代码如下:
public K ceilingKey(K key) {
    return keyOrNull(getCeilingEntry(key));
}
ceilingKey()是通过getCeilingEntry()实现的。keyOrNull()的代码很简单,它是获取节点的key,没有的话,返回null。
static <K,V> K keyOrNull(TreeMap.Entry<K,V> e) {
    return e == null? null : e.key;
}
getCeilingEntry(K key)的作用是“获取TreeMap中大于/等于key的最小的节点,若不存在(即TreeMap中所有节点的键都比key大),就返回null”。它的实现代码如下:
final Entry<K,V> getCeilingEntry(K key) {
    Entry<K,V> p = root;
    while (p != null) {
        int cmp = compare(key, p.key);
        // 情况一:若“p的key” > key。
        // 若 p 存在左孩子,则设 p=“p的左孩子”;
        // 否则,返回p
        if (cmp < 0) {
            if (p.left != null)
                p = p.left;
            else
                return p;
        // 情况二:若“p的key” < key。
        } else if (cmp > 0) {
            // 若 p 存在右孩子,则设 p=“p的右孩子”
            if (p.right != null) {
                p = p.right;
            } else {
                // 若 p 不存在右孩子,则找出 p 的后继节点,并返回
                // 注意:这里返回的 “p的后继节点”有2种可能性:第一,null;第二,TreeMap中大于key的最小的节点。
                //   理解这一点的核心是,getCeilingEntry是从root开始遍历的。
                //   若getCeilingEntry能走到这一步,那么,它之前“已经遍历过的节点的key”都 > key。
                //   能理解上面所说的,那么就很容易明白,为什么“p的后继节点”有2种可能性了。
                Entry<K,V> parent = p.parent;
                Entry<K,V> ch = p;
                while (parent != null && ch == parent.right) {
                    ch = parent;
                    parent = parent.parent;
                }
                return parent;
            }
        // 情况三:若“p的key” = key。
        } else
            return p;
    }
    return null;
}
3.实验过程中遇到的问题和解决过程
-
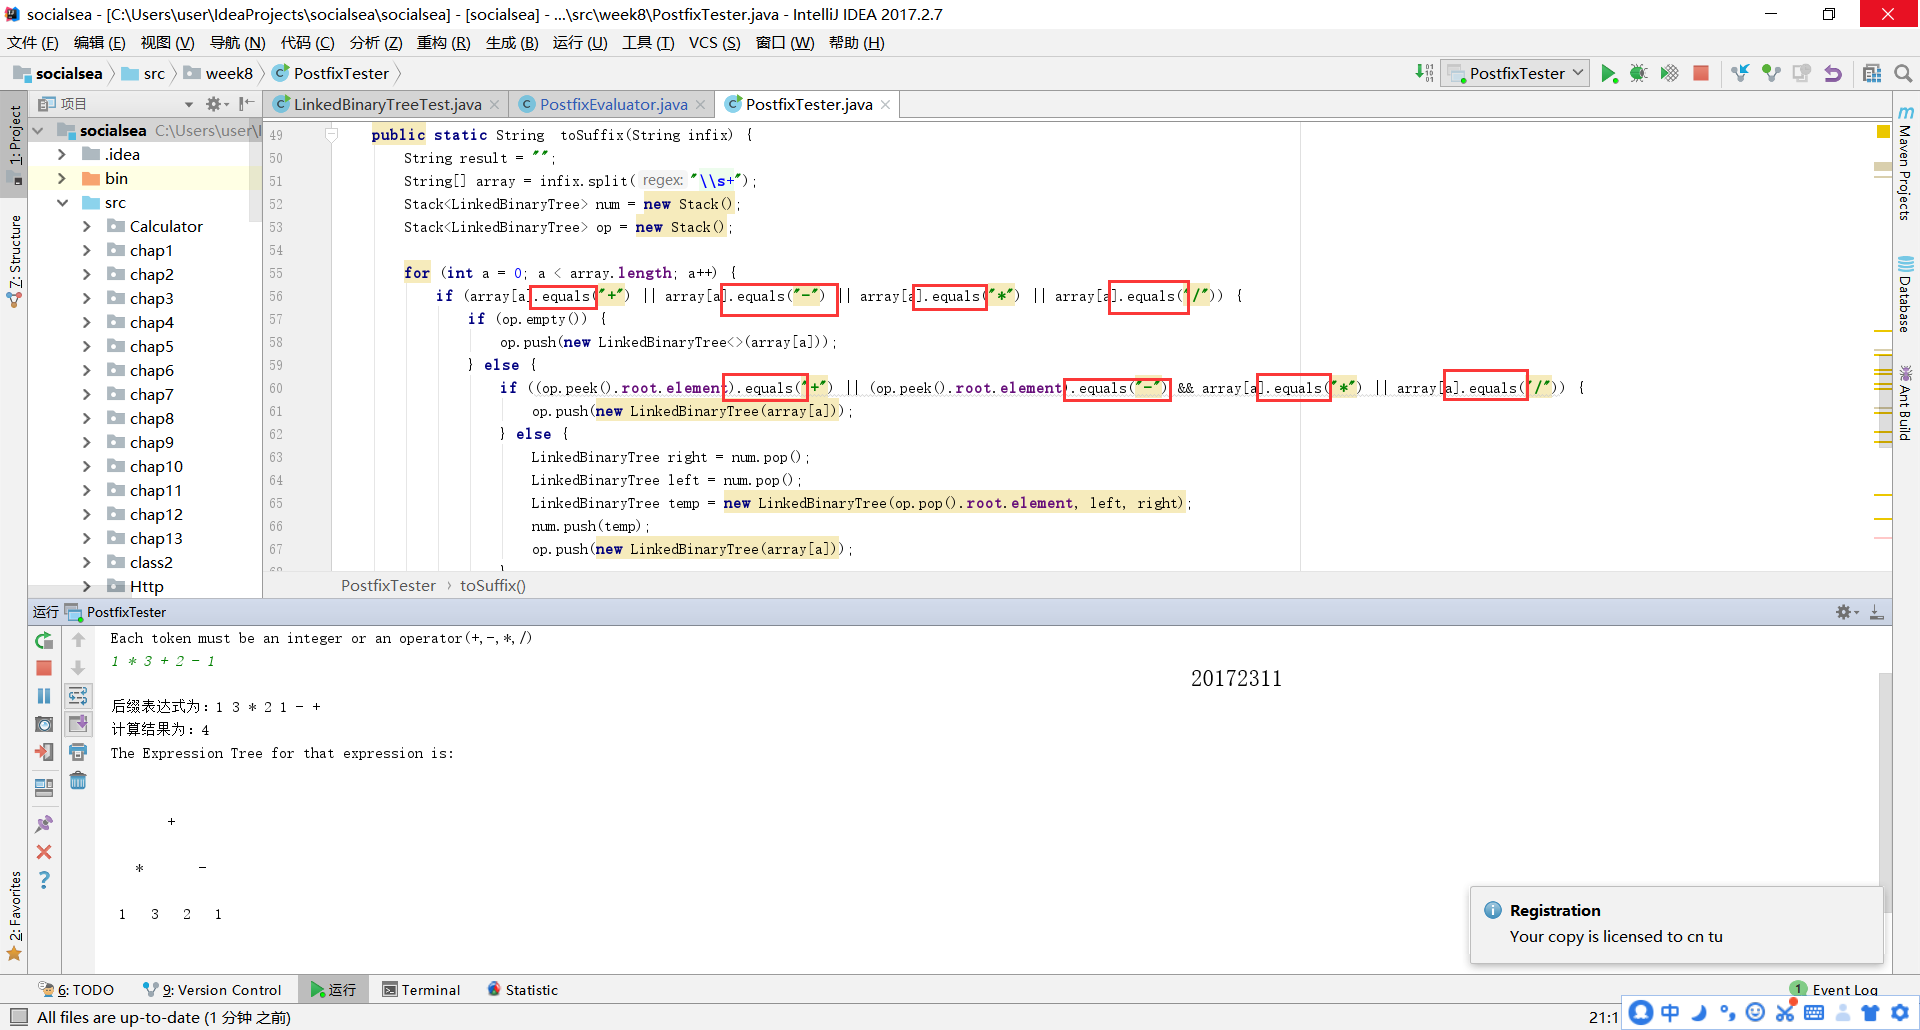
问题1:实验二 树-4-表达式树在测试时出现逻辑错误,错误如下:

-
问题1解决方案:经单步调试发现符号的判断出现问题,最后查阅资料了解到==不能判断字符串是否相等,应该用.equals方法判断字符串是否相等,改正之后如下:
4.感想
本次实验让我充分认识到自己的不足,首先是在编码能力方面,很多代码我好久都编不出来,不得不上网查阅资料和询问同学;然后是我的代码不够规范,通过实验6对Java API源码的查看分析,我认识到以后编码时应该尽量规范。但同时我也学到了很多,比如我知道了在有一定编码基础之后要多多查阅一些高质量源码,从优秀的代码中去吸取精华,从而提高自己的编码水平,而不是自己一味的编编编。总而言之,本次实验让我受益匪浅。

 浙公网安备 33010602011771号