Spring学习记录之set注入专题
Spring学习记录之set注入专题
前言
这篇文章是我第二次学习b站老杜的spring相关课程所进行的学习记录,算是对课程内容及笔记的二次整理,以自己的理解方式进行二次记录,其中理解可能存在错误,欢迎且接受各位大佬们的批评指正;
关于本笔记,只是我对于相关知识遗忘时快速查阅了解使用,至于课程中实际实验配置等,也只是记录关键,并不会记录详细步骤,若想了解可以关注我博客的项目经验模块,我会在实际项目开发过程中总结项目经验,在该模块发布!
学习视频地址:https://www.bilibili.com/video/BV1Ft4y1g7Fb/
视频配套笔记:https://www.yuque.com/dujubin/ltckqu/kipzgd?singleDoc# 《Spring6》 密码:mg9b
目录
set注入专题
一、我个人对这部分学习的一些见解
这部分内容不少,演示bean的各种注入形式、xml写法,理解上还是很重要的,但是这一部分实际项目中基本上使用粒度不会那么细化,建议熟悉各种配置方式,无需牢记,用到的时候及时查阅即可!
这部分我将继续引用老杜的笔记。
二、理解内部Bean和外部Bean注入
① 注入外部Bean
在之前案例中使用的就是注入外部Bean的方式。
spring.xml
<?xml version="1.0" encoding="UTF-8"?>
<beans xmlns="http://www.springframework.org/schema/beans"
       xmlns:xsi="http://www.w3.org/2001/XMLSchema-instance"
       xsi:schemaLocation="http://www.springframework.org/schema/beans http://www.springframework.org/schema/beans/spring-beans.xsd">

    <bean id="userDaoBean" class="com.powernode.spring6.dao.UserDao"/>

    <bean id="userServiceBean" class="com.powernode.spring6.service.UserService">
        <property name="userDao" ref="userDaoBean"/>
    </bean>

</beans>
外部Bean的特点:bean定义到外面,在property标签中使用ref属性进行注入。通常这种方式是常用。
② 注入内部Bean
内部Bean的方式:在bean标签中嵌套bean标签。(不需要id属性)
spring-inner-bean.xml
<?xml version="1.0" encoding="UTF-8"?>
<beans xmlns="http://www.springframework.org/schema/beans"
       xmlns:xsi="http://www.w3.org/2001/XMLSchema-instance"
       xsi:schemaLocation="http://www.springframework.org/schema/beans http://www.springframework.org/schema/beans/spring-beans.xsd">

    <bean id="userServiceBean" class="com.powernode.spring6.service.UserService">
        <property name="userDao">
            <bean class="com.powernode.spring6.dao.UserDao"/>
        </property>
    </bean>

</beans>
测试:
@Test
public void testInnerBean(){
    ApplicationContext applicationContext = new ClassPathXmlApplicationContext("spring-inner-bean.xml");
    UserService userService = applicationContext.getBean("userServiceBean", UserService.class);
    userService.save();
}
执行测试程序:
这种方式作为了解。
三、简单数据类型注入
我们之前在进行注入的时候,对象的属性是另一个对象(复杂数据类型)。
对象的属性是另一个对象:
public class UserService{

    private UserDao userDao;

    public void setUserDao(UserDao userDao){
        this.userDao = userDao;
    }

}
那如果对象的属性是int类型呢?
对象的属性是int类型:
public class User{

    private int age;

    public void setAge(int age){
        this.age = age;
    }

}
可以通过set注入的方式给该属性赋值吗?
- 当然可以。因为只要能够调用set方法就可以给属性赋值。
编写程序给一个User对象的age属性赋值20:
第一步:定义User类,提供age属性,提供age属性的setter方法。
User
package com.powernode.spring6.beans;

/**
 * @author 动力节点
 * @version 1.0
 * @className User
 * @since 1.0
 **/
public class User {
    private int age;

    public void setAge(int age) {
        this.age = age;
    }

    @Override
    public String toString() {
        return "User{" +
                "age=" + age +
                '}';
    }
}
第二步:编写spring配置文件:spring-simple-type.xml
spring-simple-type.xml
<?xml version="1.0" encoding="UTF-8"?>
<beans xmlns="http://www.springframework.org/schema/beans"
       xmlns:xsi="http://www.w3.org/2001/XMLSchema-instance"
       xsi:schemaLocation="http://www.springframework.org/schema/beans http://www.springframework.org/schema/beans/spring-beans.xsd">
    <bean id="userBean" class="com.powernode.spring6.beans.User">
        <!--如果像这种int类型的属性,我们称为简单类型,这种简单类型在注入的时候要使用value属性,不能使用ref-->
        <!--<property name="age" value="20"/>-->
        <property name="age">
            <value>20</value>
        </property>
    </bean>
</beans>
第三步:编写测试程序
@Test
public void testSimpleType(){
    ApplicationContext applicationContext = new ClassPathXmlApplicationContext("spring-simple-type.xml");
    User user = applicationContext.getBean("userBean", User.class);
    System.out.println(user);
}
第四步:运行测试程序

需要特别注意:如果给简单类型赋值,使用value属性或value标签。而不是ref。
四、分析Spring认为哪些类型为简单数据类型?
① 源码解读
在Spring的源码BeanUtils类中提供了一个isSimpleValueType方法来判定是否为简单数据类型。
BeanUtils
public class BeanUtils{

    //.......

    /**
	 * Check if the given type represents a "simple" property: a simple value
	 * type or an array of simple value types.
	 * <p>See {@link #isSimpleValueType(Class)} for the definition of <em>simple
	 * value type</em>.
	 * <p>Used to determine properties to check for a "simple" dependency-check.
	 * @param type the type to check
	 * @return whether the given type represents a "simple" property
	 * @see org.springframework.beans.factory.support.RootBeanDefinition#DEPENDENCY_CHECK_SIMPLE
	 * @see org.springframework.beans.factory.support.AbstractAutowireCapableBeanFactory#checkDependencies
	 * @see #isSimpleValueType(Class)
	 */
	public static boolean isSimpleProperty(Class<?> type) {
		Assert.notNull(type, "'type' must not be null");
		return isSimpleValueType(type) || (type.isArray() && isSimpleValueType(type.getComponentType()));
	}

	/**
	 * Check if the given type represents a "simple" value type: a primitive or
	 * primitive wrapper, an enum, a String or other CharSequence, a Number, a
	 * Date, a Temporal, a URI, a URL, a Locale, or a Class.
	 * <p>{@code Void} and {@code void} are not considered simple value types.
	 * @param type the type to check
	 * @return whether the given type represents a "simple" value type
	 * @see #isSimpleProperty(Class)
	 */
	public static boolean isSimpleValueType(Class<?> type) {
		return (Void.class != type && void.class != type &&
				(ClassUtils.isPrimitiveOrWrapper(type) ||
				Enum.class.isAssignableFrom(type) ||
				CharSequence.class.isAssignableFrom(type) ||
				Number.class.isAssignableFrom(type) ||
				Date.class.isAssignableFrom(type) ||
				Temporal.class.isAssignableFrom(type) ||
				URI.class == type ||
				URL.class == type ||
				Locale.class == type ||
				Class.class == type));
	}

    //........
}
② 简单数据类型
通过源码分析得知,简单类型包括:
- 基本数据类型
- 基本数据类型对应的包装类
- String或其他的CharSequence子类
- Number子类
- Date子类
- Enum子类
- URI
- URL
- Temporal子类
- Locale
- Class
- 另外还包括以上简单值类型对应的数组类型。
经典案例:给数据源的属性注入值:
假设我们现在要自己手写一个数据源,我们都知道所有的数据源都要实现javax.sql.DataSource接口,并且数据源中应该有连接数据库的信息,例如:driver、url、username、password等。
MyDataSource
package com.powernode.spring6.beans;

import javax.sql.DataSource;
import java.io.PrintWriter;
import java.sql.Connection;
import java.sql.SQLException;
import java.sql.SQLFeatureNotSupportedException;
import java.util.logging.Logger;

/**
 * @author 动力节点
 * @version 1.0
 * @className MyDataSource
 * @since 1.0
 **/
public class MyDataSource implements DataSource {
    private String driver;
    private String url;
    private String username;
    private String password;

    public void setDriver(String driver) {
        this.driver = driver;
    }

    public void setUrl(String url) {
        this.url = url;
    }

    public void setUsername(String username) {
        this.username = username;
    }

    public void setPassword(String password) {
        this.password = password;
    }

    @Override
    public String toString() {
        return "MyDataSource{" +
                "driver='" + driver + '\'' +
                ", url='" + url + '\'' +
                ", username='" + username + '\'' +
                ", password='" + password + '\'' +
                '}';
    }

    @Override
    public Connection getConnection() throws SQLException {
        return null;
    }

    @Override
    public Connection getConnection(String username, String password) throws SQLException {
        return null;
    }

    @Override
    public PrintWriter getLogWriter() throws SQLException {
        return null;
    }

    @Override
    public void setLogWriter(PrintWriter out) throws SQLException {

    }

    @Override
    public void setLoginTimeout(int seconds) throws SQLException {

    }

    @Override
    public int getLoginTimeout() throws SQLException {
        return 0;
    }

    @Override
    public Logger getParentLogger() throws SQLFeatureNotSupportedException {
        return null;
    }

    @Override
    public <T> T unwrap(Class<T> iface) throws SQLException {
        return null;
    }

    @Override
    public boolean isWrapperFor(Class<?> iface) throws SQLException {
        return false;
    }
}
我们给driver、url、username、password四个属性分别提供了setter方法,我们可以使用spring的依赖注入完成数据源对象的创建和属性的赋值吗?看配置文件:
spring-datasource.xml
<?xml version="1.0" encoding="UTF-8"?>
<beans xmlns="http://www.springframework.org/schema/beans"
       xmlns:xsi="http://www.w3.org/2001/XMLSchema-instance"
       xsi:schemaLocation="http://www.springframework.org/schema/beans http://www.springframework.org/schema/beans/spring-beans.xsd">

    <bean id="dataSource" class="com.powernode.spring6.beans.MyDataSource">
        <property name="driver" value="com.mysql.cj.jdbc.Driver"/>
        <property name="url" value="jdbc:mysql://localhost:3306/spring"/>
        <property name="username" value="root"/>
        <property name="password" value="123456"/>
    </bean>

</beans>
测试程序:
@Test
public void testDataSource(){
    ApplicationContext applicationContext = new ClassPathXmlApplicationContext("spring-datasource.xml");
    MyDataSource dataSource = applicationContext.getBean("dataSource", MyDataSource.class);
    System.out.println(dataSource);
}
执行测试程序:

④ 测试简单数据类型
接下来,我们编写一个程序,把所有的简单类型全部测试一遍:
编写一个类A:
package com.powernode.spring6.beans;

import java.net.URI;
import java.net.URL;
import java.time.LocalDate;
import java.util.Date;
import java.util.Locale;

/**
 * @author 动力节点
 * @version 1.0
 * @className A
 * @since 1.0
 **/
public class A {
    private byte b;
    private short s;
    private int i;
    private long l;
    private float f;
    private double d;
    private boolean flag;
    private char c;

    private Byte b1;
    private Short s1;
    private Integer i1;
    private Long l1;
    private Float f1;
    private Double d1;
    private Boolean flag1;
    private Character c1;

    private String str;

    private Date date;

    private Season season;

    private URI uri;

    private URL url;

    private LocalDate localDate;

    private Locale locale;

    private Class clazz;

    // 生成setter方法
    // 生成toString方法
}

enum Season {
    SPRING, SUMMER, AUTUMN, WINTER
}
spring-all-simple-type.xml
<?xml version="1.0" encoding="UTF-8"?>
<beans xmlns="http://www.springframework.org/schema/beans"
       xmlns:xsi="http://www.w3.org/2001/XMLSchema-instance"
       xsi:schemaLocation="http://www.springframework.org/schema/beans http://www.springframework.org/schema/beans/spring-beans.xsd">

    <bean id="a" class="com.powernode.spring6.beans.A">
        <property name="b" value="1"/>
        <property name="s" value="1"/>
        <property name="i" value="1"/>
        <property name="l" value="1"/>
        <property name="f" value="1"/>
        <property name="d" value="1"/>
        <property name="flag" value="false"/>

        <property name="c" value="a"/>
        <property name="b1" value="2"/>
        <property name="s1" value="2"/>
        <property name="i1" value="2"/>
        <property name="l1" value="2"/>
        <property name="f1" value="2"/>
        <property name="d1" value="2"/>
        <property name="flag1" value="true"/>
        <property name="c1" value="a"/>

        <property name="str" value="zhangsan"/>
        <!--注意:value后面的日期字符串格式不能随便写,必须是Date对象toString()方法执行的结果。-->
        <!--如果想使用其他格式的日期字符串,就需要进行特殊处理了。具体怎么处理,可以看后面的课程!!!!-->
        <property name="date" value="Fri Sep 30 15:26:38 CST 2022"/>
        <property name="season" value="WINTER"/>
        <property name="uri" value="/save.do"/>
        <!--spring6之后,会自动检查url是否有效,如果无效会报错。-->
        <property name="url" value="http://www.baidu.com"/>
        <property name="localDate" value="EPOCH"/>
        <!--java.util.Locale 主要在软件的本地化时使用。它本身没有什么功能,更多的是作为一个参数辅助其他方法完成输出的本地化。-->
        <property name="locale" value="CHINESE"/>
        <property name="clazz" value="java.lang.String"/>
    </bean>
</beans>
编写测试程序:
@Test
public void testAllSimpleType(){
    ApplicationContext applicationContext = new ClassPathXmlApplicationContext("spring-all-simple-type.xml");
    A a = applicationContext.getBean("a", A.class);
    System.out.println(a);
}
执行结果如下:

需要注意的是:
- 如果把Date当做简单类型的话,日期字符串格式不能随便写。格式必须符合Date的toString()方法格式。显然这就比较鸡肋了。如果我们提供一个这样的日期字符串:2010-10-11,在这里是无法赋值给Date类型的属性的。
- spring6之后,当注入的是URL,那么这个url字符串是会进行有效性检测的。如果是一个存在的url,那就没问题。如果不存在则报错。
五、级联属性赋值(了解)
① 举例
Clazz
package com.powernode.spring6.beans;

/**
 * @author 动力节点
 * @version 1.0
 * @className Clazz
 * @since 1.0
 **/
public class Clazz {
    private String name;

    public Clazz() {
    }

    public Clazz(String name) {
        this.name = name;
    }

    public String getName() {
        return name;
    }

    public void setName(String name) {
        this.name = name;
    }

    @Override
    public String toString() {
        return "Clazz{" +
                "name='" + name + '\'' +
                '}';
    }
}
Student
package com.powernode.spring6.beans;

/**
 * @author 动力节点
 * @version 1.0
 * @className Student
 * @since 1.0
 **/
public class Student {
    private String name;
    private Clazz clazz;

    public Student() {
    }

    public Student(String name, Clazz clazz) {
        this.name = name;
        this.clazz = clazz;
    }

    public void setName(String name) {
        this.name = name;
    }

    public void setClazz(Clazz clazz) {
        this.clazz = clazz;
    }

    public Clazz getClazz() {
        return clazz;
    }

    @Override
    public String toString() {
        return "Student{" +
                "name='" + name + '\'' +
                ", clazz=" + clazz +
                '}';
    }
}
spring-cascade.xml
<?xml version="1.0" encoding="UTF-8"?>
<beans xmlns="http://www.springframework.org/schema/beans"
       xmlns:xsi="http://www.w3.org/2001/XMLSchema-instance"
       xsi:schemaLocation="http://www.springframework.org/schema/beans http://www.springframework.org/schema/beans/spring-beans.xsd">

    <bean id="clazzBean" class="com.powernode.spring6.beans.Clazz"/>

    <bean id="student" class="com.powernode.spring6.beans.Student">
        <property name="name" value="张三"/>

        <!--要点1:以下两行配置的顺序不能颠倒,原因是把容器中的clazz对象set注入(set方法)到student对象中,student对象才能调用getClazz获取到clazz实例对象,才能给其name赋值,所以顺序不能颠倒-->
        <property name="clazz" ref="clazzBean"/>
        <!--要点2:clazz属性必须有getter方法,先获取注入的clazz对象(get方法),再给name赋值。-->
        <property name="clazz.name" value="高三一班"/>
    </bean>
</beans>
测试程序:
@Test
public void testCascade(){
    ApplicationContext applicationContext = new ClassPathXmlApplicationContext("spring-cascade.xml");
    Student student = applicationContext.getBean("student", Student.class);
    System.out.println(student);
}
运行结果:

② 级联属性赋值要点
- 在spring配置文件中,如上,注意顺序。
- 在spring配置文件中,clazz属性必须提供getter方法。
补充:这里注意get方法命名也要规范,spring底层获取执行哪一个get方法的演化方式和执行set方法的演化方式是一样的,这里name指定的是clazz的话对应get方法名称一定要是getClazz。
六、数据集合类型注入
① 数组注入
当数组中的元素是简单类型:
Person
package com.powernode.spring6.beans;

import java.util.Arrays;

public class Person {
    private String[] favariteFoods;

    public void setFavariteFoods(String[] favariteFoods) {
        this.favariteFoods = favariteFoods;
    }

    @Override
    public String toString() {
        return "Person{" +
                "favariteFoods=" + Arrays.toString(favariteFoods) +
                '}';
    }
}
spring-array-simple.xml
<?xml version="1.0" encoding="UTF-8"?>
<beans xmlns="http://www.springframework.org/schema/beans"
       xmlns:xsi="http://www.w3.org/2001/XMLSchema-instance"
       xsi:schemaLocation="http://www.springframework.org/schema/beans http://www.springframework.org/schema/beans/spring-beans.xsd">

    <bean id="person" class="com.powernode.spring6.beans.Person">
        <property name="favariteFoods">
            <array>
                <value>鸡排</value>
                <value>汉堡</value>
                <value>鹅肝</value>
            </array>
        </property>
    </bean>
</beans>
测试程序:
@Test
public void testArraySimple(){
    ApplicationContext applicationContext = new ClassPathXmlApplicationContext("spring-array-simple.xml");
    Person person = applicationContext.getBean("person", Person.class);
    System.out.println(person);
}
当数组中的元素是非简单类型:一个订单中包含多个商品。
Goods
package com.powernode.spring6.beans;

/**
 * @author 动力节点
 * @version 1.0
 * @className Goods
 * @since 1.0
 **/
public class Goods {
    private String name;

    public Goods() {
    }

    public Goods(String name) {
        this.name = name;
    }

    public String getName() {
        return name;
    }

    public void setName(String name) {
        this.name = name;
    }

    @Override
    public String toString() {
        return "Goods{" +
                "name='" + name + '\'' +
                '}';
    }
}
Order
package com.powernode.spring6.beans;

import java.util.Arrays;

/**
 * @author 动力节点
 * @version 1.0
 * @className Order
 * @since 1.0
 **/
public class Order {
    // 一个订单中有多个商品
    private Goods[] goods;

    public Order() {
    }

    public Order(Goods[] goods) {
        this.goods = goods;
    }

    public void setGoods(Goods[] goods) {
        this.goods = goods;
    }

    @Override
    public String toString() {
        return "Order{" +
                "goods=" + Arrays.toString(goods) +
                '}';
    }
}
spring-array.xml
<?xml version="1.0" encoding="UTF-8"?>
<beans xmlns="http://www.springframework.org/schema/beans"
       xmlns:xsi="http://www.w3.org/2001/XMLSchema-instance"
       xsi:schemaLocation="http://www.springframework.org/schema/beans http://www.springframework.org/schema/beans/spring-beans.xsd">

    <bean id="goods1" class="com.powernode.spring6.beans.Goods">
        <property name="name" value="西瓜"/>
    </bean>

    <bean id="goods2" class="com.powernode.spring6.beans.Goods">
        <property name="name" value="苹果"/>
    </bean>

    <bean id="order" class="com.powernode.spring6.beans.Order">
        <property name="goods">
            <array>
                <!--这里使用ref标签即可-->
                <ref bean="goods1"/>
                <ref bean="goods2"/>
            </array>
        </property>
    </bean>

</beans>
测试程序:
@Test
public void testArray(){
    ApplicationContext applicationContext = new ClassPathXmlApplicationContext("spring-array.xml");
    Order order = applicationContext.getBean("order", Order.class);
    System.out.println(order);
}
执行结果:

要点:
- 如果数组中是简单类型,使用value标签。
- 如果数组中是非简单类型,使用ref标签。
② List集合注入
List集合:有序可重复
People
package com.powernode.spring6.beans;

import java.util.List;

/**
 * @author 动力节点
 * @version 1.0
 * @className People
 * @since 1.0
 **/
public class People {
    // 一个人有多个名字
    private List<String> names;

    public void setNames(List<String> names) {
        this.names = names;
    }

    @Override
    public String toString() {
        return "People{" +
                "names=" + names +
                '}';
    }
}
spring-collection.xml
<?xml version="1.0" encoding="UTF-8"?>
<beans xmlns="http://www.springframework.org/schema/beans"
       xmlns:xsi="http://www.w3.org/2001/XMLSchema-instance"
       xsi:schemaLocation="http://www.springframework.org/schema/beans http://www.springframework.org/schema/beans/spring-beans.xsd">

    <bean id="peopleBean" class="com.powernode.spring6.beans.People">
        <property name="names">
            <list>
                <value>铁锤</value>
                <value>张三</value>
                <value>张三</value>
                <value>张三</value>
                <value>狼</value>
            </list>
        </property>
    </bean>
</beans>
测试程序:
@Test
public void testCollection(){
ApplicationContext applicationContext = new ClassPathXmlApplicationContext("spring-collection.xml");
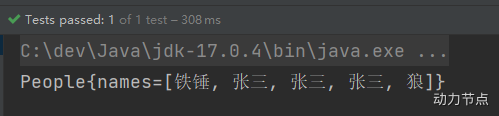
People peopleBean = applicationContext.getBean("peopleBean", People.class);
System.out.println(peopleBean);
}
执行结果:
注意:注入List集合的时候使用list标签,如果List集合中是简单类型使用value标签,反之使用ref标签。
③ Set集合注入
Set集合:无序不可重复
People
package com.powernode.spring6.beans;

import java.util.List;
import java.util.Set;

/**
 * @author 动力节点
 * @version 1.0
 * @className People
 * @since 1.0
 **/
public class People {
    // 一个人有多个电话
    private Set<String> phones;

    public void setPhones(Set<String> phones) {
        this.phones = phones;
    }

    //......

    @Override
    public String toString() {
        return "People{" +
                "phones=" + phones +
                ", names=" + names +
                '}';
    }
}
spring-collection.xml
<?xml version="1.0" encoding="UTF-8"?>
<beans xmlns="http://www.springframework.org/schema/beans"
       xmlns:xsi="http://www.w3.org/2001/XMLSchema-instance"
       xsi:schemaLocation="http://www.springframework.org/schema/beans http://www.springframework.org/schema/beans/spring-beans.xsd">

    <bean id="peopleBean" class="com.powernode.spring6.beans.People">
        <property name="phones">
            <set>
                <!--非简单类型可以使用ref,简单类型使用value-->
                <value>110</value>
                <value>110</value>
                <value>120</value>
                <value>120</value>
                <value>119</value>
                <value>119</value>
            </set>
        </property>
    </bean>
</beans>
执行结果:

要点:
- 使用set标签
- set集合中元素是简单类型的使用value标签,反之使用ref标签。
④ Map集合注入
People
package com.powernode.spring6.beans;

import java.util.List;
import java.util.Map;
import java.util.Set;

/**
 * @author 动力节点
 * @version 1.0
 * @className People
 * @since 1.0
 **/
public class People {
    // 一个人有多个住址
    private Map<Integer, String> addrs;

    public void setAddrs(Map<Integer, String> addrs) {
        this.addrs = addrs;
    }

    //......

    @Override
    public String toString() {
        return "People{" +
                "addrs=" + addrs +
                ", phones=" + phones +
                ", names=" + names +
                '}';
    }

}
spring-collection.xml
<?xml version="1.0" encoding="UTF-8"?>
<beans xmlns="http://www.springframework.org/schema/beans"
       xmlns:xsi="http://www.w3.org/2001/XMLSchema-instance"
       xsi:schemaLocation="http://www.springframework.org/schema/beans http://www.springframework.org/schema/beans/spring-beans.xsd">

    <bean id="peopleBean" class="com.powernode.spring6.beans.People">
        <property name="addrs">
            <map>
                <!--如果key不是简单类型,使用 key-ref 属性-->
                <!--如果value不是简单类型,使用 value-ref 属性-->
                <entry key="1" value="北京大兴区"/>
                <entry key="2" value="上海浦东区"/>
                <entry key="3" value="深圳宝安区"/>
            </map>
        </property>
    </bean>
</beans>
执行结果:

要点:
- 使用map标签
- 如果key是简单类型,使用 key 属性,反之使用 key-ref 属性。
- 如果value是简单类型,使用 value 属性,反之使用 value-ref 属性。
⑤ Properties注入
java.util.Properties继承java.util.Hashtable,所以Properties也是一个Map集合。
People
package com.powernode.spring6.beans;

import java.util.List;
import java.util.Map;
import java.util.Properties;
import java.util.Set;

/**
 * @author 动力节点
 * @version 1.0
 * @className People
 * @since 1.0
 **/
public class People {

    private Properties properties;

    public void setProperties(Properties properties) {
        this.properties = properties;
    }

    //......

    @Override
    public String toString() {
        return "People{" +
                "properties=" + properties +
                ", addrs=" + addrs +
                ", phones=" + phones +
                ", names=" + names +
                '}';
    }
}
spring-collection.xml
<?xml version="1.0" encoding="UTF-8"?>
<beans xmlns="http://www.springframework.org/schema/beans"
       xmlns:xsi="http://www.w3.org/2001/XMLSchema-instance"
       xsi:schemaLocation="http://www.springframework.org/schema/beans http://www.springframework.org/schema/beans/spring-beans.xsd">

    <bean id="peopleBean" class="com.powernode.spring6.beans.People">
        <property name="properties">
            <props>
                <prop key="driver">com.mysql.cj.jdbc.Driver</prop>
                <prop key="url">jdbc:mysql://localhost:3306/spring</prop>
                <prop key="username">root</prop>
                <prop key="password">123456</prop>
            </props>
        </property>
    </bean>
</beans>
执行测试程序:

要点:
- 使用props标签嵌套prop标签完成。
- 注意Properties的key和value都是字符串
七、特殊注入补充
① 注入null和空字符串
注入空字符串使用:<value/> 或者 value=""
注入null使用:<null/> 或者 不为该属性赋值
- 我们先来看一下,怎么注入空字符串。
Vip
package com.powernode.spring6.beans;

/**
 * @author 动力节点
 * @version 1.0
 * @className Vip
 * @since 1.0
 **/
public class Vip {
    private String email;

    public void setEmail(String email) {
        this.email = email;
    }

    @Override
    public String toString() {
        return "Vip{" +
                "email='" + email + '\'' +
                '}';
    }
}
spring-null.xml
<?xml version="1.0" encoding="UTF-8"?>
<beans xmlns="http://www.springframework.org/schema/beans"
       xmlns:xsi="http://www.w3.org/2001/XMLSchema-instance"
       xsi:schemaLocation="http://www.springframework.org/schema/beans http://www.springframework.org/schema/beans/spring-beans.xsd">

    <bean id="vipBean" class="com.powernode.spring6.beans.Vip">
        <!--空串的第一种方式-->
        <!--<property name="email" value=""/>-->
        <!--空串的第二种方式-->
        <property name="email">
            <value/>
        </property>
    </bean>

</beans>
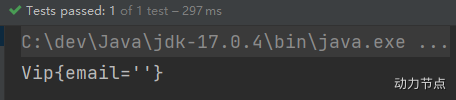
测试程序:
@Test
public void testNull(){
    ApplicationContext applicationContext = new ClassPathXmlApplicationContext("spring-null.xml");
    Vip vipBean = applicationContext.getBean("vipBean", Vip.class);
    System.out.println(vipBean);
}
执行结果:
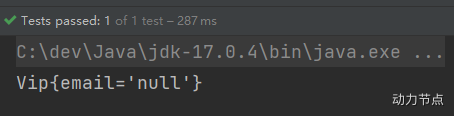
- 怎么注入null呢?
第一种方式:不给属性赋值
spring-null.xml
<?xml version="1.0" encoding="UTF-8"?>
<beans xmlns="http://www.springframework.org/schema/beans"
       xmlns:xsi="http://www.w3.org/2001/XMLSchema-instance"
       xsi:schemaLocation="http://www.springframework.org/schema/beans http://www.springframework.org/schema/beans/spring-beans.xsd">

    <bean id="vipBean" class="com.powernode.spring6.beans.Vip" />

</beans>
执行结果:
第二种方式:使用<null/>
spring-null.xml
<?xml version="1.0" encoding="UTF-8"?>
<beans xmlns="http://www.springframework.org/schema/beans"
       xmlns:xsi="http://www.w3.org/2001/XMLSchema-instance"
       xsi:schemaLocation="http://www.springframework.org/schema/beans http://www.springframework.org/schema/beans/spring-beans.xsd">

    <bean id="vipBean" class="com.powernode.spring6.beans.Vip">
        <property name="email">
            <null/>
        </property>
    </bean>

</beans>
执行结果:
② 注入的值中含有特殊符号
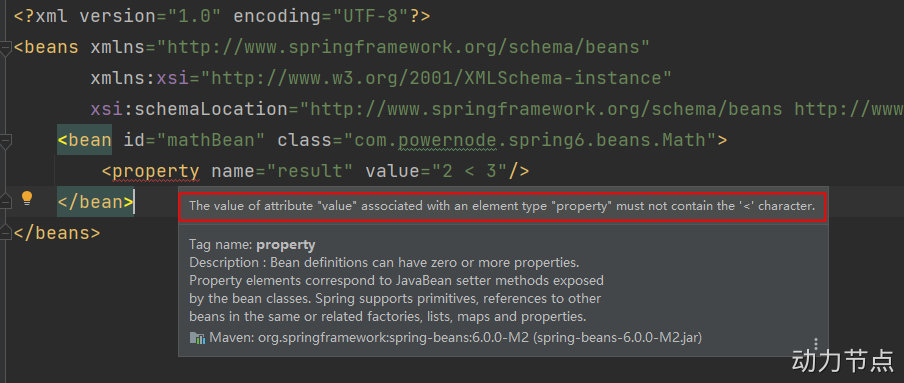
XML中有5个特殊字符,分别是:<、>、'、"、&
以上5个特殊符号在XML中会被特殊对待,会被当做XML语法的一部分进行解析,如果这些特殊符号直接出现在注入的字符串当中,会报错。
解决方案包括两种:
- 第一种:特殊符号使用转义字符代替。
- 第二种:将含有特殊符号的字符串放到:
<![CDATA[]]>当中。因为放在CDATA区中的数据不会被XML文件解析器解析。
5个特殊字符对应的转义字符分别是:
| 特殊字符 | 转义字符 |
|---|---|
| > | > |
| < | < |
| ' | ' |
| " | " |
| & | & |
先使用转义字符来代替:
Math
package com.powernode.spring6.beans;

/**
 * @author 动力节点
 * @version 1.0
 * @className Math
 * @since 1.0
 **/
public class Math {
    private String result;

    public void setResult(String result) {
        this.result = result;
    }

    @Override
    public String toString() {
        return "Math{" +
                "result='" + result + '\'' +
                '}';
    }
}
spring-special.xml
<?xml version="1.0" encoding="UTF-8"?>
<beans xmlns="http://www.springframework.org/schema/beans"
xmlns:xsi="http://www.w3.org/2001/XMLSchema-instance"
xsi:schemaLocation="http://www.springframework.org/schema/beans http://www.springframework.org/schema/beans/spring-beans.xsd">
<bean id="mathBean" class="com.powernode.spring6.beans.Math">
<property name="result" value="2 < 3"/>
</bean>
</beans>
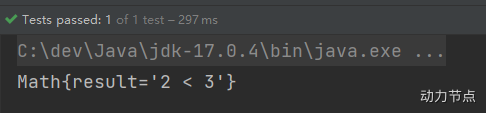
测试程序:
@Test
public void testSpecial(){
    ApplicationContext applicationContext = new ClassPathXmlApplicationContext("spring-special.xml");
    Math mathBean = applicationContext.getBean("mathBean", Math.class);
    System.out.println(mathBean);
}
执行结果:
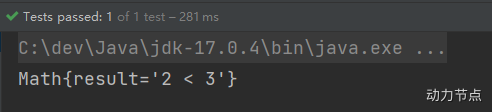
我们再来使用CDATA方式:
spring-special.xml
<?xml version="1.0" encoding="UTF-8"?>
<beans xmlns="http://www.springframework.org/schema/beans"
       xmlns:xsi="http://www.w3.org/2001/XMLSchema-instance"
       xsi:schemaLocation="http://www.springframework.org/schema/beans http://www.springframework.org/schema/beans/spring-beans.xsd">

    <bean id="mathBean" class="com.powernode.spring6.beans.Math">
        <property name="result">
            <!--只能使用value标签-->
            <value><![CDATA[2 < 3]]></value>
        </property>
    </bean>

</beans>
注意:使用CDATA时,不能使用value属性,只能使用value标签。
执行结果:
八、总结
在这部分我们通过编写xml的方式实验了各种数据类型的set注入方式,演示了xml写法。建议熟悉各种配置方式,无需牢记,用到的时候及时查阅即可!
这里需要去了解老杜这节相关讲解,可以直接点击下面链接跳转到对应课程学习了解!

 浙公网安备 33010602011771号