FireMonkey3D万能控件TMesh详解
TMesh解释为由三角形构成的网格,可以构建各种复杂的3D物体,没有TMesh不能构建的物体,真正的万能控件。这个控件使最重要的属性为Data,为TMeshData类,所有操作基本围绕TMeshData展开。TMeshData有四个重要属性,也是所有 3D对象的四大要素:
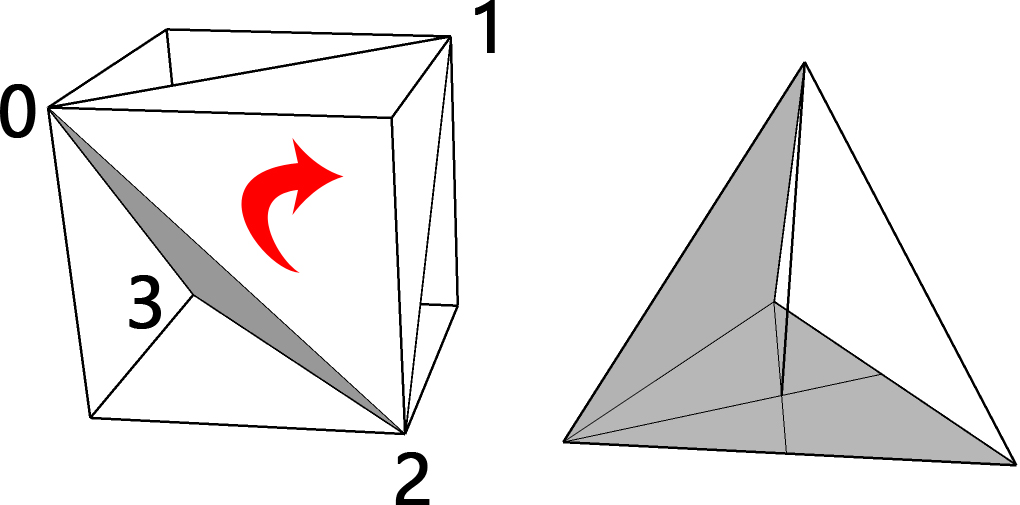
- Vertices:顶点,Tpoint3D数组,代表位置,即为构成3D对象的所有顶点,以四面体为例,从图形看共有4个顶点,然而TMesh的顶点数不是这样数的。四面体有4个面,每个面有3个顶点,那么四面体应该有4*3=12个顶点。确定顶点的数量非常重要。以四面体为例,四面体可以这样以两种方法构建,一种是利用立方体构建,取立方体的4个对角的顶点连接起来即为四面体。第二种方法是画一个正三角形,找到它的中心,通过中心引一条垂直于这个三角形的线段,线段长为“边长*sqr(6)/3”,这就是纯数学方法。如下图所示(此图已经标示了顶点):
- Normals:法线,TPoint3D数组,代表方向。我的理解即为从原点引出一条垂直于某个“面”的直线,这条直线的方向就是这个“面”的法线。法线与顶点的数量是一致的。法线是光线反射的基础,如果不计算法线,灯光效果将不起作用。大部分情况下,平面不需要手动计划法线,TMeshData提供一个函数:CalcFaceNormals,自动就把所有的法线计算出来了。曲面如果能明确法线的方向,尽量还是要手工计算,尽管TMeshData也提供了曲面法线计算函数:CalcSmoothNormals,但是这个函数运算过程复杂,曲面细分太多时,会使程序变慢。
- TexCoordinates:纹理点,TPointF数组,贴图的位置。无论贴图多大,FireMonkey都把它定义为1*1大小的图形,纹理点就代表着每个面贴图的位置。以四面体为例进行贴图,针对四个面每个面贴图不同,我们将四面体平铺,分解成1*4的图形,便于计算,当然也可以将图形分为2*2的形状,然后就是计算位置了。
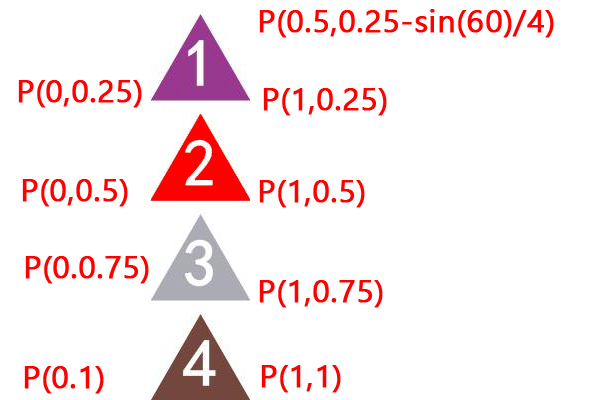
如图所示,贴图是1*1大小的,我们将其分为四份,P所标示的是贴图的位置,这是将贴图一分为四,四个面分别贴图,如果是每个面用同一个贴图,就简单了,贴图尽量与3D物体的面形状相同,以免变形。注意贴图点的顺序要与顶点的取点顺序一致,否则贴图会被反转。
- TriangleIndices:三角形的序列。无论多复杂的物体,在电脑眼中,都可以由一定数量的三角形构建,3D运算就是算三角形。四面体就是以3个正三角形构成的。TriangleIndices是根据顶点来计算的,代表顶点构建生成三角形平面的序列,顶点与TriangleIndices是密切相关的,四面体的顶点数与TriangleIndices数量是相同的。我们以立方体来算下TriangleIndices数量,立方体共有6个面,每个面4个顶点,顶点数就是6*4=24个;每个面可以分解为2个三角形,每个三角形3个顶点,TriangleIndices的数量就是2*3*6=36个。在FireMonkey里,每个三角形的序列,必须是以法线的方向为基准,顺时针取顶点序列,即当法线垂直于屏幕且面朝屏幕外时,按顺时针方向取序列,上图红色箭头即为取点顺序,如果顺序不对,这个面将不会在正面显示。
下面我们用TMesh构建四面体,代码如下:
var
 i:Integer;
 p3d:array of TPoint3D;
 pt:array of TPointF;
 v:array of Integer;
begin
//必须先确定顶点数和TriangleIndices数量,IndexBuffer就是TriangleIndices
  Mesh1.Data.IndexBuffer.Length:=12;
  Mesh1.Data.VertexBuffer.Length:=12;
//以立方体的四个顶点构建
  p3d:=[TPoint3d.Create(-1.5,-1.5,-1.5),TPoint3D.Create(1.5,-1.5,1.5),TPoint3D.Create(1.5,1.5,-1.5),TPoint3D.Create(-1.5,1.5,1.5)];
  //p3d:=[Tpoint3d.Create(-1.5,1.5,-1.5),Tpoint3d.Create(1.5,1.5,-1.5),
  //      Tpoint3d.Create(0,1.5,3*sin(pi/3)-1.5),Tpoint3d.Create(0,1.5-sqrt(6),-1.5+1.5*tan(pi/6))];//两种方式均可
  v:=[0,1,2,0,3,1,2,1,3,0,2,3];
  pt:=[pointF(1,0.25),PointF(0,0.25),pointf(0.5,0.1339745962/4)];
  for I := 0 to 11 do
  begin
    Mesh1.Data.VertexBuffer.Vertices[i]:=p3d[v[i]];
    Mesh1.Data.VertexBuffer.TexCoord0[i]:=pt[i mod 3];
    Mesh1.Data.IndexBuffer.Indices[i]:=i;
    pt[i mod 3].Offset(0,0.25);
  end;
  Mesh1.Data.CalcFaceNormals;
  Mesh1.Repaint;
end;
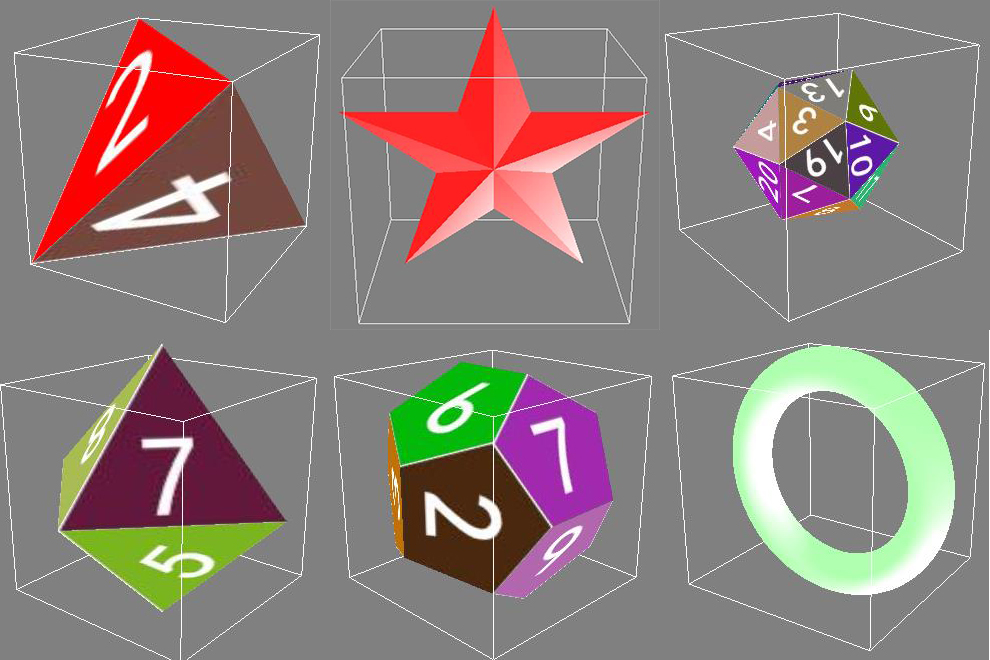
TMesh构建五角星:
Uses System.Math;
var
 i:Integer;
 p3d:array of TPoint3D;
 Theta,S,C:Single;
 indices:array of Integer;
begin
  SetLength(p3d,10);//五角星共10个点
  Mesh1.Data.IndexBuffer.Length:=60;
  Mesh1.Data.VertexBuffer.Length:=42;
  for I := 0 to 4 do
  begin
    Theta:=DegToRad(270-72*i);
    SinCos(Theta,S,C);
    p3d[i*2]:=TPoint3D.Create(C*2,S*2,0.25);
    Theta:=DegToRad(234-72*i);
    SinCos(Theta,S,C);
    p3d[i*2+1]:=TPoint3D.Create(C*0.764,S*0.764,0.25);
  end;
  //再添加1个顶点,使五角具有立体感,垂直于五角星的中心,Z轴方向
  p3d:=p3d+[p3d[0],TPoint3d.Create(0,0,-0.25)];
  //构建正面的10个面
  for I := 0 to 9 do
  begin
    Mesh1.Data.VertexBuffer.Vertices[i*3]:=p3d[i+1];
    Mesh1.Data.VertexBuffer.Vertices[i*3+1]:=p3d[i];
    Mesh1.Data.VertexBuffer.Vertices[i*3+2]:=p3d[11];
    Mesh1.Data.IndexBuffer.Indices[i*3]:=i*3;
    Mesh1.Data.IndexBuffer.Indices[i*3+1]:=i*3+1;
    Mesh1.Data.IndexBuffer.Indices[i*3+2]:=i*3+2;
  end;
  //添加背面的11个点,最后1个点是五角星的中心
  for I := 0 to 10 do
     Mesh1.Data.VertexBuffer.Vertices[i+30]:=p3d[i];
  Mesh1.Data.VertexBuffer.Vertices[41]:=TPoint3d.Create(0,0,0.25);
  //注意这里,顶点数小于三角形序列数,因为背面是由11个顶点组成一个平面
  for I := 0 to 9 do
  begin
    Mesh1.Data.IndexBuffer.Indices[i*3+30]:=i+30;
    Mesh1.Data.IndexBuffer.Indices[i*3+31]:=i+31;
    Mesh1.Data.IndexBuffer.Indices[i*3+32]:=41;
  end;
  Mesh1.Data.CalcFaceNormals;
  Mesh1.Repaint;
end;
TMesh构建8面体,代码比较简单,不注释:
var
 i:Integer;
 indices:array of Byte;
 pt:array of TPointF;
const
 P3d:array [0..5] of TPoint3D=((X:0;Y:0;Z:-2),(X:0;Y:0;Z:2),(X:0;Y:2;Z:0),
                               (X:0;Y:-2;Z:0),(X:2;Y:0;Z:0),(X:-2;Y:0;Z:0));
begin
  Mesh1.Data.IndexBuffer.Length:=24;
  Mesh1.Data.VertexBuffer.Length:=24;
  indices:=[0,4,2,1,2,4,0,3,4,1,4,3,0,2,5,1,5,2,0,5,3,1,3,5];
  pt:=[pointF(1,0.125),PointF(0,0.125),pointf(0.5,0.1339745962/8)];
  for I := 0 to 23 do
  begin
   Mesh1.Data.VertexBuffer.Vertices[i]:=P3d[indices[i]];
   Mesh1.Data.IndexBuffer.Indices[i]:=i;
   Mesh1.Data.VertexBuffer.TexCoord0[i]:=pt[i mod 3];
   pt[i mod 3].Offset(0,0.125);
  end;
  Mesh1.Data.CalcFaceNormals;
  Mesh1.Repaint;
end;
TMesh构建12面体:
正十二面体(Pentagonal dodecahedron)是五个柏拉图立体之一,属准晶体,结晶学全称为正五角十二面体,共有二十个顶点、三十条边和十二个面,而每一个面皆是正五边形。若以正十二面体的中心为(0,0,0),各顶点的坐标为{(0,±1/φ,±φ), (±1/φ,±φ,0), (±φ,0,±1/φ), (±1,±1,±1)},其中φ = (-1+√5)/2, 黄金分割数 。
const
  A = 1.61803398875; // (Sqrt(5)+1)/2
  B = 0.61803398875; // (Sqrt(5)-1)/2,黄金分割
  C = 1;
var
 i,j,k:Integer;
 P3d:array of TPoint3D;
 indices,triangle:array of Byte;
 Angle:single;
 P:array[0..4] of TPointF;
begin
//三角形序列是把每个正五边形分解成3个三角形,然后顺时针方向取点
indices:=[0, 12, 10, 11, 16, 1, 17, 8, 9, 13, 2, 14, 9, 8, 18,
            3, 19, 11, 10, 15, 4, 14, 2, 3, 15, 5, 12, 0, 1, 13,
            6, 17, 1, 0, 16, 7, 19, 3, 2, 18, 8, 17, 6, 7, 18,
            9, 14, 4, 5, 13, 10, 12, 5, 4, 15, 11, 19, 7, 6, 16];
   for I := 0 to 4 do
   begin
     Angle:=(270-72*i)/180*Pi;
     P[i]:=TPointF.Create(0.5*cos(Angle)+0.5,(0.5*sin(Angle)+0.5)/12);//贴图点的位置
   end;
  Mesh1.Data.IndexBuffer.Length:=108;//12*9,将正五边形分成3个三角形,每个三角形3个点
  Mesh1.Data.VertexBuffer.Length:=60;//12*5
  P3d:=[Point3d(-B, 0, A), Point3d( B, 0, A), Point3d( B, 0,-A),
        Point3d(-B, 0,-A), Point3d( 0, A,-B), Point3d( 0, A, B),
        Point3d( 0,-A, B), Point3d( 0,-A,-B), Point3d( A,-B, 0),
        Point3d( A, B, 0), Point3d(-A, B, 0), Point3d(-A,-B, 0),
        Point3d(-C, C, C), Point3d( C, C, C), Point3d( C, C,-C),
        Point3d(-C, C,-C), Point3d(-C,-C, C), Point3d( C,-C, C),
        Point3d( C,-C,-C), Point3d(-C,-C,-C)];//根据上述公式取点
  k:=0;
  for I := 1 to 60 do
  begin
   Mesh1.Data.VertexBuffer.Vertices[i-1]:=P3d[indices[i-1]];
   Mesh1.Data.VertexBuffer.TexCoord0[i-1]:=P[(i-1) mod 5];//贴图点按正五边形取点
   P[(i-1) mod 5].Offset(0,1/12);
   triangle:=triangle+[i-1];//用来记录正五边形的顶点顺序
   if i mod 5=0 then
   begin
     for j := 0 to 2 do//顺时针方向取点
     begin
       Mesh1.Data.IndexBuffer.Indices[k]:=triangle[0];
       Mesh1.Data.IndexBuffer.Indices[k+1]:=triangle[2+j];
       Mesh1.Data.IndexBuffer.Indices[k+2]:=triangle[1+j];
       Inc(k,3);
     end;
     triangle:=[];
   end;
  end;
  Mesh1.Data.CalcFaceNormals;
  Mesh1.Repaint;
end;
TMesh构建20面体:
var
 i:Integer;
 P3d:array of TPoint3D;
 pt:array of TPointF;
const
  indices:array[0..59] of Byte=(2,9,11,3,11,9,3,5,1,3,1,7,2,6,0,2,0,4,1,8,10,0,10,8,9,
                                4,5,8,5,4,11,7,6,10,6,7,3,9,5,3,7,11,2,4,9,2,11,6,0,8,
                                4,0,6,10,1,5,8,1,10,7);
  B = 0.61803398874; // 2/(1+Sqrt(5))
begin
  pt:=[pointF(1,0.05),PointF(0,0.05),pointf(0.5,0.1339745962/20)];
  Mesh1.Data.IndexBuffer.Length:=60;
  Mesh1.Data.VertexBuffer.Length:=60;
  P3d:=[point3d( 1, B, 0), point3d(-1, B, 0), point3d( 1,-B, 0),
        point3d(-1,-B, 0), point3d( B, 0, 1), point3d(-B, 0, 1),
        point3d( B, 0,-1), point3d( -B,0,-1), point3d( 0, 1, B),
        point3d( 0,-1, B), Point3d( 0, 1,-B), point3d( 0,-1,-B)];

  for I := 0 to 59 do
  begin
   Mesh1.Data.VertexBuffer.Vertices[i]:=P3d[indices[i]];
   Mesh1.Data.IndexBuffer.Indices[i]:=i;
   Mesh1.Data.VertexBuffer.TexCoord0[i]:=pt[i mod 3];
   pt[i mod 3].Offset(0,0.05);
  end;
  Mesh1.Data.CalcFaceNormals;
  Mesh1.Repaint;
end;
TMesh构建圆环:
程序设想,先构建一个垂直于X轴并分解为32份的多边形(圆就是多边形),半径0.3,距中心Y轴-1,然后围绕Z轴旋转一周,细分为128等份。在这里我们利用了TMatrix3D矩阵,轻松实现旋转,这样我们就实现了所有顶点的取点。代码如下:
var
  i,j,k,VH,VW,AA:Integer;
  indice:array of  Integer;
  P,P1:TPoint3D;
begin
  LightMaterialSource1.Texture.Clear($FFFFFFFF);
  LightMaterialSource1.Emissive:=TAlphaColorRec.Lightgreen;
  VH:=128;VW:=32;//VH,把圆环纵向分为128份,VW横向分为32份
  indice:=[0,1,3,0,3,2];
  Mesh1.Data.VertexBuffer.Length := VH*VW*4;
  Mesh1.Data.IndexBuffer.Length  := VH*VW*6;
  for I := 0 to VH-1 do
  for J := 0 to VW-1 do
  begin
    AA:=(i*VW+j)*4;
    for k := 0 to 1 do
    begin
      P:=Point3D(0,-0.3,0)*TMatrix3D.CreateRotationX(2*Pi/VW*(j+k));//构建垂直于X轴的圆
      P1:=Point3D(0,-1,0)*TMatrix3D.CreateRotationX(2*Pi/VW*(j+k));
      P.Offset(0,-1.5,0);//把圆沿Z轴向上平移,这样圆环的效果就有了
	  //构建垂直于Z轴的圆环
      Mesh1.Data.VertexBuffer.Vertices[AA+k*2]:=P*TMatrix3D.CreateRotationZ(2*Pi/VH*i);
      //曲面的法线还是比较容易确定的,即为Point3D(0,-1,0)旋转后的值,这是垂直于Z轴进行旋转时
	  Mesh1.Data.VertexBuffer.Normals[AA+k*2]:=P1*TMatrix3D.CreateRotationZ(2*Pi/VH*i);
	  Mesh1.Data.VertexBuffer.Vertices[AA+k*2+1]:=P*TMatrix3D.CreateRotationZ(2*Pi/VH*(i+1));
      Mesh1.Data.VertexBuffer.Normals[AA+k*2+1]:=P1*TMatrix3D.CreateRotationZ(2*Pi/VH*(i+1));
	  //按横向、纵向细分一个贴图
      Mesh1.Data.VertexBuffer.TexCoord0[AA+k*2]:=PointF(1/32*(J+k),1/128*I);
      Mesh1.Data.VertexBuffer.TexCoord0[AA+k*2+1]:=PointF(1/32*(J+k),1/128*(I+1));

    end;
    for k :=0 to 5 do
     Mesh1.Data.IndexBuffer.Indices[AA*3 div 2+k]:=indice[k]+AA;
  end;
  Mesh1.Repaint;
end;
程序运行截图如下:
程序源码:
链接:https://pan.baidu.com/s/1SyN_bWn1Xg64fZnEhNc67Q
提取码:mszw
阿里云盘不支持压缩包,改用百度。

 浙公网安备 33010602011771号