

shell 学习笔记1-什么是shell,shell变量
一、介绍
1、什么是shell
Shell 既是一种命令语言,又是一种程序设计语言,他在操作系统得最外层,负责直接与用户对话,把用户得输入解释个OS,并处理各类操作系统得输出结果,输出到屏幕返回个i用户,这种对话方式可以是交互方式(键盘输入命令,可以立即得到shell得回应),或非交互式(执行脚本程序)得方式
图示如下:
2、什么是shell脚本
其实就是通过一个程序文件执行的程序,可以由一系列命令及命令语句组成,这些命令、变量和流程控制语句等有机得综合形成一个功能强大得shell脚本,类似dos系统下得批处理文件批处理示例如下:(备份网站数据库脚本)
@echo off
set date=%date:~0,4%-%date::~5,2%-%date:~8,2%
mysqldump -uroot -poldboy -A -B >D:\bak\"%date%.sql"
rar.exe a -k -r -s -ml D:\bak\"%date%".sql.rar D:\bak\"%date%".sql
del D:\bak\*.sql
rar.exe a -k -r -s -ml d:\bak\"%date%" htdocs.rar D:\work\PHPnow\htdocs
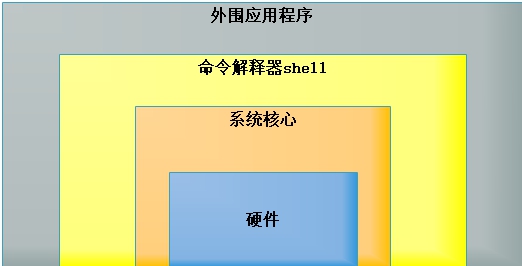
3、shell在工作中位置

4、shell的种类
shell 脚本语言是弱类型语言,较为通用shell 有标准的Bourne shell (sh)和C shell(csh),其中Bourne shell(sh)已经被bash shell 取代
bourne shell(sh,ksh,an bash)
bourene shell(sh)
bourne again shell (bash)
POSIX shell (sh)
c shell
c shell (csh)
TENEX/TOPS C shell (tcsh)
查看系统得shell
[root@web1 ~]# cat /etc/shells
/bin/sh
/bin/bash
/sbin/nologin
/usr/bin/sh
/usr/bin/bash
/usr/sbin/nologin
/bin/tcsh
/bin/csh
用的最多得莫属bash了,bash是bourne again shell的缩写,bash是 bourne shell(sh)发展来的,但又不完全相同,它包含了csh和ksh的特色,但大多数脚本都可以不加修改的在bash上运行,是bourne shell的扩展,增加了一些特性,命令补全,命令编辑和命令历史等
5、其他常用脚本语言种类
php
perl
python
js
6、第一个shell脚本
#!/bin/bash
echo "Hello World !"


[root@web1 bash-test]# chmod +x 1.sh   #<---添加运行权限
[root@web1 bash-test]# 1.sh        #<---这样运行不了,因为运行其它二进制的程序也一样,直接写 1.sh,linux 系统会去 PATH 里寻找有没有叫 1.sh 的,而只有 /bin, /sbin, /usr/bin,/usr/sbin 等在 PATH 里,你的当前目录通常不在 PATH 里,所以写成 1.sh 是会找不到命令的,要用 ./test.sh 告诉系统说,就在当前目录找。
[root@web1 bash-test]# ./1.sh
hello world!
[root@web1 bash-test]# bash 1.sh    #<---这是另一种方式,指定解释器直接运行
hello world!
[root@web1 bash-test]#
二、shell变量
1、变量
命名的内存空间(可以理解为盒子)
Shell支持自定义变量。
变量是暂时存储数据的地方及数据标记,所存储的数据存在内存空间中
常见的变量类型为整数,字符串,小数等属于弱类型语言有别于其他强类型语言比如java/c,可以使用declare显示定义变量的类型
2、变量类型
环境变量(全局变量):可以是自定义环境变量和bash内置的环境变量
普通变量(局部变量):在创建时shell函数或shell脚本种使用
有三个命令可以显示变量的值set(set -o 输出所有变量)、env(只显示全局变量)和declare(输出所有变量、函数、整数和已经导出的变量)
[root@web1 bash-test]# env |tail
HISTCONTROL=ignoredups
SHLVL=1
HOME=/root
LOGNAME=root
QTLIB=/usr/lib64/qt-3.3/lib
SSH_CONNECTION=192.168.216.1 25044 192.168.216.51 22
LESSOPEN=||/usr/bin/lesspipe.sh %s
XDG_RUNTIME_DIR=/run/user/0
_=/usr/bin/env
OLDPWD=/root
[root@web1 bash-test]# set -o |tail
notify          off
nounset         off
onecmd          off
physical        off
pipefail        off
posix           off
privileged      off
verbose         off
vi              off
xtrace          off
[root@web1 bash-test]# declare |tail
{
    local quoted=${1//\'/\'\\\'\'};
    printf "'%s'" "$quoted"
}
quote_readline ()
{
    local quoted;
    _quote_readline_by_ref "$1" ret;
    printf %s "$ret"
}
[root@web1 bash-test]#
3、定义自定义环境变量
1)设置环境变量
使用export和declare命令格式的三种方法
1、export 变量名 =value
2、变量名 =value;export 变量名
3、declare -x 变量名 =value
定义环境变量并赋值的方法:
[root@web1 bash-test]# export NAME=abc
[root@web1 bash-test]# declare -x NAME=abc
[root@web1 bash-test]# NAME=abc ;export NAME
自定义全局环境变量的方法:
vim  /etc/profile                      #<---编辑profile文件
export zxg='zhangxingeng'                 #<---插入一行定义的变量


[root@web1 bash-test]# cat /etc/profile |grep zxg   #<---确认
export zxg='zhangxingeng'
[root@web1 bash-test]# source /etc/profile        #<---使其生效
[root@web1 bash-test]# echo $zxg              #<---查看结果
zhangxingeng
[root@web1 bash-test]# env |grep zxg
zxg=zhangxingeng
[root@web1 bash-test]#
常用的环境变量永久生效的常规设置文件
用户环境变量
[root@web1 bash-test]# ls /root/.bashrc        #<---推荐
/root/.bashrc
[root@web1 bash-test]# ls /root/.bash_profile
/root/.bash_profile
[root@web1 bash-test]#
全局环境变量
[root@web1 bash-test]# ll /etc/profile
[root@web1 bash-test]# ll /etc/bashrc           #<---推荐
[root@web1 bash-test]# ll /etc/profile.d/
2)查看与取消环境变量
4、定义普通变量
定义变量时,变量名不加美元符号($),如:
variableName="value"
注意,变量名和等号之间不能有空格,这可能和你熟悉的所有编程语言都不一样。同时,变量名的命名须遵循如下规则:
首个字符必须为字母(a-z,A-Z)。
中间不能有空格,可以使用下划线(_)。
不能使用标点符号。
不能使用bash里的关键字(可用help命令查看保留关键字)。
例如:
[root@web1 bash-test]# web1=web1.zxg.com
1)、三种方式定义普通变量
[root@web1 bash-test]# a=111
[root@web1 bash-test]# b='222'
[root@web1 bash-test]# c="333"
[root@web1 bash-test]# echo "a=$a"
a=111
[root@web1 bash-test]# echo "b=$b"
b=222
[root@web1 bash-test]# echo "c=${c}"        <---$变量名表示输出变量,可以用$c或者${c}两种用法
c=333
[root@web1 bash-test]#
2)、测试
[root@web1 ~]# a=111
[root@web1 ~]# b='111'
[root@web1 ~]# c="111"
[root@web1 ~]# a=111-$a
[root@web1 ~]# b='111-$a'
[root@web1 ~]# c="111-$a"
[root@web1 ~]# echo "a=$a"
a=111-111
[root@web1 ~]# echo "c=${c}"
c=111-111-111
[root@web1 ~]# echo "b=$b"
b=111-$a
[root@web1 ~]#
3)三种方式总结
不加引号,当内容为简单连续的数字、字符串、路径名时,可以使用,值里面有变量会被解释后再输出
加单引号,输出变量内容时,单引号里面是啥就输出啥即使是变量或命令(命令需要反引起来),这种比较适合显示纯字符串的请看
加双引号,输出变量内容时引号里的变量及命令会经过解析后再输出内容,这种就比较适合字符串中附带有变量及命令且向将其解析后再输出的变量定义
4)把一个命令结果作为变量的内容赋值的两种方法
变量名=`ls` <---反引号引起来,缺点容易和单引号弄混
变量名=$(ls) <---可以使用这种方法
示例1
[root@web1 ~]# hh=`ls`
[root@web1 ~]# echo $hh
anaconda-ks.cfg bash-test Desktop Downloads google-chrome-stable_current_x86_64.rpm initial-setup-ks.cfg original-ks.cfg
[root@web1 ~]# hh1=$(ls)
[root@web1 ~]# echo $hh1
anaconda-ks.cfg bash-test Desktop Downloads google-chrome-stable_current_x86_64.rpm initial-setup-ks.cfg original-ks.cfg
[root@web1 ~]#
示例2 按天打包网站站点目录程序,生成不同的文件名
[root@web1 scripts]# CMD=$(date +%F)     #<---将当前日志(格式为2019-07-03)赋值给CMD变量
[root@web1 scripts]# echo $CMD       #<---输出变量的值
2019-07-03
[root@web1 scripts]# CMD=$(date +%F).tar.gz  #<--- 直接输出时间命令的结果
[root@web1 scripts]# CMD=$(date +%F)
[root@web1 scripts]# echo $(date +%F).tar.gz
2019-07-03.tar.gz
[root@web1 scripts]# tar zcf etc_$(date +%F).tar.gz /etc #<---将时间作为压缩包打包
tar: Removing leading `/' from member names
[root@web1 scripts]# ll                     #<---打包结果
total 10480
-rw-r--r-- 1 root root 10730854 Jul  3 16:48 etc_2019-07-03.tar.gz
[root@web1 scripts]# H=$(uname -n)     #<---将或者主机名并赋值给H
[root@web1 scripts]# echo $H
web1
[root@web1 scripts]# tar zcf $H.tar.gz /etc/services     #<---以主机名打包
tar: Removing leading `/' from member names
[root@web1 scripts]# ll                     #<---打包结果
total 10616
-rw-r--r-- 1 root root 10730854 Jul  3 16:48 etc_2019-07-03.tar.gz
-rw-r--r-- 1 root root   136214 Jul  3 16:50 web1.tar.gz
[root@web1 scripts]#
5)局部(普通)变量定义及赋值的小结
若变量内容为连续数字、字符串的赋值时,变量内容两边可以不加引号,例如a=111
变量的内容很多时,如果有空格且希望解析内容中变量,请加双引号
如果需要原样输出,请加单引号
使用命令行可以使用反引号括起来或者用$()括起来,推荐后者
输出可以用echo或者更复杂的printf 方法为,echo $变量的方式
$a和${a}效果一样
当变量后面连接其他字符的时候必须给变量加上大括号${a}_bc
再grep和sed中关于引号是和shell相符的
不加引号、单引号、双引号再awk调用shell中的变量中效果相反,所以再awk调用shell变量时,可以先echo出加符号输出变量,然后再通过管道给awk
6)变量名定义小结
变量名只能为字母、数字、或下划线,只能以字母或者下划线开头
变量名的定义要有一定的规范,并且要见名知意
首字母大写、单词间用_、驼峰语法、单词全大写
5、使用变量
使用一个定义过的变量,只要在变量名前面加美元符号($)即可,如:
[root@web1 bash-test]# name=zxg    #<===设置变量
[root@web1 bash-test]# echo $name     #<===打印变量
zxg
[root@web1 bash-test]# echo $web1
web1.zxg.com
[root@web1 bash-test]#
变量名外面的花括号是可选的,加不加都行,加花括号是为了帮助解释器识别变量的边界,比如下面这种情况:
[root@web1 bash-test]# vim 2.sh

#!/bin/bash
for i in abc;do
        echo "i am ${i}"            #<---变量加花括号
done


[root@web1 bash-test]# chmod +x 2.sh
[root@web1 bash-test]# ./2.sh
i am abc
把阔号去掉改一下参数,写成echo "I am $i111",解释器就会把$i111当成一个变量(其值为空),代码执行结果不能输出正确的变量值了
[root@web1 bash-test]# vim 2.sh
#!/bin/bash
for i in abc;do
echo "i am $i111" #<---不加花括号的变量
done
[root@web1 bash-test]# ./2.sh
i am
推荐给所有变量添加上花括号,培养良好编程习惯
6、重新定义变量
已经被定义的变量可以重新定义,如下:
[root@web1 bash-test]# echo $name
zxg
[root@web1 bash-test]# name=zhangxingeng   #<---直接重新定义即可
[root@web1 bash-test]# echo $name
zhangxingeng
7、只读变量
使用readonly命令可以将变量定义为只读变量,只读变量的值不能被改变
[root@web1 bash-test]# vim 3.sh

#!/bin/bash
aaaa="1234"
readonly aaaa
aaaa="5678"
echo $aaaa

[root@web1 bash-test]# chmod +x 3.sh
[root@web1 bash-test]# ./3.sh
./3.sh: line 4: aaaa: readonly variable               #<---可以看到readonly variable
1234
[root@web1 bash-test]#
8、删除变量
使用unset命令可以删除变量,请看如下脚本:
[root@web1 bash-test]# cat 4.sh
#!/bin/bash
myname=web1
unset myname                        #<---unset命令
echo $myname

[root@web1 bash-test]# chmod +x 4.sh
[root@web1 bash-test]# ./4.sh
                               #<---已经删除变量

 浙公网安备 33010602011771号