

puppet工作原理及部署redis主从篇
一、简介
1、国际惯例什么是puppet
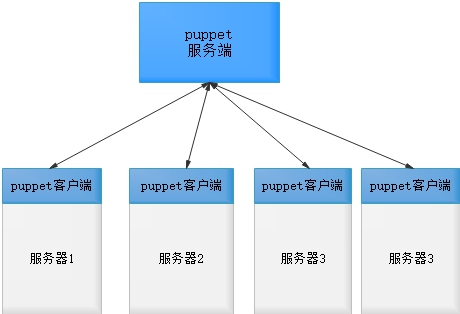
puppet是一种Linux、Unix、windows平台的集中配置管理系统,使用自有的puppet描述语言,可管理配置文件、用户、cron任务、软件包、系统服务等。puppet把这些系统实体称之为资源,puppet的设计目标是简化对这些资源的管理以及妥善处理资源间的依赖关系。
puppet采用C/S星状的结构,所有的客户端和一个或几个服务器交互。每个客户端周期的(默认半个小时)向服务器发送请求,获得其最新的配置信息,保证和该配置信息同步。每个puppet客户端每半小时(可以设置)连接一次服务器端, 下载最新的配置文件,并且严格按照配置文件来配置客户端. 配置完成以后,puppet客户端可以反馈给服务器端一个消息. 如果出错,也会给服务器端反馈一个消息
网上资料很多,可以自行查看其实就是一个自动化工具,比如我们平时需要部署软件服务账号等,肯定不能手动去做这些事情,自动部署就可以了,puppet就是为了满足这个需求的一种软件,有人说puppet本质就是对catalog的配置进行编译和应用。
常见的自动化工具还有很多比如saltstack、ansible、chef等,功能类似,puppet算是起步最早,最成熟,广泛用在google、twitter、redhat、cisco等公司,其软件是使用ruby研发的,ansible及saltstack是python研发的。
2、生命周期(四个维度)
provisioning-服务开通
configuration-配置
orchestration-编排
reporting-报告
3、三个层次,也可以叫三层模型
配置语言 configuration language
事务层 transactional layer
资源抽象层 resource abstraction layer
资源类型:用户、组、文件、服务、cron任务等
4、名词
1)puppet核心组件
资源清单:manifests
资源清单及清单中的资源定义的所依赖文件、模板等数据按特定机构组织起来即为模块。
agent和agent之间通过ssh协议,master和agent之间通过https协议基于证书ca,master自带证书,签署可以自动可以一个一个确认
2)类:一组资源清单
3)模块:包含多个类,相当于ansible中得角色
4)站点清单:以主机为核心应用哪些模块
5)catalog就是被管理服务器对应的配置文件(经过处理的配置文件),服务端master收到agent请求,然后找对应被管理的站点清单
5、组织结构
版本3+
[root@web1 ~]# tree /etc/puppet
/etc/puppet
├── auth.conf
├── fileserver.conf
├── manifests
├── modules
└── puppet.conf
版本 5+
[root@web1 yum.repos.d]# tree /etc/puppet
/etc/puppet [error opening dir]

0 directories, 0 files
[root@web1 yum.repos.d]# tree /etc/puppetlabs/
/etc/puppetlabs/
├── code
│   ├── environments
│   │   └── production
│   │       ├── data
│   │       ├── environment.conf
│   │       ├── hiera.yaml
│   │       ├── manifests
│   │       └── modules
│   └── modules
├── mcollective
│   ├── client.cfg
│   ├── data-help.erb
│   ├── discovery-help.erb
│   ├── facts.yaml
│   ├── metadata-help.erb
│   ├── rpc-help.erb
│   └── server.cfg
├── puppet
│   ├── auth.conf
│   ├── hiera.yaml
│   ├── puppet.conf
│   └── ssl
├── puppetserver
│   ├── conf.d
│   │   ├── auth.conf
│   │   ├── ca.conf
│   │   ├── global.conf
│   │   ├── metrics.conf
│   │   ├── puppetserver.conf
│   │   ├── web-routes.conf
│   │   └── webserver.conf
│   ├── logback.xml
│   ├── request-logging.xml
│   └── services.d
│       └── ca.cfg
└── pxp-agent
    └── modules

15 directories, 22 files
二、puppet工作原理
1、puppet是如何工作的
1)、定义:使用puppet特定语言定义基础配置信息,这些信息可以放在moules里
2)、模拟:在配置执行之前检测代码,但并不是真正执行
3)、执行:强制当前与定义得目标状态保持一致
4)、报告:通过puppet api将执行结果发送给接收者
2、原理框架图:

3、工作流程图:
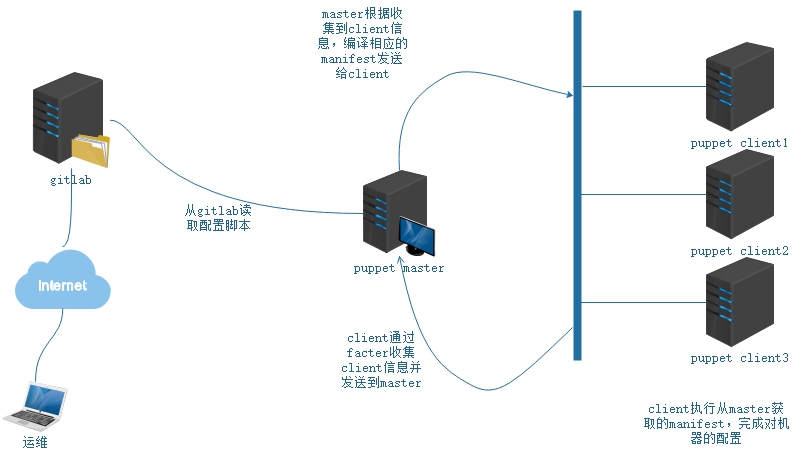
1)puppet客户端agent将节点名与facts信息发送master
2)puppet服务端master通过分类判断请求的客户端是谁,他将要做什么,这个判断是通过site.pp中包含的node.pp配置定义的
3)puppet服务端master将所需要的class类信息进行编译后存入catalog并发送给puppet客户端agent,这一步就是下面的文件编译过程
4)puppet客户端agent对catalog进行代码验证并执行,主要是代码的验证,并将执行过程的信息及结果写入日志
5)puppet客户端agent最终达到最开始所定义的状态,并将结果及任何执行数据通过开放api的形式发送给puppet服务端master
4、文件编译过程,也可以称作单机模型
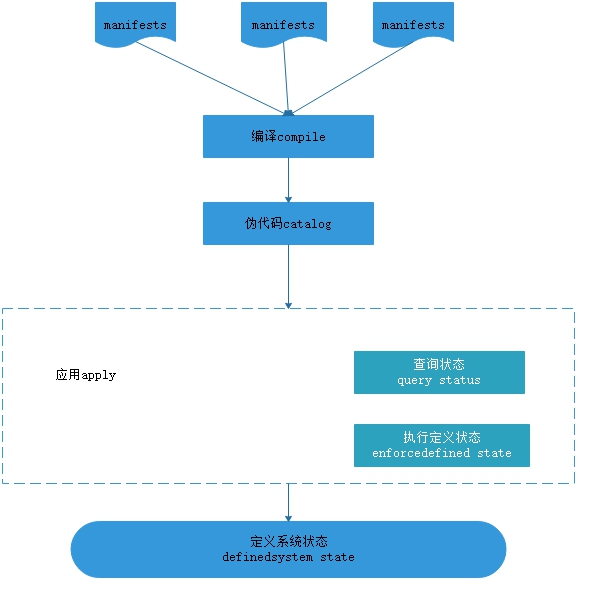
1)puppet通过编译manifest中的内容,将编译好的代码存入catalog
2)在执行前先进行代码的验证,在执行,完成最开始所定义好的状态
5、master/agent模式工作原理图
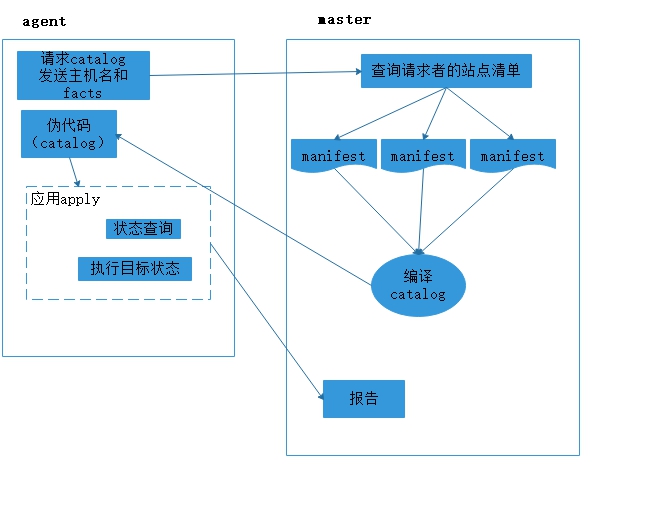
1)agent像master请求catalog并发送主机名及facts
2)master接收到请求,查询请求者的站点清单
3)master通过编译manifest中的内容,将编译好的代码存入catalog
4)在执行前先进行代码的验证,在执行,完成最开始所定义好的状态
6、非master/agent模式工作
也可以叫agent模式
运行pp文件
puppet apply -v test1.pp
7、puppet help apply命令
[root@web1 ~]# puppet help

Usage: puppet <subcommand> [options] <action> [options]

Available subcommands:

  agent             The puppet agent daemon
  apply             Apply Puppet manifests locally
  ca                Local Puppet Certificate Authority management.
  catalog           Compile, save, view, and convert catalogs.
  cert              Manage certificates and requests
  certificate       Provide access to the CA for certificate management.
  certificate_request  Manage certificate requests.
  certificate_revocation_list  Manage the list of revoked certificates.
  config            Interact with Puppet's settings.
  describe          Display help about resource types
  device            Manage remote network devices
  doc               Generate Puppet documentation and references
  facts             Retrieve and store facts.
  file              Retrieve and store files in a filebucket
  filebucket        Store and retrieve files in a filebucket
  help              Display Puppet help.
  inspect           Send an inspection report
  instrumentation_data  Manage instrumentation listener accumulated data.
  instrumentation_listener  Manage instrumentation listeners.
  instrumentation_probe  Manage instrumentation probes.
  key               Create, save, and remove certificate keys.
  kick              Remotely control puppet agent
  man               Display Puppet manual pages.
  master            The puppet master daemon
  module            Creates, installs and searches for modules on the Puppet Forge.
  node              View and manage node definitions.
  parser            Interact directly with the parser.
  plugin            Interact with the Puppet plugin system.
  queue             Deprecated queuing daemon for asynchronous storeconfigs
  report            Create, display, and submit reports.
  resource          The resource abstraction layer shell
  resource_type     View classes, defined resource types, and nodes from all manifests.
  secret_agent      Mimics puppet agent.
  status            View puppet server status.

See 'puppet help <subcommand> <action>' for help on a specific subcommand action.
See 'puppet help <subcommand>' for help on a specific subcommand.
Puppet v3.6.2
三、语法及资源简介
1、语法用法
puppet <subcommand> [options] <action>[options]
2、查看资源
获取所支持得所有资源类型
puppet describe -l
[root@web1 ~]# puppet describe -l
These are the types known to puppet:
augeas          - Apply a change or an array of changes to the  ...
computer        - Computer object management using DirectorySer ...
cron            - Installs and manages cron jobs
exec            - Executes external commands
file            - Manages files, including their content, owner ...
filebucket      - A repository for storing and retrieving file  ...
group           - Manage groups
host            - Installs and manages host entries
interface       - This represents a router or switch interface
k5login         - Manage the `.k5login` file for a user
macauthorization - Manage the Mac OS X authorization database
mailalias       - .. no documentation ..
maillist        - Manage email lists
mcx             - MCX object management using DirectoryService  ...
mount           - Manages mounted filesystems, including puttin ...
nagios_command  - The Nagios type command
nagios_contact  - The Nagios type contact
nagios_contactgroup - The Nagios type contactgroup
nagios_host     - The Nagios type host
nagios_hostdependency - The Nagios type hostdependency
nagios_hostescalation - The Nagios type hostescalation
nagios_hostextinfo - The Nagios type hostextinfo
nagios_hostgroup - The Nagios type hostgroup
nagios_service  - The Nagios type service
nagios_servicedependency - The Nagios type servicedependency
nagios_serviceescalation - The Nagios type serviceescalation
nagios_serviceextinfo - The Nagios type serviceextinfo
nagios_servicegroup - The Nagios type servicegroup
nagios_timeperiod - The Nagios type timeperiod
notify          - .. no documentation ..
package         - Manage packages
resources       - This is a metatype that can manage other reso ...
router          - .. no documentation ..
schedule        - Define schedules for Puppet
scheduled_task  - Installs and manages Windows Scheduled Tasks
selboolean      - Manages SELinux booleans on systems with SELi ...
selmodule       - Manages loading and unloading of SELinux poli ...
service         - Manage running services
ssh_authorized_key - Manages SSH authorized keys
sshkey          - Installs and manages ssh host keys
stage           - A resource type for creating new run stages
tidy            - Remove unwanted files based on specific crite ...
user            - Manage users
vlan            - .. no documentation ..
whit            - Whits are internal artifacts of Puppet's curr ...
yumrepo         - The client-side description of a yum reposito ...
zfs             - Manage zfs
zone            - Manages Solaris zones
zpool           - Manage zpools
3、资源定义方法
参考连接:puppet资源定义方法及示例 待更新
四、安装实战
m/a模型完成redis主从架构
redis原理请见链接:
1、环境
web1.zxg.com master 192.168.216.51 puppet-maser
web2.zxg.com agent 192.168.216.52 puppet-agent,redis-master
web3.zxg.com agent 192.168.216.53 puppet-agent,redis-slave
注意:请准备好主机关闭selinux,关闭firewalld
系统:
[root@web1 ~]# cat /etc/redhat-release
CentOS Linux release 7.3.1611 (Core)
[root@web1 ~]# cat /proc/version
Linux version 3.10.0-514.el7.x86_64 (builder@kbuilder.dev.centos.org) (gcc version 4.8.5 20150623 (Red Hat 4.8.5-11) (GCC) ) #1 SMP Tue Nov 22 16:42:41 UTC 2016
[root@web1 ~]#
软件:
puppet-server-3.6.2-3
puppet-3.6.2-3
2、配置软件源
很简单有epel源即可,或者puppet官方源,这里使用得epel,puppet版本为3+
epel:rpm -ivh http://dl.fedoraproject.org/pub/epel/epel-release-latest-7.noarch.rpm
puppet:rpm -ivh https://yum.puppetlabs.com/puppet5/puppet5-release-el-7.noarch.rpm
3、安装puppet
agent:puppet,facter
master:puppet-server
web1安装master,web2/web3安装agent
yum安装会安装如下依赖:
Dependencies Resolved

====================================================================================================================
 Package                          Arch                 Version                          Repository             Size
====================================================================================================================
Installing:
 facter                           x86_64               2.4.1-1.el7                      epel                  101 k
 puppet                           noarch               3.6.2-3.el7                      epel                  1.2 M
 puppet-server                    noarch               3.6.2-3.el7                      epel                   24 k
Installing for dependencies:
 hiera                            noarch               1:1.3.4-5.el7                    epel                   25 k
 libselinux-ruby                  x86_64               2.5-14.1.el7                     base                  121 k
 libyaml                          x86_64               0.1.4-11.el7_0                   base                   55 k
 ruby                             x86_64               2.0.0.648-35.el7_6               updates                72 k
 ruby-augeas                      x86_64               0.5.0-1.el7                      epel                   23 k
 ruby-irb                         noarch               2.0.0.648-35.el7_6               updates                93 k
 ruby-libs                        x86_64               2.0.0.648-35.el7_6               updates               2.8 M
 ruby-shadow                      x86_64               1.4.1-23.el7                     epel                   14 k
 rubygem-bigdecimal               x86_64               1.2.0-35.el7_6                   updates                84 k
 rubygem-io-console               x86_64               0.4.2-35.el7_6                   updates                55 k
 rubygem-json                     x86_64               1.7.7-35.el7_6                   updates                80 k
 rubygem-psych                    x86_64               2.0.0-35.el7_6                   updates                83 k
 rubygem-rdoc                     noarch               4.0.0-35.el7_6                   updates               322 k
 rubygem-rgen                     noarch               0.6.6-2.el7                      epel                   84 k
 rubygems                         noarch               2.0.14.1-35.el7_6                updates               220 k

Transaction Summary
====================================================================================================================
Install  3 Packages (+15 Dependent packages)
4、实现时间同步
方法1:systemctl start chronyd.service/systemctl enable chronyd.service #推荐
方法2:配置ntp yum ntp,ntpdate 120.25.108.11
5、m/a模型的实现
1)、开启puppetmaster
[root@web1 ~]# systemctl start puppetmaster
[root@web1 ~]# netstat -untlop |grep puppet
[root@web1 ~]# netstat -untlop |grep 8140
tcp        0      0 0.0.0.0:8140            0.0.0.0:*               LISTEN      3399/ruby            off (0.00/0/0)
2)、配置agent指定master
sed -i '/ssldir/aserver = web1.zxg.com' /etc/puppet/puppet.conf
指定后可以打印server可以看到master域名了
[root@web2 ~]# puppet config print server
web1.zxg.com
3)、等待签署ca
web2/web3上执行 puppet agent -v --noop --no-daemonize,然后就是等待签署
[root@web2 ~]# puppet agent -v --noop --no-daemonize
Info: Caching certificate for ca
Info: csr_attributes file loading from /etc/puppet/csr_attributes.yaml
Info: Creating a new SSL certificate request for web2.zxg.com
Info: Certificate Request fingerprint (SHA256): 48:A3:7C:A1:88:26:FC:80:A0:61:78:DE:BA:6F:CC:27:F5:A6:88:1A:9E:DC:D2:7A:AB:E3:DF:D4:3D:9B:1D:15
Info: Caching certificate for ca
Notice: Did not receive certificate
Notice: Did not receive certificate
master上签署ca
[root@web1 ~]# puppet cert list
  "web2.zxg.com" (SHA256) 48:A3:7C:A1:88:26:FC:80:A0:61:78:DE:BA:6F:CC:27:F5:A6:88:1A:9E:DC:D2:7A:AB:E3:DF:D4:3D:9B:1D:15
  "web3.zxg.com" (SHA256) E1:12:BC:C6:C8:BF:E6:62:FE:E3:59:D3:C2:35:72:72:C2:F0:AE:E8:2B:7E:93:01:B3:C4:8F:CF:3F:96:0B:AD
[root@web1 ~]# puppet cert sign web2.zxg.com
Notice: Signed certificate request for web2.zxg.com
Notice: Removing file Puppet::SSL::CertificateRequest web2.zxg.com at '/var/lib/puppet/ssl/ca/requests/web2.zxg.com.pem'
[root@web1 ~]# puppet cert sign web3.zxg.com
Notice: Signed certificate request for web3.zxg.com
Notice: Removing file Puppet::SSL::CertificateRequest web3.zxg.com at '/var/lib/puppet/ssl/ca/requests/web3.zxg.com.pem'
web2得签署过程
[root@web2 ~]# puppet agent -v --noop --no-daemonize
Info: Caching certificate for ca
Info: csr_attributes file loading from /etc/puppet/csr_attributes.yaml
Info: Creating a new SSL certificate request for web2.zxg.com
Info: Certificate Request fingerprint (SHA256): 48:A3:7C:A1:88:26:FC:80:A0:61:78:DE:BA:6F:CC:27:F5:A6:88:1A:9E:DC:D2:7A:AB:E3:DF:D4:3D:9B:1D:15
Info: Caching certificate for ca         #这里在等待证书得签署
Notice: Did not receive certificate
Notice: Did not receive certificate
Notice: Did not receive certificate
Info: Caching certificate for web2.zxg.com  #已经签署成正常走下去最后finished
Notice: Starting Puppet client version 3.6.2
Info: Caching certificate_revocation_list for ca
Info: Retrieving pluginfacts
Info: Retrieving plugin
Info: Caching catalog for web2.zxg.com
Info: Applying configuration version '1560169273'
Info: Creating state file /var/lib/puppet/state/state.yaml
Notice: Finished catalog run in 0.02 seconds

#退出后在此运行,看效果
[root@web2 ~]# puppet agent -v --noop --no-daemonize
Notice: Starting Puppet client version 3.6.2
Info: Retrieving pluginfacts
Info: Retrieving plugin
Info: Caching catalog for web2.zxg.com
Info: Applying configuration version '1560169273'
Notice: Finished catalog run in 0.03 seconds
puppet-ca得管理
puppet cert <action> [-all|-a] [<host>]
action:
list:列出证书请求
sign :签署证书
revoke:吊销证书
clean:清楚客户端证书,记得客户端也需要删除/var/lib/puppet/ssl/目录所有文件
6、配置站点清单
1)、站点清单
1.1、查询清单目录
[root@web1 ~]# puppet config print |grep manifest
genmanifest = false
manifestdir = /etc/puppet/manifests
manifest = /etc/puppet/manifests/site.pp
1.2、编辑清单
[root@web1 manifests]# cat site.pp
node 'web2.zxg.com' {
    include redis::master
}

node 'web3.zxg.com' {
    class{'redis::slave':
        master_ip => 'web2.zxg.com'
    }
}
[root@web1 manifests]# pwd
/etc/puppet/manifests
[root@web1 manifests]#
7、这里引用模块,请参考连接puppet模块篇
puppet工作原理之模块使用 此连接有redis模块制作步骤
8、开启相关服务
web1:sytemctl start puppetmaster
web2:systemctl start puppetagent
web3:systemctl start puppetagent
9、验证
root@web2 ~]# redis-cli -a keerya info replication
# Replication
role:master
connected_slaves:1
slave0:ip=192.168.216.53,port=6379,state=online,offset=85,lag=0
master_repl_offset:85
repl_backlog_active:1
repl_backlog_size:1048576
repl_backlog_first_byte_offset:2
repl_backlog_histlen:84
[root@web2 ~]#


[root@web3 ~]#  redis-cli -a keerya info replication
# Replication
role:slave
master_host:192.168.216.52
master_port:6379
master_link_status:up
master_last_io_seconds_ago:6
master_sync_in_progress:0
slave_repl_offset:71
slave_priority:100
slave_read_only:1
connected_slaves:0
master_repl_offset:0
repl_backlog_active:0
repl_backlog_size:1048576
repl_backlog_first_byte_offset:0
repl_backlog_histlen:0
[root@web3 ~]#
感谢:
参考:https://www.cnblogs.com/keerya/p/8087675.html#_label4
puppet官方文档:https://puppet.com/sitemap
转载请注明出处:https://www.cnblogs.com/zhangxingeng/p/10743382.html

 浙公网安备 33010602011771号