
centos7+rsyslog+loganalyzer+mysql 搭建rsyslog日志服务器
一、简介
在centos7系统中,默认的日志系统是rsyslog,它是一类unix系统上使用的开源工具,用于在ip网络中转发日志信息,rsyslog采用模块化设计,是syslog的替代品。
1、rsyslog特点
实现了基本的syslog协议
直接兼容syslogd的syslog.conf配置文件
在同一台机器上支持多个rsyslogd进程,支持多线程
丰富的过滤功能,可以实现过滤日志信息中的任何部分,可将消息过滤后在转发
灵活的配置选项,配置文件中可以写简单的逻辑判断,自定义输出格式等
增加了重要的功能,如使用tcp进行消息传输,支持UDP,TCP,SSL,TLS,RELP
有现成的前端web展示程序
可以使用MySQL,PGSQL,Oralce实现日志存储
默认安装的rsyslog软件包提供的守护进程是rsyslog,它是一项系统的基础服务,应该设置开机运行
2、核心组成
facility(设施,收集管道),priority(级别),target(路径)
facility:从功能或程序上对日志进行分类
auth:认证相关
authpriv:认证权限相关
cron:计划任务相关
daemon:守护进程相关
kern:内核相关
lpr:打印相关
mail:邮件相关
news:新闻相关
security:安全相关
syslog:自身日志
user:用户相关
uucp:unix to unix copy,早期系统文件共享服务
local0-local7:用户自定义facility
priority:日志级别也可以叫loglevel
debug:调试
info:除去debug外的所有信息
notice:注意
warn,warning:警告
err,error:错误信息
crit:蓝色警报
alert:橙色警报
emerg,panic:红色警报
指定级别的方式:
*:所有级别
none:没有级别
priority:比此级别高的(包含)所有级别的日志信息都会记录
=priority:仅记录指定级别
target:路径
文件路径:将日志记录于指定的文件中;在文件路径之前使用”-“,表示异步写入;
用户:将日志信息通知给文件
*:所有用户
日志服务器:@SERVER
管道:| COMMAND
3、配置文件明细
vim /etc/rsyslog.conf
  1 # rsyslog configuration file
  2
  3 # For more information see /usr/share/doc/rsyslog-*/rsyslog_conf.html
  4 # If you experience problems, see http://www.rsyslog.com/doc/troubleshoot.html
  5
  6 #### MODULES ####                     #模块部分
  7
  8 # The imjournal module bellow is now used as a message source instead of imuxsock.
  9 $ModLoad imuxsock #支持本地系统 provides support for local system logging (e.g. via logger command)
 10 $ModLoad imjournal # provides access to the systemd journal
 11 #$ModLoad imklog # reads kernel messages (the same are read from journald)
 12 #$ModLoad immark  # provides --MARK-- message capability
 13
 14 # Provides UDP syslog reception
 15 #$ModLoad imudp
 16 #$UDPServerRun 514
 17
 18 # Provides TCP syslog reception
 19 #$ModLoad imtcp
 20 #$InputTCPServerRun 514
 21
 22
 23 #### GLOBAL DIRECTIVES ####              #全局指定
 24
 25 # Where to place auxiliary files
 26 $WorkDirectory /var/lib/rsyslog
 27
 28 # Use default timestamp format
 29 $ActionFileDefaultTemplate RSYSLOG_TraditionalFileFormat
 30
 31 # File syncing capability is disabled by default. This feature is usually not required,
 32 # not useful and an extreme performance hit
 33 #$ActionFileEnableSync on
 34
 35 # Include all config files in /etc/rsyslog.d/
 36 $IncludeConfig /etc/rsyslog.d/*.conf
 37
 38 # Turn off message reception via local log socket;
 39 # local messages are retrieved through imjournal now.
 40 $OmitLocalLogging on
 41
 42 # File to store the position in the journal
 43 $IMJournalStateFile imjournal.state
 44
 45
 46 #### RULES ####                 #规则部分
 47
 48 # Log all kernel messages to the console.
 49 # Logging much else clutters up the screen.
 50 # 本地物理终端,比如启动引导的时候,打印在屏幕上的日志,可以用dmesg看
 51 #kern.*                                                 /dev/console
 52
 53 # Log anything (except mail) of level info or higher.
 54 # Don't log private authentication messages!
 55 #可以使用分号隔开,”*.info“所有的info,排除mail ,authpriv,cron
 56 *.info;mail.none;authpriv.none;cron.none                /var/log/messages
 57
 58 #如果想给发给日志服务器只需要指定服务器
 59 #*.info;mail.none;authpriv.none;cron.none                @192.168.216.53
 60
 61
 62
 63 # The authpriv file has restricted access.
 64 #authpriv.* ,authpriv的任何级别
 65 authpriv.*                                              /var/log/secure
 66
 67 # Log all the mail messages in one place.
 68 #任意的mail,-/var/log/maillog 减号是异步的意思,因为不是特别关键,所以异步,节省效率
 69 mail.*                                                  -/var/log/maillog
 70
 71
 72 # Log cron stuff
 73 cron.*                                                  /var/log/cron
 74
 75 # Everybody gets emergency messages
 76 #所有登陆到系统上的用户的信息
 77 *.emerg                                                 :omusrmsg:*
 78
 79 # Save news errors of level crit and higher in a special file.
 80 #”,“代表uucp和news都使用一个级别crit警告
 81 uucp,news.crit                                          /var/log/spooler
 82
 83 # Save boot messages also to boot.log
 84 #自定义日志,比如说添加一个local2,对应修改sshd配置文件
 85 local7.*                                                /var/log/boot.log
 86 #local2.*                                                /var/log/sshd.log
 87 # ### begin forwarding rule ###
 88 # The statement between the begin ... end define a SINGLE forwarding
 89 # rule. They belong together, do NOT split them. If you create multiple
 90 # forwarding rules, duplicate the whole block!
 91 # Remote Logging (we use TCP for reliable delivery)
 92 #
 93 # An on-disk queue is created for this action. If the remote host is
 94 # down, messages are spooled to disk and sent when it is up again.
 95 #$ActionQueueFileName fwdRule1 # unique name prefix for spool files
 96 #$ActionQueueMaxDiskSpace 1g   # 1gb space limit (use as much as possible)
 97 #$ActionQueueSaveOnShutdown on # save messages to disk on shutdown
 98 #$ActionQueueType LinkedList   # run asynchronously
 99 #$ActionResumeRetryCount -1    # infinite retries if host is down
100 # remote host is: name/ip:port, e.g. 192.168.0.1:514, port optional
101 #*.* @@remote-host:514
102 # ### end of the forwarding rule ###
2、loganalyzer是一款syslog日志和其他网络时间数据的web前端,它提供了对日志的简单浏览、搜索、基本分析和一些图表报告的功能。数据可以从数据库或一般syslog文本文件中获取,所有loganalyzer不需要改变现有的记录架构。基于当前的日志数据,它可以处理syslog日志消息windows事件日志记录,支持故障排除,使用户能快速查找日志数据中看出问题的解决方案
3、loganalyzer获取客户端日志会有两种保存模式,一种是直接读取客户端/var/log目录下的日志并保存到服务端该目录下,一种是读取后保存日志服务器数据库中,这里测试的是mariadb数据库
4、loganalyzer采用php开发,所以服务需要php的运行环境,这里用的lnmp
5、程序环境
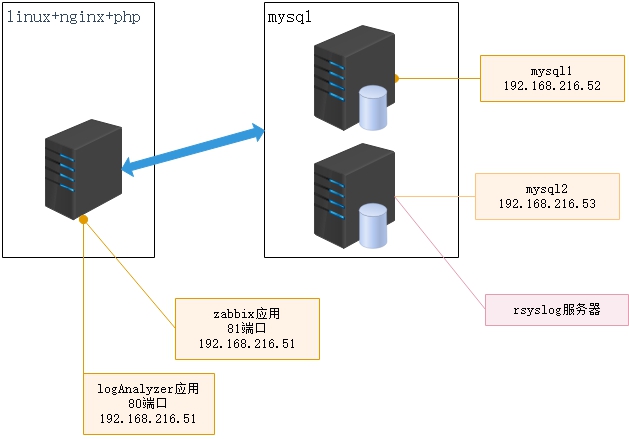
192.168.216.51 web
192.168.216.52 mysql
192.168.216.53 rsyslog-mysql
所有软件版本
 1 [root@web1 loganalyzer]# cat /etc/centos-release
 2 CentOS Linux release 7.6.1810 (Core)
 3 [root@web1 loganalyzer]# rpm -qa |grep nginx
 4 nginx-filesystem-1.12.2-2.el7.noarch
 5 nginx-1.12.2-2.el7.x86_64
 6 nginx-mod-http-xslt-filter-1.12.2-2.el7.x86_64
 7 nginx-mod-http-geoip-1.12.2-2.el7.x86_64
 8 nginx-mod-http-perl-1.12.2-2.el7.x86_64
 9 nginx-all-modules-1.12.2-2.el7.noarch
10 nginx-mod-mail-1.12.2-2.el7.x86_64
11 nginx-mod-http-image-filter-1.12.2-2.el7.x86_64
12 nginx-mod-stream-1.12.2-2.el7.x86_64
13 [root@web1 loganalyzer]# rpm -qa |grep php-fpm
14 php-fpm-5.4.16-46.el7.x86_64
15 [root@web1 loganalyzer]# rpm -qa |grep rsyslog
16 rsyslog-8.24.0-34.el7.x86_64
17 rsyslog-mysql-8.24.0-34.el7.x86_64

loganalyzer-4.1.5
1 [root@web3 ~]# rpm -qa |grep mariadb
2 mariadb-5.5.60-1.el7_5.x86_64
3 mariadb-server-5.5.60-1.el7_5.x86_64
4 mariadb-libs-5.5.60-1.el7_5.x86_64
5 [root@web3 ~]# rpm -qa |grep rsyslog
6 rsyslog-8.24.0-34.el7.x86_64
7 [root@web3 ~]#
二、部署
1、环境
lnmp环境用的Centos7+lnmp+zabbix4+分离mysql实验,这篇一样的环境

2、实验1:部署web的rsyslog-client,messages日志发送到rsyslog服务器
1)、51-web1服务器
vim /etc/rsyslog.conf
1 #*.info;mail.none;authpriv.none;cron.none /var/log/messages
2 *.info;mail.none;authpriv.none;cron.none @192.168.216.53   #指定rsyslog服务器,很简单
3 $ModLoad imudp
4 $UDPServerRun 514 #可以指定一个udp端口,默认也是udp的,看需求安排
重启服务
systemctl restart rsyslog
systemctl enable rsyslog
2)、53-web3服务器,rsyslog服务器
vim /etc/rsyslog.conf
指定端口
$ModLoad imudp
$UDPServerRun 514
systemctl restart rsyslog
systemctl enable rsyslog
3)、测试效果
51
1 [root@web1 web]# !system
2 systemctl restart nginx
53
 1 [root@web3 ~]# tail /var/log/messages
 2 Mar  6 12:13:51 web3 avahi-daemon[6119]: Registering new address record for fe80::3409:e73d:1ef:2e1 on ens33.*.
 3 Mar  6 12:13:51 web3 avahi-daemon[6119]: Registering new address record for fe80::39cb:d8d1:a78b:9be1 on ens33.*.
 4 Mar  6 12:13:51 web3 avahi-daemon[6119]: Registering new address record for 192.168.216.53 on ens33.IPv4.
 5 Mar  6 12:13:51 web3 avahi-daemon[6119]: Registering HINFO record with values 'X86_64'/'LINUX'.
 6 Mar  6 12:14:15 web1 systemd: Stopping The nginx HTTP and reverse proxy server...
 7 Mar  6 12:14:15 web1 systemd: Stopped The nginx HTTP and reverse proxy server.
 8 Mar  6 12:14:15 web1 systemd: Starting The nginx HTTP and reverse proxy server...
 9 Mar  6 12:14:15 web1 nginx: nginx: the configuration file /etc/nginx/nginx.conf syntax is ok
10 Mar  6 12:14:15 web1 nginx: nginx: configuration file /etc/nginx/nginx.conf test is successful
11 Mar  6 12:14:15 web1 systemd: Started The nginx HTTP and reverse proxy server.
12 [root@web3 ~]#
3、实验2:配置基于mysql存储日志信息
1 )、51上安装数据库插件
yum install rsyslog-mysql
1 [root@web1 web]# rpm -ql rsyslog-mysql
2 /usr/lib64/rsyslog/ommysql.so
3 /usr/share/doc/rsyslog-8.24.0/mysql-createDB.sql
2)、 53上安装mysql数据库,并配置
yum install mariadb-server mariadb
systemctl start mariadb
systemctl enable mariadb
 1 [root@web3 ~]# mysql                            #进入mysql
 2 Welcome to the MariaDB monitor.  Commands end with ; or \g.
 3 Your MariaDB connection id is 2
 4 Server version: 5.5.60-MariaDB MariaDB Server
 5
 6 Copyright (c) 2000, 2018, Oracle, MariaDB Corporation Ab and others.
 7
 8 Type 'help;' or '\h' for help. Type '\c' to clear the current input statement.
 9
10 11 1213 to your MariaDB server version for the right syntax to use near 'usem mysql' at line 1
14 MariaDB [(none)]> use mysql;                        #修改root密码1
15 Reading table information for completion of table and column names
16 You can turn off this feature to get a quicker startup with -A
17
18 Database changed
19 MariaDB [mysql]> update user set password=password('admin123') where user='root'; #改root密码2
20 Query OK, 4 rows affected (0.00 sec)
21 Rows matched: 4  Changed: 4  Warnings: 0
22
23 MariaDB [mysql]> GRANT ALL ON Syslog.* TO 'Syslog'@'192.168.%.%'IDENTIFIED BY 'admin123'; #授权syslog
24 Query OK, 0 rows affected (0.00 sec)
25
26 27
28 MariaDB [mysql]> FLUSH PRIVILEGES;                                  #刷新
29 Query OK, 0 rows affected (0.01 sec)
30
31 MariaDB [mysql]>
上面的数据库名称和syslog数据库用户,可以通过51上的/usr/share/doc/rsyslog-8.24.0/mysql-createDB.sql文件查看
1 [root@web1 web]# less /usr/share/doc/rsyslog-8.24.0/mysql-createDB.sql
2 CREATE DATABASE Syslog;
3 USE Syslog;
4 CREATE TABLE SystemEvents
3)、测试,51上测试
 1 [root@web1 web]# mysql -usyslog -h192.168.216.53 -p
 2 Enter password:
 3 Welcome to the MariaDB monitor.  Commands end with ; or \g.
 4 Your MariaDB connection id is 3
 5 Server version: 5.5.60-MariaDB MariaDB Server
 6
 7 Copyright (c) 2000, 2018, Oracle, MariaDB Corporation Ab and others.
 8
 9 Type 'help;' or '\h' for help. Type '\c' to clear the current input statement.
10
11 MariaDB [(none)]>
12 MariaDB [(none)]>
4)、数据库优化
vim /etc/my.cnf
skip_name_resolve=on #这个参数是禁止域名解析
innodb_file_per_table=on #共享表空间转化为独立表空间
#需要重启mariadb
systemctl restart mariasdb
5)、重定向导入数据库
51-web1
mysql -uSyslog -h192.168.216.53 -p < /usr/share/doc/rsyslog-8.24.0/mysql-createDB.sql
6)、数据库有了,修改配置文件
51-web1
vim /etc/rsyslog.conf
1 #### MODULES ####
2
3 $ModLoad ommysql
#### RULES ####
#*.info;mail.none;authpriv.none;cron.none /var/log/messages
#*.info;mail.none;authpriv.none;cron.none @192.168.216.53
*.info;mail.none;authpriv.none;cron.none :ommysql:192.168.216.53,Syslog,Syslog,admin123
systemctl restart rsyslog
7)、测试看看
51上
systemctl restart nginx
53上数据库看一下有没有写入
 1  mysql -uroo -p
 2 MariaDB [(none)]> show databases;
 3 +--------------------+
 4 | Database           |
 5 +--------------------+
 6 | information_schema |
 7 | Syslog             |
 8 | mysql              |
 9 | performance_schema |
10 | syslog             |
11 | test               |
12 +--------------------+
13 6 rows in set (0.01 sec)
14
15 MariaDB [(none)]> use Syslog;
16 Reading table information for completion of table and column names
17 You can turn off this feature to get a quicker startup with -A
18
19 Database changed
20 MariaDB [Syslog]> show tables;
21 +------------------------+
22 | Tables_in_Syslog       |
23 +------------------------+
24 | SystemEvents           |
25 | SystemEventsProperties |
26 +------------------------+
27 2 rows in set (0.00 sec)
28 MariaDB [Syslog]> select count(*) from SystemEvents;
29 +----------+
30 | count(*) |
31 +----------+
32 |       12 |
33 +----------+
34 1 row in set (0.01 sec)
35  MariaDB [Syslog]> select *from SystemEvents;
36 +----+------------+---------------------+---------------------+----------+----------+----------+------------------------------------------------------------------------------------------------------------------------------+------------+------------+-------------+-----------+---------------+---------+-----------------+--------------+-----------+----------+----------+------------+-----------+--------------+-----------------+----------+
37 | ID | CustomerID | ReceivedAt          | DeviceReportedTime  | Facility | Priority | FromHost | Message                                                                                                                      | NTSeverity | Importance | EventSource | EventUser | EventCategory | EventID | EventBinaryData | MaxAvailable | CurrUsage | MinUsage | MaxUsage | InfoUnitID | SysLogTag | EventLogType | GenericFileName | SystemID |
38 +----+------------+---------------------+---------------------+----------+----------+----------+------------------------------------------------------------------------------------------------------------------------------+------------+------------+-------------+-----------+---------------+---------+-----------------+--------------+-----------+----------+----------+------------+-----------+--------------+-----------------+----------+
39 |  1 |       NULL | 2019-03-06 16:36:20 | 2019-03-06 16:36:20 |        3 |        6 | web1     | Stopping System Logging Service...                                                                                           |       NULL |       NULL | NULL        | NULL      |          NULL |    NULL | NULL            |         NULL |      NULL |     NULL |     NULL |          1 | systemd:  | NULL         | NULL            |     NULL |
40 |  2 |       NULL | 2019-03-06 16:36:20 | 2019-03-06 16:36:20 |        5 |        6 | web1     |  [origin software="rsyslogd" swVersion="8.24.0-34.el7" x-pid="129667" x-info="http://www.rsyslog.com"] exiting on signal 15. |       NULL |       NULL | NULL        | NULL      |          NULL |    NULL | NULL            |         NULL |      NULL |     NULL |     NULL |          1 | rsyslogd: | NULL         | NULL            |     NULL |
41 |  3 |       NULL | 2019-03-06 16:36:20 | 2019-03-06 16:36:20 |        3 |        6 | web1     | Stopped System Logging Service.                                                                                              |       NULL |       NULL | NULL        | NULL      |          NULL |    NULL | NULL            |         NULL |      NULL |     NULL |     NULL |          1 | systemd:  | NULL         | NULL            |     NULL |
42 |  4 |       NULL | 2019-03-06 16:36:20 | 2019-03-06 16:36:20 |        3 |        6 | web1     | Starting System Logging Service...                                                                                           |       NULL |       NULL | NULL        | NULL      |          NULL |    NULL | NULL            |         NULL |      NULL |     NULL |     NULL |          1 | systemd:  | NULL         | NULL            |     NULL |
43 |  5 |       NULL | 2019-03-06 16:36:20 | 2019-03-06 16:36:20 |        5 |        6 | web1     |  [origin software="rsyslogd" swVersion="8.24.0-34.el7" x-pid="129711" x-info="http://www.rsyslog.com"] start                 |       NULL |       NULL | NULL        | NULL      |          NULL |    NULL | NULL            |         NULL |      NULL |     NULL |     NULL |          1 | rsyslogd: | NULL         | NULL            |     NULL |
44 |  6 |       NULL | 2019-03-06 16:36:20 | 2019-03-06 16:36:20 |        3 |        6 | web1     | Started System Logging Service.                                                                                              |       NULL |       NULL | NULL        | NULL      |          NULL |    NULL | NULL            |         NULL |      NULL |     NULL |     NULL |          1 | systemd:  | NULL         | NULL            |     NULL |
45 |  7 |       NULL | 2019-03-06 16:36:22 | 2019-03-06 16:36:22 |        3 |        6 | web1     | Stopping The nginx HTTP and reverse proxy server...                                                                          |       NULL |       NULL | NULL        | NULL      |          NULL |    NULL | NULL            |         NULL |      NULL |     NULL |     NULL |          1 | systemd:  | NULL         | NULL            |     NULL |
46 |  8 |       NULL | 2019-03-06 16:36:22 | 2019-03-06 16:36:22 |        3 |        6 | web1     | Stopped The nginx HTTP and reverse proxy server.                                                                             |       NULL |       NULL | NULL        | NULL      |          NULL |    NULL | NULL            |         NULL |      NULL |     NULL |     NULL |          1 | systemd:  | NULL         | NULL            |     NULL |
47 |  9 |       NULL | 2019-03-06 16:36:22 | 2019-03-06 16:36:22 |        3 |        6 | web1     | Starting The nginx HTTP and reverse proxy server...                                                                          |       NULL |       NULL | NULL        | NULL      |          NULL |    NULL | NULL            |         NULL |      NULL |     NULL |     NULL |          1 | systemd:  | NULL         | NULL            |     NULL |
48 | 10 |       NULL | 2019-03-06 16:36:22 | 2019-03-06 16:36:22 |        3 |        6 | web1     | nginx: the configuration file /etc/nginx/nginx.conf syntax is ok                                                             |       NULL |       NULL | NULL        | NULL      |          NULL |    NULL | NULL            |         NULL |      NULL |     NULL |     NULL |          1 | nginx:    | NULL         | NULL            |     NULL |
49 | 11 |       NULL | 2019-03-06 16:36:22 | 2019-03-06 16:36:22 |        3 |        6 | web1     | nginx: configuration file /etc/nginx/nginx.conf test is successful                                                           |       NULL |       NULL | NULL        | NULL      |          NULL |    NULL | NULL            |         NULL |      NULL |     NULL |     NULL |          1 | nginx:    | NULL         | NULL            |     NULL |
50 | 12 |       NULL | 2019-03-06 16:36:22 | 2019-03-06 16:36:22 |        3 |        6 | web1     | Started The nginx HTTP and reverse proxy server.                                                                             |       NULL |       NULL | NULL        | NULL      |          NULL |    NULL | NULL            |         NULL |      NULL |     NULL |     NULL |          1 | systemd:  | NULL         | NULL            |     NULL |
51 +----+------------+---------------------+---------------------+----------+----------+----------+------------------------------------------------------------------------------------------------------------------------------+------------+------------+-------------+-----------+---------------+---------+-----------------+--------------+-----------+----------+----------+------------+-----------+--------------+-----------------+----------+
52 12 rows in set (0.00 sec)
53
54 MariaDB [Syslog]> select *from SystemEvents\G      #竖排显示
4、前端显示logAnalyzer
51上配置
这里测试的为4.1.5,请自行下载loganalyzer-4.1.5.tar.gz,这里lnmp已经配置好,只需要修改nginx配置文件添加端口方式的虚拟主机
1)、环境
2)、配置loganalyzer
mkdir /loganalyzer
cp -r /loganalyzer-4.1.5/src/* /loganalyzer
cp loganalyzer-4.1.5/contri/* /loganalyzer
cd /loganalyzer
chmod +x *.sh
./configure.sh
./secure.sh
chmod 666 config.php
3)、修改nginx配置文件,添加虚拟主机
 1 [root@web1 loganalyzer]# cat /etc/nginx/conf.d/default.conf
 2 server {
 3         listen  80;
 4         server_name 192.168.216.51;
 5         index index.html index.htm index.php;
 6         charset utf-8;
 7         root /loganalyzer;
 8         location / {
 9                 #max_fails=6;
10                 #fail_timeout=60;
11                 root /loganalyzer;
12         }
13
14         location ~.*\.php$ {
15                 fastcgi_connect_timeout 300;
16                 root /loganalyzer;
17                 fastcgi_send_timeout 300;
18                 fastcgi_read_timeout 300;
19                 #max_fails=6;
20                 #fail_timeout=60;
21                 fastcgi_buffers 8 16k;
22                 fastcgi_buffer_size 32k;
23                 #fastcgi_pass unix:/dev/shm/php-fpm.sock;
24                 fastcgi_pass 127.0.0.1:9000;
25                 fastcgi_index index.php;
26                 fastcgi_param   SCRIPT_FILENAME $document_root$fastcgi_script_name;
27                 include fastcgi_params;
28                 try_files $uri = 404;
29         }
30
31         location ~.*\.(gif|jpg|jpeg|png|bmp|swf|flv|mp3|wma)$ {
32                 expires 30d;
33         }
34         location ~.*\.(js|css)$ {
35                 expires 12h;
36         }
37 }
38
39 server {
40         listen 81;
41         server_name 192.168.216.51;
42         index index.html index.htm index.php;
43         charset utf-8;
44         root /usr/share/zabbix;
45         location / {
46                 #max_fails=6;
47                 #fail_timeout=60;
48                 root /usr/share/zabbix;
49         }
50
51         location ~.*\.php$ {
52                 fastcgi_connect_timeout 300;
53                 root /usr/share/zabbix;
54                 fastcgi_send_timeout 300;
55                 fastcgi_read_timeout 300;
56                 #max_fails=6;
57                 #fail_timeout=60;
58                 fastcgi_buffers 8 16k;
59                 fastcgi_buffer_size 32k;
60                 #fastcgi_pass unix:/dev/shm/php-fpm.sock;
61                 fastcgi_pass 127.0.0.1:9000;
62                 fastcgi_index index.php;
63                 fastcgi_param   SCRIPT_FILENAME $document_root$fastcgi_script_name;
64                 include fastcgi_params;
65                 try_files $uri = 404;
66         }
67
68         location ~.*\.(gif|jpg|jpeg|png|bmp|swf|flv|mp3|wma)$ {
69                 expires 30d;
70         }
71         location ~.*\.(js|css)$ {
72                 expires 12h;
73         }
74 }
75 [root@web1 loganalyzer]#

systemctl restart nginx
systemctl restart php-fpm
5、正式开始web端配置
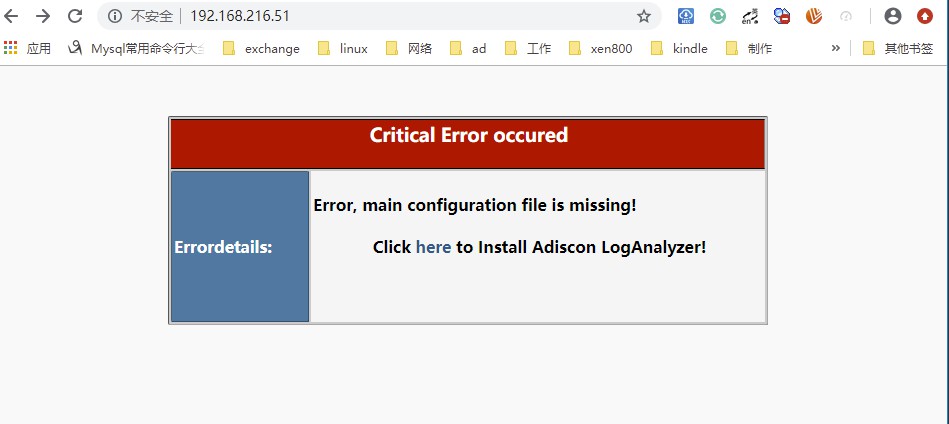
1)开始访问,默认访问的是index.php,安装需要install.php,直接点here即可
2)、安装需求,点击下一步即可

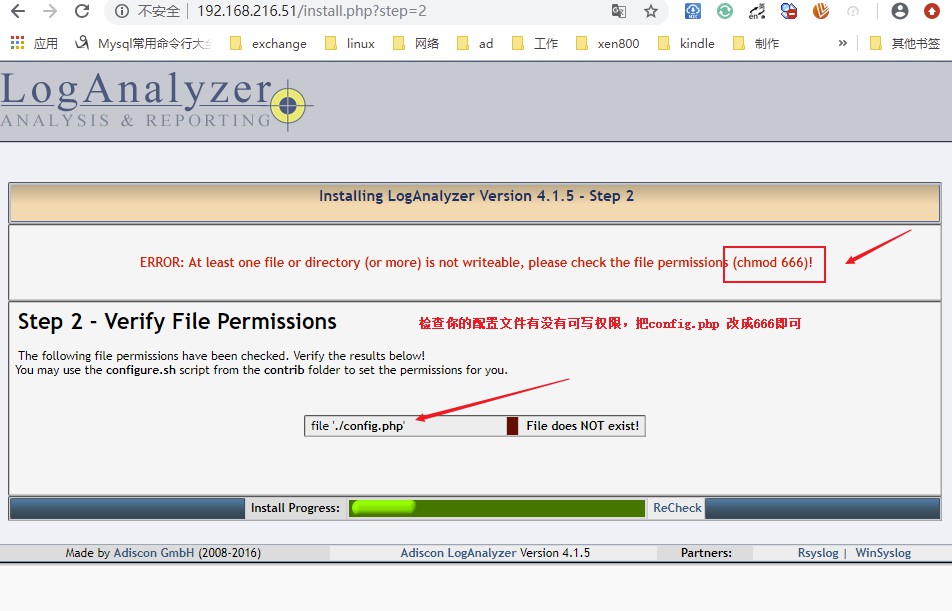
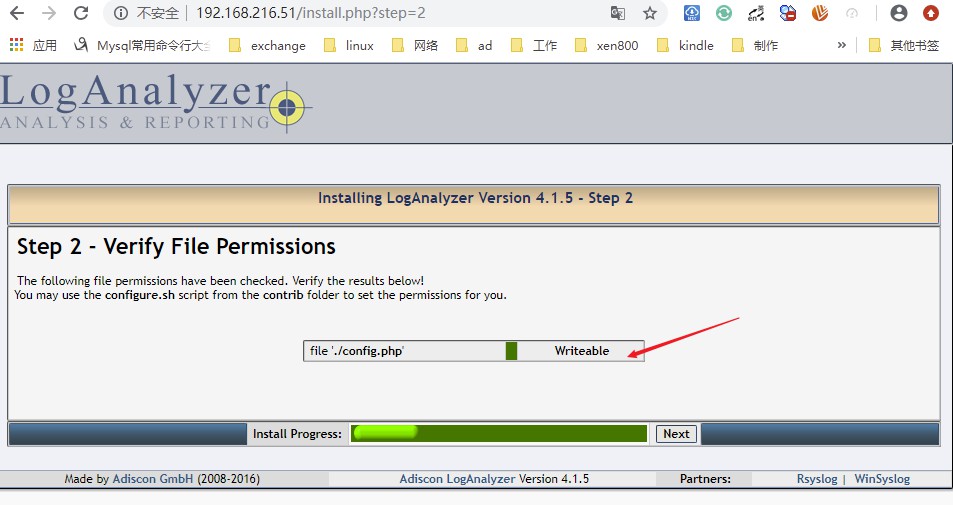
3)检查配置,config.php没有加执行权限就会包如下错误,修改权限后请看下一步
添加了权限后,点击下一步
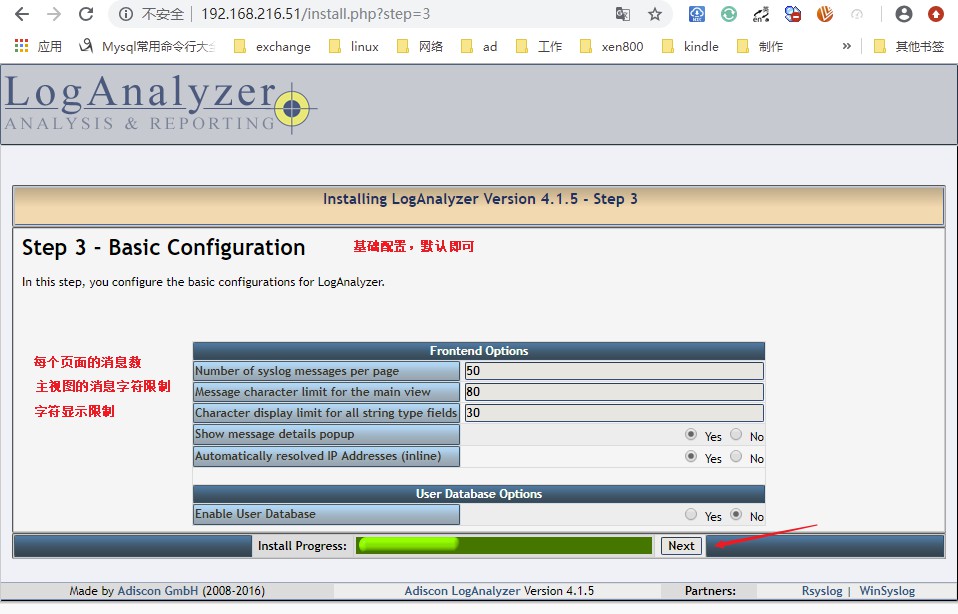
4)、一些基础配置,下一步即可
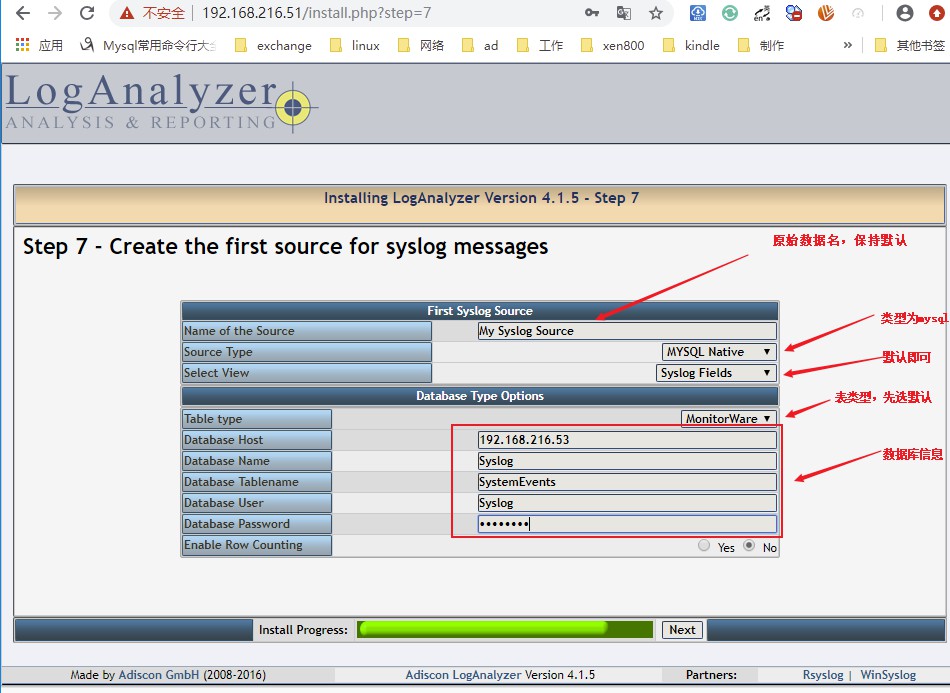
5)、创建第一个源,填写数据库信息后,下一步
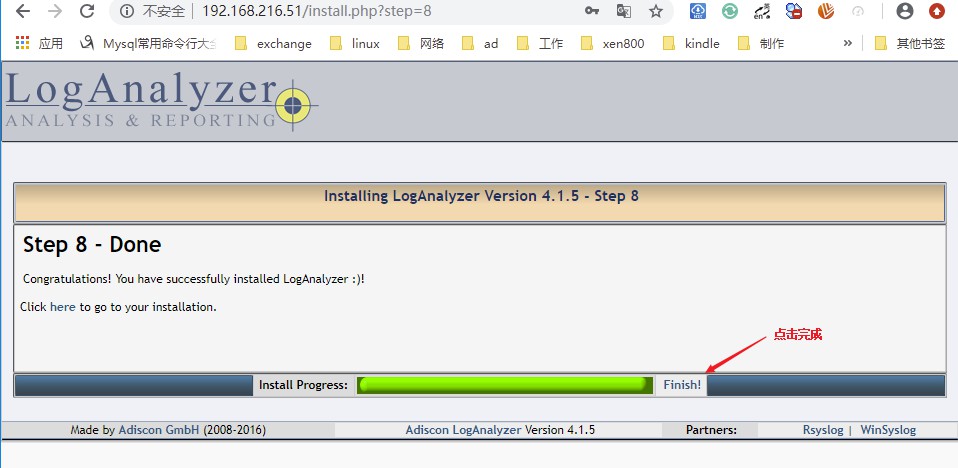
6)、点击finish,完成
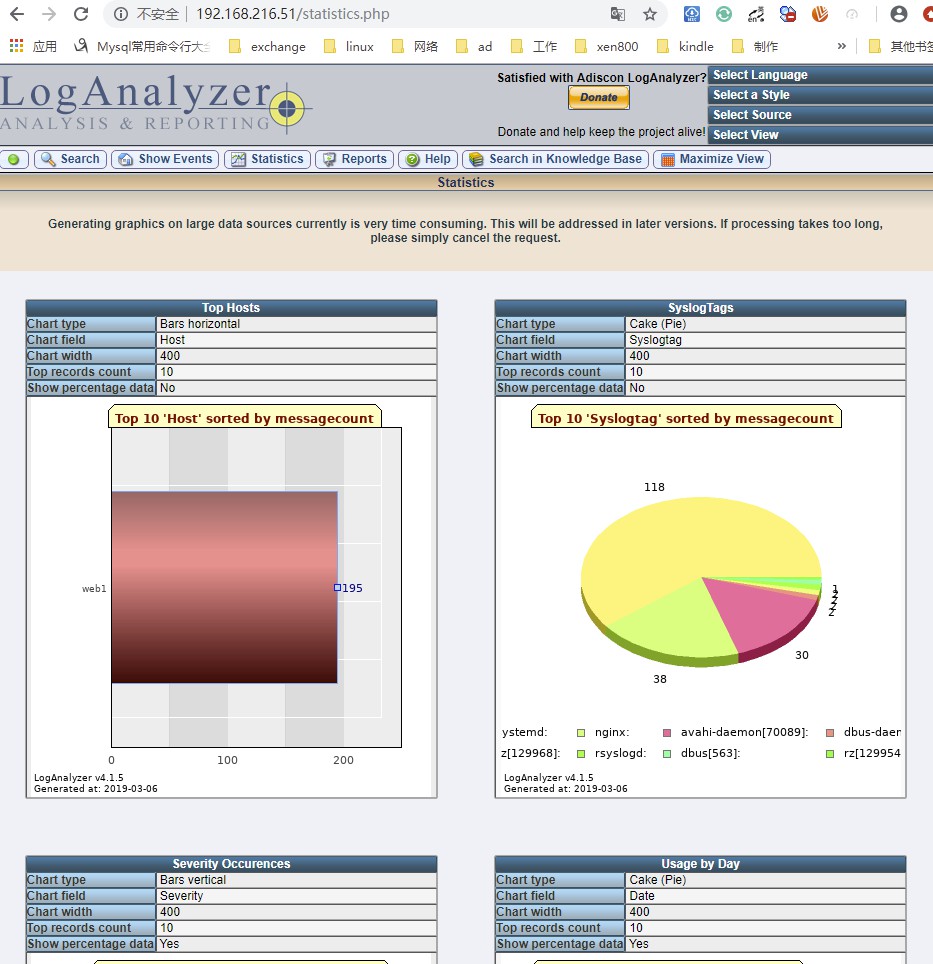
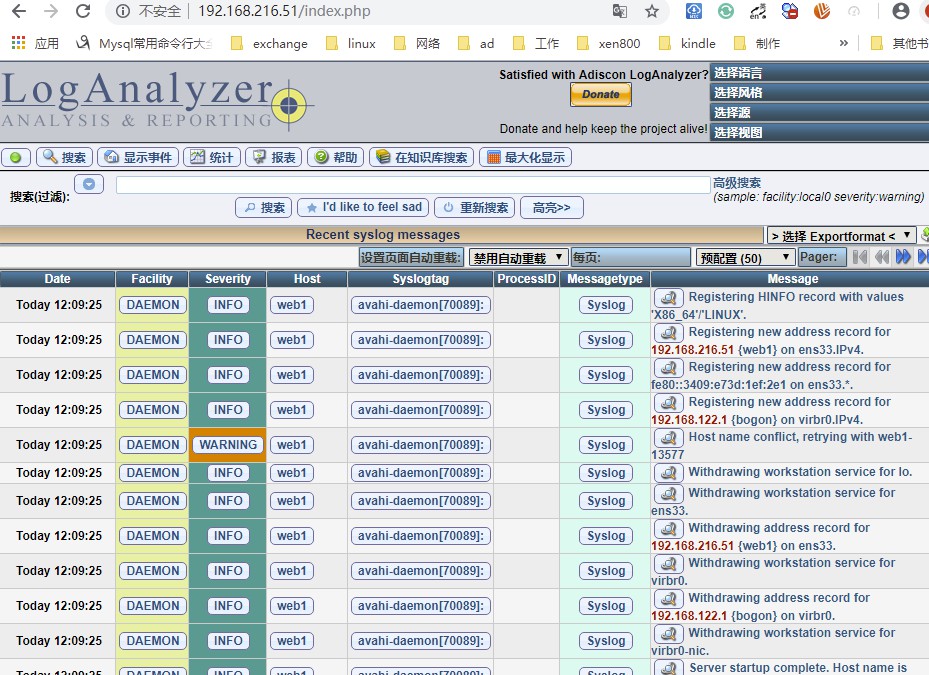
7)、展示页面

6、安全加固
config.php文件保持了数据库账号密码ip等信息,安装的时候需要加666权限,现在不在需要读权限了,改为644即可
chmod 644 /loganalyzer/config.php
7、中文语言包
1)、解压后将整个目录方至/loganalyzer/lang目录下
2)、chmod 655 -R /loganalyzer/lang/zh
3)、再次访问右上角就可以选中文了
本文参考了https://www.linuxidc.com/Linux/2017-10/147693.htm,有需要下载loganalyzer程序的还有中文语言包的可以去看看
转载请注明出处:https://www.cnblogs.com/zhangxingeng/p/10451828.html

 浙公网安备 33010602011771号