
PXE+kickstart无人值守安装
一:实验环境版本:
1.1:测试环境
虚拟机版本:VMware® Workstation 12 Pro
内核版本:2.6.32-504.el6.x86_64
操作系统版本:Red Hat Enterprise Linux Server release 6.6 (Santiago)
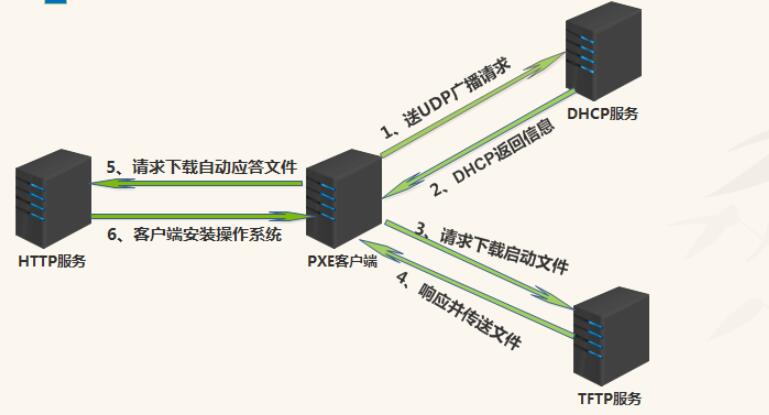
1.2:PXE概述
PXE:(Pre-boot Execution Environment)是由Intel设计的协议,它可以使计算机通过网络启动。协议分为client和server两端,PXE client在网卡的ROM中,当计算机引导时,BIOS把PXE client调入内存执行,并显示出命令菜单,经用户选择后,PXE client将放置在远端的操作系统通过网络下载到本地运行.
1.3:PXE工作流程图
二:准备工作
生成ks.cfg 文件需要system-config-kickstart 工具,而此工具依赖于X Windows,所以我们需要安装X Windows 和Desktop 并重启系统,操作如下:后面附了ks.cfg文件,这一步操作可以不做,要是想自己了解可以先安装包然后用下面链接的流程做就可以了.
[root@pxe_server ~]# yum groupinstall "X Window System" -y
[root@pxe_server ~]# yum groupinstall "Desktop" -y
[root@pxe_server ~]# yum install system-config-kickstart -y
具体生成ks.cfg语法参见感谢大佬提供资源:http://www.cnblogs.com/mchina/p/centos-pxe-kickstart-auto-install-os.html
三:DHCP,TFTP,RPC,NFS服务安装,开机3级别下启动
  [root@pxe_server ~]# yum install nfs* -y
  [root@pxe_server ~]# yum install rpc* -y
  [root@pxe_server ~]# yum install dhcp* -y
  [root@pxe_server ~]# yum install tftp* -y

  [root@pxe_server ~]# chkconfig --level 3 nfs
  [root@pxe_server ~]# chkconfig --level 3 dhcp
  [root@pxe_server ~]# chkconfig --level 3 rpcbind on
  [root@pxe_server ~]# chkconfig --level 3 xinetd on
四:配置TFTP服务
[root@pxe_server ~]# vim /etc/xinetd.d/tftp
service tftp
{
            socket_type             = dgram
            protocol                = udp
            wait                    = yes
            user                    = root
            server                  = /usr/sbin/in.tftpd
            server_args             = -s /var/lib/tftpboot
            disable                 = no   #是否启用,从yes改成no
            per_source              = 11
            cps                     = 100 2
            flags                   = IPv4
}
五:TFTP+PXE配置
要实现远程安装操作系统,首先需要在TFTPBOOT目录指定相关PXE内核模块及相关参数,配置如下:
注意:5.x系统tftpboot在根下,6.x在/var/lib/下,所以6.x是需要做软链接到根目录下.
5.1 挂载镜像
[root@pxe_server ~]# mount /dev/cdrom /mnt
5.2 拷贝pxe程序到tftpboot下做引导
[root@pxe_server ~]# cp /usr/share/syslinux/pxelinux.0 /var/lib/tftpboot/
5.3 拷贝系统初始化引导文件到tftpboot下
[root@pxe_server ~]# cp /mnt/images/pxeboot/{initrd.img,vmlinuz} /var/lib/tftpboot/
[root@pxe_server ~]# cp /mnt/isolinux/vesamenu.c32 /var/lib/tftpboot/
[root@pxe_server ~]# cp /mnt/isolinux/boot.msg /var/lib/tftpboot/
5.4 在/var/lib/tftpboot/下创建目录
[root@pxe_server ~]# mkdir -pv /var/lib/tftpboot/pxelinux.cfg
5.5 拷贝系统镜像的菜单文件并且命名为default
[root@pxe_server ~]# cp /mnt/isolinux/isolinux.cfg /var/lib/tftpboot/pxelinux.cfg/default
5.6 修改default文件(由于原文件较长,所以复制了一部分内容)
[root@pxe_server pxelinux.cfg]# cat default
default vesamenu.c32
#prompt 1
timeout 60    #原600秒改成6秒
display boot.msg
********
menu color hotkey 7 #ffffffff #ff000000
menu color scrollbar 0 #ffffffff #00000000
# 在这行加入以下内容,注意,nfs后面挂载的地址要和redhatinstall匹配,信息从网卡eth0出去
label redhat6.6
      menu default
      kernel vmlinuz
      append ks=nfs:192.168.79.9:/redhatinstall/ks.cfg ksdevice=eth0 initrd=initrd.img

label linux
      menu label ^Install or upgrade an existing system
      #menu default
      kernel vmlinuz
      append initrd=initrd.img
********
5.7 TFTP配置完毕,由于是TFTP是非独立服务,需要依赖xinetd服务来启动
/etc/init.d/xinetd restart
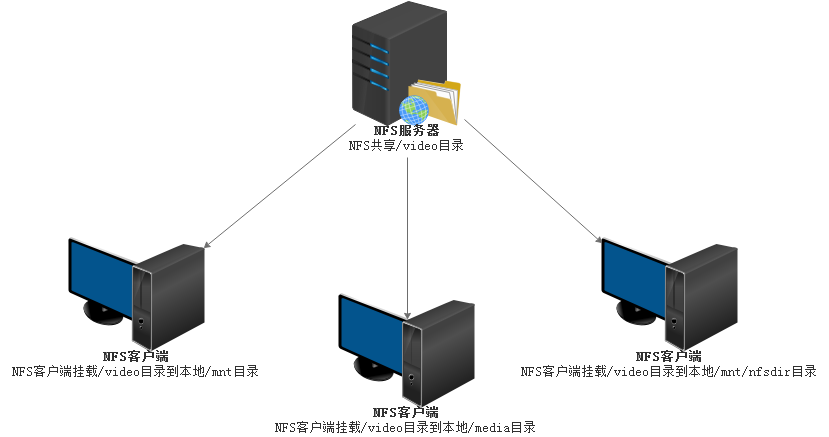
六:配置NFS服务
6.1 启动rpcbind服务,有关rpcbind服务如下图:

6.2 NFS网络文件系统如下图:
6.3 启动顺序
先启动rpcbind服务器,因为NFS是主动向rpc服务发起注册的
[root@pxe_server ~]# /etc/init.d/rpcbind restart
[root@pxe_server ~]# /etc/init.d/nfs restart
[root@pxe_server ~]# rpcinfo localhost #此项是验证rpc服务是否已经和NFS建立了连接,建立了的话会显示很多tcp和udp协议的连接
6.4 用NFS共享/redhatinstall目录
在/etc/exports 里面加入如下内容
[root@pxe_server ~]# cat /etc/exports
/redhatinstall *(rw,sync)    #*号代表所有网段,括号里面的是以读写挂载,sync是对修改的数据实时同步到磁盘,有关NFS参数请参见 /var/lib/nfs/etab,NFS优化会涉及里面参数,这里不做过多的讲解
6.5 平滑重启NFS服务
[root@pxe_server ~]# /etc/init.d/nfs reload
6.6 检查是否已经共享成功参数IP在server端意义一样
[root@pxe_server ~]# showmount -e 192.168.79.9
Export list for 192.168.79.9:
/redhatinstall *
[root@pxe_server ~]# showmount -e localhost
Export list for localhost:
/redhatinstall *
6.7 复制系统镜像所有文件到/redhatinstall目录下
[root@pxe_server ~]# cp -Rp /mnt/* /redhatinstall/
6.8 创建ks.cfg文件,cp到/redhatinstall目录下,一定要给777权限.否则读不到文件内容
[root@pxe_server redhatinstall]# ll -l ks.cfg
-rwxrwxrwx. 1 root root 2928 Nov 13 12:16 ks.cfg
七:配置DHCP服务
7.1 dhcp配置
[root@pxe_server ~]# vim /etc/dhcp/dhcpd.conf    #加入以下内容
ddns-update-style interim;  #忽略客户端更新
ignore client-updates;
next-server 192.168.79.9;    #dhcp的服务器IP
filename "pxelinux.0";    #指向tftp文件
allow booting;
allow bootp;
subnet 192.168.79.0 netmask 255.255.255.0 {
#    ---------default gateway----------
option routers 192.168.79.1;
option subnet-mask 255.255.255.0;
range dynamic-bootp 192.168.79.30 192.168.79.100;     #指定这个网段的起始和结束位置
}
7.2 最后重启以下服务
[root@pxe_server ~]# /etc/init.d/nfs restart
[root@pxe_server ~]# /etc/init.d/rpcbind restart
[root@pxe_server ~]# /etc/init.d/xinetd restart
[root@pxe_server ~]# /etc/init.d/dhcpd restart
八:问题
8.1 我们知道是通过网络传输,那么计算机在启动时,它的IP地址由谁来配置?
主要通过DHCP Server解决,由DHCP server来给PXE client分配一个IP地址,DHCP Server是用来给DHCP Client动态分配IP地址的协议,不过由于这里是给PXE Client分配IP地址,所以在配置DHCP Server时,需要增加相应的PXE特有配置.如下图:

8.2 通过什么协议下载Linux内核和根文件系统?
在PXE client所在的ROM中,已经存在了TFTP Client.PXE Client使用TFTP Client,通过TFTP协议到TFTP Server上下载所需的文件这样,PXE协议运行的条件就具备了,下面我们就来看看PXE协议的工作过程.
8.3 pexlinux.0是什么文件?
官方解释:PXELINUX is a SYSLINUX derivative, for booting Linux off a network server
我的理解:PXELINUX.0就跟平时的grub程序用来引导kernel和initrd,pexlinux.0是syslinux的一个派生品,用于支持从网络启动.
九:ks.cfg附件,分区信息可以根据自身环境设置
# Kickstart file automatically generated by anaconda.

#version=DEVEL
install

# text install
text

# check cdrom skip
key --skip

# Use NFS installation media
nfs --server=192.168.79.9 --dir=/redhatinstall

# Use language
lang en_US.UTF-8

# Keyboard
keyboard us

# Network information
network  --bootproto=dhcp --device=eth0 --noipv6

# root password
rootpw  --iscrypted $6$lQw81OhBZYvvz6dH$3wWbz479gIfuF7c7BiBOeqAqTa8J9/cN6c1dMIV8qQM2grnNP7NLqp7725.nN.BgOU2AtFizUWIsAjfHCrfBt.

# firewall disable
firewall --disabled

# System authorization information
authconfig --enableshadow --passalgo=sha512

# disable selinux
selinux --enforcing

# system date
timezone Asia/Shanghai

# System bootloader configuration
bootloader --location=mbr --driveorder=sda --append="crashkernel=auto rhgb quiet"

# Clear the Master Boot Record
zerombr

# Partition clearing information
clearpart --all --initlabel

# The following is the partition information you requested
# Note that any partitions you deleted are not expressed
# here so unless you clear all partitions first, this is
# not guaranteed to work
#clearpart --none

part /boot --fstype=ext4 --size=200
part / --fstype=ext4 --size=10240
part swap --size=1024


%packages
@base
@compat-libraries
@core
@debugging
@development
@dial-up
@performance
@server-policy
python-dmidecode
sgpio
device-mapper-persistent-data
systemtap-client
%end

%post
# Set selinux
sed -i 's/SELINUX=enforcing/SELINUX=disabled/' /etc/selinux/config

# Chkconfig opt
for tfqh in `chkconfig --list | grep "3:on" | awk '{print $1}' | grep -vE "crond|network|sshd|rsyslog|sysstat"`;do chkconfig $tfqh off;done;
/etc/init.d/iptables stop >/dev/null 2>&1

# Set sshd
sed -i 's%#UseDNS yes%UseDNS no%' /etc/ssh/sshd_config
sed -i 's%GSSAPIAuthentication yes%GSSAPIAuthentication no%' /etc/ssh/sshd_config
/etc/init.d/sshd restart >/dev/null 2>&1

# Del user
for u in bin adm lp halt mail uucp operator games gopher dbus vcsa abrt ntp saslauth postfix tcpdump;do userdel $u;done;

# File handle
echo "*                -      nofile          65535" >> /etc/security/limits.conf

# kernel parameter opt
cat << EOF >> /etc/sysctl.conf
net.ipv4.tcp_syn_retries = 1
net.ipv4.tcp_synack_retries = 1
net.ipv4.tcp_keepalive_time = 600
net.ipv4.tcp_keepalive_probes = 3
net.ipv4.tcp_keepalive_intvl =15
net.ipv4.tcp_retries2 = 5
net.ipv4.tcp_fin_timeout = 2
net.ipv4.tcp_max_tw_buckets = 36000
net.ipv4.tcp_tw_recycle = 1
net.ipv4.tcp_tw_reuse = 1
net.ipv4.tcp_max_orphans = 32768
net.ipv4.tcp_syncookies = 1
net.ipv4.tcp_max_syn_backlog = 16384
net.ipv4.tcp_wmem = 8192 131072 16777216
net.ipv4.tcp_rmem = 32768 131072 16777216
net.ipv4.tcp_mem = 786432 1048576 1572864
net.ipv4.ip_local_port_range = 1024 65000
net.ipv4.ip_conntrack_max = 65536
net.ipv4.netfilter.ip_conntrack_max=65536
net.ipv4.netfilter.ip_conntrack_tcp_timeout_established=180
net.core.somaxconn = 16384
net.core.netdev_max_backlog = 16384
EOF
%end

 浙公网安备 33010602011771号