


asp.net自定义GridView实现分页功能
当GridView中显示的记录很多的时候,可以通过GridView的分页功能来分页显示这些记录。如果GridView是直接绑定数据库,则很简单:只要点击GridView空间左上角的小三角形,再弹出的选项中,将"启动分页"打上勾即可。
如果是用代码实现,则需要这么做:
1、允许分页:设置AllowPaging=True;
2、设置GridView属性栏中PagerSetting里的一些属性中,定义分页的样式;
3、数据部署:将数据显示到GridView上;
4、加入相关事件:PageIndexChanged()、PageIndexChanging();
5、如果要添加分页码显示,即显示当前在第几页,还需添加DataBound()事件。
如果是用代码实现,则需要这么做:
1、允许分页:设置AllowPaging=True;
2、设置GridView属性栏中PagerSetting里的一些属性中,定义分页的样式;
3、数据部署:将数据显示到GridView上;
4、加入相关事件:PageIndexChanged()、PageIndexChanging();
5、如果要添加分页码显示,即显示当前在第几页,还需添加DataBound()事件。
例子:
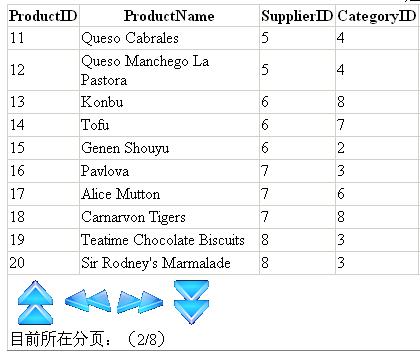
功能:GridView分页使用图片按钮并添加分页码显示。
默认情况下GridView的分页按钮如果以图片来显示就无法显示文字,这样就无法知道当前所在的页数。于是,添加分页代码显示就可以显示所在分页的索引数字了。
代码片段(2)
[代码] [C#]代码
01 |
using System; |
02 |
using System.Data; |
03 |
using System.Configuration; |
04 |
using System.Collections; |
05 |
using System.Web; |
06 |
using System.Web.Security; |
07 |
using System.Web.UI; |
08 |
using System.Web.UI.WebControls; |
09 |
using System.Web.UI.WebControls.WebParts; |
10 |
using System.Web.UI.HtmlControls; |
11 |
using System.Data.SqlClient; |
12 |
13 |
public partial class GridView_Page : System.Web.UI.Page |
14 |
{ |
15 |
protected void Page_Load(object sender, EventArgs e) |
16 |
{ |
17 |
//设置分页的图片按钮,这些都可以在控件的属性表上的pagersetting里设置 |
18 |
if (!IsPostBack) |
19 |
{ |
20 |
GridView1.Caption = "这是一个GridView的小实验"; |
21 |
//Caption属性类似于表名,显示在控件的正上方。 |
22 |
GridView1.PagerSettings.Mode = PagerButtons.NextPreviousFirstLast; |
23 |
GridView1.PagerSettings.NextPageImageUrl = "img/next.gif"; |
24 |
GridView1.PagerSettings.PreviousPageImageUrl = "img/pre.gif"; |
25 |
GridView1.PagerSettings.FirstPageImageUrl = "img/first.gif"; |
26 |
GridView1.PagerSettings.LastPageImageUrl = "img/last.gif"; |
27 |
GridView1.PageSize = 10; //每页最多显示10条记录; |
28 |
BindData(); |
29 |
} |
30 |
} |
31 |
private void BindData() |
32 |
{ |
33 |
//将数据部署到GridView中 |
34 |
string Constr = "server=localhost; uid=sa;pwd=123456;database=NorthWind"; |
35 |
string sqlstr = "select * from products"; |
36 |
SqlConnection con = new SqlConnection(Constr); |
37 |
SqlDataAdapter ad = new SqlDataAdapter(sqlstr, con); |
38 |
DataSet ds = new DataSet(); |
39 |
ad.Fill(ds); |
40 |
GridView1.DataSource = ds; |
41 |
GridView1.DataBind(); |
42 |
} |
43 |
protected void GridView1_PageIndexChanged(object sender, EventArgs e) |
44 |
{ |
45 |
//进行分页之后,重新部署数据 |
46 |
BindData(); |
47 |
} |
48 |
protected void GridView1_PageIndexChanging(object sender, GridViewPageEventArgs e) |
49 |
{ |
50 |
//分页完成之前 |
51 |
GridView1.PageIndex = e.NewPageIndex; |
52 |
} |
53 |
protected void GridView1_DataBound(object sender, EventArgs e) |
54 |
{ |
55 |
//添加分页码显示 |
56 |
GridViewRow bottomPagerRow = GridView1.BottomPagerRow; |
57 |
Label bottomLabel = new Label(); |
58 |
bottomLabel.Text = "目前所在分页:(" + (GridView1.PageIndex + 1) + "/" + GridView1.PageCount + ")"; |
59 |
bottomPagerRow.Cells[0].Controls.Add(bottomLabel); |
60 |
} |
61 |
} |

 浙公网安备 33010602011771号