

netty-基础-引导&EventLoop&测试
一. 引导
- 引导客户端和服务器
- 从Channel引导客户端
- 添加 ChannelHandler
- 使用 ChannelOption 和属性
netty提供了ChannelPipeline、ChannelHandler、编解码器,使用bootstrapping将这些组合到一起;
服务器是接受连接,创建子管道
客户端只需要单一的,非父管道
AbstractBootstrap处理公共代码
多个通道相同配置,AbstractBootstrap是clonable的,克隆之后立即可用,EventLoopGroup是浅拷贝,共享所有的克隆管道,因为克隆的管道是短暂的。
客户端引导方法
Bootstrap继承AbstractBootstrap
group               设置EventLoopGroup,处理channel事件
channel             channel()指定channel实现类,如果没有,实现一个默认的构造函数
channelFactory      指定一个工厂类被bind或connect到指定的localAddress
localAddress        本地地址Channel
option              设置ChannelOption于新建channel的ChannelConfig,选项会被bind或connect到指定的通道,ChannelOption取决于使用的通道类型
attr                bind或connect
handler             设置添加到 ChannelPipeline 中的 ChannelHandler
clone                创建一个当前 Bootstrap的克隆拥有原来相同的设置。
remoteAddress       设置远程地址。此外,您可以通过 connect() 指定
connect             连接到远端,返回一个 ChannelFuture, 用于通知连接操作完成
bind                将通道绑定并返回一个 ChannelFuture,用于通知绑定操作完成后,必须调用 Channel.connect() 来建立连接。
调用bind或connect之后,建立channel

- 当 bind() 调用时,Bootstrap 将创建一个新的管道, 当 connect() 调用在 Channel 来建立连接
- Bootstrap 将创建一个新的管道, 当 connect() 调用时
- 新的 Channel
EventLoopGroup group = new NioEventLoopGroup();
Bootstrap bootstrap = new Bootstrap(); //1
bootstrap.group(group) //2
    .channel(NioSocketChannel.class) //3
    .handler(new SimpleChannelInboundHandler<ByteBuf>() { //4
        @Override
        protected void channeRead0(
            ChannelHandlerContext channelHandlerContext,
            ByteBuf byteBuf) throws Exception {
                System.out.println("Received data");
                byteBuf.clear();
            }
        });
ChannelFuture future = bootstrap.connect(
    new InetSocketAddress("www.manning.com", 80)); //5
future.addListener(new ChannelFutureListener() {
    @Override
    public void operationComplete(ChannelFuture channelFuture)
        throws Exception {
            if (channelFuture.isSuccess()) {
                System.out.println("Connection established");
            } else {
                System.err.println("Connection attempt failed");
                channelFuture.cause().printStackTrace();
            }
        }
    });
- 创建一个新的 Bootstrap 来创建和连接到新的客户端管道
- 指定 EventLoopGroup
- 指定 Channel 实现来使用
- 设置处理器给 Channel 的事件和数据
- 连接到远端主机
兼容性
Channel和EventLoop在EventLoopGroup中必须是兼容的;
兼容的一般放在同一个包下面,比如NioEventLoop,NioEventLoopGroup 和 NioServerSocketChannel 在一起,如果替换前缀OioEventLoopGroup就不兼容;
EventLoop分配给channel负责处理cahnnel操作,执行方法后返回一个ChannelFuture,分配给Channel的EventLoop执行;
测试兼容性
EventLoopGroup group = new NioEventLoopGroup();
Bootstrap bootstrap = new Bootstrap(); //1
bootstrap.group(group) //2
    .channel(OioSocketChannel.class) //3
    .handler(new SimpleChannelInboundHandler<ByteBuf>() { //4
        @Override
        protected void channelRead0(
            ChannelHandlerContext channelHandlerContext,
                    ByteBuf byteBuf) throws Exception {
                System.out.println("Reveived data");
                byteBuf.clear();
            }
        });
ChannelFuture future = bootstrap.connect(
    new InetSocketAddress("www.manning.com", 80)); //5
future.syncUninterruptibly();
- 创建新的 Bootstrap 来创建新的客户端管道
- 注册 EventLoopGroup 用于获取 EventLoop
- 指定要使用的 Channel 类。通知我们使用 NIO 版本用于 EventLoopGroup , OIO 用于 Channel
- 设置处理器用于管道的 I/O 事件和数据
- 尝试连接到远端。当 NioEventLoopGroup 和 OioSocketChannel 不兼容时,会抛出 IllegalStateException 异常
引导服务器
ServerBootstrap方法
group               设置 EventLoopGroup
channel
channelFactory
localAddress        指定 ServerChannel 实例化的类,您可以使用 bind() 或 connect()指定localAddress
option              指定一个 ChannelOption 来用于新创建的 ServerChannel 的 ChannelConfig
childOption         当管道已被接受,指定一个 ChannelOption 应用于 Channel 的 ChannelConfig。
attr                指定 ServerChannel 的属性。这些属性可以被 管道的 bind() 设置。当调用 bind() 之后,修改它们不会生效。
childAttr           应用属性到接收到的管道上。后续调用没有效果。
handler             设置添加到 ServerChannel 的 ChannelPipeline 中的 ChannelHandler。 具体详见 childHandler() 描述
childHandler
clone               克隆 ServerBootstrap 用于连接到不同的远端,通过设置相同的原始 ServerBoostrap。
bind                绑定 ServerChannel 并且返回一个 ChannelFuture,用于 通知连接操作完成了(结果可以是成功或者失败)
ServerBootstrap 中的 childHandler(), childAttr() 和 childOption() 是常用的服务器应用的操作。
ServerChannel负责创建子Channel,它代表接受连接
引导ServerChannel的ServerBootstrap,提供这些方法来简化接收的 Channel 对 ChannelConfig 应用设置的任务

- 当调用 bind() 后 ServerBootstrap 将创建一个新的管道,这个管道将会在绑定成功后接收子管道
- 接收新连接给每个子管道
- 接收连接的 Channel
child* 的方法都是操作在子的 Channel,被 ServerChannel 管理
ServerBootstrap时会创建一个 NioServerSocketChannel实例 bind()
这个 NioServerChannel 负责接受新连接和创建NioSocketChannel 实例。
NioEventLoopGroup group = new NioEventLoopGroup();
ServerBootstrap bootstrap = new ServerBootstrap(); //1
bootstrap.group(group) //2
    .channel(NioServerSocketChannel.class) //3
    .childHandler(new SimpleChannelInboundHandler<ByteBuf>() { //4
        @Override
        protected void channelRead0(ChannelHandlerContext ctx,
            ByteBuf byteBuf) throws Exception {
                System.out.println("Reveived data");
                byteBuf.clear();
            }
        }
    );
ChannelFuture future = bootstrap.bind(new InetSocketAddress(8080)); //5
future.addListener(new ChannelFutureListener() {
    @Override
    public void operationComplete(ChannelFuture channelFuture)
        throws Exception {
            if (channelFuture.isSuccess()) {
                System.out.println("Server bound");
            } else {
                System.err.println("Bound attempt failed");
                channelFuture.cause().printStackTrace();
            }
        }
    }
);
- 创建要给新的 ServerBootstrap 来创建新的 SocketChannel 管道并绑定他们
- 指定 EventLoopGroup 用于从注册的 ServerChannel 中获取EventLoop 和接收到的管道
- 指定要使用的管道类
- 设置子处理器用于处理接收的管道的 I/O 和数据
- 通过配置引导来绑定管道
从 Channel 引导客户端
从一个Channel引导客户端channel,比如代理服务;
创建新的Bootstrap 不是很有效
EventLoop继承自EventLoopGroup,可以通过传递接收到的Channel的EventLoop到Bootstrap的group方法,这允许客户端Channel来操作相同的EventLoop,这样就能消除了额外的线程创建和所有相关的上下文切换的开销;
这样能保证channel使用相同的线程

- 当 bind() 调用时,ServerBootstrap 创建一个新的ServerChannel 。 当绑定成功后,这个管道就能接收子管道了
- ServerChannel 接收新连接并且创建子管道来服务它们
- Channel 用于接收到的连接
- 管道自己创建了 Bootstrap,用于当 connect() 调用时创建一个新的管道
- 新管道连接到远端
- 在 EventLoop 接收通过 connect() 创建后就在管道间共享
实现 EventLoop 共享,包括设置 EventLoop 引导通过Bootstrap.eventLoop() 方法
ServerBootstrap bootstrap = new ServerBootstrap(); //1
bootstrap.group(new NioEventLoopGroup(), //2
    new NioEventLoopGroup()).channel(NioServerSocketChannel.class) //3
        .childHandler(        //4
            new SimpleChannelInboundHandler<ByteBuf>() {
            ChannelFuture connectFuture;

            @Override
            public void channelActive(ChannelHandlerContext ctx) throws Exception {
                Bootstrap bootstrap = new Bootstrap();//5
                bootstrap.channel(NioSocketChannel.class) //6
                        .handler(new SimpleChannelInboundHandler<ByteBuf>() {  //7
                            @Override
                            protected void channelRead0(ChannelHandlerContext ctx, ByteBuf in) throws Exception {
                                System.out.println("Reveived data");
                            }
                        });
                bootstrap.group(ctx.channel().eventLoop()); //8
                connectFuture = bootstrap.connect(new InetSocketAddress("www.manning.com", 80));  //9
            }

            @Override
            protected void channelRead0(ChannelHandlerContext channelHandlerContext, ByteBuf byteBuf) throws Exception {
                if (connectFuture.isDone()) {
                    // do something with the data  //10
                }
            }
        });
ChannelFuture future = bootstrap.bind(new InetSocketAddress(8080));  //11
future.addListener(new ChannelFutureListener() {
    @Override
    public void operationComplete(ChannelFuture channelFuture) throws Exception {
        if (channelFuture.isSuccess()) {
            System.out.println("Server bound");
        } else {
            System.err.println("Bound attempt failed");
            channelFuture.cause().printStackTrace();
        }
    }
});
- 创建一个新的 ServerBootstrap 来创建新的 SocketChannel 管道并且绑定他们
- 指定 EventLoopGroups 从 ServerChannel 和接收到的管道来注册并获取 EventLoops
- 指定 Channel 类来使用
- 设置处理器用于处理接收到的管道的 I/O 和数据
- 创建一个新的 Bootstrap 来连接到远程主机
- 设置管道类
- 设置处理器来处理 I/O
- 使用相同的 EventLoop 作为分配到接收的管道
- 连接到远端
- 连接完成处理业务逻辑 (比如, proxy)
- 通过配置了的 Bootstrap 来绑定到管道
新的 EventLoop 会创建一个新的 Thread。出于该原因,EventLoop 实例应该尽量重用。或者限制实例的数量来避免耗尽系统资源。
一个引导中添加多个 ChannelHandler
ChannelInitializer抽象类初始化ChannelPipeline中的ChannelHandler
ChannelInitializer是一个特殊的 ChannelHandler,通道注册到EventLoop 就会调用ChannelInitializer,允许将 ChannelHandler 添加到CHannelPipeline;
完成通道初始化后ChannelInitializer会被移除;
ServerBootstrap bootstrap = new ServerBootstrap();//1
bootstrap.group(new NioEventLoopGroup(), new NioEventLoopGroup())  //2
    .channel(NioServerSocketChannel.class)  //3
    .childHandler(new ChannelInitializerImpl()); //4
ChannelFuture future = bootstrap.bind(new InetSocketAddress(8080));  //5
future.sync();


final class ChannelInitializerImpl extends ChannelInitializer<Channel> {  //6
    @Override
    protected void initChannel(Channel ch) throws Exception {
        ChannelPipeline pipeline = ch.pipeline(); //7
        pipeline.addLast(new HttpClientCodec());
        pipeline.addLast(new HttpObjectAggregator(Integer.MAX_VALUE));

    }
}
- 创建一个新的 ServerBootstrap 来创建和绑定新的 Channel
- 指定 EventLoopGroups 从 ServerChannel 和接收到的管道来注册并获取 EventLoops
- 指定 Channel 类来使用
- 设置处理器用于处理接收到的管道的 I/O 和数据
- 通过配置的引导来绑定管道
- ChannelInitializer 负责设置 ChannelPipeline
- 实现 initChannel() 来添加需要的处理器到 ChannelPipeline。一旦完成了这方法 ChannelInitializer 将会从 ChannelPipeline 删除自身。
在ChannelInitializer中可以添加多个ChannelHandler到ChannelPipeline
ChannelOption和属性
ChannelOption帮助配置通道,不需要手动配置;
选项会自动应用到引导创建的所有通道,可用的各种选项可以配置底层连接的详细信息,如通道“keep-alive(保持活跃)”或“timeout(超时)”的特性。
Channel可以绑定AttributeMap集合和AttributeKey
如何使用 ChannelOption 配置 Channel 和一个属性来存储一个整数值
final AttributeKey<Integer> id = new AttributeKey<Integer>("ID"); //1

Bootstrap bootstrap = new Bootstrap(); //2
bootstrap.group(new NioEventLoopGroup()) //3
        .channel(NioSocketChannel.class) //4
        .handler(new SimpleChannelInboundHandler<ByteBuf>() { //5
            @Override
            public void channelRegistered(ChannelHandlerContext ctx) throws Exception {
               Integer idValue = ctx.channel().attr(id).get();  //6
                // do something  with the idValue
            }

            @Override
            protected void channelRead0(ChannelHandlerContext channelHandlerContext, ByteBuf byteBuf) throws Exception {
                System.out.println("Reveived data");
            }
        });
bootstrap.option(ChannelOption.SO_KEEPALIVE, true).option(ChannelOption.CONNECT_TIMEOUT_MILLIS, 5000);   //7
bootstrap.attr(id, 123456); //8

ChannelFuture future = bootstrap.connect(new InetSocketAddress("www.manning.com", 80));   //9
future.syncUninterruptibly();
- 新建一个 AttributeKey 用来存储属性值
- 新建 Bootstrap 用来创建客户端管道并连接他们
- 指定 EventLoopGroups 从和接收到的管道来注册并获取 EventLoop
- 指定 Channel 类
- 设置处理器来处理管道的 I/O 和数据
- 检索 AttributeKey 的属性及其值
- 设置 ChannelOption 将会设置在管道在连接或者绑定
- 存储 id 属性
- 通过配置的 Bootstrap 来连接到远程主机
关闭客户端或服务器
主要是关闭EventLoopGroup用EventLoopGroup.shutdownGracefully()返回一个Future通知关闭完成,也是一种异步操作
EventLoopGroup group = new NioEventLoopGroup() //1
Bootstrap bootstrap = new Bootstrap(); //2
bootstrap.group(group)
    .channel(NioSocketChannel.class);
...
...
Future<?> future = group.shutdownGracefully(); //3
// block until the group has shutdown
future.sync();
- 创建 EventLoopGroup 用于处理 I/O
- 创建一个新的 Bootstrap 并且配置他
- 最终优雅的关闭 EventLoopGroup 释放资源。这个也会关闭中当前使用的 Channel
二. EventLoop
同一个Channel,中的ChannelHandler由同一个
其他线程模型,也可以使用netty提供的进行开发
线程池
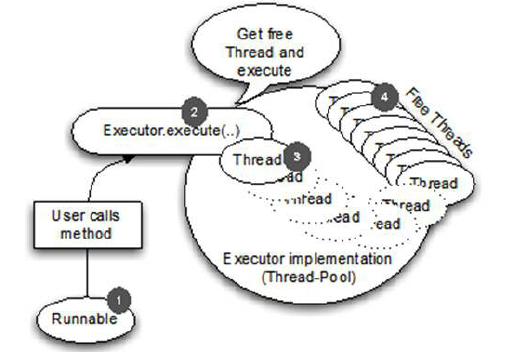
- Runnable 表示要执行的任务。这可能是任何东西,从一个数据库调用文件系统清理。
- 之前 runnable 移交到线程池。
- 闲置的线程被用来执行任务。当一个线程运行结束之后,它将回到闲置线程的列表新任务需要运行时被重用。
- 线程执行任务
EventLoop
事件循环:运行在一个循环里,直到它的终止
EventLoop 逻辑
while (!terminated) {
    List<Runnable> readyEvents = blockUntilEventsReady(); //1
    for (Runnable ev: readyEvents) {
        ev.run(); //2
    }
}
- 阻塞直到事件可以运行
- 循环所有事件,并运行他们
EventLoop接口代表事件循环,EventLoop 是从EventExecutor 和 ScheduledExecutorService 扩展而来,所以可以将任务直接交给 EventLoop 执行;
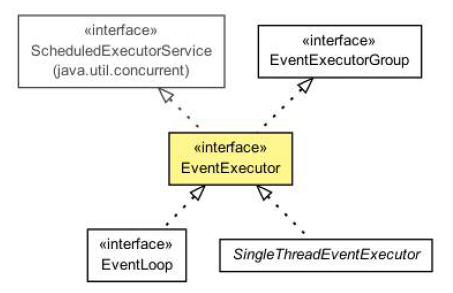
EventLoop是一个完整的Thread
任务执行的顺序FIFO
三. 任务调度
** Java API **
ScheduledExecutorService调度
newScheduledThreadPool(int corePoolSize)
newScheduledThreadPool(int corePoolSize,ThreadFactorythreadFactory)
newSingleThreadScheduledExecutor()
newSingleThreadScheduledExecutor(ThreadFact orythreadFactory) 		//调度命令来延迟或者周期性的执行
corePoolSize计算线程的数量
ScheduledExecutorService 调度任务 60 执行一次
ScheduledExecutorService executor = Executors
        .newScheduledThreadPool(10); //1

ScheduledFuture<?> future = executor.schedule(
        new Runnable() { //2
            @Override
            public void run() {
                System.out.println("Now it is 60 seconds later");  //3
            }
        }, 60, TimeUnit.SECONDS);  //4
// do something
//
executor.shutdown();  //5
- 新建 ScheduledExecutorService 使用10个线程
- 新建 runnable 调度执行
- 稍后运行
- 调度任务60秒后执行
- 关闭 ScheduledExecutorService 来释放任务完成的资源
使用 EventLoop 调度任务
使用EventLoop调度任务分配到通道
Channel ch = null; // Get reference to channel
ScheduledFuture<?> future = ch.eventLoop().schedule(
        new Runnable() {
            @Override
            public void run() {
                System.out.println("Now its 60 seconds later");
            }
        }, 60, TimeUnit.SECONDS);
- 新建 runnable 用于执行调度
- 稍后执行
- 调度任务60秒后运行
如果想任务每隔多少秒执行一次
Channel ch = null; // Get reference to channel
ScheduledFuture<?> future = ch.eventLoop().scheduleAtFixedRate(
        new Runnable() {
            @Override
            public void run() {
                System.out.println("Run every 60 seconds");
            }
        }, 60, 60, TimeUnit.SECONDS);
- 新建 runnable 用于执行调度
- 将运行直到 ScheduledFuture 被取消
- 调度任务60秒运行
取消操作
ScheduledFuture<?> future = ch.eventLoop()
.scheduleAtFixedRate(..); //1
// Some other code that runs...
future.cancel(false); //2
- 调度任务并获取返回的 ScheduledFuture
- 取消任务,阻止它再次运行
调度的内部实现
基于散列和分层定时轮:数据结构有效实现定时器
近似执行,不是100%
可以这样认为
- 在指定的延迟时间后调度任务;
- 任务被插入到 EventLoop 的 Schedule-Task-Queue(调度任务队列);
- 如果任务需要马上执行,EventLoop 检查每个运行;
- 如果有一个任务要执行,EventLoop 将立刻执行它,并从队列中删除;
- EventLoop 等待下一次运行,从第4步开始一遍又一遍的重复。
在netty中这样的工作几乎没有资源开销,netty中无法做到精准;
四. EventLoop/Thread分配细节
使用EventLoopGroup为 Channel 的 I/O 和事件服务;
异步实现使用只有少数 EventLoop(和 Threads)共享于 Channel 之间
- 所有的 EventLoop 由 EventLoopGroup 分配。这里它将使用三个EventLoop 实例
- 这个 EventLoop 处理所有分配给它管道的事件和任务。每个EventLoop 绑定到一个 Thread
- 管道绑定到 EventLoop,所以所有操作总是被同一个线程在 Channel 的生命周期执行。一个管道属于一个连接
一旦 Channel 是分配给一个 EventLoop,它将使用这个 EventLoop 在它的生命周期里和同样的线程。
在同一个ChannelHandler中不需要担心同步问题
EventLoop分配给不同的channel,这些channel中的ThreadLocal共享,可以用来跟踪状态
五. 单元测试
测试已实现的ChannelHandler和编解码器
ChannelHandler可以串联到一起,构建ChannelPipeline的处理逻辑
测试ChannelHandler通过嵌入式传输,特殊的Channel实现,EmbeddedChannel
入站和出站的数据写入EmbeddedChannel,然后检查是否到达ChannelPipeline的结束,确定消息编码或解码和ChannelHandler是否被触发;
writeInbound 	 写入EmbeddedChannel,如果能从EmbeddedChannel通过readInbound读到,返回true
readInbound   	 从 EmbeddedChannel 读到入站消息,任何返回遍历整个ChannelPipeline,如果读取还没有准备,返回null
writeOutbound 	写一个出站消息到 EmbeddedChannel。 如果数据能从 EmbeddedChannel 通过 readOutbound() 读到,则返回 true
readOutbound    从 EmbeddedChannel 读到出站消息。任何返回遍历整个ChannelPipeline。如果读取还没有准备,则此方法返回 null
Finish          如果从入站或者出站中能读到数据,标记 EmbeddedChannel 完成并且返回。这同时会调用 EmbeddedChannel 的关闭方法
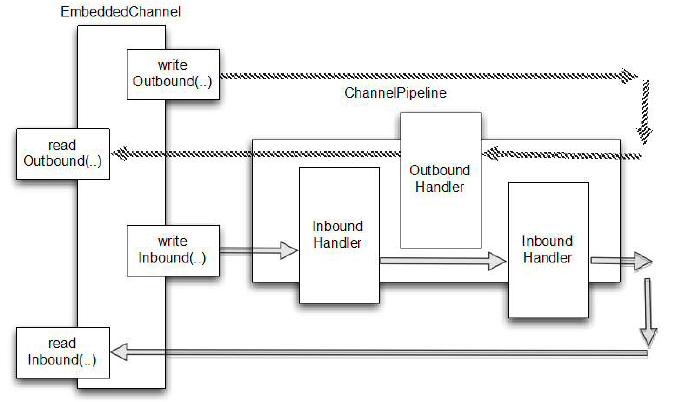
如上图所示,使用 writeOutbound() 写消息到 Channel,消息在出站方法通过 ChannelPipeline,之后就可以使用 readOutbound() 读取消息。
着同样使用与入站,使用 writeInbound() 和 readInbound()。
每种情况下,消息是通过 ChannelPipeline 并被有关ChannelInboundHandler 或 ChannelOutboundHandler 进行处理。
如果消息是不消耗您可以使用 readInbound() 或 readOutbound() 适当的读到 Channel 处理后的消息。
测试入站消息
写一个ByteToMessageDecoder
数据足够,会产生固定大小的包,数据不足会等待下一个数据块并再次检查是否可以产生一个完整的包;
可能会占用多个event,获得足够的字节产生一个数据包,并传递到下一个ChannelHandler

FixedLengthFrameDecoder实现如下
public class FixedLengthFrameDecoder extends ByteToMessageDecoder { //1
    private final int frameLength;
    public FixedLengthFrameDecoder(int frameLength) { //2
        if (frameLength <= 0) {
            throw new IllegalArgumentException(
                    "frameLength must be a positive integer: " + frameLength);
        }
        this.frameLength = frameLength;
    }

    @Override
    protected void decode(ChannelHandlerContext ctx, ByteBuf in, List<Object> out) throws Exception {
        if (in.readableBytes() >= frameLength) { //3
            ByteBuf buf = in.readBytes(frameLength);//4
            out.add(buf); //5
        }
    }
}
- 继承 ByteToMessageDecoder 用来处理入站的字节并将他们解码为消息
- 指定产出的帧的长度
- 检查是否有足够的字节用于读到下个帧
- 从 ByteBuf 读取新帧
- 添加帧到解码好的消息 List
使用EmbeddedChannel测试
public class FixedLengthFrameDecoderTest {

    @Test    //1
    public void testFramesDecoded() {
        ByteBuf buf = Unpooled.buffer(); //2
        for (int i = 0; i < 9; i++) {
            buf.writeByte(i);
        }
        ByteBuf input = buf.duplicate();

        EmbeddedChannel channel = new EmbeddedChannel(new FixedLengthFrameDecoder(3)); //3
        Assert.assertFalse(channel.writeInbound(input.readBytes(2))); //4
        Assert.assertTrue(channel.writeInbound(input.readBytes(7)));

        Assert.assertTrue(channel.finish());  //5
        ByteBuf read = (ByteBuf) channel.readInbound();
        Assert.assertEquals(buf.readSlice(3), read);
        read.release();

        read = (ByteBuf) channel.readInbound();
        Assert.assertEquals(buf.readSlice(3), read);
        read.release();

        read = (ByteBuf) channel.readInbound();
        Assert.assertEquals(buf.readSlice(3), read);
        read.release();

        Assert.assertNull(channel.readInbound());
        buf.release();
    }


    @Test
    public void testFramesDecoded2() {
        ByteBuf buf = Unpooled.buffer();
        for (int i = 0; i < 9; i++) {
            buf.writeByte(i);
        }
        ByteBuf input = buf.duplicate();

        EmbeddedChannel channel = new EmbeddedChannel(new FixedLengthFrameDecoder(3));
        Assert.assertFalse(channel.writeInbound(input.readBytes(2)));
        Assert.assertTrue(channel.writeInbound(input.readBytes(7)));

        Assert.assertTrue(channel.finish());
        ByteBuf read = (ByteBuf) channel.readInbound();
        Assert.assertEquals(buf.readSlice(3), read);
        read.release();

        read = (ByteBuf) channel.readInbound();
        Assert.assertEquals(buf.readSlice(3), read);
        read.release();

        read = (ByteBuf) channel.readInbound();
        Assert.assertEquals(buf.readSlice(3), read);
        read.release();

        Assert.assertNull(channel.readInbound());
        buf.release();
    }
}
- 测试增加 @Test 注解
- 新建 ByteBuf 并用字节填充它
- 新增 EmbeddedChannel 并添加 FixedLengthFrameDecoder 用于测试
- 写数据到 EmbeddedChannel
- 标记 channel 已经完成
- 读产生的消息并且校验
testFramesDecoded方法想测试一个ByteBuf包含9个字节,被解码成包含3个字节的ByteBuf
写入9个字节是通过writeInbound方法,之后执行finish方法,将EmbeddedChannel标记为已完成
最后调用readInbound方法获取EmbeddedChannel中的数据,直到没有可读的字节
testFramesDecoded2使用相同的方式,但是分为两个步骤,当调用 writeInbound(input.readBytes(2)) 返回false时,FixedLengthFrameDecoder 会产生输出
至少有三个字节是可读的
测试出站消息
使用MessageToMessageEncoder:AbsIntegerEncoder
- 当收到 flush() 它将从 ByteBuf 读取4字节整数并给每个执行Math.abs()。
- 每个整数接着写入 ChannelHandlerPipeline
public class AbsIntegerEncoder extends MessageToMessageEncoder<ByteBuf> {  //1
    @Override
    protected void encode(ChannelHandlerContext channelHandlerContext, ByteBuf in, List<Object> out) throws Exception {
        while (in.readableBytes() >= 4) { //2
            int value = Math.abs(in.readInt());//3
            out.add(value);  //4
        }
    }
}
- 继承 MessageToMessageEncoder 用于编码消息到另外一种格式
- 检查是否有足够的字节用于编码
- 读取下一个输入 ByteBuf 产出的 int 值,并计算绝对值
- 写 int 到编码的消息 List
使用EmbeddedChannel测试代码
public class AbsIntegerEncoderTest {

    @Test   //1
    public void testEncoded() {
        ByteBuf buf = Unpooled.buffer();  //2
        for (int i = 1; i < 10; i++) {
            buf.writeInt(i * -1);
        }

        EmbeddedChannel channel = new EmbeddedChannel(new AbsIntegerEncoder());  //3
        Assert.assertTrue(channel.writeOutbound(buf)); //4

        Assert.assertTrue(channel.finish()); //5
        for (int i = 1; i < 10; i++) {
            Assert.assertEquals(i, channel.readOutbound());  //6
        }
        Assert.assertNull(channel.readOutbound());
    }
}
- 用 @Test 标记
- 新建 ByteBuf 并写入负整数
- 新建 EmbeddedChannel 并安装 AbsIntegerEncoder 来测试
- 写 ByteBuf 并预测 readOutbound() 产生的数据
- 标记 channel 已经完成
- 读取产生到的消息,检查负值已经编码为绝对值
测试异常处理
有时候传输的入站或出站数据不够,这种情况的处理,可以抛出异常;
实现输入字节限制长度,抛出TooLongFrameException,可以防止资源耗尽

限制为3个字节,如果过长会丢弃并抛出TooLongFrameException,异常处理在ChannelHandler.exceptionCaught()中完成
public class FrameChunkDecoder extends ByteToMessageDecoder {  //1
    private final int maxFrameSize;
    public FrameChunkDecoder(int maxFrameSize) {
        this.maxFrameSize = maxFrameSize;
    }

    @Override
    protected void decode(ChannelHandlerContext ctx, ByteBuf in, List<Object> out) throws Exception {
        int readableBytes = in.readableBytes();  //2
        if (readableBytes > maxFrameSize)  {
            // discard the bytes   //3
            in.clear();
            throw new TooLongFrameException();
        }
        ByteBuf buf = in.readBytes(readableBytes); //4
        out.add(buf);  //5
    }
}
- 继承 ByteToMessageDecoder 用于解码入站字节到消息
- 指定最大需要的帧产生的体积
- 如果帧太大就丢弃并抛出一个 TooLongFrameException 异常
- 同时从 ByteBuf 读到新帧
- 添加帧到解码消息 List
测试例子
public class FrameChunkDecoderTest {

    @Test    //1
    public void testFramesDecoded() {
        ByteBuf buf = Unpooled.buffer();  //2
        for (int i = 0; i < 9; i++) {
            buf.writeByte(i);
        }
        ByteBuf input = buf.duplicate();

        EmbeddedChannel channel = new EmbeddedChannel(new FrameChunkDecoder(3));  //3
        Assert.assertTrue(channel.writeInbound(input.readBytes(2)));  //4
        try {
            channel.writeInbound(input.readBytes(4)); //5
            Assert.fail();  //6
        } catch (TooLongFrameException e) {
            // expected
        }
        Assert.assertTrue(channel.writeInbound(input.readBytes(3)));  //7


        Assert.assertTrue(channel.finish());  //8

        ByteBuf read = (ByteBuf) channel.readInbound();
        Assert.assertEquals(buf.readSlice(2), read); //9
        read.release();

        read = (ByteBuf) channel.readInbound();
        Assert.assertEquals(buf.skipBytes(4).readSlice(3), read);
        read.release();

        buf.release();
    }
}
- 使用 @Test 注解
- 新建 ByteBuf 写入 9 个字节
- 新建 EmbeddedChannel 并安装一个 FixedLengthFrameDecoder 用于测试
- 写入 2 个字节并预测生产的新帧(消息)
- 写一帧大于帧的最大容量 (3) 并检查一个 TooLongFrameException 异常
- 如果异常没有被捕获,测试将失败。注意如果类实现 exceptionCaught() 并且处理了异常 exception,那么这里就不会捕捉异常
- 写剩余的 2 个字节预测一个帧
- 标记 channel 完成
- 读到的产生的消息并且验证值。注意 assertEquals(Object,Object)测试使用 equals() 是否相当,不是对象的引用是否相当

 浙公网安备 33010602011771号