
Kubernetes K8S之Service服务详解与示例
K8S之Service概述与代理说明,并详解所有的service服务类型与示例
主机配置规划
| 服务器名称(hostname) | 系统版本 | 配置 | 内网IP | 外网IP(模拟) |
|---|---|---|---|---|
| k8s-master | CentOS7.7 | 2C/4G/20G | 172.16.1.110 | 10.0.0.110 |
| k8s-node01 | CentOS7.7 | 2C/4G/20G | 172.16.1.111 | 10.0.0.111 |
| k8s-node02 | CentOS7.7 | 2C/4G/20G | 172.16.1.112 | 10.0.0.112 |
Service概述
Kubernetes Service定义了这样一种抽象:逻辑上的一组 Pod,一种可以访问它们的策略 —— 通常被称为微服务。这一组 Pod 能够被 Service 访问到,通常是通过 selector实现的。
举例:考虑一个图片处理 backend,它运行了3个副本。这些副本是可互换的 —— frontend 不需要关心它们调用了哪个 backend 副本。 然而组成这一组 backend 程序的 Pod 实际上可能会发生变化,frontend 客户端不应该也没必要知道,而且也不需要跟踪这一组 backend 的状态。Service 定义的抽象能够解耦这种关联。
Service可以提供负载均衡的能力,但是使用上存在如下限制:
- 只能提供4层负载均衡能力,而没有7层功能。有时我们可能需要更多的匹配规则来转发请求,这点上4层负载均衡是不支持的、
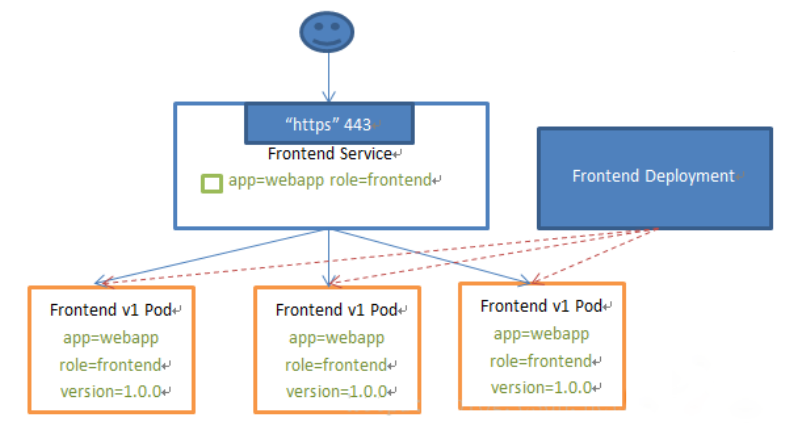
如web访问的service服务示例图:
VIP和Service代理
在 Kubernetes 集群中,每个 Node 运行一个 kube-proxy 进程。kube-proxy 负责为 Service 实现了一种 VIP(虚拟 IP)的形式,而不是 ExternalName 的形式。
从Kubernetes v1.0开始,已经可以使用 userspace代理模式。Kubernetes v1.1添加了 iptables 代理模式,在 Kubernetes v1.2 中kube-proxy 的 iptables 模式成为默认设置。Kubernetes v1.8添加了 ipvs 代理模式。
原因如下:
- DNS 实现的历史由来已久,它不遵守记录 TTL,并且在名称查找到结果后会对其进行缓存。
- 有些应用程序仅执行一次 DNS 查找,并无限期地缓存结果。
- 即使应用和库进行了适当的重新解析,DNS 记录上的 TTL 值低或为零也可能会给 DNS 带来高负载,从而使管理变得困难。
总之就是因为有缓存,因此不合适。
userspace代理模式
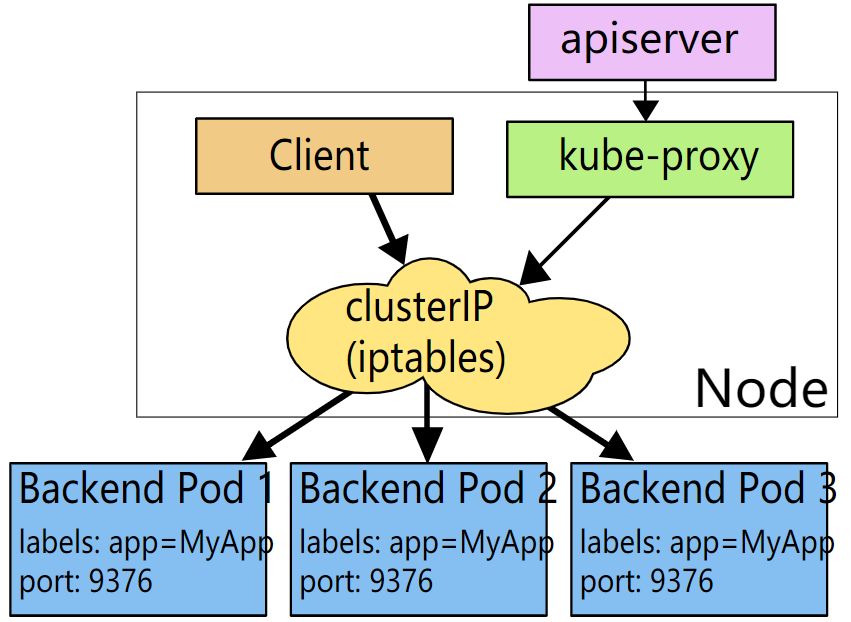
这种模式,kube-proxy 会监视 Kubernetes master 对 Service 对象和 Endpoints 对象的添加和移除。 对每个 Service,它会在本地 Node 上打开一个端口(随机选择)。 任何连接到“代理端口”的请求,都会被代理到 Service 的backend Pods 中的某个上面(如 Endpoints 所报告的一样)。 使用哪个 backend Pod,是 kube-proxy 基于 SessionAffinity 来确定的。
最后,它配置 iptables 规则,捕获到达该 Service 的 clusterIP(是虚拟 IP)和 Port 的请求,并重定向到代理端口,代理端口再代理请求到 backend Pod。
默认情况下,userspace模式下的kube-proxy通过循环算法选择后端。
默认的策略是,通过 round-robin 算法来选择 backend Pod。

iptables 代理模式
这种模式,kube-proxy 会监视 Kubernetes 控制节点对 Service 对象和 Endpoints 对象的添加和移除。 对每个 Service,它会配置 iptables 规则,从而捕获到达该 Service 的 clusterIP 和端口的请求,进而将请求重定向到 Service 的一组 backend 中的某个上面。对于每个 Endpoints 对象,它也会配置 iptables 规则,这个规则会选择一个 backend 组合。
默认的策略是,kube-proxy 在 iptables 模式下随机选择一个 backend。
使用 iptables 处理流量具有较低的系统开销,因为流量由 Linux netfilter 处理,而无需在用户空间和内核空间之间切换。 这种方法也可能更可靠。
如果 kube-proxy 在 iptables模式下运行,并且所选的第一个 Pod 没有响应,则连接失败。 这与userspace模式不同:在这种情况下,kube-proxy 将检测到与第一个 Pod 的连接已失败,并会自动使用其他后端 Pod 重试。
我们可以使用 Pod readiness 探测器 验证后端 Pod 是否可以正常工作,以便 iptables 模式下的 kube-proxy 仅看到测试正常的后端。这样做意味着可以避免将流量通过 kube-proxy 发送到已知已失败的Pod。
IPVS 代理模式
在 ipvs 模式下,kube-proxy监视Kubernetes服务(Service)和端点(Endpoints),调用 netlink 接口相应地创建 IPVS 规则, 并定期将 IPVS 规则与 Kubernetes服务(Service)和端点(Endpoints)同步。该控制循环可确保 IPVS 状态与所需状态匹配。访问服务(Service)时,IPVS 将流量定向到后端Pod之一。
IPVS代理模式基于类似于 iptables 模式的 netfilter 挂钩函数,但是使用哈希表作为基础数据结构,并且在内核空间中工作。 这意味着,与 iptables 模式下的 kube-proxy 相比,IPVS 模式下的 kube-proxy 重定向通信的延迟要短,并且在同步代理规则时具有更好的性能。与其他代理模式相比,IPVS 模式还支持更高的网络流量吞吐量。
IPVS提供了更多选项来平衡后端Pod的流量。这些是:
- rr: round-robin
- lc: least connection (smallest number of open connections)
- dh: destination hashing
- sh: source hashing
- sed: shortest expected delay
- nq: never queue
注意:要在 IPVS 模式下运行 kube-proxy,必须在启动 kube-proxy 之前使 IPVS Linux 在节点上可用。 当 kube-proxy 以 IPVS 代理模式启动时,它将验证 IPVS 内核模块是否可用。 如果未检测到 IPVS 内核模块,则 kube-proxy 将退回到以 iptables 代理模式运行。

Service服务类型
Kubernetes 中Service有以下4中类型:
- ClusterIP:默认类型,自动分配一个仅Cluster内部可以访问的虚拟IP
- NodePort:通过每个 Node 上的 IP 和静态端口(NodePort)暴露服务。以ClusterIP为基础,NodePort 服务会路由到 ClusterIP 服务。通过请求
<NodeIP>:<NodePort>,可以从集群的外部访问一个集群内部的 NodePort 服务。 - LoadBalancer:使用云提供商的负载均衡器,可以向外部暴露服务。外部的负载均衡器可以路由到 NodePort 服务和 ClusterIP 服务。
- ExternalName:通过返回 CNAME 和它的值,可以将服务映射到 externalName 字段的内容(例如,foo.bar.example.com)。没有任何类型代理被创建。
需要注意的是:Service 能够将一个接收 port 映射到任意的 targetPort。默认情况下,targetPort 将被设置为与 port 字段相同的值。
Service域名格式:$(service name).$(namespace).svc.cluster.local,其中 cluster.local 为指定的集群的域名
Deployment的yaml信息
yaml文件
 1 [root@k8s-master service]# pwd
 2 /root/k8s_practice/service
 3 [root@k8s-master service]# cat myapp-deploy.yaml
 4 apiVersion: apps/v1
 5 kind: Deployment
 6 metadata:
 7   name: myapp-deploy
 8   namespace: default
 9 spec:
10   replicas: 3
11   selector:
12     matchLabels:
13       app: myapp
14       release: v1
15   template:
16     metadata:
17       labels:
18         app: myapp
19         release: v1
20         env: test
21     spec:
22       containers:
23       - name: myapp
24         image: registry.cn-beijing.aliyuncs.com/google_registry/myapp:v1
25         imagePullPolicy: IfNotPresent
26         ports:
27         - name: http
28           containerPort: 80
启动Deployment并查看状态
 1 [root@k8s-master service]# kubectl apply -f myapp-deploy.yaml
 2 deployment.apps/myapp-deploy created
 3 [root@k8s-master service]#
 4 [root@k8s-master service]# kubectl get deploy -o wide
 5 NAME           READY   UP-TO-DATE   AVAILABLE   AGE   CONTAINERS   IMAGES                                                      SELECTOR
 6 myapp-deploy   3/3     3            3           31h   myapp        registry.cn-beijing.aliyuncs.com/google_registry/myapp:v1   app=myapp,release=v1
 7 [root@k8s-master service]#
 8 [root@k8s-master service]# kubectl get rs -o wide
 9 NAME                      DESIRED   CURRENT   READY   AGE   CONTAINERS   IMAGES                                                      SELECTOR
10 myapp-deploy-5695bb5658   3         3         3       31h   myapp        registry.cn-beijing.aliyuncs.com/google_registry/myapp:v1   app=myapp,pod-template-hash=5695bb5658,release=v1
11 [root@k8s-master service]#
12 [root@k8s-master service]# kubectl get pod -o wide --show-labels
13 NAME                            READY   STATUS    RESTARTS   AGE   IP             NODE         NOMINATED NODE   READINESS GATES   LABELS
14 myapp-deploy-5695bb5658-2866m   1/1     Running   2          31h   10.244.2.116   k8s-node02   <none>           <none>            app=myapp,env=test,pod-template-hash=5695bb5658,release=v1
15 myapp-deploy-5695bb5658-dcfw7   1/1     Running   2          31h   10.244.4.105   k8s-node01   <none>           <none>            app=myapp,env=test,pod-template-hash=5695bb5658,release=v1
16 myapp-deploy-5695bb5658-n2b5w   1/1     Running   2          31h   10.244.2.115   k8s-node02   <none>           <none>            app=myapp,env=test,pod-template-hash=5695bb5658,release=v1
curl访问
 1 [root@k8s-master service]# curl 10.244.2.116
 2 Hello MyApp | Version: v1 | <a href="hostname.html">Pod Name</a>
 3 [root@k8s-master service]#
 4 [root@k8s-master service]# curl 10.244.2.116/hostname.html
 5 myapp-deploy-5695bb5658-2866m
 6 [root@k8s-master service]#
 7 [root@k8s-master service]# curl 10.244.4.105
 8 Hello MyApp | Version: v1 | <a href="hostname.html">Pod Name</a>
 9 [root@k8s-master service]#
10 [root@k8s-master service]# curl 10.244.4.105/hostname.html
11 myapp-deploy-5695bb5658-dcfw7
12 [root@k8s-master service]#
13 [root@k8s-master service]# curl 10.244.2.115
14 Hello MyApp | Version: v1 | <a href="hostname.html">Pod Name</a>
15 [root@k8s-master service]#
16 [root@k8s-master service]# curl 10.244.2.115/hostname.html
17 myapp-deploy-5695bb5658-n2b5w
ClusterIP类型示例
yaml文件
 1 [root@k8s-master service]# pwd
 2 /root/k8s_practice/service
 3 [root@k8s-master service]# cat myapp-svc-ClusterIP.yaml
 4 apiVersion: v1
 5 kind: Service
 6 metadata:
 7   name: myapp-clusterip
 8   namespace: default
 9 spec:
10   type: ClusterIP  # 可以不写,为默认类型
11   selector:
12     app: myapp
13     release: v1
14   ports:
15   - name: http
16     port: 80
17     targetPort: 80
启动Service并查看状态
1 [root@k8s-master service]# kubectl apply -f myapp-svc-ClusterIP.yaml
2 service/myapp-clusterip created
3 [root@k8s-master service]#
4 [root@k8s-master service]# kubectl get svc -o wide
5 NAME              TYPE        CLUSTER-IP      EXTERNAL-IP   PORT(S)   AGE   SELECTOR
6 kubernetes        ClusterIP   10.96.0.1       <none>        443/TCP   22d   <none>
7 myapp-clusterip   ClusterIP   10.106.66.120   <none>        80/TCP    15s   app=myapp,release=v1
查看pod信息
1 [root@k8s-master service]# kubectl get pod -o wide --show-labels
2 NAME                            READY   STATUS    RESTARTS   AGE   IP             NODE         NOMINATED NODE   READINESS GATES   LABELS
3 myapp-deploy-5695bb5658-2866m   1/1     Running   2          31h   10.244.2.116   k8s-node02   <none>           <none>            app=myapp,env=test,pod-template-hash=5695bb5658,release=v1
4 myapp-deploy-5695bb5658-dcfw7   1/1     Running   2          31h   10.244.4.105   k8s-node01   <none>           <none>            app=myapp,env=test,pod-template-hash=5695bb5658,release=v1
5 myapp-deploy-5695bb5658-n2b5w   1/1     Running   2          31h   10.244.2.115   k8s-node02   <none>           <none>            app=myapp,env=test,pod-template-hash=5695bb5658,release=v1
查看ipvs信息
1 [root@k8s-master service]# ipvsadm -Ln
2 IP Virtual Server version 1.2.1 (size=4096)
3 Prot LocalAddress:Port Scheduler Flags
4   -> RemoteAddress:Port           Forward Weight ActiveConn InActConn
5 ………………
6 TCP  10.106.66.120:80 rr
7   -> 10.244.2.115:80              Masq    1      0          0
8   -> 10.244.2.116:80              Masq    1      0          0
9   -> 10.244.4.105:80              Masq    1      0          0
curl访问
 1 [root@k8s-master service]# curl 10.106.66.120
 2 Hello MyApp | Version: v1 | <a href="hostname.html">Pod Name</a>
 3 [root@k8s-master service]#
 4 [root@k8s-master service]# curl 10.106.66.120/hostname.html
 5 myapp-deploy-5695bb5658-2866m
 6 [root@k8s-master service]#
 7 [root@k8s-master service]# curl 10.106.66.120/hostname.html
 8 myapp-deploy-5695bb5658-n2b5w
 9 [root@k8s-master service]#
10 [root@k8s-master service]# curl 10.106.66.120/hostname.html
11 myapp-deploy-5695bb5658-dcfw7
12 [root@k8s-master service]#
13 [root@k8s-master service]# curl 10.106.66.120/hostname.html
14 myapp-deploy-5695bb5658-2866m
备注:如果访问失败,请参考如下文章:
「Kubernetes K8S在IPVS代理模式下svc服务的ClusterIP类型访问失败处理」
Headless Services
有时不需要或不想要负载均衡,以及单独的 Service IP。遇到这种情况,可以通过指定 Cluster IP(spec.clusterIP)的值为 “None” 来创建 Headless Service。
这对headless Service 并不会分配 Cluster IP,kube-proxy 不会处理它们,而且平台也不会为它们进行负载均衡和路由。
- 第一种:自主选择权,有时候client想自己来决定使用哪个Real Server,可以通过查询DNS来获取Real Server的信息。
- 第二种:Headless Services还有一个用处(PS:也就是我们需要的那个特性)。Headless Service对应的每一个Endpoints,即每一个Pod,都会有对应的DNS域名;这样Pod之间就可以互相访问。【结合statefulset有状态服务使用,如Web、MySQL集群】
yaml文件
 1 [root@k8s-master service]# pwd
 2 /root/k8s_practice/service
 3 [root@k8s-master service]# cat myapp-svc-headless.yaml
 4 apiVersion: v1
 5 kind: Service
 6 metadata:
 7   name: myapp-headless
 8   namespace: default
 9 spec:
10   selector:
11     app: myapp
12     release: v1
13   clusterIP: "None"
14   ports:
15   - port: 80
16     targetPort: 80
启动Service并查看状态和详情
 1 [root@k8s-master service]# kubectl apply -f myapp-svc-headless.yaml
 2 service/myapp-headless created
 3 [root@k8s-master service]#
 4 [root@k8s-master service]# kubectl get svc -o wide
 5 NAME             TYPE        CLUSTER-IP   EXTERNAL-IP   PORT(S)   AGE   SELECTOR
 6 kubernetes       ClusterIP   10.96.0.1    <none>        443/TCP   22d   <none>
 7 myapp-headless   ClusterIP   None         <none>        80/TCP    6s    app=myapp,release=v1
 8 [root@k8s-master service]#
 9 [root@k8s-master service]# kubectl describe svc/myapp-headless
10 Name:              myapp-headless
11 Namespace:         default
12 Labels:            <none>
13 Annotations:       kubectl.kubernetes.io/last-applied-configuration:
14                      {"apiVersion":"v1","kind":"Service","metadata":{"annotations":{},"name":"myapp-headless","namespace":"default"},"spec":{"clusterIP":"None"...
15 Selector:          app=myapp,release=v1
16 Type:              ClusterIP
17 IP:                None
18 Port:              <unset>  80/TCP
19 TargetPort:        80/TCP
20 Endpoints:         10.244.2.115:80,10.244.2.116:80,10.244.4.105:80  # 后端的Pod信息
21 Session Affinity:  None
22 Events:            <none>
service只要创建成功就会写入到coredns。我们得到coredns IP的命令如下:
1 [root@k8s-master service]# kubectl get pod -o wide -A | grep 'coredns'
2 kube-system            coredns-6955765f44-c9zfh                     1/1     Running   29         22d    10.244.0.62    k8s-master   <none>           <none>
3 kube-system            coredns-6955765f44-lrz5q                     1/1     Running   29         22d    10.244.0.61    k8s-master   <none>           <none>
在宿主机安装nslookup、dig命令安装
yum install -y bind-utils
coredns记录信息如下
 1 # 其中 10.244.0.61 为 coredns IP
 2 # myapp-headless.default.svc.cluster.local 为Headless Service域名。格式为:$(service name).$(namespace).svc.cluster.local,其中 cluster.local 指定的集群的域名
 3 [root@k8s-master service]# nslookup myapp-headless.default.svc.cluster.local 10.244.0.61
 4 Server:        10.244.0.61
 5 Address:    10.244.0.61#53
 6
 7 Name:    myapp-headless.default.svc.cluster.local
 8 Address: 10.244.2.116
 9 Name:    myapp-headless.default.svc.cluster.local
10 Address: 10.244.4.105
11 Name:    myapp-headless.default.svc.cluster.local
12 Address: 10.244.2.115
13
14 [root@k8s-master service]#
15 ### 或使用如下命令
16 [root@k8s-master service]# dig -t A myapp-headless.default.svc.cluster.local. @10.244.0.61
17
18 ; <<>> DiG 9.11.4-P2-RedHat-9.11.4-16.P2.el7_8.6 <<>> -t A myapp-headless.default.svc.cluster.local. @10.244.0.61
19 ;; global options: +cmd
20 ;; Got answer:
21 ;; WARNING: .local is reserved for Multicast DNS
22 ;; You are currently testing what happens when an mDNS query is leaked to DNS
23 ;; ->>HEADER<<- opcode: QUERY, status: NOERROR, id: 7089
24 ;; flags: qr aa rd; QUERY: 1, ANSWER: 3, AUTHORITY: 0, ADDITIONAL: 1
25 ;; WARNING: recursion requested but not available
26
27 ;; OPT PSEUDOSECTION:
28 ; EDNS: version: 0, flags:; udp: 4096
29 ;; QUESTION SECTION:
30 ;myapp-headless.default.svc.cluster.local. IN A
31
32 ;; ANSWER SECTION:
33 myapp-headless.default.svc.cluster.local. 14 IN    A 10.244.2.116
34 myapp-headless.default.svc.cluster.local. 14 IN    A 10.244.4.105
35 myapp-headless.default.svc.cluster.local. 14 IN    A 10.244.2.115
36
37 ;; Query time: 0 msec
38 ;; SERVER: 10.244.0.61#53(10.244.0.61)
39 ;; WHEN: Wed Jun 03 22:34:46 CST 2020
40 ;; MSG SIZE  rcvd: 237
NodePort类型示例
如果将 type 字段设置为 NodePort,则 Kubernetes 控制层面将在 --service-node-port-range 标志指定的范围内分配端口(默认值:30000-32767)。
yaml文件
 1 [root@k8s-master service]# pwd
 2 /root/k8s_practice/service
 3 [root@k8s-master service]# cat myapp-svc-NodePort.yaml
 4 apiVersion: v1
 5 kind: Service
 6 metadata:
 7   name: myapp-nodeport
 8   namespace: default
 9 spec:
10   type: NodePort
11   selector:
12     app: myapp
13     release: v1
14   ports:
15   - name: http
16     # 默认情况下,为了方便起见,`targetPort` 被设置为与 `port` 字段相同的值。
17     port: 80         # Service对外提供服务端口
18     targetPort: 80   # 请求转发后端Pod使用的端口
19     nodePort: 31682  # 可选字段,默认情况下,为了方便起见,Kubernetes 控制层面会从某个范围内分配一个端口号(默认:30000-32767)
启动Service并查看状态
1 [root@k8s-master service]# kubectl apply -f myapp-svc-NodePort.yaml
2 service/myapp-nodeport created
3 [root@k8s-master service]#
4 [root@k8s-master service]# kubectl get svc -o wide
5 NAME             TYPE        CLUSTER-IP    EXTERNAL-IP   PORT(S)        AGE   SELECTOR
6 kubernetes       ClusterIP   10.96.0.1     <none>        443/TCP        22d   <none>
7 myapp-nodeport   NodePort    10.99.50.81   <none>        80:31682/TCP   6s    app=myapp,release=v1
由上可见,类型变为了NodePort
查看ipvs信息
1 [root@k8s-master service]# ipvsadm -Ln
2 IP Virtual Server version 1.2.1 (size=4096)
3 Prot LocalAddress:Port Scheduler Flags
4   -> RemoteAddress:Port           Forward Weight ActiveConn InActConn
5 ………………
6 TCP  10.99.50.81:80 rr
7   -> 10.244.2.115:80              Masq    1      0          0
8   -> 10.244.2.116:80              Masq    1      0          0
9   -> 10.244.4.105:80              Masq    1      0          0
端口查看,可见在本地宿主机监听了相应的端口(备注:集群所有机器都监听了该端口)
1 # 集群所有机器都可以执行查看
2 [root@k8s-master service]# netstat -lntp | grep '31682'
3 tcp6       0      0 :::31682                :::*                    LISTEN      3961/kube-proxy
curl通过ClusterIP访问
 1 # 通过ClusterIP访问
 2 [root@k8s-master service]# curl 10.99.50.81
 3 Hello MyApp | Version: v1 | <a href="hostname.html">Pod Name</a>
 4 [root@k8s-master service]#
 5 [root@k8s-master service]# curl 10.99.50.81/hostname.html
 6 myapp-deploy-5695bb5658-2866m
 7 [root@k8s-master service]#
 8 [root@k8s-master service]# curl 10.99.50.81/hostname.html
 9 myapp-deploy-5695bb5658-n2b5w
10 [root@k8s-master service]#
11 [root@k8s-master service]# curl 10.99.50.81/hostname.html
12 myapp-deploy-5695bb5658-dcfw7
curl通过节点IP访问
 1 # 通过集群节点IP访问
 2 [root@k8s-master service]# curl 172.16.1.110:31682
 3 Hello MyApp | Version: v1 | <a href="hostname.html">Pod Name</a>
 4 [root@k8s-master service]#
 5 [root@k8s-master service]# curl 172.16.1.110:31682/hostname.html
 6 myapp-deploy-5695bb5658-2866m
 7 [root@k8s-master service]#
 8 [root@k8s-master service]# curl 172.16.1.110:31682/hostname.html
 9 myapp-deploy-5695bb5658-n2b5w
10 [root@k8s-master service]#
11 [root@k8s-master service]# curl 172.16.1.110:31682/hostname.html
12 myapp-deploy-5695bb5658-dcfw7
13 # 访问集群其他节点。每台机器都有LVS,和相关调度
14 [root@k8s-master service]# curl 172.16.1.111:31682/hostname.html
15 myapp-deploy-5695bb5658-dcfw7
16 [root@k8s-master service]#
17 [root@k8s-master service]# curl 172.16.1.112:31682/hostname.html
18 myapp-deploy-5695bb5658-dcfw7
访问日志查看
kubectl logs -f svc/myapp-nodeport
LoadBalancer类型示例
需要相关云厂商服务支持,这里就不表述了。
ExternalName类型示例
这种类型的Service通过返回CNAME和它的值,可以将服务映射到externalName字段的内容(例如:my.k8s.example.com;可以实现跨namespace名称空间访问)。ExternalName Service是Service的特例,它没有selector,也没有定义任何的端口和Endpoint。相反的,对于运行在集群外部的服务,它通过返回该外部服务的别名这种方式提供服务。
具体使用参见:「Kubernetes K8S之Pod跨namespace名称空间访问Service服务」
yaml文件
 1 [root@k8s-master service]# pwd
 2 /root/k8s_practice/service
 3 [root@k8s-master service]# cat myapp-svc-ExternalName.yaml
 4 apiVersion: v1
 5 kind: Service
 6 metadata:
 7   name: myapp-externalname
 8   namespace: default
 9 spec:
10   type: ExternalName
11   externalName: my.k8s.example.com
启动Service并查看状态
1 [root@k8s-master service]# kubectl apply -f myapp-svc-ExternalName.yaml
2 service/myapp-externalname created
3 [root@k8s-master service]#
4 [root@k8s-master service]# kubectl get svc -o wide
5 NAME                 TYPE           CLUSTER-IP   EXTERNAL-IP          PORT(S)   AGE   SELECTOR
6 kubernetes           ClusterIP      10.96.0.1    <none>               443/TCP   21d   <none>
7 myapp-externalname   ExternalName   <none>       my.k8s.example.com   <none>    21s   <none>
由上可见,类型变为了ExternalName
宿主机dig命令安装
yum install -y bind-utils
coredns记录信息如下
 1 # 其中 10.244.0.61 为 coredns IP
 2 # myapp-externalname.default.svc.cluster.local 为Service域名。格式为:$(service name).$(namespace).svc.cluster.local,其中 cluster.local 指定的集群的域名
 3 ##### 通过 nslookup 访问
 4 [root@k8s-master service]# nslookup myapp-externalname.default.svc.cluster.local 10.244.0.61
 5 Server:        10.244.0.61
 6 Address:    10.244.0.61#53
 7
 8 myapp-externalname.default.svc.cluster.local    canonical name = my.k8s.example.com.
 9 ** server can't find my.k8s.example.com: NXDOMAIN
10
11 [root@k8s-master service]#
12 ##### 通过 dig 访问
13 [root@k8s-master service]# dig -t A myapp-externalname.default.svc.cluster.local. @10.244.0.61
14
15 ; <<>> DiG 9.11.4-P2-RedHat-9.11.4-16.P2.el7_8.6 <<>> -t A myapp-externalname.default.svc.cluster.local. @10.244.0.61
16 ;; global options: +cmd
17 ;; Got answer:
18 ;; WARNING: .local is reserved for Multicast DNS
19 ;; You are currently testing what happens when an mDNS query is leaked to DNS
20 ;; ->>HEADER<<- opcode: QUERY, status: NOERROR, id: 39541
21 ;; flags: qr aa rd; QUERY: 1, ANSWER: 1, AUTHORITY: 0, ADDITIONAL: 1
22 ;; WARNING: recursion requested but not available
23
24 ;; OPT PSEUDOSECTION:
25 ; EDNS: version: 0, flags:; udp: 4096
26 ;; QUESTION SECTION:
27 ;myapp-externalname.default.svc.cluster.local. IN A
28
29 ;; ANSWER SECTION:
30 myapp-externalname.default.svc.cluster.local. 30 IN CNAME my.k8s.example.com.
31
32 ;; Query time: 2072 msec
33 ;; SERVER: 10.244.0.61#53(10.244.0.61)
34 ;; WHEN: Wed Jun 03 23:15:47 CST 2020
35 ;; MSG SIZE  rcvd: 149
ExternalIP示例
如果外部的 IP 路由到集群中一个或多个 Node 上,Kubernetes Service 会被暴露给这些 externalIPs。通过外部 IP(作为目的 IP 地址)进入到集群,打到 Service 端口上的流量,将会被路由到 Service 的 Endpoint 上。
externalIPs 不会被 Kubernetes 管理,它属于集群管理员的职责范畴。
根据 Service 的规定,externalIPs 可以同任意的 ServiceType 来一起指定。在下面的例子中,my-service 可以在【模拟外网IP】“10.0.0.240”(externalIP:port) 上被客户端访问。
yaml文件
 1 [root@k8s-master service]# pwd
 2 /root/k8s_practice/service
 3 [root@k8s-master service]# cat  myapp-svc-externalIP.yaml
 4 apiVersion: v1
 5 kind: Service
 6 metadata:
 7   name: myapp-externalip
 8   namespace: default
 9 spec:
10   selector:
11     app: myapp
12     release: v1
13   ports:
14   - name: http
15     port: 80
16     targetPort: 80
17   externalIPs:
18     - 10.0.0.240
启动Service并查看状态
1 [root@k8s-master service]# kubectl apply -f myapp-svc-externalIP.yaml
2 service/myapp-externalip created
3 [root@k8s-master service]#
4 [root@k8s-master service]# kubectl get svc -o wide
5 NAME               TYPE        CLUSTER-IP       EXTERNAL-IP   PORT(S)   AGE   SELECTOR
6 kubernetes         ClusterIP   10.96.0.1        <none>        443/TCP   22d   <none>
7 myapp-externalip   ClusterIP   10.107.186.167   10.0.0.240    80/TCP    8s    app=myapp,release=v1
查看ipvs信息
 1 [root@k8s-master service]# ipvsadm -Ln
 2 IP Virtual Server version 1.2.1 (size=4096)
 3 Prot LocalAddress:Port Scheduler Flags
 4   -> RemoteAddress:Port           Forward Weight ActiveConn InActConn
 5 ………………
 6 TCP  10.107.186.167:80 rr
 7   -> 10.244.2.115:80              Masq    1      0          0
 8   -> 10.244.2.116:80              Masq    1      0          0
 9   -> 10.244.4.105:80              Masq    1      0          0
10 ………………
11 TCP  10.0.0.240:80 rr
12   -> 10.244.2.115:80              Masq    1      0          0
13   -> 10.244.2.116:80              Masq    1      0          0
14   -> 10.244.4.105:80              Masq    1      0          0
curl访问,通过ClusterIP
 1 [root@k8s-master service]# curl 10.107.186.167
 2 Hello MyApp | Version: v1 | <a href="hostname.html">Pod Name</a>
 3 [root@k8s-master service]#
 4 [root@k8s-master service]# curl 10.107.186.167/hostname.html
 5 myapp-deploy-5695bb5658-n2b5w
 6 [root@k8s-master service]#
 7 [root@k8s-master service]# curl 10.107.186.167/hostname.html
 8 myapp-deploy-5695bb5658-2866m
 9 [root@k8s-master service]#
10 [root@k8s-master service]# curl 10.107.186.167/hostname.html
11 myapp-deploy-5695bb5658-dcfw7
curl访问,通过ExternalIP
 1 [root@k8s-master service]# curl 10.0.0.240
 2 Hello MyApp | Version: v1 | <a href="hostname.html">Pod Name</a>
 3 [root@k8s-master service]#
 4 [root@k8s-master service]# curl 10.0.0.240/hostname.html
 5 myapp-deploy-5695bb5658-2866m
 6 [root@k8s-master service]#
 7 [root@k8s-master service]# curl 10.0.0.240/hostname.html
 8 myapp-deploy-5695bb5658-dcfw7
 9 [root@k8s-master service]#
10 [root@k8s-master service]# curl 10.0.0.240/hostname.html
11 myapp-deploy-5695bb5658-n2b5w
相关阅读
1、Kubernetes K8S在IPVS代理模式下svc服务的ClusterIP类型访问失败处理
2、Kubernetes K8S之Pod跨namespace名称空间访问Service服务
3、kubernetes学习Service之headless和statefulSet结合
4、linuxea:kubernetes Headless Service无头服务
———END———
如果觉得不错就关注下呗 (-^O^-) !


 浙公网安备 33010602011771号