Flask
Flask
Flask
python web框架,本质都是一样的
-
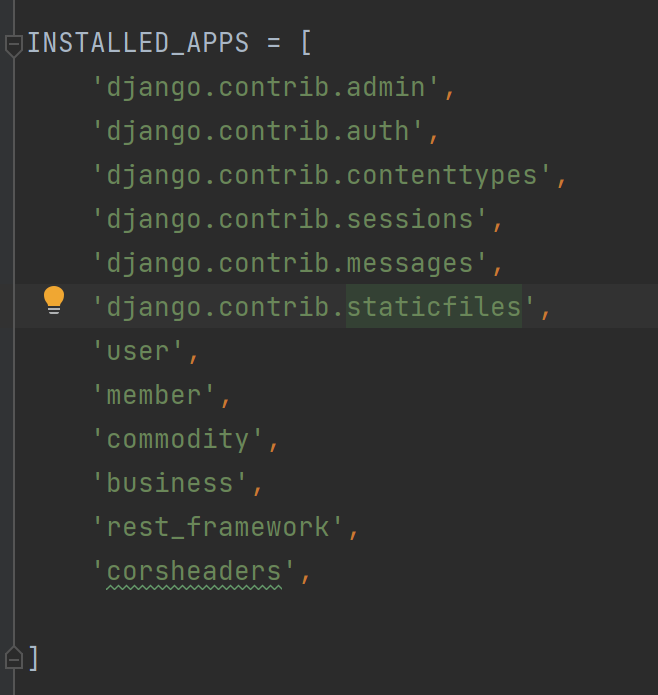
django:大而全,内置的app多,第三方app也多,django3.x也支持异步操作了
自带的应用:admin后台管理、auth身份鉴权、sessions会话管理
第三方app:Django Rest Framework、Django CORS Headers 、Django Bootstrap
-
Flask
小而精,没有过多的内置组件,只完成web框架最基本的功能,需要借助于第三方,完成更丰富的功能
-
web.py
是一个小巧灵活的Python框架,它简单而且功能强大(国内几乎没有用的)
-
fastapi
python的异步web框架,不少公司在用,https://fastapi.tiangolo.com/zh/
-
sanic
python的异步web框架,供支持异步高并发请求的 web 服务
-
tornado
异步框架,用的比较少了
# 同步框架和异步框架的区别
   1.djagno是同步框架还是异步框架,djagno 3.x以后支持异步
   2.同步框架:一个线程只处理一个请求
   3.异步框架:一个线程可以处理多个请求
   4.异步框架可以很显著的提高并发量

django的并发量是指usgi的线程数,线程的并发量就是协程,同步框架和异步框架对于用户来说,消耗的时间是一个样的。但异步框架的效率提高了。
flask介绍
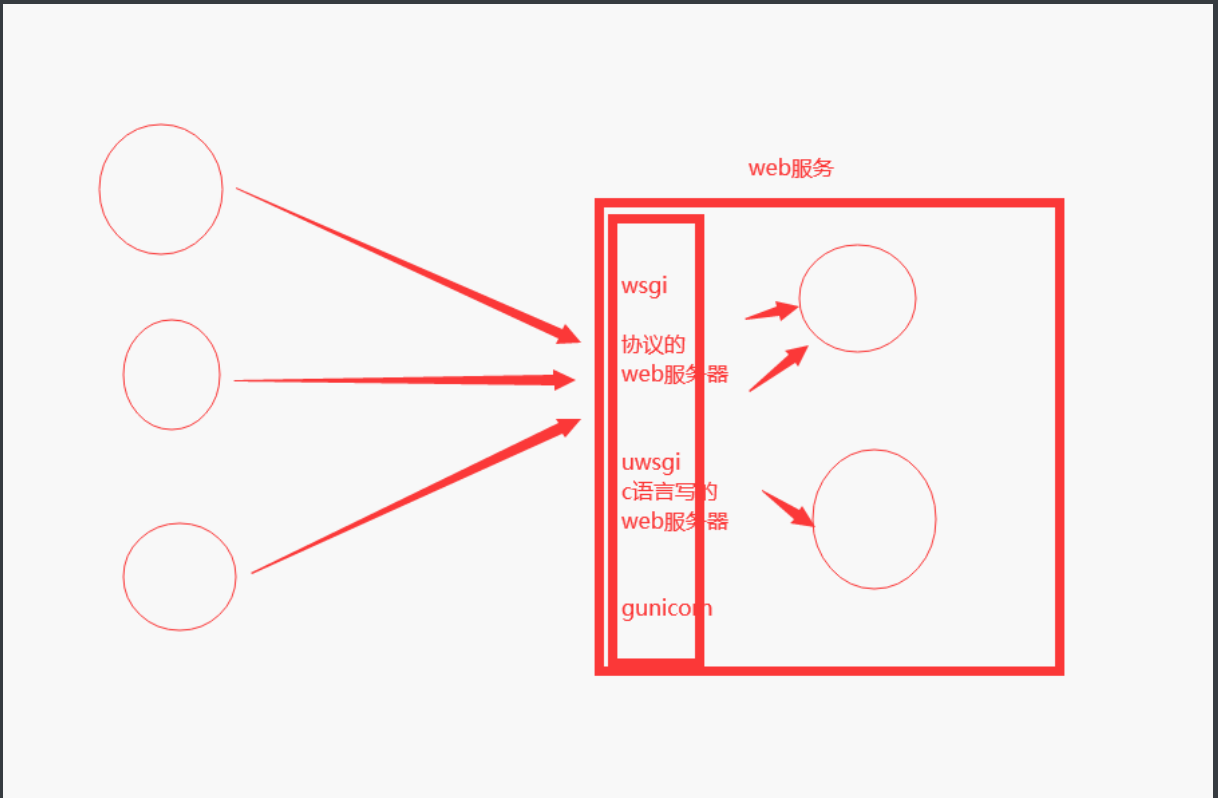
Flask是一个基于python开发并且依赖jinja2模板和werkzeug WSGI服务的一个微型框架
jinja2 模板语法,django的dtl,非常像
Werkzeug WSGI 符合wsgi协议的web服务器,django使用的是wsgiref

# 安装:    pip install flask
# 安装依赖: MarkupSafe, Werkzeug, Jinja2, flask
	-1.x 没有本质区别
     -2.x 没有本质区别,源码上动了,用起来一样
代码实现
"""wsgirf写web"""
from wsgiref.simple_server import make_server

##mya 等同于django
def mya(environ, start_response):
    #把environ包装成了request
    print(environ)
    start_response('200 OK', [('Content-Type', 'text/html')])
    if environ.get('PATH_INFO') == '/index':
        with open('index.html','rb') as f:
            data=f.read()

    elif environ.get('PATH_INFO') == '/login':
        with open('login.html', 'rb') as f:
            data = f.read()
    else:
        data=b'<h1>Hello, web!</h1>'
    return [data]  # 做成了response

if __name__ == '__main__':
    myserver = make_server('', 8008, mya)  #mya(environ, start_response)
    print('监听8010')
    myserver.serve_forever()


""" 使用werkzeug写web """
from werkzeug.wrappers import Request, Response
@Request.application
def hello(request):
    return Response('Hello World!')


if __name__ == '__main__':
    from werkzeug.serving import run_simple

    run_simple('localhost', 4000, hello) # hello是上面的函数
快速使用
from flask import Flask

app = Flask(__name__)  #__name__其实就是字符串

# app=Flask('test')

# 注册路由----路由在装饰器上
@app.route('/index')
def index():
    return 'hello web'

@app.route('/')
def hello_world():
    return 'Hello World!'


if __name__ == '__main__':
    # app.run('127.0.0.1',5000)
    app.run()
登录、显示用户信息小案例
flask小知识
1.注册路由
    app.route(路径,method=[请求方式get,post])
2.新手四件套:
    -render_template   渲染模板  跟django有区别
    -redirect    重定向
    -return  字符串 返回字符串---jsonify格式字符串
3.请求的request对象,是全局的request对象,直接导入使用即可,在不同的视图函数不会混乱
    request.method   请求方式
    request.form     post请求的body体的内容转换成了字典
4.session  全局的直接导入使用即可,一定要指定秘钥app.secret_key='shashoashofisj'
     放值:session['name']='kimi'
     取值: session.get('name')
5.模板的渲染
    -兼容django的dtl
    -更强大,可以加括号,字典取值多样(dict.get('')/dict['']/dict./dict.items()),而django只能dict.
    -{% for %}
6.转换器@app.route('/detail/<int:pk>')
案例
login.html
<form method="post">
    <p>username: <input type="text" name="username"></p>
    <p>password: <input type="text" name="password"></p>
    <input type="submit" value="登录">{{ error }}
</form>
home.html
<table>
    <h1>用户列表</h1>
    {% for k,v in user_dict.items() %}
    <tr>
        <td>{{ k }}</td>
        <td>{{ v.name }}</td>
        <td>{{ v['name'] }}</td>
        <td>{{ v.get('name') }}</td>
        <td><a href="/detail/{{ k }}">查看详细</a></td>
    </tr>
    {% endfor %}

</table>
detail.html
<body>
<p>姓名:{{ user.name }}</p>
<p>性别:{{ user.gender }}</p>
<p>年龄:{{ user.age }}</p>
<p>详情:{{ user.text }}</p>

</body>
app.py
from flask import Flask, request, render_template, redirect, session, jsonify

app = Flask(__name__)  # __name__其实就是字符串

# 要使用session,必须设置秘钥,秘钥是配置信息
# app.secret_key = 'asdfasdfa33aef3aefads'
app.secret_key = 'dsvsgsafdfdfsafefsdcz'

# app=Flask('test')

USERS = {
    1: {'name': '张三', 'age': 18, 'gender': '男', 'text': "道路千万条"},
    2: {'name': '李四', 'age': 28, 'gender': '男', 'text': "安全第一条"},
    3: {'name': '王五', 'age': 18, 'gender': '女', 'text': "行车不规范"},
}


# 注册路由----路由在装饰器上
# 1 创建templates文件夹,写login.html
@app.route('/login', methods=['GET', 'POST'])
def login():
    # 没有request对象,使用全局的request
    # get请求,返回模板
    if request.method == 'GET':
        return render_template('login.html')  # 新手四件套之一:返回模板
    else:
        # post请求,校验数据
        # 取出前端传入的用户名密码,校验
        username = request.form.get('username')
        password = request.form.get('password')
        if username == 'kimi' and password == '123':
            # 登录成功,保存登录状态 重定向到跟路径   新手四件套之一:重定向
            # 保存到session中,session是全局的
            session['name'] = username
            return redirect('/')
        else:
            return render_template('login.html', error='用户名或密码错误')  # 注意跟django的render区分,要模板渲染的数据,直接key=value传即可


@app.route('/')
def home():
    # 校验,登录成功,才能过来,不登录,重定向到登录页面
    if session.get('name'):
        return render_template('home.html', user_dict=USERS)
    else:
        return redirect('/login')


@app.route('/detail/<int:pk>')
def detail(pk):
    if session.get('name'):  # 有值说明登录了,没有值说明没有登录
        user_detail = USERS.get(pk)
        return render_template('detail.html', user=user_detail)
    else:
        return redirect('/login')

@app.route('/test')
def test():
    return jsonify([{'name':'kimi','age':19}])

if __name__ == '__main__':
    # app.run('127.0.0.1',5000)
    app.run()
配置文件方式
django的配置settings,分为开发环境和测试环境两个环境脚本,而flask配置方式多种:
方式一
文件直接设置debug和秘钥模式,仅这两种可以设置
 app.debug=True  # 调试模式,提示信息更详细,修改代码不需要重启,自动重启
 app.secret_key='dasdfasdfasd'  # 秘钥,只能 放debug和secret_key
方式二
# 直接使用app.config设置
app.config['DEBUG']=True
app.config['SECRET_KEY']='sdfasdfasd'
print(app.config)
方式三
# 使用py文件(不常用)
app.config.from_pyfile("settings.py")
 print(app.config)
方式四
# 常用的,使用类的方式
app.config.from_object(settings.DevelopmentConfig)
app.config.from_object(settings.ProductionConfig)
print(app.config)

# settings

class BASE(object):
    DEBUG=True
class ProductionConfig(BASE):
    DETABASE_URI='mysql://user@localhost/foo'
    SECRET_KEY='HSHHSHSHSH'
class DevelopmentConfig(BASE):
    DETABASE_URI='mysql://user@localhost/foo'
    SECRET_KEY='HOSHSHOHS'
其他方式
#通过环境变量配置
app.config.from_envvar("环境变量名称")

 # json
app.config.from_json("json文件名称")
JSON文件名称,必须是json格式,因为内部会执行json.loads

# 字典格式---》配置中心
app.config.from_mapping({'DEBUG': True})


# 内置的配置字段,其他可以写自己的,比如 redis的连接地址,mysql的连接地址
	-DEBUG
    -SECRET_KEY
    -SESSION_COOKIE_NAME
    -PERMANENT_SESSION_LIFETIME
路由系统
1.路由本质
django中配置路由,是在urls.py中书写path,
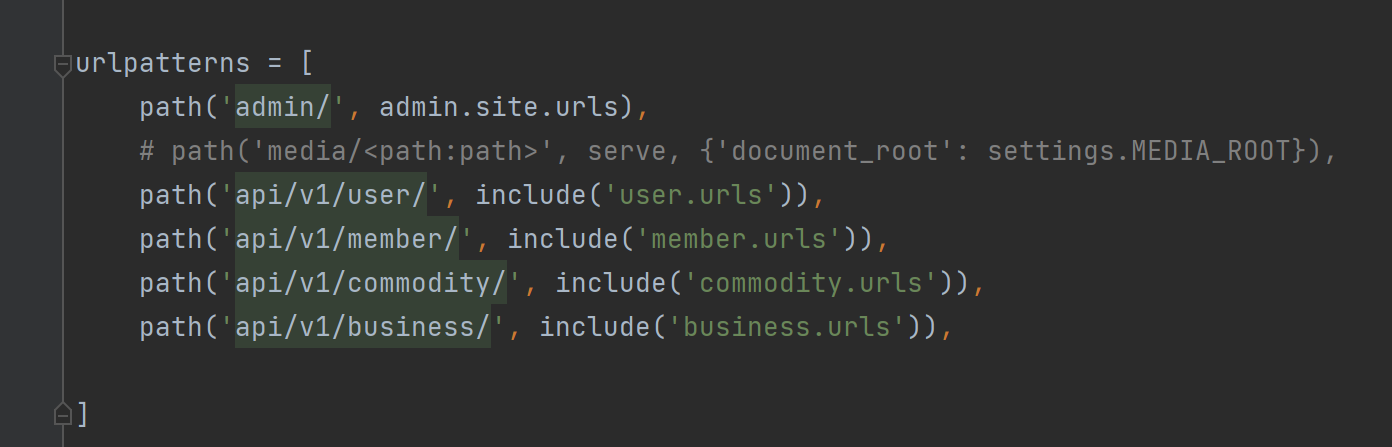
)
flask是基于装饰器的,大部分都用装饰器来做,少量可以抽取到一个urls.py中

路由源码分析
@app.route('/login')
def index():
    pass

1.本质是执行了index=app.route('/login')(index)
2.app.route('/login')的执行结果是 decorator函数
    -rule是路径
    -其他参数都给了options
3.执行decorator(index)
    def decorator(f: T_route) -> T_route:
        """
        # f是index
    	endpoint = options.pop("endpoint", None) # 目前没有endpoint,是None
        # 核心,本质--》self就是实例化得到的app对象,flask对象
        # app对象中有个方法add_url_rule,这是在添加路由
        # 不使用装饰器,自己注册路由
        self.add_url_rule(rule, endpoint, f, **options)
        return f
        """
            endpoint = options.pop("endpoint", None)
            self.add_url_rule(rule, endpoint, f, **options)
            return f

# 原本的函数  是一个闭包函数
def route(self, rule: str, **options: t.Any) -> t.Callable[[T_route], T_route]:
    def decorator(f: T_route) -> T_route:
         endpoint = options.pop("endpoint", None)
         self.add_url_rule(rule, endpoint, f, **options)
          return f

    return decorator
# 可以不使用装饰器的方式,注册路由
app.add_url_rule('/', endpoint=None, view_func=home, methods=['GET'])
flask路由的本质是app对象的add_url_rule完成路由的注册
2路由参数
# rule             URL规则
# view_func        视图函数名称
# defaults = None  默认值, 当URL中无参数,函数需要参数时,使用defaults = {'k': 'v'}为函数提供参数
# endpoint = None, 路径的别名,名称,用于反向解析URL,即: url_for('名称')
# methods = None, 允许的请求方式,如:["GET", "POST"]


#对URL最后的 / 符号是否严格要求strict_slashes
strict_slashes = None
    '''
        @app.route('/index', strict_slashes=False)
        #访问http://www.xx.com/index/ 或http://www.xx.com/index均可
        @app.route('/index', strict_slashes=True)
        #仅访问http://www.xx.com/index
    '''

#重定向到指定地址redirect_to
redirect_to = None,
    '''
        @app.route('/index/<int:nid>', redirect_to='/home/<nid>')
    '''


 # 需要记住的
    # rule
    # view_func
    # defaults
    # endpoint
    # methods
3.转换器
 'default':          UnicodeConverter,
 'string':           UnicodeConverter,
 'any':              AnyConverter,
 'path':             PathConverter,
 'int':              IntegerConverter,
 'float':            FloatConverter,
 'uuid':             UUIDConverter,

 # 了解:让路由支持正则(忽略掉)
CBV分析
1. 基于类的视图写法
from flask import Flask, request
from flask.views import MethodView

app = Flask(__name__)

app.debug = True


# 视图类,继承MethodView,类中写跟请求方式同名的方法即可,之前学的所有都一致
class IndexView(MethodView):
     decorators=[auth,] # 添加装饰器
    def get(self):
        print(request.method)
        return 'get 请求'

    def post(self):
        print(request.method)
        return 'post 请求'


# 添加路由
app.add_url_rule('/index', endpoint='index', view_func=IndexView.as_view('index'))

if __name__ == '__main__':
    app.run()
2. 源码分析
1. IndexView.as_view('index') 执行完的结果,是个函数(view的)内存地址
    def as_view(cls, name, *class_args, **class_kwargs):
        def view(**kwargs: t.Any) -> ft.ResponseReturnValue:
            # 本质是在执行self.dispatch_request,只是用了异步sync
           return current_app.ensure_sync(self.dispatch_request)(**kwargs)
        return view


2. 请求来了,执行view()--->本质在执行self.dispatch_request---》MethodView中的
    def dispatch_request(self, **kwargs):
        # self是视图类的对象
        meth = getattr(self, request.method.lower(), None)
        # 用异步执行meth()---ensure_sync
        return current_app.ensure_sync(meth)(**kwargs)


3. 总结:执行原理跟django一样


4. 路径如果不传别名,别名就是函数名---》分析一下源码
	-@app.route('/index')--》没有传endpoint
    -endpoint 就是None---》调用了app.add_url_rule,传入了None
    if endpoint is None:
       endpoint = _endpoint_from_view_func(view_func)  # type: ignore
	-_endpoint_from_view_func 就是返回函数的名字

5. as_view('index') 必须传参数,传进来的参数是【别名】
	# view是as_view内的内层函数,闭包函数
	view.__name__ = name  # 修改了函数的名字变成了你传入的

    # app.add_url_rule('/index',view_func=IndexView.as_view('index'))
    简写成:app.add_url_rule('/index',view_func=view)
    #如果不传参数, 所有人的别名(endpoint),都是内层函数view,所以就报错了


6. 补充:flask的路由注册使用装饰器,如果写了一个登录认证装饰器,那么应该放在路由装饰器上还是下?
	-放在路由下面
    -路由必须传endpoint,如果不传,又报错


7.  视图类必须继承MethodView,如果继承View,它的dispatch_request没有具体实现--》直接是抛异常,你的视图类必须重写dispatch_request,我们不想重写,继承MethodView
    def dispatch_request(self) -> ft.ResponseReturnValue:
        raise NotImplementedError()


8. 视图类加装饰器,直接配置在类属性上【decorators】即可
	decorators = [auth,]
    # 源码,cls是视图类,中有decorators
    if cls.decorators:
      for decorator in cls.decorators:
          view = decorator(view)  # view=auth(view)

# 源码学到的
	-1 as_view 执行流程跟djagno一样
    -2 路径如果不传别名,别名就是函数名(endpoint)
    -3 视图函数加多个装饰器(上下顺序和必须传endpoint)
    -4 视图类必须继承MethodView,否则需要重写dispatch_request
    -5 视图类加装饰器:类属性decorators = [auth,]
flask的路由注册使用装饰器

模板
py文件
from flask import Flask, request, render_template

app = Flask(__name__, template_folder='templates', static_folder='static')  # 模板的路径必须是templates,因为实例化app对象时,传入的

app.debug = True

def add(a, b):
    return a + b

@app.route('/', methods=['GET'])
def index():
    name = 'kimi'
    a = '<a href="http://www.baidu.com">点击跳转百度</a>'
    return render_template('index.html', add=add, name=name, a=a)

if __name__ == '__main__':
    app.run()
html
<!DOCTYPE html>
<html lang="en">
<head>
    <meta charset="UTF-8">
    <title>Title</title>
</head>
<body>
<h1>模板语法:static</h1>
<img src="/static/img.png" alt="" width="800" height="500">

<h1>模板语法:执行函数add</h1>
{{ add(9,8) }}

<h1>模板语法,if</h1>
{% if name %}
    <h1>hello {{ name }}</h1>
{% else %}
    <h1>hello world</h1>
{% endif %}

<h1>模板语法,a标签渲染</h1>
<a href="http://www.baidu.com">点击跳转百度</a>

{{ a|safe }} //a是字符串,需要过滤器safe过滤


</body>
</html>
请求与响应
请求是全局的request对象,响应就是四件套(render_template,redirect,jsonify,session)
from flask import Flask, request, render_template, redirect, jsonify,make_response

app = Flask(__name__, template_folder='templates', static_folder='static')  # 模板的路径必须是templates,因为实例化app对象时,传入的

app.debug = True


@app.route('/', methods=['GET', 'POST'])
def get():
    """
    # request.method  提交的方法
    # request.args  get请求提及的数据
    # request.form   post请求提交的数据
    # request.values  post和get提交的数据总和
    # request.cookies  客户端所带的cookie
    # request.headers  请求头
    # request.path     不带域名,请求路径
    # request.full_path  不带域名,带参数的请求路径
    # request.script_root
    # request.url           带域名带参数的请求路径
    # request.base_url    带域名请求路径
    # request.url_root      域名
    # request.host_url    域名
    # request.host       127.0.0.1:500
    """
    # print(request.method)  # GET
    # print(request.args)  # ImmutableMultiDict([('name', '123'), ('password', '123')])
    # print(request.form)  # ImmutableMultiDict([('', '')])
    # print(request.values)  # CombinedMultiDict([ImmutableMultiDict([('name', '123'), ('password', '123')])])
    # print(request.cookies)  # ImmutableMultiDict([])
    # print(request.headers)  # Host: 127.0.0.1:5000
    # print(request.path)  # /
    # print(request.full_path)  # /?name=123&password=123
    # print(request.url)  # http://127.0.0.1:5000/?name=123&password=123
    # print(request.base_url)  # http://127.0.0.1:5000/
    # print(request.host_url)  # http://127.0.0.1:5000/
    # print(request.host)  # 127.0.0.1:5000
    # return 'get请求与post请求'

    """ 上传文件,直接以文件名保存"""
    # obj=request.files['file']
    # obj.save(obj.filename)
    print('请求')

    """ 响应 """
    # 1 响应中写入cookie
    # response = 'hello'
    # res = make_response(response)  # flask.wrappers.Response
    # print(type(res))  # <class 'flask.wrappers.Response'>
    # res.set_cookie('xx','xx')  # cookies写入东西
    # return res
    # 2 响应头中写数据(新手四件套,都用make_response包一下)
    response = render_template('index1.html')
    res = make_response(response)  # flask.wrappers.Response
    print(type(res))  # <class 'flask.wrappers.Response'>
    res.headers['yy'] = 'yy'  # headers写入东西
    return res


if __name__ == '__main__':
    app.run()
session及源码分析
前端存session
from flask import Flask, request, session, render_template, redirect

app = Flask(__name__, template_folder='templates', static_folder='static')

app.debug = True
app.secret_key = '386889264265525772'


@app.route('/login', methods=['GET', 'POST'])
def login():
    if request.method == 'GET':
        return render_template('login.html')
    else:
        name = request.form.get('name')
        password = request.form.get('password')
        print(password)
        session['name'] = name
        return redirect('/index')

@app.route('/index', methods=['GET', 'POST'])
def index():
    return 'hello %s' % session.get('name', '匿名用户')


if __name__ == '__main__':
    app.run()
session源码分析
cookie是存于客户端浏览器的键值对,session是存在于服务端的键值对,而django是存放在django_session表中,而flask叫session,是加密后,放到了cookie中,如果session发生了变化,我们的cookie也会跟着变
# 源码部分:
1. app.session_interface  配置了一个类的对象,这个就是session的执行流程
2. 类中有两个非常重要的方法,请求来了,会执行open_session,请求走了会执行save_session
      def open_session(self, app, request) :
		#1 根据名字,取出前端传入的cookie的value值
        val = request.cookies.get(self.get_cookie_name(app))
        #2 如果没有val,构造了一个空session对象
        if not val:
            return self.session_class()
        max_age = int(app.permanent_session_lifetime.total_seconds())
        try:
            # 如果没有过期,解码,做成session对象,后续直接用session即可
            data = s.loads(val, max_age=max_age)
            return self.session_class(data)
        except BadSignature:
            # 如果过期了,也是空session
            return self.session_class()


    def save_session(self, app, session, response) :
        name = self.get_cookie_name(app)
		# 取出过期事件,和把session加密转成字符串,放到cookie中
        expires = self.get_expiration_time(app, session)
        val = self.get_signing_serializer(app).dumps(dict(session))
        response.set_cookie(
            name,
            val,
            expires=expires,
        )


# 扩展,想把session放到redis中,mysql中,已经有人帮咱们写了,第三方的
   只需要写个类,重写open_session,save_session自己写
session执行原理

闪现
# flash 翻译过来的
	- 当次请求先把一些数据,放在某个位置
    - 下一次请求,把这些数据取出来,取完,就没了

# 作用:
	1 可以跨请求,来保存数据
    2 当次请求,访问出错,被重定向到其他地址,重定向到这个地址后,拿到当时的错误


# djagno中有这个东西吗?
	-message框架
# 用法:
	-设置 闪现
    	-flash('%s,我错了'%name) ,可以设置多次,放到列表中
        -flash('超时错误',category="debug") 分类存
    -获取 闪现
    	-get_flashed_messages() ,取完就删除
        -get_flashed_messages(category_filter=['debug'])分类取


 # 本质,放到session中

请求扩展
# 请求扩展中:在请求来了,或请求走了,可以绑定一些函数,到这里就会执行这个函数,类似于django的中间件
# 在flask中就用请求扩展,来代替djagno的中间件

# 好几个请求扩展
    -before_request:请求来了会走,如果他返回了四件套,就结束了
    -after_request :请求走了会走,一定要返回response对象
    -before_first_request:第一次来了会走
    -teardown_request:无论是否出异常,会走
    -errorhandler:监听状态码,404  500
    -template_global:标签
    -template_filter:过滤器
代码展示
from flask import Flask, request,render_template

app = Flask(__name__)

#1 before_request 和 after_request
@app.before_request
def before():
    print('我来了')
    # if 'index' in request.path:
    return 'before'# 如果不是retrun了None,说明被拦截了,直接返回


@app.before_request
def before1():
    print('我来了222')

# 请求走了,执行一个函数,走的时候,从下往上执行
@app.after_request
def after(response):
    print('我走了111')
    return response

# 2 项目启动后的第一个请求
@app.before_first_request  # 只有第一次请求来的是会走
def first():
    print('第一次请求')

# 3 teardown_request,无论视图函数是否出错,都会执行它,做错误日志
@app.teardown_request
def teardown(e):
    print(e)
    print('执行了teardown_request')

# 4 errorhandler  监听响应状态码,如果符合监听的状态码,就会走它
@app.errorhandler(404)
def error_404(arg):
    return '404错误了'

@app.errorhandler(500)
def error_500(arg):
    return '500错误了'

##5 template_global  在模板中直接使用该过滤器
@app.template_global()
def add(a1, a2):
    return a1 + a2

# 6 template_filter
@app.template_filter()
def db(a1, a2, a3):
    return a1 + a2 + a3


@app.route('/')
def index():
    # a = [1, 2, 3]
    # print(a[9])
    return render_template('index1.html')


if __name__ == '__main__':
    app.run()
蓝图
blueprint释义 '蓝图'
作用:全在一个py中写flask项目,后期肯定要划分目录,为了方便项目的应用。
1.不用蓝图,划分目录
    little_blueprint              # 项目名
        -src                      # 核心代码
            -static               # 静态文件
                -1.jpg            # 图片
            -templates            # 模板文件
            -user.html            # 模板
            -views                # 视图函数存放位置
                -order.py         # 订单相关视图
                -user.py          # 用户相关视图
            -__init__.py          # 包
            -models.py            # 表模型
        -manage.py                # 启动文件

2.使用蓝图划分小型项目目录
使用蓝图的步骤
1.导入蓝图类
    from flask import Blueprint
2. 实列化得到蓝图对象
	user_bp=Blueprint('user',__name__)  # user是app名字
3.在app中注册蓝图
	app.register_blueprint(user_bp)
 4. 在不同的view.py使用蓝图注册路由
	@user_bp.route('/login')

补充:
    1. 蓝图可以有自己的静态文件和模板
    2.在注册蓝图时,可以使用前缀,必须要以/开头
使用蓝图划分小型项目目录
    # 静态文件和模板文件是在总目录路面
    little_blueprint              # 项目名
        -src                      # 核心代码
            -static               # 静态文件
                -1.jpg            # 图片
            -templates            # 模板文件
            	-user.html            # 模板
            -views                # 视图函数存放位置
                -order.py         # 订单相关视图
                -user.py          # 用户相关视图
            -__init__.py          # 包
            -models.py            # 表模型
        -manage.py                # 启动文件

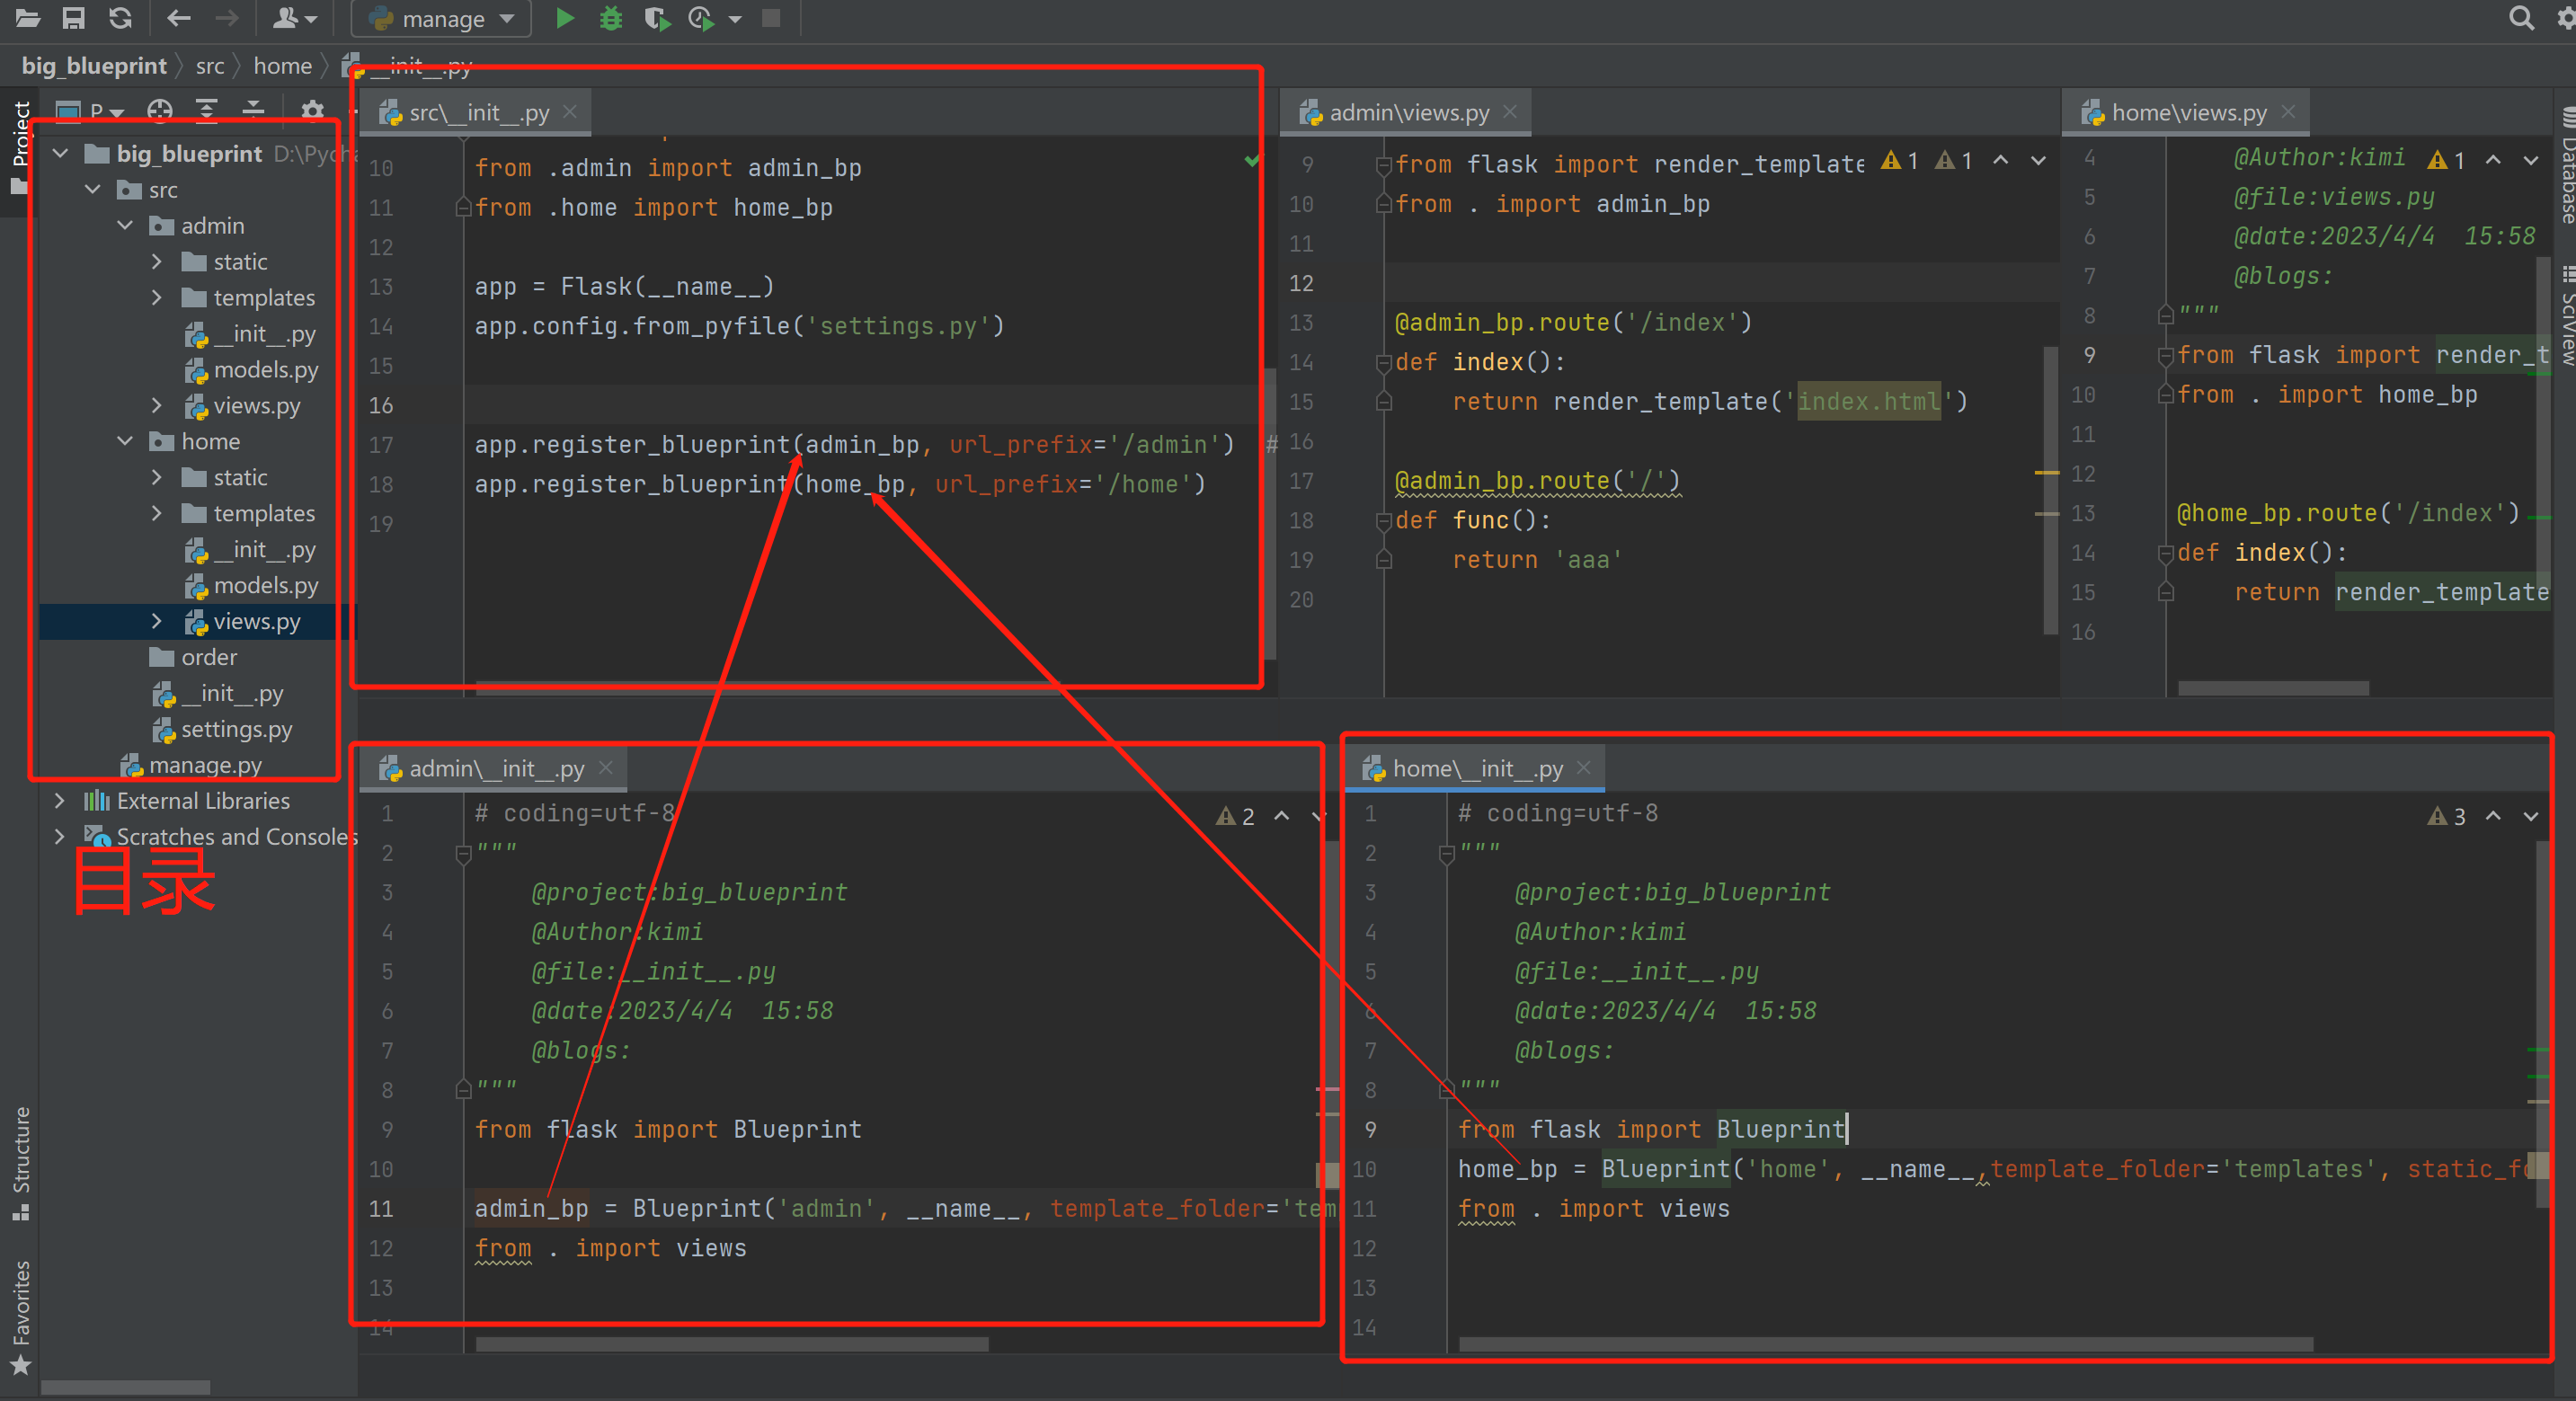
3.使用蓝图划分大型项目目录
# 静态文件和模板分别是在各自的app里面

big_blueprint  			# 项目名
    -src			 # 核心文件
        -admin			 # admin的app
            -static		 # 静态文件
                -1.jpg		 # 图片
            -templates		 # 模板文件目录
                -admin_home.html# 模板文件
            -__init__.py	 # 包
            -models.py		 # 表模型
            -views.py		 # 视图函数
         -home			 # home app
         -order			 # orderapp
         -__init__.py		 # 包
         -settings.py		 # 配置文件
    -manage.py				 # 启动文件
总结:
1 xxx = Blueprint('account', name,url_prefix='/xxx') :蓝图URL前缀,表示url的前缀,在该蓝图下所有url都加前缀
2 xxx = Blueprint('account', name,url_prefix='/xxx',template_folder='tpls'):给当前蓝图单独使用templates,向上查找,当前找不到,会找总templates
3 蓝图的befort_request,对当前蓝图有效
g对象
g对象是什么?
专门用来存储用户信息的g对象,g的全称的为global
- global的缩写在python中是个关键字,但是python中是不能以关键字命名变量名的,所以直接使用首字母作为g对象。
- g对象,在整个请求的全局中,可以放值,也可以取值。
- 是全局变量,在任意位置导入使用即可
为什么不和django的request作为上下文管理?
-
使用request,可能会造成request的数据污染,不小心改了request的属性,但是不知道的情况下,会造成request的数据混乱
eg:使用request作为全局变量 # 不小心修改了requset.method=DELETE requset.method=DELETE 使用的时候,访问了方法就会造成数据污染 -
建议使用g 是空的,放入之后再当次请求中全局优先
-
在当次请求中,放入一些数据,后面想使用就可以直接g对象

g和session有什么区别?
1 . g 是只针对当次请求,用完之后直接清空
session针对多次请求,session对于当前请求人多次请求都能拿到
代码展示
from flask import Flask,g,request
app = Flask(__name__)

@app.before_request
def before():
    if 'home' in request.path:
        g.xx='xx'

def add(a,b):
    # print('-----',g.name)
    print('-----',request.name)  #
    return a+b

@app.route('/index')
def index():
    # print(g.xx)  # 点属性,拿不到会报错
    name=request.args.get('name')
    # g.name=name
    request.method=name  # 导致数据混乱
    res = add(1,2)
    print(res)
    return 'index'


@app.route('/home')
def home():
    print(g.xx)
    return 'Hello World!'

if __name__ == '__main__':
    app.run()
数据库连接池
flask操作数据库mysql
- 使用pymysql
- 在视图函数中,创建pymysql的连接,查数据,将数据返回给前端
存在的问题?
-
前端发送一个请求,就创建一个连接,请求结束,连接关闭 ---django就是这样的
-
把连接对象做成全局的,在视图函数,使用全局的连接,查询后将数据返回给前端,这样会导致数据出现错乱。如下图所示:当第一个请求查询文章的数据的过程中,又来了查询book的请求,都使用全局的连接,查完返回前端的是book的数据,文章的数据压根没拿到,导致查询的数据出现错乱。

解决上述两个问题的方案
- 建立数据库连接池
- 创建一个全局的池
- 每次进入视图函数,从池中去一个连接使用,使用完放回池中,只要控制池的大小,就能控制mysql连接数。
下面是使用第三方数据库连接池的步骤
1.安装
     pip  install dbutils

2. 使用:实例化得到一个池对象‘pool’---作为一个单例对象
     from dbutils.pooled_db import PooledDB
     import pymysql

    pool = PooledDB(
        creator=pymysql,  # 使用链接数据库的模块
        maxconnections=10,  # 连接池允许的最大连接数,0和None表示不限制连接数
        mincached=2,  # 初始化时,链接池中至少创建的空闲的链接,0表示不创建
        maxcached=5,  # 链接池中最多闲置的链接,0和None不限制
        maxshared=3,
        # 链接池中最多共享的链接数量,0和None表示全部共享。PS: 无用,因为pymysql和MySQLdb等模块的 threadsafety都为1,所有值无论设置为多少,_maxcached永远为0,所以永远是所有链接都共享。
        blocking=True,  # 连接池中如果没有可用连接后,是否阻塞等待。True,等待;False,不等待然后报错
        maxusage=None,  # 一个链接最多被重复使用的次数,None表示无限制
        setsession=[],  # 开始会话前执行的命令列表。如:["set datestyle to ...", "set time zone ..."]
        ping=0,
        # ping MySQL服务端,检查是否服务可用。# 如:0 = None = never, 1 = default = whenever it is requested, 2 = when a cursor is created, 4 = when a query is executed, 7 = always
        host='127.0.0.1',
        port=3306,
        user='kimi',
        password='Kimi123?',
        database='luffy',
        charset='utf8'

    )
3.在视图函数中导入使用
    conn = pool.connection()
    cursor = conn.cursor(pymysql.cursors.DictCursor)  # 将((),())转换成[{},{}]
    cursor.execute('select id,create_time,name,brief from luffy_course limit 2')
    res = cursor.fetchall()
代码展示
from flask import Flask, jsonify
import pymysql

app = Flask(__name__)
app.debug = True

# @app.route('/course')
# def course():
#     # 从mysql的db库的购物车表中取出两条数据
#     conn = pymysql.connect(user='kimi', password='Kimi123?', host='127.0.0.1',
#                            port=3306, database='luffy'
#
#                            )
#     # cursor = conn.cursor()  # ((),(),(),)
#     cursor = conn.cursor(pymysql.cursors.DictCursor)  # [{},{},{}]
#     # cursor.execute('select * from luffy_course limit 2')  # 只拿两条
#     cursor.execute('select id,create_time,name,brief from luffy_course limit 2')  # 只拿两条
#     res = cursor.fetchall()  # 拿所有的数据
#     print(res)
#     return jsonify(res)


""" 使用池"""
from POOL import pool
import random
import time


@app.route('/course_pool')
def course_pool():
    conn = pool.connection()
    cursor = conn.cursor(pymysql.cursors.DictCursor)
    time.sleep(random.randint(1,3))
    cursor.execute('select id,create_time,name,brief from luffy_course limit 2')
    res = cursor.fetchall()
    print(res)
    return jsonify(res)


# 不使用连接池
@app.route('/course')
def course():
    conn = pymysql.connect(user='kimi', password='Kimi123?', host='127.0.0.1',
                           port=3306, database='luffy')
    cursor = conn.cursor(pymysql.cursors.DictCursor)
    time.sleep(random.randint(1,3))
    cursor.execute('select id,create_time,name,brief from luffy_course limit 2')
    res = cursor.fetchall()
    print(res)
    cursor.close()
    conn.close()
    return jsonify(res)


# 压力测试代码
from threading import Thread
import requests


def task():
    res = requests.get('http://127.0.0.1:5000/course')
    print(len(res.text))


if __name__ == '__main__':
    for i in range(500):
        t = Thread(target=task)
        t.start()

# 效果:使用池的连接数明显小,不使用池连接数明显很大
# 查看数据库连接数
   show status like 'Threads%'


 浙公网安备 33010602011771号