drf之认证组件、权限组件、频率组件、过滤、排序、分页
认证组件
访问某个接口,需要登录后才能访问
编写模型表
class User(models.Model):
    username = models.CharField(max_length=32)
    password = models.CharField(max_length=32)
    user = models.OneToOneField(to='UserToken', on_delete=models.CASCADE, null=True)


class UserToken(models.Model):  # 跟User是一对一
    token = models.CharField(max_length=32)
    # user :反向,表名小写,所有有user字段
登录接口
路由
router.register('user', views.UserView, 'user') # /api/v1/user/login post
视图类
from .models import User, UserToken
import uuid

#  登录接口  自动生成路由+由于登录功能,不用序列化,继承ViewSet
class UserView(ViewSet):
    @action(methods=['POST'],detail=False)
    def login(self, request):
        print(request.data)
        username = request.data.get('username')
        password = request.data.get('password')
        user = User.objects.filter(username=username, password=password).first()
        print(user)
        if user:

            # 用户存在,登录成功
            # 生成一个随机字符串---uuid
            token = str(uuid.uuid4())  # 生成一个永不重复的随机字符串
            """
            # 在userToken表中存储一下,
            1.从未登录过>>插入一条数据   新增
            2.登录过>>修改数据    可用if判断
            根据kwargs,传入的东西查找,能找到就使用defaults的更新,否则就新增一条
            """
            UserToken.objects.update_or_create(user=user, defaults={'token': token})
            return Response({'code': '100', 'msg': '登录成功', 'token': token})
        else:
            return Response({'code': '101', 'msg': '用户名或密码错误'})
认证功能
五个视图子类如何自动生成路由
ViewSetMixin+List+update+GenericAPIView 可以写到一个视图类中
自动生成路由+5个视图扩展类+GenericAPIView------>一个视图类
登录认证限制
登录认证的限制:有些接口需要登录之后才能访问,开发的接口不需要登录就能访问。
需求
编写一个登录接口,返回token,只要带着token过来,就是登录了,不带就是没有登录。
1.查询所有不需要登录就能访问
2.查询单个,需要登录才能访问
使用步骤
-
写一个认证类,继承
BaseAuthentication -
重写
authenticate方法,在该方法中实现登录认证,思考
token在哪里携带的,如何认证是否登录过? -
如果认证成功,返回两个值【返回None或两个值】
-
认证不通过,抛异常
AuthenticationFailed -
局部使用和全局使用
# 局部使用:只在某个视图类中使用【当前视图类管理的所有接口】
    class BookDetailView(ViewSetMixin,RetrieveAPIView):
        authentication_classes = [LoginAuth]


# 全局使用:全局所有接口都生效(登录接口可以局部禁用)
    REST_FRAMEWORK = {
        'DEFAULT_AUTHENTICATION_CLASSES':
        ['app01.authenticate.LoginAuth']
    }

# 局部禁用
    class BookDetailView(ViewSetMixin,RetrieveAPIView):
        authentication_classes =[]
代码实现
路由
# 自动生成路由
router.register('books',views.BookView,'books')
router.register('books',views.BookDetailView,'books')
认证类代码
# 认证类代码
from rest_framework.authentication import BaseAuthentication
from rest_framework.exceptions import AuthenticationFailed
from .models import UserToken

class LoginAuth(BaseAuthentication):
    def authenticate(self, request):
    """
     def authenticate(self, request):
        '''Authenticate the request and return a two-tuple of (user, token)'''
            raise NotImplementedError(".authenticate() must be overridden.")
        """
        # 在这里实现认证,如果是登录的,最后返回两个值,报错直接抛异常
        # 请求中是否携带token,判断是否登录,放在地址栏中
        token = request.query_params.get('token')
        if token:  # 前端传入token了,去表中查,如果能查到,登录了,返回两个值[固定的:当前登录用户,token]
            user_token = UserToken.objects.filter(token=token).first()
            if user_token:
                return user_token.user,token
            else:
                # 没有登录抛异常
                raise AuthenticationFailed('token认证失败')
        else:
            raise AuthenticationFailed('token没传')
视图
# 查询所有
class BookView(ViewSetMixin,ListAPIView):  # 不需要认证
    queryset = Book.objects.all()
    serializer_class = BookSerializer


class BookDetailView(ViewSetMixin,RetrieveAPIView):  # 需要认证才能访问
    queryset = Book.objects.all()
    serializer_class = BookSerializer
    # authentication_classes=[LoginAuth]  # 需要写一个认证类
注意,不要再配置文件乱导入不使用的东西,否则没有加载过就使用会直接报错。
权限组件
用户登录成功了,有些接口还是不能访问,因为没有权限去访问。
三种权限:
        -ACL:访问控制列表
        -rbac:公司内部系统,基于角色的访问控制
        -abac:rbac升级版,加了属性认证
需求
- 查询单个和查询所有,都需要登录后才能访问---->使用全局认证
查询单个需要超级管理员才能访问,查询所有是所有登录用户都能访问的,权限是一个字段,在user表中,加入user_type字段
使用权限的步骤
-
写一个权限类,继承
BasePermission -
重写
has_permission方法,在该方法中实现权限认证,在这方法中,request.user就是当前登录用户 -
如果有权限,返回
True -
没有权限,返回
False,定制返回的中文:self.message='中文' -
局部使用和全局使用
# 局部使用:只在某个视图类中使用【当前视图类管理的所有接口】
    class BookDetailView(ViewSetMixin,RetrieveAPIView):
        permission_classes = [CommonPermission]

# 全局使用:全局所有接口都生效(登录接口可以局部禁用)
    REST_FRAMEWORK = {
        'DEFAULT_PERMISSION_CLASSES':
        ['app01.permissions.CommonPermission']
    }

# 局部禁用
    class BookDetailView(ViewSetMixin,RetrieveAPIView):
        permission_classes =[]
代码展示
权限类代码
from rest_framework.permissions import BasePermission
class CommonPermission(BasePermission):
    def has_permission(self,request,view):
        """def has_permission(self, request, view):
        '''
        Return `True` if permission is granted, `False` otherwise.
        '''
        这个函数返回值是TRUE或是False
        """
        # 实现权限的控制---》知道当前登录用户是谁,当前登录用户request.user
        if request.user.user_type==1:
            return True
        else:
            # 没有权限,向对象放一个属性message
            # 如果表模型中,使用了choice,就可以通过,get_字段名_display()
            self.message = '您是【%s】,您没有权限' % request.user.get_user_type_display()
            return False
视图
from app01.permission import CommonPermission
# 查询所有
class BookView(ViewSetMixin,ListAPIView):
    queryset = Book.objects.all()
    serializer_class = BookSerializer
    authentication_classes = []  # 局部禁止

class BookDetailView(ViewSetMixin,RetrieveAPIView):
    queryset = Book.objects.all()
    serializer_class = BookSerializer
    permission_classes = [CommonPermission]  # 需要编写一个权限
频率组件
控制某个接口访问频率(次数)
需求
- 查询所有接口,同一个ip一分钟只能访问5次
使用频率组件的步骤
-
写一个频率类,继承
SimpleRateThrottle -
重写
get_cache_key方法,返回什么就以什么做限制--用户id做限制 -
配置一个类属性:
scope='book_5_m' -
在配置文件配置
'DEFAULT_THROTTLE_RATES':{ 'book_5_m':'5/m' } # h-小时 m-分钟 s-秒 -
局部使用和全局使用
# 局部使用:只在某个视图类中使用【当前视图类管理的所有接口】
    class BookDetailView(ViewSetMixin,RetrieveAPIView):
        throttle_classes = [Commonthrottle]

# 全局使用:全局所有接口都生效(登录接口可以局部禁用)
    REST_FRAMEWORK = {
        'DEFAULT_PERMISSION_CLASSES':
        ['app01.throttling.CommonThrottle']
    }

    REST_FRAMEWORK = {
    # Throttling
        'DEFAULT_THROTTLE_RATES': {
        'kiki': '5/m',  # 一分钟只能访问5次
    },
    'DEFAULT_THROTTLE_CLASSES': ['app01.throttling.CommonThrottle'],
}

# 局部禁用
    class BookDetailView(ViewSetMixin,RetrieveAPIView):
        permission_classes =[]
代码展示
# 频率类,不继承BaseThrottle,继承SimpleRateThrottle
from rest_framework.throttling import BaseThrottle, SimpleRateThrottle

class CommonThrottle(SimpleRateThrottle):
    # 类属性,属性值随便写
    # 配置文件中配置
    scope = 'kiki'  # kiki和配置的uer要一致

    def get_cache_key(self, request, view):
        # 返回什么,就以什么做频率限制【可以返回ip  或用户ID】
        # 客户端的ip地址从哪里拿?
        return request.META.get('REMOTE_ADDR')  # 以ip做限制
        # return request.user.pk  # 以用户id做限制
过滤排序
restful规范中,要求请求地址中带过滤条件,五个接口中,只有查询所有接口需要过滤和排序。
需求
1.查询所有图书接口,查以 ’ 三 ‘ 开头的所有图书
三种过滤器
继承APIView 自己补齐
class BookView(APIView):
    def get(self,request):
        search=request.query_params.get('search')
        books=Book.objects.filter()
内置过滤器的使用(继承GenericAPIView)
视图类
 # 过滤,必须继承GenericAPIView及其子类,才能使用这种方法---》配置过滤类的方式
from rest_framework.filters import SearchFilter
class BookView(ViewSetMixin,ListAPIView):
	queryset = Book.objects.all()
	serializer_class = BookSerializer
    """ 前面配置了权限,认证,频率,这里需要取消掉"""
    permission_classes = []
    authentication_classes = []
    throttle_classes = []
	# SerchFilter内置的,固定用法,模糊匹配
	# 就有了过滤功能了,指定哪个字段过滤
    # search_fields = ['name']  # 可以按名字模糊匹配
	filter_fields =['name','price']  # 可以按名字模糊匹配或价格模糊匹配


    # 可以使用的搜索方法
    1.http://127.0.0.1:8000/api/v1/books/?name=红  # name只要有红就会搜出来
	2.http://127.0.0.1:8000/api/v1/books/?search=红  # name或price中只要有红就会搜出来
使用第三方django-filter实现过滤
安装:django-filter
pip3.8 install django-filter -i https://pypi.tuna.tsinghua.edu.cn/simple/
视图类
# 使用第三方djagno_filter过滤器
from django_filters.rest_framework import DjangoFilterBackend
class BookView(ViewSetMixin, ListAPIView):
    queryset = Book.objects.all()
    serializer_class = BookSerializer
    permission_classes = []
    authentication_classes = []
    throttle_classes = []
    # 第三方过滤器
    filter_backends = [DjangoFilterBackend]
    # 就有了过滤功能了,指定哪个字段过滤
    # filterset_fields = ['price']
    filterset_fields =['name','price']  # 支持完整匹配 name=红楼梦$price=345

    # 支持的查询方式
http://127.0.0.1:8000/api/v1/books/?price=345
http://127.0.0.1:8000/api/v1/books/?price=345&name=红楼梦
自己定制过滤实现过滤
查询价格大于100的所有图书
http://127.0.0.1:8000/api/v1/books/?price_gt=100
-
定义一个过滤器,继承
BaseFileterBackend,重写filter_queryset方法,from rest_framework.filters import BaseFilterBackend class CommonFilter(BaseFilterBackend): def filter_queryset(self, request, queryset, view): # 在里面实现过滤,返回qs对象,就是过滤后的数据 price_gt = request.query_params.get('price_gt', None) if price_gt: qs = queryset.filter(price__gt=int(price_gt)) # 注意price字段类型 return qs else: return queryset注意:下载django-filter会将django版本升为最新版本
-
配置在视图类上
from .filter import CommonFilter
from rest_framework.filters import OrderingFilter
class BookView(ViewSetMixin, ListAPIView):
    queryset = Book.objects.all()
    serializer_class = BookSerializer
    permission_classes = []
    authentication_classes = []
    throttle_classes = []
    # 第三方过滤器
    filter_backends = [OrderingFilter,CommonFilter]  # 可以定制多个,从左到右依次执行
    ordering_fields =['price']
排序的使用
from rest_framework.filters import OrderingFilter
class BookView(ViewSetMixin, ListAPIView):
    queryset = Book.objects.all()
    serializer_class = BookSerializer
    permission_classes = []
    authentication_classes = []
    throttle_classes = []
    filter_backends = [OrderingFilter]  # 可以定制多个,从左到右依次执行
    ordering_fields =['price']

# 支持查询方法
    http://127.0.0.1:8000/api/v1/books/?ordering=price  # 升序
    http://127.0.0.1:8000/api/v1/books/?ordering=-price #降序
   http://127.0.0.1:8000/api/v1/books/?ordering=-id,price
分页
分页只针对查询所有的接口,其他四个接口不需要分页。drf内置了三个分页器,对应三种分页方式,内置的分页类不能直接使用,需要继承,定制一些参数后才能使用。一个接口只能有一种分页方式,不能混合分页方式
分页类
from rest_framework.pagination import PageNumberPagination,LimitOffsetPagination,CursorPagination
# 网页用它
class CommonPageNumberPagination(PageNumberPagination):
    page_size = 2 # 每页显示2条
    page_query_param = 'page'  # page=10  查询10页的数据,每页显示2条
    page_size_query_param = 'size'  # page=10&size=5
    max_page_size = 5 # 每页最大显示10条

# LimitOffset
class CommonLimitOffsetPagination(LimitOffsetPagination):
    default_limit=3 # 每页显示2条
    limit_query_param = 'limit'  # limit=3  取三条
    offset_query_param = 'offset' # offset=1  从第一个位置开始,取limit条
    max_limit = 5
    # offset=3&limit=2    0 1 2 3 4 5 /


# app 用下面
class CommenCursorPagination(CursorPagination):
    cursor_query_param = 'cursor'  # 查询参数
    page_size = 2  # 每页多少条
    ordering = 'id'  # 排序字段
视图类
from .page import CommonPageNumberPagination as PageNumberPagination  # 取别名
from .page import CommonLimitOffsetPagination
from .page import CommenCursorPagination
class BookView(ViewSetMixin, ListAPIView):
    queryset = Book.objects.all()
    serializer_class = BookSerializer
    permission_classes = []
    authentication_classes = []
    throttle_classes = []
    # 之前的东西一样用 ,内置的分页类不能直接使用,需要继承,定制一些参数后才能使用
    # pagination_class=PageNumberPagination
    # 基本分页方式(基本是这种,网页端):http://127.0.0.1:8000/api/v1/books/?page=2&size=1

    # pagination_class = CommonLimitOffsetPagination
    #   偏移分页  http://127.0.0.1:8000/api/v1/books/?Iimit=2&offset=1
    # 从第一条开始,取2条

    pagination_class = CommenCursorPagination
    # 游标分页,只能下一页,上一页,不能跳到中间,但它的效率很高,大数量分页,使用这种最好
认证、权限、频率源码分析
权限类的执行源码
权限的执行流程
写一个权限类,局部使用,配置在视图类的,就会执行权限类的has_permission方法,完成权限校验。
权限的源码执行流程
drf的APIView三大认证是在执行视图类的方法之前就执行了三大认证,也就是APIView中的dispatch方法中的self.initial

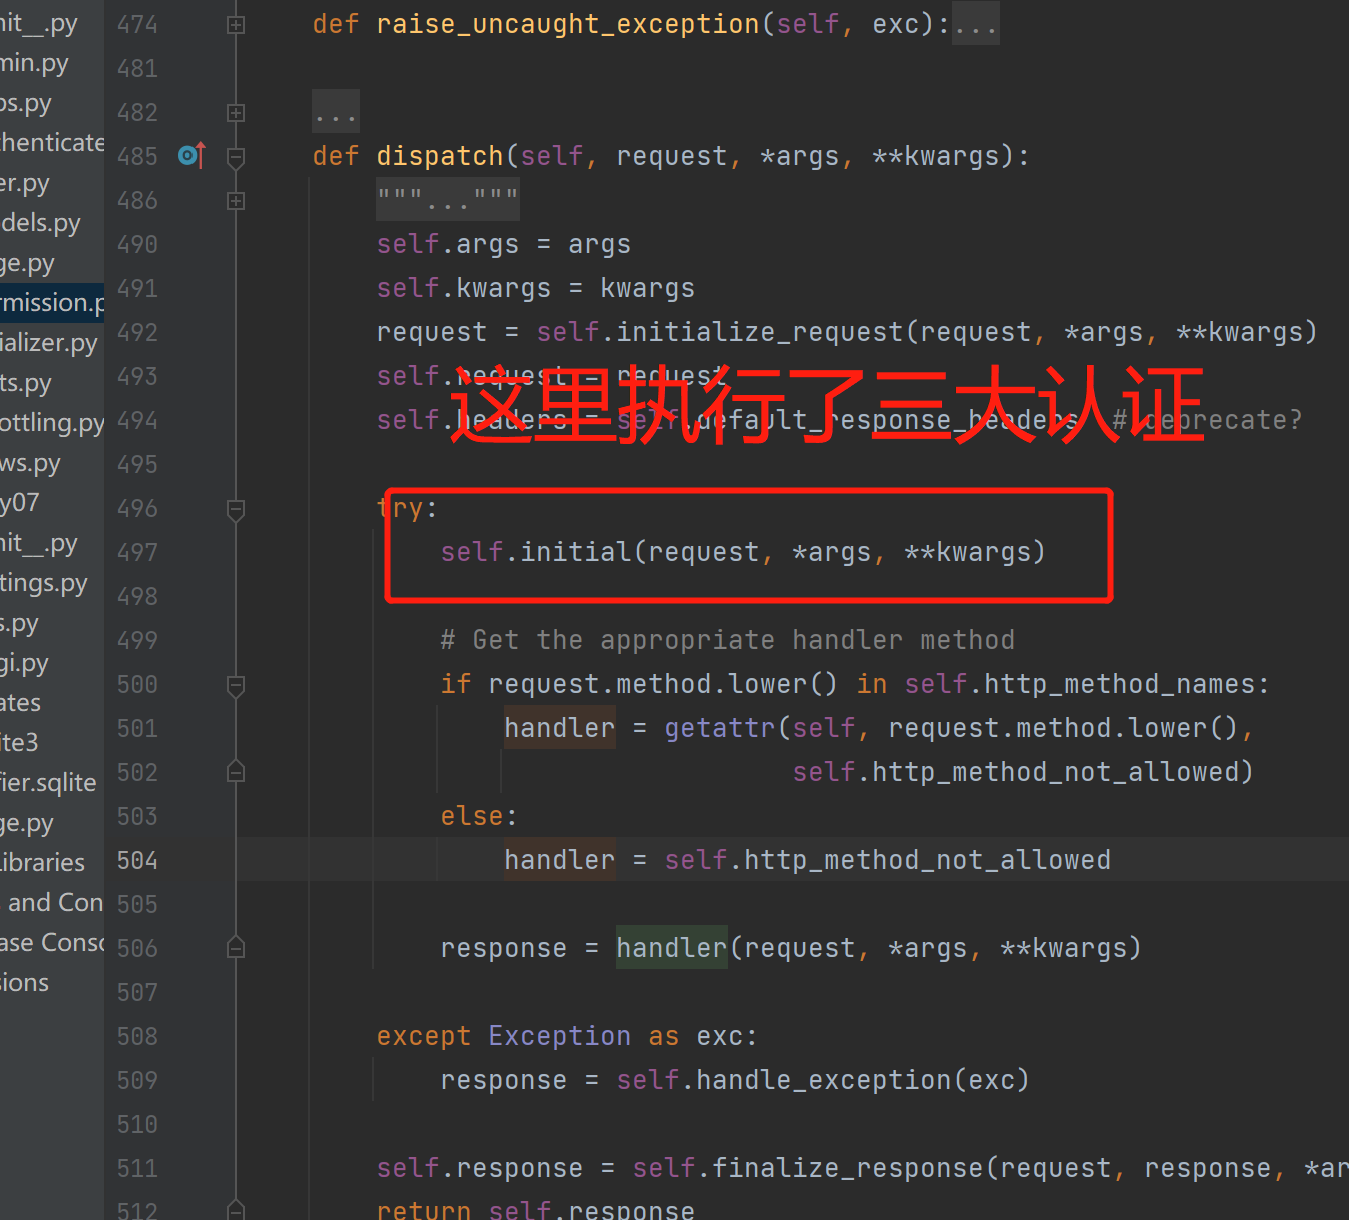
1. APIView类dispatch方法
    497行左右, self.initial(request, *args, **kwargs)---》执行3大认证

2.  APIView类的initial方法,三大组件执行位置
    399行左右
    def initial(self, request, *args, **kwargs):
        # 能够解析的编码,版本控制。。。。
        self.format_kwarg = self.get_format_suffix(**kwargs)
        neg = self.perform_content_negotiation(request)
        request.accepted_renderer, request.accepted_media_type = neg
        version, scheme = self.determine_version(request, *args, **kwargs)
        request.version, request.versioning_scheme = version, scheme

     	# 认证组件的执行位置
        self.perform_authentication(request)
        # 权限组件  [读它]
        self.check_permissions(request)
        # 频率组件
        self.check_throttles(request)


3.APIView的 check_permissions方法
# APIView的326 左右
    def check_permissions(self, request):
        # self.get_permissions()----》[CommonPermission(),]
        # permission 是我们配置在视图类上权限类的对象
        for permission in self.get_permissions():
            # 权限类的对象,执行has_permission,这就是为什么我们写的权限类要重写has_permission方法
            # self 是视图类的对象,就是咱们自己的的权限类的has_permission的view参数
            if not permission.has_permission(request, self):
                # 如果return 的是False,就会走这里,走这里是,没有权限
                # 如果配了多个权限类,第一个没过,直接不会再执行下一个权限类了
                self.permission_denied(
                    request,
                    message=getattr(permission, 'message', None),
                    code=getattr(permission, 'code', None)
                )

4. 解析--->>for permission in self.get_permissions()
# APIView的274行左右  get_permissions
    def get_permissions(self):
        # self.permission_classes  是咱们配置在视图类上的列表,里面是一个个的权限类,没加括号
        # permission_classes = [CommonPermission]
        # [CommonPermission(),]   本质返回了权限类的对象,放到列表中
        return [permission() for permission in self.permission_classes]
总结
-
权限类源码的执行流程:APIView的dispatch方法(self.initial)---->APIView的initial方法中的self.check_permissions(request)---->l里面取出配置在视图类上的权限类,实例化得到对象,for循环一个个执行对象的has_permission方法(重写的方法),如果返回False就直接结束,不再往下执行,权限就认证通过
-
如果视图类上不配做权限类,permission_classes = [CommonPermission],会默认使用配置文件的api_settings.DEFAULT_PERMISSION_CLASSES
执行的顺序:优先使用项目配置文件----->其次使用drf内配置文件
认证类的执行源码
drf的APIView三大认证是在执行视图类的方法之前就执行了三大认证,也就是APIView中的dispatch方法中的self.initial
1. APIView类dispatch方法
    497行左右, self.initial(request, *args, **kwargs)---》执行3大认证

2.  APIView类的initial方法,三大组件执行位置
    399行左右
    def initial(self, request, *args, **kwargs):
        # 能够解析的编码,版本控制。。。。
        self.format_kwarg = self.get_format_suffix(**kwargs)
        neg = self.perform_content_negotiation(request)
        request.accepted_renderer, request.accepted_media_type = neg
        version, scheme = self.determine_version(request, *args, **kwargs)
        request.version, request.versioning_scheme = version, scheme

     	# 认证组件的执行位置 【读它】
        self.perform_authentication(request)
        # 权限组件
        self.check_permissions(request)
        # 频率组件
        self.check_throttles(request)


3.APIView的 perform_authentication
# APIView的316 左右
   def perform_authentication(self, request):
        request.user #咱们觉得它是个属性,其实它是个方法,包装成了数据属性
        # request 是新生的request

4. # Request类的user方法   219行左右
    @property
    def user(self):  # self 是Request的对象
        if not hasattr(self, '_user'):
            with wrap_attributeerrors():
                self._authenticate()
        return self._user


5. 找Request类的self._authenticate()   373 行
    def _authenticate(self):
        # self.authenticators 我们配置在视图类上认证类的一个个对象,放到列表中
        # Request类初始化的时候,传入的
        for authenticator in self.authenticators:
            try:
                # 返回了两个值,第一个是当前登录用户,第二个的token,只走这一个认证类,后面的不再走了
                # 可以返回None,会继续执行下一个认证类
                user_auth_tuple = authenticator.authenticate(self)
            except exceptions.APIException:
                self._not_authenticated()
                raise

            if user_auth_tuple is not None:
                self._authenticator = authenticator
                # 解压赋值:
                #self.user=当前登录用户,self是当次请求的新的Request的对象
                #self.auth=token
                self.user, self.auth = user_auth_tuple
                return

        self._not_authenticated()

 6.解析for authenticator in self.authenticators
# self.authenticators  去Request类的init中找     152行左右
    def __init__(self, request, parsers=None, authenticators=None,
                 negotiator=None, parser_context=None):
        .....
        self.authenticators = authenticators or ()
		.....


7. # 什么时候调用Reqeust的__init__?---》APIVIew的dispatch上面的492行的:request = self.initialize_request(request, *args, **kwargs)-----》385行----》def initialize_request
    def initialize_request(self, request, *args, **kwargs):
        return Request(
            request,
            parsers=self.get_parsers(),
            authenticators=self.get_authenticators(),
            # get_authenticators() 得到的是我们认证类产生的对象
            negotiator=self.get_content_negotiator(),
            parser_context=parser_context
        )

8.解析---authenticators=self.get_authenticators()
    def get_authenticators(self):
        # self.authentication_classes  是咱们配置在视图类上的列表,里面是一个个的认证类,没加括号
        # authentication_classes=[LoginAuth]
        # [LoginAuth(),]   本质返回了类的对象,放到列表中
        return [auth() for auth in self.authentication_classes]
总结
- 配置在视图类上的认证类,会执行视图类方法之前执行认证,在权限类之前就执行认证类的认证。
- 自己写的认证类,可以返回两个值或None
- 后续可以从request.user取出当前登录用户(前提要在认证类中返回user_token.user和token),如果没有返回是拿不到当前登录用户的
频率类的执行源码
drf的APIView三大认证是在执行视图类的方法之前就执行了三大认证,也就是APIView中的dispatch方法中的self.initial
1. APIView类dispatch方法
    497行左右, self.initial(request, *args, **kwargs)---》执行3大认证

2.  APIView类的initial方法,三大组件执行位置
    399行左右
    def initial(self, request, *args, **kwargs):
        # 能够解析的编码,版本控制。。。。
        self.format_kwarg = self.get_format_suffix(**kwargs)
        neg = self.perform_content_negotiation(request)
        request.accepted_renderer, request.accepted_media_type = neg
        version, scheme = self.determine_version(request, *args, **kwargs)
        request.version, request.versioning_scheme = version, scheme

     	# 认证组件的执行位置
        self.perform_authentication(request)
        # 权限组件
        self.check_permissions(request)
        # 频率组件  【读它】
        self.check_throttles(request)


3. APIView中的check_throttles方法-----> 352行
    def check_throttles(self, request):
        throttle_durations = []
        #self.get_throttles() 配置在视图类上的频率类的对象,放到列表中
        # 每次取出一个频率类的对象,执行allow_request方法,如果是False,频率超了,不能再走了
        # 如果是True,没有超频率,可以直接往后
        for throttle in self.get_throttles():
            if not throttle.allow_request(request, self):
                throttle_durations.append(throttle.wait())
                # SimpleRateThrottle中已经帮我们写好了,直用

        if throttle_durations:
            # Filter out `None` values which may happen in case of config / rate
            # changes, see #1438
            durations = [
                duration for duration in throttle_durations
                if duration is not None
            ]

            duration = max(durations, default=None)
            self.throttled(request, duration)


4.解析  for throttle in self.get_throttles()
# APIView中的get_throttles方法
    def get_throttles(self):
	   # self.get_throttles  是咱们配置在视图类上的列表,里面是一个个的频率类,没加括号
        # throttle_classes = [CommonThrottle]
        # [CommonThrottle(),]   本质返回了类的对象,放到列表中
        return [throttle() for throttle in self.throttle_classes]

5.解析if not throttle.allow_request(request, self):
                throttle_durations.append(throttle.wait())
 # SimpleRateThrottle中allow_reques方法,
        def allow_request(self, request, view):
        if self.rate is None:
            return True

        self.key = self.get_cache_key(request, view)  # 频率类重写的方法---返回的是用户id
        if self.key is None:
            return True
		# [时间3,时间2,时间1]
        self.history = self.cache.get(self.key, [])
        """ SimpleRateThrottle提前将timer = time.time装成类的属性,当timer()就是时间戳"""
        self.now = self.timer()  # 获取当前时间
		#history[-1]是从列表后面取
        while self.history and self.history[-1] <= self.now - self.duration:
            self.history.pop()
        if len(self.history) >= self.num_requests:
            return self.throttle_failure()
        return self.throttle_success()
总结
自己写的频率类:继承BaseThrottle,重写allow_request,在内部做判断,如果超频了,就返回False,如果没有超频率,就返回True
自定义频率类(了解)
class SuperThrottle(BaseThrottle):
    VISIT_RECORD = {}

    def __init__(self):
        self.history = None

    def allow_request(self, request, view):
        # 自己写逻辑,判断是否超频
        # (1)取出访问者ip
        # (2)判断当前ip不在访问字典里,添加进去,并且直接返回True,表示第一次访问,在字典里,继续往下走 {ip地址:[时间1,时间2,时间3,时间4]}
        # (3)循环判断当前ip的列表,有值,并且当前时间减去列表的最后一个时间大于60s,把这种数据pop掉,这样列表中只有60s以内的访问时间,
        # (4)判断,当列表小于3,说明一分钟以内访问不足三次,把当前时间插入到列表第一个位置,返回True,顺利通过
        # (5)当大于等于3,说明一分钟内访问超过三次,返回False验证失败
        # (1)取出访问者ip
        ip = request.META.get('REMOTE_ADDR')
        import time
        ctime = time.time()
        # (2)判断当前ip不在访问字典里,添加进去,并且直接返回True,表示第一次访问
        if ip not in self.VISIT_RECORD:
            self.VISIT_RECORD[ip] = [ctime, ]
            return True
        # self.history  = [时间1]
        self.history = self.VISIT_RECORD.get(ip,[])
        # (3)循环判断当前ip的列表,有值,并且当前时间减去列表的最后一个时间大于60s,把这种数据pop掉,这样列表中只有60s以内的访问时间,
        while self.history and ctime - self.history[-1] > 60:
            self.history.pop()
        # (4)判断,当列表小于3,说明一分钟以内访问不足三次,把当前时间插入到列表第一个位置,返回True,顺利通过
        # (5)当大于等于3,说明一分钟内访问超过三次,返回False验证失败
        if len(self.history) < 3:
            self.history.insert(0, ctime)
            return True
        else:
            return False

    def wait(self):
        import time
        ctime = time.time()
        return 60 - (ctime - self.history[-1])
SimpleRateThrottle
写一个频率类,重写allow_request方法,在里面实现频率控制
1.# SimpleRateThrottle -- > allow_request
    def allow_request(self, request, view):
		# 这里就是通过配置文件和scop取出 频率限制是多少,比如一分钟访问5此  '5/m'
        if self.rate is None:  # 属性就要去双下init查找-第2点拿到( #5    36000)
            return True

        # 返回了ip,就以ip做限制
        self.key = self.get_cache_key(request, view) # 自定频率类返回的
        if self.key is None:
            return True
		# 获取缓存的ip和时间 【时间3,时间2,时间1】
        self.history = self.cache.get(self.key, [])
        # 获取当前执行时间
        self.now = self.timer()  # SimpleRateThrottle的属性
        while self.history and self.history[-1] <= self.now - self.duration:  # self.duration=3600
            self.history.pop()
        if len(self.history) >= self.num_requests: # num_requests=5
            return self.throttle_failure()
        return self.throttle_success()

2.# 解析if self.rate is None:
SimpleRateThrottle的init方法
    def __init__(self):
        if not getattr(self, 'rate', None):
            # self.rate= '5/m'
            self.rate = self.get_rate()
        # 5    36000
        self.num_requests, self.duration = self.parse_rate(self.rate)

3.解析 self.rate = self.get_rate()//
# SimpleRateThrottle的get_rate() 方法
    def get_rate(self):
        if not getattr(self, 'scope', None):
            msg = ("You must set either `.scope` or `.rate` for '%s' throttle" %
                   self.__class__.__name__)
            raise ImproperlyConfigured(msg)

        try:
            #  self.scope='kiki'='5/m' 是 kiki 字符串
            # return '5/m'
            return self.THROTTLE_RATES[self.scope] # 配置里写的'5/m'
        """  1.self.THROTTLE_RATES优先查询项目配置里 'DEFAULT_THROTTLE_RATES': {
        'kiki': '5/m',
    },
       2.如果项目配置没有就使用drf项目配置里的 THROTTLE_RATES = api_settings.DEFAULT_THROTTLE_RATES """
        except KeyError:
            msg = "No default throttle rate set for '%s' scope" % self.scope
            raise ImproperlyConfigured(msg)


4.解析self.num_requests, self.duration = self.parse_rate(self.rate)
# SimpleRateThrottle的parse_rate 方法
	def parse_rate(self, rate): # rate传过来的self.rate
        # rate=self.rate='5/m'
        if rate is None:
            return (None, None)
        # num =5
        # period= 'minute'
        num, period = rate.split('/') #['5','m']
        # num_requests=5
        num_requests = int(num)
        duration = {'s': 1, 'm': 60, 'h': 3600, 'd': 86400}[period[0]]
        # (5,36000)
        return (num_requests, duration)
基于APIView编写分页
分页功能: 只有查询所有才有分页功能
""" 基于APIView编写分页"""
from rest_framework.views import APIView
from rest_framework.generics import ListAPIView
class BookView(ViewSetMixin,APIView):
    authentication_classes = []
    permission_classes = []
    # 自动路由是可以映射五个接口,get---list   post----create  put---update.....
    """
        def list(self, request, *args, **kwargs):
            queryset = self.filter_queryset(self.get_queryset())
            # 过滤得到的queryset对象
            page = self.paginate_queryset(queryset)

            if page is not None:
                # 序列化
                serializer = self.get_serializer(page, many=True)
                return self.get_paginated_response(serializer.data)

            serializer = self.get_serializer(queryset, many=True)
            return Response(serializer.data)
    """
    def list(self,request):
        books = Book.objects.all()
        # 使用步骤
        # 1.实例化得到一个分页类的对象
        paginator = CommonLimitOffsetPagination()
        # 2.调用分页类对象的paginate_queryset方法来完成分页,返回的page是序列化的数据,分页好的’
        page = paginator.paginate_queryset(books,request,self)
        if page is not None:
            serializer = BookSerializer(instance=page,many=True)
            # 3.返回数据,调用paginator的get_paginated_response方法
            # return paginator.get_paginated_response(serializer.data) # 返回给前端是默认的格式
            # 可以自己定制
            return Response({
                'total':paginator.count,
                'next':paginator.get_next_link(),
                'previous':paginator.get_previous_link(),
                'results':serializer.data
            })
            """
                def get_paginated_response(self, data):
        return Response(OrderedDict([
            ('count', self.count),
            ('next', self.get_next_link()),
            ('previous', self.get_previous_link()),
            ('results', data)
        ]))
            """

 浙公网安备 33010602011771号