

PO设计模式在Appium中的应用(2)——框架内容的补充
1.对basepage模块的改造
1)封装查找元素方法
    def find(self, by, locator=None):
        # *by意思是传递多个位置参数,如果传递的是一个元组的话,就用前面的,locator注意默认等于None
        return self.driver.find_elements(*by) if isinstance(by, tuple) else self.driver.find_element(by, locator)
2)对find方法继续封装,添加如果在查找元素的时候有弹窗弹出的时候的处理逻辑
class BasePage():
  #设置一个黑名单
    _black_list = [MobileBy.ID, 'image_cancel']
  #设置一个计数器
    _error_count = 0
  #最大错误次数
    _error_max = 10
    _params = {}

    def __init__(self, driver: WebDriver = None):
        self._driver = driver

    def find(self, by, locator=None):
        # *by意思是传递多个位置参数,如果传递的是一个元组的话,就用前面的,locator注意默认等于None
        try:
            self._error_count = 0
            return self.driver.find_elements(*by) if isinstance(by, tuple) else self.driver.find_element(by, locator)
        except Exception as e:
            self._error_count += 1
            if self._error_count >= self._error_max:
                raise e
       # 循环遍历,但是有个问题,如果弹窗没有的话就会陷入一直查找的死循环,因此需要设置一个错误次数, 这里要是没有的话len=0,就不会进入if语句中,
        就没有办法从for循环中出来
            for black in self._black_list:
                elements = self.driver.find_elements(*black)
          #对弹框进行处理,如果有弹框,find-elements的len大于0,然后就点击这个弹窗,关闭它,然后再返回去查找是否有弹框;
                if len(elements) > 0:
                    elements[0].click()
                    return self.find(by, locator)
                raise e
3)basepage中设置数据驱动逻辑
from appium.webdriver.common.mobileby import MobileBy
from appium.webdriver.webdriver import WebDriver
import yaml
class BasePage():
    _black_list = [MobileBy.ID, 'image_cancel']
    _error_count = 0
    _error_max = 10
    _params = {}

    def __init__(self, driver: WebDriver = None):
        self._driver = driver
    def steps(self, path):
    #读取yaml文件, ⚠️为什么设置utf编码呢,是因为防止路径中有中文,with一般会和close一起使用
        with open(path, encoding="utf-8") as f:
            # 注意是list[]而不是list(),因为这是一个列表嵌套字典的文件list()是转换成列表的函数
            steps: list[dict] = yaml.safe_load(f)
            print(steps)
        ###for step in steps:中的step是yaml文件中的一组数据
            for step in steps:
            if "by" in step.keys():
           if "id" == step["by"]:
              element = self.find(step["by"], step["locator"])
           if "xpath" == step["by"]:
              element = self.find(MobileBy.XPATH, step["locator"])
          if "action" in step.keys():
                    if "click" == step["action"]:
                        element.click()
                    if "send" == step["action"]:##注意这里{value}要从python中取值
                        content: str = step["value"]
                        for param in self._params:
                            # 如果字典中的值命中了{value}就把param中的值替换了,这就是为什么_params={}设置为字典的原因
                            content = content.replace("{%s}" % param, self._params[param])
                            self.send(content, step["by"], step["locator"]) #send也是封装了self.driver.send_keys()
 注意⚠️❗️❗️这里的意思一定要记住,如果字典中的值命中了{value}就把param中的值替换了,这就是为什么_params={}设置为字典的原因
yaml文件中的一组数据如下:一定一定要注意-(空格)by:(空格)id,两处空格不要忘,否则读取出来的文件格式将会成为str格式而不是dict
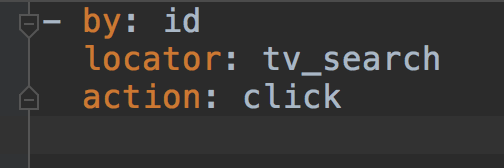
要理解:for step in steps:中的step是yaml文件中的一组数据

4)send方法中的封装和find方法类似,也对弹框进行了处理
 def send(self, value, by, locator=None):
        try:
            self.find(by, locator).send_keys(value)
            self._error_count = 0
        except Exception as e:
            self._error_count += 1
            if self._error_count >= self._error_max:
                raise e
            for black in self._black_list:
                elements = self.driver.find_elements(*black)
                if len(elements) > 0:
                    elements[0].click()
                    return self.send(by, locator)
                raise e
2.对于app模块的改造设计如下
from testenter.page.basepage import BasePage
from testenter.page.main import Main
from appium import webdriver
class App(BasePage):
    def start(self):
        _package = "com.tencent.wework"
        _activity = ".launch.LaunchSplashActivity"
        if self.driver is None:
            desired_caps = {}
            desired_caps['platformName'] = 'Android'
            desired_caps['platformVersion'] = '6.0'
            desired_caps['deviceName'] = 'emulator-5554'
            desired_caps['appPackage'] = _package
            desired_caps['appActivity'] = _activity
            desired_caps['noReset'] = 'true'
            desired_caps['dontStopAppOnReset'] = 'true'
            self.driver = webdriver.Remote('http://localhost:4723/wd/hub', desired_caps)
            self.driver.implicitly_wait(5)
        else:
            return self.driver.start_activity(_package, _activity)
        return self

    def stop(self):
        pass

    def restart(self):
        pass

    def main(self):
     #跳转到主页面,这里是没有任何操作的,一定不要整混了!❗️
        return Main(self._driver)
3.补充页面元素操作的细节
1)在主页面点击通讯录,跳转通讯录列表,在通讯录列表点击添加成员,跳转手动添加页面,点击手动添加,跳转添加成员页面,输入想要添加成员信息,点击保存,返回至手动添加成员页面,这里注意一点⚠️,如果想要使用参数化,又不想app反复打开关闭,就手动让页面从手动添加成员页面返回至通讯录列表页❗️❗️
因此页面操作如下:main.py
from testenter.page.addresslistpage import AddresslistPage
from testenter.page.basepage import BasePage
class Main(BasePage):
    def goto_message(self):
        pass

    def goto_addresslist(self):
     #使用了数据驱动,这里由于运行的时候一直报错,因此使用了全路径,按道理来讲可以先..返回主目录,再一层层进入想要读取的文件路径下的,这里依然没找出问题原因
        self.steps("/Users/zhaitiantian3/PycharmProjects/装饰器/testenter/steps/mainwe.yaml")

        return AddresslistPage(self._driver)

    def goto_workbench(self):
        pass

    def goto_myprofile(self):
        pass
其他细节不一一添加,可以从git中直接查看:https://github.com/zhaitiantian1/Enterprise-WeChat/tree/master/Appium%E5%AE%9E%E6%88%98/testenter
4.数据驱动
可能还是不太明白以下代码逻辑:
          if "send" == step["action"]:
                        content: str = step["value"]
                        for param in self._params:
                            # 如果字典中的值命中了{value}就把param中的值替换了
                            # 这就是为什么_params={}设置为字典的原因
                            content = content.replace("{%s}" % param,self._params[param])
                            self.send(content, step["by"], step["locator"])
在以雪球app的实战中有一个搜索输入框页面,定义如下:这里将search方法中的value参数传递给了self._params字典,把param中的值替换了,就将输入的参数value传给了send方法,而value的具体值是在测试用例中给到的,如下是test_search中的“jd”,即想要搜索的股票
from test.page.basepage import BasePage
class Search(BasePage):
    def search(self, value):
        self._params["value"] = value
        self.steps("../page/search.yaml")
test_search.py
from test.page.app import App
from test.page.basepage import BasePage
class Test_search():
    def test_search(self):
        App().start().main().goto_market().search("jd")
5.测试用例的参数化
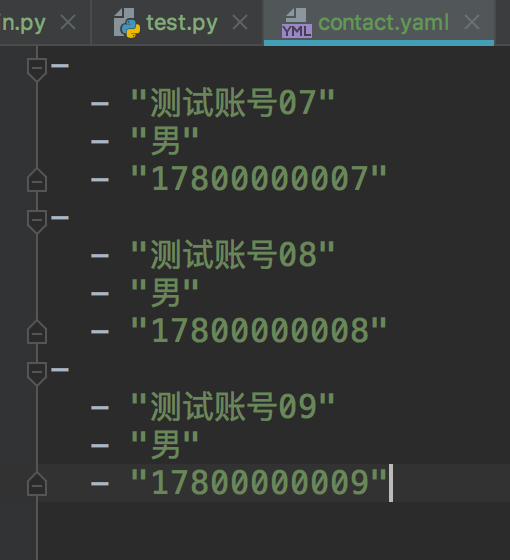
如下是企业微信添加成员的测试用例,我们可以将参数直接写在@pytest.mark.parametrize中,但是如果数据很多的时候,将会非常混乱,所以我们将
[("测试账号05", "男", "17800000005"), ("测试账号06", "女", "17800000006")]放在一个yaml文件中
from testenter.page.app import App
import pytest

class TestAddContact():
    # 这里一开始App调用的时候没有加括号,没有加括号相当于调用了App类,但是没有初始化对象,只有对象才能调用方法
    # 另外start方法要加上返回值return self,否则无法调用到main方法
    def setup(self):
        self.main = App().start().main()

    @pytest.mark.parametrize("name,sex,mobile", [("测试账号05", "男", "17800000005"), ("测试账号06", "女", "17800000006")])
    def test_addtact(self, name, sex, mobile):
        l1 = self.main.goto_addresslist().click_addmember().click_memualadd()
        l1.input_name(name).input_phone(mobile).set_gender(sex).click_save().click_back()
yaml文件格式如下:
修改后代码如下:
from testenter.page.app import App
import pytest
import yaml

class TestAddContact():
    # 这里一开始App调用的时候没有加括号,没有加括号相当于调用了App类,但是没有初始化对象,只有对象才能调用方法
    # 另外start方法要加上返回值return self,否则无法调用到main方法
    def setup(self):
        self.main = App().start().main()

    @pytest.mark.parametrize("name,sex,mobile", yaml.safe_load(
        open("/Users/zhaitiantian3/PycharmProjects/装饰器/testenter/data/contact.yaml")))
    def test_addtact(self, name, sex, mobile):
        l1 = self.main.goto_addresslist().click_addmember().click_memualadd()
        l1.input_name(name).set_gender(sex).input_phone(mobile).click_save().click_back()
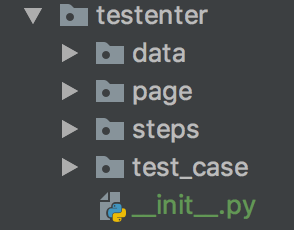
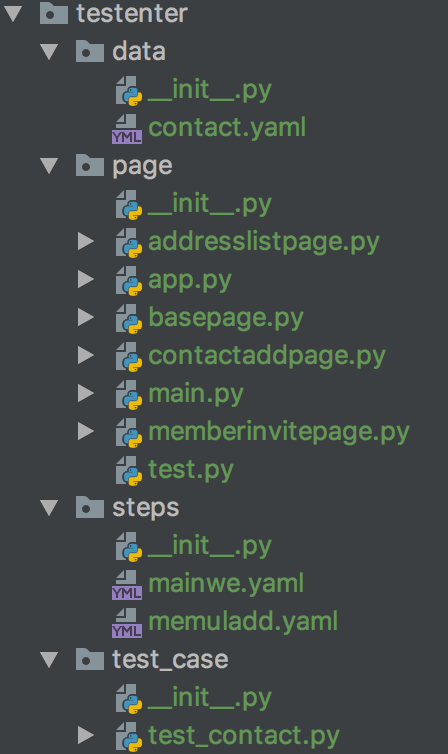
整个项目设计结构如下图:

 浙公网安备 33010602011771号