

基于lnmp实现phpmyadmin部署-生产
nginx 1.12.2
php 5.5.14
phpmyadmin 4.4.15
关闭防火墙selinux
iptables -F && setenforce 0 && systemctl stop firewalld
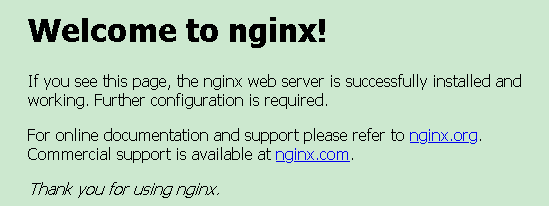
一:安装nginx
![]()
7.nginx的常用命令
配置文件 /usr/local/nginx/conf/nginx.conf
重启 /usr/local/nginx/sbin/nginx -s reload
日志 /usr/local/nginx/logs/error.log
二、安装php php-fpm
PHP在 5.3.3 之后已经把php-fpm并入到php的核心代码中了。 所以php-fpm不需要单独的
下载安装。
要想php支持php-fpm,只需要在编译php源码的时候带上 --enable-fpm 就可以了
1):yum安装php的依赖库
yum install -y make cmake gcc gcc-c++ autoconf automake libpng-devel libjpeg-devel zlib libxml2-devel ncurses-devel bison libtool-ltdl-devel libiconv libmcrypt mhash mcrypt pcre- devel openssl-devel freetype-devel libcurl-devel
2):下载 php5.6 源码
wget http://cn2.php.net/distributions/php-5.5.14.tar.gz
tar -zxvf php-5.5.14.tar.gz
cd ./php-5.5.14/
3):php配置安装
# 配置php的编译参数
./configure
--prefix=/usr/local/php
--with-mysql --with-mysqli
--with-pdo_mysql
--with-iconv- dir
--with-zlib
--with-libxml-dir
--enable-xml
--with-curl
--enable-fpm
--enable-mbstring
--with- gd
--with-openssl
--with-mhash
--enable-sockets
--with-xmlrpc
--enable-zip
--enable-soap
-- with-freetype-dir=/usr/lib64
# 开始编译安装
make && make install
然后就安装到了
/usr/local/php 目录下
4):配置php-fpm
cd /usr/local/php/etc
cp php-fpm.conf.default php-fpm.conf
pid = run/php-fpm.pid
首先启动php-fpm:
/usr/local/php/sbin/php-fpm
ps aux|grep php-fpm
5):加入开机启动
开机启动的配置文件是:/etc/rc.local
# vi /etc/rc.local
/usr/local/php/sbin/php-fpm # 添加进来
6):php-fpm的一些命令
启动 /usr/local/php/sbin/php-fpm
停止 killall php-fpm
日志 /var/log/php-fpm/error.log
配置文件 /usr/local/php/etc/php-fpm.conf
/usr/sbin/php-fpm -t 查看配置是否正确
7):nginx配置解析php php5.3之后的版本,php-fpm.conf里的listen的默认配置是127.0.0.1:9000,就不会生成php-fpm.sock,因此如果需要Nginx里的配置有链接tmp/php-fpm.sock的话,需要将php-fpm里的listen的地址配置成和nginx的配置文件里的fastcgi-pass配置保持一致,同时保证这个路径已经存在,这样在启动./php-fpm的时候,会在对应路径上自动生成php- fpm.sock,
![]()
![]()
![]()
![]()
1.安装依赖包
[root@nginx01]# yum -y install gcc pcre-devel openssl-devel gcc-c++
2.解包
[root@nginx01 ~]# tar -zxvf nginx-1.12.2.tar.gz -C /usr/local/src/
[root@nginx01 ~]# cd /usr/local/src/nginx-1.12.2/
3.加载模块并编译安装
patch -p1 < /root/ngx_http_proxy_connect_module-master/patch/proxy_connect.patch
./configure \
--prefix=/usr/local/nginx \
--sbin-path=/usr/sbin/nginx \
--error-log-path=/var/log/nginx/error.log \
--http-log-path=/var/log/nginx/access.log \
--pid-path=/var/run/nginx.pid \
--lock-path=/var/run/nginx.lock \
--http-client-body-temp-path=/var/tmp/nginx/client \
--http-proxy-temp-path=/var/tmp/nginx/proxy \
--http-fastcgi-temp-path=/var/tmp/nginx/fcgi \
--http-uwsgi-temp-path=/var/tmp/nginx/uwsgi \
--http-scgi-temp-path=/var/tmp/nginx/scgi \
--user=nginx \
--group=nginx \
--with-pcre \
--with-http_v2_module \
--with-http_ssl_module \
--with-http_realip_module \
--with-http_addition_module \
--with-http_sub_module \
--with-http_dav_module \
--with-http_flv_module \
--with-http_mp4_module \
--with-http_gunzip_module \
--with-http_gzip_static_module \
--with-http_random_index_module \
--with-http_secure_link_module \
--with-http_stub_status_module \
--with-http_auth_request_module \
--with-mail \ --with-mail_ssl_module \
--with-file-aio \ --with-ipv6 \
--with-http_v2_module \
--with-threads \
--with-stream \
--with-stream_ssl_module \
--add-module=/root/ngx_http_proxy_connect_module-master
[root@nginx01 nginx-1.12.2]# make && make install
4.打开nginx配置文件
[root@nginx01 nginx-1.12.2]# vim /usr/local/nginx/conf/nginx.conf
将443加密模块解开注释行
server {
listen 443 ssl;
server_name localhost;
ssl_certificate /root/3309085_cszc.top.pem;
ssl_certificate_key /root/3309085_cszc.top.key;
ssl_session_cache shared:SSL:1m;
ssl_session_timeout 5m;
ssl_protocols SSLv2 SSLv3 TLSv1;
ssl_ciphers;
ALL:!ADH:!EXPORT56:RC4+RSA:+HIGH:+MEDIUM:+LOW:+SSLv2:+EXP;
ssl_prefer_server_ciphers on;
location / {
root html;
index index.html index.htm;
}
}
}
5.创建nginx用户启动服务
useradd -s /sbin/nologin -M nginx /usr/local/nginx/sbin/nginx
ss -tlunp | grep nginx
6.测试
在浏览器上输入https://ip/
7.nginx的常用命令
配置文件 /usr/local/nginx/conf/nginx.conf
重启 /usr/local/nginx/sbin/nginx -s reload
日志 /usr/local/nginx/logs/error.log
二、安装php php-fpm
PHP在 5.3.3 之后已经把php-fpm并入到php的核心代码中了。 所以php-fpm不需要单独的
下载安装。
要想php支持php-fpm,只需要在编译php源码的时候带上 --enable-fpm 就可以了
1):yum安装php的依赖库
yum install -y make cmake gcc gcc-c++ autoconf automake libpng-devel libjpeg-devel zlib libxml2-devel ncurses-devel bison libtool-ltdl-devel libiconv libmcrypt mhash mcrypt pcre- devel openssl-devel freetype-devel libcurl-devel
2):下载 php5.6 源码
wget http://cn2.php.net/distributions/php-5.5.14.tar.gz
tar -zxvf php-5.5.14.tar.gz
cd ./php-5.5.14/
3):php配置安装
# 配置php的编译参数
./configure
--prefix=/usr/local/php
--with-mysql --with-mysqli
--with-pdo_mysql
--with-iconv- dir
--with-zlib
--with-libxml-dir
--enable-xml
--with-curl
--enable-fpm
--enable-mbstring
--with- gd
--with-openssl
--with-mhash
--enable-sockets
--with-xmlrpc
--enable-zip
--enable-soap
-- with-freetype-dir=/usr/lib64
# 开始编译安装
make && make install
然后就安装到了
/usr/local/php 目录下
4):配置php-fpm
cd /usr/local/php/etc
cp php-fpm.conf.default php-fpm.conf
pid = run/php-fpm.pid
首先启动php-fpm:
/usr/local/php/sbin/php-fpm
ps aux|grep php-fpm
5):加入开机启动
开机启动的配置文件是:/etc/rc.local
# vi /etc/rc.local
/usr/local/php/sbin/php-fpm # 添加进来
6):php-fpm的一些命令
启动 /usr/local/php/sbin/php-fpm
停止 killall php-fpm
日志 /var/log/php-fpm/error.log
配置文件 /usr/local/php/etc/php-fpm.conf
/usr/sbin/php-fpm -t 查看配置是否正确
7):nginx配置解析php php5.3之后的版本,php-fpm.conf里的listen的默认配置是127.0.0.1:9000,就不会生成php-fpm.sock,因此如果需要Nginx里的配置有链接tmp/php-fpm.sock的话,需要将php-fpm里的listen的地址配置成和nginx的配置文件里的fastcgi-pass配置保持一致,同时保证这个路径已经存在,这样在启动./php-fpm的时候,会在对应路径上自动生成php- fpm.sock,
例如:默认情况下监听端口 9000 。 另外,也可以使PHP-FPM使用Unix套接字,这避免了TCP的开销。
让PHP-FPM使用Unix套接字
1、编辑php-fpm配置文件
vim /usr/local/php/etc/php-fpm.conf
#listen = 0.0.0.0:9000 #端口测试不通可以用sock
listen = /var/run/php-fpm/php-fpm.sock #先mkdir -p /var/run/php-fpm/ sock就会在此目录下生成
listen.owner = nginx
listen.group = nginx
listen.mode = 0666
listen.allowed_clients = any
2、编辑nginx配置文件
vi nginx.conf 在 server 下找到
location / {
root html;
index index.html index.htm index.php; # 加上 index.php
}
location ~ .*\.(php|php5)?$ {
root /usr/local/nginx/html/;
fastcgi_index index.php;
#fastcgi_pass listen = 192.168.0.227:9000
fastcgi_pass unix:/var/run/php-fpm/php-fpm.sock; #跟php-fpm.conf里listen的一致
#fastcgi_param SCRIPT_FILENAME /usr/local/nginx/html/$fastcgi_script_name;
fastcgi_param SCRIPT_FILENAME $document_root$fastcgi_script_name;
include fastcgi_params;
}
$document_root 代表当前请求在root指令中指定的值
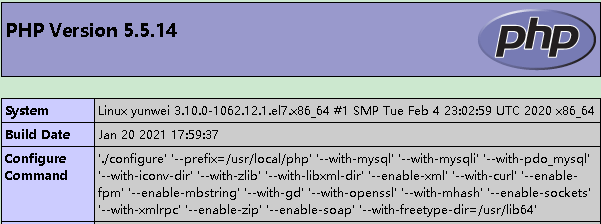
8.验证php是否配置成功
在 /usr/local/nginx/html/ 目录下编辑
vi index.php
<?
php phpinfo();
?>
3、重启nginx
/usr/local/nginx/sbin/nginx -s reload
重新刷新浏览器,出现如下图所示,说明nginx解析php成功了
让PHP-FPM使用Unix套接字
1、编辑php-fpm配置文件
vim /usr/local/php/etc/php-fpm.conf
#listen = 0.0.0.0:9000 #端口测试不通可以用sock
listen = /var/run/php-fpm/php-fpm.sock #先mkdir -p /var/run/php-fpm/ sock就会在此目录下生成
listen.owner = nginx
listen.group = nginx
listen.mode = 0666
listen.allowed_clients = any
2、编辑nginx配置文件
vi nginx.conf 在 server 下找到
location / {
root html;
index index.html index.htm index.php; # 加上 index.php
}
location ~ .*\.(php|php5)?$ {
root /usr/local/nginx/html/;
fastcgi_index index.php;
#fastcgi_pass listen = 192.168.0.227:9000
fastcgi_pass unix:/var/run/php-fpm/php-fpm.sock; #跟php-fpm.conf里listen的一致
#fastcgi_param SCRIPT_FILENAME /usr/local/nginx/html/$fastcgi_script_name;
fastcgi_param SCRIPT_FILENAME $document_root$fastcgi_script_name;
include fastcgi_params;
}
$document_root 代表当前请求在root指令中指定的值
8.验证php是否配置成功
在 /usr/local/nginx/html/ 目录下编辑
vi index.php
<?
php phpinfo();
?>
3、重启nginx
/usr/local/nginx/sbin/nginx -s reload
重新刷新浏览器,出现如下图所示,说明nginx解析php成功了
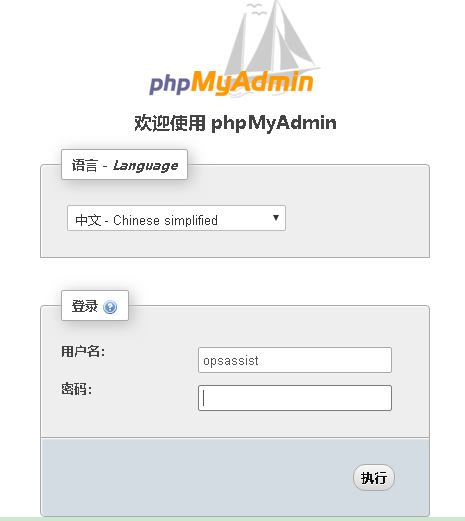
三、安装phpmyadmin
phpmyadmin官网:http://www.phpmyadmin.net/home_page/
现在数据库创建连接phpmyadmin的用户并授权
create user 'admin'@'%' identified by '123456';
grant select on performance_schema.* to "admin"@'%' identified by 'safety%$#@!';
grant select,execute on sys.* to "admin"@'%' identified by '123456';
[root@localhost ~]# unzip phpMyAdmin-4.4.15-all-languages.zip
[root@localhost ~]# mv phpMyAdmin-4.4.15-all-languages /usr/local/nginx/html/dbmg
[root@localhost ~]# cd /usr/local/nginx/html/dbmg
[root@localhost ~]# cp libraries/config.default.php config.inc.php
vim config.inc.php
$cfg['PmaAbsoluteUri'] = 'http://192.168.0.227/dbmg/'; //这里填写 phpMyAdmin 的访问网址。
$cfg['Servers'][$i]['host'] = ''192.168.0.177 ; // MySQL hostname or IP address
$cfg['Servers'][$i]['port'] = '3306'; // MySQL port - leave blank for default port $cfg['Servers'][$i]['user'] = 'admin'; // 填写 MySQL 访问 phpMyAdmin 使用的 MySQL
用户名,默认为 root。
$cfg['Servers'][$i]['password'] = '123456'; // 填写对应上述 MySQL 用户名的密码。
重启nginx
/usr/local/nginx/sbin/nginx -s reload
浏览器访问http://ip/dbmg/
用创建的数据库用户admin 123456 登录
如果报错:phpMyAdmin无法登录MySQL服务器/空密码登录被禁止
vim config.inc.php
$cfg['Servers'][$i]['AllowNoPassword'] = true; //将此字段修改为true
$cfg['Servers'][$i]['nopassword'] = true; //将此字段修改为true
$cfg['Servers'][$i]['password'] = ''; //将此字段修改为空
注意:root用户使用空密码即可登录,记得修改root用户的密码。
四、配置phpMyAdmin高级功能-查看sql历史记录
注:本文基于phpMyAdmin4.4.15,使用LNMP环境
问题:
登录到phpMyAdmin以后,在主界面的底部,我们发现两条提示信息:
一条提示信息是“phpMyAdmin高级功能尚未完全设置,部分功能未激活。请点击这里查
看原因”,另外一条信息是“配置文件现在需要一个短语密码。”
$cfg['blowfish_secret'] = '123456'; #设置短语密码,随便写
一旦出现这两条信息,就意味着phpMyAdmin中的部分功能不能使用。解决这个问题的操作步骤分为三部分:
上传create_tables.sql文件、配置config.inc.php文件和修改config.default.php文件等。
解决:
1. phpmyadmin数据库创建:
打开phpMyAdmin目录,cd ./sql 找到create_tables.sql
就可以看到create_tables.sql,然后把里面的sql语句copy,然后在phpmyadmi web界面-sql执行,这样,phpmyadmin数据库就创建成功了。
如果执行sql语句报错“Access denied for user 'admin'@'%' to database'phpmyadmin'”,
解决:
1. phpmyadmin数据库创建:
打开phpMyAdmin目录,cd ./sql 找到create_tables.sql
就可以看到create_tables.sql,然后把里面的sql语句copy,然后在phpmyadmi web界面-sql执行,这样,phpmyadmin数据库就创建成功了。
如果执行sql语句报错“Access denied for user 'admin'@'%' to database'phpmyadmin'”,
需要授权如:
grant all privileges on phpmyadmin.* to "admin"@'%' identified by '123456';
再次执行创建phpmyadmin表的命令,刷新web界面,可以看到创建的phpmyadmin表。
2. 配置config.inc.php文件
打开phpMyAdmin文件夹,找到config.sample.inc.php文件,将它重命名为config.inc.php
文件。
3. 打开config.inc.php文件,找到下面的语句:
将/* Storage database and tables */语句下面的每一条语句前面的//(双斜杠)和空格全部
去掉。
/* Storage database and tables */
// $cfg['Servers'][$i]['pmadb'] = 'phpmyadmin';
// $cfg['Servers'][$i]['bookmarktable'] = 'pma__bookmark';
// $cfg['Servers'][$i]['relation'] = 'pma__relation';
// $cfg['Servers'][$i]['table_info'] = 'pma__table_info';
// $cfg['Servers'][$i]['table_coords'] = 'pma__table_coords';
// $cfg['Servers'][$i]['pdf_pages'] = 'pma__pdf_pages';
// $cfg['Servers'][$i]['column_info'] = 'pma__column_info';
// $cfg['Servers'][$i]['history'] = 'pma__history';
// $cfg['Servers'][$i]['table_uiprefs'] = 'pma__table_uiprefs';
// $cfg['Servers'][$i]['tracking'] = 'pma__tracking';
// $cfg['Servers'][$i]['designer_coords'] = 'pma__designer_coords';
// $cfg['Servers'][$i]['userconfig'] = 'pma__userconfig';
// $cfg['Servers'][$i]['recent'] = 'pma__recent';
// $cfg['Servers'][$i]['favorite'] = 'pma__favorite';
// $cfg['Servers'][$i]['users'] = 'pma__users';
// $cfg['Servers'][$i]['usergroups'] = 'pma__usergroups';
// $cfg['Servers'][$i]['navigationhiding'] = 'pma__navigationhiding';
// $cfg['Servers'][$i]['savedsearches'] = 'pma__savedsearches';
// $cfg['Servers'][$i]['central_columns'] = 'pma__central_columns';
注:
在/* Storage database and tables */句子上面,有下面两行句子:
// $cfg['Servers'][$i]['controluser'] = 'pma';
// $cfg['Servers'][$i]['controlpass'] = 'pmapass';
如果需要,可以修改为:
$cfg['Servers'][$i]['controluser'] = '用户名';
$cfg['Servers'][$i]['controlpass'] = '密码';
4. 修改config.default.php文件
cd /usr/local/nginx/html/dbmg/libraries文件夹内的config.default.php文件。
在config.default.php文件内
1)查找:$cfg['Servers'][$i]['pmadb'] = '';
修改为:
$cfg['Servers'][$i]['pmadb'] = 'phpmyadmin';
2)查找:$cfg['Servers'][$i]['bookmarktable'] = '';
修改为:
$cfg['Servers'][$i]['bookmarktable'] = 'pma__bookmark';
3)查找:$cfg['Servers'][$i]['relation'] = '';
修改为:
$cfg['Servers'][$i]['relation'] = 'pma__relation';
4)查找:$cfg['Servers'][$i]['table_info'] = '';
修改为:
$cfg['Servers'][$i]['table_info'] = 'pma__table_info';
5)查找:$cfg['Servers'][$i]['table_coords'] = '';
修改为:
$cfg['Servers'][$i]['table_coords'] = 'pma__table_coords';
6)查找:$cfg['Servers'][$i]['pdf_pages'] = '';
修改为:
$cfg['Servers'][$i]['pdf_pages'] = 'pma__pdf_pages';
7)查找:$cfg['Servers'][$i]['column_info'] = '';
修改为:
$cfg['Servers'][$i]['column_info'] = 'pma__column_info';
8)查找:$cfg['Servers'][$i]['history'] = '';
修改为:
$cfg['Servers'][$i]['history'] = 'pma__history';
9)查找:$cfg['Servers'][$i]['table_uiprefs'] = '';
修改为:
$cfg['Servers'][$i]['table_uiprefs'] = 'pma__table_uiprefs';
10)查找:$cfg['Servers'][$i]['tracking'] = '';
修改为:
$cfg['Servers'][$i]['tracking'] = 'pma__tracking';
11)查找:$cfg['Servers'][$i]['designer_coords'] = '';
修改为:
$cfg['Servers'][$i]['designer_coords'] = 'pma__designer_coords';
12)查找:$cfg['Servers'][$i]['userconfig'] = '';
修改为:
$cfg['Servers'][$i]['userconfig'] = 'pma__userconfig';
13)查找:$cfg['Servers'][$i]['recent'] = '';
修改为:
$cfg['Servers'][$i]['recent'] = 'pma__recent';
14)查找:$cfg['Servers'][$i]['favorite'] = '';
修改为:
$cfg['Servers'][$i]['favorite'] = 'pma__favorite';
15)查找:$cfg['Servers'][$i]['users'] = '';
修改为:
$cfg['Servers'][$i]['users'] = 'pma__users';
16)查找:$cfg['Servers'][$i]['usergroups'] = '';
修改为:
$cfg['Servers'][$i]['usergroups'] = 'pma__usergroups';
17)查找:$cfg['Servers'][$i]['navigationhiding'] = '';
修改为:
$cfg['Servers'][$i]['navigationhiding'] = 'pma__navigationhiding';
18)查找:$cfg['Servers'][$i]['savedsearches'] = '';
修改为:
$cfg['Servers'][$i]['savedsearches'] = 'pma__savedsearches';
19)查找:$cfg['Servers'][$i]['central_columns'] = '';
修改为:
$cfg['Servers'][$i]['central_columns'] = 'pma__central_columns';
提示:
实际上,上面这些句子就是config.inc.php文件中已经去掉//(双斜杠)的句子。
保存并关闭config.default.php文件。
重新登录phpMyAdmin
点击 SQL(查询)选项卡。在窗口底部考左有一个控制台 选项卡 如图:
默认情况下它不会被展开,点击它就会展开历史记录

四、配置nginx反向代理,实现phpMyAdmin用域名访问
vim /usr/local/nginx/conf/nginx.conf
location ^~/dbmg/ {
proxy_pass http://192.168.0.227/phpmyadmin/;
}
浏览器访问http://yuming.com
选择SQL-执行下面sql语句,看是否会记录
use mysql;
select * from user limit 5;
location ^~/dbmg/ {
proxy_pass http://192.168.0.227/phpmyadmin/;
}
浏览器访问http://yuming.com
选择SQL-执行下面sql语句,看是否会记录
use mysql;
select * from user limit 5;


 浙公网安备 33010602011771号