

第一个spring项目helloWord
1.浅谈Spring
Spring是一个开源的控制反转(Inversion of Control ,IOC)和面向切面(AOP)的容器框架.它的主要目得是简化企业开发.
帮助文档路径,在springjar包的存在路径下:
spring-framework-3.2.2.RELEASE-dist\spring-framework-3.2.2.RELEASE\docs\spring-framework-reference\html 网页帮助文档
spring-framework-3.2.2.RELEASE-dist\spring-framework-3.2.2.RELEASE\docs\spring-framework-reference\pdf pdf文档
l IOC 控制反转
public class PersonServiceBean {
private PersonDao personDao = new PersonDaoBean();
public void save(Person person){
personDao.save(person);
}
}
PersonDaoBean 是在应用内部创建及维护的。所谓控制反转就是应用本身不负责依赖对象的创建及维护,依赖对象的创建及维护是由外部容器负责的。这样控制权就由应用转移到了外部容器,控制权的转移就是所谓反转。
l 依赖注入(Dependency Injection)
当我们把依赖对象交给外部容器负责创建,那么PersonServiceBean 类可以改成如下:
public class PersonServiceBean {
private PersonDao personDao ;
//通过构造器参数,让容器把创建好的依赖对象注入进PersonServiceBean,当然也可以使用setter方法进行注入。
public PersonServiceBean(PersonDao personDao){
this.personDao=personDao;
}
public void save(Person person){
personDao.save(person);
}
}
所谓依赖注入就是指:在运行期,由外部容器动态地将依赖对象注入到组件中。
2.spring的优点
1)降低组件之间的耦合度,实现软件各层之间的解耦。
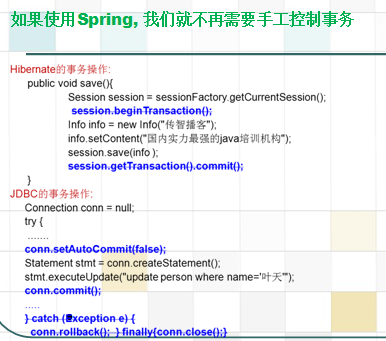
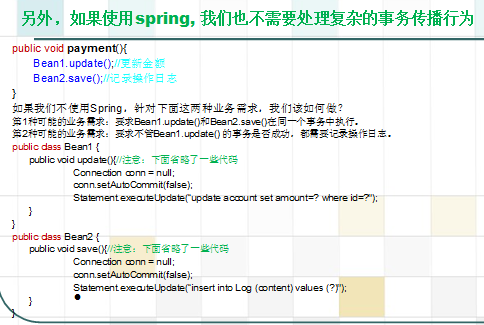
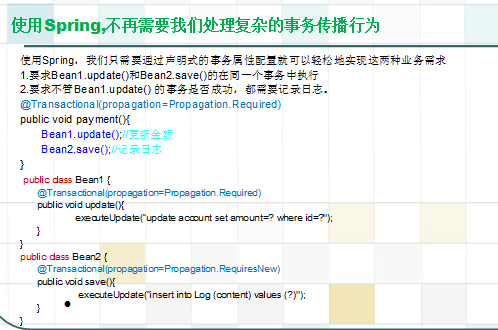
2)可以使用容器提供的众多服务,如:事务管理服务、消息服务等等。当我们使用容器管理事务时,开发人员就不再需要手工控制事务.也不需处理复杂的事务传播。
3)容器提供单例模式支持,开发人员不再需要自己编写实现代码。
容器提供了AOP技术,利用它很容易实现如权限拦截、运行期监控等功能。
4)容器提供的众多辅作类,使用这些类能够加快应用的开发,如: JdbcTemplate、 HibernateTemplate。
Spring对于主流的应用框架提供了集成支持,如:集成Hibernate、JPA、Struts等,这样更便于应用的开发。
3.Spring的其他注意事项
l spring的配置文件模版
<?xml version="1.0" encoding="UTF-8"?>
<beans xmlns="http://www.springframework.org/schema/beans"
xmlns:xsi="http://www.w3.org/2001/XMLSchema-instance"
xsi:schemaLocation="http://www.springframework.org/schema/beans
http://www.springframework.org/schema/beans/spring-beans-2.5.xsd">
.....
</beans>
该配置模版可以从spring的参考手册(spring帮助存放路径下/spring-framework-3.2.2.RELEASE-dist/spring-framework-3.2.2.RELEASE/docs/spring-framework-reference/html/beans.html第五章的beans-factory-metadata下)或spring的例子中得到。配置文件的取名可以任意,文件可以存放在任何目录下,但考虑到通用性,一般放在类路径下。
l 编写spring配置文件时,不能出现帮助信息
由于spring的schema文件位于网络上,如果机器不能连接到网络,那么在编写配置信息时候就无法出现提示信息,解决方法有两种:
1)让机器上网,eclipse会自动从网络上下载schema文件并缓存在硬盘上。
2)手动添加schema文件,方法如下:
windwos->preferences->myeclipse->files and editors->xml->xmlcatalog;点"add",在出现的窗口中的Key Type中选择URI,在location中选"File system",然后在spring解压目录的dist/resources目录中选择spring-beans-2.5.xsd,回到设置窗口的时候不要急着关闭窗口,应把窗口中的Key Type改为Schema location,Key改为http://www.springframework.org/schema/beans/spring-beans-2.5.xsd
4.装配Bean(第一讲)
一、容纳你的bean
bean工厂:最简单的容器,提供了基础的依赖注入支持。创建各种类型的Bean.
应用上下文:建立在bean工厂基础之上,提供系统架构服务。
一.1 bean工厂介绍
工厂设计模式,创建分发各种bean。配置好它们之间的写作关系,参与bean的生命周期。bean工厂只把bean的定义信息载进来,用到的时候才实例化。
一.2使用应用上下文
ApplicationCotext,spring更加高级的容器。功能强大:
1).提供文本信息解析工具,包括对国际化支持。
2).提供载入文件资源的通用方法,如图片。
3).可以向注册为监听器的bean发送事件。
在很少的情况下,使用BeanFactory,如在移动设备。
三种经常用到的实现:
1).ClassPathXmlApplicationContext:从类路径中加载。
2).FileSystemXmlApplicationContext:从文件系统加载。
3).XmlWebApplicationContext:从web系统中加载。
ApplicationContext context = new FileSystemXmlApplicationContext("c:\foo.xml");
ApplicationContext context = new ClassPathXmlApplicationContext("foo.xml");
除了应用上下文提供的附加功能外,应用上下文与bean工厂的另一个重要区别是关于单例bean如何被加载。bean工厂延迟加载所有bean,直到getBean()方法被调用。应用上下文会在启动后预载入所有单例bean.这样可确保应用不需要等待他们被创建。
4.案例:第一个spring java项目
改案例只列举出重要配置文件和测试类,其他类没什么营养就不再赘述了;下面列出的几个配置文件和关键类中都要需要注意的事项和相应的解释注释。
- <SPAN style="FONT-FAMILY: KaiTi_GB2312; FONT-SIZE: 18px">spring.xml
- <?xml version="1.0" encoding="UTF-8"?>
- <beans xmlns="http://www.springframework.org/schema/beans"
- xmlns:xsi="http://www.w3.org/2001/XMLSchema-instance"
- xsi:schemaLocation="http://www.springframework.org/schema/beans
- http://www.springframework.org/schema/beans/spring-beans.xsd">
- <import resource="spring-dao.xml"/>
- <import resource="spring-service.xml"/>
- </beans>
- spring-dao.xml
- <?xml version="1.0" encoding="UTF-8"?>
- <beans xmlns="http://www.springframework.org/schema/beans"
- xmlns:xsi="http://www.w3.org/2001/XMLSchema-instance"
- xsi:schemaLocation="http://www.springframework.org/schema/beans
- http://www.springframework.org/schema/beans/spring-beans.xsd">
- <!-- spring容器就是负责创建、管理、维护Bean 并且能够依赖注入到相应组件上 -->
- <bean id="helloDaoImpl" class="www.csdn.spring.dao.impl.HelloDaoImpl"
- scope="prototype"></bean>
- <!-- spring-service.xml引用的改配置文件,所以在前者中加入了lazy-init="false",这里可以不写也会起作用;
- lazy-init属性的意思是:是否延迟加载,就是一创建 spring容器就去实例化对应容器对象,即执行改对象的构造器,而不是在使用的时候才去加载
- lazy-init="false" ,默认的值为default,但是default=false
- -->
- </beans>
- spring-service.xml
- <?xml version="1.0" encoding="UTF-8"?>
- <beans xmlns="http://www.springframework.org/schema/beans"
- xmlns:xsi="http://www.w3.org/2001/XMLSchema-instance"
- xsi:schemaLocation="http://www.springframework.org/schema/beans
- http://www.springframework.org/schema/beans/spring-beans.xsd">
- <bean id="helloServiceImpl" class="www.csdn.spring.service.impl.HelloServiceImpl" scope="singleton" lazy-init="false">
- <property name="helloDao" ref="helloDaoImpl"/>
- </bean>
- </beans>
- DemoTest类
- package www.csdn.spring.test;
- import org.junit.Test;
- import org.springframework.context.ApplicationContext;
- import org.springframework.context.support.ClassPathXmlApplicationContext;
- import www.csdn.spring.dao.HelloDao;
- import www.csdn.spring.dao.impl.HelloDaoImpl;
- import www.csdn.spring.service.HelloService;
- import www.csdn.spring.service.impl.HelloServiceImpl;
- public class DemoTest {
- @Test
- public void testHello(){
- // 容器创建实例化容器;读取 classes 路径下面的文件 参数动态参数、单个参数、数组等
- ApplicationContext context = new ClassPathXmlApplicationContext("spring.xml");
- //使用dao和daoImpl的写法
- //写法一:使用dao获取bean;这里getBean括号内填写的是对应spring的配置文件中bean标签的id属性名
- HelloDao helloDao1 = (HelloDao) context.getBean("helloDaoImpl");
- //还可以这么写:但是一般不这么写,因为java中都是面向接口编程,所以声明的时候尽量声明接口的类型而不是实现类的类型
- HelloDaoImpl helloDaoImpl1 = (HelloDaoImpl) context.getBean("helloDaoImpl");
- //写法二:同样使用dao获取bean,官网这么写,比较规范的写法
- HelloDao helloDao2 = (HelloDao) context.getBean("helloDaoImpl",HelloDaoImpl.class);
- //还可以这么写:但是一般不这么写,因为java中都是面向接口编程,所以声明的时候尽量声明接口的类型而不是实现类的类型
- HelloDaoImpl helloDaoImpl2 = (HelloDaoImpl) context.getBean("helloDaoImpl");
- //使用service和serviceImpl的写法
- //写法三:使用service获取bean
- HelloService helloService1 = (HelloService) context.getBean("helloServiceImpl");
- //还可以这么写:但是一般不这么写,因为java中都是面向接口编程,所以声明的时候尽量声明接口的类型而不是实现类的类型
- HelloServiceImpl helloServiceImpl1 = (HelloServiceImpl) context.getBean("helloServiceImpl");
- //写法四:同样使用service获取bean,官网这么写,比较规范的写法
- HelloService helloService2 = (HelloService) context.getBean("helloServiceImpl",HelloServiceImpl.class);
- //还可以这么写:但是一般不这么写,因为java中都是面向接口编程,所以声明的时候尽量声明接口的类型而不是实现类的类型
- HelloServiceImpl helloServiceImpl2 = (HelloServiceImpl) context.getBean("helloServiceImpl",HelloServiceImpl.class);
- helloService2.sayHello();
- }
- }
- HelloServiceImpl类;需要注意的是serviceImpl中的
- package www.csdn.spring.service.impl;
- import www.csdn.spring.dao.HelloDao;
- import www.csdn.spring.service.HelloService;
- public class HelloServiceImpl implements HelloService{
- private HelloDao helloDao;
- public HelloServiceImpl() {
- System.out.println("HelloServiceImpl实例化");
- }
- //set依赖注入很重要,不写会报错,不能读写helloDao这一属性
- /*
- * org.springframework.beans.NotWritablePropertyException: Invalid property 'helloDao' of bean class
- */
- public void setHelloDao(HelloDao helloDao) {
- System.out
- .println("控制反转:应用程序本身不在负责创建helloDao对象,而是由spring容器负责创建、管理、维护,这样控制权转移,称为反转。"
- + "可以通过依赖注入方式注入该HelloDao对象");
- this.helloDao = helloDao;
- }
- @Override
- public void sayHello() {
- helloDao.sayHello();
- }
- }
- </SPAN>

 浙公网安备 33010602011771号