My Shiny notes
1 Basic
一个Shiny App在一个app.R里面,然后这个script在一个路径下(例:newdir/),运行这个app使用runApp("newdir/")。参数有display.mode = "showcase"
Shiny App由三部分组成,ui、server和shinyApp:
library(shiny)

# Define UI ----
ui <- fluidPage(

)

# Define server logic ----
server <- function(input, output) {

}

# Run the app ----
shinyApp(ui = ui, server = server)
2 User Interface
2.1 Lay Out
使用fluidPage函数可以创造一个适应于窗口大小的界面:
ui <- fluidPage(

)
界面可以包含一个主面板和一个侧面板:
ui <- fluidPage(

  titlePanel("主面板标题"),

  sidebarLayout(
  	positon = "right",     # 默认"left"
    sidebarPanel("侧面板"),
    mainPanel("主面板")
  )

)
高级的还有(待补):
navbarPage :有导航栏的多页交互界面
fuidRow和column:网格页面
2.2 HTML Content
对应函数可以使用HTML语法:
| R code | HTML code |
|---|---|
p("一段话") |
<p>text</p> |
h1("一级标题") |
<h1>text</h1>( h2, h3, ..., h6) |
a("超链接") |
<a>text</a> |
br() |
<br/> 空行 |
div() |
<div/> 分割线 |
span(, style = "blabla: blabla; blabla:blabla") |
<span>blabla</span style = "blabla: blabla"> |
pre() |
<pre> 以固定宽度的字体按原样显示文本 |
code |
<code> 代码 |
img(src = "", height = ) |
<img> 图片 |
strong() |
<strong> 粗体 |
em() |
<em> 斜体 |
3 Add control widgets
3.1 Control widgets
| R code | Outcome |
|---|---|
actionButton() |
Action Button |
checkboxGroupInput() |
A group of check boxes |
checkboxInput() |
A single check box |
dateInput() |
A calendar to aid date selection |
dateRangeInput() |
A pair of calendars for selecting a date range |
fileInput() |
A file upload control wizard |
helpText() |
Help text that can be added to an input form |
numericInput() |
A field to enter numbers |
radioButtons() |
A set of radio buttons |
selectInput() |
A box with choices to select from |
sliderInput() |
A slider bar |
submitButton() |
A submit button |
textInput() |
A field to enter text |
3.2 Adding widgets
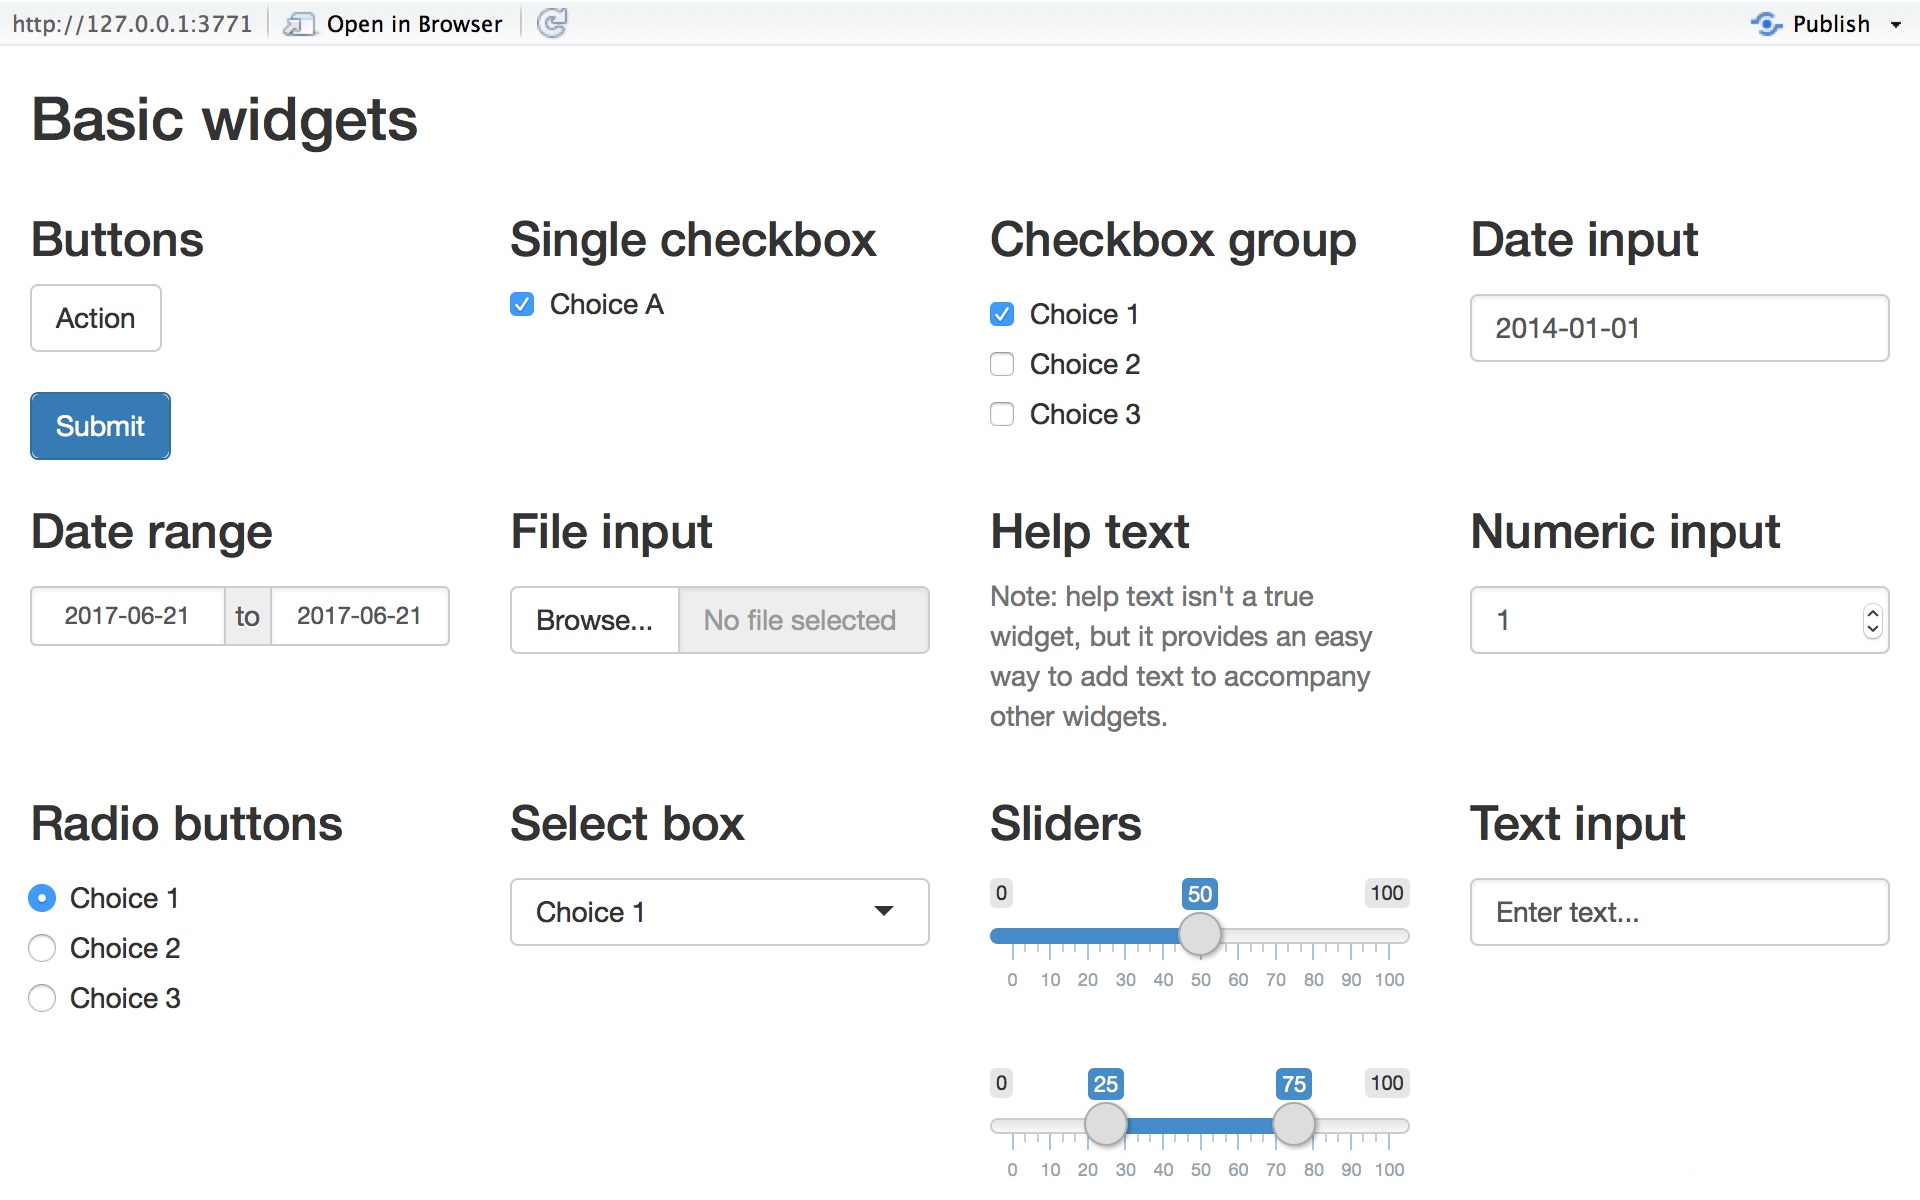
Widgets要加在面板函数里面,参数有name = "名字",label = "标签":
library(shiny)

# Define UI ----
ui <- fluidPage(
  titlePanel("Basic widgets"),

  fluidRow(

    column(3,
           h3("Buttons"),
           actionButton("action", "Action"),
           br(),
           br(),
           submitButton("Submit")),

    column(3,
           h3("Single checkbox"),
           checkboxInput("checkbox", "Choice A", value = TRUE)),

    column(3,
           checkboxGroupInput("checkGroup",
                              h3("Checkbox group"),
                              choices = list("Choice 1" = 1,
                                             "Choice 2" = 2,
                                             "Choice 3" = 3),
                              selected = 1)),

    column(3,
           dateInput("date",
                     h3("Date input"),
                     value = "2014-01-01"))
  ),

  fluidRow(

    column(3,
           dateRangeInput("dates", h3("Date range"))),

    column(3,
           fileInput("file", h3("File input"))),

    column(3,
           h3("Help text"),
           helpText("Note: help text isn't a true widget,",
                    "but it provides an easy way to add text to",
                    "accompany other widgets.")),

    column(3,
           numericInput("num",
                        h3("Numeric input"),
                        value = 1))
  ),

  fluidRow(

    column(3,
           radioButtons("radio", h3("Radio buttons"),
                        choices = list("Choice 1" = 1, "Choice 2" = 2,
                                       "Choice 3" = 3),selected = 1)),

    column(3,
           selectInput("select", h3("Select box"),
                       choices = list("Choice 1" = 1, "Choice 2" = 2,
                                      "Choice 3" = 3), selected = 1)),

    column(3,
           sliderInput("slider1", h3("Sliders"),
                       min = 0, max = 100, value = 50),
           sliderInput("slider2", "",
                       min = 0, max = 100, value = c(25, 75))
    ),

    column(3,
           textInput("text", h3("Text input"),
                     value = "Enter text..."))
  )

)

# Define server logic ----
server <- function(input, output) {

}

# Run the app ----
shinyApp(ui = ui, server = server)
4 Display Reactive Output
4.1 Output in "ui" Part
Output也要加在面板函数里面
| Output function | Creates |
|---|---|
dataTableOutput("OutputName") |
DataTable |
htmlOutput() |
raw HTML |
imageOutput() |
image |
plotOutput() |
plot |
tableOutput() |
table |
textOutput() |
text |
uiOutput() |
raw HTML |
verbatimTextOutput() |
text |
4.2 Create Output in "server" Part
output$OutputName就是ui里面的*Output("OutputName")。使用render*()来得到这些output。
input$WidgetName就是ui里面对应widget中输入变量。
| render function | creates |
|---|---|
renderDataTable() |
DataTable |
renderImage() |
images (saved as a link to a source file) |
renderPlot() |
plots |
renderPrint() |
any printed output |
renderTable() |
data frame, matrix, other table like structures |
renderText() |
character strings |
renderUI() |
a Shiny tag object or HTML |
server <- function(input, output) {

  output$OutputName <- render*({
    somefunction(input$WidgetName)
  })

}
5 Use R Script and Data
在app文件夹里可以放helper.R然后使用source("helper.R")引用。在app文件夹下新建一个data文件夹,然后使用read*()引用。
6 Reactive Expression
reactive({ })使数据需要更新时才更新,即在*render()函数里的数据过时或*render()函数里input值有变化时。在reactive与*render函数中调用reactive expression。
7 Share Your Apps
可以分享为r script(访问者需要安装R)或者一个web。
7.1 R Script
除了runApp()之外,还可以使用runUrl(),runGitHub(),runGist()。
# install.packages("shiny")
library(shiny)
runApp("someapp")
打包zip上传到一个link可以使用runGitHub():
library(shiny)
runUrl( "<the weblink>")
上传Github可以使用:
runGitHub( "<your repository name>", "<your user name>")
匿名上传Github(<gist.github.com>):
runGist("<gist number>")
7.2 Web
shinyapps.io,Shiny Server,RStudio Connect
本文作者:ZZN而已
本文链接:https://www.cnblogs.com/zerozhao/p/my-shiny-notes.html
版权声明:本博客所有文章除特别声明外,均采用 CC BY-NC-ND 4.0 许可协议。

 浙公网安备 33010602011771号