NodeMCU入门(3):断线自动重连,指示灯显示连接状态
准备工作
1.NodeMCU模块
2.ESPlorer v0.2.0-rc6
事件监听器
NodeMCU采用了事件响应的方式。也就是说,只需为事件设置一个回调函数,当事件发生时,回调函数就会被调用。
注册事件监听器
wif.sta.eventMonReg()Please update your program to use the
wifi.eventmonAPI, as thewifi.sta.eventmon___()API is deprecated.
通过监听器获取wifi连接状态
status=nil

wifi.sta.eventMonReg(wifi.STA_WRONGPWD, function()
    status = 'STA_WRONGPWD'
    print(status)
end)

--启动监听器
wifi.sta.eventMonStart(1000)
通过http://nodemcu.readthedocs.io/en/master/en/modules/wifi/#wifistaeventmonreg 文档可以获取更多的例子,如:
--register callback
wifi.sta.eventMonReg(wifi.STA_IDLE, function() print("STATION_IDLE") end)
wifi.sta.eventMonReg(wifi.STA_CONNECTING, function() print("STATION_CONNECTING") end)
wifi.sta.eventMonReg(wifi.STA_WRONGPWD, function() print("STATION_WRONG_PASSWORD") end)
wifi.sta.eventMonReg(wifi.STA_APNOTFOUND, function() print("STATION_NO_AP_FOUND") end)
wifi.sta.eventMonReg(wifi.STA_FAIL, function() print("STATION_CONNECT_FAIL") end)
wifi.sta.eventMonReg(wifi.STA_GOTIP, function() print("STATION_GOT_IP") end)

--register callback: use previous state
wifi.sta.eventMonReg(wifi.STA_CONNECTING, function(previous_State)
    if(previous_State==wifi.STA_GOTIP) then
        print("Station lost connection with access point\n\tAttempting to reconnect...")
    else
        print("STATION_CONNECTING")
    end
end)

--unregister callback
wifi.sta.eventMonReg(wifi.STA_IDLE)
断线自动重连
有时因为路由器重启等原因,NodeMCU可能会掉线,好在NodeMCU可以设置自动连接:
Auto connects to AP in station mode.
0 to disable auto connecting, 1 to enable auto connecting
修改上一节中的 wifi.sta.connect()为 wifi.sta.autoconnect(1)
控制LED灯闪烁
在NodeMCU上有一个LED可用。可以用它来显示当前的连接状态。经测试,控制该LED的引脚为D4。
这是一个控制LED以特定延迟序列闪烁的函数。
----------------------
--define
---------------------
IO_BLINK = 4
TMR_BLINK = 5

gpio.mode(IO_BLINK, gpio.OUTPUT)


---------------------
-- blink
---------------------
blink = nil
tmr.register(TMR_BLINK, 100, tmr.ALARM_AUTO, function()
    gpio.write(IO_BLINK, blink.i % 2)
    tmr.interval(TMR_BLINK, blink[blink.i + 1])
    blink.i = (blink.i + 1) % #blink
end)

function blinking(param)
    if type(param) == 'table' then
        blink = param
        blink.i = 0
        tmr.interval(TMR_BLINK, 1)
        running, _ = tmr.state(TMR_BLINK)
        if running ~= true then
            tmr.start(TMR_BLINK)
        end
    else
        tmr.stop(TMR_BLINK)
        gpio.write(IO_BLINK, param or gpio.LOW)
    end
end
blinking()函数需要传入一个数组,数组元素依次表示LED亮灭的延迟。例子:
blinking({300, 300}) -- 循环闪烁:亮300ms,灭300ms
blinking({100, 100 , 100, 500}) -- 循环闪烁:亮100ms,灭100ms,亮100ms,灭500ms

blinking() -- 常亮
blinking(gpio.LOW) -- 常亮
blinking(gpio.HIGH) -- 常灭
LED显示连接状态
现在就可以结合监听器用LED显示连接状态了。
在上一节的监听器事件里,各添加一行闪烁的即可。
wifi.sta.eventMonReg(wifi.STA_WRONGPWD, function()
    blinking({100, 100 , 100, 500})
    status = 'STA_WRONGPWD'
    print(status)
end)

wifi.sta.eventMonReg(wifi.STA_APNOTFOUND, function()
    blinking({2000, 2000})
    status = 'STA_APNOTFOUND'
    print(status)
end)

wifi.sta.eventMonReg(wifi.STA_CONNECTING, function(previous_State)
    blinking({300, 300})
    status = 'STA_CONNECTING'
    print(status)
end)

wifi.sta.eventMonReg(wifi.STA_GOTIP, function()
    blinking()
    status = 'STA_GOTIP'
    print(status, wifi.sta.getip())
end)
更新测试
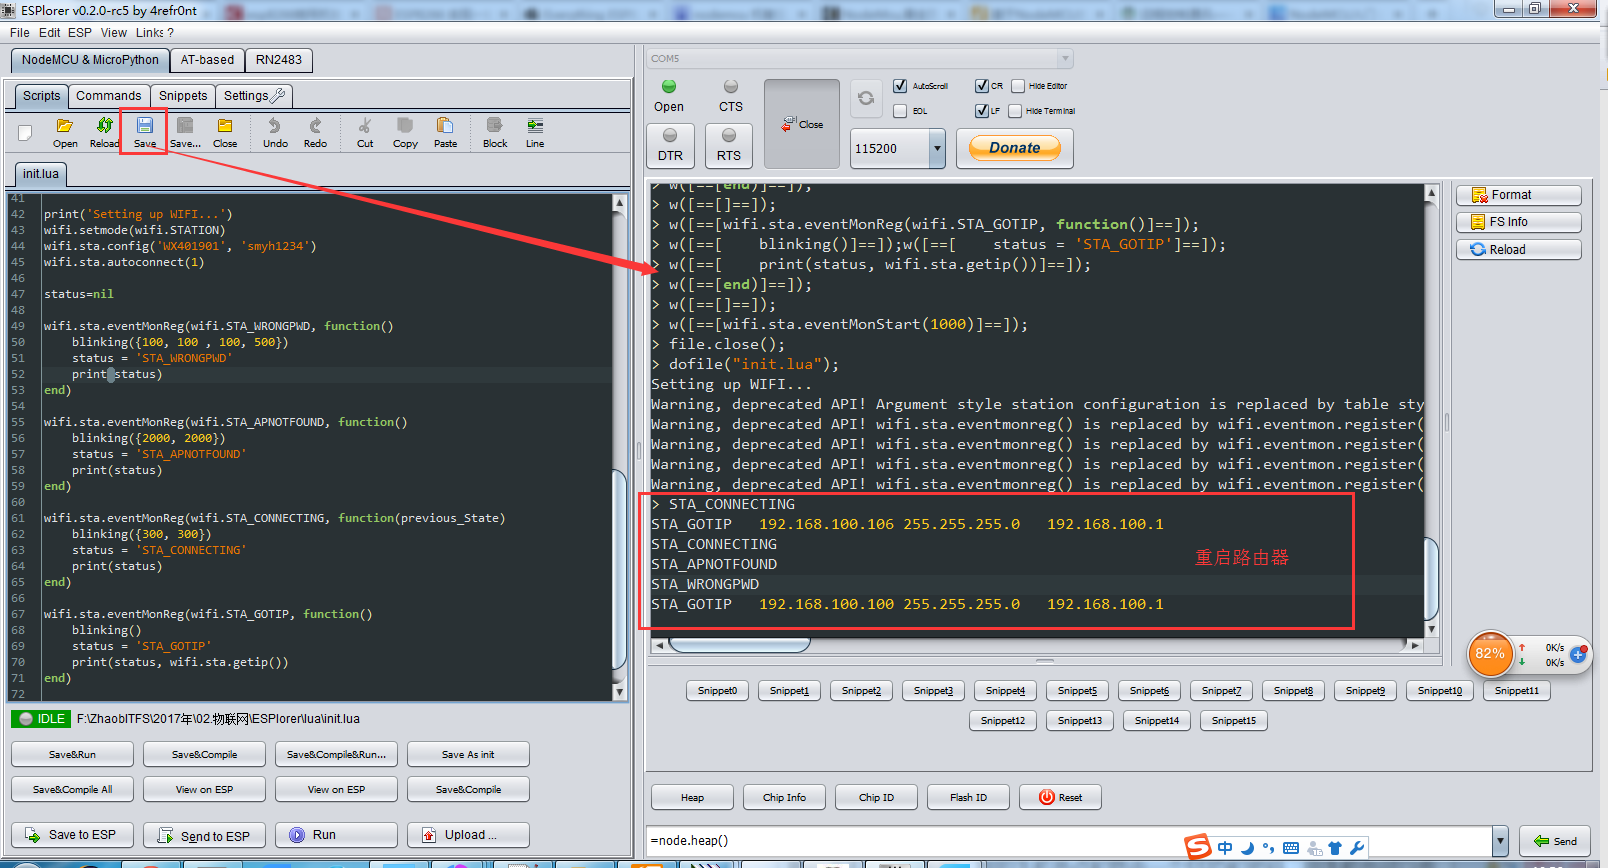
点击保存按钮就可以更新到NodeMCU模块里了,并且重新刷固件也不会丢失,通过输出信息可以看到每一步操作,错误提示可以定位到行,有问题时可以仔细看看输出。
连接上WIFI后LED常亮,重启路由器,LED灯闪烁并输出状态信息。


-- init.lua

----------------------
--define
---------------------
IO_BLINK = 4
TMR_BLINK = 5

gpio.mode(IO_BLINK, gpio.OUTPUT)


---------------------
-- blink
---------------------
blink = nil
tmr.register(TMR_BLINK, 100, tmr.ALARM_AUTO, function()
    gpio.write(IO_BLINK, blink.i % 2)
    tmr.interval(TMR_BLINK, blink[blink.i + 1])
    blink.i = (blink.i + 1) % #blink
end)

function blinking(param)
    if type(param) == 'table' then
        blink = param
        blink.i = 0
        tmr.interval(TMR_BLINK, 1)
        running, _ = tmr.state(TMR_BLINK)
        if running ~= true then
            tmr.start(TMR_BLINK)
        end
    else
        tmr.stop(TMR_BLINK)
        gpio.write(IO_BLINK, param or gpio.LOW)
    end
end


---------------------
-- wifi
---------------------

print('Setting up WIFI...')
wifi.setmode(wifi.STATION)
wifi.sta.config('WX401901', 'smyh1234')
wifi.sta.autoconnect(1)

status=nil

wifi.sta.eventMonReg(wifi.STA_WRONGPWD, function()
    blinking({100, 100 , 100, 500})
    status = 'STA_WRONGPWD'
    print(status)
end)

wifi.sta.eventMonReg(wifi.STA_APNOTFOUND, function()
    blinking({2000, 2000})
    status = 'STA_APNOTFOUND'
    print(status)
end)

wifi.sta.eventMonReg(wifi.STA_CONNECTING, function(previous_State)
    blinking({300, 300})
    status = 'STA_CONNECTING'
    print(status)
end)

wifi.sta.eventMonReg(wifi.STA_GOTIP, function()
    blinking()
    status = 'STA_GOTIP'
    print(status, wifi.sta.getip())
end)

wifi.sta.eventMonStart(1000)
相关资源
你也可以在NodeMCU-Tutorial下载到本文的相关资源和代码。
本文是在 NodeMCU之旅(二):断线自动重连,闪烁连接状态 基础之上的学习过程,感谢原作者。

 浙公网安备 33010602011771号