
Salesforce LWC学习(二十九) getRecordNotifyChange(LDS拓展增强篇)
本篇参考:
https://developer.salesforce.com/docs/component-library/documentation/en/lwc/data_ui_api
https://developer.salesforce.com/docs/component-library/documentation/en/lwc/data_guidelines
之前在aura以及lwc得文章中都有过介绍 LDS(Lightning Data Service)。简而言之, LDS实现了记录得跨组件共有,并且当前得记录在跨组件中得版本相同,从而实现不同得组件展示当前记录同样得内容。在lwc中,有两个部分自动实现了LDS。
- lightning-record-form/lightning-record-view-form/lightning-record-edit-form
lightning/ui*Api模块中得所有得wire adapter得方法。
这样说来很懵,举个例子更直观得理解。
RecordNotifyChangeController.cls
 1 public with sharing class RecordNotifyChangeController {
 2     @AuraEnabled
 3     public static String saveAccount(String recordId,String industry,String phone) {
 4         Account accountItem = new Account();
 5         accountItem.Id = recordId;
 6         accountItem.industry = industry;
 7         accountItem.phone = phone;
 8         accountItem.Name = industry + phone;
 9         try {
10             update accountItem;
11             return 'success';
12         } catch(Exception e) {
13             return 'error';
14         }
15     }
16
17     @AuraEnabled(cacheable=true)
18     public static Account getAccount(String recordId) {
19         Account accountItem = [SELECT Name,Industry,Phone from Account where Id = :recordId limit 1];
20         return accountItem;
21     }
22 }
recordNotifyChangeSample.js
 1 import { LightningElement, wire,api,track } from 'lwc';
 2 import { getRecord } from 'lightning/uiRecordApi';
 3 import { refreshApex } from '@salesforce/apex';
 4 import saveAccount from '@salesforce/apex/RecordNotifyChangeController.saveAccount';
 5 import getAccount from '@salesforce/apex/RecordNotifyChangeController.getAccount';
 6 import PHONE_FIELD from '@salesforce/schema/Account.Phone';
 7 import INDUSTRY_FIELD from '@salesforce/schema/Account.Industry';
 8 import NAME_FIELD from '@salesforce/schema/Account.Name';
 9 export default class RecordNotifyChangeSample extends LightningElement {
10     @api recordId;
11
12     @track phone;
13
14     @track industry;
15
16     @track accountName;
17
18     fields=[PHONE_FIELD,INDUSTRY_FIELD];
19
20    accountRecord;
21
22     // Wire a record.
23     @wire(getRecord, { recordId: '$recordId', fields: [PHONE_FIELD, INDUSTRY_FIELD,NAME_FIELD]})
24     wiredAccount(value) {
25         this.accountRecord = value;
26         const { data, error } = value;
27         if(data && data.fields) {
28             this.industry = data.fields.Industry.value;
29             this.phone = data.fields.Phone.value;
30             this.accountName = data.fields.Name.value;
31         } else if(error) {
32             //TODO
33         }
34     }
35
36
37     handleChange(event) {
38         if(event.target.name === 'phone') {
39             this.phone = event.detail.value;
40         } else if(event.target.name === 'industry') {
41             this.industry = event.detail.value;
42         }
43     }
44
45     handleSave() {
46         saveAccount({ recordId: this.recordId, industry : this.industry, phone : this.phone})
47         .then(result => {
48             if(result === 'success') {
49                 refreshApex(this.accountRecord);
50             } else {
51                 //TODO
52             }
53         })
54         .catch(error => {
55             //TODO
56         });
57     }
58
59 }
recordNotifyChangeSample.html
 1 <template>
 2     <lightning-card title="use lightning-record-form">
 3         <lightning-record-form object-api-name="Account" fields={fields} record-id={recordId} mode="view"></lightning-record-form>
 4     </lightning-card>
 5
 6     <lightning-card title="use lightning input">
 7         <lightning-layout multiple-rows="true">
 8             <lightning-layout-item size="12">
 9                 <lightning-input value={accountName} label="Name"></lightning-input>
10             </lightning-layout-item>
11             <lightning-layout-item size="6">
12                 <lightning-input value={phone} label="Phone" name="phone" onchange={handleChange}></lightning-input>
13             </lightning-layout-item>
14             <lightning-layout-item size="6">
15                 <lightning-input value={industry} name="industry" label="Industry"></lightning-input>
16             </lightning-layout-item>
17             <lightning-layout-item size="12">
18                 <lightning-button onclick={handleSave} label="save"></lightning-button>
19             </lightning-layout-item>
20         </lightning-layout>
21     </lightning-card>
22 </template>
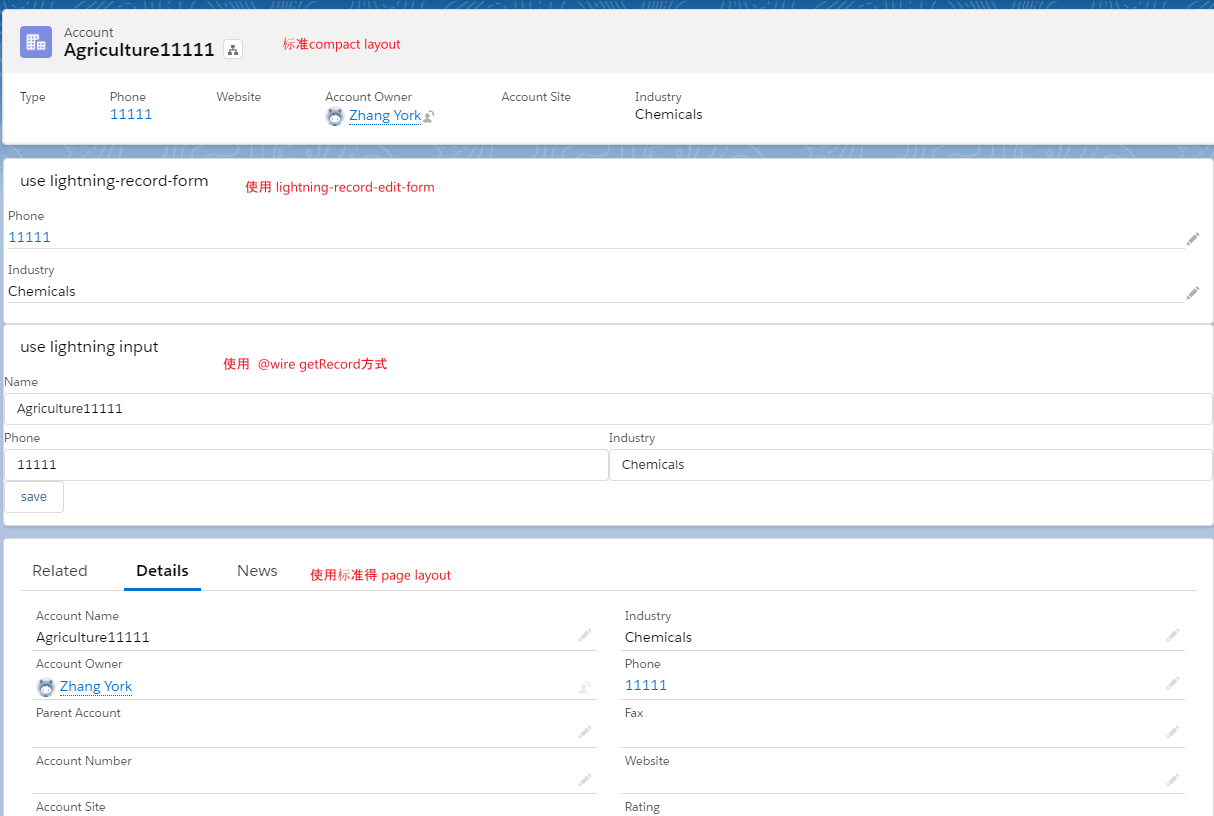
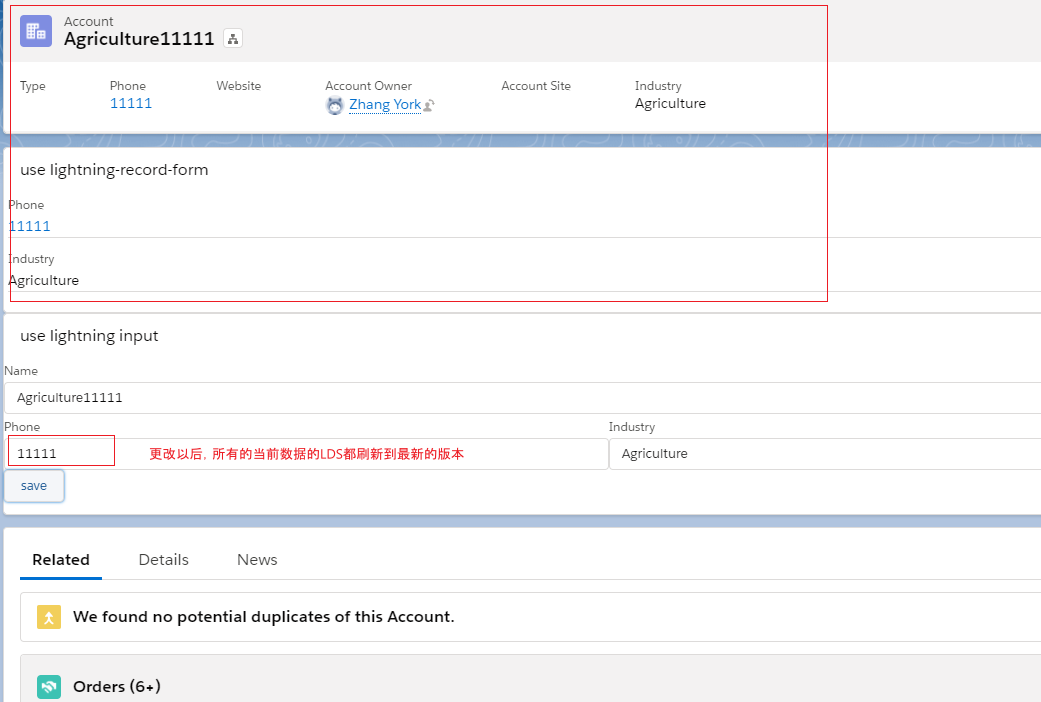
效果展示:
1. 下方页面由几部分组成,因为在lightning中,一个页面可能包含多个组件,多个组件可能共用数据,使用LDS得好处是所有得缓存都是同一个版本,即一个修改改变了version以后,所有的使用当前LDS的都重新刷新版本到最新,展示最新的内容。
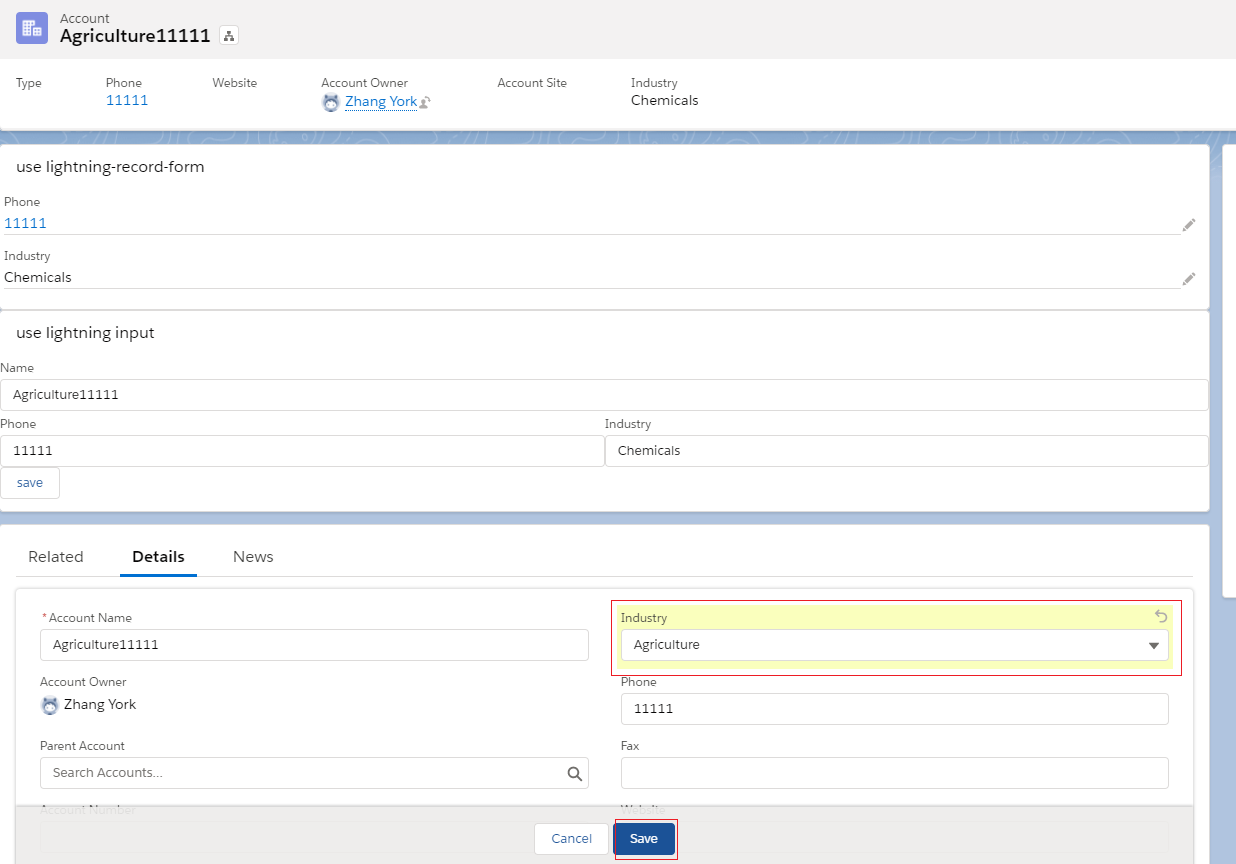
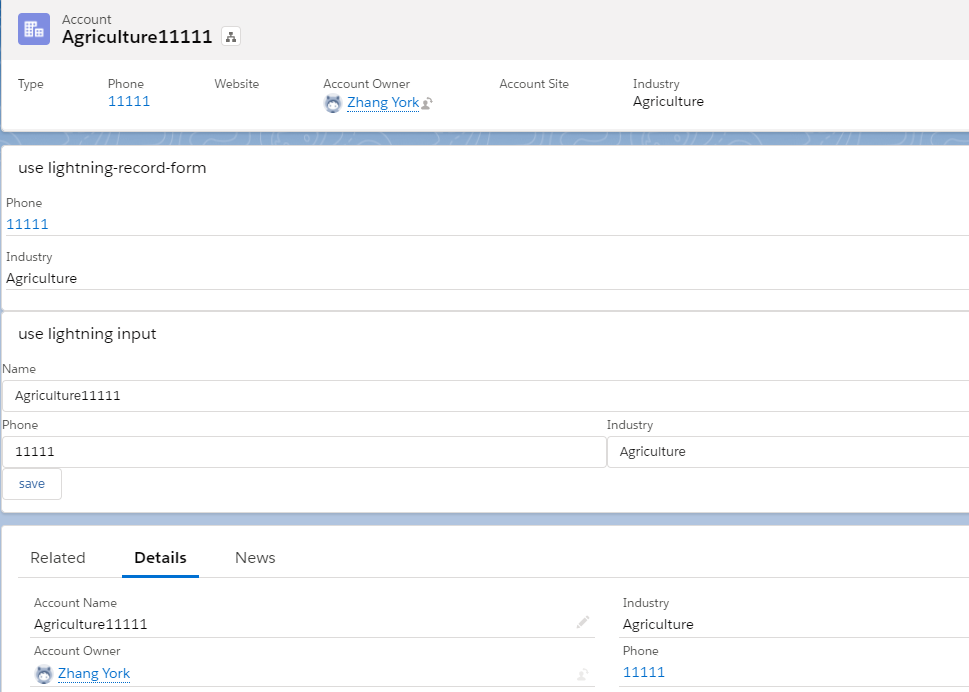
2. 我们使用 inline edit更改industry的值,更改以后不用刷新当前页面,上面的两部分引用内容会自动改变。
LDS虽然用的爽,但是毕竟有限制,因为只有满足上面所说的条件才可以共用LDS的缓存,如果使用 @wire调用后台apex的代码则无法实现 共用LDS从而导致一个页面各个 component展示出现问题。说到这里提一下在lwc中 work with data通常的使用顺序。
1. 如果需求可以使用 lightning-record-form / lightning-record-view-form / lightning-record-edit-form场景,优先使用。使用此种标签需要考虑权限问题,因为使用此标签权限取决于当前的 user对当前的表和字段访问权限。如果我们对这个表和字段没有相关的权限,就没法正常的使用。而且 这三个标签不是针对所有的表都有效,使用时需要查看你的表是否支持,比如 Event/Task就不支持。而且这三个表不适用于特别复杂的新建/更新场景。
2. 如果需求使用1所述内容无法实现,可以使用 lwc提供的相关的 wire adapter的方法,比如 getRecord,updateRecord等。此种还是针对大部分standard object以及所有custom object有效,会比1更灵活处理。
3. 使用wire 或者命令式调用apex方法处理逻辑。此种适用于以下的场景:
- 用于 wire adapter不支持的object的数据处理,比如 Event / Task;
- 用于user interface不支持的操作,比如 wire adapter提供了允许获取列表数据的方法,但是没法设置相关的filter的逻辑,我们就可以使用apex在后台去处理复杂的逻辑;
- 去处理一个transactional逻辑,比如创建一条 account以后,还想创建一个默认的contact,这种使用 wire adapter无法实现,只能使用apex;
- 隐式调用方法,比如我们点某个按钮或者在生命周期函数中调用某些后台方法。
apex方法好用是好用,因为能搞定任何的场景,但是他有一个缺点,即查询的数据不是LDS,如果数据进行了更新,本页面其他的component如果引用了LDS,数据的版本不是最新的版本,则展示了不同步的数据现象。举例说明,我们对 上面demo中的wiredAccount从getRecord方法换成后台 通过apex获取数据。
recordNotifyChangeSample.js
 1 import { LightningElement, wire,api,track } from 'lwc';
 2 import { getRecord } from 'lightning/uiRecordApi';
 3 import { refreshApex } from '@salesforce/apex';
 4 import saveAccount from '@salesforce/apex/RecordNotifyChangeController.saveAccount';
 5 import getAccount from '@salesforce/apex/RecordNotifyChangeController.getAccount';
 6 import PHONE_FIELD from '@salesforce/schema/Account.Phone';
 7 import INDUSTRY_FIELD from '@salesforce/schema/Account.Industry';
 8 import NAME_FIELD from '@salesforce/schema/Account.Name';
 9 export default class RecordNotifyChangeSample extends LightningElement {
10     @api recordId;
11
12     @track phone;
13
14     @track industry;
15
16     @track accountName;
17
18     fields=[PHONE_FIELD,INDUSTRY_FIELD];
19
20    accountRecord;
21
22    @wire(getAccount,{recordId : '$recordId'})
23    wiredAccount(value) {
24        this.accountRecord = value;
25        const { data, error } = value;
26        if(data) {
27            this.industry = data.Industry;
28            this.phone = data.Phone;
29            this.accountName = data.Name;
30        }
31    }
32
33
34     handleChange(event) {
35         if(event.target.name === 'phone') {
36             this.phone = event.detail.value;
37         } else if(event.target.name === 'industry') {
38             this.industry = event.detail.value;
39         }
40     }
41
42     handleSave() {
43         saveAccount({ recordId: this.recordId, industry : this.industry, phone : this.phone})
44         .then(result => {
45             if(result === 'success') {
46                 refreshApex(this.accountRecord);
47             } else {
48                 //TODO
49             }
50         })
51         .catch(error => {
52             //TODO
53         });
54     }
55
56 }
结果展示
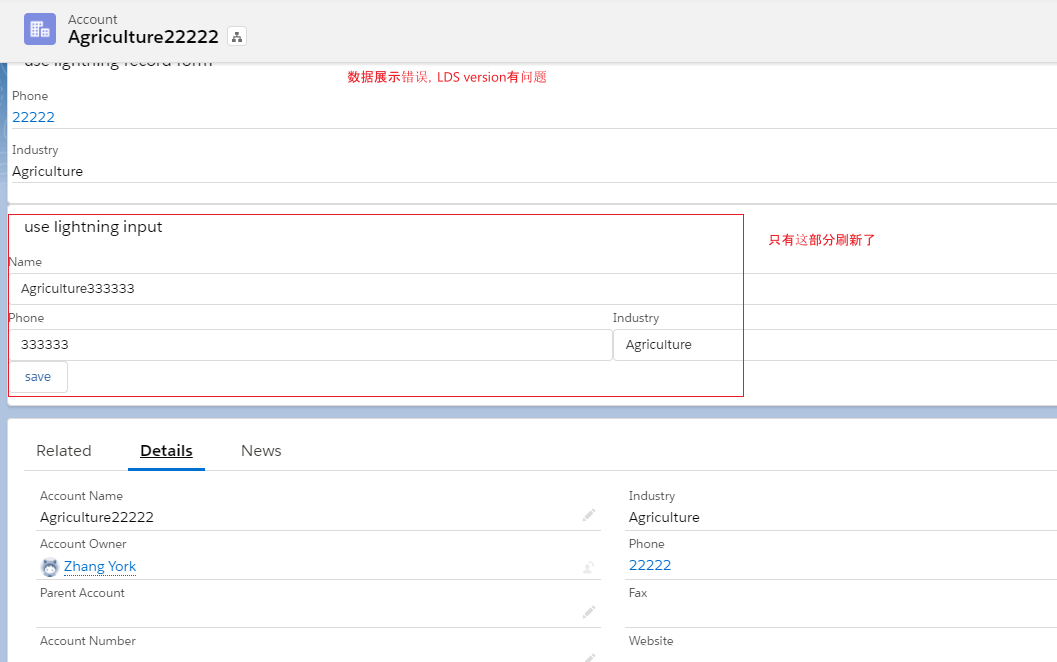
这种就会充满了困惑,同一个页面相同记录数据展示两个version,自然用户这关过不了。如何解决呢?下面就讲一下今天的主角:getRecordNotifyChange。
getRecordNotifyChange用于查询指定的记录ID或ID列表,将他们的LDS的缓存和version刷新到最新。从而实现apex调用情况下,即使在更新了数据情况下,整个页面的LDS都是最新的。需要注意的是,这个 功能仅用于 version 50及以上版本,如果是48/49或者其他的老版本不支持。具体使用直接上demo
 1 import { LightningElement, wire,api,track } from 'lwc';
 2 import { getRecord,getRecordNotifyChange } from 'lightning/uiRecordApi';
 3 import { refreshApex } from '@salesforce/apex';
 4 import saveAccount from '@salesforce/apex/RecordNotifyChangeController.saveAccount';
 5 import getAccount from '@salesforce/apex/RecordNotifyChangeController.getAccount';
 6 import PHONE_FIELD from '@salesforce/schema/Account.Phone';
 7 import INDUSTRY_FIELD from '@salesforce/schema/Account.Industry';
 8 import NAME_FIELD from '@salesforce/schema/Account.Name';
 9 export default class RecordNotifyChangeSample extends LightningElement {
10     @api recordId;
11
12     @track phone;
13
14     @track industry;
15
16     @track accountName;
17
18     fields=[PHONE_FIELD,INDUSTRY_FIELD];
19
20    accountRecord;
21
22    @wire(getAccount,{recordId : '$recordId'})
23    wiredAccount(value) {
24        this.accountRecord = value;
25        const { data, error } = value;
26        if(data) {
27            this.industry = data.Industry;
28            this.phone = data.Phone;
29            this.accountName = data.Name;
30        }
31    }
32
33
34     handleChange(event) {
35         if(event.target.name === 'phone') {
36             this.phone = event.detail.value;
37         } else if(event.target.name === 'industry') {
38             this.industry = event.detail.value;
39         }
40     }
41
42     async handleSave() {
43         await saveAccount({ recordId: this.recordId, industry : this.industry, phone : this.phone})
44         .then(result => {
45             if(result === 'success') {
46                 refreshApex(this.accountRecord);
47                 getRecordNotifyChange([{recordId: this.recordId}]);
48             } else {
49                 //TODO
50             }
51         })
52         .catch(error => {
53             //TODO
54         });
55     }
56
57 }
上面demo中主要改了两部分:
1. 在头部引入了 getRecordNotifyChange
2. handleSave需要使用 async或者 Promise,demo中使用异步操作。这个是硬性要求。
结果展示:
总结:getRecordNotifyChange实现了使用调用后台apex情况下,LDS保证是最新的痛点,项目中可能会经常用到,不了解的小伙伴快去查看一下官方文档。篇中有错误的欢迎指出,有不懂欢迎留言。
作者:zero
博客地址:http://www.cnblogs.com/zero-zyq/
本文欢迎转载,但未经作者同意必须保留此段声明,且在文章页面明显位置给出原文连接
如果文章的内容对你有帮助,欢迎点赞~
为方便手机端查看博客,现正在将博客迁移至微信公众号:Salesforce零基础学习,欢迎各位关注。

 浙公网安备 33010602011771号