
Linux系列教程——Linux文件查找、Linux压缩打包、Linux软件管理
1 Linux 文件查找
1.find 查找概述
为什么要有文件查找,因为很多时候我们可能会忘了某个文件所在的位置,此时就需要通过 find 来查找。find 命令可以根据不同的条件来进行查找文件,例如:文件名称、文件大小、文件修改时间、属主属组、权限、等等方式。同时 find 命令是 Linux 下必须掌握的。
find 命令的基本语法如下
| 命令 | 路径 | 选项 | 表达式 | 动作 |
|---|---|---|---|---|
| find | [path…] | [options] | [expression] | [action] |
| 查找 | 地区 | 妹纸 | 18-25 岁 | 约? |
2.find 查找示例
以下列出所有 find 常用的选项
1.find 名称查找
#1.创建文件
touch /etc/sysconfig/network-scripts/{ifcfg-eth1,IFCFG-ETH1}

#2.查找/etc目录下包含ifcfg-eth0名称的文件
[root@lqz ~]# find /etc -name "ifcfg-eth1"

#3.-i 忽略大小写
[root@lqz ~]# find /etc -iname "ifcfg-eth1"
#查找/etc目录下包含ifcfg-eth名称所有文件
[root@lqz ~]# find /etc/ -name "ifcfg-eth*"
[root@lqz ~]# find /etc -iname "ifcfg-eth*"
2.find 大小查找
#1.查找大于5M的文件
[root@lqz ~]# find /etc -size +5M

#2.查找等于5M的文件
[root@lqz ~]# find /etc -size 5M

#3.查找小于5M的文件
[root@lqz ~]# find /etc -size -5M
3.find 类型查找
# f 文件
[root@lqz ~]# find /dev -type f
# d 目录
[root@lqz ~]# find /dev -type d
# l 链接
[root@lqz ~]# find /dev -type l
# b 块设备
[root@lqz ~]# find /dev -type b
# c 字符设备
[root@lqz ~]# find /dev -type c
# s 套接字
[root@lqz ~]# find /dev -type s
# p 管道文件
[root@lqz ~]# find /dev -type p
4.find 时间查找
#1.创建测试文件(后期shell会讲)
[root@lqz ~]# for i in {01..28};do date -s  201904$i && touch file-$i;done

#2.查找7天以前的文件(不会打印当天的文件)
[root@lqz ~]# find ./ -iname "file-*" -mtime +7

#3.查找最近7天的文件,不建议使用(会打印当天的文件)
[root@lqz ~]# find ./ -iname "file-*" -mtime -7

#4.查找第7天文件(不会打印当天的文件)
[root@lqz ~]# find ./ -iname "file-*" -mtime 7

#5.本地文件保留最近7天的备份文件, 备份服务器保留3个月的备份文件(实际使用方案)
find /backup/ -iname "*.bak" -mtime +7 -delete
find /backup/ -iname "*.bak" -mtime +90 -delete
5.find 用户查找
#查找属主是jack
[root@lqz ~]# find /home -user jack
#查找属组是admin
[root@lqz ~]# find /home -group admin
#查找属主是jack, 属组是admin
[root@lqz ~]# find /home -user jack -group admin
#查找属主是jack, 并且属组是admin
[root@lqz ~]# find /home -user jack -a -group admin
#查找属主是jack, 或者属组是admin
[root@lqz ~]# find /home -user jack -o -group admin
#查找没有属主
[root@lqz ~]# find /home -nouser
#查找没有属组
[root@lqz ~]# find /home -nogroup
#查找没有属主或属组
[root@lqz ~]# find /home -nouser -o -nogroup
6.find 权限查找
#精切匹配644权限
[root@lqz ~]# find . -perm 644 -ls

#包含444权限即可
[root@lqz ~]# find . -perm -444  -ls
#查找全局可写(每位权限必须包含w)
[root@lqz ~]# find . -perm -222 -ls
#包含set uid
[root@lqz ~]# find  /usr/sbin -perm -4000 -ls
#包含set gid
[root@lqz ~]# find  /usr/sbin -perm -2000 -ls
#包含sticky
[root@lqz ~]# find  /usr/sbin -perm -1000 -ls
2.find 动作处理,比如查找到一个文件后,需要对文件进行如何处理, find 的默认动作是 -print
| 动作 | 含义 |
|---|---|
| 打印查找到的内容(默认) | |
| -ls | 以长格式显示的方式打印查找到的内容 |
| -delete | 删除查找到的文件(仅能删除空目录) |
| -ok | 后面跟自定义 shell 命令(会提示是否操作) |
| -exec | 后面跟自定义 shell 命令(标准写法 -exec 😉 |
1.find 查找后的动作命令示例
#1.使用-print打印查找到的文件
[root@lqz ~]# find /etc -name "ifcfg*"
[root@lqz ~]# find /etc -name "ifcfg*" -print

#2.使用-ls打印查找到的文件,以长格式显示
[root@lqz ~]# find /etc -name "ifcfg*" -ls

#3.使用-delete删除文件,但仅能删除空目录
[root@lqz ~]# find /etc -name "ifcfg*" -delete

#4.使用-ok实现文件拷贝,但会提示是否拷贝
[root@lqz ~]# find /etc -name "ifcfg*" -ok cp -rvf {} /tmp \;

#5.使用-exec实现文件拷贝和文件删除。
[root@lqz ~]# find /etc -name "ifcfg*" -exec cp -rvf {} /tmp \;
[root@lqz ~]# find /etc -name "ifcfg*" -exec rm -f {} \;
2.使用 find 命令结合 xargs
#xargs将前者命令查找到的文件作为一个整体传递后者命令的输入
[root@lqz ~]# touch file.txt
[root@lqz ~]# find . -name "file.txt" |xargs rm -f
[root@lqz ~]# find . -name "file.txt" |xargs -I {} cp -rvf {} /var/tmp
3.find 逻辑运算符
| 符号 | 作用 |
| ---- | ---- | --- |
| -a | 与 |
| -o | 或 |
| -not | ! | 非 |
#1.查找当前目录下,属主不是hdfs的所有文件
[root@lqz ~]# find . -not -user hdfs
[root@lqz ~]# find . ! -user hdfs

#2.查找当前目录下,属主属于hdfs,且大小大于300字节的文件
[root@lqz ~]# find . -type f -a -user hdfs -a -size +300c

#3.查找当前目录下的属主为hdfs或者以xml结尾的普通文件
[root@lqz ~]# find . -type f -a \( -user hdfs -o -name '*.xml' \)
4.find 相关练习题
1.查找/tmp目录下,属主不是root,且文件名不以f开头的文件
2.查找/var目录下属主为root,且属组为mail的所有文件
3.查找/var目录下不属于root、lp、gdm的所有文件
4.查找/var目录下最近一周内其内容修改过,同时属主不为root,也不是postfix的文件
5.查找/etc目录下大于1M且类型为普通文件的所有文件
6.将/etc/中的所有目录(仅目录)复制到/tmp下,目录结构不变
7.将/etc目录复制到/var/tmp/,/var/tmp/etc的所有目录权限777/var/tmp/etc目录中所有文件权限666
8.保留/var/log/下最近7天的日志文件,其他全部删除
9.创建touch file{1..10}10个文件, 保留file9,其他一次全部删除
10.解释如下每条命令含义
mkdir /root/dir1
touch /root/dir1/file{1..10}
find /root/dir1 -type f -name "file5"
find /root/dir1 ! -name "file5"
find /root/dir1 -name "file5" -o -name "file9"
find /root/dir1 -name "file5" -o -name "file9" -ls
find /root/dir1 \( -name "file5" -o -name "file9" \) -ls
find /root/dir1 \( -name "file5" -o -name "file9" \) -exec rm -rvf {} \;
find /root/dir1  ! \( -name "file4" -o -name "file8" \) -exec rm -vf {}  \;
2 Linux 压缩打包
1.文件打包与压缩
1.什么是文件压缩?
将多个文件或目录合并成为一个特殊的文件。比如: 搬家…脑补画面 img.
2.为什么要对文件进行压缩?
当我们在传输大量的文件时,通常都会选择将该文件进行压缩,然后在进行传输。首先:压缩后的文件会比压缩前的文件小。一个 28G 的文件夹压缩后能达到 6G 其次:多个文件传输很慢,但单个文件传输会很快,同时还能节省网络的消耗。(比如: 搬家时,单行李往外拿和打包后往外拿??你懂我意思?)
2.Windows 的压缩包与 Linux 的压缩包能否互通?
在 windows 系统下,我们接触最多的压缩格式是 rar 或 zip ,但在 Linux 上使用最多的压缩格式是 zip 和 tar.gz 。当然不用担心,Linux 上的压缩格式放在 windows 系统下都是可以正常打开的。PS: Linux 不支持 Windows 下的 RAR 格式的压缩文件。Windows 和 Linux 互通通常选择 zip
3.Linux 下压缩包有哪些常见的类型
格式
压缩工具
.zip
zip 压缩工具
.gz
gzip 压缩工具,只能压缩文件,会删除原文件(通常配合 tar 使用)
.bz2
bzip2 压缩工具,只能压缩文件,会删除原文件(通常配合 tar 使用)
.tar.gz
先使用 tar 命令归档打包,然后使用 gzip 压缩
.tar.bz2
先使用 tar 命令归档打包,然后使用 bzip 压缩
2.gzip 打包与压缩
使用 gzip 方式进行压缩文件
# 仅对文件有效,对文件夹无效,压缩有文件删除,解压后压缩包删除
[root@lqz ~]# yum install gzip -y
[root@lqz ~]# gzip file      #对文件进行压缩
[root@lqz ~]# zcat file.gz    #查看gz压缩后的文件
[root@lqz ~]# gzip -d file.gz #解压gzip的压缩包

#使用场景:当需要让某个文件不生效时,快速关闭和启用配置文件
[root@lqz ~]# cd /etc/yum.repos.d/
[root@lqz ~]# gzip *
[root@lqz ~]# gzip CentOS-Vault.repo --> CentOS-Vault.repo.gz
[root@lqz ~]# zcat CentOS-Vault.repo.gz   --> 查看不想解压的压缩包文件内容
3.zip 打包与压缩
使用 zip 命令可以对文件进行压缩打包,解压则需要使用 unzip 命令
# 默认情况下没有zip和unzip工具,需要进行安装
[root@lqz ~]# yum install zip unzip -y

#1.压缩文件为zip包
# zip 压缩表名 压缩的文件
[root@lqz ~]# zip  filename.zip  filename
# 打包不通目录下的不通文件
[root@lqz ~]# zip  filename1.zip  file1 file2 /etc/hosts

#2.压缩目录为zip包 (不加r,只会打包一个文件夹)
[root@lqz ~]# zip -r  dir.zip dir/

#3.查看zip压缩包是否是完整的
[root@lqz ~]# zip -T  filename.zip
test of filename.zip OK

#4.不解压压缩查看压缩包中的内容
[root@lqz ~]# unzip -l  filename.zip
[root@lqz ~]# unzip -t  filename.zip

#5.解压zip文件包, 默认解压至当前目录
[root@lqz ~]# unzip  filename.zip

#6.解压zip内容至/opt目录
[root@lqz ~]# unzip filename.zip  -d /opt/
4.tar 打包与压缩
tar 是 linux 下最常用的压缩与解压缩, 支持文件和目录的压缩归档
#语法:tar [-zjxcvfpP] filename
c   #创建新的归档文件
x   #对归档文件解包
t   #列出归档文件里的文件列表
v   #输出命令的归档或解包的过程
f   #指定包文件名,多参数f写最后

z   #使用gzip压缩归档后的文件(.tar.gz)
j   #使用bzip2压缩归档后的文件(.tar.bz2)
J   #使用xz压缩归档后的文件(tar.xz)
C   #指定解压目录位置
X   #排除多个文件(写入需要排除的文件名称)
h   #打包软链接
--hard-dereference  #打包硬链接
--exclude   #在打包的时候写入需要排除文件或目录


#常用打包与压缩组合
czf     #打包tar.gz格式 常用
cjf     #打包tar.bz格式 不怎么用
cJf     #打包tar.xz格式 不考虑

zxf     #解压tar.gz格式
jxf     #解压tar.bz格式
xf      #自动选择解压模式
xvf     #显示解压过程
tf      #查看压缩包内容
1.将文件或目录进行打包压缩
#1.以gzip归档方式打包并压缩
tar czf  test.tar.gz  test/ test2/

#2.以bz2方式压缩
tar cjf  test.tar.bz2 dir.txt dir/

#3.打包链接文件,打包链接文件的真实文件
[root@lqz ~]# cd /
[root@lqz /]# tar czfh local.tar.gz  etc/rc.local

#4.打包/tmp下所有文件
[root@lqz ~]# cd /
[root@lqz /]# find tmp/ -type f | xargs tar czf tmp.tar.gz

#5.打包/tmp下所有文件
[root@lqz /]# tar czf tmp.tar.gz $(find /tmp/ -type f)
2.排除文件, 并打包压缩
#1.排除单个文件
[root@lqz /]#  tar czf etc.tar.gz --exclude=etc/services etc/

#2.排除多个文件
[root@lqz /]# tar czf etc.tar.gz --exclude=etc/services --exclude=etc/rc.local etc/

#3.将需要排除的文件写入文件中
[root@lqz /]# cat paichu.list
etc/services
etc/rc.local
etc/rc.d/rc.local
#指定需要排除的文件列表, 最后进行打包压缩
[root@lqz /]# tar czfX etc.tar.gz paichu.list etc/
3.查看压缩文件
#查看压缩包内容和解压
[root@lqz /]# tar tf  test.tar.gz
4.解压缩文件
#1.解压至当前目录
[root@lqz /]# tar xf  test.tar.gz

#2.将解压内容存储至指定的/tmp目录
[root@student ~]# tar xf /etc/local.tar.gz  -C /tmp
tar 命令练习
#1.环境准备
[root@lqz ~]# yum install mariadb-server
[root@lqz ~]# systemctl start mariadb
[root@lqz ~]# mkdir /backup

#案例1.mysql备份及恢复
[root@lqz ~]# tar cJf /backup/mysql.tar.xz /var/lib/mysql
[root@lqz ~]# tar xf /backup/mysql.tar.xz -C /

#案例2 mysql备份及恢复
[root@lqz ~]# cd /var/lib/mysql
[root@lqz mysql]# tar cJf /backup/mysql.tar.xz
[root@lqz mysql]# tar tf /backup/mysql.tar.xz
[root@lqz mysql]# tar xf /backup/mysql.tar.xz -C /var/lib/mysql
3 Linux 软件管理
1.RPM 基本概述
1.什么是 rpm?
RPM 全称 RedHat Package Manager 缩写,由红帽开发用于软件包的安装升级卸载与查询
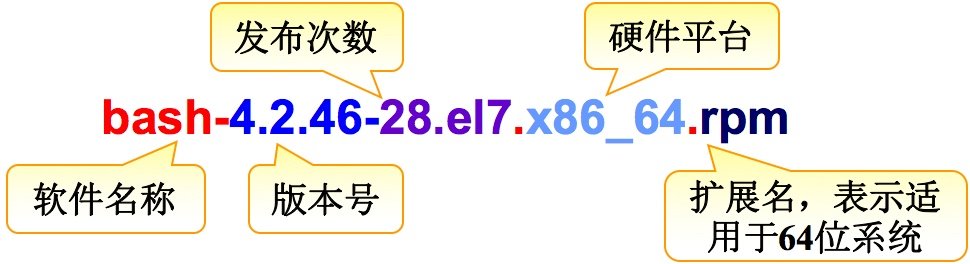
2.rpm 包名组成部分?
RPM 包命名以-将软件分成了若干部分bash-4.2.46-28.el7.x86_64.rpm
bash:软件名
4.2.46-28.el7:4是大版本,2是小版本,46是修订次数,28是发布次数,el7是:enterprise linux 7,使用linux7系统
x86_64:64位架构
3.如何获取 rpm 包
在我们刚开始学习 rpm 包,建议先使用本地 CentOS7 的镜像,但实际生产环境中都是通过联网的方式获取 rpm 包。(先学会,你懂的?)我们先通过虚拟机加载镜像,然后在 linux 中执行 mount /dev/cdrom /mnt,此时你会在/mnt/Packages目录下看到很多 rpm 的包文件。那么就可以开始 rpm 包管理之旅。
4.扩展: Linux 中除了 rpm 安装软件,是否还有安装软件方式?
分类
安装
版本
rpm 包
预先编译打包,安装简单
软件版本偏低
源码包
手动编译打包,安装繁琐
软件版本随意
二进制包(绿色包)
解压即可使用, 安装简单
不能修改源码
2.RPM 使用示例
1.rpm 包如何安装
以下列出了 rpm 命令进行安装软件的常用参数
选项
描述
-i
安装 rpm
-v
显示安装详细信息
-h
显示安装 rpm 进度
–force
强制重新安装
–nodeps
忽略依赖关系
#安装软件包, 需要指定软件包绝对路径
# mount /dev/cdrom /mnt
[root@lqz ~]# rpm -ivh /mnt/Packages/tree-1.6.0-10.el7.x86_64.rpm
[root@lqz ~]# rpm -ivh /mnt/Packages/vsftpd-3.0.2-22.el7.x86_64.rpm

#在软件包所在目录下可以不指定绝对路径
[root@lqz ~]# cd /mnt/Packages/
[root@lqz Packages]# rpm -ivh zsh-5.0.2-28.el7.x86_64.rpm

#如果软件包存在, 强制再次安装
[root@lqz ~]# rpm -ivh --force /mnt/Packages/tree-1.5.3-3.el6.x86_64.rpm

#安装samba服务需要依赖其他组件, 使用--nodeps可重新强制安装
[root@lqz ~]# rpm -ivh --nodeps  /mnt/Packages/tree-1.6.0-10.el7.x86_64.rpm
# yum 安装会自动处理依赖

# 其他用法,直接使用连接地址
# https://developer.aliyun.com/mirror/
# https://developer.aliyun.com/mirror/zabbix?spm=a2c6h.13651102.0.0.3e221b113DCKcf
# https://mirrors.aliyun.com/zabbix/zabbix/
# 先装3,再装4测试升级
# zabbix-agent-3.0.9-1.el7.x86_64.rpm
[root@lqz ~]#  rpm -ivh https://mirrors.aliyun.com/zabbix/zabbix/3.0/rhel/7/x86_64/zabbix-agent-3.0.9-1.el7.x86_64.rpm
# 升级要用U
[root@lqz ~]# rpm -Uvh https://mirrors.aliyun.com/zabbix/zabbix/4.2/rhel/7/x86_64/zabbix-agent-4.2.8-1.el7.x86_64.rpm

# 卸载(带依赖的卸不了)
rpm -e zabbix-agent
rpm -q zabbix-agent

yum remove samba
2.如何查询已安装好的 rpm 包
选项
描述
rpm -q
查看指定软件包是否安装(重点)
rpm -qa
查看系统中已安装的所有 RPM 软件包列表
rpm -qi
查看指定软件的详细信息
rpm -ql
查询指定软件包所安装的目录、文件列表(重点)
rpm -qc
查询指定软件包的配置文件(只有配置文件,etc 下的)
rpm -qf
查询文件或目录属于哪个 RPM 软件
rpm -qip
查询未安装的 rpm 包详细信息
rpm -qlp
查询未安装的软件包会产生哪些文件
#查询vsftpd这个rpm包是否安装
[root@lqz ~]# rpm -q vsftpd

#模糊查找系统已安装的rpm包
[root@lqz ~]# rpm -qa |grep ftp

#查询vsftpd软件包的相关信息
[root@lqz ~]# rpm -qi vsftpd

#查询rpm包所安装的文件
[root@lqz ~]# rpm -ql vsftpd

#查询rpm包相关的配置文件
[root@lqz ~]# rpm -qc vsftpd

#查询配置文件或命令来自于哪个rpm包(只能查已经安装过的)
[root@lqz ~]# rpm -qf /etc/vsftpd/vsftpd.conf # 查看这个配置文件是
[root@lqz ~]# rpm -qf /usr/sbin/vsftpd
[root@lqz ~]# rpm -qf /usr/sbin/ifconfig
# 想看未安装的
yum provides vim

#查询未安装的软件包会产生哪些文件
[root@lqz ~]# rpm -qlp /mnt/Packages/samba-3.6.23-41.el6.x86_64.rpm

#查询未安装的软件包会产生哪些文件
[root@lqz ~]# rpm -qip /mnt/Packages/samba-3.6.23-41.el6.x86_64.rpm
3.RPM 包升级
选项
描述
rpm -U
如果老版本不存在则全新安装,如果存在有新版即升级
# wget  https://mirrors.aliyun.com/zabbix/zabbix/3.0/rhel/7/x86_64/zabbix-agent-3.0.9-1.el7.x86_64.rpm
# wget  https://mirrors.aliyun.com/zabbix/zabbix/4.2/rhel/7/x86_64/zabbix-agent-4.2.0-1.el7.x86_64.rpm

#1.先安装低版本
[root@www.lqz.com ~]# rpm -ivh zabbix-agent-3.0.9-1.el7.x86_64.rpm

#2.尝试安装高版本(会出现错误)
[root@www.lqz.com ~]# rpm -ivh zabbix-agent-4.2.0-1.el7.x86_64.rpm

#3.使用升级的方式,完美解决替换
[root@www.lqz.com ~]# rpm -Uvh zabbix-agent-4.2.0-1.el7.x86_64.rpm
4.RPM 包卸载
卸载包时需要先把依赖的包卸载掉,如果依赖的包是系统所必须的,那就不能卸载这个包,否则会造成系统崩溃。
#先查询, 然后卸载
[root@www.lqz.com ~]# rpm -qa |grep sh
[root@www.lqz.com ~]# rpm -e zsh
5.RPM 包校验(扩展了解)
软件相关的数据库存放于/var/lib/rpm目录
参数
描述
S
文件的容量大小是否被改变
M
文件的类型或者文件的属性是否被修改
5
MD5 这一种指纹加密的内容已经不同
L
路径已经被改变
U
文件的所属主已被修改
G
文件的所属组已被修改
T
文件的创建时间已被改变
[root@www.lqz.com ~]# rpm -V vsftpd
S.5....T.  c /etc/pam.d/vsftpd
.......T.  c /etc/vsftpd/ftpusers
S.5....T.  c /etc/vsftpd/vsftpd.conf
.M.......    /var/ftp/pub
6.RPM 包小结
如何查询 util-linux 软件包安装了哪些文件?如何查询 mkdir 命令是由哪个 RPM 软件包安装的?安装 .rpm 软件包时,-i、-U、选项有何区别?
3.YUM 基本介绍
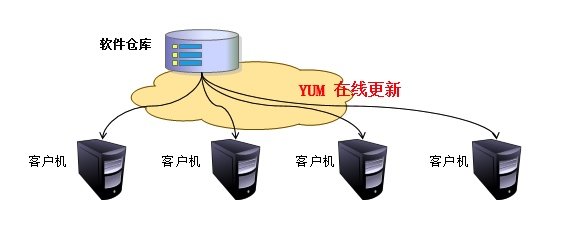
1.什么是 YUM
Yum 是 RedHat 以及 CentOS 中的软件包管理器。能够通过互联网下载 .rpm 包并且安装,并可以自动处理依赖性关系,无须繁琐地一次次下载、安装。(PS: YUM 是生产最佳实践)
2.YUM 源是什么
1 要成功的使用 YUM 工具安装更新软件或系统,就需要有一个包含各种 rpm 软件包的 repository(软件仓库),这个软件仓库我们习惯称为 yum 源。(可以是本地源、网络源)
3.YUM 源配置实例
1.阿里 yum 源
# yum repolist # 查看现在有多少源,nginx没有,可以配置nginx仓库,就有了
# 扩展epel源:
[root@www.lqz.com ~]# wget -O /etc/yum.repos.d/epel.repo http://mirrors.aliyun.com/repo/epel-7.repo


#默认系统是国外源,需要替换为国内的源
[root@www.lqz.com ~]# wget -O /etc/yum.repos.d/CentOS-Base.repo
http://mirrors.aliyun.com/repo/Centos-7.repo

#扩展源,有很多软件在基本源中没有
[root@www.lqz.com ~]# wget -O /etc/yum.repos.d/epel.repo
http://mirrors.aliyun.com/repo/epel-7.repo
2.Nginx 官方源,比如在学习 Nginx 时需要使用官方的 yum 源来安装
[root@www.lqz.com ~]# vim /etc/yum.repos.d/nginx.repo
[nginx]
name=nginx repo
baseurl=http://nginx.org/packages/centos/7/$basearch/
gpgcheck=0
enabled=1
PS:源超找方式基本一致,zabbix,Docker、Nginx、saltstack、openstack
4.YUM 实践案例
1.使用 yum 查询软件包的方式
[root@www.lqz.com ~]# yum list
[root@www.lqz.com ~]# yum list|grep ftp
[root@www.lqz.com ~]# yum info ftp
2.使用 yum 安装软件包的方式
[root@www.lqz.com ~]# yum install tree
[root@www.lqz.com ~]# yum install tree -y    #非交互

#安装本地的rpm包, 如果有依赖关系, 会自动从软件仓库中下载所需依赖
[root@www.lqz.com ~]# yum localinstall /mnt/Packages/bind-9.9.4-50.el7.x86_64.rpm

#直接安装网络上的rpm包
[root@www.lqz.com ~]# yum install http://repo.zabbix.com/zabbix/3.4/rhel/7/x86_64/zabbix-release-3.4-2.el7.noarch.rpm
3.使用 yum 重新安装软件包的方式
#1.如果不小心删除vsftpd配置文件
[root@www.lqz.com ~]# rm -f /etc/vsftpd/vsftpd.conf

#2.可以对软件进行重新安装
[root@www.lqz.com ~]# yum reinstall vsftpd

#3.检查软件的配置文件
[root@www.lqz.com ~]# rpm -qc vsftpd
/etc/logrotate.d/vsftpd
/etc/pam.d/vsftpd
/etc/vsftpd/ftpusers
/etc/vsftpd/user_list
/etc/vsftpd/vsftpd.conf
4 使用 yum 更新软件包
#对比Linux已安装的软件和yum仓库中的软件, 有哪些需要升级
[root@www.lqz.com ~]# yum check-update

#更新acl软件
[root@www.lqz.com ~]#  yum update acl -y

#如下的执行很危险,这代表更新整个系统所有的软件,包括内核
[root@www.lqz.com ~]#  yum update -y
5.使用 yum 删除软件包
[root@www.lqz.com ~]# yum install samba -y
[root@www.lqz.com ~]# yum erase samba -y
[root@www.lqz.com ~]# yum remove samba -y
6.与 yum 仓库相关指令(扩展了解)
#列出yum源可用的软件仓库
[root@www.lqz.com ~]# yum repolist

#列出全部yum源可用和禁用的仓库
[root@www.lqz.com ~]# yum repolist all

#查找某个命令或文件属于那个软件包(生产常用)
[root@www.lqz.com ~]# yum provides /etc/my.cnf
[root@www.lqz.com ~]# yum provides cd
7.与 yum 缓存相关指令(扩展了解)
#1.缓存rpm包方式一、修改yum全局配置文件
[root@www.lqz.com ~]# vim /etc/yum.conf
[main]
cachedir=/var/cache/yum/$basearch/$releasever
keepcache=1     #启动缓存

#2.缓存rpm包方式二,只下载不安装
[root@www.lqz.com ~]# yum install -y yum-plugin-downloadonly #插件
[root@www.lqz.com ~]# yum install httpd -y --downloadonly --downloaddir=/tmp

#3.清除所有yum缓存的软件包以及元数据
[root@www.lqz.com ~]# yum clean all

#4.只清除缓存的软件包
[root@www.lqz.com ~]# yum clean packages
8.组包相关指令,(扩展了解)
[root@www.lqz.com ~]# yum groups list
#安装一整个组的软件
[root@lqz ~]# yum groups install Development tools
Compatibility libraries
Base Debugging Tools

#yum删除包组
[root@www.lqz.com ~]# yum groups remove  -y Base
9.历史记录指令,(扩展了解)
#1.查看历史执行yum命令
[root@www.lqz.com ~]# yum history

#2.查询历史执行yum命令ID详细信息
[root@www.lqz.com ~]# yum history info N

#3.撤销历史执行过的yum命令
[root@www.lqz.com ~]# yum history undo N
PS: YUM 还有配置文件与签名验证需要我们额外扩展了解的请点击传送门
5.搭建本地仓库
1.有的时候你的 linux 系统不能联网,当然就不能很便捷的使用联网的 yum 源了,这时候就需要你自己会利用 linux 系统光盘制作一个 yum 源。具体步骤如下:
#1.挂载镜像
[root@lqz ~]# mount /dev/cdrom /mnt

#2.备份原有仓库
[root@lqz ~]# gzip /etc/yum.repos.d/

#3.使用yum-config-manager命令添加本地仓库
[root@lqz ~]# yum-config-manager --add-repo="file:///mnt"

#4.或者使用手动添加repo文件
[root@lqz ~]# vim /etc/yum.repos.d/cdrom.repo
[cdrom]
name=This is local cdrom
baseurl=file:///mnt
enabled=1
gpgcheck=0

[]          #仓库名称
name        3仓库描述信息
baseurl     #YUM源url地址 ,可以是file:// ftp:// http://
enabled     #是否使用该YUM源(0代表禁用, 1代表激活)
gpgcheck    #是否验证软件签名(0代表禁用, 1代表激活)

#5.生成缓存
[root@lqz ~]# yum makecache
2.很多时候不仅仅是一台机器无法上网,而是很多机器都无法上网,但都有联网下载软件的需求,这个时候难道每台机器都挂在光盘吗? 当然可以,但如果软件出现了更新怎么办?
本地光盘提供基础软件包: Baseyum 缓存提供常用软件包: nginx, zabbix, docker
1.环境准备
| 系统 | IP | 角色 |
|---|---|---|
| centos7 | 10.0.0.99 | yum 仓库服务端 |
| centos7 | 10.0.0.98 | yum 仓库客户端 |
2.服务端进行 yum 仓库的搭建准备工作
#1.关闭防火墙、与selinux
[root@yum_server ~]# systemctl stop firewalld
[root@yum_server ~]# setenforce 0

#2.安装ftp服务,启动并加入开机启动
[root@yum_server ~]# yum -y install vsftpd
[root@yum_server ~]# systemctl start vsftpd
[root@yum_server ~]# systemctl enable vsftpd

#3.开启yum缓存功能
[root@yum_server ~]# vim /etc/yum.conf
[main] cachedir=/var/cache/yum/$basearch/$releasever
keepcache=1
[root@yum_server ~]# yum clean all

#4.提供基础base软件包
[root@yum_server ~]# mkdir /var/ftp/centos7
[root@yum_server ~]# mount /dev/cdrom /mnt
[root@yum_server ~]# cp -rp  /mnt/Packages/.rpm /var/ftp/centos7/

#5.提供第三方源
[root@yum_server ~]# mkdir /var/ftp/ops
[root@yum_server ~]# yum -y install nginx docker

#6.复制已缓存的 Nginx docker 及依赖包 到自定义 YUM 仓库目录中
[root@yum_server_69_112 ~]# find /var/cache/yum/x86_64/7/
-iname ".rpm" -exec cp -rf {} /var/ftp/ops ;

#7.安装createrepo并创建 reopdata仓库
[root@yum_server_ ~]# yum -y install createrepo
[root@yum_server_ ~]# createrepo /var/ftp/ops

#PS: 如果此仓库每次新增软件则需要重新生成一次
3.客户端配置 yum 源指向服务端
#1.客户端配置并使用 base 基础源
[root@yum_client ~]# gzip /etc/yum.repos.d/
[root@yum_client ~]# vim /etc/yum.repos.d/centos7.repo
[centos7]
name=centos7_base
baseurl=ftp://10.0.0.99/centos7
gpgcheck=0

#2.客户端配置并使用 ops 源
[root@yum_client ~]# vim /etc/yum.repos.d/ops.repo
[ops]
name=local ftpserver
baseurl=ftp://10.0.0.99/ops
gpgcheck=0
6.源码包管理实践
1.源码包是什么
源码包指的是开发编写好的程序源代码,但并没有将其编译为一个能正常使用的工具。
2.为什么要学习源码包
1、部分软件官网仅提供源码包,需要自行编译并安装。2、部分软件在新版本有一些特性还没来得及制作成 rpm 包时,可以自行编译软件使用其新特性。
3.源码包的优缺点
1.可以自行修改源代码 2.可以定制需要的相关功能 3.新版软件优先更新源码 4.缺点是: 1) 相对 yum 安装软件会复杂很多。2) 标准化实施困难,自动化就无法落地。
4.源码包如何获取
常见的软件包都可以在官网获取源码包,比如 apache、nginx、mysql 等等
5 将源码包编译为二进制可执行文件步骤如下,简称安装三步曲
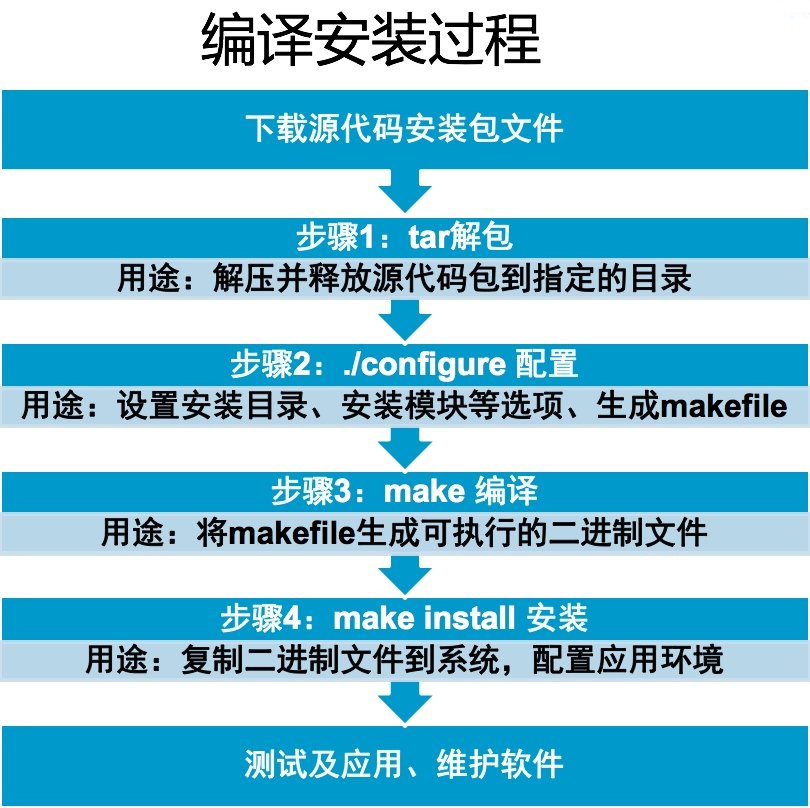 PS: 此方法不是百分百通用于所有源码包,建议拿到源码包解压后,进入到目录找相关的 README 帮助文档
6.源码编译示例
下面通过编译 Nginx 来深入了解下源码包编译的过程。
#1.基础环境准备
[root@node1 ~]# yum install -y gcc make wget

#2.下载源码包
[root@node1 ~]# wget http://nginx.org/download/nginx-1.15.12.tar.gz

#3.解压源码包, 并进入相应目录
[root@node1 ~]# tar xf nginx-1.15.12.tar.gz
[root@node1 ~]# cd nginx-1.15.12

#4.配置相关的选项,并生成Makefile
[root@node1 nginx-1.15.12]# ./configure --help
[root@node1 nginx-1.15.12]# ./configure --prefix=/usr/local/nginx
[root@node1 nginx-1.15.12]# echo $? # 检查上一个命令是否执行成功

#5.将Makefile文件编译可执行二进制程序,此时,/usr/local/nginx可执行文件还不在,需要执行make install 才能copy过去
[root@node1 nginx-1.15.12]# make

#6.将二进制文件拷贝至对应的目录中
[root@node1 nginx-1.15.12]# make install

#7 建立软连接(以后方便升级)
[root@node1 nginx-1.15.12]# ln -s nginx-1.18.0 nginx

#8 目录介绍
conf:配置文件
html:网站文件存放
logs:日志
sbin:可执行文件

# 9 命令
nginx  # 启动
nginx -s reload # 重新加载
nginx -s stop  # 重启
nginx -s stop # 停止
源码编译报错信息处理
checking for C compiler ... not found ./configure: error: C compiler cc is not found
# yum -y install gcc gcc-c++ make


./configure: error: the HTTP rewrite module requires the PCRE library.
You can either disable the module by using --without-http_rewrite_module
option, or install the PCRE library into the system, or build the PCRE library
statically from the source with nginx by using --with-pcre=<path> option.
# yum install -y pcre-devel


./configure: error: the HTTP gzip module requires the zlib library.
You can either disable the module by using --without-
http_gzip_module option, or install the zlib library into the
system, or build the zlib library statically from the source with
nginx by using --with-zlib=<path> option.
# yum -y install zlib-devel


./configure: error: SSL modules require the OpenSSL library.
You can either do not enable the modules, or install the OpenSSL
library into the system, or build the OpenSSL library statically
from the source with nginx by using --with-openssl=<path> option.
# yum -y install openssl-devel
本文来自博客园,作者:喝茶看猴戏,转载请注明原文链接:https://www.cnblogs.com/zdwzdwzdw/p/17487896.html

 浙公网安备 33010602011771号